- HTTP2 Proxy
- Probe resistance,当验证错误时,不会返回HTTP 407 错误。 当有 Probe进行探测时,其不会直接暴露自己是 一个Proxy(实验阶段,比较有意思)
- Basic Auth
- IP hiding
- Servers PAC file
步骤
- 准备
- 下载Caddy
http.forwardproxy,运行:
(使用说明,参见https://getcaddy.com/)
setcap 'cap_net_bind_service=+ep' /usr/local/bin/caddy
- 编写配置文件-caddyfile
yourdomain.com:1443 {
gzip
log access.log
forwardproxy
}
-http-port 82- 运行程序:
$ caddy -http-port 82 -conf ~/caddyfile &
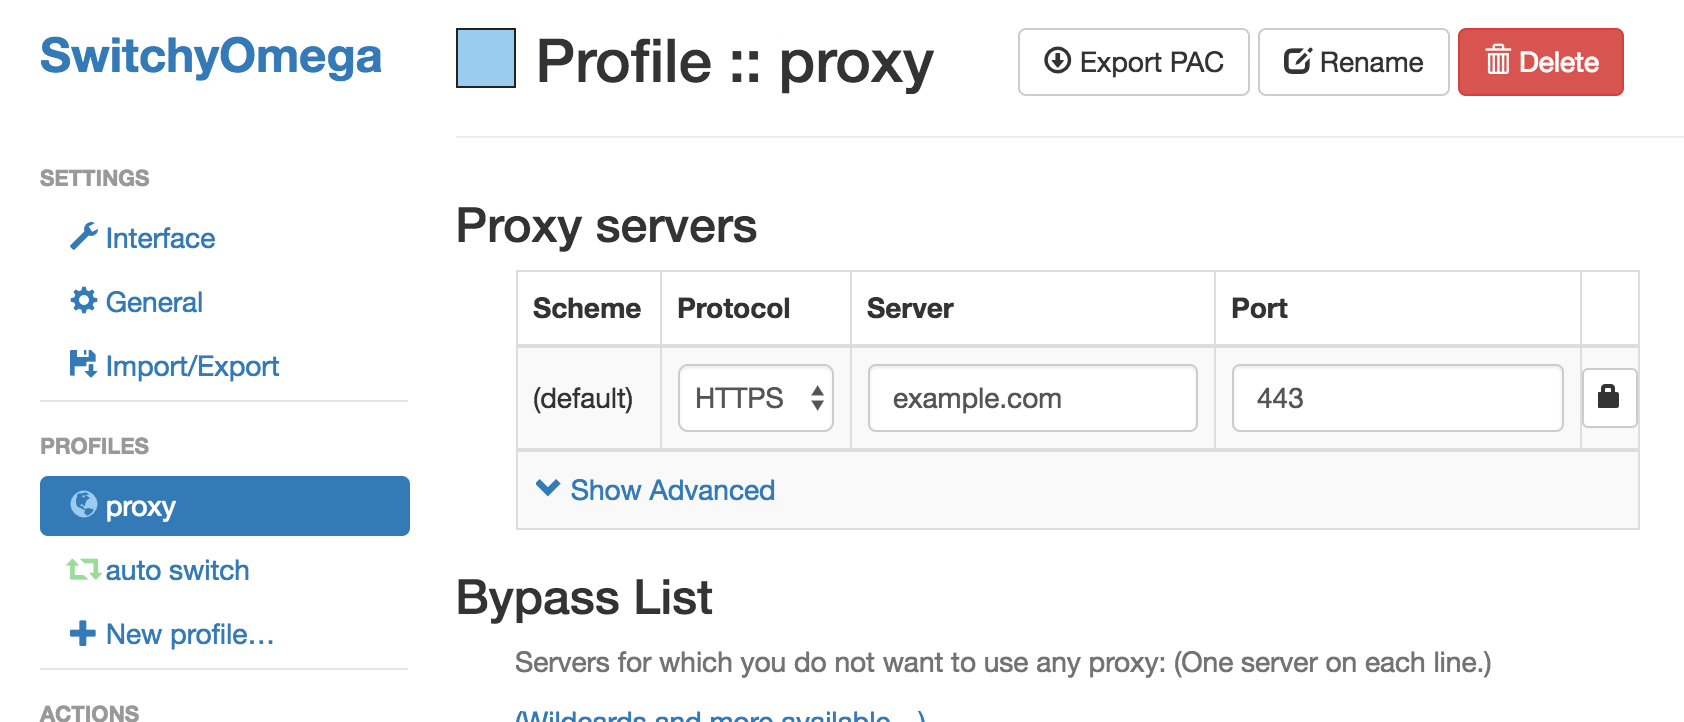
SwitchyOmega而言, 代理协议选择HTTPS,然后就能正常使用此https Proxy了。用Caddy2搭建HTTPS proxy
由于官方已经放弃Caddy v1,使用Caddy v2打入forwardproxy插件,快速搭建HTTPS代理,毕竟Caddy自动请求SSL证书,能够省下许多不必要的折腾。
申请域名和填写DNS记录
首先你要注册一个免费域名,这个可以到Freenom上免费搞一个,不多讲。
域名注册好后,需要添加DNS记录,如果没有v6IP的话,就填一个v4IP的A记录,如下:
| Name (prefix) | Type | TTL | Target |
|---|---|---|---|
| A | 3600 | 这里填写vps上的v4IP | |
| AAAA | 3600 | vps上的v6IP,没有可不填 |
上面完成后,就开始服务端的配置了。
服务端安装Caddy2
v2版需要自己编译打入插件。
下面说说怎么自己编译caddy2并打入插件。
服务端编译Caddy2
配置Go
下载go并解压到/usr/local路径下:
wget https://dl.google.com/go/go1.14.linux-amd64.tar.gz -O - | tar -xz -C /usr/local/
设置go环境变量,也可以写入到profile中
vi ~/.profile 添加下面内容:
export PATH=$PATH:/usr/local/go/bin |
保存后,source ~/.profile
下载Xcaddy
wget https://github.com/caddyserver/xcaddy/releases/download/v0.1.5/xcaddy_0.1.5_linux_amd64.tar.gz -O - | tar -xz -C /usr/bin/
运行xcaddy并打入forwardproxy@caddy2插件:
xcaddy build master \ |
编译完成后caddy二进制文件会在root目录下,俺们可以移到/usr/bin/下运行:
mv caddy /usr/bin
配置caddy.json文件
上面安装好caddy2后,现在就来配置caddy.json文件,caddy v2的配置文件改成json后,有点复杂,博主也是折腾了好久。
新建一个caddy文件夹,存放caddy.json文件
mkdir -p /etc/caddy
nano /etc/caddy/caddy.json
编写caddy.json文件,添加内容如下:
{ |
上面需要修改的地方是自己的域名,添加自己的邮箱就可以了。
caddy.json文件建议本地编辑好后再scp到服务端,vi修改,容易换行错误,用时请删除上面的中文注释。
检查80端口有没有被其它服务占用,因为caddy需要用80/443端口申请证书,否则会启动失败。下面命令检查端口占用情况:
netstat -lntp
上面配置、检查完就可以启动caddy了,启动命令如下:
/root/caddy run --config /etc/caddy/caddy.json
如果启动后,出现申请证书不成功的情况,一般是因为域名已经申请过证书导致的,建议DNS解析页面新建一个子域名,重新配置、启动申请证书。
启动后会发现,caddy一直在前台运行,很不方便,这个时候俺们就需要用systemctl来启动caddy。
注册systemd服务
新建caddy.service文件,命令:
vi /etc/systemd/system/caddy.service
添加如下内容:
[Unit] |
重载systemctl服务 systemctl daemon-reload
到这也就可以启动caddy了,启动命令
systemctl start caddy
systemctl enable caddy #添加开机自启动.
服务端到此也就部署完成了,下面来折腾客户端。https代理,不必多讲,安全、快捷,电脑端不用另装客户端,移动端大多APP都支持http/https代理。
(https://caddyserver.com/docs/getting-started)
客户端配置
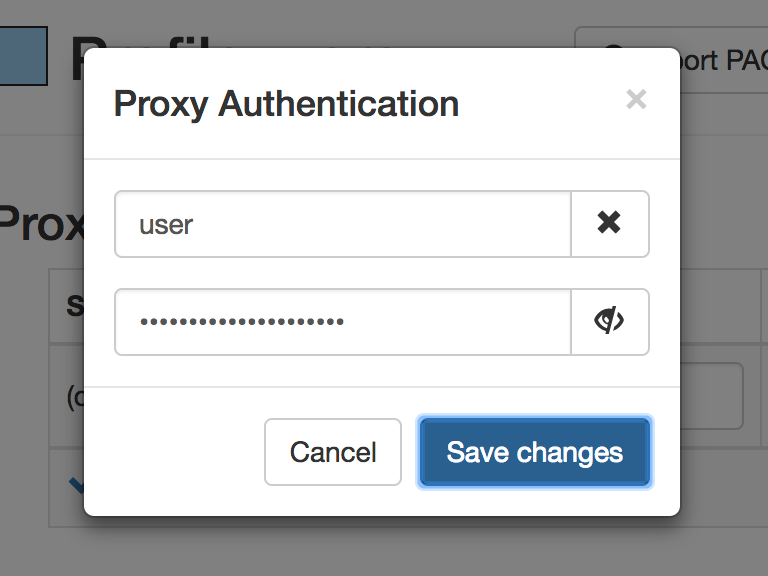
电脑端浏览器安装SwitchyOmega插件,新建一个代理情景模式,代理协议填写HTTPS,代理服务器填写你的域名,端口填写你的服务器所使用的端口,比如1443,最后点击右边小锁,填写你的用户名和密码,就可以使用了,如果需要分流的话,可以另建立一个自动切换模式。
移动端,俺们以小火箭为例,小火箭,选择https代理,服务器填写你的域名。
Quantumult X 配置文件/编辑/server_local字头下填写:
http=你的域名:1443,
 username=用户名, password=密码, over-tls=true, tls-verification=true,
tls-host=你的域名, fast-open=false, udp-relay=true, tls13=true, tag=caddy2
最后推荐几个移动端支持https代理的软件,iOS:Quantumult X ,小火箭, Android:Clash, Surfboard.
使用Caddy搭建TLS1.3+HTTP2代理
yum -y install git wget nano patch
wget https://dl.google.com/go/go1.12beta2.linux-amd64.tar.gz
tar -xzvf go1.12beta2.linux-amd64.tar.gz -C /usr/bin
nano ~/.bash_profile
export PATH=$PATH:/usr/bin/go/bin
source ~/.bash_profile
mkdir caddy && export GOPATH=$PWD/caddy
go get github.com/mholt/caddy
go get github.com/caddyserver/builds
go get github.com/caddyserver/forwardproxy
cd $GOPATH/src/github.com/mholt/caddy
wget https://www.hnrk.io/md/caddy.patch
patch -p1 < caddy.patch
nano $GOPATH/src/github.com/mholt/caddy/caddy/caddymain/run.go
_ "github.com/caddyserver/forwardproxy"

cd $GOPATH/src/github.com/mholt/caddy/caddy
go run build.go
mv caddy /usr/local/bin
mkdir -p /etc/caddy && mkdir -p /etc/ssl/caddy
vi /etc/caddy/Caddyfile
tls.koko.cat {
 tls 1062951199@qq.com
 log stdout
 forwardproxy {
 basicauth user password
 hide_ip
 hide_via
 }
}
vi /etc/systemd/system/caddy.service
[Unit]
Description=Caddy HTTP/2 web server
Documentation=https://caddyserver.com/docs
After=network-online.target
Wants=network-online.target systemd-networkd-wait-online.service

[Service]
Restart=on-abnormal
User=root
Group=root
Environment=CADDYPATH=/etc/ssl/caddy
ExecStart=/usr/local/bin/caddy -log stdout -agree=true -conf=/etc/caddy/Caddyfile
ExecReload=/bin/kill -USR1 $MAINPID
KillMode=mixed
KillSignal=SIGQUIT
TimeoutStopSec=5s

[Install]
WantedBy=multi-user.target
systemctl start caddy
systemctl enable caddy
journalctl --boot -u caddy.service
chrome://flags/


-----------------------------------------
- The obvious requirement here is for HTTPS at the very least, but unless you properly automate a Let’s Encrypt certificate, you have to go to do some work to maintain the HTTPS server. Pretty much all HTTP proxies these days do not support HTTP/2, and it’s pretty easy to tell (from the client-side) if a server is acting as a forward proxy. I should not even have to mention that trusting random HTTP proxies on the Internet isn’t a great idea.
This article will show you how to secure your Internet connection in a way that overcomes these weaknesses. You will learn how to set up the Caddy web server as a secure forward proxy using the http.forwardproxy plugin, which has these advantages:
- HTTPS enabled by default. All certificate maintenance is automated. It just works!
- Full-duplex HTTP/2. This proxy speaks HTTP/2 both ways, which gives you faster page load times.
- End-to-end encryption. For sites that use HTTPS, your connection to the origin is E2E encrypted. Even the proxy server cannot decrypt your connection between your computer and the origin site. Once the HTTPS tunnel is established with the proxy, it simply shuttles bytes in a two-way stream. Underlying TLS connections remain intact. (Even a nefarious proxy can’t read the content of your underlying HTTPS traffic, but you should still only use proxies you trust. There’s more to traffic than its contents.)
- Probe resistance (experimental). This feature hides the proxy behavior of the server from everyone except to those who already know how to access it and are authorized to use it. Only a secret link specified by you (the server operator) exposes the authentication prompt.
- Innocuous traffic patterns. Since this proxy is not a VPN or SSH tunnel, it blends in better with the rest of HTTPS traffic.
- Standard ports. Where VPN ports and SSH port 22 are blocked by firewalls, port 443 is almost always allowed because accessing the Web is so standard for most use cases. (But you can still customize the port.)
- Hides your IP address. With just one line of config, this proxy will not add the user’s IP to the HTTP “Forwarded” header. (Note that there are ways around this out of the proxy’s control, like WebRTC in browsers.)
- Access controls. You can specify users and passwords to restrict access to the proxy, as well as a port whitelist for the proxy.
- Easy to set up! Best of all, this proxy is easy to get running and hard to get wrong because of sane defaults and automatic HTTPS. Caddy is designed to be easy to use to reduce the potential error surface of misconfigurations.
In particular, we’re interested in exploring how helpful this software software could be in circumventing censorship. It definitely needs more careful vetting (read on) but we hope people will try it out in low-or-no-risk scenarios.
This plugin was developed by Sergey Frolov while interning at Google and the source is available on GitHub.
Presented “As-Is”
I make no guarantees; use this tutorial and the server software at your own risk. There are a number of edge cases that ultimately depend on your client and your threat model; see especially the warning in the client configuration section below.
This technique is still fairly new. We want to make it even safer. So we do not recommend using it in high-risk situations. If you find a way to improve it, though, please contribute your feedback, issues, and pull requests!
Setting up the Server
First, you’ll need a machine that is accessible with a public IP address. Home servers can work if you forward the port(s) properly. You can also rent a cloud instance from any reputable cloud provider for a few dollars per month. Once you have such a machine, here’s what to do:
Download Caddy with the http.forwardproxy plugin included. To do that, make sure you select it in the plugins list on the download page!
Install Caddy; this is as easy as extracting the archive and putting the binary in your PATH, or using the one-line auto-installer script shown at the bottom of the download page after you select the plugins you want.
Make a file called Caddyfile that looks like this:
example.comroot /path/to/your/site
forwardproxy {
    basicauth user pass
    probe_resistance secret.localhost
    hide_ip
}
You must replace:
example.comwith the actual domain name pointed at your machine/path/to/your/sitewith the actual path to the root of your site (or an empty or decoy folder if you have no site)user passwith a username and password of your choice (otherwise anyone could use your server!)secret.localhostwith a custom, secret hostname to enable probe resistance; strongly recommended to end with “.localhost”
Then run caddy in the same folder as your Caddyfile. After a few seconds, your probe-resistant, IP-hiding, full-duplex, HTTP/2 proxy will be running with a fully-managed TLS certificate from Let’s Encrypt!
The default port is 443 (the HTTPS port) unless you specify otherwise. Read more about the Caddyfile if you want to customize further.
Setting up the Client
Now how do you use your proxy server? With a client, of course!
There are several ways to do this. For example, if you want to secure your web browsing in Chrome, you can use an extension like Proxy SwitchyOmega to configure the connection. Firefox has some network options built into its settings. You can also configure your entire OS or mobile phone to use the proxy for all applications (except those that are specifically configured to not use your OS’ proxy settings). However, we found only Chrome+SwitchyOmega to be reliable, which we explain below.
** WARNING! A weakness in any part of the proxy configuration could leak information. Even if your proxy server is secure, your client may not be. Clients which do not honor the proxy settings for all network traffic could put you at risk. This includes major browsers and operating systems. For example, browsers don’t put WebRTC requests through the proxy (by design, sigh). One way to mitigate this risk somewhat is to use a VM that tunnels all traffic across a virtual NIC. This is obviously more involved, so act according to your threat model. If you just need basic public Internet cafe privacy to check your email, maybe the VM is overkill. That’s up to you.
Chrome + SwitchyOmega
This was the most reliable and simple client configuration I tried.
Install SwitchyOmega. It comes with an example proxy profile (on the left) which you can modify, or you can create a new one. In the table, select “HTTPS” for the “Protocol” field and type in your domain name and the port:

Click the lock icon by the port and enter your username and password:

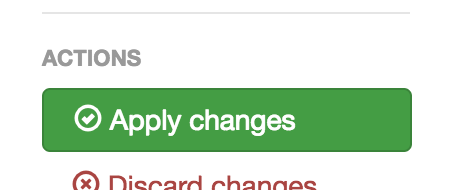
After save your credentials, click the green “Apply Changes” button to the left:

You can turn on the proxy by clicking it from your menu:

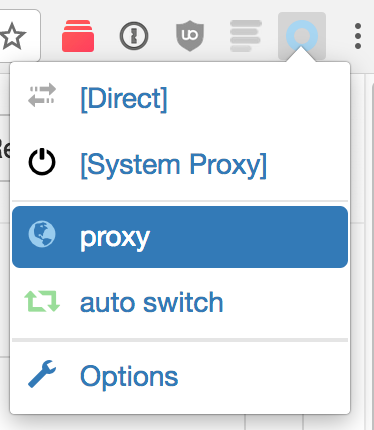
Congrats! Now all your Chrome connections are proxied securely through your server.
Firefox
Like Chrome, Firefox also has a SwitchyOmega extension. I would suggest using extension first, since you are likely to have more success than with Firefox’s built-in network settings. The instructions are nearly the same as above.
Using Firefox’s built-in network configuration settings, I was not able to get this working in Firefox (on macOS 10.12.6) for a server with probe_resistance enabled. It appears to be a bug in Firefox. Firefox hangs when loading the page, for several minutes — and spins the CPU at 100%. Even after closing the application, my computer ran sluggish for almost a day until I found the firefox process still running in the background still using 100% of my CPU. Other than using the SwitchyOmega extension, there are two other workarounds on Mac: Use Chrome, or disable probe resistance.
To change Firefox’s built-in network configuration, go to Menu -> Preferences:

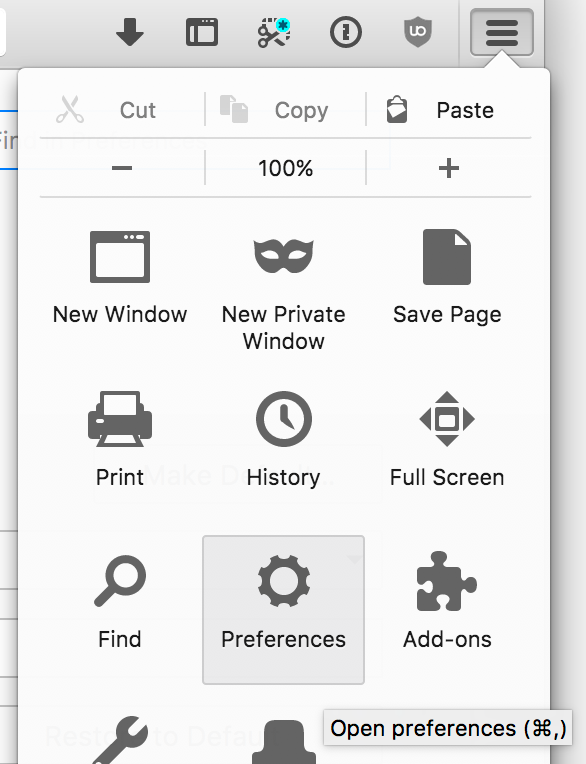
Then Network Proxy, and click “Settings…”:

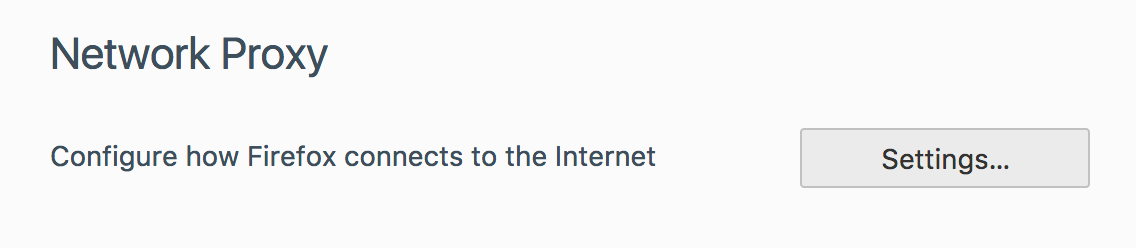
Here you have a few options. You can “Use system proxy settings” which should use your operating system’s proxy settings. You can specify a “Manual proxy configuration” where you enter the hostname and port your proxy is listening on (EDIT: As noted in a comment, this will not utilize TLS-to-proxy. So don’t do this, use the PAC file instead — next sentence). Or, if you use the serve_pac server setting, you can specify its URL:

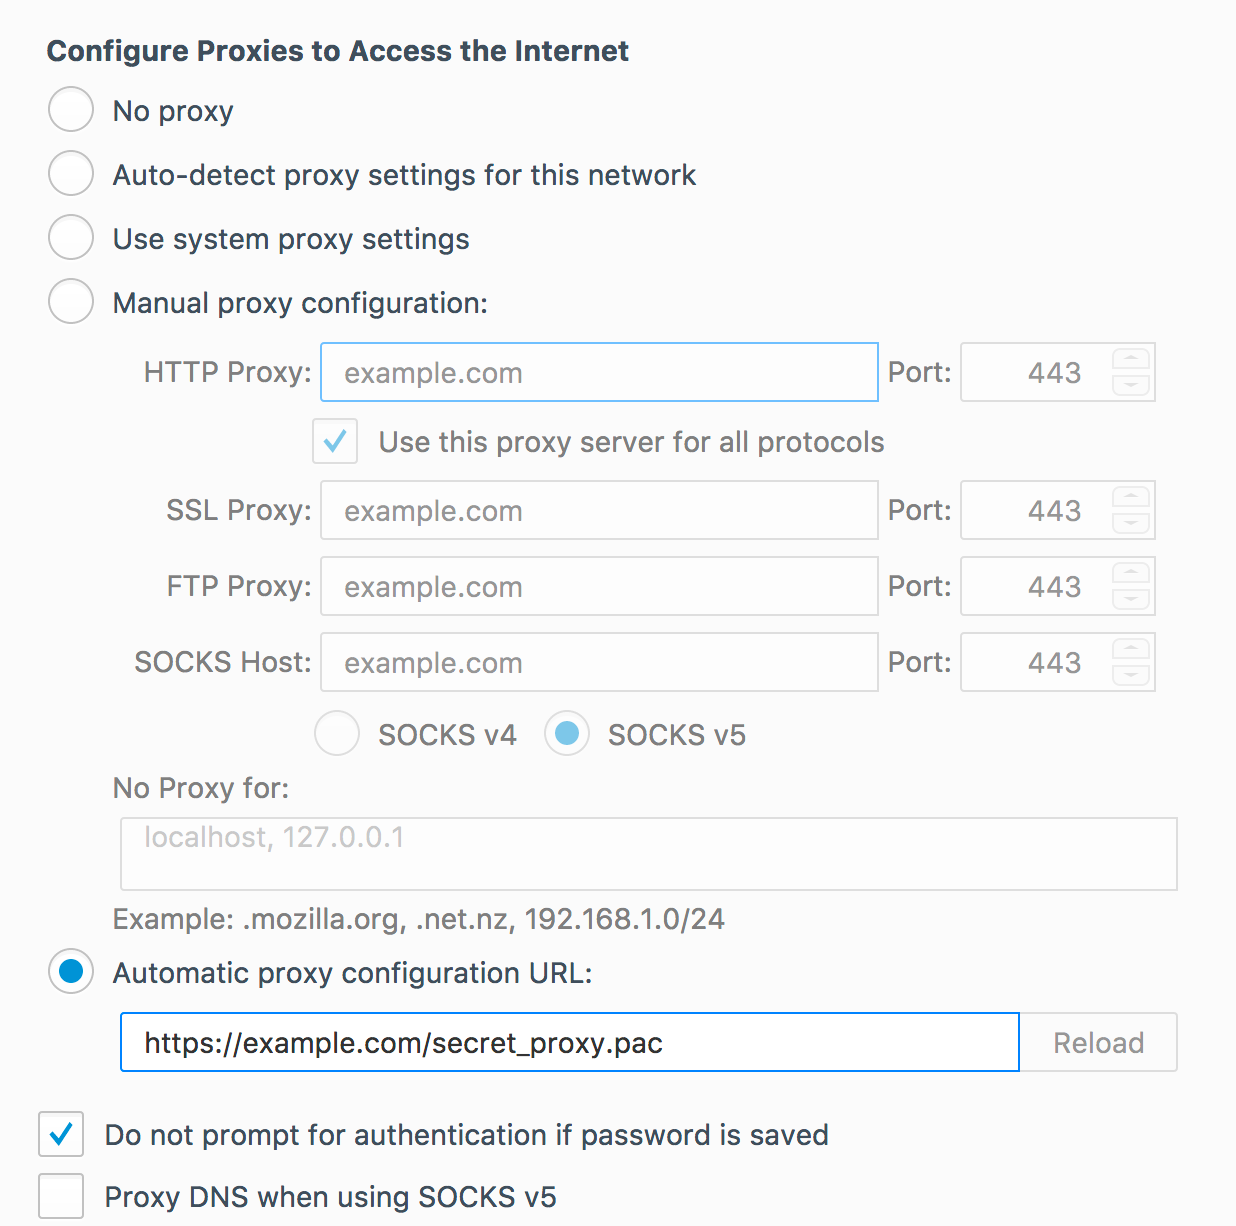
Save your settings, and you should be good to go. Maybe. Good luck!
macOS (and/or Safari)
This will change the proxy settings for the entire system. Make sure this is really what you want to do instead of using the proxy only with your web browser!
Unfortunately, I was not able to successfully get macOS’ system-wide proxy configurations to work reliably, even with probe resistance / authentication turned off. I’ve also been told that some previous version(s) of macOS (or OS X) could even kernel panic when using a TLS proxy. (But I was able to get Firefox and Chrome using the proxy successfully, as described above.)
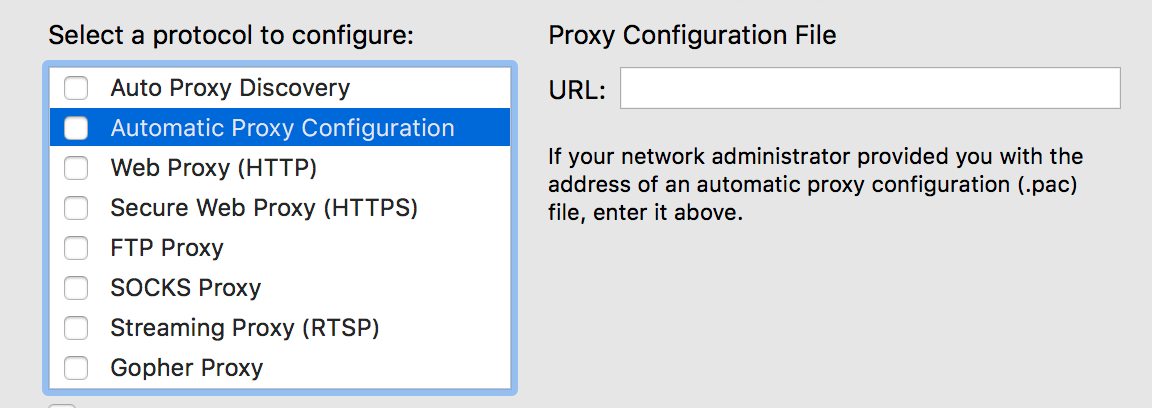
If you want to experiment with getting system-wide proxy config working, open System Preferences and go to Network. Choose your active network interface on the left and click the “Advanced” button in the lower-right. Click the “Proxies” tab. I tried both the “Automatic Proxy Configuration” (where you give the .pac file URL) and the “Secure Web Proxy (HTTPS)” options. Both had different but equally disappointing levels of support in various applications.

Linux (Ubuntu 16.04 Desktop)
Good news! Setting Linux’s system-wide proxy settings worked fairly well in my testing.
Open Network preferences and select “Network Proxy”. Choose “Automatic” for the Method, and type the configuration URL of the .pac file. (You’ll have to enable serve_pac on your server configuration inside the forwardproxy directive; choose a secret URL to serve the file on, so it doesn’t defeat your probe resistance). If you don’t want to use a .pac file, you can choose “Manual” for the Method and enter your hostname and port (443 probably) — use it for all protocols.
Since there isn’t a way to configure the system proxy to send credentials, you need to use your secret link to authenticate. Only the secret link will prompt the browser to enter credentials. You may have to do that every time you re-open your browser.
So open your web browser (maybe double-check its network configuration if you’re not sure) and go to your secret link. Enter your credentials, and you’re good to go!
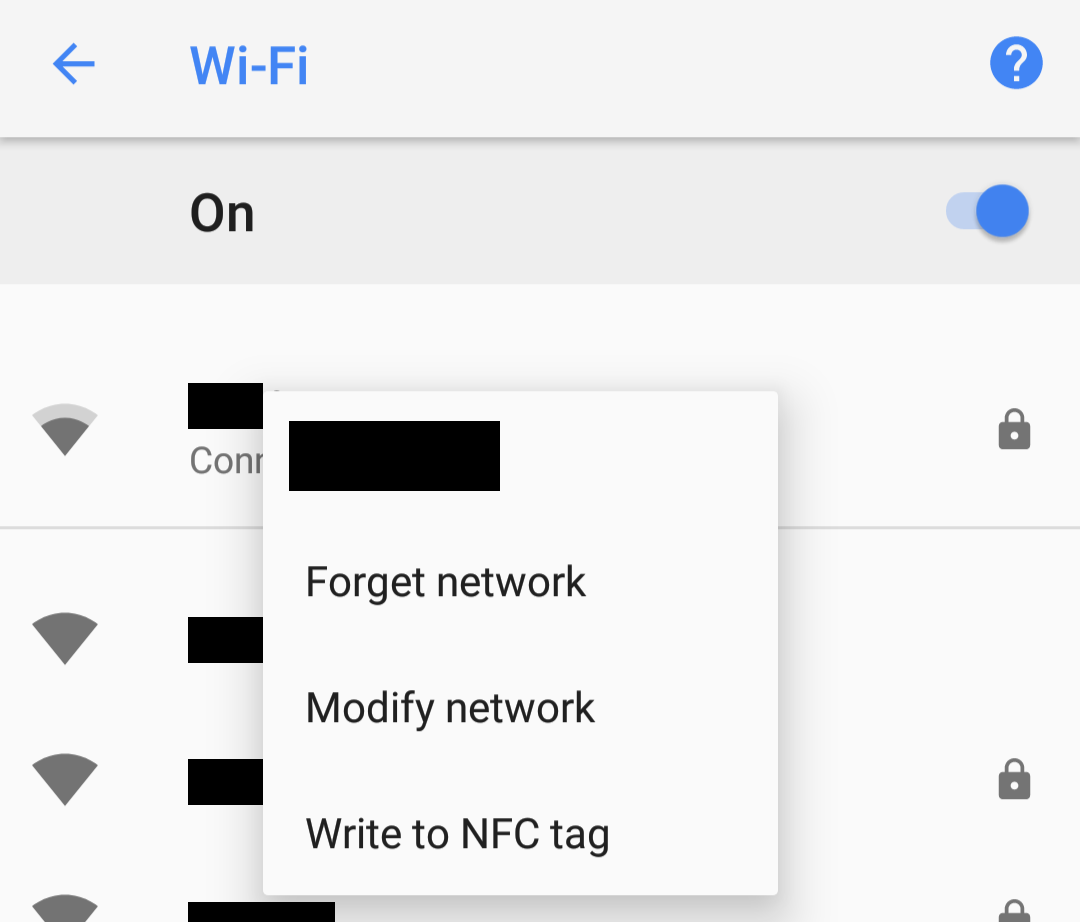
Android
This method works for WiFi networks. I haven’t looked into how to set a proxy for the cell network. It requires using a .pac file. If you haven’t already, enable the serve_pac option within the forwardproxy directive. For probe resistance, I recommend specifying a secret URL to serve it on, rather than the default /proxy.pac.
Go to your WiFi settings and long-tap on the current network. Choose “Modify Network”:

Under Proxy, choose “Proxy Auto-Config” and type the URL to your .pac file:

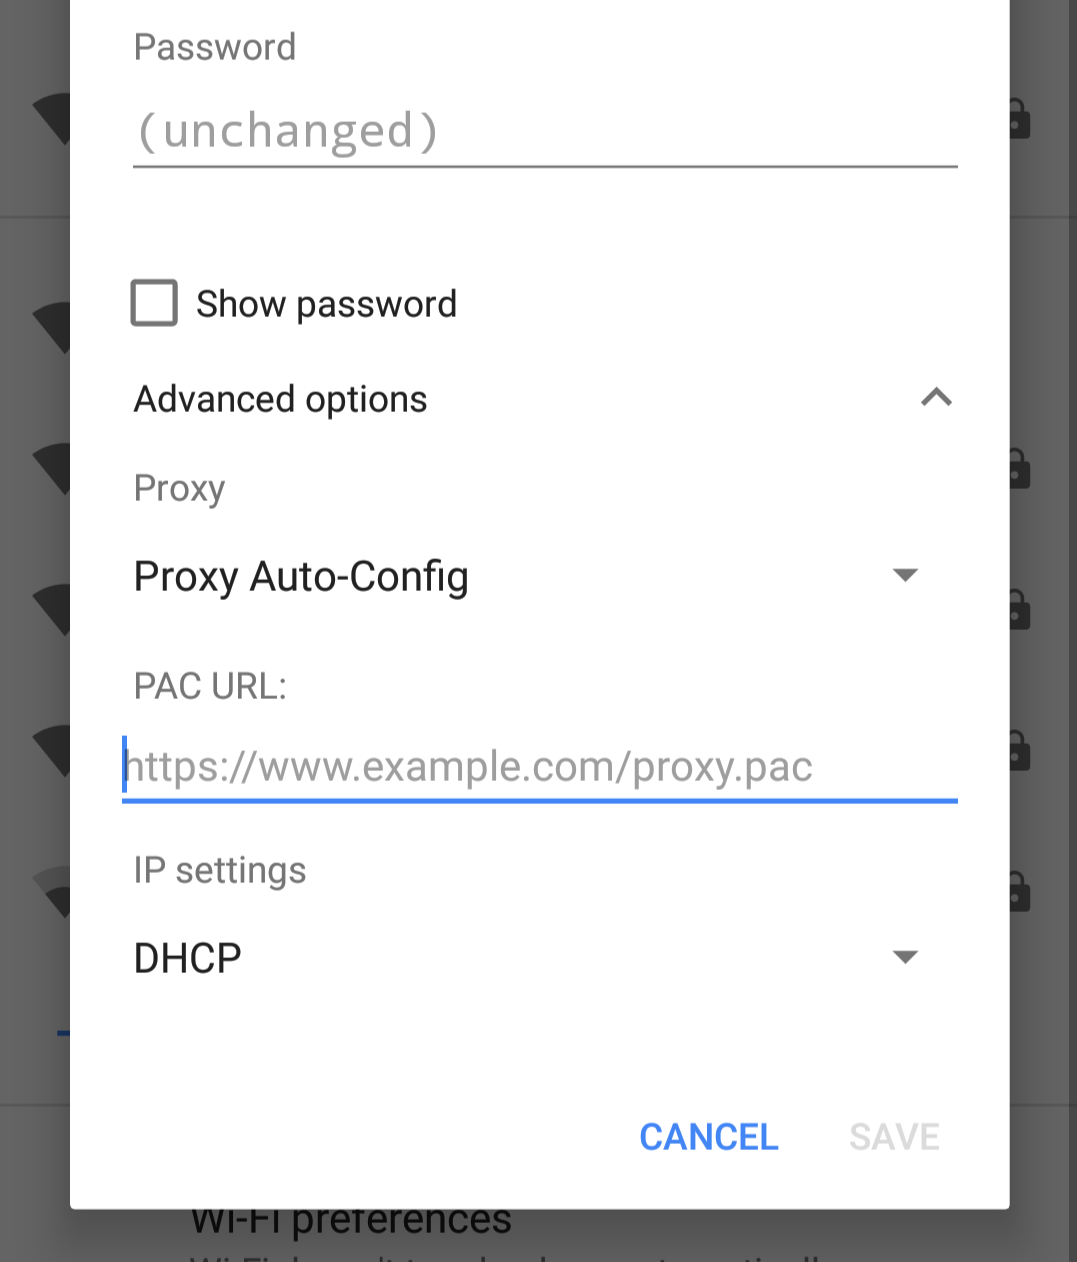
Save settings. With probe resistance enabled, you’ll have to navigate to your secret link in your browser to expose the authentication prompt. Then you should be good to go. Remember: this doesn’t apply to the cell network.
Windows
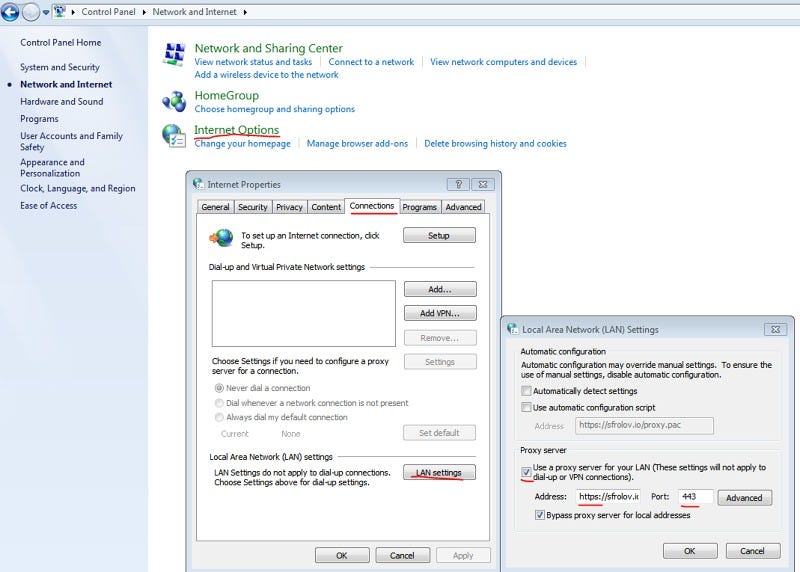
**IMPORTANT NOTE** While this can work on Windows, apparently Windows does not support TLS-to-proxy, meaning your transmissions to your proxy server will not be properly secured. If you want this fixed, you should raise a stink with Microsoft. I don’t have a Windows machine to confirm this, so in the meantime, use another solution.
These instructions are for Windows 7, but the same basic idea works in more recent versions of Windows. I’m borrowing these instructions from Sergey’s blog (with permission) because I don’t have Windows:
Control Panel → Network and Internet → Internet Options → Connections → LAN settings → Check “Use a proxy server…” and paste your “https://yourserver.com” in Address and “443” in port. Don’t lose “https://” in Address, Windows likes to remove it when you open LAN settings window again.

Conclusion
Caddy’s http.forwardproxy plugin is a promising alternative to using VPNs or SSH tunnels for certain tasks and for certain threat models. We hope this technology will help provide greater access to the Web to more people because of its unique properties and ease of use. However, client support for TLS-to-proxy must improve and become more reliable and predictable. We hope that client support for secure proxying will improve and become more robust in the future.
from https://medium.com/@mattholt/private-browsing-without-a-vpn-e91027552700
----------------------------------------------
Caddy2 简明教程
Caddy 是一个 Go 编写的 Web 服务器,类似于 Nginx,Caddy 提供了更加强大的功能,随着 v2 版本发布 Caddy 已经可以作为中小型站点 Web 服务器的另一个选择;相较于 Nginx 来说使用 Caddy 的优势如下:
- 自动的 HTTPS 证书申请(ACME HTTP/DNS 挑战)
- 自动证书续期以及 OCSP stapling 等
- 更高的安全性包括但不限于 TLS 配置以及内存安全等
- 友好且强大的配置文件支持
- 支持 API 动态调整配置(有木有人可以搞个 Dashboard?)
- 支持 HTTP3(QUIC)
- 支持动态后端,例如连接 Consul、作为 k8s ingress 等
- 后端多种负载策略以及健康检测等
- 本身 Go 编写,高度模块化的系统方便扩展(CoreDNS 基于 Caddy1 开发)
- ……
就目前来说,Caddy 对于我个人印象唯一的缺点就是性能没有 Nginx 高,但是这是个仁者见仁智者见智的问题;相较于提供的这些便利性,在性能可接受的情况下完全有理由切换到 Caddy。
一、编译 Caddy2
注意: 在 Caddy1 时代,Caddy 官方发布的预编译二进制文件是不允许进行商业使用的,Caddy2 以后已经全部切换到 Apache 2.0 License,具体请参考 issue#2786。
在默认情况下 Caddy2 官方提供了预编译的二进制文件,以及自定义 build 下载页面,不过对于需要集成一些第三方插件时,我们仍需采用官方提供的 xcaddy 来进行自行编译;以下为具体的编译过程:
1.1、Golang 环境安装
本部分编译环境默认为 Ubuntu 20.04 系统,同时使用 root 用户,其他环境请自行调整相关目录以及配置;编译时自行处理好科学上网相关配置,也可以直接用国外 VPS 服务器编译。
首先下载 go 语言的 SDK 压缩包,其他平台可以从 https://golang.org/dl/ 下载对应的压缩包:
wget https://golang.org/dl/go1.15.6.linux-amd64.tar.gz下载完成后解压并配置相关变量:# 解压
tar -zxvf go1.15.6.linux-amd64.tar.gz
# 移动到任意目录
mkdir -p /opt/devtools
mv go /opt/devtools/go
# 创建 go 相关目录
mkdir -p ${HOME}/gopath/{src,bin,pkg}
# 调整变量配置,将以下变量加入到 shell 初始化配置中
# bash 用户请编辑 ~/.bashrc
# zsh 用户请编辑 ~/.zshrc
export GOROOT='/opt/devtools/go'
export GOPATH="${HOME}/gopath"
export GOPROXY='https://goproxy.cn' # 如果已经解决了科学上网问题,GOPROXY 变量可以删除,否则可能会起反作用
export PATH="${GOROOT}/bin:${GOPATH}/bin:${PATH}"
# 让配置生效
# bash 用户替换成 ~/.basrc
# 重新退出登录也可以
source ~/.zshrc配置完成后,应该在命令行执行 go version 有成功返回.1.2、安装 xcaddy
按照官方文档直接命令行执行 go get -u github.com/caddyserver/xcaddy/cmd/xcaddy 安装即可.安装完成后应当在命令行可以直接执行 xcaddy 命令:xcaddy --help
1.3、编译 Caddy2
编译之前系统需要安装 jq、curl、git 命令,没有的请使用 apt install -y curl git jq 命令安装;
自行编译的目的是增加第三方插件方便使用,其中官方列出的插件可以从 Download 页面获取到.
其他插件可以从 GitHub 上寻找或者自行编写,整理好这些插件列表以后只需要使用 xcaddy 编译即可:
# 获取最新版本号,其实直接去 GitHub realse 页复制以下就行
# 这里转化为脚本是为了方便自动化
export version=$(curl -s "https://api.github.com/repos/caddyserver/caddy/releases/latest" | jq -r .tag_name)
# 使用 xcaddy 编译
xcaddy build ${version} --output ./caddy_${version} \
--with github.com/abiosoft/caddy-exec \
--with github.com/caddy-dns/cloudflare \
--with github.com/caddy-dns/dnspod \
--with github.com/caddy-dns/duckdns \
--with github.com/caddy-dns/gandi \
--with github.com/caddy-dns/route53 \
--with github.com/greenpau/caddy-auth-jwt \
--with github.com/greenpau/caddy-auth-portal \
--with github.com/greenpau/caddy-trace \
--with github.com/hairyhenderson/caddy-teapot-module \
--with github.com/kirsch33/realip \
--with github.com/porech/caddy-maxmind-geolocation \
--with github.com/caddyserver/format-encoder \
--with github.com/mholt/caddy-webdav
稍等片刻后将会生成编译好的二进制文件.
编译成功后可以通过 list-modules 子命令查看被添加的插件是否成功编译到了 caddy 中.
二、安装 Caddy2
2.1、宿主机安装
宿主机安装 Caddy2 需要使用 systemd 进行守护,幸运的是 Caddy2 官方提供了各种平台的安装包以及 systemd 配置文件仓库;目前推荐的方式是直接采用包管理器安装标准版本的 Caddy2,然后替换自编译的可执行文件:# 安装标准版本 Caddy2
sudo apt install -y debian-keyring debian-archive-keyring apt-transport-https
curl -1sLf 'https://dl.cloudsmith.io/public/caddy/stable/cfg/gpg/gpg.155B6D79CA56EA34.key' | sudo apt-key add -
curl -1sLf 'https://dl.cloudsmith.io/public/caddy/stable/cfg/setup/config.deb.txt?distro=debian&version=any-version' | sudo tee -a /etc/apt/sources.list.d/caddy-stable.list
sudo apt update
sudo apt install caddy
# 替换二进制文件
systemctl stop caddy
rm -f /usr/bin/caddy
mv ./caddy_v2.3.0 /usr/bin/caddy
三、配置 Caddy2
Caddy2 的配置文件核心采用 json,但是 json 可读性不强,所以官方维护了一个转换器,抽象出称之为 Caddyfile 的新配置格式;关于 Caddyfile 的完整语法请查看官方文档 https://caddyserver.com/docs/caddyfile,本文仅做一些基本使用的样例.
3.1、配置片段
Caddyfile 支持类似代码中 function 一样的配置片段,这些配置片段可以在任意位置被 import,同时可以接受参数,以下为配置片断示例:# 括号内为片段名称,可以自行定义
(TLS) {
protocols tls1.2 tls1.3
ciphers TLS_ECDHE_ECDSA_WITH_AES_128_GCM_SHA256 TLS_ECDHE_RSA_WITH_AES_128_GCM_SHA256 TLS_ECDHE_ECDSA_WITH_AES_256_GCM_SHA384 TLS_ECDHE_RSA_WITH_AES_256_GCM_SHA384 TLS_ECDHE_ECDSA_WITH_CHACHA20_POLY1305_SHA256 TLS_ECDHE_RSA_WITH_CHACHA20_POLY1305_SHA256
}
# 在任意位置可以引用此片段从而达到配置复用
import TLS
3.2、配置模块化
import 指令除了支持引用配置片段以外,还支持引用外部文件,同时支持通配符,有了这个命令以后我们就可以方便的将配置文件进行模块化处理:# 引用外部的 /etc/caddy/*.caddy
import /etc/caddy/*.caddy
3.3、站点配置
针对于站点域名配置,Caddyfile 比较自由化,其格式如下:地址 {
站点配置
}
关于这个 “地址” 接受多种格式,以下都为合法的地址格式:
localhostexample.com:443http://example.comlocalhost:8080127.0.0.1[::1]:2015example.com/foo/**.example.comhttp://
3.4、环境变量
Caddyfile 支持直接引用系统环境变量,通过此功能可以将一些敏感信息从配置文件中剔除:# 引用环境变量 GANDI_API_TOKEN
dns gandi {$GANDI_API_TOKEN}
3.5、配置片段参数支持
针对于配置片段,Caddyfile 还支持类似于函数代码的参数支持,通过参数支持可以让外部引用时动态修改配置信息:(LOG) {
log {
format json {
time_format "iso8601"
}
# "{args.0}" 引用传入的第一个参数,此处用于动态传入日志文件名称
output file "{args.0}" {
roll_size 100mb
roll_keep 3
roll_keep_for 7d
}
}
}
# 引用片段
import LOG "/data/logs/mritd.com.log"
3.6、自动证书申请
在启动 Caddy2 之前,如果目标域名(例如: www.example.com)已经解析到了本机,那么 Caddy2 启动后会尝试自动通过 ACME HTTP 挑战申请证书;如果期望使用 DNS 的方式申请证书则需要其他 DNS 插件支持,比如上面编译的 --with github.com/caddy-dns/gandi 为 gandi 服务商的 DNS 插件;关于使用 DNS 挑战的配置编写方式需要具体去看其插件文档,目前 gandi 的配置如下:tls {
dns gandi {env.GANDI_API_TOKEN}
}
配置完成后 Caddy2 会通过 ACME DNS 挑战申请证书,值得注意的是即使通过 DNS 申请证书默认也不会申请泛域名证书,如果想要调整这种细节配置请使用 json 配置或管理 API。
3.7、完整模块化配置样例
了解了以上基础配置信息,我们就可以实际编写一个站点配置了;以下为本站的 Caddy 配置样例:
目录结构:
caddy
├── Caddyfile
├── yourdomain.com.caddy
3.7.1、Caddyfile
Caddyfile 主要包含一些通用的配置,并将其抽到配置片段中,类似与 nginx 的 nginx.conf 主配置;在最后部分通过 import 关键字引入其他具体站点配置,类似 nginx 的 vhost 配置。(LOG) {
log {
# 日志格式参考 https://github.com/caddyserver/format-encoder 插件文档
format formatted "[{ts}] {request>remote_addr} {request>proto} {request>method} <- {status} -> {request>host} {request>uri} {request>headers>User-Agent>[0]}" {
time_format "iso8601"
}
output file "{args.0}" {
roll_size 100mb
roll_keep 3
roll_keep_for 7d
}
}
}
(TLS) {
# TLS 配置采用 https://mozilla.github.io/server-side-tls/ssl-config-generator/ 生成,SSL Labs 评分 A+
protocols tls1.2 tls1.3
ciphers TLS_ECDHE_ECDSA_WITH_AES_128_GCM_SHA256 TLS_ECDHE_RSA_WITH_AES_128_GCM_SHA256 TLS_ECDHE_ECDSA_WITH_AES_256_GCM_SHA384 TLS_ECDHE_RSA_WITH_AES_256_GCM_SHA384 TLS_ECDHE_ECDSA_WITH_CHACHA20_POLY1305_SHA256 TLS_ECDHE_RSA_WITH_CHACHA20_POLY1305_SHA256
}
(HSTS) {
# HSTS (63072000 seconds)
header / Strict-Transport-Security "max-age=63072000"
}
(ACME_GANDI) {
# 从环境变量获取 GANDI_API_TOKEN
dns gandi {$GANDI_API_TOKEN}
}
# 聚合上面的配置片段为新的片段
(COMMON_CONFIG) {
# 压缩支持
encode zstd gzip
# TLS 配置
tls {
import TLS
import ACME_GANDI
}
# HSTS
import HSTS
}
# 开启 HTTP3 实验性支持
{
servers :443 {
protocol {
experimental_http3
}
}
}
# 引入其他具体的站点配置
import /etc/caddy/*.caddy
3.7.2 urdomain.com.caddy
urdomain.com.caddy 为主站点配置,主站点配置内主要编写一些路由规则,TLS 等都从配置片段引入,这样可以保持统一:www.urdomain.com {
# 重定向到 urdomain.com(默认 302)
redir https://urdomain.com{uri}
# 日志
import LOG "/data/logs/urdoamin.com.log"
# TLS、HSTS、ACME 等通用配置
import COMMON_CONFIG
}
urdomain.com {
# 路由
route /* {
reverse_proxy urdomain_com:80
}
# 日志
import LOG "/data/logs/urdomain.com.log"
# TLS、HSTS、ACME 等通用配置
import COMMON_CONFIG
}
四、启动与重载
配置文件编写完成后,通过 systemctl start caddy 可启动 caddy 服务器;每次配置修改后可以通过 systemctl reload caddy 进行配置重载,重载期间 caddy 不会重启(实际上调用 caddy reload 命令),当配置文件书写错误时,重载只会失败,不会影响正在运行的 caddy 服务器.
五、总结
本文只是列举了一些简单的 Caddy 使用样例,在强大的插件配合下,Caddy 可以实现各种 “神奇” 的功能,这些功能依赖于复杂的 Caddy 配置,Caddy 配置需要仔细阅读官方文档,关于 Caddyfile 的每个配置段在文档中都有详细的描述。
值得一提的是 Caddy 本身内置了丰富的插件,例如内置 “file_server”、内置各种负载均衡策略等,这些插件组合在一起可以实现一些复杂的功能;Caddy 是采用 go 编写的,官方也给出了详细的开发文档,相较于 Nginx 来说通过 Lua 或者 C 来开发编写插件来说,Caddy 的插件开发上手要容易得多;Caddy 本身针对数据存储、动态后端、配置文件转换等都内置了扩展接口,这为有特定需求的扩展开发打下了良好基础。
最终总结,综合来看目前 Caddy2 的性能损失可接受的情况下,相较于 Nginx 绝对是个绝佳选择,各种新功能都能够满足现代化 Web 站点的需求.