from https://github.com/sakisds/Serial-TUN/
https://github.com/sakisds/Serial-TUN/issues/1
客户端程序仅能运行在linux desktop os.
ppt.cc/fKlBax ppt.cc/fwlgFx ppt.cc/fVjECx ppt.cc/fEnHsx ppt.cc/fRZTnx ppt.cc/fSZ3cx ppt.cc/fLOuCx ppt.cc/fE9Nux ppt.cc/fL5Kyx ppt.cc/f71Yqx tecmint.com linuxcool.com linux.die.net linux.it.net.cn ostechnix.com unix.com ubuntugeek.com runoob.com man.linuxde.net ppt.cc/fwpCex ppt.cc/fxcLIx ppt.cc/foX6Ux linuxprobe.com linuxtechi.com howtoforge.com linuxstory.org systutorials.com ghacks.net linuxopsys.com ppt.cc/ffAGfx ppt.cc/fJbezx ppt.cc/fNIQDx ppt.cc/fCSllx ppt.cc/fybDVx ppt.cc/fIMQxx
go get zenhack.net/go/websocket-proxy
websocket-proxy -listen :9000 -url wss://example.com/my-websocket from https://github.com/zenhack/websocket-proxy Jason Hennessey, Sahil Tikale, Ata Turk, Emine Ugur Kaynar, Chris Hill, Peter Desnoyers, and Orran Krieger. 2016. HIL: Designing an Exokernel for the Data Center. In Proceedings of the Seventh ACM Symposium on Cloud Computing (SoCC '16). DOI: 10.1145/2987550.2987588Bibtex:
@inproceedings{hil-designing-an-exokernel,
author = {Hennessey, Jason and Tikale, Sahil and Turk, Ata and Kaynar, Emine Ugur and Hill, Chris and Desnoyers, Peter and Krieger, Orran},
title = {HIL: Designing an Exokernel for the Data Center},
booktitle = {Proceedings of the Seventh ACM Symposium on Cloud Computing},
series = {SoCC '16},
year = {2016},
isbn = {978-1-4503-4525-5},
location = {Santa Clara, CA, USA},
pages = {155--168},
numpages = {14},
url = {https://doi.acm.org/10.1145/2987550.2987588},
doi = {10.1145/2987550.2987588},
acmid = {2987588},
publisher = {ACM},
address = {New York, NY, USA},
keywords = {IaaS, PaaS, bare metal, cloud computing, datacenter management, exokernel},
}
Jason Hennessey, Chris Hill, Ian Denhardt, Viggnesh Venugopal, George Silvis, Orran Krieger, and Peter Desnoyers, Hardware as a service - enabling dynamic, user-level bare metal provisioning of pools of data center resources. in 2014 IEEE High Performance Extreme Computing Conference, Waltham, MA, USA, 2014.Other work that has involved HIL can be found on the Mass Open Cloud papers page.
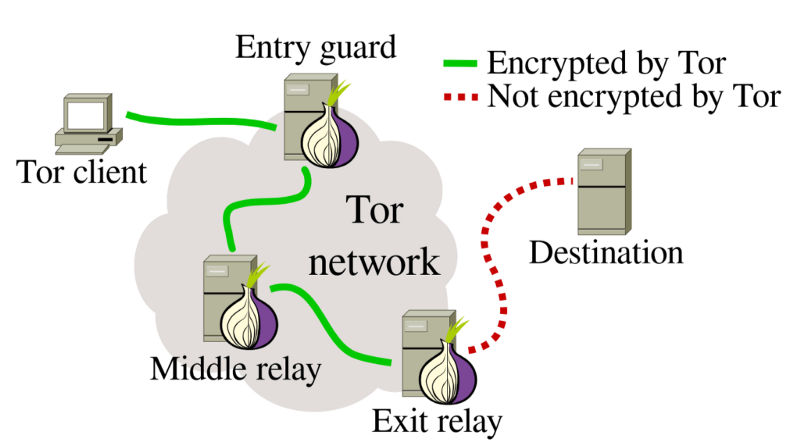
Ed25519 keys start life as a 32-byte (256-bit) uniformly random binary seed (e.g. the output of SHA256 on some random input). The seed is then hashed using SHA512, which gets you 64 bytes (512 bits), which is then split into a “left half” (the first 32 bytes) and a “right half”. The left half is massaged into a curve25519 private scalar “a” by setting and clearing a few high/low-order bits. The pubkey is generated by multiplying this secret scalar by “B” (the generator), which yields a 32-byte/256-bit group element “A”.比較有趣的是tor的網路可以橫跨原本的IPv4或是IPv6上直接運作,使得只有2³²的IPv4也有機會享有更多的地址使用。再也不需要煩惱IP攝影機是使用IPv4 可是沒有這麼多IP可以用的問題。
各個版本的配置文件位置 Mac:/usr/local/etc/tor/torrc Windows:%appdata%\tor\torrc Ubuntu/Debian:/etc/tor/torrcps : 如果沒有文件的用記事本創一個,不要有副檔名喔
ORPort 443
Exitpolicy reject *:*
Nickname Bitcoiner #自己取一個喜歡的名字 我是Bitcoiner
ContactInfo ***@gmail.com #輸入自己的email
AccountingMax 500 GBytes # 每月分配给Tor 500G 流量
AccountingStart month 3 15:00 # 每月3号15点(Locale)清零
RelayBandwidthRate 100 KBytes # Throttle traffic to 100KB/s (800Kbps)
RelayBandwidthBurst 200 KBytes # But allow bursts up to 200KB (1600Kb)
各個版本運行 Mac:tor Windows:執行 tor資料夾底下的tor.exe Ubuntu/Debian:torps. 因為需要port 443 請自行調整防火牆規則

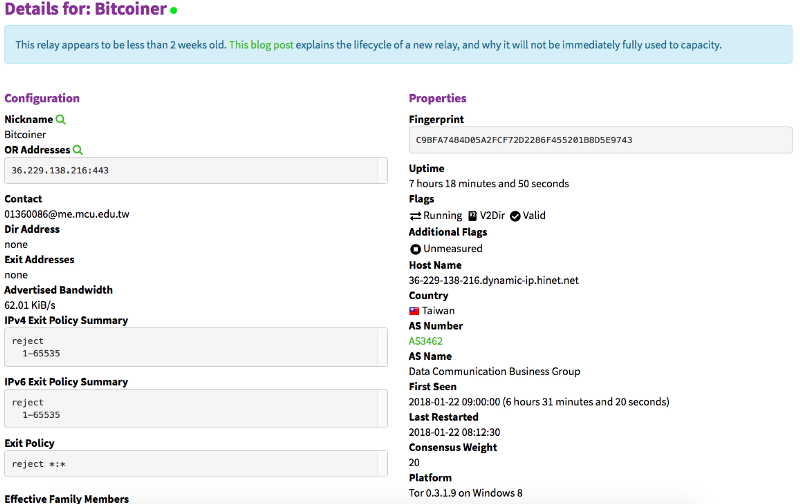
brew install tor還有tor跑起來之後,並無法順利的抵達Tor directory server,也就無法進一步提取一些中繼節點來建立路徑。
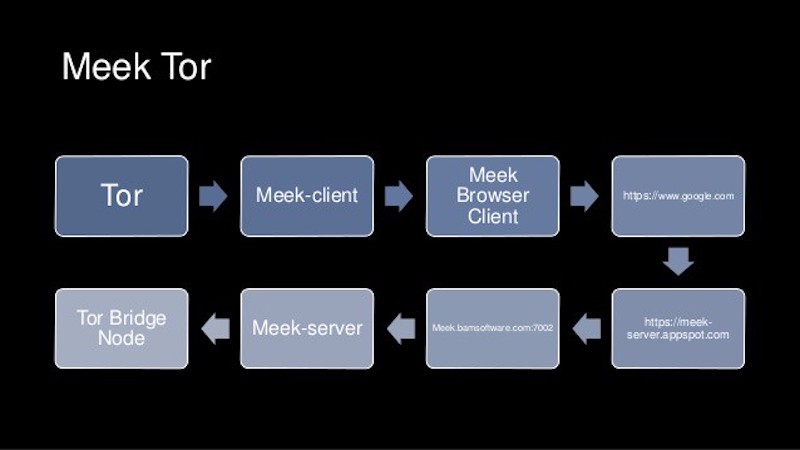
brew install tor之後,來clone一個meek工具(這是Tor Project 自己的git)下來:git clone https://git.torproject.org/pluggable-transports/meek.git
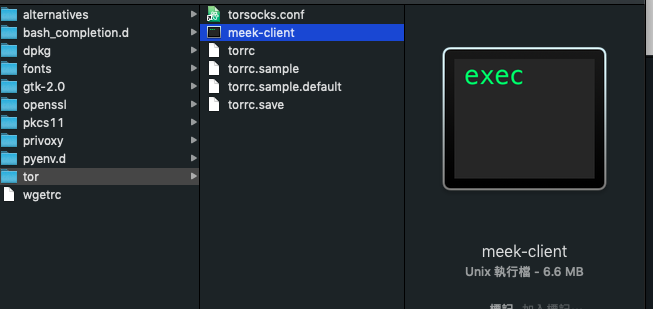
make(前提是要裝好go,有些不足的go包報錯會有載點)一下,順利的話 你會跟我依樣見到一個meek-client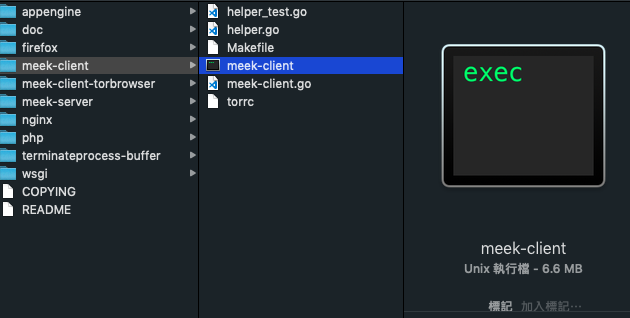
UseBridges 1
Bridge meek 0.0.2.0:3 url=https://meek.azureedge.net/ front=ajax.aspnetcdn.com
ClientTransportPlugin meek exec ./meek-client — log meek-client.log
tor就行了。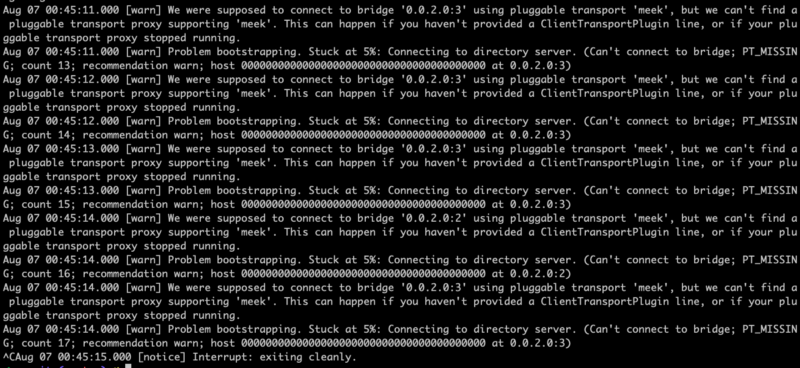

.onion網站的搭建不需要以公有IP的方是搭建 .onion的網站不需要在防火牆新增port規則那如何搭建一個.onion網站呢,首先你在你自己的電腦中搭建一個網站,最簡單的去XAMPP[5]下載一個,搓一下很快。好了我們有個網站了,接下來去Tor project下載是windows 的話選windows”Expert Bundle”[4],不要選瀏覽器壓我就不了你。
HiddenServiceDir C:\ #這會是你存’放網站private key 檔案跟public檔案的地方啊,喜歡改地方也可以 HiddenServicePort 80 127.0.0.1:81 #左邊的數字是你希望在哪個port開hidden service,右邊是你希望把本地端的哪個port接上去左邊的

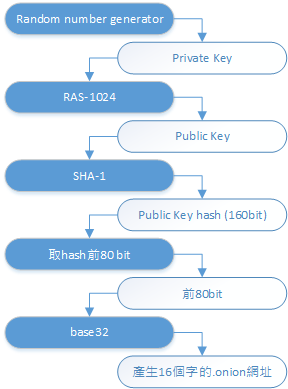
Better crypto (replaced SHA1/DH/RSA1024 with SHA3/ed25519/curve25519)
 .onion

  SYNTAX:  [digest].onion
           [ignored].[digest].onion

  The digest is the first eighty bits of a SHA1 hash of the identity key for
  a hidden service, encoded in base32.

  When Tor sees an address in this format, it tries to look up and connect to
  the specified hidden service.  See rend-spec.txt for full details.

  The "ignored" portion of the address is intended for use in vhosting, and
  is supported in Tor 0.2.4.10-alpha and later.
256 bits 的 ECC key 強度大約是 3072 bits RSA key (以現在最好的攻擊演算法來估算)。 直接放 public key 不需要經過 hash function 計算,可以避免掉 hash function 被找到 collision 時的風險。[3]
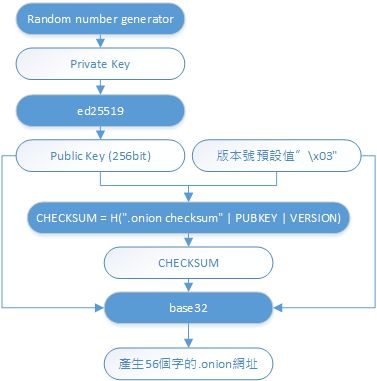
ed25519 算法相對於secp256k1 更加高效,同時安全性也非常高。目前也被廣泛應用很多加密數字貨幣項目中,著名的項目例如Zcash、公證通(Factom)、新經幣(NEM)等等, 以太坊的創始人Vitalik 也曾在博客中公開表示,以太坊計劃在新版本中切換到ed25519。ed25519 的好處是在不損失安全級別的情況下,顯著提昇運算效率,其效率是secp256k1 的很多倍。以ed25519 的論文中的實驗為例,該算法完成一次簽名需要87548 個CPU 循環,一個4 核2.4GHz 的CPU 每秒可以完成109000 次簽名。密鑰的生成也非常高效。而ed25519 的安全級別和secp256k1 的級別相同,都是128 位的安全級別。[2]新的v3比較特別的是他加入了CHECKSUM,這個CHECKSUM與比特幣地址生成中的CHECKSUM不同,比特幣的版本是取double sha-256取前幾個bit當作CHECKSUM,而.onion v3 採用的是簽章算法中的CHECKSUM。
1. Encoding onion addresses [ONIONADDRESS]

   The onion address of a hidden service includes its identity public key, a
   version field and a basic checksum. All this information is then base32
   encoded as shown below:

     onion_address = base32(PUBKEY | CHECKSUM | VERSION) + ".onion"
     CHECKSUM = H(".onion checksum" | PUBKEY | VERSION)[:2]

     where:
       - PUBKEY is the 32 bytes ed25519 master pubkey of the hidden service.
       - VERSION is an one byte version field (default value '\x03')
       - ".onion checksum" is a constant string
       - CHECKSUM is truncated to two bytes before inserting it in onion_address
brew install git-lfs
git lfs installgit lfs track "*.psd",就一直家就對了。.gitattributesgit add .gitattributes,最好可以先commit, push 一波
完成這五步驟基本上就已經部署完成了。我們只要再下一輪的add, commit, push 就可以感受到可以上傳超過 100M的檔案了。官方社区 | QQ 交流群 | Telegram 交流群 | Telegram 频道 | WeHalo 小程序。
wget https://github.com/halo-dev/halo/releases/download/v1.1.1/halo-1.1.1.jar -O halo-latest.jar
java -jar halo-latest.jar
demoP@ssw0rd123..
https://docs.halo.run)
------------------------------------------------------------------------------
今天要推荐另外一个免费开源的建站工具「Halo」支持快速部署,支持模板与插件,强大易用。
Halo介绍
使用「Halo」你不需要懂太多的网站编程技术,你只需要拥有云服务器或者 VPS,通过使用 Docker 来快速部署就可以快速搭建一个博客网站了。
后台功能:已经具备博客网站应有的功能,包括文章发布、页面发布、评论管理、上传附件、友情链接链接、站点管理、个人资料、内置全文搜索引擎、备份与恢复等等。
插件功能:据介绍支持在插件运行时为系统添加新功能,同时保持「Halo」自身的简洁轻量。这种机制让用户根据自身需求自由扩展「Halo」的功能。同时提供插件开发接口以确保较高扩展性和可维护性。
主题方面:支持动态切换主题模板、支持实时编辑和预览效果、多语言支持、与插件配合实现更多功能。如果你会前端开发也可以自己写主题,目前作者也提供了 44 个不错的主题模板。
在线体验
环境地址:https://demo.halo.run
后台地址:https://demo.halo.run/console
用户名:demo
密码:P@ssw0rd123..
总结
初步体验下来「Halo」还是很不错的,各方面功能都很完善,作者也提供了详细的开发文档,方便你开发插件主题等。整体很类似 WordPress 博客程序,但比较轻量化,感兴趣的可以试试看。
官方网站:
https://halo.run
部署教程:
https://docs.halo.run/getting-started/install/docker-compose
代码仓库:
https://github.com/halo-dev/halo
demo site: Ryan Wang's Blog
$GOPATH/bin to your PATH. Then you can use the following command to automatically download, compile and install this software:go get -u -v github.com/physacco/socks5
$GOPATH/bin directory.socks5 [host]:port
pkill -f socks5git clone https://github.com/farmercode/Socks5Server.git
cd Socks5Server
go build socks5server.go
./socks5server
#如果需要后台执行可以使用下面命令
./socks5server > /dev/null 2>&1 &
#如果需要记录日志文件可以使用nohup
nohup ./socks5server &
#或者重定向到自己指定的一个文件
./socks5server > server.log 2>&1 &
127.0.0.01:9527["127.0.0.1","180.168.85.190"]
npm install -g dns-proxy-https
sudo dns-proxy-https --socks_host 127.0.0.1 --socks_port 1080 --fallback 8.8.8.8
(可简写为sudo dns-proxy-https -s 127.0.0.1 -p 1080 -f 8.8.8.8)
程序dns-proxy-https默认监听0.0.0.0:53 ,看到命令中的
“--socks_host 127.0.0.1 --socks_port 1080”了吗? 你需要先运行本机上的一个监听
1080端口的socks proxy,本机上的ss就是这样的socks proxy。
实际例子:
sudo wg-quick up wg0
sudo networksetup -setdnsservers "Wi-Fi" 127.0.0.1
sudo dns-proxy-https --socks_host 127.0.0.1 --socks_port 1080 --fallback 8.8.8.8
项目地址:https://github.com/xcodebuild/dns-proxy-https