Total Pageviews

Friday, 15 September 2017

一款新型的vpn程序-WireGuard

(https://git.zx2c4.com/WireGuard)
WireGuard is an extremely simple yet fast and modern VPN that utilizes state-of-the-art cryptography. It aims to be fastersimpler, leaner, and more useful than IPSec, while avoiding the massive headache. It int
ends to be considerably more performant than OpenVPN. WireGuard is designed as a general purpose VPN for running on embedded interfaces and super computers alike, fit for many different circumstances. Initially released for the Linux kernel, it plans to be cross-platform and widely deployable. It is currently under heavy development, but already it might be regarded as the most secure, easiest to use, and simplest VPN solution in the industry.

 Simple & Easy-to-use

WireGuard aims to be as easy to configure and deploy as SSH. A VPN connection is made simply by exchanging very simple public keys – exactly like exchanging SSH keys – and all the rest is transparently handled by WireGuard. It is even capable of roaming between IP addresses, just like Mosh. There is no need to manage connections, be concerned about state, manage daemons, or worry about what's under the hood. WireGuard presents an extremely basic yet powerful interface.

 Cryptographically Sound

WireGuard uses state-of-the-art cryptography, like the Noise protocol frameworkCurve25519ChaCha20Poly1305BLAKE2SipHash24HKDF, and secure trusted constructions. It makes conservative and reasonable choices and has been reviewed by cryptographers.

 Minimal Attack Surface

WireGuard has been designed with ease-of-implementation and simplicity in mind. It is meant to be easily implemented in very few lines of code, and easily auditable for security vulnerabilities. Compared to behemoths like *Swan/IPsec or OpenVPN/OpenSSL, in which auditing the gigantic codebases is an overwhelming task even for large teams of security experts, WireGuard is meant to be comprehensively reviewable by single individuals.

 High Performance

A combination of extremely high speed cryptographic primitives and the fact that WireGuard lives inside the Linux kernel means that secure networking can be very high-speed. It is suitable for both small embedded device like smartphones and fully loaded backbone routers.

 Well Defined & Thoroughly Considered

WireGuard is the result of a lengthy and thoroughly considered academic process, resulting in the technical whitepaper, an academic research paper which clearly defines the protocol and the intense considerations that went into each decision.

Conceptual Overview

If you'd like a general conceptual overview of what WireGuard is about, read onward here. You then may progress to installation and reading the quickstart instructions on how to use it.
If you're interested in the internal inner workings, you might be interested in the brief summary of the protocol, or go more in depth by reading the technical whitepaper, which goes into more detail on the protocol, cryptography, and fundamentals. If you intend to implement WireGuard for a new platform, please read the cross-platform notes.
WireGuard securely encapsulates IP packets over UDP. You add a WireGuard interface, configure it with your private key and your peers' public keys, and then you send packets across it. All issues of key distribution and pushed configurations are out of scope of WireGuard; these are issues much better left for other layers, lest we end up with the bloat of IKE or OpenVPN. In contrast, it more mimics the model of SSH and Mosh; both parties have each other's public keys, and then they're simply able to begin exchanging packets through the interface.

Simple Network Interface

WireGuard works by adding a network interface (or multiple), like eth0 or wlan0, called wg0 (or wg1wg2wg3, etc). This network interface can then be configured normally using ifconfig(8) or ip-address(8), with routes for it added and removed using route(8) or ip-route(8), and so on with all the ordinary networking utilities. The specific WireGuard aspects of the interface are configured using the wg(8) tool. This interface acts as a tunnel interface.
WireGuard associates tunnel IP addresses with public keys and remote endpoints. When the interface sends a packet to a peer, it does the following:
  1. This packet is meant for 192.168.30.8. Which peer is that? Let me look... Okay, it's for peer ABCDEFGH. (Or if it's not for any configured peer, drop the packet.)
  2. Encrypt entire IP packet using peer ABCDEFGH's public key.
  3. What is the remote endpoint of peer ABCDEFGH? Let me look... Okay, the endpoint is UDP port 53133 on host 216.58.211.110.
  4. Send encrypted bytes from step 2 over the Internet to 216.58.211.110:53133 using UDP.
When the interface receives a packet, this happens:
  1. I just got a packet from UDP port 7361 on host 98.139.183.24. Let's decrypt it!
  2. It decrypted and authenticated properly for peer LMNOPQRS. Okay, let's remember that peer LMNOPQRS's most recent Internet endpoint is 98.139.183.24:7361 using UDP.
  3. Once decrypted, the plain-text packet is from 192.168.43.89. Is peer LMNOPQRS allowed to be sending us packets as 192.168.43.89?
  4. If so, accept the packet on the interface. If not, drop it.
Behind the scenes there is much happening to provide proper privacy, authenticity, and perfect forward secrecy, using state-of-the-art cryptography.

Cryptokey Routing

At the heart of WireGuard is a concept called Cryptokey Routing, which works by associating public keys with a list of tunnel IP addresses that are allowed inside the tunnel. Each network interface has a private key and a list of peers. Each peer has a public key. Public keys are short and simple, and are used by peers to authenticate each other. They can be passed around for use in configuration files by any out-of-band method, similar to how one might send their SSH public key to a friend for access to a shell server.
For example, a server computer might have this configuration:
[Interface]
PrivateKey = yAnz5TF+lXXJte14tji3zlMNq+hd2rYUIgJBgB3fBmk=
ListenPort = 51820

[Peer]
PublicKey = xTIBA5rboUvnH4htodjb6e697QjLERt1NAB4mZqp8Dg=
AllowedIPs = 10.192.122.3/32, 10.192.124.1/24

[Peer]
PublicKey = TrMvSoP4jYQlY6RIzBgbssQqY3vxI2Pi+y71lOWWXX0=
AllowedIPs = 10.192.122.4/32, 192.168.0.0/16

[Peer]
PublicKey = gN65BkIKy1eCE9pP1wdc8ROUtkHLF2PfAqYdyYBz6EA=
AllowedIPs = 10.10.10.230/32
And a client computer might have this simpler configuration:
[Interface]
PrivateKey = gI6EdUSYvn8ugXOt8QQD6Yc+JyiZxIhp3GInSWRfWGE=
ListenPort = 21841

[Peer]
PublicKey = HIgo9xNzJMWLKASShiTqIybxZ0U3wGLiUeJ1PKf8ykw=
Endpoint = 192.95.5.69:51820
AllowedIPs = 0.0.0.0/0
In the server configuration, each peer (a client) will be able to send packets to the network interface with a source IP matching his corresponding list of allowed IPs. For example, when a packet is received by the server from peer gN65BkIK..., after being decrypted and authenticated, if its source IP is 10.10.10.230, then it's allowed onto the interface; otherwise it's dropped.
In the server configuration, when the network interface wants to send a packet to a peer (a client), it looks at that packet's destination IP and compares it to each peer's list of allowed IPs to see which peer to send it to. For example, if the network interface is asked to send a packet with a destination IP of 10.10.10.230, it will encrypt it using the public key of peer gN65BkIK..., and then send it to that peer's most recent Internet endpoint.
In the client configuration, its single peer (the server) will be able to send packets to the network interface with any source IP (since 0.0.0.0/0 is a wildcard). For example, when a packet is received from peer HIgo9xNz..., if it decrypts and authenticates correctly, with any source IP, then it's allowed onto the interface; otherwise it's dropped.
In the client configuration, when the network interface wants to send a packet to its single peer (the server), it will encrypt packets for the single peer with any destination IP address (since 0.0.0.0/0 is a wildcard). For example, if the network interface is asked to send a packet with any destination IP, it will encrypt it using the public key of the single peer HIgo9xNz..., and then send it to the single peer's most recent Internet endpoint.
In other words, when sending packets, the list of allowed IPs behaves as a sort of routing table, and when receiving packets, the list of allowed IPs behaves as a sort of access control list.
This is what we call a Cryptokey Routing Table: the simple association of public keys and allowed IPs.
Any combination of IPv4 and IPv6 can be used, for any of the fields. WireGuard is fully capable of encapsulating one inside the other if necessary.
Because all packets sent on the WireGuard interface are encrypted and authenticated, and because there is such a tight coupling between the identity of a peer and the allowed IP address of a peer, system administrators do not need complicated firewall extensions, such as in the case of IPSec, but rather they can simply match on "is it from this IP? on this interface?", and be assured that it is a secure and authentic packet. This greatly simplifies network management and access control, and provides a great deal more assurance that your iptables rules are actually doing what you intended for them to do.

Built-in Roaming

The client configuration contains an initial endpoint of its single peer (the server), so that it knows where to send encrypted data before it has received encrypted data. The server configuration doesn't have any initial endpoints of its peers (the clients). This is because the server discovers the endpoint of its peers by examining from where correctly authenticated data originates. If the server itself changes its own endpoint, and sends data to the clients, the clients will discover the new server endpoint and update the configuration just the same. Both client and server send encrypted data to the most recent IP endpoint for which they authentically decrypted data. Thus, there is full IP roaming on both ends.

Ready for Containers

WireGuard sends and receives encrypted packets using the network namespace in which the WireGuard interface was originally created. This means that you can create the WireGuard interface in your main network namespace, which has access to the Internet, and then move it into a network namespace belonging to a Docker container as that container's only interface. This ensures that the only possible way that container is able to access the network is through a secure encrypted WireGuard tunnel.

Learning More

Consider glancing at the commands & quick start for a good idea of how WireGuard is used in practice. There is also a description of the protocol, cryptography, & key exchange, in addition to the technical whitepaper, which provides the most detail.

About The Project

Work in Progress

WireGuard is not yet complete. You should not rely on this code. It has not undergone proper degrees of security auditing and the protocol is still subject to change. We're working toward a stable 1.0 release, but that time has not yet come. There are experimental snapshots tagged with "0.0.YYYYMMDD", but these should not be considered real releases and they may contain security vulnerabilities (which would not be eligible for CVEs, since this is pre-release snapshot software). If you are packaging WireGuard, you must keep up to date with the snapshots.
However, if you're interested in helping out, we could really use your help and we readily welcome any form of feedback and review. There's currently quite a bit of work to do on the project roadmap.
from https://www.wireguard.com/
https://www.wireguard.com/papers/wireguard.pdf
--------

https://wiki.archlinux.org/index.php/WireGuard
https://lwn.net/Articles/693015/
https://blog.lilydjwg.me/2017/10/10/wireguard.210886.html 

https://www.digitalocean.com/community/tutorials/how-to-create-a-point-to-point-vpn-with-wireguard-on-ubuntu-16-04

https://steemit.com/cn/@curl/ubuntu-vpn-wireguard
(此文里的“在客户端,添加虚拟网卡 wg0 并设置 IP 和路由”部分可以忽略,完全无需一条一条命令的去手工运行

https://www.jianshu.com/p/68fb0185ab2b
https://www.xda-developers.com/wireguard-vpn-project-support-android-roms/
https://forum.xda-developers.com/android/development/wireguard-rom-integration-t3711635
------------

服务器端的安装(在debian vps上.注意:linux vps的内核必须是3.2或更高版本。这样,在openvz vps上,就无法安装wireguard,因为openvz vps的内核为2.6.3版,且用户无权限自行升级内核。
echo "deb http://deb.debian.org/debian/ unstable main" > /etc/apt/sources.list.d/unstable-wireguard.list
apt-get update -y
apt-get install wireguard-dkms wireguard-tools -y
会显示:
...
Setting up wireguard-tools (0.0.20180118-1) ...
Setting up wireguard (0.0.20180118-1) ...
Processing triggers for libc-bin (2.23-0ubuntu3) ...
root@RegalMusty-VM:~# which wg
/usr/bin/wg
root@RegalMusty-VM:~# which wg-quick
/usr/bin/wg-quick
root@RegalMusty-VM:~#

(说明安装成功)

 
在mac上,则运行:brew install wireguard-tools
会显示:
==> Downloading https://homebrew.bintray.com/bottles/wireguard-tools-0.0.2017122
######################################################################## 100.0%
==> Pouring wireguard-tools-0.0.20171221.sierra.bottle.tar.gz
==> Caveats
Bash completion has been installed to:
  /usr/local/etc/bash_completion.d
==> Summary
🍺  /usr/local/Cellar/wireguard-tools/0.0.20171221: 7 files, 99.2KB
yudeMacBook-Air:~ brite$ cd /usr/local/Cellar/wireguard-tools
yudeMacBook-Air:wireguard-tools brite$ ls
0.0.20171221
yudeMacBook-Air:wireguard-tools brite$ cd 0.0.20171221
yudeMacBook-Air:0.0.20171221 brite$ ls
COPYING   README.md  etc
INSTALL_RECEIPT.json bin   share
yudeMacBook-Air:0.0.20171221 brite$ ls bin
wg
yudeMacBook-Air:0.0.20171221 brite$ which wg
/usr/local/bin/wg
yudeMacBook-Air:0.0.20171221 brite$
(说明在mac上,安装wireguard成功)
 
参考https://www.wireguard.com/install/
参考https://github.com/aturl/awesome-anti-gfw/blob/master/WireGuard_VPN_Tunnel.md

相关帖子:https://briteming.blogspot.com/2018/11/macwireguard.html 
(正式搞定在mac上,用wireguard翻墙)
-----------
 

WireGuard搭建与配置

安装

请直接参考https://www.wireguard.com/install/
这里为了避免大家跑一趟,如果你也用的是Debian8系统,那就看下面的操作。
# echo "deb http://deb.debian.org/debian/ unstable main" > /etc/apt/sources.list.d/unstable-wireguard.list
# printf 'Package: *\nPin: release a=unstable\nPin-Priority: 150\n' > /etc/apt/preferences.d/limit-unstable
# apt update
# apt install wireguard-dkms wireguard-tools
(注意:前面的#不要带进去 这里只是让你好辨别命令行)

生成KEY

wg genkey | tee privatekey | wg pubkey > publickey

查看私钥

cat privatekey 

查看公钥

cat publickey

服务端配置文件

vi /etc/wireguard/wg0.conf
[Interface]
    Address = 207.246.95.191/24 #你的服务器IP/24
    PostUp = iptables -A FORWARD -i wg0 -j ACCEPT; iptables -t nat -A POSTROUTING -o eth0 -j MASQUERADE
    PostDown = iptables -D FORWARD -i wg0 -j ACCEPT; iptables -t nat -D POSTROUTING -o eth0 -j MASQUERADE
    ListenPort = 51820 #设置端口
    PrivateKey = 服务器私钥

    [Peer]
    PublicKey = 客户端公钥
    AllowedIPs = 10.0.0.1/24 #这个暂不需修改(这步我也没琢磨透,后续会更新上)

启动

wg-quick up wg0

使用

安卓

由于博主没有安卓手机,所以在此无法贴出教程。
只能贴下链接
WireGuard  Google商店的东西,请自备梯子与账号.

苹果

由于软件还在内测,还没有上架,只能耐心等待了.

from https://www.aihoom.com/1293.html
-------------

在 Ubuntu vps部署 VPN 隧道 WireGuard


关于 WireGuard

WireGuard 是简单、快速、高效并且安全的开源 VPN 软件,它采用先进的加密协议,基于 Linux 内核实现。
WireGuard 项目官方网站 https://www.wireguard.com/
WireGuard 源代码由开发者自我托管,代码仓库 https://git.zx2c4.com/WireGuard/
WireGuard 源代码在 GitHub 的镜像仓库 https://github.com/WireGuard

在服务器端部署 WireGuard

WireGuard 跨平台,参照官方给出的快速安装指南 https://www.wireguard.com/install/

服务器环境以 Ubuntu 系统为例

生成公钥、私钥、共享密钥

sudo mkdir -p /etc/wireguard && sudo chmod 0777 /etc/wireguard && cd /etc/wireguard
umask 077
wg genkey | tee privatekey | wg pubkey > publickey | wg genpsk > presharedkey
打印输出私钥
cat privatekey
+Cr59JzbCKz9rESqimHGi5C2QfIRYZ5xVMssiTAEqV4=
打印输出公钥
cat publickey
bco6xIgfp++iFBj6vmDr27tAXfgYsppn/wyUJRcFgUc=
打印输出共享密钥(可以不生成,配置文件中不是必须的)
cat presharedkey
Vv0MdBNolqbnsBPQPf0ttJecOw2QC8QqWBVieNtvoIo=

编辑并保存 wg0 配置文件 wg0.conf

sudo vi wg0.conf

wg0.conf 配置文件内容如下:

[Interface]
ListenPort = 1194
PrivateKey = +Cr59JzbCKz9rESqimHGi5C2QfIRYZ5xVMssiTAEqV4=

[Peer]
PublicKey = 1lq23n/oNwYosnf0xMadtrIcC+droND9fg/wiS0aEhw=
AllowedIPs = 10.100.0.1/24

设置服务器的 NAT 流量转发

sudo vi /etc/sysctl.conf

找到这一行 #net.ipv4.ip_forward = 1 去掉注释符 “#”

net.ipv4.ip_forward = 1

执行 sysctl 并生效

sudo sysctl -p

在服务器端添加虚拟网卡 wg0,设置隧道 IP 和 iptables 规则:

sudo ip link add dev wg0 type wireguard
sudo ip address add dev wg0 10.100.0.1/24
sudo ip link set wg0 up
sudo wg setconf wg0 /etc/wireguard/wg0.conf
sudo iptables -A FORWARD -i wg0 -j ACCEPT
sudo iptables -A FORWARD -o wg0 -j ACCEPT
sudo iptables -t nat -A POSTROUTING -o wg0 -j MASQUERADE
sudo iptables -t nat -A POSTROUTING -o ens4 -j MASQUERADE
检查 wg 设置是否正常
sudo wg show

正常情况应该输出以下内容:

interface: wg0
  public key: 1lq23n/oNwYosnf0xMadtrIcC+droND9fg/wiS0aEhw=
  private key: (hidden)
  listening port: 1194

peer: 8+9jGlxuwyGUWtUk8/NZMAl1Ax577KAvnXJY0EeuNkQ=
  endpoint: 12.34.56.78:61353
  allowed ips: 10.100.0.0/24
  latest handshake: 0 days, 8 minutes, 19 seconds ago
  transfer: 0.60 GiB received, 0.93 GiB sent
服务器端设置完成。

设置客户端

客户端系统 Ubuntu/Debian/ArchLinux 参照官方给出的快速安装指南 https://www.wireguard.com/install/

sudo mkdir -p /etc/wireguard && sudo chmod 077 /etc/wireguard && cd /etc/wireguard
umask 077
wg genkey | tee privatekey | wg pubkey > publickey
打印输出私钥
cat privatekey
SHBjWA3uAYAZc+TUvr6PcTA5SVQnt+aSVkdlZhlg1Hk=
打印输出公钥
cat publickey
8+9jGlxuwyGUWtUk8/NZMAl1Ax577KAvnXJY0EeuNkQ=

编辑并保存 wg0 配置文件 wg0.conf

sudo nano wg0.conf

wg0.conf 配置文件内容如下:

[Interface]
ListenPort = 1194
PrivateKey = SHBjWA3uAYAZc+TUvr6PcTA5SVQnt+aSVkdlZhlg1Hk=

[Peer]
PublicKey = bco6xIgfp++iFBj6vmDr27tAXfgYsppn/wyUJRcFgUc=
AllowedIPs = 0.0.0.0/0
Endpoint = 12.34.56.78:1194
PersistentKeepalive = 25

在本地客户机器上:

在客户端,添加虚拟网卡 wg0 并设置 IP 和路由

以下命令不适合mac机器)
sudo ip link add dev wg0 type wireguard
sudo ip address add dev wg0 10.100.0.101/24
sudo ip link set wg0 up
sudo wg setconf wg0 /etc/wireguard/wg0.conf
sudo ip route add 12.34.56.78 via 192.168.1.1
sudo ip route del default
sudo ip route add default dev wg0

sudo route add vps-public-ip router-ip
sudo route delete default
sudo route add default vps-internal-ip

客户端设置完成,Ping 测试 VPN 隧道

ping 10.100.0.1

ping 输出如下

PING 10.100.0.1 (10.100.0.1) 56(84) bytes of data.
64 bytes from 10.100.0.1: icmp_seq=1 ttl=44 time=103.50 ms
64 bytes from 10.100.0.1: icmp_seq=2 ttl=44 time=103.50 ms
64 bytes from 10.100.0.1: icmp_seq=3 ttl=44 time=103.50 ms
64 bytes from 10.100.0.1: icmp_seq=4 ttl=44 time=103.50 ms
64 bytes from 10.100.0.1: icmp_seq=5 ttl=44 time=103.50 ms
64 bytes from 10.100.0.1: icmp_seq=6 ttl=44 time=103.50 ms
64 bytes from 10.100.0.1: icmp_seq=7 ttl=44 time=103.50 ms
64 bytes from 10.100.0.1: icmp_seq=8 ttl=44 time=103.50 ms
^C
--- 10.100.0.1 ping statistics ---
8 packets transmitted, 8 received, 0% packet loss, time 828ms
rtt min/avg/max/mdev = 103.50/103.50/103.50/0.00 ms
说明 VPN 隧道已通
用 curl 命令测试隧道的流量转发状态
curl ifconfig.me
显示 IP 为服务器的公网 IP
12.34.56.78
curl 获取到了服务器的公网 IP,流量转发成功

Disable WireGuard,禁用 WireGuard

删除添加的虚拟网卡、IP 和路由,或者重启系统,将恢复默认设置

服务器端

sudo ip link del dev wg0

本地客户端

sudo ip link del dev wg0

其他

WireGuard 设计原理和使用方法参考 https://www.wireguard.com/
WireGuard 支持各种 Linux 发行版,目前 Windows 和 macOS 客户端(Go 实现)以及 Android 应用都在开发中。
WireGuard 在数字权利遭受强权政府日益侵害的国家,能有效捍卫网络用户的数字权利。
WireGuard 在中国、俄罗斯、伊朗等网络审查严重的国家,能有效突破网络封锁,突破 GFW 封锁,加密访问被封锁的网站,自由使用互联网.

from https://steemit.com/cn/@curl/ubuntu-vpn-wireguard
----------

WireGuard介绍及客户端使用教程

WireGuard是Jason A. Donenfeld开发的开源VPN协议。目前已经支持Linux, macOS, Android, iOS以及OpenWrt平台。WireGuard被视为下一代VPN协议,用来替代OpenVPN,IPSec等VPN协议。官方网站https://www.wireguard.com/ . MullvadAzireVPN这两家商业VPN已经部署应用了这个协议。经过我一段时间使用觉得很稳定,可以日常使用
WireGuard协议作为Linux内核模块运行,所以效率极高。使用了最先进的加密技术(利用Curve25519进行密钥交换,ChaCha20和Poly1305用于数据认证,BLAKE2用于散列),安全性毋庸置疑。WireGuard是为嵌入式设备开发的,支持IP地址漫游,也就是网络断开再连,对它不会有影响。WireGuard使用UDP协议传输数据,在不使用的情况下默认不会传输任何 UDP 数据包,所以比常规VPN省电很多,可以像SS一样一直挂着使用。WireGuard协议的速度瞬秒其它VPN协议,官方测试结果.

WireGuard Android官方版客户端使用教程


WireGuard Android

  1. 安装WireGuard Android客户端,Play下载地址:https://play.google.com/store/apps/details?id=com.wireguard.android
  2. 导入配置文件:把下载的配置文件传到手机里,手机上打开WireGuard客户端,点右下角加号,选择第一个Create from file or archive,点选传到手机里的配置文件。这时直接点选某个配置文件即可连接VPN
  3. WireGuard官方客户端可以允许部分应用绕过VPN,打开WireGuard,点击一个节点配置,在右上角点击铅笔按钮,在中间有蓝色的0 EXCLUDED APPLICATIONS,点击后进入APP排除设置,勾选某个APP就是让这个APP不走VPN通道。选择完成后点右下角蓝色SET EXCLUSIONGS,然后点配置界面右上角的保存按钮即可。缺点:不支持排除系统应用
  4. WireGuard Android客户端支持快捷设置面板功能。即在下拉通知栏中可以添加WireGuard快捷设置图标,方便一键开启VPN.
TunSafe发布的Android客户端,下载地址:https://play.google.com/store/apps/details?id=com.tunsafe.app,客户端内置了TunSafe提供的5个免费服务器,使用方法与WireGuard官方版一致。但TunSafe客户端提供了Kill Switch以及排除系统应用的功能。

TunSafe iOS客户端

TunSafe发布了第一款iOS上的WireGuard协议客户端,目前处于测试状态,下载地址:https://testflight.apple.com/join/9gbYAJLB
TunSafe同时提供了5个免费的公用服务器,目前速度还不错.打开TunSafe VPN配置下载页面 https://tunsafe.com/vpn,点击First Server下拉选单选择想要连接的服务器,然后点击Generate and Download下载配置文件,导入到TunSafe客户端即可.

TunSafe Windows PC客户端使用教程

目前官方尚未释出Windows客户端,但是大神Ludvig Strigeus(µTorrent作者,Spotify主要开发者)发布了第一款可在Windows PC上使用的WireGuard协议客户端TunSafe,支持Windows 7及后续版本.
TunSafe V1.4 rc1
TunSafe选项
  1. 下载安装TunSafe WireGuard客户端,地址 https://tunsafe.com/download。因为目前测试版迭代比较快,功能也更多,使用还算稳定,推荐下载RC版
  2. 导入WireGuard配置。打开TunSafe,选择Options,选择Import File…导入单个配置,或者可以拖动单个配置文件到TunSafe窗口完成导入。如果想一次性导入多个文件,可以在Options里选择Browse In Explorer,就会打开C:\Program Files\TunSafe\Config这个文件夹,然后将配置文件一起复制到这个文件夹即可
  3. 点击客户端的Connect即可连接VPN。Edit Config可以编辑配置文件,文末副有配置文件编辑说明
  4. 你也可以将多个节点配置放到一个文件夹中,再将这个文件夹放入C:\Program Files\TunSafe\Config,TunSafe这时会将子文件夹列为二级菜单显示,如下图
submenus
WireGuard配置文件由VPN供应商提供,或者自建服务器。TunSafe同时提供了5个免费的公用服务器,目前速度还不错,分别是Amsterdam / Netherlands(荷兰阿姆斯特丹),Bucharest / Romania(罗马尼亚布加勒斯特), New-York / US(美国纽约),Stockholm / Sweden(瑞典斯德哥尔摩),Düsseldorf / Germany(德国杜塞尔多夫)。
使用方法:打开TunSafe VPN配置下载页面 https://tunsafe.com/vpn,点击First Server下拉选单选择想要连接的服务器,然后点击Generate and Download下载配置文件,导入到TunSafe PC客户端即可

TunSafe配置文件说明

这里一般不需要更改
#客户端
[Interface]
# 本机的密钥
PrivateKey = gIIBl0OHb3wZjYGqZtgzRml3wec0e5vqXtSvCTfa42w=
# 设置UDP监听端口可以让其他客户端向本机发起连接
# ListenPort = 51820
# VPN连接成功后使用的DNS服务器
# DNS = 8.8.8.8
# 拦截所有DNS请求并强制所有DNS都通过VPN
# BlockDNS = true
# 虚拟网络设备的内网IP地址
Address = 192.168.2.2/24
# 流量拦截功能,是否拦截所有未通过tunsafe的网络请求:
#  route - 使用黑洞路由阻止所有流量(直接丢弃数据包)
#  firewall - 通过Windows防火墙阻止除tunsafe外的所有流量
#  on - 使用默认拦截机制
#  off - 关闭流量拦截
# BlockInternet = route, firewall
# MTU
# MTU = 1420
#服务器配置
[Peer]
# 服务器公钥
PublicKey = hIA3ikjlSOAo0qqrI+rXaS3ZH04Yx7Q2YQ4m2Syz+XE=
# 预共享密钥
PresharedKey  =  SNz4BYc61amtDhzxNCxgYgdV9rPU+WiC8woX47Xf/2Y=
# 需要转发流量的IP范围,如果你要把流量全部转发到服务器就填0.0.0.0/0
AllowedIPs = 192.168.2.0/24
# 服务器IP
Endpoint = 192.168.1.4:8040
# 保持连接参数
PersistentKeepalive = 25
# 当服务器作为默认网关时,是否通过隧道转发多播和广播数据包
# AllowMulticast = false

自建服务器

如果要自建WireGuard服务器,可以参考WireGuard官网上的搭建指南。和我一样的小白,也可以观看罗在草木间在YouTube提供的Google Cloud 一键搭建WireGuard教程,简单易懂,跟着做就可以借助Google Cloud提供的试用免费使用一年WireGuard。如果要配置多个用户,可以参考atrandys的WireGuard多用户配置教程视频。他们都在视频说明里提供了Telegram讨论群,更多问题也可以进群详询
Reference:

  1. https://en.wikipedia.org/wiki/WireGuard
  2. https://www.wireguard.com/
  3. https://www.azirevpn.com/wireguard
  4. https://tunsafe.com/
  5. https://sskaje.me/2017/06/wireguard-wg-quick-postup的高级玩法/
from https://medium.com/@xtarin/wireguard%E4%BB%8B%E7%BB%8D%E5%8F%8A%E5%AE%A2%E6%88%B7%E7%AB%AF%E4%BD%BF%E7%94%A8%E6%95%99%E7%A8%8B-2ae1eb4bf670
--------------

wireguard一键安装配置教程

  2017年,新一代VPN技术wireguard诞生。从评测效果来看,wireguard基于linux kernel内核运行,效率极高,速度很快,而且支持设备IP地址漫游功能,不仅适合海外vps服务器与电脑手机设备的VPN连接,还适合管理嵌入式系统,包括家中的智能路由器,配合LEDE openwrt等开源路由器系统,可安装wireguard脚本,实现路由器绑定wireguard代理功能。

截止目前,wireguard仅限于Linux系统之间连接,也就是说,你的vps服务器安装ubuntu/debian/centos系统,你的电脑使用ubuntu操作系统,彼此互连是完全没有问题的。在Mac、iOS\Windows平台的移植仍在部署中,这也是wireguard尚未大规模普及,替代ss的原因。


wireguard运行起来十分安静。原理和ss有几分相似。服务器和客户端都安装一样的wireguard软件,两者地位是平等的。然后在配置文件中添加彼此的private key和public key,以及udp监听的端口、服务器地址。从原理上讲,谁先主动发起传输请求,谁就是服务器端,没有多少区别。wireguard还支持presharedpsk,预共享密钥,抵御未来的量子计算机攻击。

wireguard代码非常小,只有几千行,功能简单运行效率高,开源审计方便,易于部署,大受欢迎。实测使用wireguard观看youtube视频,和ss没有多少速度差距。

wireguard安装教程

Ubuntu版本:


$ sudo add-apt-repository ppa:wireguard/wireguard

$ sudo apt-get update


$ sudo apt-get install wireguard-dkms wireguard-tools


Debian版本:

# echo “deb http://deb.debian.org/debian/ unstable main” > /etc/apt/sources.list.d/unstable-wireguard.list


# printf ‘Package: *\nPin: release a=unstable\nPin-Priority: 150\n’ > /etc/apt/preferences.d/limit-unstable

# apt update


# apt install wireguard-dkms wireguard-tools

CentOS版本:

$ sudo curl -Lo /etc/yum.repos.d/wireguard.repo https://copr.fedorainfracloud.org/coprs/jdoss/wireguard/repo/epel-7/jdoss-wireguard-epel-7.repo

$ sudo yum install epel-release


$ sudo yum install wireguard-dkms wireguard-tools

LEDE/OpenWRT路由器版本:

# opkg install wireguard

(module & tools: https://git.openwrt.org/?p=openwrt/openwrt.git;a=blob;f=package/network/services/wireguard/Makefile)


Mac OS版本:

$ brew install wireguard-tools


wireguard官方提供的demo server:
$ sudo contrib/examples/ncat-client-server/client.sh

建议使用一台海外vps服务器,安装ubuntu 16.04或者17.10系统,配置wireguard效果好


$ sudo contrib/examples/ncat-client-server/client.sh default-route

$ curl zx2c4.com/ip


163.172.161.0

demo.wireguard.com

curl/7.49.1

from:https://www.jianshu.com/p/68fb0185ab2b 

-----------

WireGuard wg-quick PostUp的高级玩法

真的很高级。

wg-quick是WireGuard用来启动网络设备的**脚本**。

注意了,迄今为止,wg-quick是用bash写的一个脚本,不知道未来会不会变,至少目前shebang是
!#/bin/bash

回到正题。
我在服务器端配的WireGuard配置文件是 /etc/wireguard/wg0.conf,内容大致如下:
[Interface]
Address = 192.168.10.1/24
MTU = 1500
ListenPort = 12345
PrivateKey = xxxx

[Peer]
PublicKey = xxxx
AllowedIPs = 192.168.10.40/32, 192.168.1.0/24

   
大致解释一下:
[Interface] 这里定义的是虚拟网络设备的配置。
Address 是网络设备的地址,IP地址。
MTU 默认MTU是1420。改MTU的原因最后边会解释的。
ListenPort 监听的UDP端口。
PrivateKey 私钥,用 wg genkey > private.key 生成的文件内容。

[Peer] 对端的地址,如果这里是C,对面就是S,如果这里是S,对面就是C。至于谁是C谁是S,鉴于是UDP,那姑且认为先发请求的是C。
PublicKey 对端PrivateKey对应的私钥,用 wg pubkey < private.key 生成。
AllowedIPs 这里解释一下,不管上边谁是C谁是S,想像一下传统的VPN需求,如果你要把流量全量转发到设备里,那直接配 0.0.0.0/0,而此时对端的设备就是S了,那对端的配置,把你的Interface.Address 和你本地的网段填入,不过后边这个理论上不是必须。
Endpoint 上边的例子里没有,但是,作为C要连到S,那就需要告诉C连到哪个IP:PORT,至于S会自动生成对应C的Endpoint。

蛋疼的需求来了。
我希望我服务器的端口是不固定的。或者换句话说,我希望我服务器上WireGuard监听的端口是不固定的。
那我就在我VPS上的wg0.conf里,注释掉 ListenPort,同时 Peer里加上 Endpoint = 我家路由IP:端口。
完了。服务器端用 wg-quick down wg0; wg-quick up wg0 重启wireguard后,家里的网络连不上VPS了,因为作为现实的C,我的VPS没有主动连接我家路由,以更新我家路由上这个设备记录的上次连接对端的IP/端口。

好在,wg-quick支持在配置文件里使用 PreUp, PreDown, PostUp, PostDown。
那我需要做的,就是用 PostUp 在VPS上的WireGuard重启后,主动请求一下我家路由这端的网络,但是不用care请求是否有效。
于是我试了 ping -c,但是,如果有任意一个Peer连不上,wg-quick就会退出,并关闭wg0。
我试过 ping -c 1 ip1; ping -c 1 ip2; ping -c 1 127.0.0.1,不行,超时。我也试过 ping -c 1 -w 1,依旧退出。

然后我就发现了这个问答-https://stackoverflow.com/questions/9696129/how-to-send-only-one-udp-packet-with-netcat, 进而知道了这篇文章:
http://nerotux.tuxfamily.org/articles.php?article_id=72

于是现在的配置文件变成了
[Interface]
Address = 192.168.10.1/24
MTU = 1500
PrivateKey = xxx
PostUp = echo -n "hello" > /dev/udp/192.168.1.1/80; echo -n "hello" > /dev/udp/192.168.2.1/80

[Peer]
PublicKey = xxx
AllowedIPs = 192.168.10.40/32, 192.168.1.0/24
Endpoint = peer1:12345

[Peer]
PublicKey = xxx
AllowedIPs = 192.168.10.50/32, 192.168.2.0/24
Endpoint = peer2:12345


再回到 MTU 的问题。
问题出现在,我在EdgeRoute Lite上配好wireguard之后,发现,cn.engadget.com 加载的资源打不开了,直接请求超时;community.ubnt.com 打不开了,请求超时。
在我路由和VPS上同时抓包:
路由上: [TCP Window Update], [TCP Previous segment not captured], [TCP Dup ACK 3#1], [TCP Dup ACK 3#2] …
VPS上: Destination unreachable (Fragmentation needed), [TCP Retransmission], [TCP Dup ACK 3#1], [TCP Retransmission]… [TCP Dup ACK 3#2], [TCP Retransmission]…

这个问题我之前遇到过,当时应该用的还是pptp,从路由连到我的VPS。community.ubnt.com下的某些资源域名怎么都打不开,电脑上连接超时,但是VPS上正常,ping也能通。

搜了搜,有这篇文章:Why Can’t I Browse the Internet when Using a GRE Tunnel?-
http://www.cisco.com/c/en/us/support/docs/ip/generic-routing-encapsulation-gre/13725-56.html

文章里给了几个解决方案:调低客户端设备MTU以减小MSS;加代理;加大隧道两端设备的MTU,把协议保的‘overhead’加上去。
当然,作为思科,还提供了一个解决方案是在他家路由上‘clear-df’,这个选项在EdgeRouter没看到。

所以WireGuard可能的‘overhead’有多大呢?继续搜:https://www.mail-archive.com/wireguard@lists.zx2c4.com/msg00029.html,这篇里WireGuard作者提到:
- 20 byte IPv4 header or 40 byte IPv6 header
- 8 byte UDP header
- 1 byte type
- 4 byte key index
- 8 byte nonce
- N byte encrypted data
- 16 byte poly1305 authentication tag
   
于是我就保守地在我VPS端的wg0上,直接使用 ‘ip link set wg0 mtu 1557’,结果都能访问了。
至于路由端,保守起见,我就没有改mtu了。

如果要走这个tunnel上ipv6,那安全的做法估计得是 1500 + 40 + 8 + 1 + 4 + 8 + 16 = 1577了?
但是,本身我VPS eth0的mtu是1500,所以1557,1577,也只是没有意义的数字而已。
于是我尝试把mtu直接改成1500,cn.engadget.com页面上所有o.aolcdn.com的资源加载都正常,一个都不超时,community.ubnt.com也正常载入。

然后调mtu,做个表格
MTU                  Ubnt Community                        Engadget CDN资源
1500                 打开                                               正常

1420                 超时,打不开                                资源加载超时

1499                 打开,ubnt.i.lithium.com资源     资源加载超时
                         加载超时

到1499就不用测了。

 from https://sskaje.me/2017/06/wireguard-wg-quick-postup%e7%9a%84%e9%ab%98%e7%ba%a7%e7%8e%a9%e6%b3%95/

-----------------

Ubuntu vps部署WireGuard

安装WireGuard

按照官方说明,可以使用下列命令装依赖,不够的自己看着装
apt-get install libmnl-dev linux-headers-$(uname -r) build-essential pkg-config

直接从git里拉。
git clone https://git.zx2c4.com/WireGuard

直接make就行
cd WireGuard/src
make
make install


配置

参考前一篇文章“WireGuard wg-quick PostUp的高级玩法”,可以直接无视官方和其他各种第三方给的教程。

前文给了一个参考的配置。
[Interface]
Address = 192.168.10.1/24
MTU = 1500
PrivateKey = xxx
PostUp = echo -n "hello" > /dev/udp/192.168.1.1/80; echo -n "hello" > /dev/udp/192.168.2.1/80

[Peer]
PublicKey = xxx
AllowedIPs = 192.168.10.40/32, 192.168.1.0/24
Endpoint = 2.2.2.2:12345

[Peer]
PublicKey = xxx
AllowedIPs = 192.168.10.50/32, 192.168.2.0/24
Endpoint = 3.3.3.3:12345


按上述配置,假定的网络环境如下:
服务器:IP 1.1.1.1,WireGuard内网 IP 192.168.10.1,公网环境
节点1: IP 2.2.2.2,WireGuard内网 IP 192.168.10.40,LAN IP 192.168.1.0/24
节点2: IP 3.3.3.3,WireGuard内网 IP 192.168.10.50,LAN IP 192.168.2.0/24

此处,服务器、节点1、节点2均有公网IP。

如果节点IP不固定,或者是没有公网IP,那就改为如下配置

[Interface]
Address = 192.168.10.1/24
MTU = 1500
PrivateKey = xxx
ListenPort = 54321

[Peer]
PublicKey = xxx
AllowedIPs = 192.168.10.40/32, 192.168.1.0/24

[Peer]
PublicKey = xxx
AllowedIPs = 192.168.10.50/32, 192.168.2.0/24

VPS上,将配置文件保存为 /etc/wireguard/wg0.conf,执行下列命令,启用Wireguard:
wg-quick up wg0

为了让网络正常工作,还需要在VPS的公网接口上启用NAT:
iptables -F FORWARD
iptables -A FORWARD -j ACCEPT
iptables -A POSTROUTING -t nat -o eth0 -j MASQUERADE

修改 /etc/sysctl.conf,启用net.ipv4.ip_forward=1,然后执行sysctl -p

from https://sskaje.me/2017/06/deploy-wireguard-on-ubuntu/

----------

在EdgeRouter上,部署 WireGuard


从 https://github.com/Lochnair/vyatta-wireguard/releases 下载对应的包。
ERL, ER等 mips架构的,下载 octeon 版本。
ERX 下载 ralink版本。

可以选择上传到路由上,或者ssh登录路由,sudo su到root,执行类似如下的命令
curl https://github.com/Lochnair/vyatta-wireguard/releases/download/0.0.20170612-2/wireguard-octeon-0.0.20170612-2.deb -o wireguard-octeon-0.0.20170612-2.deb


curl https://github.com/Lochnair/vyatta-wireguard/releases/download/0.0.20170612-2/wireguard-ralink-0.0.20170612-2.deb -o wireguard-ralink-0.0.20170612-2.deb

下载完成后,
dpkg -i xxx.deb

配置

执行下列命令生成私钥、共享密钥,公钥:
wg genkey > /config/auth/wg.private
wg genpsk > /config/auth/wg.psk
chmod 0600 /config/auth/wg.*
wg pubkey < /config/auth/wg.private

将最后一个命令的输出复制下来,配置到服务器端

获取服务器端的公钥,替换下文的“公钥”并执行命令
configure
set interfaces wireguard wg0 address 192.168.10.40/24
set interfaces wireguard wg0 listen-port 本地端口
set interfaces wireguard wg0 peer 公钥 allowed-ips 0.0.0.0/0
set interfaces wireguard wg0 peer 公钥 endpoint '服务器IP:端口'
set interfaces wireguard wg0 peer 公钥 preshared-key /config/auth/wg-eos.psk
set interfaces wireguard wg0 private-key /config/auth/wg.private
set interfaces wireguard wg0 route-allowed-ips false
commit
save

配置好设备后,配置nat服务
configure
set service nat rule 5032 outbound-interface wg0
set service nat rule 5032 type masquerade
commit
save

剩下就是配置路由规则了.

from https://sskaje.me/2017/06/deploy-wireguard-on-edgerouter/

---------- --------
参与 Android GUI for WireGuard (VPN) 测试计划的提交地址:

,或者给开发者发邮件申请(有心的话就能联系到)

最早能用上 Android GUI for WireGuard (VPN) 可能是 Sultanxda 版的 LineageOS 14.1,Sultanxda ROM 对一加手机支持很好。会编译 ROM 的也可以自己搞。

----------

第三方提供的wireguard vpn client for osx:

https://tunsafe.com/downloads/tunsafe_osx.zip

from https://tunsafe.com/osx

https://tunsafe.com/support

讨论:https://news.ycombinator.com/item?id=16560006 

----------

wireguard使用指南

安装

Installation - WireGuard
note ubuntu ppa 中的 wireguard v0.0.20170105 软件包存在 bug 请不要安装,建议自行编译安装这个版本
编译安装的时候建议使用 checkinstall 工具,以及记得 modprobe wireguard

两点互联简易配置

配置方法 1. 两端均有公网 IP
# 在机器A 上
ip link add dev wg0 type wireguard
umask 077
wg genkey > privateA
wg pubkey < privateA > publicA
cat publicA
wg set wg0 listen-port 51920 private-key ~/privateA peer <PEER_PUBLIC_KEY publicB> allowed-ips 192.168.2.0/24 endpoint <OTHER_SERVER_IP IP_B>:51920
ip link set up dev wg0
ip addr add 192.168.2.1/24 dev wg0

# 在机器B 上
ip link add dev wg0 type wireguard
umask 077
wg genkey > privateB
wg pubkey < privateB > publicB
cat publicB
wg set wg0 listen-port 51920 private-key ~/privateB peer <PEER_PUBLIC_KEY publicA> allowed-ips 192.168.2.0/24 endpoint <OTHER_SERVER_IP IP_A>:51920
ip link set up dev wg0
ip addr add 192.168.2.2/24 dev wg0
配置方法 2. 一端有一端无
# 在机器A(有公网IP) 上
ip link add dev wg0 type wireguard
umask 077
wg genkey > privateA
wg pubkey < privateA > publicA
cat publicA
wg set wg0 listen-port 51920 private-key ~/privateA peer <PEER_PUBLIC_KEY publicB> allowed-ips 192.168.2.0/24 
ip link set up dev wg0
ip addr add 192.168.2.1/24 dev wg0

# 在机器B(无公网IP) 上
ip link add dev wg0 type wireguard
umask 077
wg genkey > privateB
wg pubkey < privateB > publicB
cat publicB
wg set wg0 listen-port 51920 private-key ~/privateB peer <PEER_PUBLIC_KEY publicA> allowed-ips 192.168.2.0/24 endpoint <OTHER_SERVER_IP IP_A>:51920
ip link set up dev wg0
ip addr add 192.168.2.2/24 dev wg0
tips其实方法一二分开写完完全是凑字数=.=,区别就在于机器A配置的时候少些 endpoint :51920 这一点

开机自启

#!/bin/bash
cd /root
source /etc/profile
ip link add wg0 type wireguard
ip link set wg0 up
ip addr add dev wg0 10.1.2.3/24
wg set wg0 private-key  privateA peer icaB5UTzeOykCAx80HgbMLOnFhu6btRf4EQdKXUUimc= endpoint 192.227.213.182:51820 allowed-ips 0.0.0.0/0
ip route add 10.1.1.3 via 10.1.2.1

# 然后将脚本置于某一目录,然后在 /etc/network/interfaces 中公网网卡的条目下增加 post-up 即可

注意

  • 需要注意的是 allowed-ips 的段是专属的,比如 peerA 为中央节点,peerB 、peerC 分别与 peerA 链接,如果 peerA 和 peerB 之间使用了 10.0.1.0/24 那么 peerA 和 peerC 之间就不能再使用 10.0.1.0/24 了,如果强行使用,会导致 peerA 和 peerB 之间的 allowed-ips 被设置为 None 此时若需要连同 PeerB 与 PeerC 之间的网络可以使用静态路由。
  • ----------------
  •  
  • 在 Arch, Devuan, LEDE 上使用 WireGuard

    由于我的实验室内网只能访问国内地址,同时我还有安全上网的需求,因此我在社团服务器上部署了 VPN 用于在实验室内网访问国外网站,同时在我的 VPS 上也部署了 VPN 用于安全上网。
    此前我用的是 OpenVPN. 但是它配置麻烦,用 easy-rsa 生成密钥的操作也十分繁琐。此外,OpenVPN 已经被安全研究人员进行了流量分析研究,因此用 OpenVPN 进行安全上网还很容易被切断连接。此前我还试用过 tinc,配置简单一些,但是却有一些奇怪的问题让我没法用它安全上网,最后就没再使用。
    WireGuard 是 2017 年兴起的一个 VPN 软件,它在 Linux 内核的基础上构建,直接使用 Linux 内核中的网络功能,可以用 iproute2 等工具对 VPN 的网络接口进行操作。它使用 Curve25519, ChaCha20-Poly1305, BLAKE2 等先进而高效的密码学算法,安全性好,CPU 要求低。此外,它也提供预共享密钥的设置以抵抗量子计算机的攻击。
    WireGuard 提供 wg(8) 工具以配置 WireGuard 网络接口,此外还提供了 wg-quick(8) 脚本来实现设置 IP 地址,设置路由表等功能。
    以下是我在不同系统下配置 WireGuard 的方法。

    密钥生成

    要使用 WireGuard,首先要知道怎样生成密钥。
    • 私钥和公钥:每个机器上都要有一个密钥对,用 wg genkey 可以直接生成一个私钥,然后用 echo <privkey> | wg pubkey 从私钥计算出公钥。在 WireGuard 的配置文件中,私钥填在 [Interface] 节的 PrivateKey 字段中,公钥填在对应端 [Peer] 节的 PublicKey 字段中。
    • 预共享密钥:预共享密钥是个可选项。用 wg genpsk 可以生成预共享密钥。预共享密钥为两端共享,要填在 [Peer] 节的 PresharedKey 字段中。

    Arch

    我的 VPS 安装的是 Arch. 在 Arch 上安装 WireGuard, 直接安装 wireguard-dkms 和 wireguard-tools 即可。VPS 只用于安全上网,只作为 WireGuard 服务端使用。
    配置文件 /etc/wireguard/wg0.conf 如下(本文中的配置文件将敏感信息全部改为 <redacted> ):
    [Interface]
    PrivateKey = <redacted>
    ListenPort = 13394
    43.1/24 [Peer] PublicKey
    Address = 192.168. 2= <redacted> PresharedKey = <redacted> AllowedIPs = 192.168.243.0/24
    这里我用 UDP 端口 13394 (WireGuard 只用 UDP),服务端 IP 地址为 192.168.243.1,接受所有来自 192.168.243.0/24 的连接。
    然后用 systemctl enable wg-quick@wg0 和 systemctl start wg-quick@wg0 设置系统启动时启动 WireGuard,之后启动 WireGuard.

    Devuan

    由于新版本 Debian 默认使用 systemd,所以我们社团的一位大佬让社团服务器改用 Devuan,最近我把 Devuan 升级到了 testing 版本 Ascii.
    Devuan Ascii 官方源没有 WireGuard,因此我下源码,按官网的教程安装,过程很简单,在这里就省略。
    由于 Devuan 不用 systemd,WireGuard 源码包没有 sysvinit 的模板,所以我就用 OpenVPN 的改了一个,然后用 update-rc.d 让它在系统启动时启动:
    #!/bin/sh -e
    ## BEGIN INIT INFO
    ## Provides: wireguard
    # Required-Start: $network $remote_fs $syslog
    # Required-Stop: $network $remote_fs $syslog
    p: network-manager # X-Start-B
    # Should-Start: network-manager # Should-St oefore: $x-display-manager gdm kdm xdm wdm ldm sdm nodm # X-Interactive: true
    d VPN service # Description:
    # Default-Start: 2 3 4 5 # Default-Stop: 0 1 6 # Short-Description: WireGua r This script will start WireGuard tunnels as specified # in /etc/wireguard/*.conf ### END INIT INFO
    . /lib/lsb/init-functions test $DEBIAN_SCRIPT_DEBUG && set -v -x WGQUICK=/usr/bin/wg-quick DESC="WireGuard vir tual private network daemon" CONFIG_DIR=/etc/wireguard test -x $WGQUICK || exit 0 test -d $CONFIG_DIR || exit 0
    nf
    case "$1" in start) log_daemon_msg "Starting $DESC" for wg in $CONFIG_DIR/*.c o do $WGQUICK up `basename $wg .conf` done ;; stop)
    $WGQUICK down `basename $wg
    log_daemon_msg "Stopping $DESC" for wg in $CONFIG_DIR/*.conf do .conf` done ;; *)
    rt|force-reload|cond-restart|soft-restart|status}" >&2 exit 1 ;; esac exit 0 #
    echo "Usage: $0 {start|stop|reload|rest
    a vim:set ai sts=2 sw=2 tw=0:
    这个机器要连接我的 VPS 做客户端用于安全上网,也要作为服务端让我用这个机器做路由上国外网站。首先是我连接 VPS 的配置文件 /etc/wireguard/wg-vps.conf:
    [Interface]
    Address = 192.168.243.2/24
    PrivateKey = <redacted>
    ted> P
    [Peer] PublicKey = <reda cresharedKey = <redacted>
    address>]:13394 AllowedIPs = 192.168.243.
    Endpoint = [<redacted IPv 60/24
    dIPs = 8.0.0.0/8, 52.0.0.0/8, 74.125.0.0/16, 173.194.0.0/16, 172.217.0.0/16 Allow
    Allow
    eedIPs = 207.0.0.0/8, 216.56.0.0/14, 104.0.0.0/8, 199.59.0.0/16
    我把这个机器的 IP 设为 192.168.243.2, AllowedIPs 里面除了 VPS 那端的 IP 外,还加入了我要连接的各个墙外网站的 IP,因为那些网站的流量也会发往 WireGuard 接口,因此要加入 AllowedIPs 的列表里面。
    这个机器也要作为 WireGuard 的服务端,和 Arch 上配置 WireGuard 服务端类似,我使用 69 端口:
    [Interface]
    Address = 192.168.189.1/24
    PrivateKey = <redacted>
    PublicKey = <re
    ListenPort = 69 [Peer] dacted>
    dIPs = 192.168.189.0/24
    PresharedKey = <redacted> Allow
    e

    LEDE

    LEDE 是一个基于 OpenWrt 的用于路由器等嵌入式设备的操作系统。要在 LEDE 中使用 WireGuard,需要安装 wireguard 和 wireguard-tools.
    LEDE的wiki中介绍了如何配置WireGuard. 我在LEDE上的 /etc/config/network 的 WireGuard 部分配置如下(此处省略了很多 allowed_ips ):
    config interface 'vpn'
    option proto 'wireguard'
    list addresses '192.168.189.2/24'
    option private_key '<redacted>'
    c_key '<redacted>'
    config wireguard_vpn option publ i option preshared_key '<redacted>'
    option endpoint_port '69' o
    option endpoint_host '<redacted>' ption persistent_keepalive '60'
    5.129.65/32' # 0.x.x.x to 95.x.x.x
    list allowed_ips '192.168.189.0/24' list allowed_ips '162.1 0 list allowed_ips '0.0.0.0/2' list allowed_ips '64.0.0.0/3' option route_allowed_ips '1'
    首先 interface 部分的写法和OpenWrt/LEDE里面其他网络接口的写法一样, proto 要设为 wireguard ,接下来是针对 peer 的配置,和 wg(8) 所读取的ini格式的配置文件类似,填上公钥、预共享密钥、 allowed_ips 等信息就行了,最后设置 route_allowed_ips 选项用于设置路由表。
-----------------------------------------------------------------------------


轻松几步搭建WireGuard


WireGuard 是一个快速安全的新型 VPN 隧道程序,它简单高效的特性特别适合在手机等低能耗设备上使用。
WireGuard 不同于 IPSec ,它的设计简单(目前整体只有几千行代码),在不使用的情况下默认不会传输任何 UDP 数据包,而且能够无缝漫游在不同的 IP 地址间,这些特定都使它特别适合于移动设备的使用。目前 WireGuard 基于 Linux 内核实现,得到了 Linux 内核主要维护者 Greg KH 的肯定。下面介绍如何在 Ubuntu 16.04 搭建使用 WireGuard 。

搭建步骤

下载安装 WireGuard (服务端和客户端都需要安装)

$ sudo add-apt-repository ppa:wireguard/wireguard$ sudo apt-get update$ sudo apt-get install wireguard

配置服务端相关参数,创建并编辑 /etc/wireguard/wg0.conf ,内容如下:

[Interface]PrivateKey = <Private Key>Address = 10.0.0.1/24ListenPort = 56660PostUp = iptables -A FORWARD -i wg0 -j ACCEPT; iptables -t nat -A POSTROUTING -o eth0 -j MASQUERADE; ip6tables -A FORWARD -i wg0 -j ACCEPT; ip6tables -t nat -A POSTROUTING -o eth0 -j MASQUERADEPostDown = iptables -D FORWARD -i wg0 -j ACCEPT; iptables -t nat -D POSTROUTING -o eth0 -j MASQUERADE; ip6tables -D FORWARD -i wg0 -j ACCEPT; ip6tables -t nat -D POSTROUTING -o eth0 -j MASQUERADESaveConfig = true
其中 PrivateKey 通过命令 wg genkey 生成。

启动服务端 WireGuard

$ wg-quick up wg0
可以通过命令 wg 检查启动是否成功,成功的话会输出如下内容:
interface: wg0public key: xxxxxxxxxxprivate key: (hidden)listening port: 56660

将 WireGuard 设置成开机启动

$ systemctl enable wg-quick@wg0

配置客户端相关参数,创建并编辑 /etc/wireguard/wg0.conf ,内容如下:

[Interface]PrivateKey = <Private Key>Address = 10.0.0.3/24DNS = 8.8.8.8
[Peer]PublicKey = xxxxxxxxxxEndpoint = <Server Public IP>:56660AllowedIPs = 0.0.0.0/0
其中 PrivateKey 也是通过命令 wg genkey 生成, Peer 的 PublicKey 填入上面服务端 wg 命令返回的 public key, Endpoint 的 IP 设置为服务端可访问的公网 IP 。

启动客户端 WireGuard

$ wg-quick up wg0
启动后同样通过命令 wg 可查看公钥。

在服务端添加客户端信息

$ sudo wg set wg0 peer <Public Key> allowed-ips 10.0.0.3/24
Public Key 是客户端的公钥。
如果在服务端配置信息里设置了 SaveConfig = true 那么刚才添加的客户端参数信息会在服务端关闭时自动保存到配置文件中。如果想立即存储刚设置的参数也可以执行命令 wg-quick save wg0 。

测试验证

完成上述步骤后客户端便能直接访问服务端所在的网络了,可以通过 ping 10.0.0.1 进行验证。

Tips

  1. WireGuard 能够提供类似 TCP keepalive 的功能,如果客户端在 NAT 子网可以考虑开启这一选项
  2. WireGuard 目前仅实现了 Linux 内核模块版本,所以目前客户端仅支持部分 Linux 和 Android 。
--------------------------------------------------------------------

搭建了一个 macOS 和 Linux vps之间的 WireGuard Tunnel

随着 Wireguard Go 版本的开发,在 macOS 上起 WireGuard Tunnel 成为现实。于是,搭建了一个 macOS 和 Linux 之间的 WireGuard Tunnel。假设 Linux 端为服务端, macOS 端为客户端。
macOS端:
$ brew install wireguard-tools
$ cd /usr/local/etc/wireguard
$ wg genkey > privatekey
$ wg pubkey < privatekey > publickey
$ nano tunnel.conf
内容如下:
[Interface]
Address = 192.168.0.2/24
PrivateKey = MACOS_PRIVATE_KEY [Peer] PublicKey = LINUX_PUBLIC_KEY # Generated below AllowedIPs = 192.168.0.0/24 Endpoint = LINUX_PUBLIC_IP:12345

$ nano up.sh
#!/bin/bash
# change interface name when necessary
sudo wireguard-go utun0
sudo wg setconf utun0 tunnel.conf
sudo ifconfig utun0 192.168.0.2 192.168.0.1
$ chmod +x up.sh
$ ./up.sh
配置 Linux vps 端:
$ git clone https://git.zx2c4.com/WireGuard
$ make
$ sudo make install
$ cd /etc/wireguard
$ wg genkey > privatekey
$ wg pubkey < privatekey > publickey
$ nano wg0.conf
[Interface]
Address = 192.168.0.1/24
PrivateKey = LINUX_PRIVATE_KEY
ListenPort = 12345

[Peer]
PublicKey = MACOS_PUBLIC_KEY
AllowedIPs = 192.168.0.2/24

$ wg-quick up wg0
经过测试,两边可以互相 ping 通。
后续尝试在 Android 上跑通 WireGuard 。
UPDATE 2018-07-11:
成功在 Android 上跑通 WireGuard 。在 Google Play 上下载官方的 App 即可。麻烦在于,将 Android 上生成的 Public Key 和服务器的 Public Key 进行交换。
然后又看到WireGuard在systemd-networkd上的配置方案,自己也实践了一下。首先,如果用的是 stretch ,请首先打开 stretch-backports 源并把 systemd 升级到 237 版本。
然后,根据上面这个连接进行配置,由于都是 ini 格式,基本就是复制粘贴就可以配置了。有一点要注意,就是,要保护 PrivateKey 的安全,注意配置 .netdev 文件的权限。

参考:https://github.com/WireGuard/wireguard-go
----------------------------------------------------------------

在OpenVZ vps平台上安装WireGuard-Go实现搭建WireGuard服务端


0. 引言

在Wall越来越高的年代,能够找到一款稳定过Wall的V#P#N,已经越来越不容易。

先是Open#V#P#N的沦陷,然后AnyConnect也慢慢的被认证掉了,

纯V#P#N类的工具越来越少,但很多时候预计Socks协议的代理却远远不能满足我们的使用需要。

可能有的人会说,那就用WireGuard啊。

是,WireGuard确实是个完美的方案,但WireGuard只能安装在KVM/Xen/物理架构上,并不能安装在某些基于OpenVZ的服务器上。

难道真的没办法了么?

其实WireGuard官方也提供了一个额外的解决方案,那就是 WireGuard-Go 。

1. 什么是WireGuard-Go

WireGuard-Go是WireGuard的Go语言实现。

在原版的WireGuard中,由于是基于C/C++语言编写,而且需要将成品的WireGuard模块 (wireguard.ko) 编译到系统内核中,这样一来基于OpenVZ的共享核心型虚拟化架构来讲根本无法成功安装WireGuard。

而在WireGuard-Go中,由于WireGuard模块已经通过Go语言实现,所以并不需要将模块编译到内核中,但相对于原版的WireGuard来讲,执行效率可能会略有下降。但这已经是在OpenVZ这种极端环境下的唯一选择。(谁让V#P#N没有其他选择了呢)(逃)

2. 安装WireGuard-Go

2.1 前提条件

首先,在安装WireGuard-Go前,我们来看下安装WireGuard-Go的一些需求。

编译环境:

任何虚拟化架构或者物理机架构
内存>512MB (推荐>1GB,如果内存不足推荐通过增加Swap的方式临时扩展内存)
磁盘可用空间>5GB
安装Golang环境 (下文会具体讲安装及编译过程)

运行环境:

OpenVZ虚拟化架构 (Docker/LXC尚未进行测试)
内存>128MB (推荐>256MB)
磁盘可用空间>500MB
开启TUN/TAP (可以在VPS后台控制面板中检查并打开此项)

编译环境和运行环境可以是同一台服务器,也可以在不同的服务器上,下文会具体讲如何导出编译结果。

一定要注意,毕竟WireGuard怎么说也是个V#P#N,所以一定会用到TUN/TAP,请务必开启TUN/TAP,以防止WireGuard无法正常转发流量!

2.2 准备编译环境

首先我们登录编译环境服务器,并安装Golang环境:

wget -O /tmp/golang.tar.gz https://dl.google.com/go/go1.12.4.linux-amd64.tar.gz
tar -C /usr/local -xvzf /tmp/golang.tar.gz

之后配置Golang相关环境变量:

export PATH=$PATH:/usr/local/go/bin

2.3 编译WireGuard-Go

在Golang安装完成之后,开始下载WireGuard-Go源码:

mkdir -p /tmp/gobuild/ && cd /tmp/gobuild/
git clone https://git.zx2c4.com/wireguard-go
cd wireguard-go

配置环境变量并开始编译(请确保你的网络状况良好,推荐使用海外服务器进行编译):

export GOPATH="/tmp/gobuild/"
go build -v -o "wireguard-go"

如果没有遇到任何错误的话,我们会在同目录看到一个 wireguard-go 的可执行文件。

将此文件复制到系统目录中(本机编译本机安装):

cp wireguard-go /usr/sbin/wireguard-go

或者通过SSH、FTP等方式传输到目标运行环境服务器上,并将文件导入上述位置并配置可执行权限(异机编译安装)。

如果无法自行编译安装,可以使用博主提供的成品编译二进制文件:

https://download.ilemonrain.com/WireGuard-Go/precompile/wireguard-go.gz

2.4 安装并配置WireGuard

看到这里很多人会问了,我们安装的不是WireGuard-Go么?怎么又要安装WireGuard了?

先别急,我在这里解释一下。

在上一步里安装的WireGuard-Go,只是将WireGuard的内核部分 (wireguard.ko) 编译完成了,我们还需要编译WireGuard主程序 (wg 和 wg-quick),才能使得WireGuard能够正常使用,同时也可以像正常配置WireGuard那样配置WireGuard-Go。

首先安装必要的编译环境组件:

For Debian/Ubuntu:

apt-get install libmnl-dev libelf-dev build-essential pkg-config

For CentOS

yum install libmnl-devel elfutils-libelf-devel pkg-config @development-tools

之后下载源码包:

mkdir -p /tmp/build/ && cd /tmp/build/
git clone https://git.zx2c4.com/WireGuard
cd wireguard-go/src/tools

编译安装WireGuard工具:

make && make install

到这里,WireGuard的wg和wg-quick这两条命令,应该就可以使用了。

再加上上一步中编译好的wireguard-go,我们可以在OpenVZ平台上运行WireGuard了。

3. 配置WireGuard-Go

首先执行WireGuard-Go,启动WireGuard内核,并创建一块虚拟网卡(可能现在不会显示出来,但当使用wg或wg-quick命令行启动时就会自动出现):

由于是测试版的原因,会自动弹出一个类似这样的警告:

WARNING WARNING WARNING WARNING WARNING WARNING WARNING
W G
W You are running this software on a Linux kernel, G
W which is probably unnecessary and foolish. This G
W is because the Linux kernel has built-in first G
W class support for WireGuard, and this support is G
W much more refined than this slower userspace G
W implementation. For more information on G
W installing the kernel module, please visit: G
https://www.wireguard.com/install G
W G
W If you still want to use this program, against G
W the advice here, please first export this G
W environment variable: G
W WG_I_PREFER_BUGGY_USERSPACE_TO_POLISHED_KMOD=1 G
W G
WARNING WARNING WARNING WARNING WARNING WARNING WARNING

执行以下命令即可继续使用:

export WG_I_PREFER_BUGGY_USERSPACE_TO_POLISHED_KMOD=1

之后执行命令,创建虚拟网卡:

wireguard-go wg

下述部分你可以参照doubi的WireGuard教程操作!
传送门:https://doubibackup.com/qbc20cn3.html

接下来我们创建WireGuard的配置文件:

mkdir -p /etc/wireguard/ && cd /etc/wireguard/

生成密钥对:

wg genkey | tee sprivatekey | wg pubkey > spublickey
wg genkey | tee cprivatekey | wg pubkey > cpublickey

确认你的外网网卡(对于OpenVZ虚拟化架构来讲,一般都是 venet0 )

root@ovzhost:~# ip addr
1: lo: <LOOPBACK,UP,LOWER_UP> mtu 65536 qdisc noqueue state UNKNOWN

link/loopback 00:00:00:00:00:00 brd 00:00:00:00:00:00
inet 127.0.0.1/8 scope host lo
inet6 ::1/128 scope host 
   valid_lft forever preferred_lft forever

2: venet0: <BROADCAST,POINTOPOINT,NOARP,UP,LOWER_UP> mtu 1500 qdisc noqueue state UNKNOWN

link/void 
inet 127.0.0.2/32 scope host venet0
inet X.X.X.X/32 brd X.X.X.X scope global venet0:0

3: wg: <POINTOPOINT,MULTICAST,NOARP> mtu 1420 qdisc noop state DOWN qlen 500
link/none

生成WireGuard服务端配置文件 wg0.conf :

echo "[Interface]
PrivateKey = $(cat sprivatekey)
Address = 10.0.0.1/24 
PostUp   = iptables -A FORWARD -i wg0 -j ACCEPT; iptables -A FORWARD -o wg0 -j ACCEPT; iptables -t nat -A POSTROUTING -o venet0 -j MASQUERADE
PostDown = iptables -D FORWARD -i wg0 -j ACCEPT; iptables -D FORWARD -o wg0 -j ACCEPT; iptables -t nat -D POSTROUTING -o venet0 -j MASQUERADE
ListenPort = 6666
MTU = 1420

[Peer]
PublicKey = $(cat cpublickey)
AllowedIPs = 10.0.0.2/32" | sed '/^#/d;/^\s*$/d' > wg0.conf

生成WireGuard客户端文件 client.conf :

echo "[Interface]
PrivateKey = $(cat cprivatekey)
Address = 10.0.0.2/24
DNS = 8.8.8.8
MTU = 1420

[Peer]
PublicKey = $(cat spublickey)
Endpoint = $(curl -s whatismyip.akamai.com):6666
AllowedIPs = 0.0.0.0/0, ::0/0
PersistentKeepalive = 30" | sed '/^#/d;/^\s*$/d' > client.conf

当然,不要忘了开启转发:

echo 1 > /proc/sys/net/ipv4/ip_forward
echo "net.ipv4.ip_forward = 1" >> /etc/sysctl.conf
sysctl -p

在确认配置无误后,启动WireGuard服务端:

wg-quick up wg0

会得到类似这样的结果:
root@ovzhost:/etc/wireguard# wg-quick up wg0

[#] ip link add wg0 type wireguard
RTNETLINK answers: Operation not supported
[!] Missing WireGuard kernel module. Falling back to slow userspace implementation.
[#] wireguard-go wg0
WARNING WARNING WARNING WARNING WARNING WARNING WARNING
W G
W You are running this software on a Linux kernel, G
W which is probably unnecessary and foolish. This G
W is because the Linux kernel has built-in first G
W class support for WireGuard, and this support is G
W much more refined than this slower userspace G
W implementation. For more information on G
W installing the kernel module, please visit: G
https://www.wireguard.com/install G
W G
WARNING WARNING WARNING WARNING WARNING WARNING WARNING
INFO: (wg0) 2019/04/19 09:45:50 Starting wireguard-go version 0.0.20190409-9-gd024393
[#] wg setconf wg0 /dev/fd/63
[#] ip address add 10.0.0.1/24 dev wg0
[#] ip link set mtu 1420 up dev wg0
[#] iptables -A FORWARD -i wg0 -j ACCEPT; iptables -A FORWARD -o wg0 -j ACCEPT; iptables -t nat -A POSTROUTING -o venet0 -j MASQUERADE

则说明WireGuard启动成功(出错为正常现象,因为无法加载基于内核模块的WireGuard,所以只能加载WireGuard-Go作为Fallback方案)

将client.conf传回本地并导入客户端中(个人推荐使用TunSafe,下载地址自己找),即可完成配置工作。

4. 一点点善后工作...

配置WireGuard开机启动:

systemctl enable wg-quick@wg0

清理编译过程中产生的垃圾文件:

rm -rf /tmp/gobuild/
rm -rf /tmp/build/
rm -f /tmp/golang.tar.gz

Enjoy~

------------------------------------------------------------

IOS 官方版客户端(TestFlight 测试中):https://testflight.apple.com/join/63I19SDT
IOS TunSafe版客户端(TestFlight 测试中):https://testflight.apple.com/join/9gbYAJLB
-------------

Route-based VPN on Linux with WireGuard

As an alternative to IPsec, WireGuard is an extremely simple (less than 5,000 lines of code) yet fast and modern VPN that utilizes state-of-the-art and opinionated cryptography (Curve25519ChaCha20Poly1305) and whose protocol, based on Noise, has been formally verified. It is currently available as an out-of-tree module for Linux but is likely to be merged when the protocol is not subject to change anymore. Compared to IPsec, its major weakness is its lack of interoperability.
It can easily replace strongSwan in our site-to-site setup. On Linux, it already acts as a route-based VPN. As a first step, for each VPN, we create a private key and extract the associated public key:
$ wg genkey
oM3PZ1Htc7FnACoIZGhCyrfeR+Y8Yh34WzDaulNEjGs=
$ echo oM3PZ1Htc7FnACoIZGhCyrfeR+Y8Yh34WzDaulNEjGs= | wg pubkey
hV1StKWfcC6Yx21xhFvoiXnWONjGHN1dFeibN737Wnc=
Then, for each remote VPN, we create a short configuration file:1
[Interface]
PrivateKey = oM3PZ1Htc7FnACoIZGhCyrfeR+Y8Yh34WzDaulNEjGs=
ListenPort = 5803

[Peer]
PublicKey  = Jixsag44W8CFkKCIvlLSZF86/Q/4BovkpqdB9Vps5Sk=
EndPoint   = [2001:db8:2::1]:5801
AllowedIPs = 0.0.0.0/0,::/0
A new ListenPort value should be used for each remote VPNWireGuard can multiplex several peers over the same UDP port but this is not applicable here, as the routing is dynamic. The AllowedIPs directive tells to accept and send any traffic.
The next step is to create and configure the tunnel interface for each remote VPN:
$ ip link add dev wg3 type wireguard
$ wg setconf wg3 wg3.conf
WireGuard initiates a handshake to establish symmetric keys:
$ wg show wg3
interface: wg3
  public key: hV1StKWfcC6Yx21xhFvoiXnWONjGHN1dFeibN737Wnc=
  private key: (hidden)
  listening port: 5803

peer: Jixsag44W8CFkKCIvlLSZF86/Q/4BovkpqdB9Vps5Sk=
  endpoint: [2001:db8:2::1]:5801
  allowed ips: 0.0.0.0/0, ::/0
  latest handshake: 55 seconds ago
  transfer: 49.84 KiB received, 49.89 KiB sent
Like VTI interfaces, WireGuard tunnel interfaces are namespace-aware: once created, they can be moved into another network namespace where clear traffic is encapsulated and decapsulated. Encrypted traffic is routed in its original namespace. Let’s move each interface into the private namespace and assign it a point-to-point IP address:
$ ip link set netns private dev wg3
$ ip -n private addr add 2001:db8:ff::/127 dev wg3
$ ip -n private link set wg3 up
The remote end uses 2001:db8:ff::1/127. Once everything is setup, from one VPN, we should be able to ping each remote host:
$ ip netns exec private fping 2001:db8:ff::{1,3,5,7}
2001:db8:ff::1 is alive
2001:db8:ff::3 is alive
2001:db8:ff::5 is alive
2001:db8:ff::7 is alive
BIRD configuration is unmodified compared to our previous setup and the BGP sessions should establish quickly:
$ birdc6 -s /run/bird6.private.ctl show proto | grep IBGP_
IBGP_V2_1 BGP      master   up     20:16:31    Established
IBGP_V2_2 BGP      master   up     20:16:31    Established
IBGP_V3_1 BGP      master   up     20:16:31    Established
IBGP_V3_2 BGP      master   up     20:16:29    Established
Remote routes are learnt over the different tunnel interfaces:
$ ip -6 -n private route show proto bird
2001:db8:a1::/64 via fe80::5254:33ff:fe00:13 dev eth2 metric 1024 pref medium
2001:db8:a2::/64 metric 1024
        nexthop via 2001:db8:ff::1 dev wg3 weight 1
        nexthop via 2001:db8:ff::3 dev wg4 weight 1
2001:db8:a3::/64 metric 1024
        nexthop via 2001:db8:ff::5 dev wg5 weight 1
        nexthop via 2001:db8:ff::7 dev wg6 weight 1
From one site, you can ping an host on the other site through the VPNs:
$ ping -c 2 2001:db8:a3::1
PING 2001:db8:a3::1(2001:db8:a3::1) 56 data bytes
64 bytes from 2001:db8:a3::1: icmp_seq=1 ttl=62 time=1.54 ms
64 bytes from 2001:db8:a3::1: icmp_seq=2 ttl=62 time=1.67 ms

--- 2001:db8:a3::1 ping statistics ---
2 packets transmitted, 2 received, 0% packet loss, time 1001ms
rtt min/avg/max/mdev = 1.542/1.607/1.672/0.065 ms
As with the strongSwan setup, you can easily snoop unencrypted traffic with tcpdump:
$ ip netns exec private tcpdump -c3 -pni wg5 icmp6
tcpdump: verbose output suppressed, use -v or -vv for full protocol decode
listening on wg5, link-type RAW (Raw IP), capture size 262144 bytes
08:34:34 IP6 2001:db8:a3::1 > 2001:db8:a1::1: ICMP6, echo reply, seq 40
08:34:35 IP6 2001:db8:a3::1 > 2001:db8:a1::1: ICMP6, echo reply, seq 41
08:34:36 IP6 2001:db8:a3::1 > 2001:db8:a1::1: ICMP6, echo reply, seq 42
3 packets captured
3 packets received by filter
0 packets dropped by kernel
You can find all the configuration files for this example on GitHub.
Update (2018.11)
It is also possible to transport IPv4 on top of IPv6 WireGuard tunnels. The lab has been updated to support such a scenario.


from https://vincent.bernat.ch/en/blog/2018-route-based-vpn-wireguard
----------------------------
对wireguard的吐槽

前言

最近有一款新型 VPN 工具备受瞩目,相信很多人已经听说过了,没错就是 WireGuard,传言它有望取代 IPSec 和 OpenVPN。那么 WireGuard 是否真的有传说中的那么神奇?今天我就来一一解读。

这是一篇非常长的文章,我建议你先去冲杯咖啡,然后边喝咖啡边看。

首先要声明:我并没有诋毁 WireGuard 的意思,WireGuard 很棒很优秀,但总是有某些无脑媒体天天说 WireGuard 即将取代 IPSec 和 OpenVPN,这我就不能忍了,今天就来和你们好好掰扯掰扯 WireGuard。

WireGuard 白皮书

本文所有的观点都是针对 Jason Donenfeld 撰写的 WireGuard 白皮书,其他的博客和文档不在我的讨论范围之内。白皮书的第一句话是这么说的:

WireGuard 的目标是在大多数场景下取代 IPsec 和其他基于用户空间和 TLS 的 VPN(例如 OpenVPN),与其他 VPN 相比,它更简单、更高效、更容易使用。

可以看到,WireGuard 最大的卖点就是简单,大多数新技术也都是这个营销套路。当然,作为一款 VPN 产品,它还有性能和安全这两个卖点。

有趣的是,作为 VPN,如果你不简单、不安全、性能不好,那你可能就没有机会了。这不止是你 WireGuard 的设计目标,其他的 VPN 产品也是这么干的好吗?

最有趣的部分是“在大多数场景下”这几个字,媒体报道时直接将其删除了,混淆大众的视听。

WireGuard 能否取代 IPSec?

不!Cisco 和 Juniper 等大厂不可能使用 WireGuard,除非迫不得已,他们是不会上 WireGuard 的车的。后面我会详细解释为什么即使他们想卖 WireGuard 服务也卖不出去。

WireGuard 实现了 Road Warrior?

当然没有。Road Warrior 是具有动态分配 IP 地址的移动客户端,比如笔记本电脑。你可以直接理解为漫游。WireGuard 目前不能使用动态 IP 来建立连接,要想实现漫游功能,还有很长的路要走。

WireGuard 有一个子项目叫 wg-dynamic[1],它增加了一个用户空间守护程序来使 WireGuard 支持动态 IP。然而这个项目最后一次更新是在 2019 年,不知道还维护不维护了。。。

大家都知道,IPv6 就是动态寻址的,如果将来全面进入 IPv6 的世界,WireGuard 还怎么用?从商业角度来看,这是相当令人失望的。

WireGuard 的设计目标之一是保持协议的精简,现在看来是精简过头了,以至于需要更多的辅助软件才能使它发挥强大的功效。

WireGuard 真的好用吗?

并没有。我并没有说 WireGuard 最终不能替代其他 VPN 产品,我只是说目前 WireGuard 还不行,如果它的目标和我们理解的一样,目前它还只是处在 Alpha 阶段。

WireGuard 到底想解决什么问题?IPsec 真的很难用吗?

恐怕不是这样,如果厂商做了正确的功课,并提供了易于使用的界面(比如,IPFire[2]),就不会难用。

要想建立一个 IPSec 隧道,只需要输入 5 组信息:你的公网地址、peer 的公网地址、子网、你的预共享秘钥和 peer 的预共享秘钥。这样看来,几分钟就可以建立一个隧道,而且每个厂商之间都是兼容的。

当然,也有一些例外,比如与 OpenBSD 系统之间建立隧道,过程可能会比较痛苦。

协议复杂度真的很重要吗?

作为终端用户,其实无需考虑协议的复杂度。

如果复杂度真的影响很大,我们肯定早就摆脱 SIP、 H.323 和 FTP 等不能很好地应对 NAT 的协议了,然而并没有。讲道理,IPsec 比 WireGuard 更复杂是有原因的:**它能做的事情太多了。**比如,使用用户名/密码或带有 EAP 的 SIM 卡进行用户认证;也可以扩展新的加密方式。

而 WireGuard 呢?这些功能都没有。这就意味着当某一天它的固定的那些加密方式被破解或削弱了之后,就彻底崩盘了。

WireGuard 作者说过:

WireGuard 在加密方式上比较偏执,故意砍掉了加密协议的敏捷性,不支持扩展加密协议,因为这么做会大大降低软件的复杂度。如果底层的加密协议出现了漏洞,只能更新所有端点来修复漏洞。

我非常同意他这句话里阐述的观点,因为协商使用何种方式来加密会使 IKE 和 TLS 等协议变得更复杂。那么,是我们想不开刻意要搞这么复杂吗?当然不是啊,即使这样,在握手过程中也会经常发现各种漏洞,不复杂能行吗?除此以外,别无他法。

如何更新密码?

想象一下,你有一个 VPN 服务器,为 200 多个 Road Warrior 客户端提供服务,而且这些客户端分布在世界各地。假设现在你改了密码,那么就需要同时更新所有客户端的密码才能正常工作,这简直就是不可能的事情,作为管理员,你可能会需要几个月的时间来下方更改后的配置。

IPsec 和 OpenVPN 就没有这些烦恼,它们都有秘钥协商功能,可以将新秘钥逐步更新到所有客户端,在漫长的更新过程中,仍在使用旧秘钥的客户端仍然有效,直到所有客户端更新完毕后,才会弃用旧秘钥。整个过程中客户端不会有任何察觉,也不需要重启。

加密方式

WireGuard 使用以下加密技术来保障数据的安全:

  • 使用 ChaCha20 进行对称加密,使用 Poly1305 进行数据验证。
  • 利用 Curve25519 进行密钥交换。
  • 使用 BLAKE2 作为哈希函数。
  • 使用 HKDF 进行解密。

而 IPSec 和 OpenVPN 使用的都是标准的 ChaCha20-Poly1305 加密算法。

BLAKE2算法是 BLAKE 算法的升级版,而 BLAKE 是 SHA-3 的入围者,与 SHA-2 非常相似,所以没有获奖。如果哪天 SHA-2 被破解了,BLAKE 也很有可能被破解。

IPSec 和 OpenVPN 使用的加密方式和 WireGuard 是类似的,比如对称加密使用的是标准的 ChaCha20-Poly1305 算法。唯一没有用到的就是 BLAKE2,因为它目前没有列入标准。即使不用 BLAKE2,也没什么大不了的,因为 VPN 是使用 HMACs 来保障数据的完整性,即使使用 MD5 也仍然没问题。

我的结论是:实际上所有的 VPN 都可以使用相同的加密技术,WireGuard 在加密或数据完整性方面并没有比其他的 VPN 更安全或更不安全。

然而白皮书上说了,加密不是重点,速度才是。

好吧,那我们就来看看速度是不是真的有那么快。

WireGuard 真的很快吗?

答案是否定的。

ChaCha20 是一种流加密算法,一次只加密一个比特,使用软件更容易实现。而像 AES 这样的分块加密方式,会将明文分成多个等长的模块,每次加密 128 位的模块。这种加密方式在硬件中实现时需要更多的晶体管,所以大型处理器都带有一个指令集扩展 -- AES-NI[3],它可以提高加密和解密的速度。

今天你能买到的任何一款智能手机都带有 AES 的硬件加速功能,在这些硬件中使用 AES 会比 ChaCha20 加密解密更快、更节能。几乎所有的个人 PC 和服务器的 CPU 都带有 AES-NI,加密解密速度就更不用说了。因此,我预计 AES 在几乎所有场景下表现都会优于 ChaCha20

然而,WireGuard 的白皮书又说了,ChaCha20-Poly1305 的性能优于 AES-NI,但该指令集只适用于大型处理器,对普通 PC 和移动硬件没有任何帮助,所以并没有什么卵用。

WireGuard 执着于一种加密算法,我觉得不好。而 IPSec 允许你选择不同的加密算法,这样就可以根据不同的使用场景选择最合适的加密算法,例如,传输 10G 或更多的数据[4]

既然 WireGuard 选择了更现代的加密方式,就会带来很多问题。比如,由于 Linux 内核中缺乏支持这些加密方式的模块,导致 WireGuard 并没有使用 Linux 内核提供的模块,要推迟好几年才能用上 Linux 内核提供的模块。我不知道其他操作系统是什么情况,但可能也没有什么不同。

理想与现实

假设 WireGuard 真的很完美,大厂就一定会用吗?

现实情况是,每次当客户要求我帮他们搭建 VPN 时,给到他们手里的证书都是使用旧的加密方式,通常是 3DES 和 MD5 结合,或者 AES-256 和 SHA1 结合。至于秘钥交换,我们一直在使用 RSA,虽然速度很慢,但足够安全。

大部分客户都和政府机构或巨头公司有关,他们在我们这里的订单表还是几十年前的,根本就没有添加过 SHA-512 的选项。所以阻止创新的不一定是技术,而是缓慢的企业流程。

看到这种情况,我也很痛心?我就不想使用新技术吗?当然想啊。IPsec 从 2005 年左右就开始支持椭圆曲线加密算法了,Curve25519 算法现在也支持了,也有了 AES 的替代方案(比如 Camellia 和 ChaCha20),但很显然并不是所有的大厂都愿意去适配,比如思科等。思科是这个领域的市场领导者,他们对推动创新其实并不感兴趣。

基准测试

白皮书中还提到了 WIreGuard 的基准测试,虽然这不是一篇科学论文,但我仍然希望以科学的方法来进行基准测试。如果测试不能重复,那么它就毫无价值;如果测试没有考虑实际场景,也毫无价值。

WireGuard 的 Linux 版本使用 GSO(Generic Segmentation Offloading,通用分段卸载)来创建一个 64k 字节的巨大数据包,并一次性对其进行加密或解密,以此来获得速度优势。这样一来,初始化和调用加密操作的开销就被节省了。如果你想最大限度地提高吞吐量,这倒是一个好主意。

然而现实不是这样的,你想向网络适配器发送如此大的数据包,就需要将其切割成许多小数据包,通常为 1500 字节。对于 64k 字节的超大数据包来说,会被切割成 45 个数据包(每个数据包有 1480 字节的有效载荷和 20 字节的 IP 头),这些数据包将会阻塞网络适配器相当长的时间,因为它们想要被一次性发送出去。像 VoIP 呼叫这样应该优先处理的数据包也不得不慢慢等着。

因此,WireGuard 宣称的高吞吐量是通过让其他应用变慢来获得的,官方团队已经承认了这一点。

我们再来看看基准测试的最终数据,吞吐量为 1011 MBit/s

这个数据令人印象深刻,我至今仍感到疑惑,在数据包大小为 1500 字节的情况下,一个千兆以太网链路的最大理论吞吐量为 966 MBit/s,减去 20 个字节的 IP 头、8 个字节的 UDP 头和 16 个字节的 WireGuard 头,再减去封装数据包中的另一个 IP 头和另一个 20 个字节的 TCP 头,额外的带宽到底从哪来的?

OK,假设启用了巨型帧和 GSO9000 字节帧大小时的理论最大值将是 1014 MBit/s。如果使用更大的巨型帧,理论最大值为 1023 MBit/s。然而这在现实中是绝对不实用的,因为开销太大了,而且只能在服务器直连的情况下使用。通常 VPN 都是通过互联网连接的,完全不支持巨型帧,所以这样的基准测试根本不切实际,永远不可能在现实世界中使用。

最终幻想

WireGuard 的官方网站写了很多关于容器的内容,很明显这应该就是 WireGuard 的真实目的。

通过一个简单迅速的 VPN 来实现容器通信的 CNI,可以通过 Kubernetes 等大型容器编排工具来快速部署,针对吞吐量和大于 9000 字节的数据包进行了优化,可以快速分发容器镜像,等等。

这一切的种种都好像是为容器而设计的,不得不承认,超精简、超优雅、超快速。

但是,它根本不是为数据中心以外的世界而设计的,在外面的世界,你必须要在协议的设计和实现上做出妥协。

总结

我最终的结论是:WireGuard 还没有准备好。

它是作为一个轻量级和快速的解决方案来起草的,以解决现有解决方案中的一些问题,但不幸的是,它牺牲了许多与用户相关的功能,因此无法取代 IPsec 和 OpenVPN。

你至少得有动态地址分配和推送路由等配置的功能吧?这些功能都是需要进行秘钥协商的。

此外,安全性是重中之重,目前我还没发现 IKE 或者 TLS 有啥明显的缺陷,它们都支持现代加密方式,而且都经过了几十年的审计。不能仅仅因为某些东西是新的,就觉得它是好的。

加密方式总会过时,押注在一种加密方式身上,当这种加密方式不再安全时,你该何去何从?

参考资料

[1]

wg-dynamic: https://git.zx2c4.com/wg-dynamic/about/docs/idea.md

[2]

IPFire: https://www.ipfire.org

[3]

AES-NI: https://zh.wikipedia.org/wiki/AES%E6%8C%87%E4%BB%A4%E9%9B%86

[4]

传输 10G 或更多的数据: https://blog.ipfire.org/post/feature-spotlight-galois-counter-mode-ipsec-with-10g


from https://mp.weixin.qq.com/s/OvqpL9aO6oMSL4GgjE6zbw
------------------------------------------------

Why Not WireGuard


The latest thing that is getting a lot of attention is WireGuard - the new shooting star in terms of VPN. But is it as great as it sounds? I would like to discuss some thoughts, have a look at the implementation and tell you why WireGuard is not a solution that will replace IPsec or OpenVPN.

In this article I would like to debunk the myths. It is a long read. If you are in need of a tea or coffee, now is the time to make it. Thanks to Peter for proof-reading my chaotic thoughts.

I do not want to discredit the developers of WireGuard for their efforts or for their ideas. It is a working piece of technology, but I personally think that it is being presented as something entirely different - as a replacement for IPsec and OpenVPN which it simply is not.

As a side-note, I think that the media is responsible for this and not the WireGuard project itself.

There has not been much positive news around the Linux kernel recently. They have reported of crushing processor vulnerabilities that have been mitigated in software, Linus Torvalds using too harsh language and just boring developer things. The scheduler or a zero-copy network stack are not very approachable topics for a glossy magazine. WireGuard is.

It sounds great on paper, it is exciting new technology.

Let's have a closer look.

The WireGuard Whitepaper

This article is based on the WireGuard Whitepaper written by Jason Donenfeld. In there he explains the concept, objective and technical implementation in the Linux kernel.

The first sentence says:

WireGuard [...] aims to replace both IPsec for most use cases, as well as popular user space and/or TLS-based solutions like OpenVPN, while being more secure, more performant, and easier to use.

Of course the biggest selling points of some new technology are that it is easy. VPNs also need to be performant and secure.

What else would they say here?

If that is not your design goal, then you will probably have no chance. However, those are exactly the same goals for literally every other VPN technology, too.

The more interesting part of that sentence is "for most use cases". That has been removed by the press and here we are in the middle of this mess.

Will WireGuard replace my (IPsec) site-to-site VPN?

No. There is no chance the big vendors like Cisco, Juniper, etc. will pick up WireGuard. They do not jump onto trains like this unless there is a big necessity.

I will later cover a couple of reasons why they probably can't ship WireGuard even if they wanted to.

Will WireGuard replace my roadwarrior from my laptop to the data centre?

No. Right now, WireGuard has a huge backlog of features that it needs to implement to be suitable for this use-case. It does not, for example, allow using a dynamic IP address on the server side of the tunnel which breaks a whole use-case.

IPFire is often used on a cheap Internet uplink like a DSL or cable connection. For branch offices and small to even medium businesses, this makes sense and saves money on an expensive fibre uplink which isn't needed by everyone. However, DSL, cable, LTE and all other sorts of wireless connections come with dynamic IP addresses. Sometimes it does not change that often, but it still is dynamic.

There is a sub-project called "wg-dynamic" which adds a user-space daemon to overcome this shortcoming. A massive design flaw because of the use-cases stated above, but it is even worse that IPv6 is all about dynamic addressing.

From a distributor's point of view, this is also quite disappointing. One of the design goals was to keep the protocol lean and simple.

Unfortunately it has become too simple that more software is now necessary to make it work in the real world.

So it is easy to use then?

Not yet. I am not saying that WireGuard won't reach a point where it is a good alternative for host-to-net connections, but so far it just is an alpha version of what it aims to be.

But what does it actually try to solve? Is IPsec really hard to use?

No, it clearly is not if the vendor has done their homework right and provides an interface that is easy to use - like IPFire.

To setup an IPsec VPN tunnel you will need to have five pieces of information that you will have to type in: Your own public IP address, the public IP address of your peer, the subnets that you want to make available through this VPN for each side and a pre-shared-key. That way, the VPN is set up within minutes and it is compatible with every vendor out there.

Unfortunately there are some exceptions out there. Everyone who has ever tried to create an IPsec tunnel to an OpenBSD machine can probably tell a tale of that. There are some more black sheep out there, but there are just as many good examples.

On Protocol Complexity

The end-user does not have to worry about the complexity of the protocol.

If that was an issue we would have definitely gone rid of SIP and H.323, FTP and other protocols that don't cope well with NAT and are decades old.

There are reasons why IPsec is more complex than WireGuard: It does so many more things. User-authentication using username/password or a SIM card with EAP. It is extensible that new cryptographic primitives can be added.

WireGuard does not have that.

That means WireGuard will break at some point, because one of the cryptographic primitives will weaken or entirely break at some point. The author says:

Finally, WireGuard is cryptographically opinionated. It intentionally lacks cipher and protocol agility. If holes are found in the underlying primitives, all endpoints will be required to update. As shown by the continuing torrent of SSL/TLS vulnerabilities, cipher agility increases complexity monumentally.

The last sentence is absolutely true.

Negotiating what cipher to use makes protocols like IKE and TLS more complex. But is it too complex? Indeed vulnerabilities have often been found in the protocol handshake. There is no alternative to this.

On Ignoring Real-World Problems

Imagine you have a VPN server with 200 road warrior clients somewhere out there in the world - which is a very normal use-case. If you were to change the cipher you are using from one day to the next one, you would need to upgrade your WireGuard software on all those laptops, phones, etc. at the same time. That is literally impossible. Administrators who have tried this needed months to deploy configuration changes. Sometimes even middle-sized companies need years to conduce a process like this.

IPsec and OpenVPN offer cipher negotiation. So for a while you will turn on the new cipher and gradually update all clients. After that is done you will turn off using the broken cipher and you are done. The clients won't even notice.

This is a very common task in large deployments and OpenVPN has been a pain with this, too. Compatibility matters and although you are using some weaker cipher, for many this is no reason to shut down their business and cut off hundreds of sales people from doing their job.

WireGuard made their protocol easier, but entirely unusable for people who are not in permanent control of both peers. In my experience this is by far the most likely case.


Cryptography!

But what are all those exciting new ciphers that WireGuard is using?

WireGuard utilizes Curve25519 for key exchange, ChaCha20 for encryption, and Poly1305 for data authentication, SipHash for hashtable keys, and BLAKE2s for hashing.

ChaCha20-Poly1305 is standardised for both, IPsec and OpenVPN (through TLS).

It is obvious that Daniel J. Bernstein's work is being used here a lot. BLAKE2 is the successor of BLAKE, a SHA-3 finalist which did not win because of its close similarity to SHA-2. If SHA-2 would have been broken, there is a good chance that BLAKE breaks, too.

IPsec and OpenVPN do not need SipHash because of their design. So the only thing that is currently not usable with those is BLAKE2 until it is standardised. That is not much of a disadvantage, because VPNs use HMACs for integrity, which still is considered strong even with MD5.

I would conclude that practically the same cryptography is available for all VPNs here. Therefore WireGuard is not more or less secure than the others when it comes to encryption or data integrity.

But that isn't the focus, according to the whitepaper. Speed is.

Is WireGuard faster than other VPN solutions?

Simple answer: It isn't.

ChaCha20 is a stream cipher which are easier to implement in software. They encrypt one bit at a time. Block ciphers like AES encrypt a block of 128 bits at a time. That would need many more transistors when implemented in hardware, so larger processors come with AES-NI - an instruction set extension that performs some tasks of the encryption process to speed it up.

AES-NI was not expected to land in smartphones and ChaCha20 was developed as a lightweight and battery-saving alternative. So it might surprise you that every smartphone that you can buy today has some sort of acceleration for AES and perform it faster and more energy-efficiently than ChaCha20.

Obviously virtually every desktop/server CPU bought in the last couple of years has AES-NI.

Hence I expect AES to outperform ChaCha20 in every single scenario. The WireGuard whitepaper mentions due to AVX512, ChaCha20-Poly1305 will outperform AES-NI1, but that instruction set extension will only be available on large processors which again won't help with smaller and mobile hardware that will always be faster with AES-NI.

I am not sure if this could have been foreseen when WireGuard was drafted, but today it is already a disadvantage that it is nailed to one cipher which might not perform very well.

IPsec allows you to freely choose what cipher is best for your setup. Certainly that is necessary when you want to transfer 10G or more over a VPN connection.

Issues integrating into Linux

So although WireGuard has chosen modern cryptography, this has already causes loads of problems. Instead of using what the Linux kernel provides, the integration of WireGuard was delayed by years due to lack of those primitives in Linux.

I am not sure what the situation is like in other operating systems, but probably not very different.

What does the real world look like?

Unfortunately every time, when a customer asks me to help them setting up a VPN, the credentials that they are getting are using old ciphers. 3DES in combination with MD5 is a common candidate as well as AES-256 with SHA1. Although the latter is better, it is still not what I would like to use today.

For the key exchange RSA is always being used, which is slow, but still secure enough.

These customers have connections with customs authorities or other government agencies and large corporations in the world which names we all know. They all use an order form that has been created decades ago and an option for "SHA-512" has simply never been added. It is isn't always the technology that is stopping innovation, but slow corporate processes.

It hurts me to see this because IPsec has support for Elliptic Curves since around 2005. Curve25519 is newer and available, too. Alternatives to AES like Camellia and ChaCha20 are also specified, but obviously not all of them are implemented by the big vendors like Cisco and so on.

That is however what people are using out there. There is a lot of Cisco boxes out there, and those that are not Cisco are made to work with Cisco. They are the market leader in this segment and not very much interested in driving innovation.

This is awful, but we won't see that change with WireGuard. The vendors will probably not see any performance issues with their existing choice of ciphers, no interoperability issues when using IKEv2 - and therefore there is little pressure for them to offer alternatives.

If you have fallen victim of any of this, have you thought about replacing your Cisco?

Benchmarks

The whitepaper benchmarks WireGuard. Although it is not a scientific paper, I would still expect a scientific approach to a benchmark. It is worthless if it cannot be repeated and it is worthless when it does not examine the software in a realistic lab setup.

In the Linux implementation, WireGuard is gaining an advantage by using GSO - Generic Segmentation Offloading. It creates a huge packet of 64 kilobytes and encrypts or decrypts it in one go. That way, overhead of initialising and calling cryptographic operations is being saved. If you want to maximise throughput that is a good idea to do.

However, things are again not so easy in reality. Sending such a large packet to the network adapter will require that it is being cut into many smaller packets. Usually of 1500 bytes. 64 kilobytes would result in 45 packets (1480 bytes payload and 20 bytes IP header per packet). Those will then block the adapter for quite some time, because they all will be sent in one go. Packets that should be prioritised like VoIP calls will have to wait.

So the high throughput that WireGuard claims to achieve is being bought by making other applications slower. This needs to go and the WireGuard team has already acknowledged it2.

But they went further.

The benchmark in the whitepaper shows a throughput of 1011 MBit/s.

Impressive.

Especially because the maximum theoretical throughput of a one Gigabit Ethernet link is 966 MBit/s at a packet size of 1500 bytes, minus 20 bytes IP header, 8 bytes UDP header and 16 bytes WireGuard header, another IP header in the encapsulated packet and another TCP header of 20 bytes. Where is this extra bandwidth coming from?

With jumbo frames enabled and the GSO advantages from above, the theoretical maximum at 9000 bytes frame size would be 1014 MBit/s. Normally, that won't be achievable in reality because there is more overhead. So I can only assume that the benchmark was made using even larger jumbo frames at 64 kilobytes with a theoretical maximum of 1023 MBit/s, which is supported by some network adapters. However, that is absolutely not practical in reality, but can be used with a direct link between the two systems executing the benchmark.

Since a VPN is usually built to connect two hosts over the Internet, which supports no jumbo frames at all, this is not a fair benchmark. It is an unrealistic lab setup which could never be applied in the real world.

Not even inside a data center I would expect to be able to transmit frames larger than 9000 bytes.

This benchmark is absolutely broken and I think that the author has discredited himself a lot for obvious reasons.

A last glimmer of hope

WireGuard's website talks a lot about containers. And clearly this is what this is designed for.

A simple and fast VPN, that takes nothing to set up and can be rolled out and configured by large orchestration tools like Amazon would have them for their cloud. They are using latest hardware features like AVX512 to be fast, but not tie themselves to x86 or another architecture.

They optimise for throughput and packets that are larger than 9000 bytes - that would be jumbo frames being encapsulated when two containers are talking to each other, or to backup, snapshot and deploy container images. Even dynamic IP addresses will not matter in this scenario.

Well done. Brilliant implementation and very lean and almost elegant protocol.

But it simply is not made for a world outside of the data centre in which you control everything. Otherwise you start making compromises on the design and implementation of the protocol.

Conclusion

It is not very hard for me to conclude that WireGuard is not ready - yet.

It has been drafted as a lightweight and fast solution to some problems of the existing solutions. Unfortunately it has sacrificed many features that will be relevant for many users and therefore will not be able to replace IPsec and OpenVPN.

For that we need to add at least IP address assignment, pushing configuration like DNS servers and routes. Obviously this needs cipher negotiation, too.

Security is my top priority and I have currently no reason to believe that IKE or TLS are intrinsically broken. Modern ciphers are supported in both of them and they have all been audited over decades. Just because something is newer, does not mean that it is better.

Interoperability is important when you connect with third parties that you do not control. IPsec is established as the de-facto standard and is virtually supported everywhere. It works. As it even looks, WireGuard might not even be compatible with itself in the future.

Cryptography breaks and things need to be replaced and updated.

Denying any of this and still wanting to use WireGuard to connect your iPhone to your home is a masterclass of putting your head in the sand.

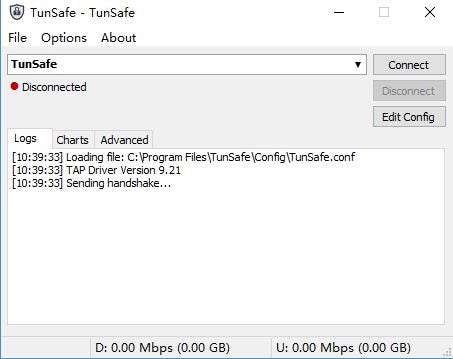
  1. https://moderncrypto.org/mail-archive/noise/2016/000699.html 

  2. https://www.wireguard.com/todo/ 

from https://blog.ipfire.org/post/why-not-wireguard
------
WireGuard是新型的主流协议,性能极佳,不过还是比较容易被封锁的,对于封锁一般可以更换端口(可以设置一个端口段到vpn端口,方便一个端口封锁时切换到另一个),端口敲门(避免GFW主动探测),使用PhantunUdp2rawudp-over-tcp将UDP数据包混淆为TCP、
Amnezia混淆等方法缓解。(https://github.com/amnezia-vpn/amneziawg-go,
https://github.com/amnezia-vpn/amnezia-client)
-----------

相关帖子:
https://briteming.blogspot.com/2018/08/tunsafewindowsvpnwireguard.html
https://briteming.blogspot.com/2022/10/phantun-wireguard-udp-tcp.html 
https://briteming.blogspot.com/2022/02/udp-over-tcp.html

No comments:

Post a Comment