首先fork此项目https://github.com/hxlog/prologue.dev,我fork后,得到的项目地址是https://github.com/brightmann/hlpd
访问https://github.com/brightmann/hlpd/tree/master/data/content/blog,在此处新建源帖(即add file),我新建了源帖fh.md,内容为:
---
title: 战马
featured: true
tags:
- misc1
- misc2
- misc3
publishDate: 2026-07-14 12:17
lastmod: 2026-07-14 12:17
description: 这是一篇文章
---
此处写正文或html codes.
( 详见https://github.com/brightmann/hlpd/blob/master/data/content/blog/fh.md?plain=1)
然后,访问vercel.com/new ,导入项目https://github.com/brightmann/hlpd
Build Command栏填入npm run build
Install Command栏填入npm install
然后点击底部的deploy按钮,等待部署完成。部署完成后,我得到网址:
https://hlpd.vercel.app/
项目地址:
https://github.com/hxlog/prologue.dev
https://github.com/brightmann/hlpd
演示博客:
https://hlpd.vercel.app/
https://hlpd.vercel.app/blog/ 支持分页
https://hlpd.vercel.app/blog/fh 不能显示视频
https://github.com/hxlog/prologue.dev/issues/53
Tuesday, 14 July 2026
搭建基于nextjs的静态博客程序hlpd
搭建基于nextjs的静态博客程序szb
首先fork此项目https://github.com/ZL-Asica/SuzuBlog,我fork后,得到的项目地址是https://github.com/brightmann/szb
访问https://github.com/brightmann/szb/tree/main/post,在此处新建源帖(即add file),我新建了源帖fh.md,内容为:
---
title: '战马'
date: '2026-06-07 11:39:00'
categories:
- 前端
- 教程
tags:
- misc1
- misc2
- misc3
---
此处写正文或html codes.
( 详见https://github.com/brightmann/szb/blob/main/posts/fh.md?plain=1)
然后,访问vercel.com/new ,导入项目https://github.com/brightmann/szb
Build Command栏填入pnpm build
Install Command栏填入pnpm install
然后点击底部的deploy按钮,等待部署完成。部署完成后,我得到网址:
https://szb-gules.vercel.app/
项目地址:
https://github.com/ZL-Asica/SuzuBlog
https://github.com/brightmann/szb
https://github.com/brightmann/szb/blob/main/config.yml, 第58/59行可设置每页的帖子数量。
演示博客:
https://szb-gules.vercel.app/
https://szb-gules.vercel.app/fh 能显示视频,
https://szb-gules.vercel.app/posts 支持分页
(https://suzu.zla.app/guide/ )
Monday, 13 July 2026
搭建基于nextjs的静态博客程序snbtmt
首先fork此项目https://github.com/Rose-stack/static-nextjs-blog-with-typescript-mdx-tailwindcss,我fork后,得到的项目地址是https://github.com/brightmann/snbtmt
访问https://github.com/brightmann/snbtmt/tree/main/_posts,在此处新建源帖(即add file),我新建了源帖fh.mdx,内容为:
---
date: '2026-06-07 16:05:00'
thumbnail: /assets/getting-started.jpeg
title: 战马
description: 这是一篇文章
---
此处写正文或html codes.
( 详见https://github.com/brightmann/snbtmt/blob/main/_posts/fh.mdx?plain=1)
然后,访问vercel.com/new ,导入项目https://github.com/brightmann/snbtmt
Build Command栏填入npm run build
Install Command栏填入npm install
然后点击底部的deploy按钮,等待部署完成。部署完成后,我得到网址:
https://snbtmt.vercel.app/
项目地址:
https://github.com/Rose-stack/static-nextjs-blog-with-typescript-mdx-tailwindcss
https://github.com/brightmann/snbtmt
演示博客:
https://snbtmt.vercel.app/
https://snbtmt.vercel.app/posts/fh 能显示视频。
越新的帖子,越排在网页的下面。
搭建基于nextjs的静态博客程序ssgi
首先fork此项目https://github.com/santhalakshminarayana/santhalakshminarayana.github.io,我fork后,得到的项目地址是https://github.com/brightmann/ssgi ,然后删除package-lock.json
访问https://github.com/brightmann/ssgi/tree/master/posts,在此处新建源帖(即add file),我新建了源帖fh.mdx,内容为:
---
title: "战马"
description: "这是一篇文章"
imgName: "chromatic-adaptation/chromatic-adaptation.jpg"
date: "Jun 16, 2026"
tags: ["misc1", "misc2", "misc3"]
keywords:
["horse", "fighting", "song"]
---
此处写正文或html codes.
( 详见https://github.com/brightmann/ssgi/blob/master/posts/fh.mdx?plain=1)
然后,访问vercel.com/new ,导入项目https://github.com/brightmann/ssgi
Build Command栏填入yarn build
Install Command栏填入yarn
然后点击底部的deploy按钮,等待部署完成。部署完成后,我得到网址:
https://ssgi-rose.vercel.app/
项目地址:
https://github.com/santhalakshminarayana/santhalakshminarayana.github.io
https://github.com/santhalakshminarayana/santhalakshminarayana.github.io/issues/2
https://github.com/brightmann/ssgi
演示博客:
https://ssgi-rose.vercel.app/
https://ssgi-rose.vercel.app/blog/fh 能显示视频
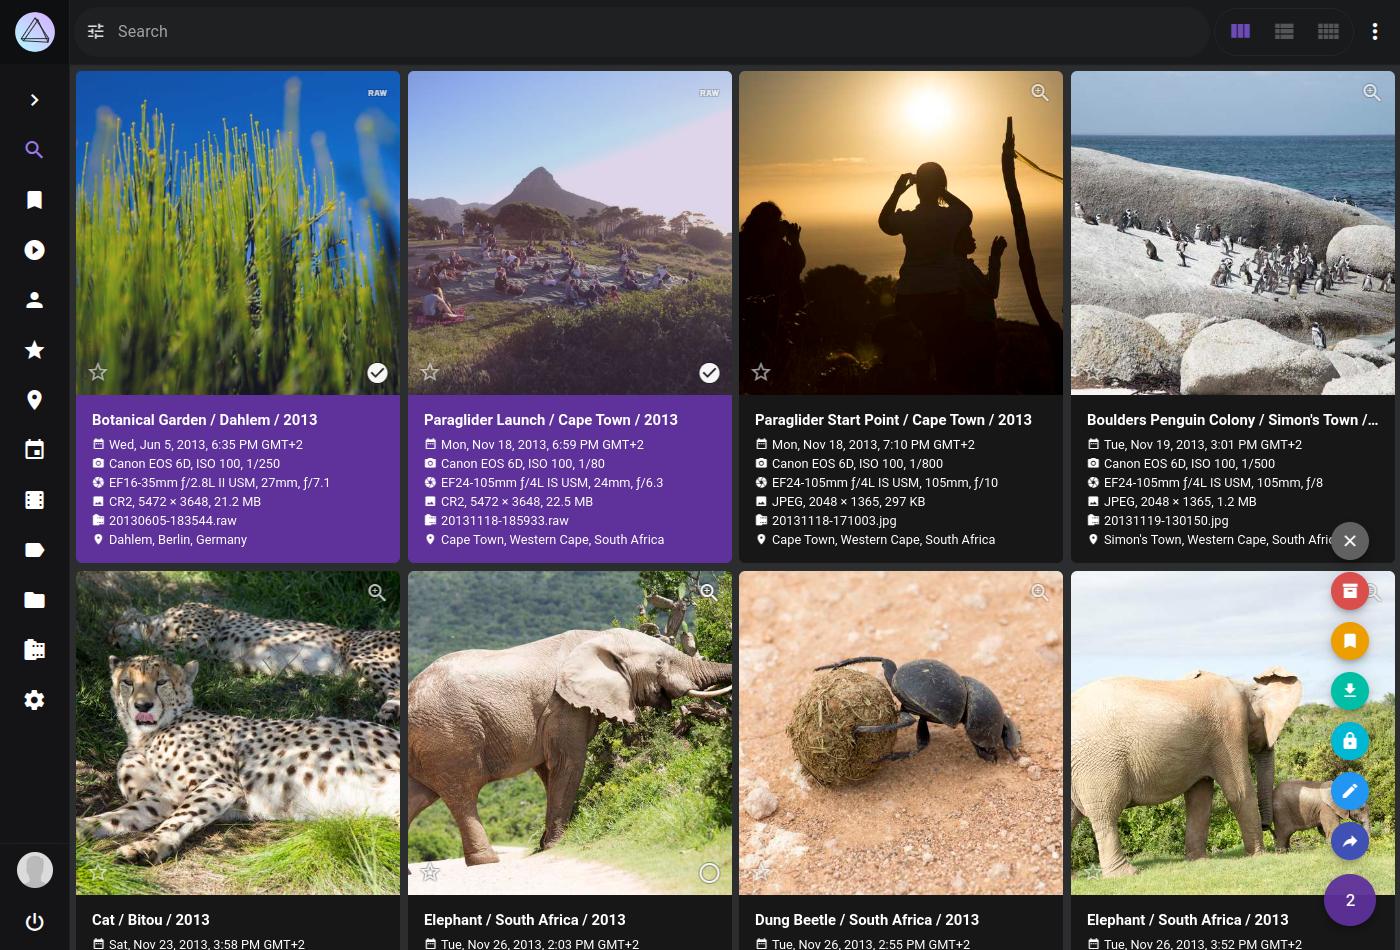
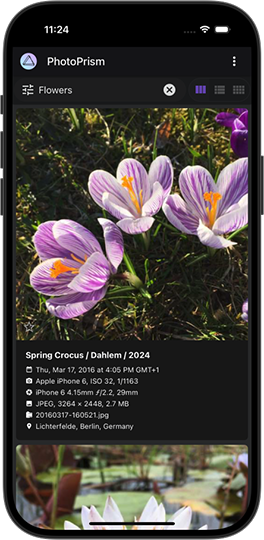
PhotoPrism
(go install github.com/photoprism/photoprism/cmd/photoprism@latest)
AI-Powered Photos App
PhotoPrism® is an AI-powered, privacy-first app for browsing, organizing, and sharing photos and videos. It helps tag, search, and rediscover media without getting in your way, whether self-hosted or in the cloud.
To get a first impression, you are welcome to play with our public demo. Please be careful not to upload any private, unlawful or offensive pictures.
Our mission is to provide the most user- and privacy-friendly solution to keep your pictures organized and accessible. That's why PhotoPrism was built from the ground up to run wherever you need it, without compromising freedom, privacy, or functionality:
- Browse all your pictures without worrying about RAW images or video formats
- Whether you're using a phone, tablet, or desktop computer, our intuitive PWA provides a native app-like experience and can be easily installed on your home screen
- Quickly find specific photos and videos with powerful search filters that can be combined and are available for many different properties, including labels, location, resolution, color, chroma, and quality
- Automatically labels your pictures based on content and location, and recognizes the faces of your family and friends
- Live Photos start playing when you hover over them and when viewing a slideshow
- Six high-resolution World Maps and our privacy-preserving geocoding service help bring back memories of your favorite trips and let you explore the world
- Metadata can be extracted and merged from Exif, XMP, and other sources like Google Photos
- Use compatible apps like PhotoSync to back up iOS and Android phones in the background
- WebDAV clients such as Microsoft's Windows Explorer and Apple's Finder can connect directly to PhotoPrism, allowing you to open, edit, and delete files from your computer as if they were local
Being completely self-funded and independent, we can promise you that we will never sell your data and that we will always be transparent about our software and services. Your data will never be shared with Google, Amazon, Microsoft or Apple unless you intentionally upload files to one of their services. 🔒
Step-by-step installation instructions for our self-hosted community edition can be found on docs.photoprism.app - all you need is a Web browser and Docker to run the server. It is available for Mac, Linux, and Windows.
The stable releases and development preview are available as a multi-arch image for 64-bit AMD, Intel, and ARM processors. That means, Raspberry Pi and Apple Silicon users enjoy the exact same functionality and can follow the same installation steps.
See our Getting Started FAQ for alternative installation methods, for example using the tar.gz packages we provide.
PhotoPrism is 100% self-funded and independent. Your continued support helps us provide more features to the public, release regular updates, and remain independent!
Our members enjoy additional features, including access to interactive world maps, and can join our private chat room to connect with our team. We currently have the following membership options:
- You can sign up directly on our website and pay with credit card or SEPA through Stripe, so you don't need to link an external account and can easily upgrade or downgrade at any time
- Alternatively, Patreon also supports PayPal, additional currencies, and lets you choose between monthly and annual billing for all tiers
If you currently support us through GitHub Sponsors, you can also register on our website and use the Activate GitHub Sponsors Membership button to link your account. For details on this and how to link your Patreon account, see our Activation Guide.
You are welcome to contact us for change requests, membership questions, and business partnerships.
View Membership FAQ › Sign Up ›
- Your continued support helps us provide regular updates and remain independent, so we can fulfill our mission and protect your privacy
- Sustained funding is key to quickly releasing new features requested by you and other community members
- Being self-funded and independent, we can personally promise you that we will never sell your data and that we will always be transparent about our software and services
Please also leave a star on GitHub if you like this project. It provides additional motivation to keep going.
A big thank you to all current and past sponsors, whose generous support has been and continues to be essential to the success of the project!
View Sponsors › View Credits ›
Visit docs.photoprism.app/user-guide to learn how to sync, organize, and share your pictures. If you need help installing our software at home, you are welcome to post your question in GitHub Discussions or ask in our Community Chat. Common problems can be quickly diagnosed and solved using our Troubleshooting Checklists. Eligible members are also welcome to email us for technical support and advice.
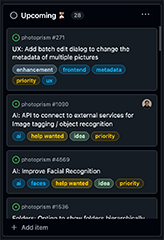
Our Project Roadmap shows what tasks are in progress and what features will be implemented next. You are invited to give ideas you like a thumbs-up, so we know what's most popular.
Be aware that we have a zero-bug policy and do our best to help users when they need support or have other questions. This comes at a price though, as we can't give exact release dates for new features. Our team receives many more requests than can be implemented, so we want to emphasize that we are in no way obligated to implement the features, enhancements, or other changes you request. We do, however, appreciate your feedback and carefully consider all requests.
Because sustained funding is key to quickly releasing new features, we encourage you to support our mission by signing up for a personal membership or purchasing a commercial license.
We kindly ask you not to report bugs via GitHub Issues unless you are certain to have found a fully reproducible and previously unreported issue that must be fixed directly in the app. Thank you for your careful consideration!
- When browsing issues, please note that our team and all issue subscribers receive an email notification from GitHub whenever a new comment is added, so these should only be used for sharing important information and not for discussions, questions, or expressing personal opinions
- In order for us to investigate new bug reports, they must include a complete list of steps to reproduce the problem, the software versions used and information about the environment in which the problem occurred, such as browser type, browser version, browser plug-ins, operating system, storage type, processor type, and memory size
- Contact us or a community member if you need help, it could be a local configuration problem, or a misunderstanding in how the software works
- This gives us the opportunity to improve our documentation and provide best-in-class support instead of dealing with unclear/duplicate bug reports or triggering a flood of notifications by replying to comments
Follow us on Mastodon, Bluesky, or join the Community Chat to get regular updates, connect with other users, and discuss your ideas. Our Code of Conduct explains the "dos and don’ts" when interacting with other community members.
As a contributor, you are also welcome to contact us directly if you have something on your mind that you don't want to discuss publicly. Please note, however, that due to the high volume of emails we receive, our team may be unable to get back to you immediately. We do our best to respond within five business days or less.
We welcome contributions of any kind, including blog posts, tutorials, translations, testing, writing documentation, and pull requests. Our Developer Guide contains all the information necessary for you to get started.
from https://github.com/photoprism/photoprism
awesome-codex-skills
A curated list of practical Codex skills for automating workflows across the Codex CLI and API.
Awesome Codex Skills

A curated list of practical Codex skills for automating workflows across the Codex CLI and API.
Want skills that do more than generate text? Codex can send emails, create issues, post to Slack, and take actions across 1000+ apps. See how →
git clone https://github.com/ComposioHQ/awesome-codex-skills.git
cd awesome-codex-skills
# Install one or more skills into $CODEX_HOME/skills (defaults to ~/.codex/skills)
python skill-installer/scripts/install-skill-from-github.py --repo ComposioHQ/awesome-codex-skills --path meeting-notes-and-actions
The installer fetches the skill and places it in $CODEX_HOME/skills/<skill-name>. Restart Codex to pick up new skills.
- Copy the desired skill folder (e.g.,
./spreadsheet-formula-helper) into$CODEX_HOME/skills/(defaults to~/.codex/skills/). - Restart Codex so it loads the new metadata.
- In your next session, describe the task or mention the skill name; Codex will trigger matching skills based on their
descriptionfrontmatter.
- Bernstein - Multi-agent orchestrator with Codex CLI adapter. Runs parallel Codex agents in isolated git worktrees with quality gates.
- What Are Codex Skills?
- Skills
- Using Skills in Codex
- Creating Skills
- Contributing
- Join the Community
Codex skills are modular instruction bundles that tell
Codex how to execute a task the way you want it done. Each skill lives
in its own folder with a SKILL.md that includes metadata
(name + description) and step-by-step guidance. Codex reads the metadata
to decide when to trigger a skill and loads the body only after it
fires, keeping context lean.
- brooks-lint -
AI code reviews grounded in six classic engineering books — decay risk
diagnostics with book citations, severity labels, and four analysis
modes (PR review, architecture audit, tech debt, test quality). Install:
python3 ~/.codex/skills/.system/skill-installer/scripts/install-skill-from-github.py --repo hyhmrright/brooks-lint --path skills/brooks-lint --name brooks-lint - bringyour-migration-auditor
- Audit Claude Code to Codex harness migrations for AGENTS.md/CLAUDE.md
scope, hooks, MCP config, skills, secrets, and validation notes.
Install:
python3 ~/.codex/skills/.system/skill-installer/scripts/install-skill-from-github.py --repo unitedideas/bringyour-mcp --path skills/bringyour-migration-auditor --name bringyour-migration-auditor - codebase-migrate/ - Run large codebase migrations and multi-file refactors in reviewable batches with CI verification.
- codebase-recon
- Analyze git history to understand a codebase before reading any code —
surfaces hotspots, bug magnets, bus factor, momentum, and high-risk
files (hotspot ∩ bug-magnet) via auto-scaled analysis. Install:
python3 ~/.codex/skills/.system/skill-installer/scripts/install-skill-from-github.py --repo yujiachen-y/codebase-recon-skill --path skills/codebase-recon --name codebase-recon - create-plan/ - Quickly draft concise execution plans for coding tasks.
- deploy-pipeline/ - End-to-end Stripe → Supabase → Vercel release pipelines with verify and rollback.
- Emdash Skills
- 14-category autonomous product-building OS: CF Workers + Hono +
Angular + D1 + Stripe. One-line prompts to deployed SaaS with 94
reference docs, 18 agents, and Codex-native
.agents/skills/support. - gh-address-comments/ - Address review or issue comments on the open GitHub PR for the current branch using
gh. - gh-fix-ci/ - Inspect failing GitHub Actions checks, summarize failures, and propose fixes.
- mcp-builder/ - Build and evaluate MCP servers with best practices and an evaluation harness.
- pr-review-ci-fix/ - Automated GitHub/GitLab PR review plus CI auto-fix loop via the Composio CLI.
- sentry-triage/ - Diagnose Sentry issues by mapping stack frames to local source — no copy-paste.
- webapp-testing/ - Run targeted web app tests and summarize results.
- AuraKit -
All-in-one skill framework: 46 modes, 23 sub-agents, 6-layer OWASP
security, 10 lifecycle hooks, ~55% token savings. Install:
npx @smorky85/aurakit - Vibe-Skills - Governed Codex skill harness for staged, test-driven work: routes 340+ skills through requirement freeze, plan approval, execution, verification evidence, and cross-session memory.
- polywave - Parallel agent coordination with structural merge safety. Scout decomposes, Wave agents implement in isolated worktrees with disjoint file ownership. Same protocol on Claude Code and Codex.
- connect/ - Connect Codex to 1000+ apps via the Composio CLI for real actions (Slack, GitHub, Notion, etc.).
- connect-apps/ - Wire up Composio CLI connections for Claude and kick off app workflows from the shell.
- issue-triage/ - Triage Linear or Jira backlogs and run bug sweeps from the terminal.
- linear/ - Manage issues, projects, and team workflows in Linear.
- meeting-insights-analyzer/ - Analyze meeting transcripts for themes, risks, and follow-ups.
- meeting-notes-and-actions/ - Turn meeting transcripts into summaries with decisions and owner-tagged action items.
- internal-comms/ - Craft internal announcements, updates, and stakeholder messaging.
- invoice-organizer/ - Normalize and extract invoice data for tracking and reporting.
- notion-knowledge-capture/ - Convert chats or notes into structured Notion pages with proper linking.
- notion-meeting-intelligence/ - Prepare meeting materials with Notion context plus Codex research.
- notion-research-documentation/ - Synthesize multiple Notion sources into briefs, comparisons, or reports with citations.
- notion-spec-to-implementation/ - Turn Notion specs into implementation plans, tasks, and progress tracking.
- support-ticket-triage/ - Triage customer support tickets with categories, priority, next actions, and draft replies.
- file-organizer/ - Organize, rename, and tidy files to keep workspaces clean.
- paperjsx/
- Generate PPTX presentations, DOCX documents, XLSX spreadsheets, and
PDF invoices/reports/charts from structured JSON. Runs locally via
@paperjsx/mcp-server— no API key, no network calls. - skill-share/ - Share skills and reusable instructions across teammates.
-
codex-sms-verification - External repo: real-SIM SMS verification for AI agents via VirtualSMS MCP. 145+ countries, 2000+ services, both hosted (mcp.virtualsms.io) and local stdio transports.
-
email-draft-polish/ - Draft, rewrite, or condense emails for the right tone and audience.
-
changelog-generator/ - Create clear changelogs from commits or summaries.
-
content-research-writer/ - Research and draft content with sourced citations.
-
diasporic-intelligence - External repo: source-credit skill for consent-governed lineage AI with attribution, provenance, revocation, and non-impersonation boundaries.
-
novel-writing - External repo: public Codex skill for fiction planning, chapter drafting, scene continuation, and revision.
-
tailored-resume-generator/ - Tailor resumes to job descriptions with quantified impact.
-
unslop - External repo: CLI and MCP server that removes AI writing patterns from text: tricolons, em-dash overuse, hedging stacks, and sycophancy openers. Works with Codex, Claude Code, Gemini CLI, and Cursor. Five intensity levels and a lint-only audit mode.
- spreadsheet-formula-helper/ - Write and debug spreadsheet formulas, pivots, and array formulas.
- competitive-ads-extractor/ - Analyze competitor ads and extract structured insights.
- datadog-logs/ - Filter Datadog logs from the shell via the Composio CLI, with JSON-friendly output and digest workflows.
- developer-growth-analysis/ - Analyze Codex chat history for coding patterns and learning gaps.
- lead-research-assistant/ - Research leads and enrich records with firmographic data.
- domain-name-brainstormer/ - Brainstorm available domain names with criteria and checks.
- raffle-winner-picker/ - Randomly select winners with audit-friendly logs.
- langsmith-fetch/ - Pull LangSmith project/test data for analysis.
- helium-mcp/ - Search real-time news with bias scoring, get live market data, ML options pricing, and balanced news synthesis via MCP.
- brand-guidelines/ - Apply OpenAI/Codex brand colors and typography to artifacts.
- agent-deep-links/ - Build and validate deep links for Codex, Cursor, and VS Code with Slack-safe formatting and fallback guidance.
- canvas-design/ - Generate structured canvas layouts and design artifacts.
- image-enhancer/ - Upscale and refine images with configurable presets.
- slack-gif-creator/ - Generate GIFs for Slack with captions and styling.
- theme-factory/ - Create reusable theme tokens and palettes.
- video-downloader/ - Download and prepare videos for offline review.
- template-skill/ - Starter template for building new skills.
- skill-installer/ - Helper scripts to install skills from curated lists or GitHub paths.
- skill-creator/ - Guidance for building effective Codex skills with progressive disclosure.
- Skills live in
$CODEX_HOME/skills(default~/.codex/skills). Each subfolder needs aSKILL.mdwithnameanddescriptionfrontmatter. - After installing or updating a skill, restart Codex so it reloads metadata.
- In a session, describe the task naturally; Codex auto-triggers skills whose descriptions match the request. You can also mention a skill by name if you want it considered.
- To verify installation, list installed skills (
ls ~/.codex/skills) and inspect metadata (head ~/.codex/skills/<skill>/SKILL.md).
Creating Skills
Skill layout:
skill-name/
├── SKILL.md          # Required: instructions + YAML frontmatter
├── scripts/          # Optional: helper scripts for deterministic steps
├── references/       # Optional: long-form docs loaded only when needed
└── assets/           # Optional: templates or files used in outputs
Basic SKILL.md template:
---
name: my-skill-name
description: What the skill does and when Codex should use it.
---

# My Skill Name

Clear instructions and steps for Codex to execute the task.
Best practices:
- Keep the
descriptionexhaustive about when to trigger; keep the body focused on execution steps. - Use progressive disclosure: put detailed references in
references/and call them out fromSKILL.mdonly when needed. - Include scripts for repeatable or deterministic operations; mention when Codex should run them.
- Avoid extra docs (README, changelog) inside the skill folder to keep context lean.
Join the Community
- Join our Discord - Chat with other developers building Codex skills.
- Follow on X - Updates on new skills and features.
- Questions? support@composio.dev
Resources
Join thousands of developers building agents that ship
from https://github.com/ComposioHQ/awesome-codex-skills
FASTFOX - FIREFOX FULLY CUSTOMIZED
"FEATURE :
SURFING WEB WITHOUT ANNOYING ADS * KILL ANNOYING ADS AT FACEBOOK * FACEBOOK AUTO PHOTO ZOOM * NETWORK TWEAKING * IDM INTEGRATION MODULE * 4SHARED DIRECT DOWNLOAD WITHOUT LOGIN * ALLOWS YOU TO LOGGED INTO MULTIPLE ACCOUNT * REMOVE UNWANTED TWEET OR HASHTAG ON TWITTER * AND MUCH MORE..."
https://sourceforge.net/projects/fastfox/
下载地址:https://sourceforge.net/projects/fastfox/files/
BiglyBT,Feature-filled Bittorrent client
based on the Azureus open source project。
Source for BiglyBT, a feature filled, open source, ad-free, bittorrent client. BiglyBT is forked from the original project and is being maintained by two of the original developers as well as members of the community. With over 20 years of development, there's a good chance we have the features you are looking for.
- Official BiglyBT site
- Ways to Contribute
- Translation Information
- Feature Voting Page
- Coding Guidelines
- Beta Program Changelog
Getting the basics to compile from source is pretty straightforward:
- Clone the repo into your favorite IDE
- Mark
core/srcanduis/srcas project roots (source modules) - To the uis module, add
core/lib/*and one of the swt.jars at/uis/lib/:
swt-win64.jaron Windows
swt-cocoa-64.jaron OSX
swt-linux-64.jaron Linux (GTK) - To the core module, add
core/lib/* - Make
uismodule depend oncore.Coreshould not depend onuis
IntelliJ IDEA will do all these steps for you with its wizard.
If you wish IntelliJ IDEA to show MessageBundle strings instead of keys, as well as reduce the number of NPE warnings, you can attach the external annotations either by:
- Project Settings->Modules->Paths->External Annotations
- in
<module>/<module>.imladd to component:<annotation-paths> <root url="file://$MODULE_DIR$/../external-annotations" /> </annotation-paths>
External Annotations definitions are a WIP and not complete list of definitions.
Running is only few more steps:
-
Main class is
com.biglybt.ui.Mainin moduleuis -
Working Directory should be a new folder, since the app will write things to it. Put the
aereg.dllorlibOSXAccess.jnilibin there.When a normal user is running the app, the working directory is where the jar, executable, and libraries (dll, so, jnilib) are.
-
If you want a separate config dir from the default one, use VM Option
-Dazureus.config.path=<some config path> -
Run it
We build our installers using Install4j, multi-platform installer builder

Our binaries and installers up to and including v3.4 are signed with a digital signature of "Bigly Software". Releases after v3.4 will use an individual signing certificate and will bear the name "Arron Mogge (Open Source Developer)" denoting the identity of our team member responsible for signing.
from https://github.com/BiglySoftware/BiglyBT
(下载地址: https://github.com/BiglySoftware/BiglyBT/releases)
Sunday, 12 July 2026
一款专为高速、大规模媒体下载而设计的批量视频下载器 Meget Pro
为什么选择 Meget Pro 而不是 Hitomi Downloader?
- 批量下载功能 :与 Hitomi Downloader 不同,Meget Pro 旨在高效地同时下载多个视频和图像。
- 广泛的网站兼容性 :支持10,000多个视频和图像托管网站。
- 更快的下载速度 :使用多线程技术,快速下载。
- 内置媒体转换 :立即将下载的文件转换为各种格式。
- 用户友好界面 :提供更直观、更易于使用的体验。
- 可靠的客户支持 :与开源替代品不同,Meget Pro 提供专门的支持。
- 定期更新 :确保与不断变化的网站结构的兼容性。
如何使用 Meget Pro 批量下载视频和图像:
步骤 1:单击下面的下载,为您的 Windows 或 Mac 下载 Meget Pro,然后在您的计算机上安装并启动该软件。
第 2 步:在 Meget Pro 的内置浏览器中访问包含您想要下载的视频或图像的网站.
凭借卓越的批量下载功能、更快的速度、更广泛的网站支持和内置媒体转换功能,Meget Pro 是经常大量下载视频和图像的人的理想选择。
https://zh-cn.meget.io/meget-pro/
(我亲测,确实可用Meget Pro下载youtube video)
----------------------
相关帖子:
https://briteming.blogspot.com/2022/07/twitterpornhubyoutubebinstagramhitomi.html
一些Android/Linux/MacOS/Windows程序的下载地址
https://file.cnxiaobai.com/Android/
https://file.cnxiaobai.com/Linux/
https://file.cnxiaobai.com/MacOS/
https://file.cnxiaobai.com/Windows/
from https://file.cnxiaobai.com
用chrome插件tubly下载youtube video
1.下载扩展程序
点击下方按钮下载扩展程序包(.zip文件)。
https://tubly.download/tubly_downloader_v1.5.5.zip
2。 解压ZIP文件
下载后,找到ZIP文件并解压以获取.crx文件。
3。 启用开发者模式
在Chrome浏览器中访问chrome://extensions/,并在右上角启用"开发者模式"。(英文为developer mode)
4. 拖拽安装
将解压出的.crx文件(不是ZIP文件)拖到扩展程序页面,然后在提示时点击"添加扩展程序"。
故障排除: 如果没有出现安装对话框,请确保已启用开发者模式(步骤3),并且你拖拽的是解压后的.crx文件,而不是ZIP文件或直接从Windows压缩文件夹中拖拽的.crx文件(步骤2)
from https://tubly.download/zh/install.html
( https://tubly.download/zh/)
下载示例视频:https://www.youtube.com/watch?v=e6rhUvwB5Y8
不错,我亲测有效。
基于Django(后端程序)和 React(前端程序)的协作文本编辑程序docs
Docs is an open-source text editor: web-native, made for real-time collaboration, cleanly structured documents and sub-documents with full ownership of your data. Built to scale with Django(后端程序) and React(前端程序)
Docs, where your notes can become knowledge through live collaboration.
Docs is an open-source collaborative editor that helps teams write, organize, and share knowledge together - in real time.
Docs is an open-source alternative to tools like Notion or Google Docs, focused on:
- Real-time collaboration
- Clean, structured documents
- Knowledge organization
- Data ownership & self-hosting
Built for public organizations, companies, and open communities.
- Rich-text & Markdown editing
- Slash commands & block system
- Beautiful formatting
- Offline editing
- Optional AI writing helpers (rewrite, summarize, translate, fix typos)
- Live cursors & presence
- Comments & sharing
- Granular access control
- Subpages & hierarchy
- Searchable content
- Import to
.docxand.md - Export to
.docx,.odt,.pdf
Experience Docs instantly - no installation required.
Docs supports Kubernetes, Docker Compose, and community-provided methods such as Nix and YunoHost.
Get started with self-hosting: Installation guide
Warning
Some advanced features (for example: Export as PDF) rely on XL packages from Blocknote.
These packages are licensed under GPL and are not MIT-compatible
You can run Docs without these packages by building with:
PUBLISH_AS_MIT=trueThis builds an image of Docs without non-MIT features.
More details can be found in environment variables
Run Docs locally for development and testing.
Warning
This setup is intended for development and testing only. It uses Minio as an S3-compatible storage backend, but any S3-compatible service can be used.
- Docker
- Docker Compose
- GNU Make
Verify installation:
docker -v
docker compose version
If you encounter permission errors, you may need to use
sudo, or add your user to thedockergroup.
The easiest way to start is using GNU Make:
make bootstrap FLUSH_ARGS='--no-input'This builds the app-dev and frontend-dev containers, installs dependencies, runs database migrations, and compiles translations.
It is recommended to run this command after pulling new code.
Start services:
make runDefault credentials (development only):
username: impress
password: impressFor frontend work, running outside Docker is often more convenient:
make frontend-development-install
make run-frontend-developmentStarting all services except the frontend container:
make run-backendmake frontend-test
make frontend-lintBackend tests can be run without docker. This is useful to configure PyCharm or VSCode to do it.
Removing docker for testing requires to overwrite some URL and port values that are different in and out of
Docker. env.d/development/common contains all variables, some of them having to be overwritten by those in
env.d/development/common.test.
Create a basic demo site:
make demoTo check all available Make rules:
make helpCreate a superuser:
make superuserAdmin UI: http://localhost:8071/admin
from https://github.com/suitenumerique/docs
-----
Docs(https://github.com/suitenumerique/docs)这个项目我一直都在关注,奈何之前的部署方式只支持k8s,如果只是为了部署一个笔记软件去搭一个k8s的话,那真的是有点拿大炮打蚊子那味了= =最近发现这个项目支持用docker compose部署了,遂记录下部署过程与遇到的一些问题。
不得不说国家队还是牛B!这个笔记软件第一次用就感觉挺顺手的,前端UI简洁大气,自带AI功能,可以帮你美化、改写、总结、修正错别字、翻译等。自托管的实例所有功能都能使用,与官方实例1:1还原,而不是像某些“开源笔记”那样吃相难看。
缺点也还是有的,没有十全十美的东西= =目前虽然支持docker compose部署了,但部署起来还是比较麻烦。另外我在使用中发现一些小bug,例如:上传的文件名不能包含中文,有中文就会导致上传失败。导出的PDF文件显示中文是乱码,且不支持代码块等。如果你不介意这些问题的话,可以尝试一下。
本文根据Docs官方的文档(https://github.com/suitenumerique/docs/blob/main/docs/installation/compose.md)编写,进行了一些修改:
1.将Keycloak更换为VoidAuth,因为Keycloak部署和配置都过于复杂。
2.将MinIO更换为Garage,因为开源的MinIO已经名存实亡了。
3.不使用官方的NGINX反向代理配置,因为我的服务器已经运行Ferron Web Server了。
基于python的密码生成器程序 Password-Generator
Generates Password Instantly
cd ~/Dev
mkdir password_generator
cd ~/Dev/password_generator
git clone https://github.com/Arvind-4/password-generator.git .
python src/main.py
from https://github.com/arvind-4/password-generator基于django的聊天网站程序Chatapp
Real Time Chat App Using Django, Channels, JavaScript and much more.


Real Time Chat App Using Django, Channels, JavaScript, Docker, Tailwind CSS and much more..
- Real-time messaging: The app allows users to send and receive messages in real-time, providing a seamless chatting experience.
- Django and Channels: The app is built using the Django web framework and Channels, which extends Django to handle WebSockets and other asynchronous protocols.
- JavaScript: The app uses JavaScript to provide a dynamic and interactive user interface.
- Docker: The app can be containerised using Docker, making it easy to deploy and manage.
- Tailwind CSS: The app uses Tailwind CSS, a utility-first CSS framework, to style the user interface.
Is there anything else you would like to know about this chat app?

- WebSockets - WebSocket is a computer communications protocol, providing full-duplex communication channels over a single TCP connection.
- Django - Django makes it easier to build better web apps more quickly and with less code.
- Django Channels - Channels is a project that takes Django and extends its abilities beyond HTTP - to handle WebSockets, chat protocols, IoT protocols, and more.
- Vite - Next Generation Frontend Tooling.
- Tailwind 3 - Rapidly build modern websites without ever leaving your HTML.
- Docker - Docker is a platform designed to help developers build, share, and run modern applications. We handle the tedious setup, so you can focus on the code.
- Postgres DB - The World's Most Advanced Open Source Relational Database.
- Clone the project and make it your own.
mkdir ~/Dev
cd ~/Dev
git clone https://github.com/Arvind-4/Chatapp.git
cd Chatapp- Create virtual environment and activate it.
python3.9 -m venv .
source bin/activate
Use .\venv\Scripts\activate if on Windows.
- Install requirements
$(Chatapp) python -m pip install pip --upgrade
$(Chatapp) python -m pip install -r requirements.txt- Open VS Code
code .- Create
.envfile:
Add Your Credentials .env from .env.sample:
PYTHON_VERSION=

DJANGO_PG_PASSWORD=iz-MAIesYif5c8d53pEnAg
DJANGO_PG_HOST=db
DJANGO_PG_USER=admin
DJANGO_PG_DATABASE=chatdb
DJANGO_PG_PORT=5432

DJANGO_REDIS_HOST=redis
DJANGO_REDIS_PORT=6379

DJANGO_SUPERUSER_EMAIL=
DJANGO_SUPERUSER_USERNAME=admin
DJANGO_SUPERUSER_PASSWORD=-_cYnxeqvWQKhCUe_AJn8Q

DJANGO_SECRET_KEY=P_wXmuyfulz3qZTe3bAmRw5d0-9maJ5PIIVDMjMIm1gw
DJANGO_ADMIN_URL=admin/
DJANGO_DEBUG=1
DJANGO_ALLOWED_HOSTS=*
DJANGO_REDIS_AVAILABLE=0
DJANGO_HTTPS_SECURITY=0
DJANGO_LIVE=0

POSTGRES_PASSWORD=iz-MAIesYif5c8d53pEnAg
POSTGRES_USER=admin
POSTGRES_DB=chatdb
Replace your SECRET_KEY with a new one using the code Below.
python -c 'from django.core.management.utils import get_random_secret_key; print(get_random_secret_key())'Or
bash commands/secret.sh- Build and Start the Docker File:
Below will start a Docker Instance on your local machine to match the .env from the previous step.
docker compose -f docker-compose.selfhost.yaml buildStart the Docker Build Image:
docker compose -f docker-compose.selfhost.yaml up- Run Django Commands & Migrations and Create Superuser
cd ~/Dev/Chatapp
source bin/activate
$(Chatapp) python manage.py makemigrations
$(Chatapp) python manage.py migrate
$(Chatapp) python manage.py createsuperuser
Run the server:
$(Chatapp) python manage.py runserver- Install & Build the Front end.
Install the Required Dependencies
npm run bootstrapBuild the Front end for Production
npm run productionClick the Button to Deploy to Render.

OR
Self Host using Docker, Docker Compose in a VM :)
from https://github.com/arvind-4/Chatapp