Total Pageviews

Showing posts with label jamstack. Show all posts

Monday, 11 November 2024

Using Next.js with FaunaDB: How to Query the Database from Your App


What distinguishes plain static sites from Jamstack sites?

Their use of data from APIs.

While a traditional static site might use file-based data like Markdown and YAML, a Jamstack site frequently uses things like a headless CMS or e-commerce.

Headless CMS and API-driven services like Algolia fill many needs but are built for particular purposes. Your Jamstack site might need to store and access data that doesn't fit into the CMS archetype, for instance. In those cases, you might need a... database!

Fauna is one solid option. It is a cloud-based transactional serverless database that makes that data available via a data API. This makes it ideal for use in a Jamstack application.

A great piece about FaunaDB with its CEO here.

This article will explore how to get started using FaunaDB and Next.js to connect a database to a Jamstack site built in the React framework.

We'll cover:

  1. Setting up FaunaDB

  2. Using Fauna Query Language

  3. Setting up Next.js and Fauna DB

More about serverless architectures here.

Setting up FaunaDB

Fauna databases provide many ways to get started. You can use the web-based admin to create and manage new databases. However, you can also do most actions via the Fauna Shell, a CLI for interacting with Fauna, which is what we'll use for this tutorial.

npm install -g fauna-shell

Now we can log in.

fauna cloud-login

You'll need to enter your email and password. If you signed up using third-party authentication like Netlify or GitHub, you need to create the database via the web admin and get a security key in the security tab of the database.

Fauna documentation about cloud-login here

We'll create a simple application using Next.js that will be a list of shows that I want to watch. Let's create a new database to store this data.

fauna create-database my_shows

At this point, we can use the shell to interact with the database and create new collections, which are Fauna's equivalent of a table.

fauna shell my_shows

You should see something like the following:

Starting shell for database my_shows
Connected to https://db.fauna.com
Type Ctrl + D or .exit to exit the shell
my_shows> 

Using FQL (Fauna Query Language) to create and query data

Once inside the shell, you can interact with your new database using FQL (Fauna Query Language). FQL is essentially Fauna's API language for creating, updating, and querying data. However, it isn't an API in the way you're probably used to using one. It includes things like data types, built in functions and even user defined functions that make it feel more like a programming language than a typical API. There's a lot you can do with FQL, more than we can cover in-depth here. Be sure to refer to the documentation for a full overview.

Let's start by creating a collection called "shows."

CreateCollection({ name: "shows" })

A collection in Fauna stores documents. If you are more comfortable with a traditional relational database model, you can think of these as table rows. We could create a single document using the Create() method, but instead, populate multiple documents using the Map() method. We'll map over a nested array of values. Each of the nested arrays represents the values of one document. We'll use these to populate the two properties in our document, title and watched. For now, we'll set watched on all these dummy items to false to indicate we have not yet watched them.

Map(
  [
    ["Kim's Convenience",false],
    ["I'm Sorry",false],
    ["The Good Place",false]
  ],
  Lambda(["title","watched"],
    Create(
      Collection("shows"), { data: { title: Var("title"), watched: Var("watched")} }
    )
  )
)

Lastly, let's query for all the documents in our "shows" collection. In this case, we'll use Collection() to define which collection we are pulling from, Documents() to say that we want all the references to each document in our shows collection, and then Paginate() to convert these references to Page objects. Each page will be passed to the Lambda() function, where they will be used to Get() the full record.

Map(
  Paginate(Documents(Collection("shows"))),
  Lambda(show => Get(show))
)

You should see a result like:

{
  data: [
    {
      ref: Ref(Collection("shows"), "293065998672593408"),
      ts: 1615748366168000,
      data: { title: "I'm Sorry", watched: false }
    },
    {
      ref: Ref(Collection("shows"), "293065998672594432"),
      ts: 1615748366168000,
      data: { title: 'The Good Place', watched: false }
    },
    {
      ref: Ref(Collection("shows"), "293065998672595456"),
      ts: 1615748366168000,
      data: { title: "Kim's Convenience", watched: false }
    }
  ]
}

Finally, before we move on, we should create an index for this collection. Among other things, the index will make it easier to locate a document, updating the records easier.

CreateIndex({
  name: "shows_by_title",
  source: Collection("shows"),
  terms: [{ field: ["data", "title"] }]
})

Now that we have our database created and populated let's move to use it within a Next.js app.

Getting data in Next.js with FaunaDB

We're going to walk through creating a simple web app using Next.js that uses our Fauna table to allow us to add shows we want to watch and mark the shows we've watched as done. This will demonstrate how to read data from Fauna and display it in Next.js, create new records in Fauna, and update an existing record.

The code for this sample is available in GitHub. It borrows the layout from this CodePen. You can see what the app looks like below.

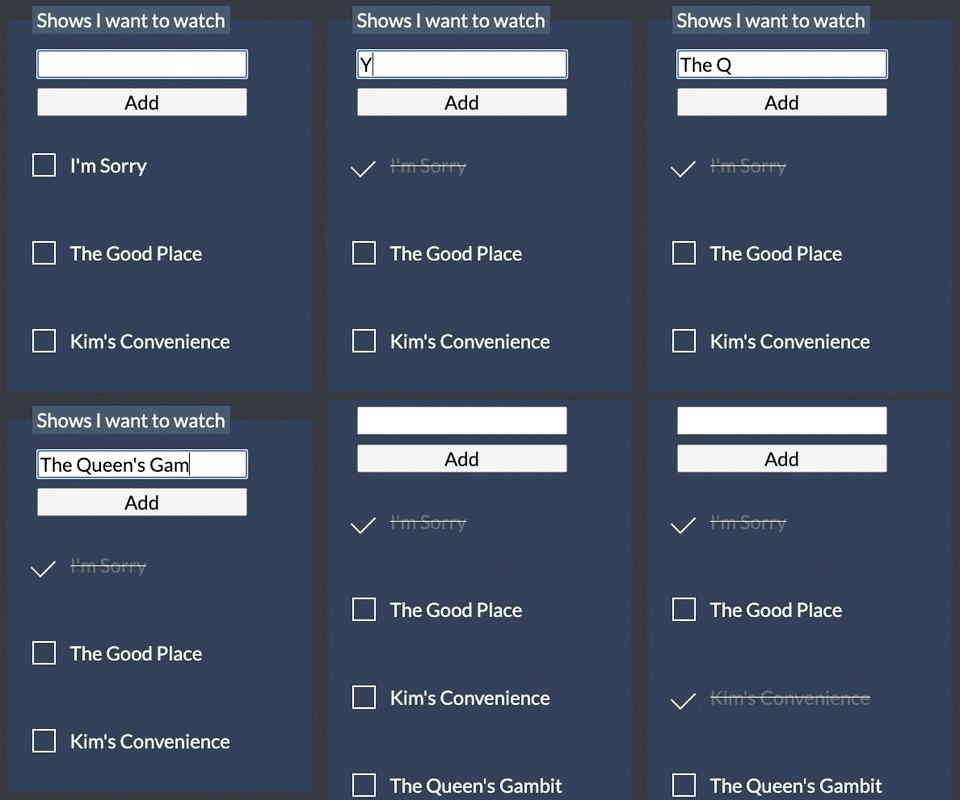
The sample of Shows to Watch app

To use the sample yourself, you'll need to provide a .env file with a value for FAUNADB_SECRET that contains a key from Fauna to connect to your shows collection. To obtain a key, go to the "Security" tab within your collection on the Fauna dashboard and create a new key.

We won't cover every detail of building a Next.js app here as it is just a single page. We'll explore some of the basic pieces that you need to understand to use Fauna.

You can follow this tutorial from Vercel to get started with Next.js

Fauna JavaScript driver

To query Fauna within our app, we're going to use the Fauna JavaScript driver. This is a Node.js library for integrating with Fauna. It allows you to run the same FQL queries that we ran within the Fauna Shell from your Node application. To add this to a new Next.js application, you need to run:

npm install faunadb

Within Node, you need to instantiate the client with your Fauna key. We can do this from within a /lib/fauna.js file that we will include wherever we need to access data in Fauna. It gets the key from an environment variable called FAUNADB_SECRET that is within a .env.local file.

import faunadb from 'faunadb';

export const faunaClient = new faunadb.Client({
  secret: process.env.FAUNADB_SECRET,
});

Protecting your API key

Before we begin getting data, there's one area of concern. Since our application data is all user-generated, it is getting all of its Fauna data client-side rather than at build time. This means that anyone inspecting the API call would have access to the Fauna key.

There are two ways to handle this:

1. Create a key that has very restricted permissions set within the Fauna dashboard to limit misuse.

This still exposes the key but limits the potential for misuse. It's handy if you are reading data and limit the key to read-only.

2. Create a serverless function that is an intermediary for calling the Fauna API, thereby hiding your key entirely.

This is the more secure option because it never exposes the key at all. Users can still call the endpoint if they inspect how, but the API limits what they can do.

Luckily, within Next.js, there is an easy way to accomplish the second option by using Nextjs API routes.

All of the interaction with Fauna within this sample app will go through one of three API routes: getShows; addShows; or updateShows.

Getting data from Fauna database

From a Fauna Query Language standpoint, reading data from Fauna is pretty straightforward. We'll use the same Map() function we used within the Fauna Shell earlier. We need to do it in the context of the client that we instantiated earlier.

from https://snipcart.com/blog/nextjs-faunadb


New to Jamstack?


What is the Jamstack?

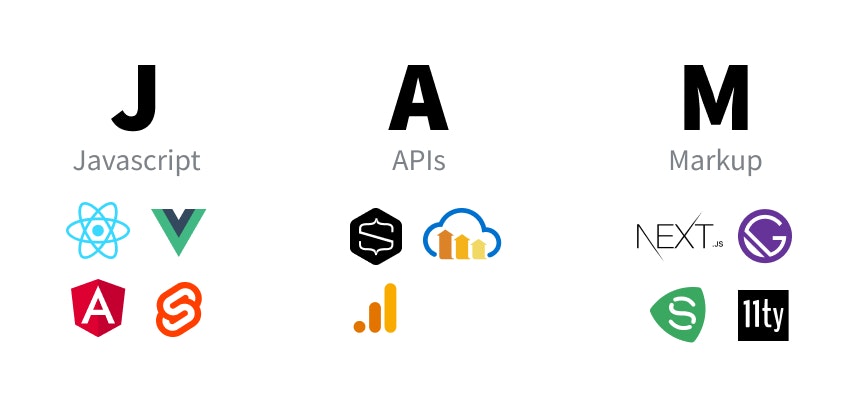
The Jamstack is an architecture where a website is delivered statically, such as serving HTML from static hosting or CDN (content delivery network), but providing dynamic content and an interactive experience through JavaScript. The term itself represents the JAM in a website: JavaScript, APIs, and Markup.

Jamstack Javascript APIs Markup

This concept started from an idea: that the developer community needed a way to get past the potential negative stigmas of the word “static”. It gives us a term to describe how a modern dynamic web app is built.

Some argue we’re past the JAM in Jamstack, but the concepts remain. We still depend on Markup to deliver a website or application and optionally can use JavaScript and APIs to enhance the experience.

Though Jamstack includes the word “stack”, it’s more of an architecture. It’s a foundation and set of principles that when put together represent a powerful way of building web applications.

What’s the difference compared to traditional architecture?

If you look at the beginning of the web, we can see Jamstack concepts in practice. Before server-side solutions were in place, developers wrote HTML by hand and served static sites to their visitors.

But as the web grew, the technology matured, seeing complex and powerful server-side solutions come into the picture. That led to projects like WordPress, where with a small amount of work to install it on a server, you can be up and running with an entire website and a content management system (CMS).

While WordPress is in fact still pretty much dominant, developers wanted to deliver static content in a way that would be more performant. They were also looking for fewer moving pieces and less maintenance than typical serverful solutions that run on the client-side.

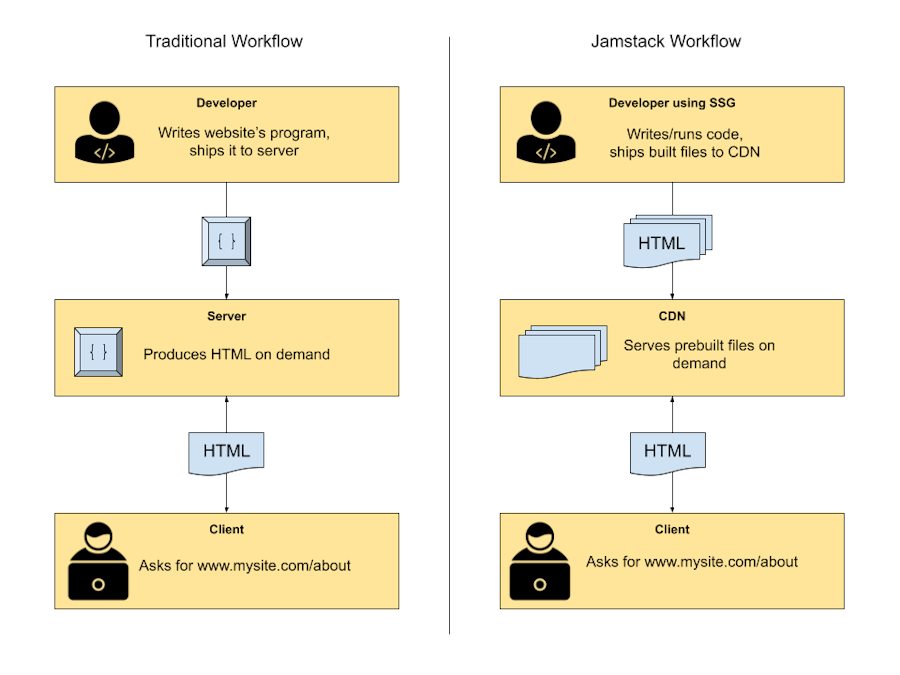
Traditional Workflow VS Jamstack Workflow

This gave way to static site generators and static hosting solutions like AWS S3, which a developer could use to deliver an entire website statically. This eventually led to platforms like Netlify and Vercel that made that process easier and came up with a ton of features to make the web development process better.

What are the benefits of the Jamstack?

The Jamstack comes with a lot of benefits compared to the more traditional web development approach. For instance, Jamstack web apps are fast, reliable, scalable, and usually pretty cheap.

Out of the box, they hit all of the 5 AWS Well-Architected pillars. By delivering an app from a static hosting platform, you’re:

  • Limiting the number of moving pieces required to deliver that app

  • Exposing fewer attack surfaces for bad actors

  • Providing an app that will infinitely scale, suffering from less downtime

  • Delivering the website fast as its mostly static files

  • Spending less money on hosting

Beyond these benefits, the Jamstack world is rich with a fantastic developer experience.

Frameworks like Next.js and Gatsby allow you to build a new web app in 1 minute. You can then deploy that website from a GitHub repository to Netlify or Vercel in 1 additional minute. Alternatively, you can use tools like Stackbit and Builder.io that take care of that entire end-to-end process.

Web services are also being driven by the Jamstack growth to provide a better developer experience. Content management systems and eCommerce services (like Snipcart) make it easy to manage even the most complex applications built with the Jamstack.

While it’s already fun and easy to build web apps in the Jamstack world, it’s still relatively young. There’s a ton of growth potential and room for improvement that will continue to change how we develop web applications.

What are the disadvantages of Jamstack?

The Jamstack main disadvantage for some is its strength for others. More traditional ways of building a website, like WordPress, don’t require you to think about the frontend and backend. The entire solution comes with a user interface and a content management system that ultimately serves a rendered website.

With the Jamstack, on the other hand, you need multiple tools and services to accomplish the same result. You’ll also need to think about your frontend and your backend separately since those will be decoupled. Since many pieces of a web project are decoupled, managing and building a website with the Jamstack architecture might be more complex for less tech-savvy users. While I may create the frontend of my application with Next.js for example, I would need to choose another solution for user and content management.

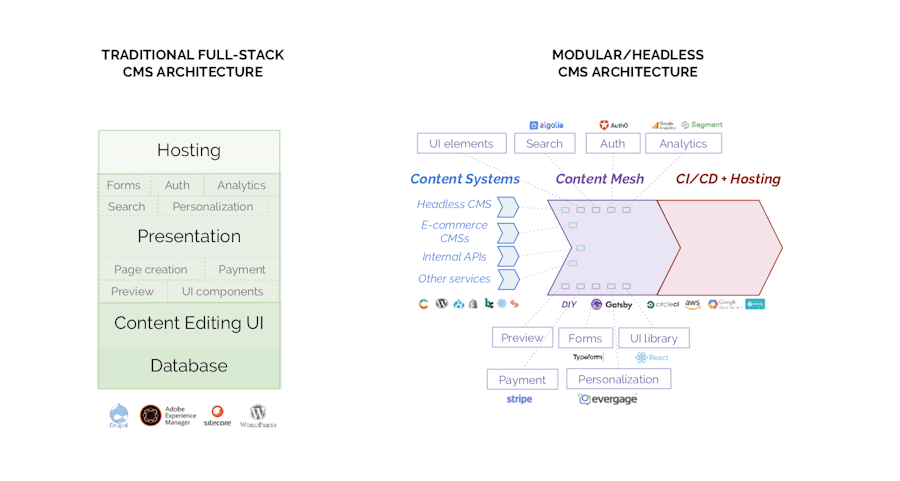
Modular CMS Architecture

Some argue there’s a lot of benefit to having decoupled parts each doing their tasks really well. Others feel there are too many different services to manage, each with its own separate billing and user management.

There’s also a challenge with how Jamstack projects are built for large websites. If you’re just starting off with a few pages, you may not notice, but websites with thousands or millions of pages are going to have a hard time as their static site generator needs to render each page before getting deployed.

The good news is this problem is actively being tackled with features like Incremental Builds.

Like any architecture or set of tools, it’s important that you weigh the pros and cons of the Jamstack for your project, instead of being dogmatic about a particular solution.

How has the Jamstack evolved over the years?

Like any new, popular technology, the Jamstack has seen a lot of growth and has evolved since it first appeared.

2015: Static sites are slowly making a comeback from the ruins of the web’s early years. The first CMS-deniers are making them “cool” again.

2016: As you would expect, backlash occurs. Static sites aren’t cool at all—they lack too many features to build anything other than blogs. In the meantime though, a small group of developers is coining the “Jamstack” and slowly promoting its principles in modern dev circles.

2017: The year Jamstack really comes to life, for a somewhat niche community. Static sites aren't “static” anymore. This modern web revolution gives you all the features you need to build “hyper-dynamic” sites & apps. Sequoia Capital, Mailchimp & Red Bull are a few of the first big enterprises to build Jamstack projects.

2018: Here’s a phrase we start to hear a lot: “Just discovered the Jamstack and, oh my God, it's amazing!” The paradigm makes a mainstream breakthrough with more & more people talking about it. Substantial funding is announced for tools like Gatsby, Netlify, Contentful, etc. The first JAMstack_conf takes place.

2019: The year of maturity & accessibility. The Jamstack isn’t a niche community anymore. Most frontend developers hear about it and many starts looking into it. With the likes of Stackbit, the Jamstack opens its doors to less technical users. The rise of serverless functions is also huge for bringing more backend functionalities to frontend-centric projects.

2020: Jamstack rebranded as the Jamstack along with a new design. Investors see a lot of opportunity in the Jamstack in addition to the bootstrap companies trying to carve out their space in the community. ZEIT was officially renamed to Vercel and they continue to blur the lines as to what the Jamstack means with Next.js. It also gained the attention of the big web tech players like WordPress, sparking criticism and a debate between the Matts at Jamstack Conf, but the community has continued to grow strong and open the door to tackling new challenges.

2021: While 2020 started to see the inception of “Full Stack Jamstack” solutions like RedwoodJS and Blitz.js, we have seen some confusion on what Jamstack really means.

2022: News tools, like Astro, are redefining what it means to build static websites with the Jamstack. We’re seeing a new approach where JavaScript is less used in favor of a more lightweight approach.

How to get started with the Jamstack?

One of my favorite parts of working with the Jamstack is the tooling. For me, it makes web development fun.

The tools we have available make it relatively easy to build and deploy production-ready websites that can withstand huge traffic spikes or bring a rich experience to our content.

Building the frontend of a Jamstack app

Jamstack Frontend Apps

Let’s start with the frontend of the Jamstack. While the core of a Jamstack website is the static HTML that’s delivered to the browser, JavaScript and the UI frameworks that build the experience are what popularized the architecture.

Tools like React, Vue, Angular, and Svelte are UI-focused frameworks that help developers build applications with modular components. They ultimately render to HTML with JavaScript right in the browser (or server) making the process of building interactions or serving dynamic content more natural and declarative.

Static site generators and web frameworks such as Gatsby, Next.js, Gridsome, Scully, and SvelteKit extend those frameworks providing the ability to more easily manage the content that gets added to the projects and render pages out to static files.

Most of these projects have provided the ability to render the pages out at build time, meaning you’re serving the entire rendered experience to the browser straight from the HTML, instead of waiting for it to load on the client. This typically allows you to provide a faster web app rather than relying on JavaScript to fill in the entire page.

But once those pages load the HTML and JavaScript, you’re still able to fully take advantage of the UI frameworks like React to fill in any missing pieces or provide the interactive elements.

Some of the UI frameworks available for developers:

Some of the static site generators and web frameworks available or developers:

Managing content, data, and the backend of a Jamstack app

Jamstack data management apps

At the heart of any website or application is the content. This comes in many forms, whether it’s a personal blog or the products of an online store.

The rise of the Jamstack has brought endless solutions trying to tackle specific problems in the space. Tools like Auth0 provide user authentication and management, which can bring many challenges on its own. Others like DatoCMS (or even headless WordPress) give developers and their clients the ability to manage content and access it with an API integration. Snipcart provides an easy way to add a shopping cart and entire checkout experience to a website, giving eCommerce powers to anyone on the web.

Beyond all of the services made available, projects like Netlify and Vercel make it easy to build serverless functions, where you can start developing your own backend service. If you need something more tailored to your needs, you can integrate custom infrastructure from AWS, Azure, or Google Cloud that can provide the static front of the application with the highly dynamic backend pieces to provide that rich experience.

The awesome part about Jamstack apps is that they provide a central point to bring in any feature or service you need, paving the way for powerful solutions focused on tackling your specific challenge.

Some of the cloud services available for developers:

Jamstack Tools
CMS Search Identity Serverless Functions Comments eCommerce Forms Database

Strapi


• Contentful


• DatoCMS


• Forestry


• Ghost


• NetlifyCMS


Sanity

Algolia


Bonsai


• CloudSh

Auth0


Netlify Identity


Magic

Netlify Functions


• AWS Lambda


• Azure Functions

• Staticman


Disqus


• Hyvor Talk

Snipcart


• Commerce.js


Commerce Layer

• FormKeep


Jamform


Postform

• FaunaDB


Firebase


• Supabase

Learn how to use FaunaDB in your Jamstack site here.

Deploying a Jamstack app

As a frontend developer myself, arguably one of the more painful parts of building a web application is deploying a website and managing CI/CD systems. If you’ve been around the web for a while, you might remember the days of having to manually drag over files into your favorite FTP client.

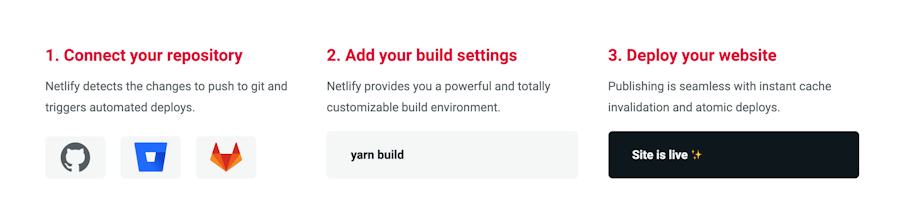
In the Jamstack world, tools like Netlify and Vercel have given us the ability to have a sort of automated DevOps. After connecting our projects to a service with our Git provider, our website or application is automatically deployed any time changes are merged into the main branch.

Deploying Site Netlify

This extends even further with features like deploy previews. By default, any time you create a new branch and set up a new merge request, you get new environments that give you a unique URL to preview your changes. This makes it incredibly easy to share those changes with your client or to get a review from your coworker.

But we’re not limited to those tools to deploy our websites. Because at that point our apps are static HTML files, we can really put them wherever we want. The end result being static files makes our projects versatile and gives us many different options for getting them out to the world.

Some of the hosting and deployment options available for developers:

Transitioning or migrating to the Jamstack

There’s no such thing as a negligible migration, but thanks to the flexibility of the Jamstack and the core idea that you can pull in content from different sources, we can take existing infrastructure and use it to take a step in the Jamstack direction.

For instance, any new WordPress project automatically ships with a REST API, allowing you to grab your website’s content. Projects like WPGraphQL, which is actually being funded by Gatsby, are also working to expand this into a GraphQL interface allowing more complex querying for your data. Using these tools will enable you to use WordPress as a headless CMS.

While there’s going to be an inevitable cost associated with that transition process, you’ll be able to maintain the core business logic in your backend while taking advantage of the benefits of the Jamstack with your frontend.

Great Jamstack resources

If you’re interested in learning more or want to keep up with the rapid changes in the community, here are some resources that we like to keep an eye on.

Websites

Books

  •