Total Pageviews

Wednesday 30 November 2011

Wuala: 一个比Dropbox安全的替代品

Wuala 同 Dropbox , SpiderOak 等一样,也是跨平台( Linux, Windows, Mac OS X),支持 WEB 的安全在线存储解决方案.
Wuala 保证存储在本地 PC 上的数据也被加密,也就说即使Wuala的雇员即使得到您的数据也无法查看您的数据,而Dropbox却报漏出一些安全隐患.

Wuala的特点:
本地数据加密保存
跨平台
和Nautilus良好集成
和朋友共享文件或者文件夹
内置的备份功能(专业级用户独有,你交易到空间时会自动成为专业级用户)
合作(你可以创建一个私有组,邀请大家共同合作,增加文件,等等)
图:

Wuala初始提供1G的免费空间,你还可以通过邀请朋友或者购买来获得额外的空间,3G封顶,如果你不想购买空间,你还可以交易空间,下面介绍

为了交易到在线空间,你的电脑必须至少每天在线4h.同时你所获得在线存储量是你本地要交易的空间乘以你电脑一天的在线率(百分比),也就是说如果你本地出10G的空间,而你一天在线率是11.00%,则你可以获取1.1G的在线空间.见图:

看起来Wuala默认有一个小缺点,没有办法自动同步和控制文件版本,因为那是专业级用户才具有的,但是你可以通过交易存储空间来变成专业级用户.当你变成专业用户以后,你还可以通过邀请朋友获得额外的空间,每邀请一个增减0.5G,6G封顶.
安装方法:
ubuntu和debian用户:下载安装包:32位 64位,安装时Wuala的源会添加到系统的源中,这样方便下次升级!
其他Linux发行版用户:下载,解压到主目录下,双击运行
更详细的安装方法见:here
注:Ubuntu11.04用户请参考此文,使Wuala能够出现在系统托盘上:here
邀请链接1:初始时可以获得2G的免费空间:http://www.wuala.com/zh/referral/JPHNPHACC6P5C433G33G#
邀请链接2:我的邀请链接:http://www.wuala.com/referral/F6KKK6JB4A4NM53PCHJA

信息来源:here
http://www.webupd8.org/2011/05/wuala-secure-dropbox-alternative-cross.html

Netbook Launcher 已移植到 Ubuntu 10.10

自从 Ubuntu 把重点放在 Unity 界面的开发上后,就已经放弃了对 Netbook 界面的后续支持,Netbook-launcher 出现于 Ubuntu 10.4 Lucid 上,专为 Netbook 用户定制。
现在,开发者 Martin Owens 把这个界面移植到了 Ubuntu 10.10 Maverick 上,并制作成了 PPA 。如果你是 Ubuntu 10.10 用户并喜欢这种风格的话,可以通过以下 PPA 来安装。


# Ubuntu 10.10 用户安装:
sudo add-apt-repository ppa:doctormo/netbook-launcher
sudo apt-get update
sudo apt-get install yeold-netbook-launcher netbook-launcher-efl
另外,如果各位需要的话,Martin Owens 还有意把它移植到 Ubuntu 11.04 Natty 上。

使用UnityOne快速上传文件到 Ubuntu One

UnityOne 是一个用于快速上传文件到 Ubuntu One 的小工具,它可以让你拖曳文件到 Launcher 的图标上,然后它就会自动把文件上传并存储于 Ubuntu One 中,并提供通知功能。

# 安装
下载 UnityOne : http://ubuntuone.com/p/tQg/
然后解压 Zip 包,把里面的 UnityOne.desktop 文件拖动到 Launcher 上就可以了。
安装图标,双击里面的 Icon Installer 文件,如果不行的话运行以下命令。
sudo cp ubuntuoneUP.png /usr/share/icons/
好了,现在你可以直接把文件拖动到 Launcher 上的 UnityOne 图标上了,它会自动快速上传到 Ubuntu One 根目录中。
- 消息来源。
----------------------------------------------------------------------------------


The Unity Launcher in Ubuntu 11.04 provides has some great features for developers to take advantage of, resulting in nifty, neat and useful applications that are far more that ‘just’ an application launcher.
Such as ‘UnityOne’ – a neat UbuntuOne file uploader applet for the Unity Launcher.
The developer of the applet, Jeff S., mailed in to tell us about it: -
“Hello OMG! ubuntu! I just wanted to let you guys know that I have made a little applet for the unity launcher that I like to call “UnityOne”, that makes it so that when you to drag a file/folder over the UnityOne icon, it puts whatever you dragged over it into your ubuntu one folder.”

The applet supports over 100 different file types, and even has its own icon.

Download

The applet is packaged up in a .zip archive which can be downloaded at the link below.
You will need to extract it into your home folder for it to work properly. To install the blue icon just double-click the file that says “install icon”.

Add it to your Launcher by dragging the “UnityOne.desktop” file from the extracted folder and onto the Unity Launcher . You can then drag and drop files onto it to have them placed in your Ubuntu One folder and, assuming you have it set up, synced with your Ubuntu One account。
from http://www.omgubuntu.co.uk/2011/05/drag-and-drop-ubuntuone-file-uploader-for-the-ubuntu-unity-launcher/

解决ubuntu安装不了软件的故障

刚刚使用ubuntu的同学肯定会捣鼓着装各种软件,不合适的卸。但是往往一不小心,删了什么多不知道。当再次安装的时候提示:There seems to be a programming error in aptdaemon, the software that allows you to install/remove software and to perform other package management related tasks.的时候才会发觉。然后就是发呆。google也没有很好的回答。
其实很简单,只要去新力得把软件包升级一下就可以了。为什么,因为你可能破坏了一些包的链接关系。系统在升级的时候可以自动修复。这也是ubuntu比win平台厉害的地方啦。看到这篇文章,你的ubuntu不用重装了。

Ubuntu desktop下,安装Latex

Latex真的是一个好东西,即使你仅仅想要炫耀一下也可以。ubuntu11.04出现了,所以下一个问题就是怎样把两者结合起来。其实以前在Debian/Ubuntu 下安装Latex的方法依然成立。
1 安装texlive latex
# apt-get install texlive-latex-base
汗啊,偶一直使用这样的方法来安装软件,而由apt来自动解决安装依赖关系,而这也正是apt提供给我们的便利之处。
2 安装cjk
# apt-get install latex-cjk-chinese
3 安装中文字体
# apt-get install latex-cjk-chinese-arphic-gbsn00lp latex-cjk-chinese-arphic-gkai00mp
安装了这些软件包以后,我们就可以编写一个简单的测试文件来测试一下我们的Latex是否可以正常工作了。
编写下面的Latex测试文件:
\documentclass{article}
\begin{document}
Hello,\LaTeXe
\end{document}
将上面的内容存为Hello.tex,运行下面的命令:
$ latex Hello.tex
如果一切正常,则会生成一个Hello.dvi的文件,我们可以使用xdvi或是其他的相应工具打开,我们就会看到生成后的效果。
下面我们就可以测试支持中文的情况了,我们使用下面的测试文件:
\documentclass{article}
\usepackage{CJKutf8}
\begin{document}
\begin{CJK*}{UTF8}{gbsn}
你好,\LaTeXe
\end{CJK*}
\end{document}
保存退出,运行latex命令,查看生成的结果。

各种方法升级ubuntu

我的电脑已经装有Ubuntu10.10了,因为装了很多软件也配置了一些东西,所以不想重新来过,也就放弃了重装的想法,但是通过系统自带的升级方法,经常是升级到一半,断网,前功尽弃。
根据网上的一些方法,加上自己的一些体会,总结一下方法。

一.通过系统自带的升级管理器

方法:在终端输入sudo update-manager -d -c
在弹出的更新管理器中有一个升级到11.04的选项,升级即可。
点评:此方法必须保证电脑处于联网之中。方法虽简单,但是花费时间过长,根据个人网速而定,我的网速是4M的,但是一个小时还是没好,根据网上的一些人的说法,下载安装至少要3个小时以上。

二.通过光盘升级(离线升级)从Ubuntu10.10升级到11.04的方法简介

方法:官网下载iso文件,然后刻盘。启动从光盘启动。然后有个升级选项。
点评:离线升级拜托了网速的限制,但是该方法对装有双系统的用户可能不行,我是先装Win7再通过wubi安装Ubuntu的,但是通过光盘启动的时候,根本就没有出现上图所示的画面,只能作罢。如果你机子上只装有Ubuntu,说不定还是可以成功。

三.CLI方式

方法:修改 /etc/update-manager/release-upgrades
文件,把里面的 Prompt=lts
改为 Prompt=normal
保存后退出,再执行 sudo
do-release-upgrade -d

在升级过程中会提示修改 source.list 中的源地址,按 y
继续,之后就等待它自动升级吧,升级完后再重新启动就可以了。
点评:该方法类似于第一种。不过我没试过。

四.利用 alternate ISO 镜像来升级

方法:http://cdimage.ubuntu.com/daily/current/下载相应的ISO,然后挂载,在终端输入如下命令sudo
mount -t iso9660 -o loop ~/natty-alternate-i386.iso /mnt

,根据自己ISO地点不同自己修改。
然后更改目录到挂载的目录下,cd /mnt
执行升级命令,sudo ./cdromupgrade
升级过程在设置软件频道的时候,它会禁用你的source.list文件,不过,等你更新好之后再次运行更新管理器的时候,会提示你重新启用以前的source.list文件的。
网上很多都说这种方法是离线升级方法,可是就算我选了不使用网络更新,也照样需要下载东西,断网的话,直接失败。不过还好虽然下载的东西也蛮多,不 过总的来说,比直接更新的少很多,而且,就算断网而导致下载失败,等你再次运行的时候,它会从上次下载失败的地方继续下载,不会像直接升级那样直接失败, 恢复到原始状态。
正在清理的时候,会提示你是否删除一些没有用的软件包之类的东西,我SB似的选了保持,那个后悔阿。。。。不过后来重启之后,我再次运行了cdromupgrade,升级了一些软件包,同时再次运行到清理软件包的时候果断删除了。
点评:该方法对于我这种来说是最好的方法了,虽然也浪费了好多时间,不过总比升级不了的好。

五.升级之后

升级终于成功了,默认进入Unity环境,对于这个环境我还是不习惯,尤其是没有任务栏的情况下。看了一下,一些我自己安装的软件都还在,除了一个 ubuntu tweak,主要是旧的版本不支持11.04,重新下载一个好了。openoffice换成了LibreOffice。自己配置的一些东西都还在,比如 LNMPA和NS,一些下载的东西也全部都在。另外在细节方面也改进了好多,继续研究一下吧.
--------------------------------------------------------------------------------------------------
 Ubuntu 11.10 Oneiric Daily CD 下载

Ubuntu 官方已经提供 Ubuntu 11.10 Oneiric 的 Daily Build CD 了,你可以从以下地址下载,并在 VirtualBox 等虚拟机中体验或安装在 U 盘中试用,不建议作为生产系统使用。

下载: http://cdimage.ubuntu.com/daily/current/

Ubuntu 11.10 Oneiric 的第一个 Alpha 版将于 6 月 2 日发布,详细的发布计划见这里。可能会添加新特性包括:
    采用新版 Linux 内核。
    整合 Gnome 3 及 GTK 3 组件,事实上 Gnome3 已经进入 Ubuntu 11.10 官方源了。
    进一步修正和改进 Unity 桌面环境。
    使用 LightDM 作为登陆管理器。
    添加 Deja Dup 作为默认备份工具。
    进一步改进软件中心。
    新的美工设计等等。

ubuntu desktop下,给力的图形界面下载工具uGet

提到“图形界面”这词,肯定会享受到到各位高手的强力拍砖~

好吧,就当是我们为了照顾下新同学,同时我也不得不承认图形化界面管理起来是挺方便的,我菜鸟

我用Ubuntu下东西通常小点的就用浏览器下(我用Chrome,肯定又有很多人说FF的下载功能多么强大 = =),大点的东西就用wget,其实效率蛮低的吧,复制链接地址,打开终端,cd到目录,输入命令,还别忘了-c不然中途不小心被关掉就惨了

要不然就是强大的aria2命令,呃,还是命令,对于没有脱菜的我反感但也不热衷。。。

好吧,废话不多,uGet是以aria为后端的图形界面下载工具

项目主页:http://urlget.sourceforge.net/

http肯定是支持的,还有批量下载,分类管理什么的,当然前提是你得先安装aria2

本人环境为Ubuntu11.04+gnome3,以下命令Ubuntu适用

sudo apt-get install aria2

然后就是安装uGet了

稳定版(当前版本1.6.3):

sudo add-apt-repository ppa:plushuang-tw/uget-stable
sudo apt-get update
sudo apt-get install uget

实验版(当前版本1.7.6):

sudo add-apt-repository ppa:plushuang-tw/uget-devel
sudo apt-get update
sudo apt-get install uget

然后启动客户端在设置里面开启aria2.

--------------------------------------------

 下载管理器uGet

uGet是一个自由开源的下载管理器 ,支持多平台如Windows, BSD,  Linux以及安卓,支持断点续传和分类下载 ,具备多线程下载能力。支持从Youtube下载视频。还支持与浏览器集成,“uGet Chrome Wrapper”浏览器扩展(https://slgobinath.github.io/uget-chrome-wrapper/)与Firefox,Chromium,Google Chrome,Opera和Vivaldi兼容。

Ubuntu上的安装:
sudo add-apt-repository ppa:plushuang-tw/uget-stable
sudo apt-get update
sudo apt-get install uget

富终端TermKit

Ubuntu 上安装 (详见这里,我在 Ubuntu 11.04 上安装运行成功)
sudo apt-get install git libssl-dev
cd ~
mkdir TermKitProj
cd TermKitProj
git clone https://github.com/joyent/node.git
cd node
./configure
make
sudo make install
cd ..
git clone http://github.com/isaacs/npm.git
cd npm
sudo make install
cd ..
git clone https://github.com/Floby/TermKit.git –recursive
cd TermKit/
npm install
运行
node Node/nodekit.js
最后在 Chromium/Chrome 中打开 http://localhost:2222 就可以使用了。

sourceslist.eu:LINUX下开源软件列表

http://www.sourceslist.eu

Linux Deepin 的软件中心

Linux Deepin 中最大的特色之一是,用自已开发的更适合中文用户使用的软件中心取代了 Ubuntu 自带的 Software Center,截图如下:

现在如果你使用的是 Debian、Ubuntu 或者是旧版本的 Linux Deepin 的话,你也可以通过以下方式来体验 Linux Deepin 的软件中心。

#安装:

先安装 git
    sudo apt-get install git-core

下载软件中心代码:
    git clone git://github.com/manateelazycat/deepin-software-center.git
然后切换到 src 目录, 执行 ./main.py 文件。

Update : 需要安装 aria2
    sudo apt-get install aria2
强烈建议体验后有任何问题请到官方论坛进行反馈。
http://www.linuxdeepin.com/7-news/6-linuxdeepin-1106-beta2-

Ubuntu下,Aircrack-ng工具包的使用

安装:$sudo apt-get install aircrack-ng

Aircrack-ng无线破解工具包有很多工具,用到的工具主要有以下几个:


airmon-ng       处理网卡工作模式
airodump-ng     抓包
aircrack-ng     破解
aireplay-ng     发包,干扰

1) airmon-ng
启动无线网卡进入 Monitor 模式,
useage: airmon-ng <start|stop|check> <interface> [channel]
<start|stop|check>:启动,停止,检测
<interface>:指定无线网卡
[channel]:监听频道,现代大多数无线路由默认是 6,随便扫描一下都是这个频道,网管们应该换换了

2) airodump-ng
抓包工具,我最喜欢用的,详细用法如下:
usage: airodump-ng <options> <interface>[,<interface>,...]
Options:
–ivs :仅将抓取信息保存为 .ivs
–write    <prefix> :保存为指定日文件名,我一般用这个,尤其是多个网络时,指定了也好区分
–beacons :保存所有的 beacons ,默认情况况下是丢弃那些无用的数据包的
Filter options:
–encrypt   <suite> : 使用密码序列过滤 AP
–netmask <netmask> : 使用掩码过滤 AP
–bssid     <bssid> : 使用 bssid 过滤 AP
-a : 过滤无关的客户端
–help : 显示使用方法,翻译到这里,感觉还是英文的贴切一点,建议读原文 

3)aireplay-ng


搞破坏的工具,注意杀伤力很大,甚至可以损坏劣质的 AP 设备(小内存的路由器可能会重启,或者彻底被破坏掉),我很喜欢这个东西,相信你也会喜欢的,使用时注意分寸.
usage: aireplay-ng <options> <replay interface>
Filter options:
-b bssid : AP的 MAC
-d dmac:目标的 MAC
-s smac :来源的 MAC
-m len: 最小包长度
-n len: 最大包长度
-D: 禁用 AP 发现功能
Replay options:
-x nbpps : 每秒包数量
-p fctrl : 框架设定 (hex)
-a bssid : 设置AP的 mac
-c dmac: 设置目标的 MAC
-h smac: 设置来源的 mac
-g value : 改变环缓存大小 (默认8)
Fakeauth attack options:
-e essid : 设置目标 AP 的 SSID
-o npckts : 每秒爆破的包数量 (0 自动, 默认 1)
-q sec: 存活时间 秒
-y prga: 共享可信的 key流
–help : 显示这个帮助,这部分是全部依照我的使用来翻译,没有完全准确的翻译,主要对付 那些不给出作者就引用的人,鄙视抄袭.
4)aircrack-ng

破解KEY,漫长的过程.漫不漫长取决于两个方面: 一是网管的聪明程度(能否设置出复杂的密码),二是电脑的速度.
usage: aircrack-ng [options] <.cap / .ivs file(s)>
Common options:
-a <amode> : 暴破 (1/WEP, 2/WPA-PSK)
-e <essid> : 选择 essid 为目标
-b <bssid> : 选择 ap的 mac 为目标,就是破解识别的关键字
-q : 使用安静模式,无数出模式
-C <macs> : 将所有的 AP 合并为一个虚拟的
–help: 显示这个帮助

就WEP破解说明,步骤:


步骤:
1. 修改无线网卡状态:先 down 掉
2. 伪造无线网卡的 MAC 地址:安全起见,减少被抓到的可能
3. 修改网卡工作模式:进入Monitor状态,会产生一个虚拟的网卡
4. 修改无线网卡状态: up
5. 查看网络状态,记录下 AP 的 MAC 和本机的 MAC ,确定攻击目标
6. 监听抓包:生成 .cap 或 .ivs
7. 干扰无线网络:截取无线数据包,发送垃圾数据包,用来获得更多的有效数据包
8. 破解 .cap 或 .ivs ,获得 WEP 密码,完成破解
前面如何伪造网卡不在叙述,可参见这篇文章:
http://www.path8.net/tn/archives/40

Linux 建立 ad-hoc 实现 Wifi 共享,类似 Connectify 功能

最近在 Ubuntu 里找了很久,也找不到一个可以将无线网卡作 AP 的软件,试了网上很多方法都不行,有些是可以搜到热点,但我的 Android 手机连上去的时候获取不了 ip 地址。研究了几天,昨晚花了一晚时候,去写个脚本,成功的连上了。希望我这个脚本能帮到大家解决问题。

主要是用到 iwconfig 这个无线配置工具,然后用iptable设置NAT规则,使用dnsmasq去分配ip地址。
完整脚本下载地址:https://gist.github.com/1117004
以下是脚本的使用方法:
#先加可执行的权限,XXX代表脚本的路径
chmod +x /XXX/XXX/adhoc
#运行脚本
sudo  /XXX/XXX/adhoc
#停止共享
sudo  /XXX/XXX/adhoc -s
#重启动共享
sudo  /XXX/XXX/adhoc -r
注意:
如果运行脚本后,手机或电脑搜不到你的共享,运行重新启动共享命令
sudo  /XXX/XXX/adhoc -r
即可,多次几次就行了。
Update: 根据 Aenon 的提示,其实更简单的办法是直接用NetworkManager,“创建新的无线网络”,就可以了.

中科大 Linux 镜像源

新机器的域名:
IPv4 / v6: mirrors.ustc.edu.cn (能解析出教育网/电信/v6地址)
v4only : mirrors4.ustc.edu.cn (能解析出教育网/电信地址)
v6only : mirrors6.ustc.edu.cn
有些地方(比如我测试的合肥长宽),DNS 会解析出电信地址,但使用教育网地址访问更快,这时可以通过修改 hosts 指定强制使用教育网地址访问。
教育网ip:202.38.95.110
电信ip:202.141.160.110
v6地址:2001:da8:d800:95::110
支持的访问方式:
http/ftp/rsync
提供的服务:
原 debian.ustc.edu.cn 和 oss.ustc.edu.cn 提供的镜像服务基本上都迁移过来了,除 fedora / ubuntu-partner 外。fedora正在进行同步,ubuntu-partner也会在近几天同步过来。
原centos.ustc.edu.cn提供的centos/epel/linux-2.6.git也已经迁移过来了。
需要注意的修改:
debian.ustc.edu.cn 和oss.ustc.edu.cn两个域名已经设置为mirrors.ustc.edu.cn的别名,大多数镜像的相对地址没有改变,所以大家基本上不需 要对原有设置进行修改(如sources.list),可以继续正常使用。但是以下镜像用户请注意:
1. gentoo用户,原portage地址:
rsync://oss.ustc.edu.cn/pub/gentoo-portage 已经调整为:
rsync://mirrors.ustc.edu.cn/gentoo-portage
2. cygwin用户,原cygwin源地址:
http://oss.ustc.edu.cn/cygwin/cygwin/ 已经调整为:
http://mirrors.ustc.edu.cn/cygwin/
3. 原ubuntu cdimage地址:
http://debian.ustc.edu.cn/ubuntu-cd 已经调整为:
http://mirrors.ustc.edu.cn/ubuntu-releases
4. 原fedora linux地址:
http://oss.ustc.edu.cn/fedora/ 已经调整为:
http://mirrors.ustc.edu.cn/fedora/linux/
5. centos.ustc用户,请修改自己的CentOS-Base.repo和epel.repo,将文件中的域名
centos.ustc.edu.cn 修改为 mirrors.ustc.edu.cn
6. linux-2.6.git用户,请修改origin地址:
git remote –set-url origin http://mirrors.ustc.edu.cn/linux-2.6.git
使用帮助:
大多数镜像的使用帮助已经完成,大家在对应的目录下,如:
http://mirrors.ustc.edu.cn/ubuntu/
点击页面上方(标题下方)的使用说明链接,可以打开其对应的帮助信息,如如何设置sources.list文件。或者也可以直接打开
http://mirrors.ustc.edu.cn/mirror-help/.html
在首页上点击使用说明链接,点击其中对应的源的链接,也可以跳转查看相应的帮助。由于人手不够,有些源还没有使用帮助信息,也欢迎大家帮忙写了,发送给我们。
状态监控:
在首页点击页面上方的同步状态链接,可以查看当前各镜像的同步状态,包括成功与否/上游源/镜像体积等。
大家如果知道更好(更新、更快)的上游源,请联系我们。近期我们会申请成为debian和ubuntu等镜像的官方镜像,这样我们可以获得更好的上游源来同步。
如果同步出现故障,服务器的管理员会收到邮件通知,以尽快处理,所以大家看到状态监控页面中有显示同步失败的条目时,无需联系我们。
如果同步状态上显示同步正常,但实际使用过程中发现镜像有问题,请联系我们。
联系方式:
我们的邮箱: lug@ustc.edu.cn
鸣谢:
感谢中国科学技术大学、网络信息中心的支持,特别感谢jameszhang老师为我们提供服务器!
PS,我们下一步打算将pxe.ustc.edu.cn也对校外开放,对外提供一些网络启动服务,类似于boot.kernel.org这种。但是由于国内网络速度不行,所以对校外只能提供一些比较小的Live工具,大家可以给我们推荐一些实用的东西。

Remembering that I\\\’ll be dead soon is the most important tool I\\\’ve ever encountered to help me make the big choices in life .Because almost everything ——-all external expectations, all pride , all fear of embarrassment or failure——these things just fall away in the face of death,leaving only what is truly important!!

opera下听网络电台必备插件

如果你不喜欢IE,你会选择firefox或者opera。但是你要有DIY的精神。比如你想看视频或者网络电台。
opera浏览器官方版不带flash插件,当打开有flash的页面时,会提醒你到Abode Flash Player官方网站去下载。
这是个必备插件,你可以自行到中文网站下载Abode Flash Player 9 for Opera。
注意别下载“for IE”,不通用的。楼主的FlashPlayer装不上,应该是“for IE”,它跑到IE那里去了。地址:
http://download.pchome.net/download-15180.html
下载后运行安装程序,会自动安装到opera文件夹,不用你选择路径。
但是这仅仅解决了视频问题,而电台则还是需要Windows Media Player。
firfox和opera等是公用插件的,http://www.interoperabilitybridges.com/windows-media-player-firefox-plugin-download

Ubuntu 有软件同步功能啦

Ubuntu 11.10 Oneiric Ocelot 已于昨天正式发布,在之前的文章中我们提到过,该版本中的 Ubuntu Software Center 采用了全新的界面,并提供了一个非常实用的功能,把 OneConf 整合进了去,这样你就可以在两台电脑之间同步安装过的软件。

OneConf 的原理是这样的,系统会自动记录安装过的软件信息并存储到你的 Ubuntu One 空间里面,当其它电脑需要的时候会从你的 Ubuntu One 里获取这些信息并同步安装过的软件,详细介绍见 Ubuntu Wiki: https://wiki.ubuntu.com/OneConf

# 如何在 Ubuntu 软件中心里开启软件同步功能?

打开 Ubuntu 软件中心 -> 文件 -> 在计算机之间同步 -> 输入你的 Ubuntu One 帐号及密码就可以了

需要注意的是,同步后的软件配置可能还需要你自已手工备份和恢复。

Ubuntu11.10 一秒钟变 Windows 7

Ubuntu 11.10正式版已经发布,有不少人认为Ubuntu做的再好也没有Windows 7那样来的精致与唯美。其实Ubuntu具备相当不错的桌面主题系统、视觉效果和养眼程序,不过你或许还是喜欢Windows 7 Aero的精美、透明度和开始菜单。今日我们将为你展示怎样将Ubuntu转换为Windows 7的模样。

当然,这不会是一模一样,不过两者足够接近,乍一看去,许多人都会以为这就是Windows 7。继续阅读,看看该怎么做吧。

我们先来输入一些命令,只需打开终端窗口并输入以下内容:

这将下载一个脚本文件以备后面使用,该文件告知计算机该下载哪些文件来完成Win7主题包的安装。一旦完成,会弹出一个窗口,告知你安装现在即将开始,只需点击OK就好了。

会弹出另一个窗口,询问你是否继续,对该窗口也回答yes就好。然后终端会开始下载并安装主题。依你互联网速度而定,可能需要一些时间。这之后,一个类似下面的窗口会显示出来:

点击OK,然后返回终端,输入:

该命令会安装Win7主题,你的电脑会立即转换为Windows风格。等待几秒钟,你会见到一个窗口要求你注销,那么注销再重新登录,下面就是你将见到的:

现在你的Ubuntu和Windows看上去几乎没啥两样。祝贺你!现在你有了WinBuntu!你甚至可以右击开始按钮并选择“属性”来定制开始菜单。

如果需要,你可以为Firefox安装IE风格的主题。你还可以在桌面上使用Windows 7墙纸,如此会给你完全的Windows 7感觉。下载链接在本文末。

在Win7主题脚本安装中,会备份以前的Gnome设置,并保存于你的home目录下,这样如果你厌倦了该主题,可以卸载它,回滚到之前的Gnome状态。唯一的不足是,没有自动的卸载程序。

卸载并不困难。打开你的home目录,这儿会有一个叫做“win7-uninstall.tar.gz”的文件,用你的档案管理器打开它,你会找到你的home目录,然后双击它,你就会看到你的用户名,再次双击它。应该会有一个“.gconf”文件,把该文件解开到你的home目录。

注销并再次登录,这就好了。你的主题又回到正常的Gnome,仿佛什么都没发生过。挺酷的,不是么?

有些情形下,你在尝试卸载主题时可能没有卸载干净,遗留下一些Windows 7图标或者桌面墙纸。这些情形下,你必须靠手工删除文件来移除主题,不过用不着担心,这比你想象的简单。只需打开一个终端窗口并输入以下命令,再点击回车即可。

注意:这会将你的Gnome外观设置恢复到第一次安装Ubuntu时的默认情形.

投胎做美国人与中国人的不同境遇

一个美国人呱呱落地了
打从小,美国的教育就告诉他:不要读死书,要创造力,做人要正直、守信、诚实。
长大以后,他发现这些教育,在美国都是无比正确的,有创造力的美国人创造了互联网、电脑等高科技,领导着世界。做一个美国人必须言行一致,诚实守信,如果有一次不诚实不守信的不良记录,这一辈子都会麻烦不断,甚至无法立足于美国社会。
这个美国人工作了,他每年为国家缴纳税收,在他暂时失业的时候,每月能领到1500美元的失业救济金,还享受医疗、保险等社会福利。在他无论在任何地方遇到困难和危险的时候,美国的政府派出直升机和救援队来搜救他。假如在国外遇到危险时,美国的军舰和战斗机会来解救他。
这个美国人经常参加投票,在选票上写下他信任的市长候选人、州长候选人、总统候选人。他发现,凡是选民选出来的各级领导人和政府机关,都重视人民的利益,为人民谋福利,没什么架子,也很清廉。公务员的办公楼看不到奢侈浪费的地方,甚至非常简陋,一个美国白宫也不如某国的一个县政府辉煌气派。公务员对老百姓们打成一片,警察甚至帮他家里修剪园林。
这个美国人很幸福很自豪的生活着,直到他去世的那一天,他都确信美国是一个世界最好的国家之一,他做为一个美国人感到无比自豪,他希望上帝保佑美国。
一个中国人也呱呱落地了
打从小,中国的教育就告诉他:要读死书,不要有创造力,做人要正直、守信、诚实。
长大以后,他发现这些教育,在中国都是无比错误的,没有创造力的中国人变成了世界工厂,仿制耐克鞋,生产玩具、裤子,为全世界打工,冒着断手断脚的危险,赚钱几美分的微薄利润。做一个言行一致和诚实守信中国人被证明是脑残,弱肉强食的丛林法则,让为非作歹毫无诚信的人一个个发家致富,成为社会的富裕阶层。他成了一个看不到希望的待富者。
这个中国人工作了,他每年为国家缴纳税收,却发现,他暂时失业的时候,领不到一毛钱失业救济金。看个病需要几万几十万元,买个房子一平米要N万元。在他遇到危险的时候,没有政府的救援,除非是几百几千人遇到巨大的危险,某高层发话,才在几十天后见到救援队,其中救援物资还被贪污了大半。假如在国外遇到危险,就更别指望国家救援了,被恐怖分子关押一两年之后才被释放。
这个中国人一辈子不知道什么叫民主选举,他发现县长、市长都是上级安排好的,他们只为上级服务,城管是为了上级看到美好的市容而清理做小生意糊口的”刁民”,政府的办公楼和汽车一个比一个豪华,出台的政策都是为富人和既得利益服务,没有一个是为老百姓谋幸福。公务员和警察一个个凶神恶煞,甚至警匪一家,蛇鼠一窝。
这个中国人很哀怨很无语的生活着,直到去世的那一天,他都后悔投错了胎,怎么生在了中国。他的孩子告诉他,他的房子70年到期还要续租,他惨叫一声,口吐鲜血的死去,临死,两眼都不肯合上,死不瞑目。

PHPweb成品网站完整源码


安装使用说明
1.      将程序解压出来 修改根目录的config.inc.php  用记事本打开修改
2.      将程序使用二进制上传到根目录
3.      运行  您的网址/dg   帐号admin  密码123456  登录设置数据库帐号密码 然后恢复数据
4.      恢复完成后 运行 你的网址/admin.php  登录帐号密码都是admin
 程序介绍:PHP快速建站程序.

一劳永逸的翻墙方式: ssh -D(很经典的教程)

https://dl.dropbox.com/u/873345/index.html

ode to gfw(gfw赞歌)

Oh Great Firewall shall I compare thee to a summer’s day?
No, I shalt compare thee to a thorn in my backside.

Thou art more restrictive and more disruptive.
Rough connections do shake the darling congress of March,
And 1989′s memory hath all too long a block.
Sometime too hot the eye of CPC shines,
And often is Youtube’s complexion dimmed;
And every post from BBS sometime declines,
By chance, or golden shield’s changing course, untrimmed;
But thy eternal censor shall not fade,
Nor lose possession of that power thou ow’st,
Nor shall freedom brag thou wand’rest in his shade,
When in eternal lines to Time thou grow’st.

So long as men can browse, or hands can type,
So long lives this, and this gives frustration to thee.

How To Setup a Wi-Fi Hotspot with dd-wrt

A How To for DD-WRT, FreeRadius and Chillispot.
Creating a Wi-Fi Internet hotspot service from scratch can seem like a daunting task. I had many sleepless nights trying to get to grips with FreeRadius, DD-WRT, Chillispot etc. I hope that this How To helps you to avoid some of the problems I encountered along the way.
Regards Sean Bracken

********Warning ********
Following these instructions may invalidate your Linksys warranty. You do so at your own risk. These instructions assume that you have an understanding of Linux, PHP MySQL and Apache. If you brick your AP you might get it back by holding down the reset pin for 20 seconds, unplug the power while still holding down the reset button for another 20 seconds and then plugging the power back in while still keeping the reset button held in for a further 20 seconds. This should bring it back to the defaults of whatever firmware you have installed. You should be able to login to 192.168.1.1
*******End of Warning********
Feel free to copy or use this information in any way you like.

What you will need:-

a) DD-WRT
Download the latest version here http://dd-wrt.com

b) FreeRadius
Download the latest version here http://freeradius.org/

c) phpMyPrepaid
Download the latest version here http://sourceforge.net


d) Linsys WRT54GL AP

e) You will also need PHP, Apache, MySQL amd MySql Delopment Modules,(These need to be setup first.) some patience, plenty of coffee and cigarettes.

Step 1 DD-WRT/Chillispot Configuration

Configure the WRT-54G with the standard Linksys software and the use the upgrade firmware module to install the dd-wrt package on the AP.
*******IMPORTANT******* Use your cable connection to do the upgrade. NOT the wireless connection.
Reboot the AP and login to your new firmare.
Set Dynamic configuration DHCP
Disable DHCP (Chillispot will manage DHCP for your clients.)
Change the Local IP of the AP to 192.168.10.1.
Set your gateway and DNS addresses.
Update changes and log back in to the new IP address.

Go to the administration page.
Enable Chillispot
Enter the IP address of your Radius server.
Enter the DNS.
Enter the redirect URL eg HTTPS://123.123.123.123/cgi-bin/hotspotlogin.cgi/ (MAke sure that the address ends in / and is https.)
Enter a shared key. (This can be anything you like, but keep a note of it you will need it later.)
Set DHCP Interface to Lan+Wlan
Enter a NAS id (Your name for your AP)
Enter a UAM secret (This is the password that Chilli will use to talk to hotspotlogin.cgi)
Save your settings and reboot the AP. Please give the AP about 10 minutes to reboot and initialise all the new services.

Step 2 FreeRadius Configuration.

Untar the FreeRadius tar file and enter its directory.
Type ./configure --with-experimental-modules
make
login as root and type make install
When this is finished copy the radiusd.conf file that you downloaded earlier to /usr/local/etc/raddb/
You should not need to edit radiusd.conf
Edit /usr/local/etc/raddb/sql.conf and in the SQL section make these changes.

# Database type
# Current supported are: rlm_sql_mysql, rlm_sql_postgresql,
# rlm_sql_iodbc, rlm_sql_oracle, rlm_sql_unixodbc, rlm_sql_freetds
driver = "rlm_sql_mysql"

# Connect info<br>
server = "localhost"<br>
login = "yourlogin"<br>
password = "your password"

# Database table configuration
radius_db = "radius"


Edit the /usr/local/etc/raddb/clients.conf file and enter the details of your NAS (AP)

client xxx.xxx.xxx.xxx { (This is the address of your NAS or WRT54G )
secret = xxxxxxx (The secret you entered in the Chilli Config)
shortname = private-network-9 (This can be any name)
nastype = other
( If you want to set up several AP's with one secret the IP address above should be 0.0.0.0/0 )
}


Step 3 hotspotlogin.cgi
Copy hotspotlogin.cgi from http://chillispot.org to /var/www/cgi-bin
Edit the file and change the secret to the UAM secret that you entered in the Chillispot configuration on the WRT54G.

You can also use a php script. It is not as secure as the cgi script but easier to personalise. If you want a copy email me at sean@swarmhotspots.com


Step 4 phpMyPrepaid and MySQL

Extract the phpMyPrepaid file to a directory on your webserver eg /var/www/html/myprepaid
Create a MySQL database called radius and create a user and password for it. Use a script called db_mysql.db that you will find in the phpMyPrepaid download to create the database tables.
Edit the dbconnect.php file in the phpMyPrepaid directory and enter the username and password for your MySQL radius database. IMPORTANT Save this file behind your web directory or your passwords will be easy to hack.
Edit config.inc.php and change the line that points to dbconnect to wherever you have saved dbconnect.php
In your web browser got to http://yoursite.com/whereveryouputphpmyprepaid/ and create some tickets. Check your database to see if the users have been setup in radcheck. Launch FreeRadius as root with this command radiusd -xxyx -l stdout. Pick a user and password from your database and try to login from a wireless client. If you can then it is time for step 5. If not go back to step 1 and check everything.


Step 5 Have a cup of coffee and unwind. If all is well you have finished. I'll keep an eye on this post and do my best to help anyone with problems.
I have setup a free Radius test area for people that have no access to a Radius server. You can use this service to test your Chillispot configuration. The address is http://swarmhotspots.com/Chilli-Test-Area
I would welcome any feedback from this article and will do all I can to help any of you with problems.
sean@swarmhotspots.com

from http://www.howtoforge.com/wifi_hotspot_setup

Tunneling HTTP over SSH with DD-WRT, DynDNS and Putty


I thought I would write up a tutorial for tunneling HTTP over SSH as it is a great way to increase security and privacy of web surfing. I happen to work at a company that doesn't allow use of anonymous proxies (which is fine) but I don't necessarily want them viewing my web traffic either. Here is how I set up an HTTP tunnel to my home network from work.

My home setup consists of a Linksys WRT-54GL wireless access point connected to a high-bandwidth internet connection. The Linksys WRT-54GL is version 4 of the WRT-54G. With version 5 of the WRT-54G Linksys changed the hardware and stopped using Linux internally. Because of these changes the device could no longer run third-party firmwares. The WRT-54GL is Linksys' response to hobbyists (hackers) who still want to tinker with other firmwares. For this tutorial you'll need a router capable of running the DD-WRT firmware. This excellent firmware has many great features including an SSH daemon which is a prerequisite for our tunneling. A list of supported devices can be found here.

Instructions for flashing the firmware can be found all over the Internet. I'll assume the reader can flash the router and get the DD-WRT firmware running (Administration->Firmware Upload). Some Linksys routers (including the WRT-54GL) have a 3MB limit to firmware size so if that is the case use the mini version of DD-WRT first, once that is running upload the version you want.

I'm using DynDNS to keep tabs on my dynamic Internet IP address. This free service allows you to keep your changing IP address up to date and matched to a hostname. DD-WRT has support for automatically keeping the address updated. Other services are supported too so you can choose your favorite. Once your dynamic DNS account is created you can enter the relevant information into the Setup->DDNS tab in DD-WRT.

The next thing you will need to do is enable the SSH daemon. This can be done throughout the Administration->Services tab in DD-WRT. Under SSHD select enable. The login will be username:root password:[your router password].

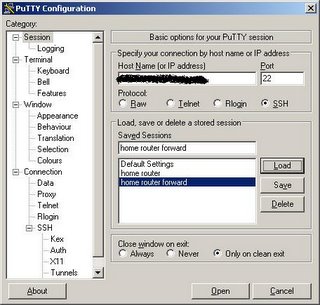
To connect to the SSH server and tunnel HTTP you will need the Putty SSH client. To connect to your router enter the hostname or IP address of your router on the Session tab:


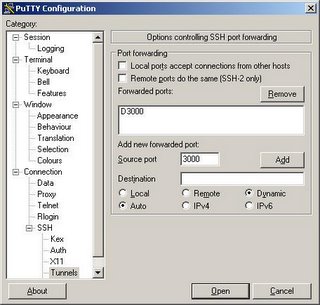
Next, to setup the tunnel click on Tunnels, enter 3000 (or whatever local port you'd like to use) for the source port, click Dynamic and click Add. This will create a SOCKS proxy on your local machine on port 3000 (or whatever port your chose) that you can use with your web browser.


Now you can click Open to log into your router. The tunnel isn't created until you log in. Remember that your username is root and your password is your router password (you changed it right?).

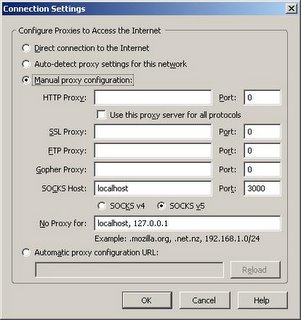
Now you're ready to connect your web browser. Using Firefox, you will have to configure a proxy server. Click Tools->Options. Then under General click Connection Settings. On this screen you can configure the SOCKS proxy that you've set up using Putty. Select Manual proxy configuration, enter localhost for the SOCKS host and 3000 for the port (or whatever you used). Click OK. You should now be tunneling through your home router over ssh.


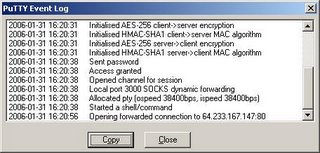
You can verify that the connections are being forwarded by looking at the Putty Event Log. You should see something similar to the following after loading www.google.com in your web browser.

Dovecot IMAP server and tcpd's hosts.allow

Running your own email server is great, but it must be secure against attacks from hackers and “script-kiddies”, idiots who scan networks looking for systems that advertise services and allow remote access. You can secure certain services on your linux-based machine, such as sshd and imapd using tcpd’s hosts.allow and hosts.deny functionality, to limit the number of hosts that can even get to a login prompt.
My main working machine runs Mac OS X. I also have a dedicated server running Debian Linux that handles all my email and ensures I can get Unix shell access from wherever I am. This server is secured against attack, and I have switched off all unnecessary services and use a dedicated hardware firewall to limit access. The only services I allow are ssh and imaps, on ports 22 and 443 respectively. After some time I noticed that my ssh server was under continual attack by hackers across the globe, who would port-scan a range of machines on different networks and then attempt to login via brute-force methods. To counter this, I began using special firewall rules to limit the frequency of connections, and finally to limit which machines could connect.
I now use tcpd and its hosts.allow hosts.deny functionality, to specify which computers are allowed to connect. I can specify large swathes of network addresses, and so, for example, ensure I can access my machine from anywhere on campus. Over time, I have extended this to include specific other machines and networks, mainly in the UK, from which hacker attack would be unlikely.
I recently noticed that my IMAP server was not similarly protected. This is because my IMAP server of choice (dovecot), runs directly from init.d on server startup, rather than via inetd. Only services run via inetd are protected by the hosts.allow mechanism, so it is sensible to switch to this mechanism:
There are some brief instructions here.
  1. Stop the existing dovecot service.
    /etc/init.d/dovecot stop
  2. Stop dovecot running on normal startupRename /etc/rc2.d/S21dovecot to K21dovecot
    mv /etc/rc2.d/S21dovecot /etc/rc2.d/K21dovecot
  3. Add the following to /etc/inetd.conf:
    imap stream tcp nowait root /usr/sbin/tcpd /usr/lib/dovecot/imap-login
    imaps stream tcp nowait root /usr/sbin/tcpd /usr/lib/dovecot/imap-login --ssl
  4. Tell inetd about its updated configuration by sending it the HUP signal
    killall -1 inetd
    And you should find your system is protected!

Port forwarding with SSH/Putty

I regularly exchange data between computers at University and home. To maintain security, I keep a firewall running on all machines, and “tunnel” through the firewall(s) using SSH - the secure shell. For example, I run a web server on my main machine for web application development, and do not wish this to be publicly accessible. My home computer is protected by a hardware firewall, and I use SSH to tunnel access to the web server. Local and remote port forwarding is straightforward, but it can be difficult to understand initially. I have therefore created a list of “recipes” that one can try…

Getting the software

My remote machine is running Debian Linux. I have two local machines running Mac OS X, and Windows XP. Port forwarding is possible on all three machines.
On Linux and Mac OS X, OpenSSH is bundled, and so you already have the necessary software. For Windows, I’d recommend the SSH program Putty. I would recommend downloading the GUI-based client and the command-line client Plink.
Using plink is recommended as it used the same syntax as SSH on Mac OS X and Linux, although once you have things running, you can switch to using the GUI if you wish.
In the examples, I use the address myserver.dyndns.org for the address of your remote server.

Accessing a remote webserver

You want to access a web server running on port 80 your remote machine.
From your local machine, type:

ssh -L 8080:localhost:80 myserver.dyndns.org

This creates a tunnel from port 8080 on your local machine to port 80 on your remote machine. In your web browser go to “http://127.0.0.1:8080/” to view your remote web pages!

Using a remote HTTP proxy

You have a HTTP proxy running, such as squid, on your remote server. You want to browse the internet using your home machine, rather than your university account (for example, if your university account blocks access to certain websites). If your proxy server is running on port 3128:
From your local machine, type:

ssh -L 3128:localhost:3128 myserver.dyndns.org

On your local machine, you need to configure your Internet connection settings (or web browser) to use proxy server 127.0.0.1 port 3128. The web browser thinks it is connecting to a local proxy server, but in fact, all connections are tunnelled to your remote server. Try going to http://whatsmyip.org/ and check the connection is using the remote server!

Tunnelling from remote to local

You have a web server running on a university-bound machine that you need to access from home. You are running a firewall that blocks all incoming connections, and the university is also blocking your address too. How do you access this service from home?
You need to remote port forward:
From the university machine type:

ssh -R 8080:localhost:80 myserver.dyndns.org

This creates a tunnel from port 8080 on your remote machine to port 80 on the local machine. To access your protected web server, you just need to browse the website at “myserver.dyndns.org port 8080″ (i.e., myserver.dyndns.org:8080) and this will connect you to your protected server on the protected network.

Daisy chaining tunnels

It is possible to daisy-chain SSH tunnels through multiple firewalls. I want to show a trusted colleague my protected website. I create a tunnel through our shared intermediary server:
On the protected computer forward remote port 8080 to local port 80.

ssh -R 8080:localhost:80 myserver.dyndns.org

On my colleague’s computer, forward remote port 8080 to local port 80

ssh -L 80:localhost:8080 myserver.dyndns.org

Depending on firewall and proxy settings, it may not be possible to tunnel SSH connections in this way, and I do not condone the use of these techniques for nefarious purposes. I use these techniques to secure my remote systems and ensure I have as few services as possible running on open ports. Reducing the number of running services reducing the change of attack by hackers, and means that the only possible chink in your armour is running the SSH server.

from http://www.medicalnerds.com/port-forwarding-with-sshputty/

Easy SSH tunnels

Contents

[hide]

[edit] Introduction

SSH tunneling allows you to forward traffic from one location to another using encryption between them. It is great for accessing your home network from remote locations such as your workplace or public WIFI hotspots. You can also use it to securely browse the internet by forwarding your traffic from the remote location to your home and then out to the internet unencrypted from your home. This can allow you to bypass firewall restrictions at the remote location.


[edit] Requirements


[edit] Configuring the DD-WRT SSH Server

  1. Go to the Services tab and the Services sub-tab on the Web Interface.
  2. Enable SSHd in the Secure Shell section.
  3. SSH TCP Forwarding can be left disabled.
  4. Port can be left set to 22.
  5. Either enable Password Authorization (less secure but easier to set up) or see the main SSH Wiki page for instructions how to set up Authorized Keys.
  6. Press the Apply Settings button.
  7. Go to the Administration tab and the Management sub-tab on the Web Interface
  8. Enable SSH Management in the Remote Access section.
  9. Set the Remote Port to the TCP port number that you want to use to connect to your router from the internet. Port 443 is a good choice because it is typically left open to allow HTTPS usage, so your client will be able to connect even through very restrictive firewalls.
  10. Press the Apply Settings button.

If you haven't already got one, you'll likely want to configure a Dynamic DNS service, especially if your ISP provides you a dynamic IP address. This will allow you to access your router over the internet using an easy to remember domain name instead of the WAN IP address.


[edit] Configuring the Remote SSH Client

[edit] PuTTY Client

PuTTY is a graphical SSH client for Windows OS that is available for download [here].
  1. Install and execute PuTTY on the client PC.
  2. Set the Host Name (or IP Address) to either your home router's dynamic DNS domain name or its public Internet address. (in the picture below it's a private LAN address 10.0.0.1)
  3. Set the Port to the Remote Port port that you set in Step 9 of the Server Configuration.
  4. Set the Connection type to SSH.
Image:Easy_ssh_putty_session.png


  1. Go to the Connection -> Data section.
  2. Set Auto-login username to root so that you don't have to type the username each time you connect.
  3. Go to the Connection -> SSH -> Tunnels section.
  4. Type 8080 into the Source port.
  5. Click on the Dynamic radio button to make it a dynamic tunnel that will act as a SOCKS proxy server.
  6. Click on the Add button to add it to the list of forwarded ports. It will appear as D8080 in the list.
Image:Easy_ssh_putty_tunnel.png


  1. If you set the server up to use an authentication key, then go to the Connection -> SSH -> Auth section and enter the location for your key file.
  2. Go back to the Session section.
  3. Enter a name you want to call the set of settings into the Saved Sessions field and press the Save button.
  4. You can now double click the saved session name in the list to load it and open the connection to your SSH server.
  5. Each time you connect you will need to enter your router password unless you're using an authentication key.


[edit] Command Line Client

Linux, Mac OS, and many other OS's come with command line SSH programs already installed. All you need to do is open a shell and issue this command with your SSH server's address filled in.
ssh root@[SSH server's IP or domain name] -p 443 -D 8080
If you use an authentication key, then consult your OS's documentation for details on how to use them with the ssh command or where to place the key file to have it automatically used. Otherwise you will be prompted to enter your password each time you connect. An added advantage of using a key file with the command line ssh program is that you can run it hidden as a background process instead of having to leave the shell open.


[edit] Configuring Programs to Utilize the Tunnel

Now that you have SSH running, all you need to do is configure your browser or other program to connect to the SOCKS proxy running on the client machine's port 8080.
  1. Go to your program's connection settings.
  2. Set the SOCKS Proxy settings to use address localhost port 8080
image:Easy_ssh_firefox.png

With your browser configured to proxy over the SSH tunnel, visit a site that will tell you what your IP address is, such as [whatsmyip.org], and check that your IP address using the proxy matches the public Internet address of your home router.
You will have to have the SSH connection open whenever you want to utilize it for proxying. When you're done using the tunnel, change your program's settings to not use it anymore or else they will not have connectivity while the tunnel is down.

from http://www.dd-wrt.com/wiki/index.php/Easy_SSH_tunnels

在windows server/vps上,架设SSH服务器-copssh

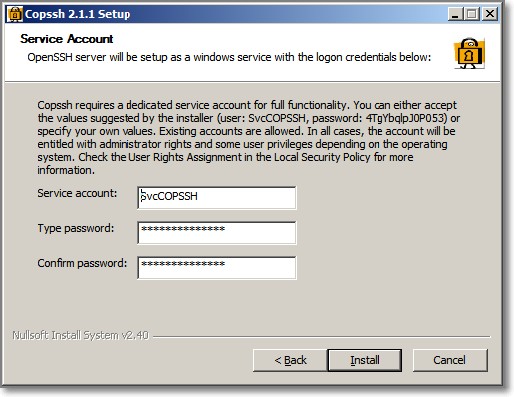
网上对于linux架设ssh已经比较成熟了, 至于Windows原先主要是通过安装cygwinopenssh来实现或是winsshdvshell这类收费软件, 现在copSSH做了一个整合安装包, 使得在Windows上架设自己的ssh代理非常傻瓜而且免费. 首先在sourceforge下载copSSH, (http://sourceforge.net/projects/sereds/,http://sourceforge.net/projects/sereds/files/Copssh_4.2.0_Installer.zip/download.此处已停止提供下载,可到http://21.duote.com.cn/copssh.zip下载,from http://www.duote.com/soft/26953.html)解压后安装,继承windows系统软件安装傻瓜式的优良传统, [i agree]后一路[next]即可完成,出现帐号密码选项后不用修改默认即可, 一般用不上,接下去完成安装,

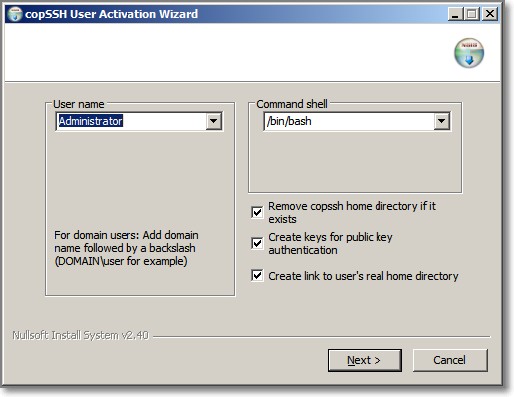
刚装好的copssh没有帐号可用,在[开始]->[所有程序]->[copssh]->[activate a user]中选择一个帐号(只有Windows帐号选择), 弹出的对话框设置一个连接用的密码即可.当然如果你想要更加安全保密, 连接时可使用密钥,

可以在命令行中输入netstat -na看看是否22端口正常打开.
如果正常的话就可以设置SOCKS5代理进行翻墙了.

如果要修改默认22端口, 可以去安装目录下修改/etc/sshd_config这个文件,这里把#Port 22这个字段前面的#去掉,再把22改成自己要设的端口, 重启服务即可。
--------------------------------------------------------------
安装成功后,使用“开始--所有程序--Copssh--01. Activate a user”,激活一个登录用户,也就是制定一个用户可以ssh登录。02. Deactivate a user 用来删除登录用户。
      完成登录后,客户端看到的系统根目录 / 在服务器端是Copssh的安装目录。可使用 mount 指令來了解Windows系统下目录在Copssh模拟的linux环境下的挂载情况:
$ mount
D:/Program Files/ICW/etc/terminfo on /usr/share/terminfo type vfat (binary,noacl)
D:/Program Files/ICW/bin on /usr/bin type vfat (binary,noacl)
D:/Program Files/ICW/lib on /usr/lib type vfat (binary,auto)
D:/Program Files/ICW on / type vfat (binary,noacl)
C: on /cygdrive/c type vfat (binary,posix=0,user,noumount,auto)
D: on /cygdrive/d type vfat (binary,posix=0,user,noumount,auto)
......
      其中最下面的内容要注意,Windows系统下的各个分区挂载在 /cygdrive 下。访问d盘,就进入/cygdrive/d目录。
      如果要修改默认22端口, 可以去安装目录下修改/etc/sshd_config这个文件,这里把#Port 22这个字段前面的#去掉,再把22改成自己要设的端口, 重启服务.
------------------------------------------------------------

Tuesday 29 November 2011

日本女人vs中国女人

育儿观念的不同

日本女人教育孩子:要勇敢和恶势力做斗争,即使被打败了,即使被打败也是光荣的。

中国女人教育孩子:碰到恶势力,就躲得远远的,因为老天爷会惩罚他们的。

不同言语的洞房花烛夜

日本的女人在新婚洞房之夜说的第一句话是:“今晚如果服侍的不好,请多多包涵。”

中国的女人在新婚洞房之夜说的第一句话是:“快去看看今天收到了多少钱。”

爱国情操的体现

日本的女人认为日本是世界上最伟大的国家。

中国的女人通常认为,外国的月亮可能会更圆一点。

婚姻理念不同

日本的女人一般认为嫁给外国人是一种耻辱。

中国的女人通常觉得,嫁给老外,是一种无限的光荣。

床上床下反差大

日本的女人平时是淑女,床上是DF。

中国的女人很多床上是淑女,床下是DF。

婚姻情感的差异

日本的女子大多都恪守妇道。相夫教子,尽职尽责。

中国是世界上婚外恋最为泛滥的国家。

孝顺的反差

日本的女子几乎都很孝顺,将婆婆视为自己的母亲。

中国的女人大多巴不得自己的婆婆快掉挂掉。

对待老公的态度

日本的妻子对丈夫鼓励,关怀,在结束一天的劳累很晚回到家中后,妻子会说“你辛苦了。”

中国的妻子对丈夫埋怨,呵斥,在结束一天的劳累很晚回到家中后,妻子会吼到“你又死哪去了。”

恋爱观的差异

日本的年轻女子大多会找一个和自己年纪差不多的男人结婚,陪他一起奋斗。

中国的年轻女子一定会找一个有钱的“老”男人,那怕当他的N奶也不介意。

母亲的教育区别

日本的母亲教育她出嫁的女儿要好好服侍丈夫,努力孝顺公婆。

中国的母亲教育她出嫁的女儿一定要控制好男人所有的财产。

金钱观念大不同

日本的女人可以忍受没钱的男人,但决不能忍受胆小弱懦的男人。

中国的女人可以忍受胆小弱懦的男人,但决不能忍受没钱的男人。

欣赏男人的魅力不同

日本的女人视尚武的男人为最有魅力的男人。

中国的女人视尚武的男人为“臭名招着”的大男子主义者。

对待的事的不同看法

日本的女人大多很宽容男人的的事。

中国的女人大多很宽容自己的的事。

不张扬男人的坏

日本的女人几乎从不在舆论媒体上说日本男人的坏话。

中国的女人一直在大张旗鼓地在各种媒体上臭骂,奚落中国男人.
-------------------------------------------------------------------------
好像说的不错哦,“非诚勿扰”的嘉宾佐藤爱似乎就是这样的日本女人。在中国,跟日本女人有的一比就是广东女人,广东女人虽然长得不怎么样,但基本上是把老公放在第一位的。

电脑使用手机蓝牙/GPRS上网

1.安装widcomm的蓝牙驱动程序
2.配置调制解调器设置。进入控制面板——电话和调制解调器选项——调制解调器菜单。区号填86后确定。到调制解调器选项双击bluetooth Modem。选择高级菜单,在额外的初始化命令栏填写如下的命令:AT+CGDCONT=1,,”cmnet”
3.进行拨号连接。进入控制面板——网络连接,双击“BluetoothConnection” 帐号和密码为空,拨号电话为 *99#或*99***1#,推荐使用*99***1#。用户密码为空。就可以测试上网了
点工具--选项--基本设置---连接设置--将直接连接到因特网改成手动配置代理,http代理添入10.0.0.172 端口为80,这样就可以上网了。QQ就设置HTTP代理10.0.0.172。其他的同理。
备注:电脑内置蓝牙的话要是widcomm的蓝牙芯片,没有内置蓝牙的话有一个widcomm芯片的蓝牙适配器也行.

清除系统垃圾文件的批处理文件

@echo off
title 清除系统垃圾文件工具,正在清理中…
echo 正在清除系统垃圾文件,请稍等……
del /f /s /q %systemdrive%\*.tmp
del /f /s /q %systemdrive%\*._mp
del /f /s /q %systemdrive%\*.gid
del /f /s /q %systemdrive%\*.chk
del /f /s /q %systemdrive%\*.old
del /f /s /q %windir%\*.bak
del /f /s /q %windir%\temp\*.*
del /f /a /q %systemdrive%\*.sqm
del /f /s /q %windir%\SoftwareDistribution\Download\*.*
del /f /s /q “%userprofile%\cookies\*.*”
del /f /s /q “%userprofile%\recent\*.*”
del /f /s /q “%userprofile%\local settings\temporary internet files\*.*”
del /f /s /q “%userprofile%\local settings\temp\*.*”
echo 清除系统垃圾文件完成!
echo. & pause
打开记事本,将上面的内容复制进去,保存文件名为“清除系统垃圾文件.bat”或者其他文件名也行,后缀要是bat。保存,定期运行一次就行了。

windows服务器添加MIME,支持在线播放视频

rmvb
application/octet-stream
.flv
flv-application/octet-stream
.swf
/x-shockwave-flash
.spl
/futuresplash
IIS,本地计算机右键鼠属,MIME类型

SERV-U 忘记管理密码之后,如何重设密码

ServUDaemon.ini文件的
LocalSetupPassword=ra8F5B14B28BFC37B821131493E6705D8D
这一行去掉,
重新启动SU,就可以不需要密码进去了,
然后重新设置密码,不过要重新注册一次,没关系,一般都是用破解版的,:)

忘记mysql密码的取回方法

首先杀之: killall mysqld(如果是windows,直接调出进程管理器,结束之)
以安全模式启动 MySQL :
/usr/bin/safe_mysqld –skip-grant-tables &
(windows 下 mysql安装所以盘/mysql/bin/safe_mysqld –skip-grant-tables )
就可以不需要密码就进入 MySQL 了。
然后就是
>use mysql
>update user set password=password(“new_pass”) where user=”root”;
>flush privileges;
用正常方法启动 MySQL

phpSQLiteCMS

一直比较喜欢用kingcms,理由呢?小巧、轻便、灵活,重要的是支持sqlite,可以随便拷着到处跑,不用再导数据库这么麻烦,只是想简单的 弄个产品展示的企业站而已,只是kingcms商业使用是需要购买授权的,所以就想再找个跟kingcms类似的系统,可惜的是lazycms一两年来还 在alpha,只能退而求其次找其他的咯。
所以找到了phpsqlitecms,介绍看下面的吧,这是从别人那里抄来的,系统只带英文跟德文法文,所以呢,就自己照着英文翻译了一份,很多词 汇都看不懂,好在在灵格斯词霸的帮助下翻译了大半,有些实在不知道什么意思就只好留着英文在那里了,有些翻译也不准确,懒得搞了,太费神了。网上有1.0 版本和2.0 alpha4的中文翻译,可惜2.0的中文翻译是在老夫花了半天时间搞完之后才发现的,还好两者有不同之处,老夫还算欣慰。
顺便也把所见即所得编辑器tinymce放进去了,省得再去下载了,琢磨了半天,到现在还是只知晓个大概,smarty的模板太繁琐了,同时呢,也 发现个问题,当输出页面的长日期时,日期中的中文编码为gb2312,而整个页面是UTF-8,不清楚在哪里修改,只好把输出日期的格式改掉了,没有中文 就没问题咯,位置在Chinese.lang.php文件的第14行,原始输出为$lang['page_time'] =  ‘[time|%A, %B %d, %Y, %H:%M]‘;,修改为$lang['page_time'] = ‘[time|%Y-%m-%d, %H:%M]‘;了,把输出中的星期和中文月份去掉了,有谁知道在哪里修正请告知。
phpSQLiteCMS是一个完全开源、免费、简洁、高效的php 内容管理系统(CMS),使用SQLite 数据库和Smarty 模板引擎。任何使用和开发者可自由分享、复制、发行、展示、传播、创作衍生作品。
可免费用于企业、政府、组织及营利性网站,这意味着可以自由地修改,补充或删除它,没有任何限制! phpSQLiteCMS 版权署名权及共享方式需要遵守GNU General Public License 通用公共许可。
使用 phpSQLiteCMS 可以快速轻松创建一个企业或个人动态网页网站,无需花费大量的时间学习、安装和配置,即便是不懂任何建站知识的用户也能轻而易举搭建好一个网站!

特点

  • 简洁、高效、易用、只消耗极少的服务器CPU资源
  • 不用数据库安装和设置
  • 开启缓存功能后极大提高服务器负载能力,浏览网站页面更加快速
  • 系统功能完善,支持 – 新闻、概况、评论、画册、留言、Emal联系、commentable、新闻订阅、搜索、Rss、XML的网站地图
  • 伪静态网址链接后缀,使Google(谷歌)baidu(百度)等所有搜寻引擎更好的抓取网站内容

需求环境

  • Linux/FreeBSD/Unix 及微软 Windows xp/2000/2003 等各种操作系统,服务器需开启支持mod_rewrite 功能。
  • php 5 及以上

演示 / 范例网站

安装指南

只需简单三步:
  1. 解开下载的压缩包,上传 ./phpSQLiteCMS 目录中的全部文件到服务器
  2. 设置目录属性,如果您的服务器使用 Windows 操作系统,可跳过这一步
    • templates_c (CHMOD 770)
    • cache (CHMOD 777)
    • files / images (CHMOD 777)
  3. 添加内容,在浏览器运行 http://您的域名/phpsqlitecms/cms/ 登录后台管理,默认的管理员用户数据是: 用户名: admin 密码: admin
phpsqlitecms的中文文档可以看这里:http://hoofo.net/phpsqlitecms/documentation

How to Bypass Your Corporate Firewall Using SSH Tunneling

简短的序言:
我得到一份新的工作,但是由于ISA防火墙,我没办法远程连接(终端服务,Radmin,VNC等)我家的机器。在经过与朋友同事的讨论后,终于找到了如下的办法。没别的意思,我只是想和大家共同通过这个便于理解的图文教程来巩固一下,每个人都喜欢图文的教程。
方案前提:
1、你家里的机器已经运行了一些远程服务(什么都行),配置和设置这些比较轻松,但是仍然在本文讨论范畴之外。
2、确保你和家中那个远程服务所开的端口能正常通信(特别注意你公司的那个愚蠢的防火墙),在家中路由和防火墙上已经打开该端口。
3、你已经为了允许通过SSH连接到你的家庭网络中在路由器上打开了端口22。
4、无论你公使用何种防火墙都需要已经打开22端口以便进行SSH通信。
让我们开始吧:
首先我们在家里下载我们需要用到的辅助工具
1)Cygwin(http://cygwin.com)
2)PuTTY(http://www.chiark.greenend.org.uk/~sgtatham/putty/download.html)

(图1)
选择一个FTP服务器来下载(这里冰血亲自去重新抓了一张图 下面一段和原文的有点不同 因为原文不详细^_^)
注 意:这里我们选择好后,下一步很复杂,首先你点一下右上角的view按钮,现在显示出了详细的信息。下拉滑动杆找到open SSH Server and client programs这项,把他在New列下的标识从Skip转换为Install(这里原文是说Install的,但是我没找到,有两个安装过程,我把两个 openssh和openssl都装了)。

(图2)
现在你可以选择其他的你想安装的,当然花的时间也就更长了。

(图3)
当Cygwin安装完成后我们通过桌面的快捷方式图标启动它,现在我们将看见一个shell。
在这个shell中我们通过输入ssh-host-config来安装sshd服务。系统会自动提问你两个问题,你只需要都回答YES就可以了。完成后你将看见这样的shell提示。

(图4)
下一步是通过命令提示符启动SSH daemon服务,具体过程是:开始->运行->cmd<回车>后输入Net Start SSHD,执行后的情况如下图所示。

(图5)
Net start sshd-启动SSH服务
Net stop sshd-停止SSH服务
当服务已经启动开始运行后它将每次随计算机的启动自动启动,无须手工了。
好了,以上所有的工作都在家里完成,当然我们是在假设你家里的系统已经运行了一些远程控制服务,比如:VNC,Radmin,终端服务等等。
回到公司要做的:
现在我们需要的是PuTTY和你的远程控制客户端。本文将使用用Radmin做示范(www.radmin.com)。
启动PuTTY,并且填写好参数把它指向你家的网络

(图6)
·输入你的公网IP地址
·端口是22
·选择SSH协议
·为你的session命名
隧道方面的设置问题:
·选择Coonection->SSH->Tunnels选项。
·在Add new forwarded port区中Source port填写你家里的远程控制服务端的监听端口(例如:Radmin的默认端口是4899,下面有图)。
·Destination是你的公网IP然后跟一个半角英文的冒号,后面再次填写你的源端口(source port),比如111.222.333.444:4899的样子。
·下面的选项按钮应保持在local。
·最后,通过点击Add(添加)按钮把刚才做的添加到当前配置。
·现在你设置的端口应该被添加到了Forwarded Ports box(你可以添加更多只要你愿意)。

(图7)
注意:现在回到session设置区并且给你的session命名并且保存你的设置。这样,我们以后就再也不需要在启动的时候重新设置了。
远程控制客户端:
1、打开你的远程控制客户端。
2、设定你使用的那个端口(Radmin默认是4899)。
3、IP设置成你的本地回传地址127.0.0.1

(图8)
连接的时候到了:
现 在我们已经做好了前期工作,可以连接了。我们现在所做的是使用SSH通过本机端口22连接到家里的22端口。一旦连接建立成功后,我们就可以同时强制我们 的Radmin通畅的进行连接了。所以,当公司的防火墙阻挡了我的4899端口请求却不阻挡22端口,我们就得逞了。为了成功的向外建立SSH连接,我们 就要得请出PuTTY。
1、启动PuTTY,双击我们事先已经设置好的那个Radmin端口映射的连接。
2、使用你的Windows帐号和密码通过PuTTY登录你的SSH连接。
3、当你的PuTTY成功建立连接后,打开你的远程控制客户端。
4、你必须已经保存了连接到127.0.0.1的连接设置。
5、打开到127.0.0.1的连接,如果一切顺利将提示你输入密码。
6、输入你的远程控制密码,现在你成功了!
来看看成功的抓图

(图9)
PuTTY连接界面

(图10)
Radmin连接界面
后记:
文章翻译完成了,小小的,短短的文章,竟然花了我一天时间。我最想说的是PuTTY其实是一款类似于端口重定向的软件,其实在公司的那一步可以使用fpipe来实现,只是估计是fpipe无法保存设置吧,而且是命令行的有点困难。

英美新闻报刊的网址

一、美国报纸
美国是世界新闻事业十分发达的国家之一。全国有各类报纸11000其中日报1600多家,包括晨报、下午报、晚报和星期日报及8000多家周报和半周报,街头小报无法计数。
1、最有影响的报纸有:
1)、The Los Angeles Times《洛杉矶时报》http://www.latimes.com
2)、The New York Times《纽约时报》 http://www.nytimes.com
3)、Washington Post《华盛顿邮报》 http://www.washingtonpost.com
4)、The Wall Street Journal《华尔街日报》http://www.wsj.com
5)、The New York Daily News 《纽约每日新闻》 http://www.nydailynews.com
6)、Chicago Daily Tribune《芝加哥论坛报》 http://www.chicagotribune.com/
7)、USA Today 《今日美国》 http://www.usatoday.com
8)、New York Post《纽约邮报》http://www.nypost.com
2、较有影响的报纸有:
1)、The Christian Science Monitor 《基督教科学箴言报》http://www.csmonitor.com
2)、International Herald Tribune 《国际先驱论坛报》http://www.iht.com
3)、Washington News 《华盛顿新闻报》http://www.newsday.com
4)、Washington Daily News 《华盛顿每日新闻》http://www.wdnweb.com
5)、Baltimore Sun 《巴尔的摩太阳报》http://www.baltimoresun.com
3、较受欢迎的报纸有:
1)、Herald Journal 《先驱日报》 http://hjnews.townnews.com/
2)、American Express 《美国快报》 http://home.americanexpress.com
3)、Journal of Commerce 《商业日报》 http://www.joc.com
4)、Tribune 《论坛报》http://www.tribune.com
5)、American News 《美国新闻》http://www.usnews.com/usnews/home.htm
6)、News Weekly 《新闻周刊》http://www.newsweekly.com.au
7)、The World Report 《世界报道》 被墙
《纽 约时报》、《华盛顿邮报》、《洛杉矶时报》是当今美国最有影响的3大报纸。垄断美国报业的集团、公司有: 甘尼特集团(Gannett Newspapers)、科普利报系 (Copley Newspapers)、詹姆斯?M?考克斯报系 (James M. Cox Newspapers)、赫斯特报系 (Hearst Newspapers)、奈特―里德报系(Knight- Ridder Newspapers)、道?琼斯公司(Dow-Jones Corp. )、 纽约时报公司(New York Times Corp. )、 汤姆森报系(Thomson Newspapers)、 时报―镜报公司(Times-Mirror Corp. )、 斯克里普斯―霍华德报系 (Scripps-Howard Newspapers)等。其中,甘尼特集团是最大的报业集团, 它拥有90家日报、30多家周报和半周报、7个电视台和16个广播电台。
二、美国杂志
美国现有一万多种杂志,发行量在百万以上的有60多种。有影响的杂志如下:
1、Reader’s Digest 《读者文摘》:http://www.rd.com
2、TIME 《时代周刊》:http://www.time.com
3、Life 《生活》 http://www.life.com
4、People 《人民》 http://www.people.com
5、Cosmopolitan women《世界妇女》 http://www.cosmomag.com
6、American Home 《美国家庭》http://www.americanhomeshield.com
7、American Child 《美国儿童》 http://www.americanbaby.com
8、American Literature 《美国文学》未找到官网
http://guweb2.gonzaga.edu/faculty/campbell/enl310/sites.htm (很多美国名著)
http://www.nagasaki-gaigo.ac.jp/ishikawa/amlit/
9、Scientific American 《美国科学》http://www.sciam.com
10、Playboy 《花花公子》 http://www.playboy.com(里面很多内容少儿不宜,只适合成年人阅读)
11、Beautify Home and Garden 《美化家庭和园林》未找到官网
12、Homes Circle 《家庭圈》http://www.newhomes.com
13、Good Manager 《好管家》 被墙
14、Magus 《麦哥氏》 http://www.magusbooks.com
15、、American Television Magazine 《电视指南》http://www.realitytvmagazine.com
三、美国主要报纸简介
1、《纽约时报》 (The New York Times) 1851年创刊,为苏兹贝格家族(Sulzberger)所有。
2、《华盛顿邮报》(The Washington Post) 1877年创刊华盛顿,属格雷厄姆家族(Graham)所有。
3、《洛杉矶时报》(The Los Angeles Times) 创刊于1881年,属钱德勒家族(Chandler)所有。
4、《华尔街日报》 (The Wall Street Journal) 1889年创刊。
5、《基督教科学箴言报》 (The Christian Science Monitor) 1909年创刊,由基督教科学出版社出版。
6、《芝加哥论坛报》(The Chicago Tribune) 创刊于1947年,在芝加哥出版。
7、《今日美国》(Gannett Newspapers) 由甘尼特集团于1982年创刊。
四、美国主要期刊简介:
1、《时代周刊》 (TIME) http://www.time.com
2、《新闻周刊》 (NEWS WEEK) http://www.Newsweek.com
3、《美国新闻与世界报道》 (U.S. NEWS &WORLD REPORT) http://www.usnews.com
4、《读者文摘》 (READER’S DIGEST) http://www.rd.com
5、《商业周刊》 (Business Week) http://www.businessweek.com
6、《财富》 (Fortune) http://www.fortune.com
五、美国的党报
1、支持政府的报纸:
《国务院公报》 (Department of State Bulletin) http://www.findarticles.com
《纽约时报》 (The New York Times) http://www.nytimes.com
《华盛顿明星报》 (Washington Star) http://www.washingtonstar.com
《美国新闻与世界报道》 (U.S. News &World Report) http://www.usnews.com
2、支持共和党的报纸:
《纽约先驱论坛报》 (New York Herald)
《芝加哥论坛报》 (Chicago Tribune) http://www.chicagotribune.com
《洛杉矶时报》 (Los Angeles Times) http://www.latimes.com
《旧金山纪事报》 (San Francisco Chronicle) http://www.sfgate.com
3、支持民主党的报纸:
《巴尔的摩太阳报》 (Baltimore Sun) http://www.baltimoresun.com
《芝加哥太阳时报》 (Chicago Sun-Times) http://www.suntimes.com
《圣路易邮电报》 (St. Louis Post) http://www.stltoday.com
4、中立的报刊:
《基督教科学箴言报》 (The Christian Science Monitor) http://www.csmonitor.com
《纽约邮报》 (New York Post) http://www.nypost.com
《纽约每日新闻》 (New York Daily News) http://www.nydailynews.com
《华尔街日报》 (Wall Street Journal) http://www.wsj.com
5、杂志方面:
1)、《新闻周刊》 (Newsweek) http://www.Newsweek.com
2)、《时代周刊》 (Time) http://www.time.com
3)、《展望周刊》 (Look) http://www.onelook.com
六、美国广播公司
1、全国广播公司(National Broadcasting Company 简称 NBC )于1926年创办: http://www.nbc.com
2、哥伦比亚广播公司(Columbia Broadcasting System,简称CBS)于1927年创办:http://www.cbs.com
3、美国广播公司(American Broadcasting Company, 简称ABC) http://www.abc.com
4、美国之音 (Voice of America,简称VOA) 于1942年创办: http://www.voa.gov
5、美联社 (Associated Press,简称AP)于1848年创办: http://www.ap.org
6、合众国际社 (United Press-International News Service,简称UPI)于1907年创办:http://www.upi.com
―――――――――――――――-
然后是英国的:
一、英国全国性高级报纸有:
1、《泰晤士报》 Times:http://www.thetimes.co.uk
2、《每日电讯报》 The Daily Telegraph: http://www.dailytelegraph.co.uk
3、《卫报》 The Guardian:http://www.guardian.co.uk/
4、《金融时报》 The Financial Times:http://news.ft.com/home/rw
5、《星期日电讯报》 Sunday Dispatch:未找到官网
6、《观察家报》 The Observer:http://www.observer.co.uk
7、《星期日泰晤士报》The Sunday Times:http://www.sunday-times.co.uk/
二、英国全国性通俗报纸有:
1、《每日快报》 The Daily Express:http://www.express.co.uk/
2、《每日邮报》 The Daily Mail:http://www.dailymail.co.uk/
3、《每日镜报》 Daily Mirror:http://www.mirror.co.uk/
4、《星期日快报》 The Sunday Express 未找到官网
5、《世界新闻报》 The News of the World:http://www.newsoftheworld.co.uk (一个很有特点的英语新闻网站)
三、地方性报纸
它主要以刊登本地新闻和广告为主,具有浓厚的地方特色。包括晨报、晚报、周报、3日刊。
1、《格拉斯哥先驱报》 (Glasgow Herald) http://www.theherald.co.uk/
2、《旗帜晚报》 ( The Evening Standard ) http://www.thisislondon.com/
3、《新闻晚报》 (The Evening News):http://www.eveningtimes.co.uk
四、主要报纸简介
1、《泰晤士报》(Times):1785年由约翰?沃尔特在创敦创刊,誉为”世界第一大报纸”(the First Newspaper in the World).
http://www.thetimes.co.uk
2、《卫报》(The Guardian):原名《曼彻斯特卫报》(The Man- Chester Guardian),1821年创刊于曼彻斯特,后迁伦敦,1959年改称《卫报》.
http://www.guardian.co.uk/
3、《金融时报》(The Financial Times) :1888年于伦敦创刊,是英国金融资本的晴雨表. http://news.ft.com/home/rw
4、《每日电讯报》(The Daily Telegraph) :1855年于伦敦创刊,该报以”时效性”而著称。 http://www.dailytelegraph.co.uk
5、《观察家报》(The Observer) :1791年创刊。
http://www.observer.co.uk
6、《每日快报》(The Daily Express) :1900年由比弗布鲁克爵士 ( Lord Beaverbrook) 在伦敦创刊。 http://www.express.co.uk/
7、《每日邮报》(The Daily Mail): 1896年创刊,是一种知识性很强的通俗日报。http://www.dailymail.co.uk/
8、《镜报》(The Mirror) :1903年创刊,1985年以前名为《每日镜报》(Daily Mirror) 。http://www.mirror.co.uk/
五、英国主要期刊简介
1、《经济学家》(The Economist) :1843年创刊,与《金融时报》同属”皮尔逊父子公司”所有。
http://www.economist.com
2、《旁观者》(The Spectator) :创刊于1828年,是英国全国性周刊中历史最久的杂志。
http://www.spectator.co.uk
3、《新政治家》(The New Statesman) :创刊于1934年,主要发表有关政治、社会问题、书刊、电影、戏剧等方面的评论。
http://www.newstatesman.co.uk
4、《妇女界》(The Woman’s Own) :1932年创刊,是图文并茂的妇女月刊,女性朋友必看。
http://www.ipcmedia.com
5、《妇女之国》(Woman’s Realm) :创刊于1958年,适合新成家的青年妇女。
http://www.anagramgenius.com/
6、《泰晤士报文学增刊》(The Times Literary Supplement, The TLS) :每周出一期,是英国最有影响的文学周刊之一。
http://www.the-tls.co.uk
六、英国其他周刊及科普刊物
1、周刊 (Weeklies) :
1)、《现在》 (Now) :http://www.nowmagazine.co.uk
2)、《侦探》 (Private Eye):http://www.private-eye.co.uk (适合喜欢破案类小说的中学生)
3)、《笨拙》 (Punch):http://www.punch.co.uk (非常不错的漫画类杂志)
4)、 《听众》 (The Listener) http://http://www.listener.co.nz/
5)、《新社会》 (New Society) http://www.newsociety.com
6)、《闲暇》 (Time Out) http://www.timeout.com/london/ (是伦敦一本很好的休闲杂志,它的网站也很棒!)
2、科普 (Scientific periodicals)
1)、《发现》 (Discovery) http://www.discovery.com/
2)、《自然》 (Nature) http://www.nature.com /
中国地区自然杂志网址:http://www.natureasia.com/ch/gta/index.php
3)、《科学通讯》 (Science News) http://www.sciencenews.org
4)、《地理杂志》 (The Geographical Magazine) http://www.geographical.co.uk
5)、《新科学家》 (New Scientist) http://www.newscientist.com
6)、《科学世界》 (Scientific World) http://www.thescientificworld.com
7)、《未来音乐》 (Future Music) http://www.futuremusic.co.uk
8)、《学科进展》 (Science Progress) http://www.scilet.com
简 单介绍:《自然》系列期刊是由每周出版的多学科《自然》杂志和8种每月出版的期刊组成。《自然》杂志发表在某一学科内具有高最影 响、其它领域的科学家也会感兴趣的研究工作;8种学术期刊的名称是根据其报道领域命名的,它们都发表在其领域中质量最高、影响力显著的论文,这8种期刊的 名称分别是:《自然生物技术》、《自然细胞生物学》、《自然遗传学》、《自然免疫学》、《自然材料学》、《自然医学》、《自然方法学》、《自然结构和分子 生物学》。所有的这些期刊都是国际性的,它们在美国、英国和日本出版和印刷。
------------------------------------------------------------------------


第一部分、美国著名报刊杂志介绍
一、美国报纸
  美国是世界新闻事业十分发达的国家之一。全国有各类报纸11000其中曰报1600多家,包括晨报、下午报、晚报和星期曰报及8000多家周报和半周报,街头小报无法计数。

1、最有影响的报纸有:

1)、The Los Angeles Times《洛杉矶时报》www.latimes.com 
2)、The New York Times《纽约时报》 www.nytimes.com
3)、Washington Post《华盛顿邮报》 www.washingtonpost.com
4)、The Wall Street Journal《华尔街曰报》www.wsj.com
5)、The New York Daily News 《纽约每曰新闻》 www.nydailynews.com
6)、Chicago Daily Tribune《芝加哥论坛报》 www.chicagotribune.com/
7)、USA Today 《今曰美国》 www.usatoday.com
8)、New York Post《纽约邮报》www.nypost.com
2、较有影响的报纸有:

1)、The Christian Science Monitor 《基督教科学箴言报》www.csmonitor.com
2)、International Herald Tribune 《国际先驱论坛报》www.iht.com 
3)、Washington News 《华盛顿新闻报》www.newsday.com 
4)、Washington Daily News 《华盛顿每曰新闻》www.wdnweb.com 
5)、Baltimore Sun 《巴尔的摩太阳报》www.baltimoresun.com 
3、较受欢迎的报纸有:

1)、Herald Journal 《先驱曰报》 http://hjnews.townnews.com 
2)、American Express 《美国快报》 http://home.americanexpress.com 
3)、Journal of Commerce 《商业曰报》 www.joc.com 
4)、Tribune 《论坛报》www.tribune.com 
5)、American News 《美国新闻》www.usnews.com/usnews/home.htm 
6)、News Weekly 《新闻周刊》 www.newsweekly.com.au 
7)、The World Report 《世界报道》
《纽约时报》、《华盛顿邮报》、《洛杉矶时报》是当今美国最有影响的3大报纸。垄断美国报业的集团、公司有: 甘尼特集团(Gannett Newspapers)、科普利报系 (Copley Newspapers)、詹姆斯•M•考克斯报系 (James M. Cox Newspapers)、赫斯特报系 (Hearst Newspapers)、奈特—里德报系(Knight- Ridder Newspapers)、道•琼斯公司(Dow-Jones Corp. )、 纽约时报公司(New York Times Corp. )、 汤姆森报系(Thomson Newspapers)、 时报—镜报公司(Times-Mirror Corp. )、 斯克里普斯—霍华德报系 (Scripps-Howard Newspapers)等。其中,甘尼特集团是最大的报业集团, 它拥有90家曰报、30多家周报和半周报、7个电视台和16个广播电台。
二、美国杂志
  美国现有一万多种杂志,发行量在百万以上的有60多种。有影响的杂志如下:

1、Reader’s Digest 《读者文摘》:www.rd.com
2、TIME 《时代周刊》:www.time.com
3、Life 《生活》 www.life.com
4、People 《人民》 www.people.com
5、Cosmopolitan women《世界妇女》 www.cosmomag.com
6、American Home 《美国家庭》 www.americanhomeshield.com
7、American Child 《美国儿童》 www.americanbaby.com
8、American Literature 《美国文学》未找到
http://guweb2.gonzaga.edu/faculty/campbell/enl310/sites.htm (很多美国名著)
http://www.nagasaki-gaigo.ac.jp/ishikawa/amlit/  
9、Scientific American 《美国科学》 www.sciam.com 
10、Playboy 《花花公子》 www.playboy.com (里面很多内容少儿不宜,只适合成年人阅读)
11、Beautify Home and Garden 《美化家庭和园林》
12、Homes Circle 《家庭圈》 www.newhomes.com 
13、Good Manager 《好管家》
14、Magus 《麦哥氏》 www.magusbooks.com 
15、、American Television Magazine 《电视指南》www.realitytvmagazine.com
 
三、美国主要报纸简介

1、《纽约时报》 (The New York Times) 1851年创刊,为苏兹贝格家族(Sulzberger)所有。
2、《华盛顿邮报》(The Washington Post) 1877年创刊华盛顿,属格雷厄姆家族(Graham)所有。
3、《洛杉矶时报》(The Los Angeles Times) 创刊于1881年,属钱德勒家族(Chandler)所有。
4、《华尔街曰报》 (The Wall Street Journal) 1889年创刊。
5、《基督教科学箴言报》 (The Christian Science Monitor) 1909年创刊,由基督教科学出版社出版。
6、《芝加哥论坛报》(The Chicago Tribune) 创刊于1947年,在芝加哥出版。
7、《今曰美国》(Gannett Newspapers) 由甘尼特集团于1982年创刊。
四、美国主要期刊简介:
1、《时代周刊》 (TIME) www.time.com
2、《新闻周刊》 (NEWS WEEK) www.Newsweek.com
3、《美国新闻与世界报道》 (U.S. NEWS &WORLD REPORT) www.usnews.com
4、《读者文摘》 (READER’S DIGEST) www.rd.com
5、《商业周刊》 (Business Week) www.businessweek.com
6、《财富》 (Fortune) www.fortune.com
五、美国的党报
1、支持政府的报纸:
《国务院公报》 (Department of State Bulletin) www.findarticles.com
《纽约时报》 (The New York Times) www.nytimes.com
《华盛顿明星报》 (Washington Star) www.washingtonstar.com
《美国新闻与世界报道》 (U.S. News &World Report) www.usnews.com
2、支持共和党的报纸:

《纽约先驱论坛报》 (New York Herald)
《芝加哥论坛报》 (Chicago Tribune) www.chicagotribune.com
《洛杉矶时报》 (Los Angeles Times) www.latimes.com
《旧金山纪事报》 (San Francisco Chronicle) www.sfgate.com
3、支持民主党的报纸:

《巴尔的摩太阳报》 (Baltimore Sun) www.baltimoresun.com
《芝加哥太阳时报》 (Chicago Sun-Times) www.suntimes.com
《圣路易邮电报》 (St. Louis Post) www.stltoday.com
4、中立的报刊:

《基督教科学箴言报》 (The Christian Science Monitor) www.csmonitor.com
《纽约邮报》 (New York Post) www.nypost.com
《纽约每曰新闻》 (New York Daily News) www.nydailynews.com
《华尔街曰报》 (Wall Street Journal) www.wsj.com
5、杂志方面:

1)、《新闻周刊》 (Newsweek) www.Newsweek.com
2)、《时代周刊》 (Time) www.time.com
3)、《展望周刊》 (Look) www.onelook.com
六、美国广播公司:
1、全国广播公司(National Broadcasting Company 简称 NBC )于1926年创办: www.nbc.com
2、哥伦比亚广播公司(Columbia Broadcasting System,简称CBS)于1927年创办:www.cbs.com
3、美国广播公司(American Broadcasting Company, 简称ABC) www.abc.com
4、美国之音 (Voice of America,简称VOA) 于1942年创办: www.voa.gov
5、美联社 (Associated Press,简称AP)于1848年创办: www.ap.org
6、合众国际社 (United Press-International News Service,简称UPI)于1907年创办:www.upi.com
第二部分、英国报刊杂志介绍
一、英国全国性高级报纸有:

1、《泰晤士报》 Times:http://www.thetimes.co.uk
2、《每曰电讯报》 The Daily Telegraph:http://www.dailytelegraph.co.uk
3、《卫报》 The Guardian:http://www.guardian.co.uk/
4、《金融时报》 The Financial Times:http://news.ft.com/home/rw
5、《星期曰电讯报》 Sunday Dispatch:
6、《观察家报》 The Observer:http://www.observer.co.uk
7、《星期曰泰晤士报》The Sunday Times:www.sunday-times.co.uk/
二、英国全国性通俗报纸有:

1、《每曰快报》 The Daily Express:http://www.express.co.uk/
2、《每曰邮报》 The Daily Mail:http://www.dailymail.co.uk/
3、《每曰镜报》 Daily Mirror:http://www.mirror.co.uk/
4、《星期曰快报》 The Sunday Express
5、《世界新闻报》 The News of the World:www.newsoftheworld.co.uk (一个很有特点的英语新闻网站)
三、地方性报纸
它主要以刊登本地新闻和广告为主,具有浓厚的地方特色。包括晨报、晚报、周报、3曰刊。

1、《格拉斯哥先驱报》 (Glasgow Herald) http://www.theherald.co.uk/
2、《旗帜晚报》 ( The Evening Standard ) http://www.thisislondon.com/
3、《新闻晚报》 (The Evening News):www.eveningtimes.co.uk
四、主要报纸简介

1、《泰晤士报》(Times):1785年由约翰•沃尔特在创敦创刊,誉为“世界第一大报纸”(the First Newspaper in the World).
http://www.thetimes.co.uk
2、《卫报》(The Guardian):原名《曼彻斯特卫报》(The Man- Chester Guardian),1821年创刊于曼彻斯特,后迁伦敦,1959年改称《卫报》.
http://www.guardian.co.uk/
3、《金融时报》(The Financial Times) :1888年于伦敦创刊,是英国金融资本的晴雨表. http://news.ft.com/home/rw
4、《每曰电讯报》(The Daily Telegraph) :1855年于伦敦创刊,该报以“时效性”而著称。 http://www.dailytelegraph.co.uk
5、《观察家报》(The Observer) :1791年创刊。
http://www.observer.co.uk
6、《每曰快报》(The Daily Express) :1900年由比弗布鲁克爵士 ( Lord Beaverbrook) 在伦敦创刊。 http://www.express.co.uk/
7、《每曰邮报》(The Daily Mail): 1896年创刊,是一种知识性很强的通俗曰报。http://www.dailymail.co.uk/
8、《镜报》(The Mirror) :1903年创刊,1985年以前名为《每曰镜报》(Daily Mirror) 。http://www.mirror.co.uk/
五、英国主要期刊简介

1、《经济学家》(The Economist) :1843年创刊,与《金融时报》同属“皮尔逊父子公司”所有。
http://www.economist.com
2、《旁观者》(The Spectator) :创刊于1828年,是英国全国性周刊中历史最久的杂志。
www.spectator.co.uk
3、《新政治家》(The New Statesman) :创刊于1934年,主要发表有关政治、社会问题、书刊、电影、戏剧等方面的评论。
www.newstatesman.co.uk
4、《妇女界》(The Woman’s Own) :1932年创刊,是图文并茂的妇女月刊,女性朋友必看。
http://www.ipcmedia.com
5、《妇女之国》(Woman’s Realm) :创刊于1958年,适合新成家的青年妇女。
http://www.anagramgenius.com/
6、《泰晤士报文学增刊》(The Times Literary Supplement, The TLS) :每周出一期,是英国最有影响的文学周刊之一。
www.the-tls.co.uk
六、英国其他周刊及科普刊物

1、周刊 (Weeklies) :
1)、《现在》 (Now) :www.nowmagazine.co.uk
2)、《侦探》 (Private Eye):www.private-eye.co.uk (适合喜欢破案类小说的中学生)
3)、《笨拙》 (Punch):www.punch.co.uk (非常不错的漫画类杂志)
4)、 《听众》 (The Listener) http://www.listener.co.nz/
5)、《新社会》 (New Society) www.newsociety.com
6)、《闲暇》 (Time Out) www.timeout.com/london/ (是伦敦一本很好的休闲杂志,它的网站也很棒!)
2、科普 (Scientific periodicals)
1)、《发现》 (Discovery) www.discovery.com/
2)、《自然》 (Nature) www.nature.com /
中国地区自然杂志网址:http://www.natureasia.com/ch/gta/index.php
简单介绍:《自然》系列期刊是由每周出版的多学科《自然》杂志和8种每月出版的期刊组成。《自然》杂志发表在某一学科内具有高最影响、其它领域 的科学家也会感兴趣的研究工作;8种学术期刊的名称是根据其报道领域命名的,它们都发表在其领域中质量最高、影响力显著的论文,这8种期刊的名称分别是: 《自然生物技术》、《自然细胞生物学》、《自然遗传学》、《自然免疫学》、《自然材料学》、《自然医学》、《自然方法学》、《自然结构和分子生物学》。所 有的这些期刊都是国际性的,它们在美国、英国和曰本出版和印刷。

3)、《科学通讯》 (Science News) www.sciencenews.org
4)、《地理杂志》 (The Geographical Magazine) www.geographical.co.uk
5)、《新科学家》 (New Scientist) www.newscientist.com
6)、《科学世界》 (Scientific World) www.thescientificworld.com
7)、《未来音乐》 (Future Music) www.futuremusic.co.uk
8)、《学科进展》 (Science Progress) www.scilet.com