Total Pageviews

Showing posts with label mongodb. Show all posts

Sunday, 5 July 2026

NoderCMS - 轻量级内容管理系统

 轻量级内容管理系统,基于 Node.js + MongoDB 开发,拥有灵活的内容模型以及完善的权限角色机制.

安装

$ npm install --production
$ npm start

完成后访问 http://localhost:3000/admin/install 进入安装程序

环境要求:

  1. Node.js v4.4.3 及以上
  2. Mongodb v3.0.6 及以上

重新安装

  1. 清空数据库
  2. 删除 /install.lock
  3. 访问 http://localhost:3000/admin/install 进入安装程序

常见问题

from  https://github.com/welkinwong/nodercms

Friday, 2 January 2026

nextjs-blog-react-admin

 个人博客系统.包括博客页面(next.js),博客后台管理(React)和后端(node.js). 

简介

个人博客系统.包括博客页面(next.js),博客后台管理(React)和后端(node.js).本项目提供了一个简洁方便的博客方案,可以让发布和管理博客更加轻松.如果对项目有任何建议和想法,欢迎发起issue.

演示网站

后台管理演示网站: https://admin.manfreddemoblog.top (密码admin,请勿提交或修改数据)

博客演示网站: https://www.manfreddemoblog.top/

技术栈

博客管理:

  • React 18.1.0
  • React Router v6
  • Ant Design 5.13.2
  • Redux Toolkit
  • redux-thunk
  • axios
  • echarts
  • react-three-fiber
  • react-simplemde-editor
  • react-markdown
  • CSS Modules

后端:

  • JWT
  • Express
  • mongoose
  • multer

博客:

  • Next.js 12.2.5
  • React 18.2.0
  • CSS Modules

系统结构图

系统结构图 博客管理采用前后端分离的模式开发.前端使用react,antd搭建管理页面.因为后台管理不需要SEO,所以没有使用next.js.后端使用express.js框架构建的restful api,具有基本的增删改查功能,数据库使用mongoDB.博客网站使用next.js,并且是静态站点.这样的好处是SEO友好,页面加载速度快而且服务器压力小.在管理页面修改或者发布博客文章后,后端会请求next.js重新构建部分静态页面,使得博客页面的内容是最新的.其实也可以使用SSR(服务端渲染)方案,但担心服务器压力过大而没有选择此方案.next.js的服务端会从数据库中直接获取博客数据,然后根据数据编译出静态的html页面.因为这个过程是在服务端进行的,所以是安全的.博客管理上传的图片会保存到服务器本地.博客页面具有基本的评论功能,还在完善中.

功能和特点

  • 博客管理和博客页面都完成了移动端适配.
  • 博客页面经行了特定的SEO优化和性能优化,lighthouse接近满分.
  • 管理页面可以对文章,分类和标签进行增删改查操作,文章可以设置为草稿来隐藏.
  • 管理页面的博客列表中可以下载文章的md文件,文件中的Front-matter符合hexo格式.
  • 管理页面可以添加,删除和修改友链.
  • 博客页面可以发布评论.管理页面可以查看最近评论和每篇博客的评论以及删除评论.
  • 管理页面可以修改博客站点的网站元信息.
  • 管理页面统计页使用react-three/fiber开发了3d词云,使用ECharts展示了过去30天博客动态的堆叠图.
  • 管理页面使用markdown编辑器,支持GFM,KaTeX,脚注,代码高亮和代码块行高亮,并且支持自动保存.
  • 后端的api会对短时间的大量请求进行限流.
  • 登录鉴权使用JWT方案.如果用户修改密码,之前发布的令牌将失效.
  • 博客系统内带有图床,支持多图片和文件夹上传.

文件夹目录

  • /admin-blog 博客后台管理
  • /backend 后端
  • /nextjs-blog 博客页面

拉取项目和安装依赖

  • 拉取项目并在三个文件夹下分别安装依赖(提前安装好Node.js,注意Node版本必须14以上)
git clone https://github.com/ManfredMT/nextjs-blog-react-admin.git

cd nextjs-blog-react-admin/admin-blog
npm install

cd ../backend
npm install

cd ../nextjs-blog
npm install
  • 安装mongoDB

部署

如果只想搭建博客,可以跳过后面的开发运行章节.

  • 在admin-blog目录下打包前端管理项目.

    npm run build

运行生产模式.

npm start

express.js运行在localhost:5000. 实际部署的时候建议使用PM2来启动服务,而不是直接npm start.PM2是一个进程管理工具,可以很方便的管理node.js应用. 安装PM2:

sudo npm i pm2 -g

使用PM2启动:

pm2 start server.js --name httpServer

打包和运行生产模式.

npm run build
npm start

next.js运行在localhost:3001. 或者使用PM2启动(推荐):

pm2 start npm --name next -- start

这时项目只是运行在特殊的端口号上.可以使用nginx的反向代理让网站通过域名访问,网络上有很多教程,这里不再详细说明.注意nginx服务器一定要配置X-Forwarded-For,否则后端无法经行api请求的限流.如果没在.env配置USER_PASSWORD,部署之后请修改默认的管理密码.

开发运行

在三个文件夹下分别运行,可参考文件夹下package.json文件中scripts配置.

  • 在backend目录下创建.env文件,可使用示例文件.envexample,具体配置可参考.env文件配置说明.然后运行开发模式,使用nodemon运行node.js后端,修改文件时自动重启服务.后端服务运行在localhost:5000.

    mv .envexample .env
    //修改.env文件
    npm run server

在admin-blog目录下,是博客管理的前端项目.开发时运行在localhost:3000.

npm run start

在nextjs-blog目录下,是个人博客的项目.使用示例文件.envexample创建.env.local文件.具体配置可参考.env文件配置说明.next.js运行在localhost:3001.

mv .envexample .env.local
//修改.env.local文件
npm run dev

.env文件配置说明

在backend目录下需要有.env配置文件,并且nextjs-blog目录下需要有.env.local配置文件,才能让项目正常运行.项目中已经有.envexample示例文件作为参考.开发时可以不修改,部署时需要修改NODE_ENV,JWT_SECRETMY_SECRET_TOKEN三项,其他的默认设置即可.下面详细说明每一项的含义.

/backend目录下的.env文件

  • NODE_ENV项代表后端运行的模式,可以设置为development(开发)或者production(生产).请在admin-blog目录下完成打包后再设置为production,因为node.js在生产环境下会根据admin-blog目录下的build文件夹创建静态服务器.
  • PORT项代表node.js运行的端口,如果不设置将使用5000端口.不建议更改.
  • MONGO_URI项代表MongoDB数据库的URL.如果是自己服务器上安装的,可以不用修改.如果使用了云数据库,按云厂家说明经行配置.一般不需要修改.
  • DB_NAME项代表MongoDB数据库中使用的Database名称,可以设置其他值.一般不需要修改.
  • JWT_SECRET代表JWT中的secret.请务必自己修改成其它字符串!不要将secret泄漏给别人或者暴露出去!
  • USER_NAME代表初始化的管理用户名,不需要修改,只有在第一次启动后端之前有用.
  • USER_PASSWORD代表初始的管理用户密码,如果没有修改,请在管理UI界面修改密码,注意只有在第一次启动后端之前有用.
  • MY_SECRET_TOKEN代表next.js中revalidate api需要的令牌.请修改成其他字符串,并且在nextjs-blog目录下.env.local里设置成一样的.
  • NEXTJS_PORT代表next.js运行的端口,不建议更改.
  • DEMO代表是否为演示环境,数字0代表非演示环境,其他数字代表演示环境.搭建博客设置为0就可以,不需要修改.

/nextjs-blog目录下的.env.local文件

  • USER_NAME与/backend目录下的.env文件值相同.
  • MONGODB_URI与/backend目录下的.env文件值相同.
  • DB_NAME与/backend目录下的.env文件值相同.
  • MY_SECRET_TOKEN与/backend目录下的.env文件值相同.
  • PORT代表后端的端口,与/backend目录下的.env文件值相同.
  • ANALYZE代表是否开启bundle-analyzer(打包文件分析),如果设置为true,将会分析两次,一次是服务端的分析,一次是客户端的分析.
  • 打包后的管理前端项目全都放在build文件夹下.运行后端的生产模式会根据这个build包创建静态服务器.

  • 在backend目录下根据.envexample创建.env文件,把NODE_ENV设置为production,修改JWT_SECRETMY_SECRET_TOKEN.具体参考.env文件配置说明.

    mv .envexample .env
    //修改.env文件
  • --name后面是应用的名字,可以把httpServer改成其他名字.

  • 在nextjs-blog目录下根据.envexample创建.env.local文件,修改MY_SECRET_TOKEN与backend目录下.env相同.其他的项除了ANALYZE都与backend配置一致.具体参考.env文件配置说明.打包和运行生产模式.

    mv .envexample .env.local
    //修改.env.local文件
    from  https://github.com/ManfredMT/nextjs-blog-react-admin
  • Friday, 13 September 2024

    类似于Slack/Discord的聊天程序Tailchat


    Next generation noIM application in your own workspace, not only another Slack/Discord/Rocket.chat

    tailchat.msgbyte.com/

    Docker Publish Docker Image Version (tag latest semver) Docker Pulls CI Codemagic build status Desktop Build deploy nightly Tailchat Nightly

    tailchat

    简体中文

    Next generation noIM application in your own workspace

    Not only another Slack, Discord, Rocket.Chat....

    If you are interested in the concept of noIM, welcome to read my blog:

    Official Documentation: https://tailchat.msgbyte.com/

    Nightly version Try it online: https://nightly.paw.msgbyte.com/

    Nightly version is the automatic compile version, that means, every commit code will be automatically compiled. The reliability and stability of the data are not guaranteed, you can deploy with stable version with docker images or github release page

    Motivation

    At present, the existing IM applications only focus on chatting itself, and IM is naturally a multi-person collaboration method. In my opinion, it should be able to take on more responsibilities, and form its own unique way of forwarding external applications through IM workflow.

    Therefore, I bring up the point of noIM, which means Not only IM. Instead, it designed a highly customized application platform for individuals/teams centered on IM, with third-party applications as enhanced functions, and a plugin system as the glue connection layer in the middle.

    To this end, the functions were abstracted, and a lot of time was spent designing the underlying mechanism. An instant messaging application such as Tailchat was born for expansion from the beginning of the underlying design. Through Tailchat's plugin system, developers can easily use their favorite applications as part of Tailchat in a very natural way. Different from traditional integration methods such as Slack, the integration of Tailchat is more free, as if it is a native function.

    Feature

    • Pay attention to privacy, only invited members can join the group
    • Prevent strangers, add friends only by nickname + a random string of numbers
    • Two-level group space, dividing different topics by panels
    • Highly customized group space, create original group space by grouping with dragging and dropping. At the same time, more plugins can be used to add more capabilities
    • It can be rigorous or fun. Through the combination of plugins, Tailchat can be created for different scenarios. It can be for individuals or for enterprises
    • The backend microservice structure is ready for large-scale deployment. Don't worry about what to do after the number of user growth

    Learn more in our website

    Performance and Expansion

    Tailchat is a modern open source IM application which based on React + Typescript

    Front-end microkernel architecture + backend microservice architecture, Tailchat is ready for clustering deployment.

    The front end empowers the application through the plugin system, which is very simple and easy to expand for the secondary development of Tailchat.

    NOTICE: Although the core functionality of Tailchat is currently in a stable stage, its exposed interface for third-party developers is still being improved. Generally speaking, it is backward compatible, but retains the possibility of Break Change

    Visit the official website to learn more: https://tailchat.msgbyte.com/

    Quick Deploy

    Deploy on Sealos

    Deploy on Sealos

    Communication

    If you are interested in Tailchat, welcome to join Tailchat's seed user exchange group, your feedback can help Tailchat grow better

    Tailchat

    Tailchat Nightly Group

    Producthunt

    Tailchat - The next-generation noIM Application in your own workspace | Product Hunt 

    from https://github.com/msgbyte/tailchat

    ------

    Manual Deployment

    caution

    The content of this chapter requires you to have a certain degree of understanding of nodejs, git, linux. When there are problems such as dependency problems, environmental problems, system problems, etc., you need to have the ability to solve and troubleshoot problems by yourself.

    If you do not understand this, it is not recommended that you use the contents of this chapter for deployment. It is recommended to use a unified image for deployment.

    Dependencies

    • git
    • nodejs v16.18.0 or above
    • pnpm v8.3.1 or above
    • mongodb
    • redis
    • minio

    Download the source code

    mkdir msgbyte && cd msgbyte

    git clone https://github.com/msgbyte/tailchat.git

    Switch to stable code

    Because the cloned code is the latest code, it may be unstable for a short period of time, so if you want to switch to the stable code of each version, you can use the tag function of git

    For example, if you wanna use v1.7.6, you can use the command:

    git checkout v1.7.6

    Compile the project

    Tailchat is a front-end and back-end separated project. So we have to deal with the front-end code and the back-end code separately

    Install dependencies

    We assume you have installed nodejs v16.18.0+ or above. And installed pnpm v8.3.1 or above

    cd tailchat
    pnpm install

    This command will take some time to install all the dependencies of Tailchat. When the installation is complete, the internal plug-in will automatically execute the compilation command.

    Building the project

    NODE_ENV=production pnpm build

    This command will execute the commands for compiling the front-end and back-end management terminals in parallel. And move the front-end product to the server/dist/public directory of the server.

    When the project is built, our product can run normally.

    caution:

    Please build in macos / linux environment as much as possible, window does not necessarily fully support shell commands.

    Run the project

    In order to ensure the horizontal expansion of the project, although the core code of Tailchat is written in the same project, it can be divided into multiple subdivided microservices when it is actually started. Selectively enable different services by passing in a combination of different environment variables.

    Create an environment variable file in the server directory using the .env.example directory as an example:

    cp server/.env.example server/dist/.env
    vim .env

    Modify the necessary environment variables to your own, such as MONGO_URL, REDIS_URL, MINIO_URL

    then start the service

    SERVICEDIR=services,plugins pnpm start:service

    SERVICEDIR indicates the directory where the microservice is loaded.

    from https://tailchat.msgbyte.com/docs/deployment/other-way/manual


    聊天程序fiora


    An interesting open source chat application. Developed with node.js, mongoDB, socket.io and react.

    fiora.suisuijiang.com

    Fiora is an interesting open source chat application. It is developed based on node.js, react and socket.io technologies

    • Richness: Fiora contains backend, frontend, Android and iOS apps
    • Cross Platform: Fiora is developed with node.js. Supports Windows / Linux / macOS systems
    • Open Source: Fiora follows the MIT open source license

    Online Example: https://fiora.suisuijiang.com/
    Documentation: https://yinxin630.github.io/fiora/

    Features

    1. Register an account and log in, it can save your data for a long time
    2. Join an existing group or create your own group to communicate with everyone
    3. Chat privately with anyone and add them as friends
    4. Multiple message types, including text / emoticons / pictures / codes / files / commands, you can also search for emoticons
    5. Push notification when you receive a new message, you can customize the notification ringtone, and it can also read the message out
    6. Choose the theme you like, and you can set it as any wallpaper and theme color you like
    7. Set up an administrator to manage users

    Install

    Fiora provides two ways to install

    Change Log

    You can find the Fiora changelog on the website

    from https://github.com/yinxin630/fiora

    --------------------------------------------------

    Install

    Environmental Preparation#

    To run Fiora, you need Node.js(recommend v14 LTS version), MongoDB and redis

    Recommended to running on Linux or MacOS systems

    How to run#

    1. Clone the project git clone https://github.com/yinxin630/fiora.git -b master
    2. Ensure you have install yarn before, if not please run npm install -g yarn
    3. Install project dependencies yarn install
    4. Build client yarn build:web
    5. Config JwtSecret echo "JwtSecret=<string>" > .env2. Change <string> to a secret text
    6. Start the server yarn start
    7. Open http://[ip]:[port](such as http://127.0.0.1:9200) in browser

    Run in the background#

    Using yarn start to run the server will stop running after disconnecting the ssh connection, it is recommended to use pm2 to run

    # install pm2
    npm install -g pm2
    # use pm2 to run fiora
    pm2 start yarn --name fiora -- start
    # view pm2 apps status
    pm2 ls
    # view pm2 fiora logging
    pm2 logs fiora

    Run With Develop Mode#

    1. Start the server yarn dev:server
    2. Start the client yarn dev:web
    3. Open http://localhost:8080 in browser

    Running on the docker#

    First install docker https://docs.docker.com/install/

    Run directly from the DockerHub image#

    # Pull mongo
    docker pull mongo
    # Pull redis
    docker pull redis
    # Pull fiora
    docker pull suisuijiang/fiora
    # Create a virtual network
    docker network create fiora-network
    # Run mongodB
    docker run --name fioradb -p 27017:27017 --network fiora-network mongo
    # Run redis
    docker run --name fioraredis -p 6379:6379 --network fiora-network redis
    # Run fiora
    docker run --name fiora -p 9200:9200 --network fiora-network -e Database=mongodb://fioradb:27017/fiora -e RedisHost=fioraredis suisuijiang/fiora

    Local build image and run#

    1. Clone the project to the local git clone https://github.com/yinxin630/fiora.git -b master
    2. Build the image docker-compose build --no-cache --force-rm
    3. Run it docker-compose up

    from https://yinxin630.github.io/fiora/docs/install/

    Tuesday, 25 June 2024

    mongodb数据库的备份和迁移


    1.先进入到mongodb目录的bin目录下,Linux windos是一样

    2.集合备份和恢复

    使用mongo自带命令来迁移数据,思路是先导出集合数据再导入到数据库中
    导出命令:mongoexport
    语法:mongoexport -d dbname -c collectionname -o filepath --type json/csv -f field

    -d:数据库名
    -c:集合名称
    -o : 导出数据文件的路径
    -type : 导出数据类型,默认json
    导入命令:mongoimport
    语法:mongoimport -d dbname -c collectionname --file filename --headerline --type json/csv -f field

    -d:数据库名
    -c:集合名称
    --file : 选择导入的文件
    -type : 文件类型,默认json
    -f : 字段,type为csv是必须设置此项
    实战命令 推荐直接使用json格式就可以啦
    导出:mongoexport -d local -c userInfo -o D:\data\data.json --type json
    导入:mongoimport -d config -c userInfo --file D:\data\data.json --type json
    3.数据库备份和恢复

    使用 mongo 备份还原命令
    数据库备份语法:mongodump -h dbhost -d dbname -o dbdirectory
    数据库恢复语法:mongorestore -h dbhost -d dbname --dir dbdirectory

    -h:数据库服务器地址
    -d:数据库名
    -o:备份文件路径
    --file:恢复文件的路径
    实战命令
    数据库备份语法:mongodump -h 127.0.0.1 -d local -o D:\data
    数据库恢复语法:mongorestore -h 127.0.0.1 -d dump --dir D:\data\local

    备注:如果原有集合或者数据库存在则是把相同名称原有数据覆盖。

    Tuesday, 28 March 2023

    数据库管理工具 DBeaver

     DBeaver是一款跨平台的通用数据库管理工具,支持 MySQL, PostgreSQL, Oracle, DB2, MSSQL, Sybase, Mimer, HSQLDB, Derby, 以及其他兼容 JDBC 的数据库。DBeaver 提供一个图形界面用来查看数据库结构、执行SQL查询和脚本,浏览和导出数据,处理BLOB/CLOB 数据,修改数据库结构等。  社区版遵守Apache 2.0开源协议,另外也有收费企业版,企业版支持non-JDBC数据来源,包括WMI, MongoDB, Cassandra, Redis。

    特色:
        包含 metadata 编辑器, SQL 编辑器, 富文本编辑器, ERD,  数据导出/导入/迁移,SQL 计划执行等
        基于Eclipse平台
        使用插件构架来支持以下数据库:MySQL/MariaDB, PostgreSQL, Greenplum, Oracle, DB2 LUW, Exasol, SQL Server, Sybase/SAP ASE, SQLite, Firebird, H2, HSQLDB, Derby, Teradata, Vertica, Netezza, Informix, 等.

    (DBeaver v23.0.2 开源数据库管理工具 便携版

    DBeaver 是一个通用的数据库管理工具和 SQL 客户端,支持 MySQL, PostgreSQL, Oracle, DB2, MSSQL, Sybase, Mimer, HSQLDB, Derby, 以及其他兼容 JDBC 的数据库。DBeaver 提供一个图形界面用来查看数据库结构、执行 SQL 查询和脚本,浏览和导出数据,处理 BLOB/CLOB 数据,修改数据库结构等等。

    功能特点
        可用性是这个项目的主要目标,程序 UI 是经过精心设计和实现的
        它是免费和开源的(ASL)
        它是多平台的
        它基于开源框架,允许编写各种扩展(插件)
        它支持任何具有 JDBC 驱动程序的数据库
        它可以处理任何可能有也可能没有 JDBC 驱动程序的外部数据源
        有一组插件用于不同的数据库和不同的数据库管理实用程序(例如 ERD、数据传输、比较、数据导出/导入、模拟数据生成等)
     

    DBeaver是一款针对于开发者和数据库管理员的免费开源的通用数据库管理软件

    文件名 文件类型 提交时间 下载
    dbeaver-ce-7.3.0-x86_64-setup exe 2020-12-06 极速下载

     (DBeaver Community | Free Universal Database Tool

    DBeaver Community is a free cross-platform database tool for developers, database administrators, analysts, and everyone working with data. It supports all popular SQL databases like MySQL, MariaDB, PostgreSQL, SQLite, Apache Family, and more.

    DBeaver Community 是一个 免费 的跨平台 数据库 工具,适用于开发人员、数据库管理员、分析师和所有使用数据的人。它支持所有流行的 SQL 数据库,如 MySQL , MariaDB, PostgreSQL , SQLite , Apache Family 等。dbeaver 它具有如下功能特性:

        拥有很多功能,包括元数据编辑器、SQL 编辑器、丰富的数据编辑器、ERD、数据导出/导入/迁移、SQL 执行计划等。
        基于 Eclipse 平台。
        使用插件架构并为以下数据库提供附加功能:MySQL/MariaDB、PostgreSQL、Greenplum、Oracle、IBM Db2、Exasol、SQL Server、Sybase/SAP ASE、SQLite、Firebird、H2、HSQLDB、Derby、Teradata、Vertica、Netezza 、Informix 等;

    如何运行?只需运行安装程序(或解压缩存档)并运行 dbeaver;注意:DBeaver 需要 Java 才能运行。Open JDK 17 包含在所有 DBeaver 发行版中。您可以通过替换 dbeaver 安装文件夹中的目录来更改默认 JDK 版本 jre。

    总之,dbeaver 是面向开发人员、SQL 程序员、数据库管理员和分析师的免费多平台数据库工具。支持任何具有 JDBC 驱动程序的数据库(这基本上意味着支持任何数据库)。 商业版本还支持非 JDBC 数据源,例如 MongoDB、Cassandra、Couchbase、Redis、BigTable、DynamoDB 等。如果您对该项目感兴趣,可移步 dbeaver 在 Github 开源仓库:
    https://github.com/dbeaver/dbeaver, 从而了解更多。
    https://dbeaver.io/ )

    ---------------------------------------------


    轻量级数据库管理客户端Adminer

    Adminer是基于PHP 编写的数据库管理客户端, 类似于phpMyAdmin,支持的数据库包括MySQL, PostgreSQL, SQLite, MS SQL, Oracle, SimpleDB, Elasticsearch, MongoDB, Firebird。整个程序只有一个PHP文件, 大小未超过500k,方便使用和安装。支持多语言(自带11种翻译语言文件, 包括中文)。支持插件,易于扩展。

    功能包括:
    1:创建,修改,删除索引/外键/视图/存储过程和函数。
    2:查询,合计,排序数据。
    3:新增/修改/删除记录。
    4:支持所有数据类型,包括大字段。
    5:能够批量执行SQL语句。
    6:支持将数据,表结构,视图导成SQL或CSV。
    7:能够外键关联打印数据库概要。
    8:能够查看进程和关闭进程。
    9:能够查看用户和权限并修改。
    10:管理事件和表格分区(MySQL5.1+)。

    在线演示:http://adminer.sourceforge.net/adminer.php?username=

    [repo owner=”vrana” name=”adminer”]

    ( MySQL的Web管理客户端 Adminer

    Adminer是一个基于Web的MySQL开源php管理客户端。整个程序只有一个PHP文件,易于使用和安装。Adminer支持多语言。

    提供的功能包括:

    1:创建,修改,删除索引/外键/视图/存储过程和函数。
    2:查询,合计,排序数据。
    3:新增/修改/删除记录。
    4:支持所有数据类型,包括大字段。
    5:能够批量执行SQL语句。
    6:支持将数据,表结构,视图导成SQL或CSV。
    7:能够外键关联打印数据库概要。
    8:能够查看进程和关闭进程。
    9:能够查看用户和权限并修改。
    10:管理事件和表格分区。

    官网: https://www.adminer.org/)

    ------------------------------------------------------

    SQLite在线工具-SQLime

    SQLime是一款开源的 SQLite 在线工具,可用于调试与分享 SQL 片段。基于Javascript编写,遵守MIT开源协议。跟前端开发工具 JSFiddle 类似,只是JSFiddle用于调试Javascript,SQLime用于调试SQL 。

    主要特性:
        SQLime包含整合了 sql.js 项目. 提供所有SQL 的基本功能, 如 indexes, triggers, views, transactions等.
        可以直接链接本地 SQLite数据库,同时也支持连接远程 ,文件和 URLs都可以支持。如直联GitHub项目下的 SQLite数据库。
        SQLime可保存查询语句,数据库以文本格式储存,方便读取和导入到其他数据库如 PostgreSQL, MySQL等。
        手机界面友好。
        安全可靠。如果要连接GitHub项目下的 SQLite数据库,GitHub API token将储存在本地。

    Demo: www.sqlime.org

    源码:
    https://github.com/nalgeon/sqlime

    ------------------------------------------ 

    开源 SQL客户端-Beekeeper Studio

    Beekeeper Studio是一款开源的跨平台SQL 客户端,支持 Windows、Linux、Mac OS 等操作系统,拥有语法高亮、多任务执行、排序过滤数据、丰富的快捷键、查询历史记录等功能。支持MySQL,Postgres的,SQLite,SQL等服务器。Beekeeper Studio可以使用SSL加密连接,或者通过SSH建立安全数据隧道。主题可选黑暗模式。基于Electron开发,遵守MIT开源协议。

    官网:https://www.beekeeperstudio.io/ 

    ------------------------------------------------

    阿里巴巴开源数据库 PolarDB

    PolarDB是阿里云基于PostgreSQL开源的数据库。遵守Apache2.0开源协议。PolarDB 扩展了 PostgreSQL,支持全局数据一致性、ACID 跨数据库节点、分布式 SQL 处理、数据冗余和高可用性,设计在引入新功能的同时维持兼容性。

    主要特色:
        大容量:最高100 TB
        高性能:支持超过50万次/秒的读请求以及超过15万次/秒的写请求。
        分钟级扩缩容: 存储与计算分离的架构存储容量在线扩容,无需中断业务。
        读一致性:集群地址利用LSN(Log Sequence Number)确保读取数据时的全局一致性,避免因为主备延迟引起的不一致。
        毫秒级延迟:利用基于Redo的物理复制代替基于Binlog的逻辑复制,提升主备复制的效率和稳定性。
        秒级快速备份:备份过程不会对数据库加锁。

    https://github.com/alibaba/PolarDB-for-PostgreSQL

      ----------------------------------------------------------------

    HeidiSQL,开源数据库管理工具

    HeidiSQL 是免费软件,其目标是易于学习。 “ Heidi ” 让您可以从运行 MariaDB、MySQL、Microsoft SQL、PostgreSQL 和 SQLite 数据库系统之一的计算机上查看和编辑数据和结构。 HeidiSQL 由 Ansgar 于 2002 年发明,属于全球最流行的 MariaDB 和 MySQL 工具。

    功能特点:
        对所有人免费,开源
        在一个窗口中连接到多个服务器
        支持的数据库系统:MariaDB,MySQL,MS SQL,PostgreSQL,SQLite,Interbase和Firebird
        通过命令行连接到服务器
        通过 SSH 隧道连接,或通过 SSL 设置
        创建和编辑表,视图,存储例程,触发器和计划事件。
        生成漂亮的SQL导出,然后压缩它们,或将它们放在剪贴板上。
        从一个服务器/数据库直接导出到另一个服务器/数据库
        管理用户权限
        导入文本文件
        将表行导出为 CSV、HTML、XML、SQL、LaTeX、Wiki Markup 和 PHP 数组
        使用舒适的网格浏览和编辑表数据
        批量编辑表(移动到数据库、更改引擎、排序规则等)
        将 ASCII 或二进制文件批量插入到表中
        使用可自定义的语法突出显示和代码完成编写查询
        相当重新格式化无序的SQL
        监视和终止客户端进程
        在一个服务器的所有数据库的所有表中查找特定文本
        批量优化和修复表
        使用当前连接设置启动并行 mysql.exe 命令行窗口
       
    Github开源项目:https://github.com/HeidiSQL/HeidiSQL

    ------------------------

    PostgreSQL数据库的备份和灾难恢复工具-Barman

    Barman 是一款 PostgreSQL 数据库的备份和灾难恢复开源管理工具。基于Python编写。遵守GPL 3 开源协议。由2ndQuadrant公司开源并维护。环境要求:Python 2.6+,PostgreSQL 8.4+。

    功能特色:

    支持本地/远程备份恢复;

        能够同时管理多个备份端,并能同时对多个备份端进行操控;
        支持在线全备、wal增量备份;
        支持多种压缩功能,如:gzip、bzip2及用户自定义压缩工具;
        提供灵活多变的备份、归档保留策略;
        支持流量压缩,可定义到表空间;
        支持迁移表空间(未测);
        支持自动维护;
        支持PIT

    https://github.com/EnterpriseDB/barman
    https://github.com/2ndquadrant-it/barman-cli

    -------------------------------------------------------

    浏览和发布数据的工具-Datasette

    Datasette 是一款基于Python编写的数据管理工具。遵守Apache 2.0 协议。可以为SQLite数据库生成JSON API。项目目标是针对数据记者,博物馆,互联网归档者等任何愿意分享数据的机构或个人。安装环境需要Python 3.6以上。

    安装:

    pip3 install datasette

    基本使用:

    datasette serve path/to/database.db

    之后可访问 http://localhost:8001/ 进行数据下载。

    [repo owner=”simonw” name=”datasette”]
    -----------------------------------------------------

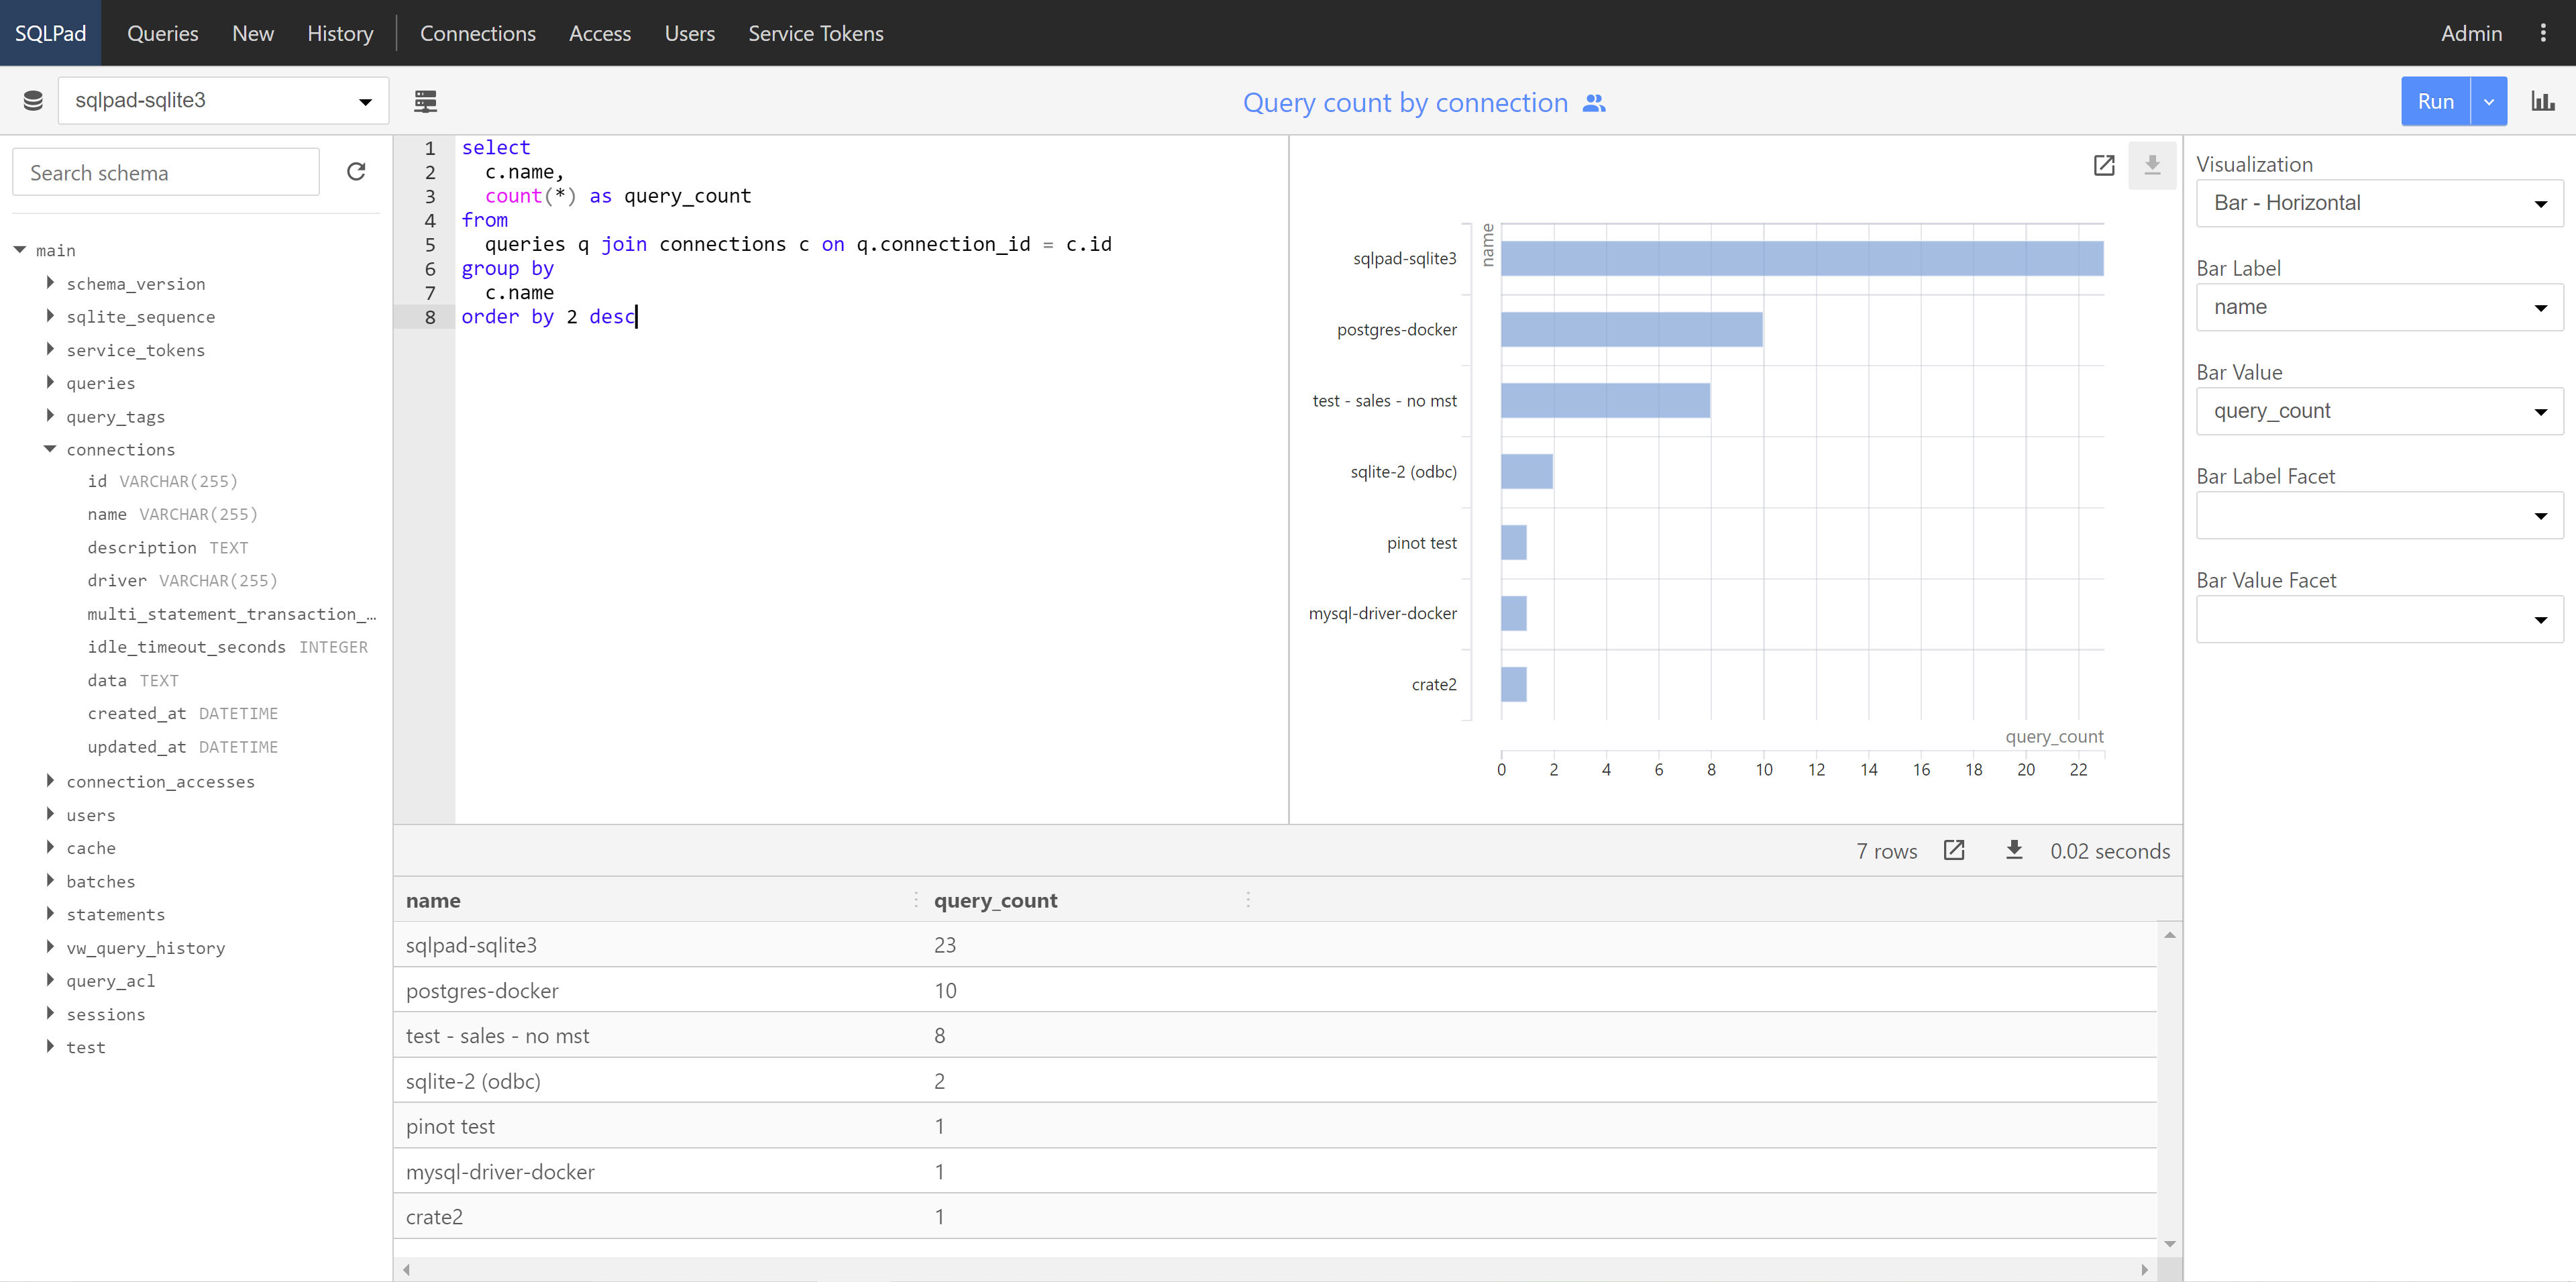
    在线 SQL 查询工具 SqlPad

    SqlPad是一款可用于编写、运行 SQL 查询并可视化查询结果的开源Web 应用。支持 Postgres、MySQL、SQL Server、Crate、Vertica、Presto 和 SAP HANA。SqlPad直接通过网络连接到数据库服务器,在线执行任意 SQL 语句,根据查询结果可以生成各种图表。遵守MIT开源协议。

    [repo owner=”rickbergfalk” name=”sqlpad”]

    (Web-based SQL editor. Legacy project in maintenance mode.

    getsqlpad.com

    SQLPad

    A web app for writing and running SQL queries and visualizing the results. Supports Postgres, MySQL, SQL Server, ClickHouse, Crate, Vertica, Trino, Presto, SAP HANA, Cassandra, Snowflake, Google BigQuery, SQLite, TiDB and many more via ODBC.

    SQLPad Query Editor

    Project Status

    SQLPad is a legacy project in maintenance mode. If evaluating SQLPad, please consider a potential alternative or forking the project and making it your own.

    Maintenance releases for security and dependency updates will continue as possible.

    As of version 7, semver is no longer followed. Going forward patch updates may require major Node.js version updates, or contain removal of functionality.

    Project Documentation

    Documentation located at https://getsqlpad.com.

    Development

    For instructions on installing/running SQLPad from git repo see DEVELOPER-GUIDE.md

    from https://github.com/sqlpad/sqlpad)

    (Developer Guide

    Prerequisites

    • Node installed at v14.0.0+
    • Yarn 1 (classic yarn)
    • Some dependencies may require compilation. On macOS, the Xcode Command Line Tools should be installed. On Ubuntu, apt-get install build-essential will install the required packages. Similar commands should work on other Linux distros. Windows will require some additional steps, see the node-gyp installation instructions for details.

    Style Guide

    SQLPad uses an automatic code formatter called Prettier and a linting tool called ESLint. Run yarn run lint after making any changes to code to check formatting and lint. Some formatting and lint may be fixed automatically by running yarn run fixlint.

    If using Visual Studio Code, Prettier and ESLint extensions can be installed to assist in detecting and fixing issues during development.

    Getting Started

    • Clone/download this repo

    • Install dependencies and build the UI

      scripts/build.sh

    The gist of this script is:

    # install root level dependencies using package-lock.json as reference
    yarn
    # install front-end dependencies using package-lock.json
    cd client
    yarn
    # build front-end
    yarn build
    # install back-end dependencies
    cd ../server
    yarn
    cd ..
    # copy client build to server directory
    mkdir server/public
    cp -r client/build/* server/public

    At this point you can run the SQLPad server with the front-end built for production use:

    cd server
    node server.js --config ./config.dev.env

    If preferred, SQLPad can be installed as a global module using the local files in this repo. This allows running SQLPad via the cli in any directory, just as if you had installed it with npm install sqlpad -g. Note that you must build and copy the client prior to this step.

    cd server
    npm install -g
    
    # Now from somewhere else you can run sqlpad like
    cd ~
    sqlpad --config ./config.dev.env

    If sqlpad was installed globally via npm from npm, you may need to run npm uninstall sqlpad -g.

    A docker image may be built using the Dockerfile located in server directory. See docker-publish.sh for example docker build command.

    Developing

    Open 2 terminal sessions in the root of this repo.

    In one session run the back end in development mode

    cd server
    yarn start

    In the other start the development server for the front end.

    cd client
    yarn start

    At this point you should have both back end and front end development servers running.

    http://localhost:3000 serves React-based frontend in dev-mode
    http://localhost:3010 serves frontend compiled for production

    When viewing the front end in development mode, the page will automatically refresh on client file changes. The back end server will auto-restart on back end file changes as well.

    When viewing SQLPad in dev-mode in port 3000, some features may not work correctly (like csv/xlsx downloads, google auth). This is likely due to the port difference in configuration (google auth can only redirect to 1 url/port) or the dev-mode proxy setup (React dev mode is served by a secondary web server that will proxy requests it doesn't understand to the SQLPad server running on 3010 during development.)

    ESLint and Prettier are used to enforce code patterns and formatting in this project. A precommit hook should enforce and warn about these checks. If that is not set up however you may find these terminal commands useful.

    # To check lint
    yarn run lint
    
    # To fix (some) errors and formatting automatically
    yarn run fixlint

    Developing on Windows

    To run build/scripts.sh on Windows, you may want to use an application like cmder. It will allow you to run scripts/build.sh by calling sh directly with sh scripts/build.sh.

    Test/Dev Database Connection

    A Node.js script, server/generate-test-db-fixture.js, can be used to generate a test sqlite database to be used for tests and local development. This replaces the previous mock driver implementation that was enabled when the debug flag was turned on.

    This test database allows for running SQL you likely know, instead of having to remember and use some variables set in SQL comments.

    The script adds a sqlite database under server/test/fixtures/sales.sqlite.

    It can be used within SQLPad by creating a connection using the SQLite driver, and setting the filename to ./test/fixtures/sales.sqlite.

    The data in the database is somewhat nonsensical. It is also not randomized so that the results can be predictable. If you'd like to expand on this database, feel free.

    Running Tests

    SQLPad's test cases focus on the API server, with majority of tests being integration tests, with some unit tests sprinkled throughout.

    Tests are located under server/test directory, and use mocha as a test runner. Tests may be run by running yarn test within the server directory. For tests to run successfully, dependencies must be installed and the test database fixture generated.

    cd server
    # if dependencies have not yet been installed (build.sh will do this)
    yarn
    
    # If test fixture has not yet been generated (build.sh will do this)
    node generate-test-db-fixture.js
    
    # Start backend services if desired. (-d runs in background)
    docker-compose up -d redis
    docker-compose up -d ldap
    
    # Run tests
    yarn test
    
    # If you are aiming to run a specific test case,
    # you may do so using npx to call mocha,
    # specifying the path to the test file and --exit to exit after tests have run
    npx mocha test/path/to/file.js --exit
    from https://github.com/sqlpad/sqlpad/blob/master/DEVELOPER-GUIDE.md)
    (Getting Started

    Running SQLPad

    Building from source

    SQLPad does not require any additional servers other than its own self. By default it uses SQLite and the file system for storing queries, query results, and web sessions. SQLite may be replaced with an external database. See backend database configuration for more info.

    Build and run SQLPad from the git repository

    from https://getsqlpad.com/en/getting-started/

    https://getsqlpad.com/en/configuration/?id=backend-database-management#backend-database-management ) 

    ----------------------------------

    BI可视化报表系统-Poli

    Poli是由国人开发的开源BI可视化报表系统,遵守MIT开源协议。主要针对SQL关系型数据库,只要支持JDBC即可使用,包括PostgreSQL, Oracle, SQL Server, MySQL, Elasticsearch等。安装简单快捷,导入jar文件,再加上数据库文件即可运行。包含了用户管理的组件,可以配置三级不同权限的用户和用户组。

    其他特性:

        报表一键分享功能
        报表列表新增以目录树方式显示
        过滤器允许设置默认值
        折线/柱/区域图允许修改图表间距
        UI轻量化修改,更易用
        自带SQL编辑器和数据库对象查询,不需要构建ETL和数据管道,直接使用SQL来处理数据
        丰富灵活的样式和定制,支持自定义和拖拽组件定位
        交互式Ad Hoc报告支持使用动态SQL来联动过滤器和图片组件
        自动刷新,钻取查询,全屏显示,报表嵌入,图表调色盘和数据表导出等功能

    [repo owner=”shzlw” name=”poli”]
    ------------------------------------------------

    数据可视化工具redash


    re:dash 是一款开源的数据可视化BI工具,基于Python和AngularJS编写,可快速轻便的访问大量数据。支持多种数据来源,包括:Redshift, Google BigQuery, PostgreSQL, MySQL, Graphite, Presto, Google Spreadsheets, Cloudera Impala, Hive等等。

    re:dash 由两部分组成: 1.查询编辑器:用于保存和在组织内分享查询语句; 2.控制面板/可视化工具: 提供了多种图表可视化和组织方式来构造自己的控制面板。re:dash提供简单便捷的方式查询数据:在web页面上输入sql语句,使用查询返回的结果构造数据可视化图表,用户可以将这些图表结果拖动构造成自己需要的数据图形面板。

    re:dash在2016年年底还获得了Mozilla开源支持计划的10万美元自助。

    源码下载:https://github.com/getredash/redash

    ------------------------------------------------------------

    BI数据分析工具Metabase

    Metabase一款开源的数据集可视化BI分析工具。具有可视化操作界面的数据分析和查询功能,让不懂SQL得用户可能够快速掌握业务数据,支持团队共享业务数据。通过友好的用户界面过滤内容,并可以立即将数据转换为易于阅读的图形。集成了多种可视化模式,支持与H2,MongoDB,MySQL,PostgreSQL,Amazon Redshift,SQLite和SQL数据库服务器连接,以便导入数据集以进行进一步分析和共享数据。

    功能特色:

        设置仅需5分钟
        丰富的仪表板与自动刷新和全屏模式
        分析师和数据专家专属SQL模式
        为团队创建规范细分和指标
        发送数据到Slack或电子邮件与Pulses的日程安排
        使用Metabot随时查看Slack中的数据
        通过重命名、注释和隐藏字段针对团队进行个性化人数据显示

    [repo owner=”metabase” name=”metabase”]

    --------------------------------------------------------------


    PostgreSQL的客户端Postbird

    Postbird是Mac OS下的PostgreSQL开源客户端, GUI 基于 JavaScript 和 Electron,  支持基本的增删查改操作,软件遵守MIT开源协议。

    [repo owner=”Paxa” name=”postbird”]
    -----------------------------------------------------

    在线MySQL表结构变更开源工具 gh-ost

    gh-ost是一款支持在线更改 MySQL 表结构的开源工具,遵守MIT开源协议。gh-ost无触发器,可监控,可动态调整暂停,实现新旧表切换的(cut-over)顺畅。 三种工作模式:1:连接到从库,在主库做迁移。2:连接到主库,迁移过程所有操作都在主上操作,包括读取binlog等等。3:在从库做迁移测试。

    [repo owner=”github” name=”gh-ost”]

    ( 安装方法:go install github.com/github/gh-ost/go/cmd/gh-ost@latest

    Online Schema-migration Tool for MySQL。

    from https://github.com/github/gh-ost) 

    --------------------------------------------------


    苹果开源NoSQL数据库FoundationDB

    FoundationDB 是支持 ACID 事务处理的 NoSQL 开源分布式数据库。支持多样化的应用程序和数据模型的同时提供良好性能、数据一致性和操作弹性。FoundationDB属于苹果旗下子公司,是苹果在2015年收购的初创公司。

    FoundationDB表示,通过开源 FoundationDB,建设一个开放的社区,将所有重大开发放在开源环境中进行。设计文档将确保所有工作都以透明的方式展开,并且有社区的参与。FoundationDB制定了一系列的规则和行为准则来鼓励或约束参与者的行为, 希望 FoundationDB 成为一个健康的,响应积极的社区。

    官方博客:https://www.foundationdb.org/blog/foundationdb-is-open-source/

    [repo owner=”apple” name=”foundationdb”]

    --------------------------------------------------------------


    跨平台的数据管理开源工具SQL Operations Studio

    SQL Operations Studio(SqlOps) 是微软开源的跨平台数据管理工具,支持的操作系统包括:Windows、Mac OS、Linux 。支持的数据库包括 SQL Server,Azure SQL DB 以及 SQL DW 等多款微软旗下的数据库,开发者也可以扩展该工具,用于支持其他数据库平台

    VS Code已经有一个SQL扩展(vscode-mssql),但微软的SQL Server Management Studio只能运行在Windows上。SQL Operation Studio 能够和 VS Code 深度集成,运行在不同操作系统上。重要特性包括:T-SQL编辑器,支持自动完成和错误检查,可将结果导出到CSV或Excel,还支持直接手动插入、修改、删除表记录。SqlOps还集成了一个对象浏览器,开发者可以通过它查看SQL Server和表信息、视图、存储过程等 。

    [repo owner=”Microsoft” name=”sqlopsstudio”]

    ----------------------------------------------------------------


    MongoDB的管理软件 Mongotron

    Mongotron是一款Mac OS下的 MongoDB 数据库开源管理软件,使用Electron 和 Angular JS 构建。遵循MIT开源协议。

    [repo owner=”officert” name=”mongotron”]

    -------------------------------------------------------------


    MongoDB数据库的管理工具Robomongo

    Robomongo是一款跨平台的MongoDB图形化客户端数据库管理软件, 基于Shell。支持操作系统包括:Windows, Linux, 和Mac OS。可以管理数据库内容以及编辑数据库代码,内置一个代码编辑区域,可以将数据库文件放到软件上修改,结合图形化的处理方式,支持将MongoDB数据库中的文件转换为分布式的存储方式,提高数据文件编辑和保存效率,方便查找数据库对象、利用其中的数据生成器,可以将Excel文件的数据导入数据库中保存,方便制作数据文件。

    [repo owner=”Studio3T” name=”robomongo”]

    ----------------------------------------------------------------

    可视化数据库浏览器 SQLite Database Browser

    SQLite Database Browser是一款跨平台的开源可视化数据库浏览器,支持Windows, Linux, 以及Mac OS操作系统。基于 Qt 库开发,可创建、修改和编辑 SQLite 数据库,支持向导方式处理SQLite3数据库文件,可打开sqlite3数据库文件(常见的文件扩展名为.db,.db3, .s3db) , 创建编辑数据库文件后,支持输出为CSV或SQL文件。

    [repo owner=”sqlitebrowser” name=”sqlitebrowser”]

    ------------------------------------------------------------------------

    Redis数据库管理工具Medis

    Medis 是一款界面漂亮,易于使用的 Redis 数据库开源管理工具。基于 Electron, React, 和 Redux 平台构建,由诸多的 Node.js 模块所组成,如 ioredis 和 ssh2. 支持多操作系统包括Mac OS平台和Windows平台。遵循MIT开源协议。

    基本功能:

        Keys查看与编辑
        SSH 加密连接服务器
        终端执行自定义命令
        配置文件查看与编辑

    高级特性包括:

        JSON/MessagePack 格式的查看和编辑,高亮显示与查验。
        百万级并发量支持。
        Pattern manager选择子组

    [repo owner=”luin” name=”medis”]

    ----------------------------------------------------


    Mac下MongoDB的客户端mongoDB.app

    mongoDB.app是 Mac OS下的MongoDB数据库开源管理工具。遵守MIT开原协议。 体积小巧,功能简单,使用快捷。

    [repo owner=”gcollazo” name=”mongodbapp”]

    -----------------------------------------------------------------

    Redis的管理工具 RDM

    RDM(Redis Desktop Manager)是一款开源的Redis数据存储管理工具, 基于Qt 5编写。 跨平台支持包括:Windows, Linux 以及 MacOS. 提供简单的GUI 图形化界面来管理Redis DB数据库。支持的操作包括以主键为树形展示, CRUD keys,等通过Shell执行的命令。支持SSL/TLS, SSH加密传输,不仅可以管理本地的Redis,还可以管理云服务包括Amazon ElastiCache, Microsoft Azure Redis Cache 以及Redis Labs。

    [repo owner=”uglide” name=”RedisDesktopManager”]

    -------------------------------------------------------------------------

    Chrome上管理你的数据库ChromeMyAdmin

    ChromeMyAdmin 是一款开源的Chrome插件,可以非常方便的管理MySQL数据库, 是MySQL开发的跨平台、可视化数据库的利器。支持增,删,查,改,支持普通传输或者加密传输。查询编辑器还支持自动补全命令功能。

    [repo owner=”yoichiro” name=”chrome_mysql_admin”]

    安装地址:
    https://chrome.google.com/webstore/detail/chromemyadmin/ndgnpnpakfcdjmpgmcaknimfgcldechn 

    -------------------------------------------------


    MySQL数据库管理软件Sequel Pro

    Sequel Pro是一款Mac OS平台下开源的数据库管理软件, 可快速链接MySQL 3.x, MySQL 4 或 MySQL 5服务器,基于 Cocoa和Object C编写的。允许编辑数据库,表格(字段和索引)和列,执行个性化查找和导入导出数据。

    功能特点:

        支持多达30种编码方式
        快速导出/导入、备份/还原数据库的SQL/CSV文件
        内置强大的数据库查询编辑器,有自定义查询中的自动语句高亮功能,可自定义字体,自定义查询占位符.
        允许你编辑数据库,表格(字段和索引)和列,执行个性化查找和导入导出数据
        自动补全关键词,表名,域名
        自动段落化查询命令
        IP直连数据库
        表触发机制
        服务器运行监控Query Favourites for SQL reuse
        包括检索功能在内的全表管理设计
        快速在Mac上架设本地MySQL数据库
        在MAMP/XAMP架构上连接数据库
        SSH连接模式

    [repo owner=”sequelpro” name=”sequelpro”]

    -----------------------------------------------------------

    SQL客户端Bdash

    Bdash是mac OS平台下的开源SQL客户端, 遵守MIT开源协议。Bdash可以保存SQL查询,展示数据图表,分享查询结果。

    目前支持的数据源有:
        MySQL
        PostgreSQL (Redshift)
        BigQuery

    [repo owner=”bdash-app” name=”bdash”]

    -------------------------------------------------------

    大数据查询引擎Presto

    Presto是 Facebook 开源的大数据分布式 SQL 查询引擎,可对从数 G 到数 P 的大数据进行交互式的查询,查询的速度达到商业数据仓库的级别。支持查询包括 Hive、Cassandra 以及某些商业的数据存储产品。单个 Presto 查询可合并来自多个数据源的数据进行统一分析。Presto 不使用 MapReduce ,只需要 HDFS。

    Facebook 在内部已经在多个数据存储中使用 Presto 交互式查询,包括 300PB 的数据仓库,超过 1000 个 Facebook 员工每天在使用 Presto 运行超过 3 万个查询,每天扫描超过 1PB 的数据。 Airbnb 和 Dropbox 目前也在使用 Presto 产品。

    [repo owner=”prestodb” name=”presto”]

    ( The official home of the Presto distributed SQL query engine for big data

    prestodb.github.io
     

    Presto is a distributed SQL query engine for big data.

    See the User Manual for deployment instructions and end user documentation.

    Requirements

    • Mac OS X or Linux
    • Java 8 Update 151 or higher (8u151+), 64-bit. Both Oracle JDK and OpenJDK are supported.
    • Maven 3.3.9+ (for building)
    • Python 2.4+ (for running with the launcher script)

    Building Presto

    Presto is a standard Maven project. Simply run the following command from the project root directory:

    ./mvnw clean install
    

    On the first build, Maven will download all the dependencies from the internet and cache them in the local repository (~/.m2/repository), which can take a considerable amount of time. Subsequent builds will be faster.

    Presto has a comprehensive set of unit tests that can take several minutes to run. You can disable the tests when building:

    ./mvnw clean install -DskipTests
    

    Presto native and Velox

    Presto native is a C++ rewrite of Presto worker. Presto native uses Velox as its primary engine to run presto workloads.

    Velox is a C++ database library which provides reusable, extensible, and high-performance data processing components.

    Check out building instructions to get started.

    Running Presto in your IDE

    Overview

    After building Presto for the first time, you can load the project into your IDE and run the server. We recommend using IntelliJ IDEA. Because Presto is a standard Maven project, you can import it into your IDE using the root pom.xml file. In IntelliJ, choose Open Project from the Quick Start box or choose Open from the File menu and select the root pom.xml file.

    After opening the project in IntelliJ, double check that the Java SDK is properly configured for the project:

    • Open the File menu and select Project Structure
    • In the SDKs section, ensure that a 1.8 JDK is selected (create one if none exist)
    • In the Project section, ensure the Project language level is set to 8.0 as Presto makes use of several Java 8 language features

    Presto comes with sample configuration that should work out-of-the-box for development. Use the following options to create a run configuration:

    • Main Class: com.facebook.presto.server.PrestoServer
    • VM Options: -ea -XX:+UseG1GC -XX:G1HeapRegionSize=32M -XX:+UseGCOverheadLimit -XX:+ExplicitGCInvokesConcurrent -Xmx2G -Dconfig=etc/config.properties -Dlog.levels-file=etc/log.properties
    • Working directory: $MODULE_WORKING_DIR$ or $MODULE_DIR$(Depends your version of IntelliJ)
    • Use classpath of module: presto-main

    The working directory should be the presto-main subdirectory. In IntelliJ, using $MODULE_DIR$ accomplishes this automatically.

    Additionally, the Hive plugin must be configured with location of your Hive metastore Thrift service. Add the following to the list of VM options, replacing localhost:9083 with the correct host and port (or use the below value if you do not have a Hive metastore):

    -Dhive.metastore.uri=thrift://localhost:9083

    from https://github.com/prestodb/presto

    https://prestodb.io/docs/current/installation.html ) 

    -------------------------------------------------------------


    SQL优化工具SQLAdvisor

    SQLAdvisor是由美团点评公司技术工程部DBA团队开源的分析SQL给出索引优化建议的工具。它基于MySQL原生态词法解析,结合分析SQL中的where条件、聚合条件、多表Join关系 给出索引优化建议。SQLAdvisor已经在美团点评内部广泛应用。

    SQLAdvisor的优点

        基于 MySQL原生词法解析,充分保证词法解析的性能、准确定以及稳定性;
        支持常见的 SQL(Insert/Delete/Update/Select);
        支持多表 Join 并自动逻辑选定驱动表;
        支持聚合条件 Order by 和 Group by;
        过滤表中已存在的索引。

    [repo owner=”Meituan-Dianping” name=”SQLAdvisor”]

    --------------------------------------------------------------------------

    关系数据库浏览器DBeauty

    DBeauty 是由Java编写的一个面向关系数据库的开源浏览器,提供了浏览数据以及行记录关系的窗口,可自动检测并展示基于外键的记录关系。

    官网下载:http://dbeauty.sourceforge.net/

    ------------------------------------------------

    数据库管理工具 Database .NET

    Database .NET 是一款支持多数据库的开源管理工具。特点是操作一致性与使用方便,无需单独再安装数据库系统,可直接连接本地和远程数据库系统,可创建数据库、表维护、分析、调试、查询、打印和备份等。

    官网下载:http://fishcodelib.com/Database.htm

    ---------------------------------------------------------

    SQLite的可视化查询工具-Sqliteviz

    Sqliteviz是一款开源的 SQLite 可视化查询工具 sqliteviz, 是一个单页的网页应用(PWA-Progressive Web Apps),可以离线使用,当成一个轻量级本地的应用来操作。sqliteviz 可为 SQLite 数据库快速生成可视化图表,支持导入 CSV 和 JSON 文件等。遵守Apache 2.0开源协议。

    功能特色:
        运行SQL语句查询,可根据结果创建 Plotly 图(https://github.com/plotly/plotly.js)
        导入 CSV 进入 SQLite数据库并可视化导入数据
        导出 CSV 文件
        管理查询并可查询多个数据库
        导入导出 JSON 文件
        导出修改的SQLite 数据库
        像桌面app一样离线使用

    源码:https://github.com/lana-k/sqliteviz
    -----------------------------------------------------------------------------

    开源的网页版数据库浏览工具-SQL Studio


    SQL Studio (原SQLite Studio)是一款开源网页版数据库浏览工具,支持本地数据库及远程数据库文件,浏览器上可直接查询多种数据库,支持数据库包括SQLite, libSQL, PostgreSQL, MySQL and DuckDB。基于Rust编写,遵守MIT开源协议。


    特色:

    包含通用元数据的概述页面。

    包含每个表元数据的“表”页面。

    无限滚动行视图。

    一个自定义查询页面,可对数据库进行更多访问。

    可选黑暗模式主题

    源代码:https://github.com/frectonz/sql-studio


    Tuesday, 21 March 2023

    WeKan- A Open Source kanban app

     wekan.github.io

    Gitpod Ready-to-Code

    Docker Containers

    Other platforms and compatible software versions at https://wekan.github.io Download section.

    Code stats

    Chat

    Discussions - WeKan Community GitHub Discussions, that are not Feature Requests and Bugs.

    WeKan IRC FAQ

    FAQ

    NOTE:

    • Please read the FAQ first
    • Please don't feed the trolls and spammers that are mentioned in the FAQ :)

    About WeKan ®

    WeKan ® is an completely Open Source and Free software collaborative kanban board application with MIT license.

    Whether you’re maintaining a personal todo list, planning your holidays with some friends, or working in a team on your next revolutionary idea, Kanban boards are an unbeatable tool to keep your things organized. They give you a visual overview of the current state of your project, and make you productive by allowing you to focus on the few items that matter the most.

    Since WeKan ® is a free software, you don’t have to trust us with your data and can install Wekan on your own computer or server. In fact we encourage you to do that by providing one-click installation on various platforms.

    • WeKan ® is used in most countries of the world.
    • WeKan ® largest user has 22k users using WeKan ® in their company.
    • WeKan ® has been translated to about 105 languages.
    • Features: WeKan ® has real-time user interface.
    • Platforms: WeKan ® supports many platforms. WeKan ® is critical part of new platforms Wekan is currently being integrated to.

    Requirements

    • 64bit: Linux Snap or Sandstorm / Mac / Windows. More Platforms, bundle for RasPi3 ARM and other CPUs where Node.js and MongoDB exists.
    • 1 GB RAM minimum free for WeKan ®. Production server should have minimum total 4 GB RAM. For thousands of users, for example with Docker: 3 frontend servers, each having 2 CPU and 2 wekan-app containers. One backend wekan-db server with many CPUs.
    • Enough disk space and alerts about low disk space. If you run out disk space, MongoDB database gets corrupted.
    • SECURITY: Updating to newest WeKan ® version very often. Please check you do not have automatic updates of Sandstorm or Snap turned off. Old versions have security issues because of old versions Node.js etc. Only newest WeKan ® is supported. WeKan ® on Sandstorm is not usually affected by any Standalone WeKan ® (Snap/Docker/Source) security issues.
    • Reporting all new bugs immediately. New features and fixes are added to WeKan ® many times a day.
    • Backups of WeKan ® database once a day miminum. Bugs, updates, users deleting list or card, harddrive full, harddrive crash etc can eat your data. There is no undo yet. Some bug can cause WeKan ® board to not load at all, requiring manual fixing of database content.

    Roadmap and Demo

    Roadmap - Public read-only board at WeKan ® demo.

    Developer Documentation

    made with Meteor.

    from https://github.com/wekan/wekan 

    -------------------------------------------------

    看板(kanban)管理系统Wekan

    Wekan 是一款开源 KanBan(看板) 管理应用系统(支持中文),基于 Meteor 框架用 JavaScript编 写。“看板管理”指为了达到准时生产方式控制现场生产流程的工具,常见于工厂车间或IT软件开发的管理, 提供项目当前状态的概览,提升工作效率。

    Wekan拥有项目管理所需的标签、注释、添加成员等功能,除了可以下载安装使用外,也可以将Wekan通过Dockerfile镜像在一个容器里安全运行。可一键部署Wekan,随时随地查看任务和项目进度。

    [repo owner=”wekan” name=”wekan”]