推荐了最近爆火的网站:魔术橡皮擦「Magic Eraser」,这个网站可以在几秒钟就帮你把图片中不需要的元素清除干净,比用PS来慢慢修图要方便太多了。
最近吾爱论坛的大佬@zhaoyun007 根据这个项目背后的开源技术,自己开发了一款Windows离线版的 「魔术橡皮擦」,不需要将图片上传到别人的网站,用自己的电脑就能处理.
使用方法也非常简单,导入需要处理的图片,然后用鼠标将图片中不需要的元素涂抹覆盖,点击右上角的转换按钮等待几秒钟即可~
由于是本地跑模型,所以你的CPU性能越好,处理速度也就越快,一般十来秒的就能搞定。
注意:如果第一次处理后有瑕疵,可以反复涂抹几次瑕疵部位。
转换后的图片,会和软件保存在同一个目录下,并会在原件名后增加magic后缀显示。
这个网站和离线版工具都是根据三星AI研究所的开源项目 LaMa 开发,感兴趣的小伙伴也可以自己去研究研究这个项目。
下载地址:https://www.123pan.com/s/uYh9-AMWQ3
魔术橡皮擦「Magic Eraser」:https://www.magiceraser.io
项目地址:https://github.com/saic-mdal/lama
(在线抠图网站:魔术橡皮檫Magic Eraser-瞬间删除图像中不需要的部分.
要保留照片原本完美的样子,又要移除图片中某个不需要的人物,物体时,透过 Magic Eraser 在线移除工具就可以了,只要将照片上传到网站上,简单操作涂抹要移除的部分, 马上就可以瞬间完成完美的照片,不需要注册也不需要钱,完全免费使用!
Magic Eraser 在线移除人像
首先进入网站,点击「Upload lmage」上传要修改的照片。
上传照片后,就可以直接把照片中想要移除的物体通过刷子涂抹掉(刷子的大小可以根据要移除图片的大小来自由调节),然后点击“搽除”等待系统处理后,就会看到处理成像的照片非常完美,最后只要点选右下角的「Download」即可下载保存,非常实用。
是不是非常惊艳呢?有需要的小伙伴赶快试试!
Magic Eraser官网主页:魔术橡皮擦 – 在几秒钟内从图像中删除不需要的东西 (magiceraser.io) )
--------------------------------------------------------
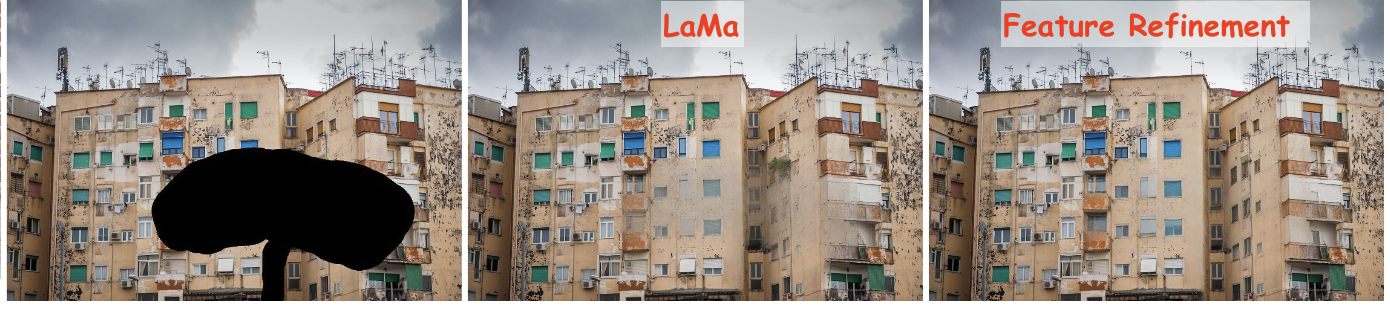
LaMa Image Inpainting, Resolution-robust Large Mask Inpainting with Fourier Convolutions, WACV 2022
advimman.github.io/lama-project/
LaMa: Resolution-robust Large Mask Inpainting with Fourier Convolutions
by Roman Suvorov, Elizaveta Logacheva, Anton Mashikhin, Anastasia Remizova, Arsenii Ashukha, Aleksei Silvestrov, Naejin Kong, Harshith Goka, Kiwoong Park, Victor Lempitsky.
🔥🔥🔥
LaMa generalizes surprisingly well to much higher resolutions (~2k❗️)
than it saw during training (256x256), and achieves the excellent
performance even in challenging scenarios, e.g. completion of periodic
structures.
[Project page] [arXiv] [Supplementary] [BibTeX] [Casual GAN Papers Summary]
Try out in Google Colab
LaMa development
(Feel free to share your paper by creating an issue)
- Amazing results paper / video / code #112 / by Geomagical Labs (geomagical.com)
Non-official 3rd party apps:
(Feel free to share your app/implementation/demo by creating an issue)
- https://cleanup.pictures - a simple interactive object removal tool by @cyrildiagne
- lama-cleaner by @Sanster is a self-host version of https://cleanup.pictures
- Integrated to Huggingface Spaces with Gradio. See demo:
by @AK391
- Telegram bot @MagicEraserBot by @Moldoteck, code
- Auto-LaMa = DE:TR object detection + LaMa inpainting by @andy971022
- LAMA-Magic-Eraser-Local = a standalone inpainting application built with PyQt5 by @zhaoyun0071
- Hama - object removal with a smart brush which simplifies mask drawing.
- ModelScope = the largest Model Community in Chinese by @chenbinghui1.
- LaMa with MaskDINO = MaskDINO object detection + LaMa inpainting with refinement by @qwopqwop200.
Environment setup
Clone the repo:
git clone https://github.com/advimman/lama.git
There are three options of an environment:
-
Python virtualenv:
virtualenv inpenv --python=/usr/bin/python3 source inpenv/bin/activate pip install torch==1.8.0 torchvision==0.9.0 cd lama pip install -r requirements.txt -
Conda
% Install conda for Linux, for other OS download miniconda at https://docs.conda.io/en/latest/miniconda.html wget https://repo.anaconda.com/miniconda/Miniconda3-latest-Linux-x86_64.sh bash Miniconda3-latest-Linux-x86_64.sh -b -p $HOME/miniconda $HOME/miniconda/bin/conda init bash cd lama conda env create -f conda_env.yml conda activate lama conda install pytorch torchvision torchaudio cudatoolkit=10.2 -c pytorch -y pip install pytorch-lightning==1.2.9 -
Docker: No actions are needed 🎉.
Inference
Run
cd lama
export TORCH_HOME=$(pwd) && export PYTHONPATH=$(pwd)
1. Download pre-trained models
Install tool for yandex disk link extraction:
pip3 install wldhx.yadisk-direct
The best model (Places2, Places Challenge):
curl -L $(yadisk-direct https://disk.yandex.ru/d/ouP6l8VJ0HpMZg) -o big-lama.zip
unzip big-lama.zip
All models (Places & CelebA-HQ):
curl -L $(yadisk-direct https://disk.yandex.ru/d/EgqaSnLohjuzAg) -o lama-models.zip
unzip lama-models.zip
2. Prepare images and masks
Download test images:
curl -L $(yadisk-direct https://disk.yandex.ru/d/xKQJZeVRk5vLlQ) -o LaMa_test_images.zip
unzip LaMa_test_images.zip
OR prepare your data:
1) Create masks named as `[images_name]_maskXXX[image_suffix]`, put images and masks in the same folder.3. Predict
On the host machine:
python3 bin/predict.py model.path=$(pwd)/big-lama indir=$(pwd)/LaMa_test_images outdir=$(pwd)/output
OR in the docker
The following command will pull the docker image from Docker Hub and execute the prediction script
bash docker/2_predict.sh $(pwd)/big-lama $(pwd)/LaMa_test_images $(pwd)/output device=cpu
Docker cuda: TODO
4. Predict with Refinement
On the host machine:
python3 bin/predict.py refine=True model.path=$(pwd)/big-lama indir=$(pwd)/LaMa_test_images outdir=$(pwd)/output
Train and Eval
Make sure you run:
cd lama
export TORCH_HOME=$(pwd) && export PYTHONPATH=$(pwd)
Then download models for perceptual loss:
mkdir -p ade20k/ade20k-resnet50dilated-ppm_deepsup/
wget -P ade20k/ade20k-resnet50dilated-ppm_deepsup/ http://sceneparsing.csail.mit.edu/model/pytorch/ade20k-resnet50dilated-ppm_deepsup/encoder_epoch_20.pth
Places
⚠️ NB: FID/SSIM/LPIPS metric values for Places that we see in LaMa paper are computed on 30000 images that we produce in evaluation section below. For more details on evaluation data check [Section 3. Dataset splits in Supplementary] ⚠️
On the host machine:
# Download data from http://places2.csail.mit.edu/download.html
# Places365-Standard: Train(105GB)/Test(19GB)/Val(2.1GB) from High-resolution images section
wget http://data.csail.mit.edu/places/places365/train_large_places365standard.tar
wget http://data.csail.mit.edu/places/places365/val_large.tar
wget http://data.csail.mit.edu/places/places365/test_large.tar

# Unpack train/test/val data and create .yaml config for it
bash fetch_data/places_standard_train_prepare.sh
bash fetch_data/places_standard_test_val_prepare.sh

# Sample images for test and viz at the end of epoch
bash fetch_data/places_standard_test_val_sample.sh
bash fetch_data/places_standard_test_val_gen_masks.sh

# Run training
python3 bin/train.py -cn lama-fourier location=places_standard

# To evaluate trained model and report metrics as in our paper
# we need to sample previously unseen 30k images and generate masks for them
bash fetch_data/places_standard_evaluation_prepare_data.sh

# Infer model on thick/thin/medium masks in 256 and 512 and run evaluation
# like this:
python3 bin/predict.py \
model.path=$(pwd)/experiments/<user>_<date:time>_lama-fourier_/ \
indir=$(pwd)/places_standard_dataset/evaluation/random_thick_512/ \
outdir=$(pwd)/inference/random_thick_512 model.checkpoint=last.ckpt

python3 bin/evaluate_predicts.py \
$(pwd)/configs/eval2_gpu.yaml \
$(pwd)/places_standard_dataset/evaluation/random_thick_512/ \
$(pwd)/inference/random_thick_512 \
$(pwd)/inference/random_thick_512_metrics.csv
Docker: TODO
CelebA
On the host machine:
# Make shure you are in lama folder
cd lama
export TORCH_HOME=$(pwd) && export PYTHONPATH=$(pwd)

# Download CelebA-HQ dataset
# Download data256x256.zip from https://drive.google.com/drive/folders/11Vz0fqHS2rXDb5pprgTjpD7S2BAJhi1P

# unzip & split into train/test/visualization & create config for it
bash fetch_data/celebahq_dataset_prepare.sh

# generate masks for test and visual_test at the end of epoch
bash fetch_data/celebahq_gen_masks.sh

# Run training
python3 bin/train.py -cn lama-fourier-celeba data.batch_size=10

# Infer model on thick/thin/medium masks in 256 and run evaluation
# like this:
python3 bin/predict.py \
model.path=$(pwd)/experiments/<user>_<date:time>_lama-fourier-celeba_/ \
indir=$(pwd)/celeba-hq-dataset/visual_test_256/random_thick_256/ \
outdir=$(pwd)/inference/celeba_random_thick_256 model.checkpoint=last.ckpt
Docker: TODO
Places Challenge
On the host machine:
# This script downloads multiple .tar files in parallel and unpacks them
# Places365-Challenge: Train(476GB) from High-resolution images (to train Big-Lama)
bash places_challenge_train_download.sh

TODO: prepare
TODO: train
TODO: eval
Docker: TODO
Create your data
Please check bash scripts for data preparation and mask generation from CelebaHQ section, if you stuck at one of the following steps.
On the host machine:
# Make shure you are in lama folder
cd lama
export TORCH_HOME=$(pwd) && export PYTHONPATH=$(pwd)

# You need to prepare following image folders:
$ ls my_dataset
train
val_source # 2000 or more images
visual_test_source # 100 or more images
eval_source # 2000 or more images

# LaMa generates random masks for the train data on the flight,
# but needs fixed masks for test and visual_test for consistency of evaluation.

# Suppose, we want to evaluate and pick best models
# on 512x512 val dataset  with thick/thin/medium masks
# And your images have .jpg extention:

python3 bin/gen_mask_dataset.py \
$(pwd)/configs/data_gen/random_<size>_512.yaml \ # thick, thin, medium
my_dataset/val_source/ \
my_dataset/val/random_<size>_512.yaml \# thick, thin, medium
--ext jpg

# So the mask generator will:
# 1. resize and crop val images and save them as .png
# 2. generate masks

ls my_dataset/val/random_medium_512/
image1_crop000_mask000.png
image1_crop000.png
image2_crop000_mask000.png
image2_crop000.png
...

# Generate thick, thin, medium masks for visual_test folder:

python3 bin/gen_mask_dataset.py \
$(pwd)/configs/data_gen/random_<size>_512.yaml \  #thick, thin, medium
my_dataset/visual_test_source/ \
my_dataset/visual_test/random_<size>_512/ \ #thick, thin, medium
--ext jpg


ls my_dataset/visual_test/random_thick_512/
image1_crop000_mask000.png
image1_crop000.png
image2_crop000_mask000.png
image2_crop000.png
...

# Same process for eval_source image folder:

python3 bin/gen_mask_dataset.py \
$(pwd)/configs/data_gen/random_<size>_512.yaml \  #thick, thin, medium
my_dataset/eval_source/ \
my_dataset/eval/random_<size>_512/ \ #thick, thin, medium
--ext jpg


# Generate location config file which locate these folders:

touch my_dataset.yaml
echo "data_root_dir: $(pwd)/my_dataset/" >> my_dataset.yaml
echo "out_root_dir: $(pwd)/experiments/" >> my_dataset.yaml
echo "tb_dir: $(pwd)/tb_logs/" >> my_dataset.yaml
mv my_dataset.yaml ${PWD}/configs/training/location/


# Check data config for consistency with my_dataset folder structure:
$ cat ${PWD}/configs/training/data/abl-04-256-mh-dist
...
train:
  indir: ${location.data_root_dir}/train
  ...
val:
  indir: ${location.data_root_dir}/val
  img_suffix: .png
visual_test:
  indir: ${location.data_root_dir}/visual_test
  img_suffix: .png


# Run training
python3 bin/train.py -cn lama-fourier location=my_dataset data.batch_size=10

# Evaluation: LaMa training procedure picks best few models according to
# scores on my_dataset/val/

# To evaluate one of your best models (i.e. at epoch=32)
# on previously unseen my_dataset/eval do the following
# for thin, thick and medium:

# infer:
python3 bin/predict.py \
model.path=$(pwd)/experiments/<user>_<date:time>_lama-fourier_/ \
indir=$(pwd)/my_dataset/eval/random_<size>_512/ \
outdir=$(pwd)/inference/my_dataset/random_<size>_512 \
model.checkpoint=epoch32.ckpt

# metrics calculation:
python3 bin/evaluate_predicts.py \
$(pwd)/configs/eval2_gpu.yaml \
$(pwd)/my_dataset/eval/random_<size>_512/ \
$(pwd)/inference/my_dataset/random_<size>_512 \
$(pwd)/inference/my_dataset/random_<size>_512_metrics.csv
OR in the docker:
TODO: train
TODO: eval
Hints
Generate different kinds of masks
The following command will execute a script that generates random masks.
bash docker/1_generate_masks_from_raw_images.sh \
    configs/data_gen/random_medium_512.yaml \
    /directory_with_input_images \
    /directory_where_to_store_images_and_masks \
    --ext png
The test data generation command stores images in the format, which is suitable for prediction.
The table below describes which configs we used to generate different test sets from the paper. Note that we do not fix a random seed, so the results will be slightly different each time.
| Places 512x512 | CelebA 256x256 | |
|---|---|---|
| Narrow | random_thin_512.yaml | random_thin_256.yaml |
| Medium | random_medium_512.yaml | random_medium_256.yaml |
| Wide | random_thick_512.yaml | random_thick_256.yaml |
Feel free to change the config path (argument #1) to any other config in configs/data_gen
or adjust config files themselves.
Override parameters in configs
Also you can override parameters in config like this:
python3 bin/train.py -cn <config> data.batch_size=10 run_title=my-title
Where .yaml file extension is omitted
Models options
Config names for models from paper (substitude into the training command):
* big-lama
* big-lama-regular
* lama-fourier
* lama-regular
* lama_small_train_masks
Which are seated in configs/training/folder
Links
- All the data (models, test images, etc.) https://disk.yandex.ru/d/AmdeG-bIjmvSug
- Test images from the paper https://disk.yandex.ru/d/xKQJZeVRk5vLlQ
- The pre-trained models https://disk.yandex.ru/d/EgqaSnLohjuzAg
- The models for perceptual loss https://disk.yandex.ru/d/ncVmQlmT_kTemQ
- Our training logs are available at https://disk.yandex.ru/d/9Bt1wNSDS4jDkQ
Training time & resources
TODO
Acknowledgments
- Segmentation code and models if form CSAILVision.
- LPIPS metric is from richzhang
- SSIM is from Po-Hsun-Su
- FID is from mseitzer
from https://github.com/advimman/lama
-----------------------------------------------------
开源图像修复工具 污点擦除 – Lama Cleaner
Lama Cleaner,一款GitHub上免费开源的图像修复工具,由 SOTA AI 模型提供支持的图像修复工具,基于cv2的经典图像修复算法,支持中央处理器和图形处理器,多种策略修复图像,可以从照片中删除任何不需要的物体、缺陷、人物或擦除和替换(由稳定扩散驱动)你照片上的任何东西,A 姐体验了一下,非常不错。
Lama Cleaner:https://huggingface.co/spaces/Sanster/Lama-Cleaner-lama
GitHub地址:https://github.com/Sanster/lama-cleaner
-------------------------------------------------------------
Image inpainting tool powered by SOTA AI Model. Remove any unwanted object, defect, people from your pictures or erase and replace(powered by stable diffusion) any thing on your pictures.
IOPaint
A free and open-source inpainting & outpainting tool powered by SOTA AI model.


| Erase | Replace Object |
|---|---|
IOPaint-erase-markdown.mp4 |
iopaint-inpaint-markdown.mp4 |
| Draw Text | Out-painting |
|---|---|
AnyText-markdown.mp4 |
outpainting.mp4 |
Quick Start
Start webui
IOPaint provides a convenient webui for using the latest AI models to edit your images. You can install and start IOPaint easily by running following command:
# In order to use GPU, install cuda version of pytorch first.
# pip3 install torch==2.1.2 torchvision==0.16.2 --index-url https://download.pytorch.org/whl/cu118
# AMD GPU users, please utilize the following command, only works on linux, as pytorch is not yet supported on Windows with ROCm.
# pip3 install torch==2.1.2 torchvision==0.16.2 --index-url https://download.pytorch.org/whl/rocm5.6

pip3 install iopaint
iopaint start --model=lama --device=cpu --port=8080
That's it, you can start using IOPaint by visiting http://localhost:8080 in your web browser.
Batch processing
You can also use IOPaint in the command line to batch process images:
iopaint run --model=lama --device=cpu \
--input=/path/to/image_folder \
--mask=/path/to/mask_folder \
--output=output_dir
--input is the folder containing input images, --mask is the folder containing corresponding mask images.
When --mask is a path to a mask file, all images will be processed using this mask.
You can see more information about the available models and plugins supported by IOPaint below.
Features
- Completely free and open-source, fully self-hosted, support CPU & GPU & Apple Silicon
- Windows 1-Click Installer
- Supports various AI models:
- Erase models: These models can be used to remove unwanted object, defect, watermarks, people from image. I have also developed a macOS native app called OptiClean that provides this feature.
- Stable Diffusion models: You can use any Stable Diffusion Inpainting(or normal) models from Huggingface in IOPaint. Some popular used models include:
- Other Diffusion models:
- Plugins
- Segment Anything: Accurate and fast interactive object segmentation
- RemoveBG: Remove image background or generate masks for foreground objects
- Anime Segmentation: Similar to RemoveBG, the model is specifically trained for anime images.
- RealESRGAN: Super Resolution
- GFPGAN: Face Restoration
- RestoreFormer: Face Restoration
- FileManager: Browse your pictures conveniently and save them directly to the output directory.
from https://github.com/Sanster/IOPaint
No comments:
Post a Comment