本地部署
- https://github.com/ollama/ollama
- https://ollama.com/library/deepseek-r1
- https://ollama.com/library/nomic-embed-text
- ollama 环境变量
- OLLAMA_HOST: 这个变量定义了 Ollama 监听的网络接口。通过设置 OLLAMA_HOST=0.0.0.0,我们可以让 Ollama 监听所有可用的网络接口,从而允许外部网络访问
- OLLAMA_MODELS: 这个变量指定了模型镜像的存储路径
- OLLAMA_PORT: 这个变量允许我们更改 Ollama 的默认端口。例如,设置 OLLAMA_PORT=8080 可以将服务端口从默认的 11434 更改为 8080
- https://lmstudio.ai (在 Mac 上不支持 Intel 芯片)
- https://github.com/huggingface/transformers.js-examples
API 供应商
- https://platform.deepseek.com/api_keys
- https://www.dmxapi.com/token
- https://openrouter.ai/settings/keys
- https://cloud.siliconflow.cn/account/ak
- https://bailian.console.aliyun.com/?apiKey=1#/api-key
- https://console.volcengine.com/ark/region:ark+cn-beijing/apiKey
- https://api.together.ai
客户端
-
Cline: https://marketplace.visualstudio.com/items?itemName=saoudrizwan.claude-dev
-
Roo Code: https://marketplace.visualstudio.com/items?itemName=RooVeterinaryInc.roo-cline
-
GitHub Copilot: https://marketplace.visualstudio.com/items?itemName=GitHub.copilot
- 安装 VS Code Insiders 才能支持 agent: https://code.visualstudio.com/insiders
-
https://www.trae.ai (不推荐)
-
https://github.com/CherryHQ/cherry-studio (推荐:个人使用)
- 优点
- 支持直接复制粘贴到知识库
- 支持选择指定知识库
- 支持诶特指定模型
- 支持系统托盘快捷提问
- 缺点
- 单机使用
- 优点
-
https://github.com/Mintplex-Labs/anything-llm (推荐:团队使用)
- 优点
- 支持浏览器插件往知识库里喂数据 https://github.com/Mintplex-Labs/anythingllm-extension
- 支持管理员添加账号给其他用户访问
- 缺点
- 不支持直接复制粘贴文本到知识库
- 优点
-
https://github.com/n4ze3m/page-assist (推荐:个人使用)
- 优点
- 支持和当前页面对话
- 支持联网搜索
- 支持知识库
- 优点
-
https://github.com/1Panel-dev/MaxKB
-
Speak in Chinese
-
Always research in English, respond in English, also follow by Chinese
--------------------------------------------------------------------------------
离线安装 Ollama及加载离线模型
前言
本地已经玩了
ollama很长时间了, 今天打算把ollama安装到服务器上, 但是服务器没有外网, 所以只能离线安装了, 找了一下离线装教程还是比较少了, 所以自己写一篇, 以便以后查阅.离线安装 Ollama
下载安装包
在官方 Release 中进行下载, 根据服务器的 cpu 类型下载对应的安装包, 下载完成后上传到服务器上.
安装
解压安装包
ollama linux amd64.tgz, 进入到解压后的目录, 执行install.sh脚本进行安装:# 解压安装包 tar xvf Ollama-Linux-AMD64.tgz # 将 ollama 执行命令移动到 /usr/bin 目录下 sudo mv bin/ollama /usr/bin/ollama启动并添加开机启动
1.创建执行用户, 这一步可以忽略, 可以直接设置
root或其他有ollama执行权限的用户都可以:sudo useradd -r -s /bin/false -U -m -d /usr/share/ollama ollama sudo usermod -a -G ollama $(whoami)2.创建配置文件
创建文件
/etc/systemd/system/ollama.service, 并填充如下内容, 其中的User和Group根据上一步的选择填写:[Unit] Description=Ollama Service After=network-online.target [Service] ExecStart=/usr/bin/ollama serve User=ollama Group=ollama Restart=always RestartSec=3 Environment="PATH=$PATH" [Install] WantedBy=default.target# 加载配置 sudo systemctl daemon-reload # 设置开机启动 sudo systemctl enable ollama # 启动 ollama 服务 sudo systemctl start ollama离线安装模型
如下使用
gguf模型安装方式, 模型安装的方式都差不多, 可以参考如下方式Qwen2.5-3b
1.下载模型, 可以到 huggingface 上搜索对应模型的 gguf 版本, 如搜索 qwen2.5-3b-gguf
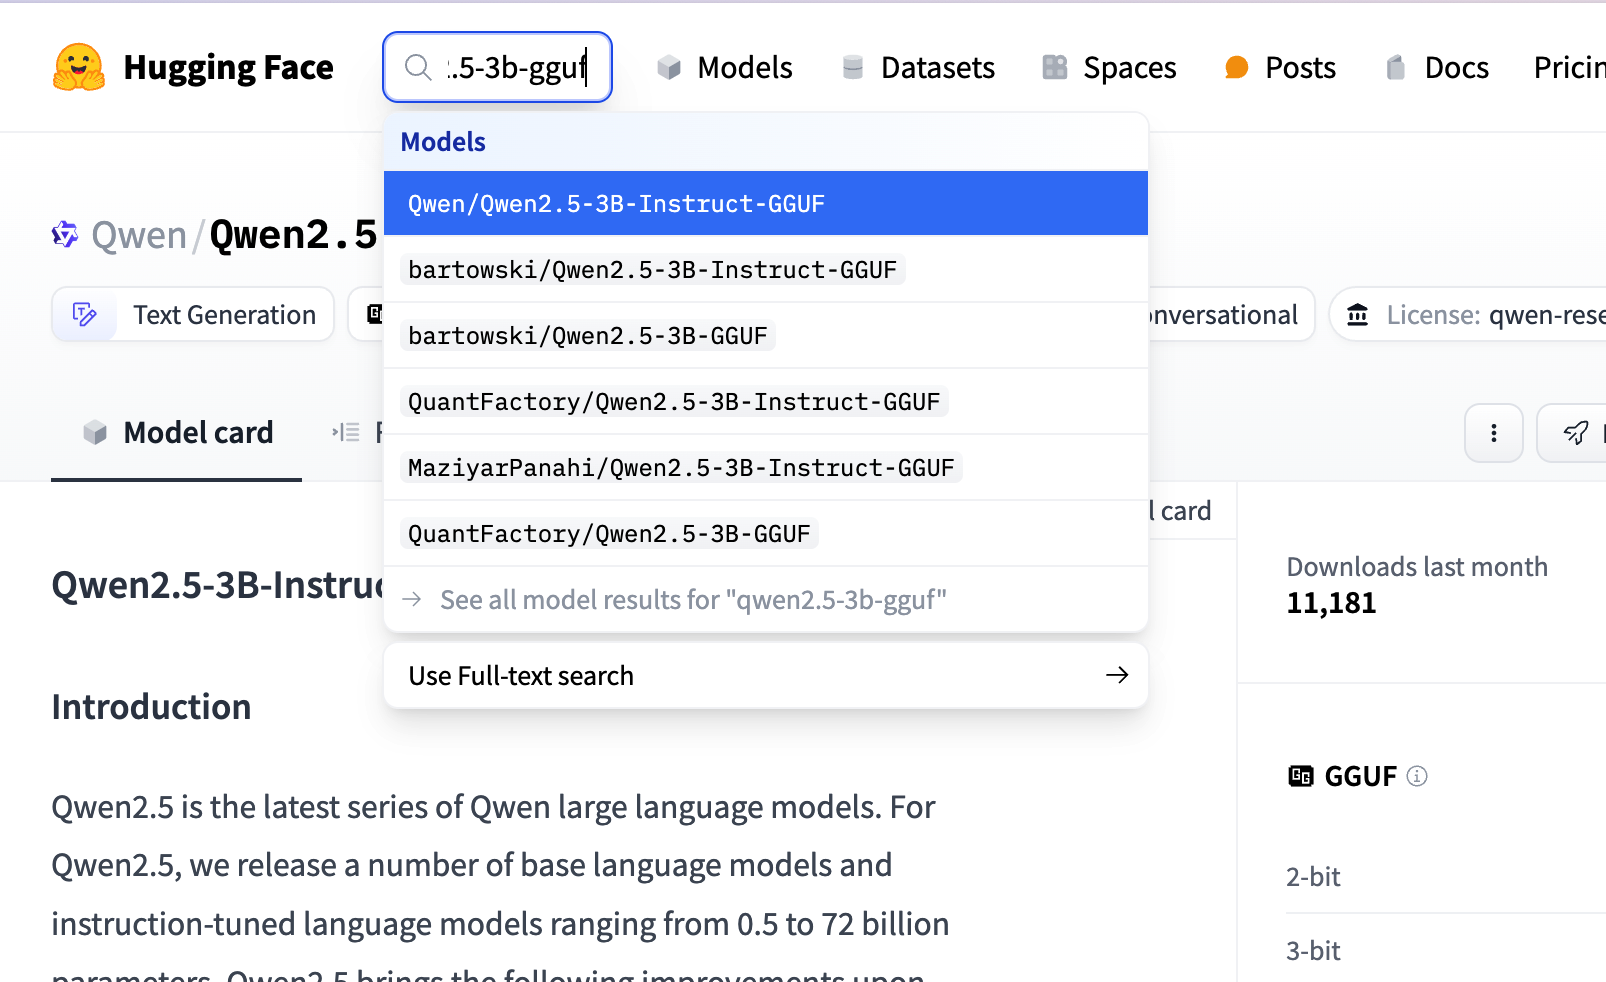 search huggingface model
具体选那个微调版本都可以, 我们这里参考
ollama上选择的模型版本, 如下图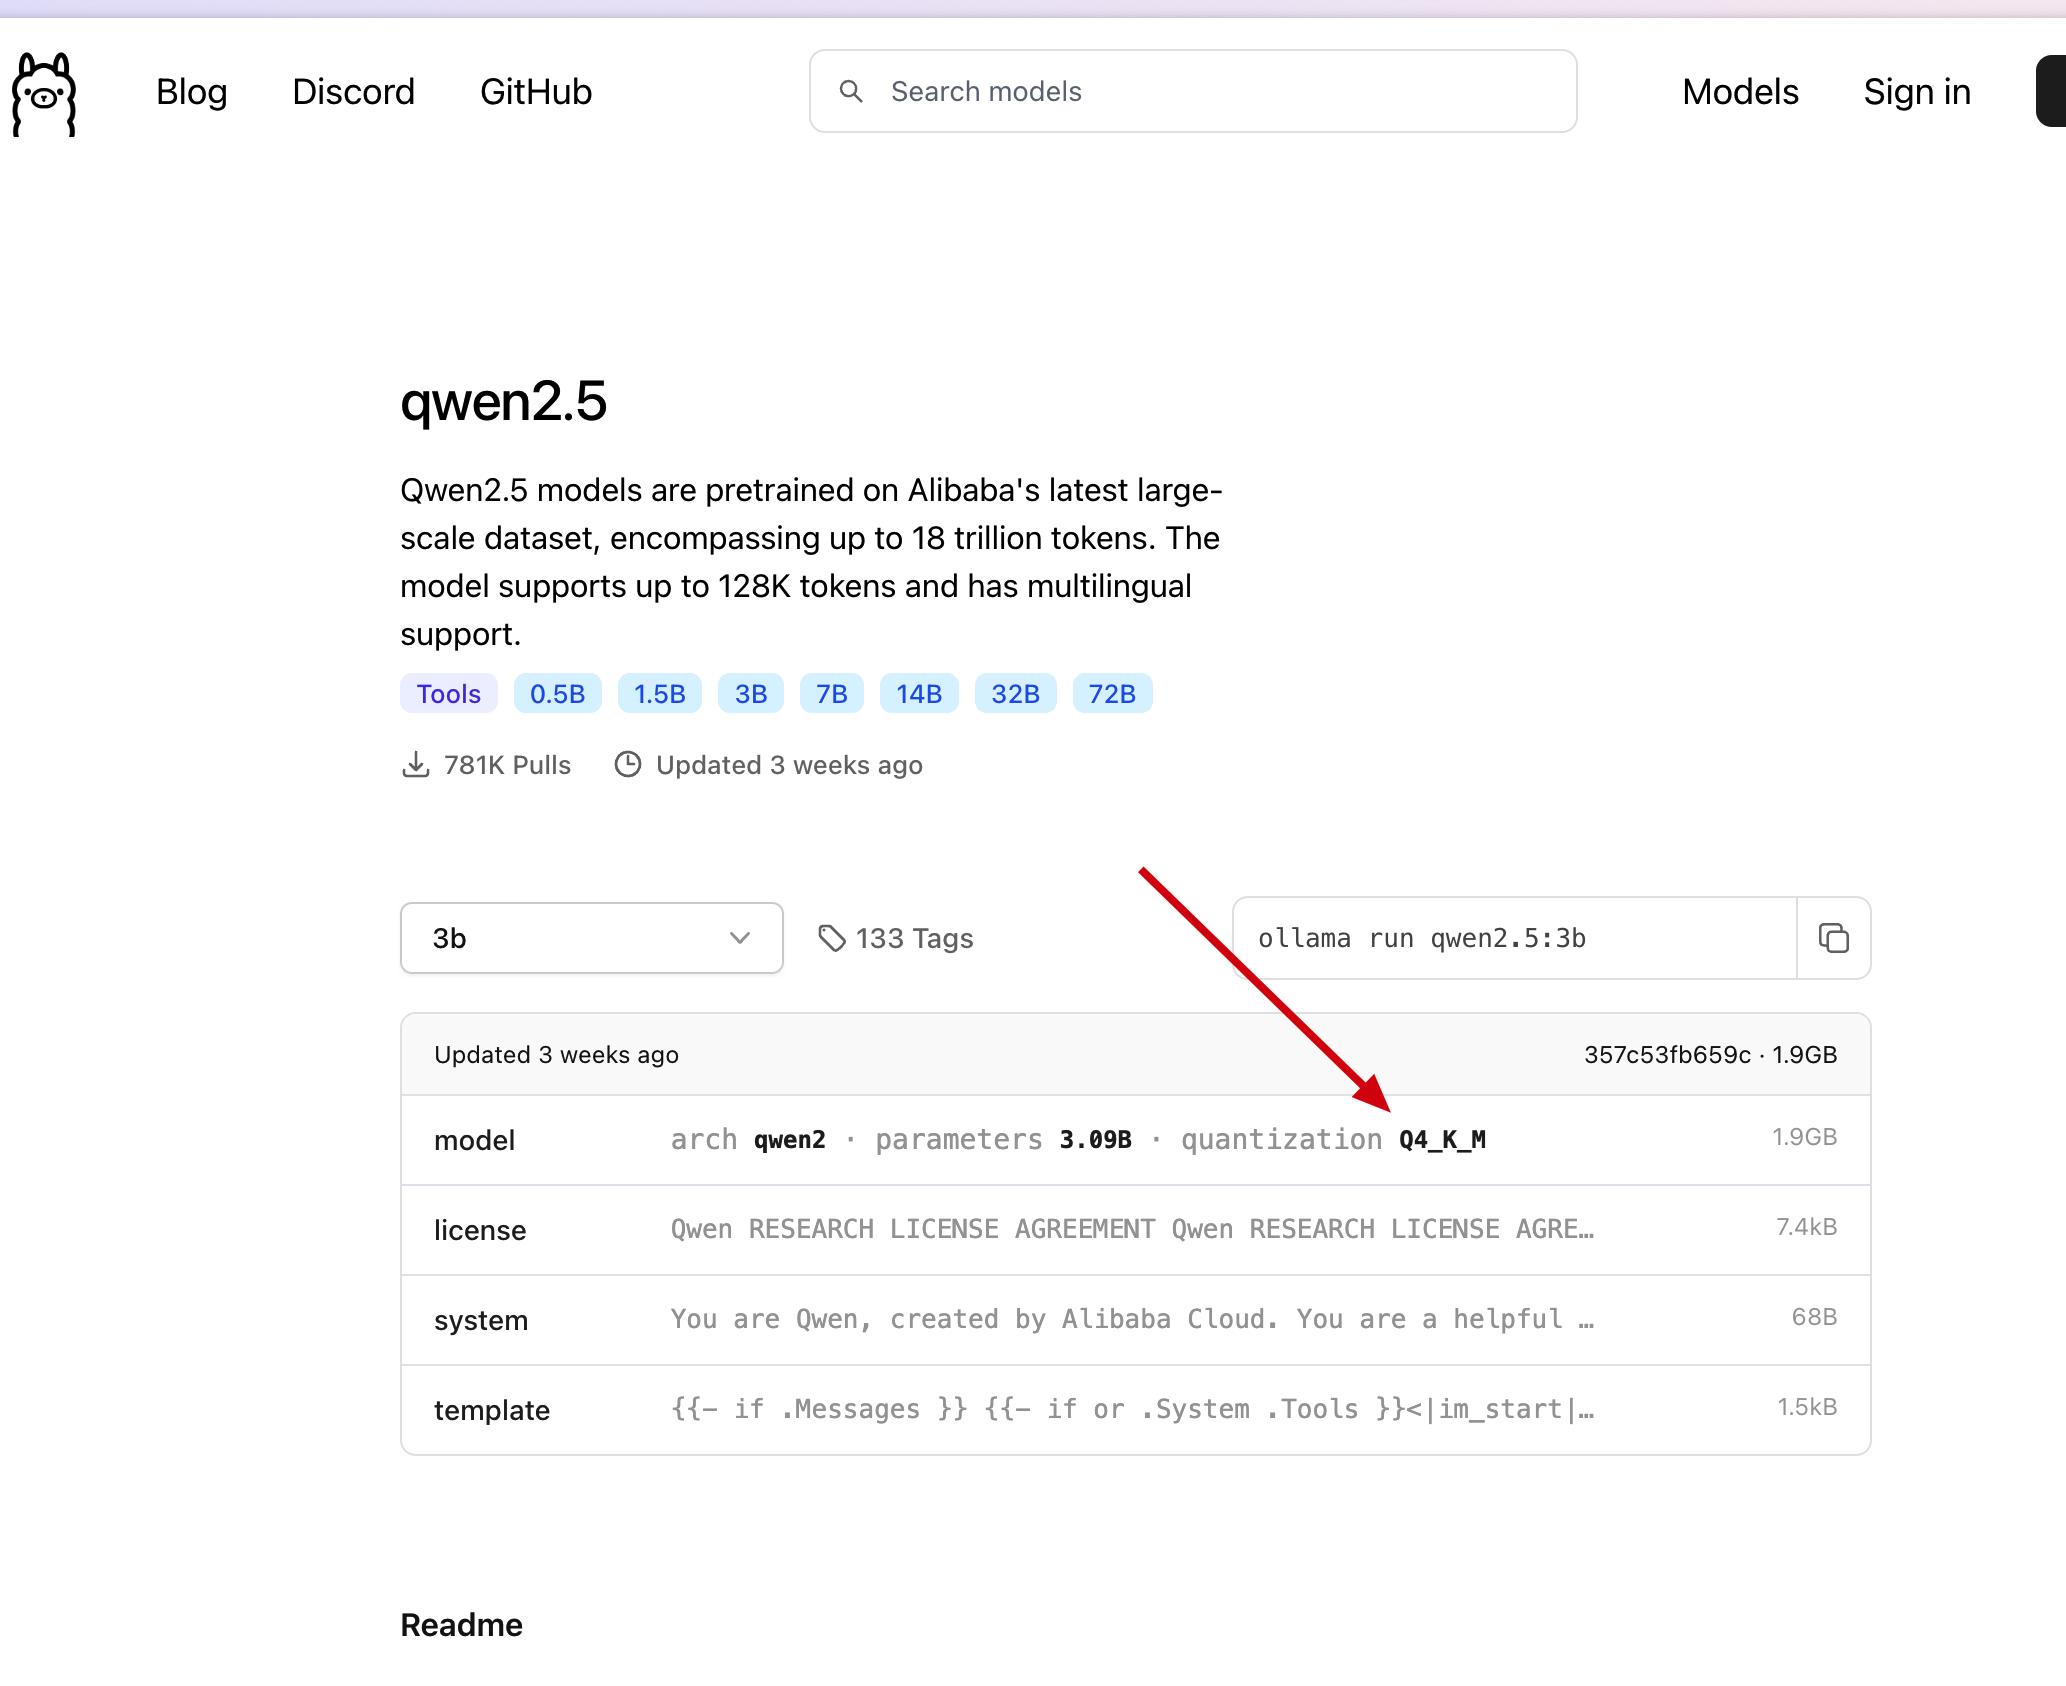 ollama qwen2.5-3b model
我们直接在刚才找到的模型中, 点击
Files and versions, 找到在 ollama 中找到的版本, 点击下载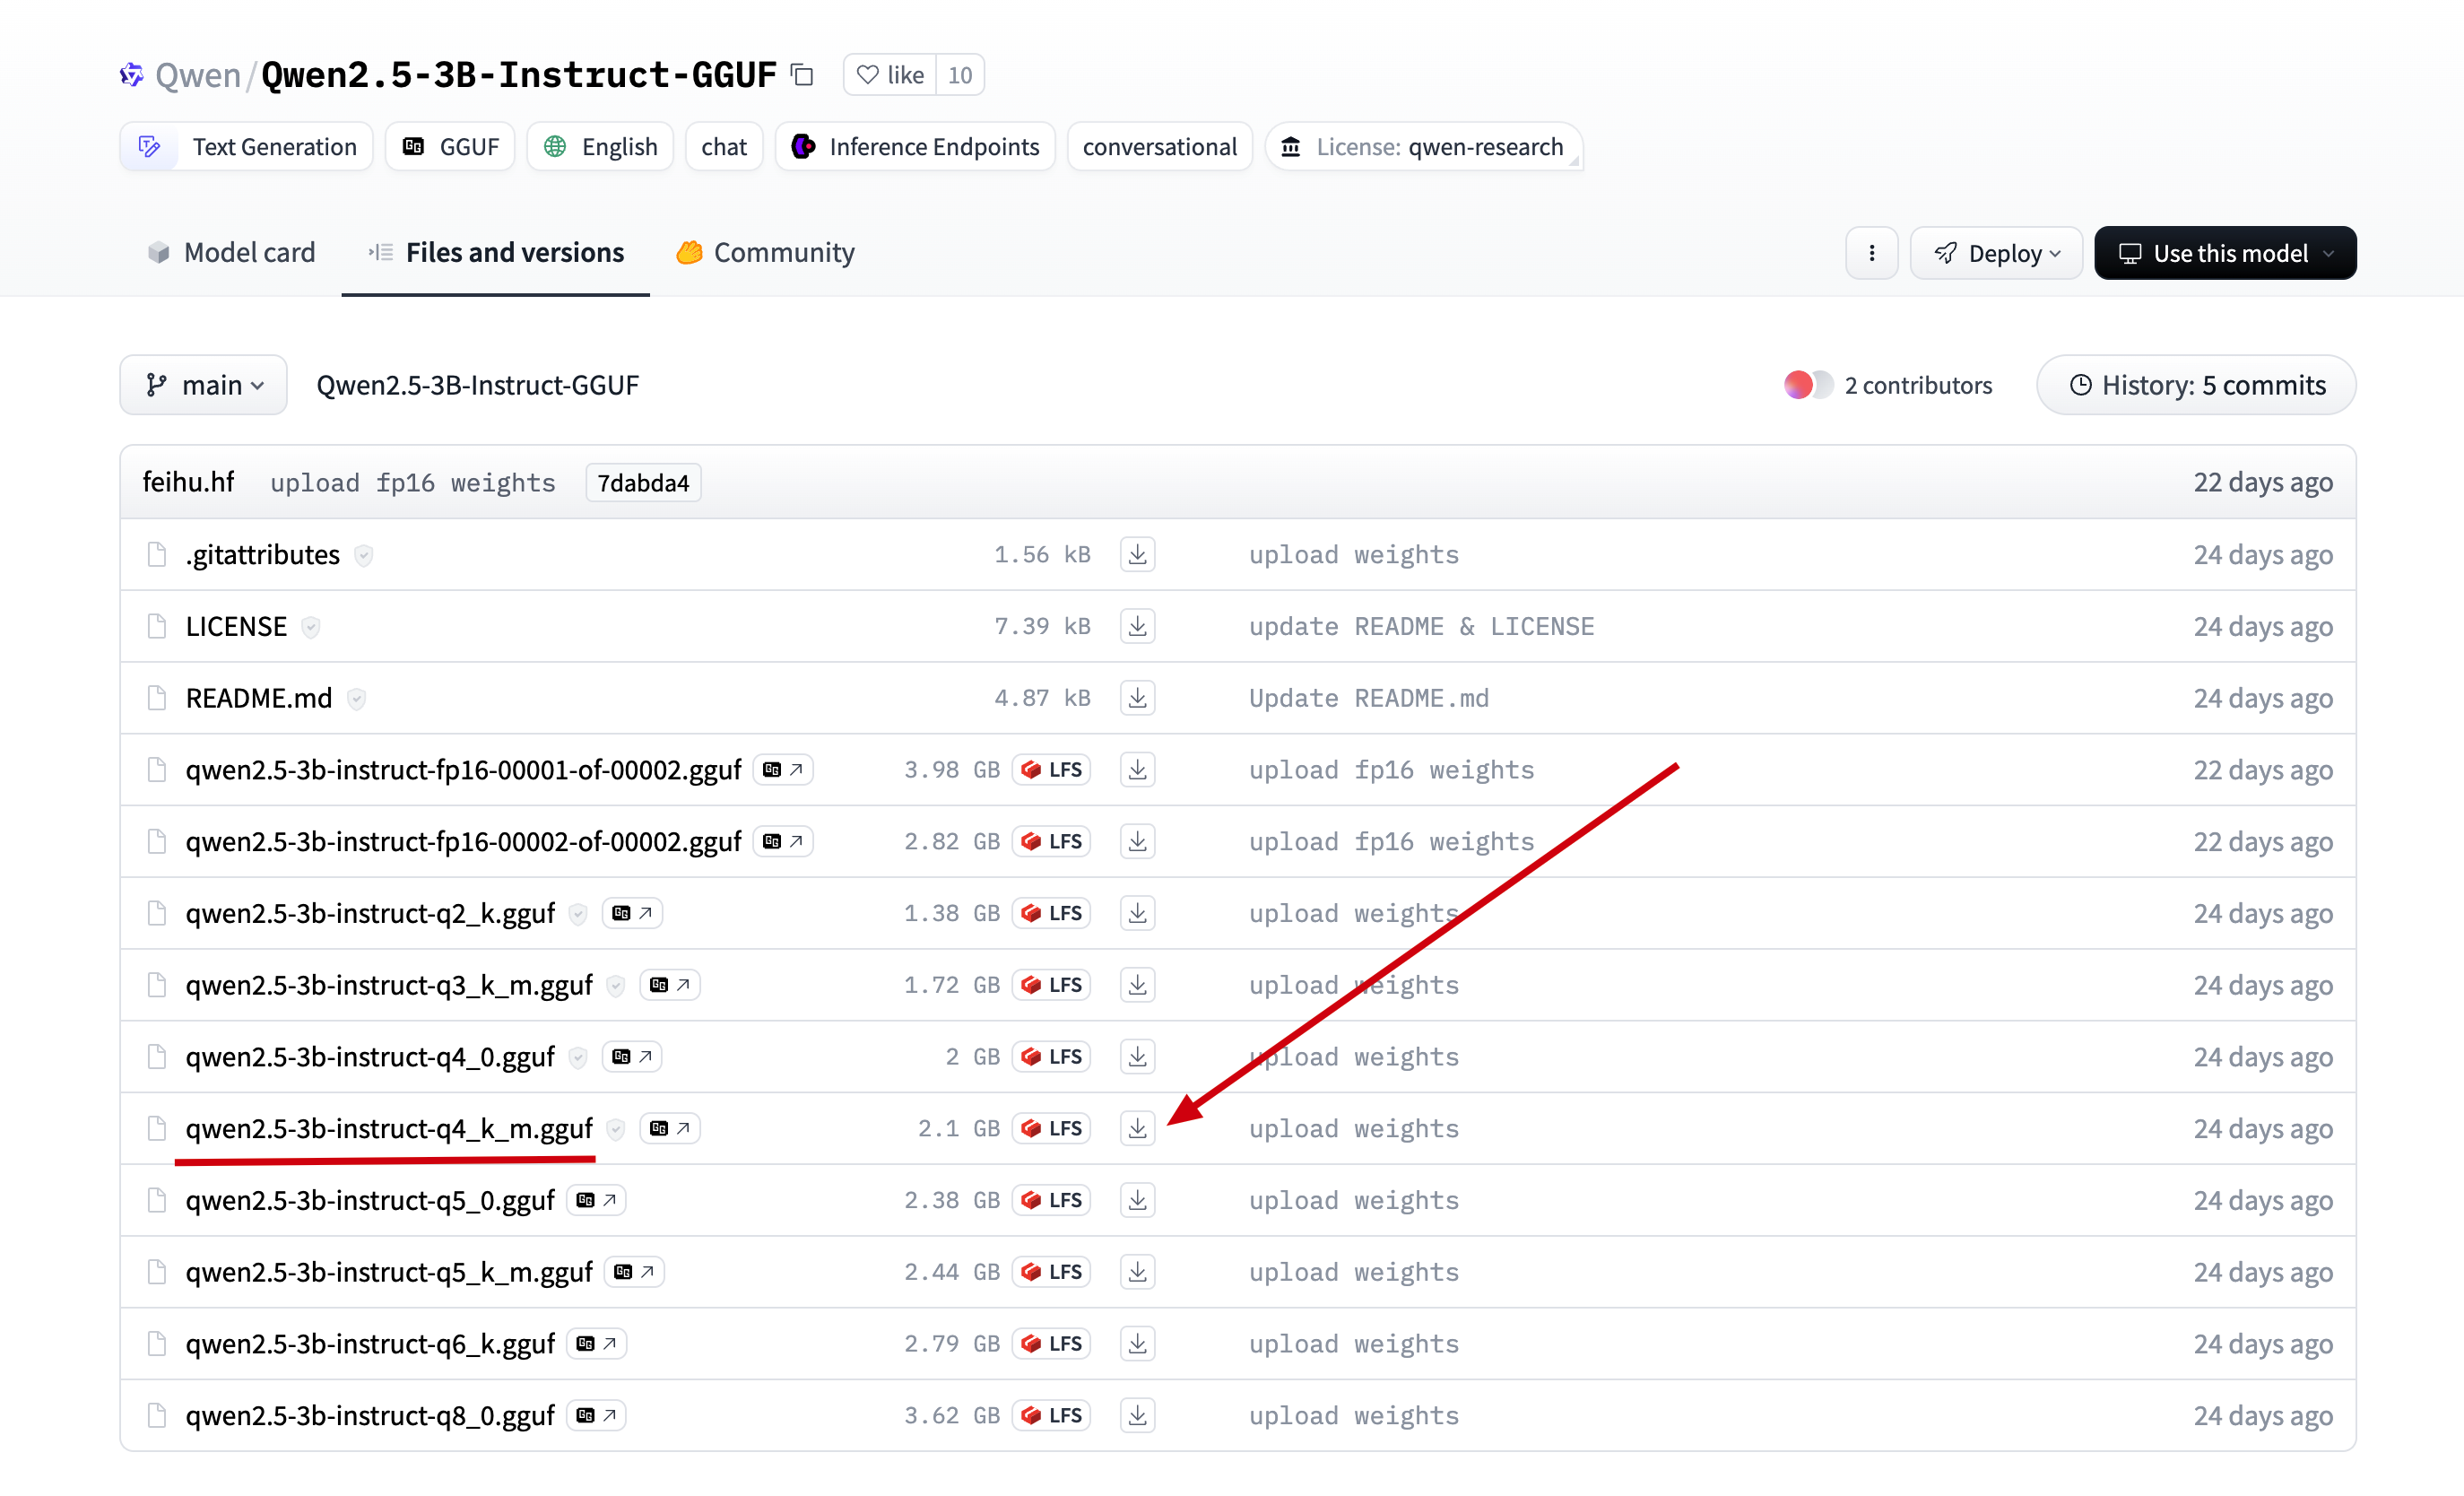 download qwen2.5-3b
2.将下载后的文件上传到服务器的目录
/data/ollama, 并重命名为 qwen2.5-3b.gguf, (重命名为了方便后面引用)
3.在/data/ollama目录下创建文件Modelfile, 添加如下内容:# 上一步的模型名 FROM ./qwen2.5-3b.gguf # 可以到 ollama 网站上的模型库去寻找, 如 qwen2.5-3b 的模板地址: https://ollama.com/library/qwen2.5:3b/blobs/eb4402837c78 # 直接复制 ollama 上的 Template 到如下三个双引号中间 TEMPLATE """{{- if .Messages }} {{- if or .System .Tools }}<|im_start|>system {{- if .System }} {{ .System }} {{- end }} {{- if .Tools }} # Tools You may call one or more functions to assist with the user query. You are provided with function signatures within <tools></tools> XML tags: <tools> {{- range .Tools }} {"type": "function", "function": {{ .Function }}} {{- end }} </tools> For each function call, return a json object with function name and arguments within <tool_call></tool_call> XML tags: <tool_call> {"name": <function-name>, "arguments": <args-json-object>} </tool_call> {{- end }}<|im_end|> {{ end }} {{- range $i, $_ := .Messages }} {{- $last := eq (len (slice $.Messages $i)) 1 -}} {{- if eq .Role "user" }}<|im_start|>user {{ .Content }}<|im_end|> {{ else if eq .Role "assistant" }}<|im_start|>assistant {{ if .Content }}{{ .Content }} {{- else if .ToolCalls }}<tool_call> {{ range .ToolCalls }}{"name": "{{ .Function.Name }}", "arguments": {{ .Function.Arguments }}} {{ end }}</tool_call> {{- end }}{{ if not $last }}<|im_end|> {{ end }} {{- else if eq .Role "tool" }}<|im_start|>user <tool_response> {{ .Content }} </tool_response><|im_end|> {{ end }} {{- if and (ne .Role "assistant") $last }}<|im_start|>assistant {{ end }} {{- end }} {{- else }} {{- if .System }}<|im_start|>system {{ .System }}<|im_end|> {{ end }}{{ if .Prompt }}<|im_start|>user {{ .Prompt }}<|im_end|> {{ end }}<|im_start|>assistant {{ end }}{{ .Response }}{{ if .Response }}<|im_end|>{{ end }} """ # 这一步参考 ollama 上的 parameters, 但是 ollama 上的 qwen2.5-3b 是没有参数的, 按照下面的格式添加即可 PARAMETER stop "<|im_start|>" PARAMETER stop "<|im_end|>"4.执行如下命令, 加载并运行离线模型:
# 通过模型描述文件, 创建并运行 qwen2.5 模型
ollama create qwen2.5 -f Modelfile
# 查看模型运行列表, 是否正在运行
ollama ls

# 通过 api 调用模型, 检测模型是否运行正常
curl --location --request POST 'http://127.0.0.1:11434/api/generate' \
--header 'Content-Type: application/json' \
--data '{
    "model": "qwen2.5",
    "stream": false,
    "prompt": "你好, 24节气的第一个节气是什么?"
}' \
-w "Time Total: %{time_total}s\n"
如下图, 正常返回回答内容, 表示模型成功安装:
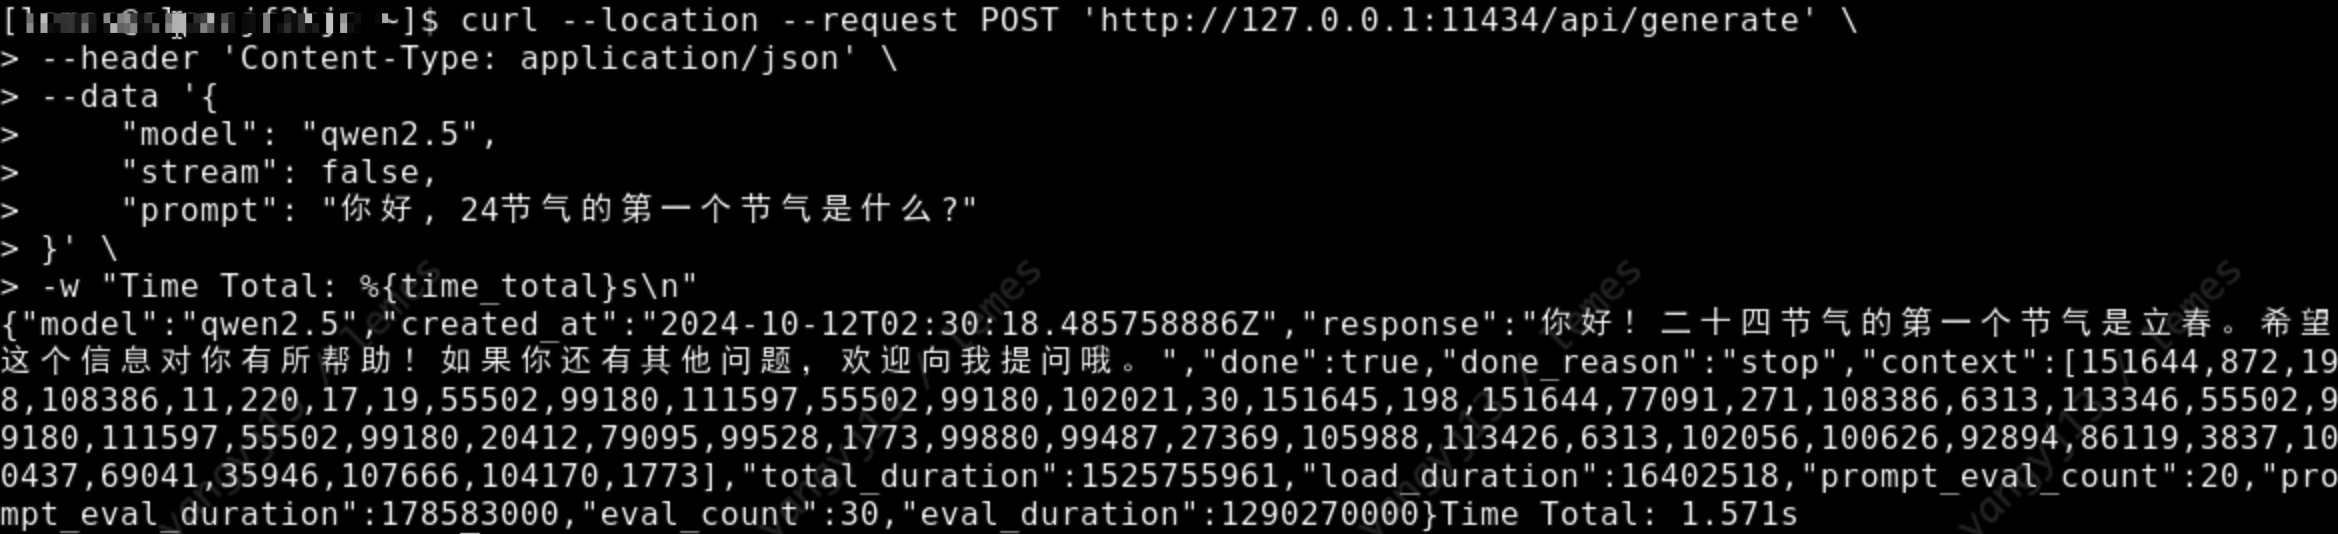 api/generate
Llama3.2-3b
1.下载模型, 可以到 huggingface 上搜索对应模型的 gguf 版本, 如搜索
llama3.2-3b-gguf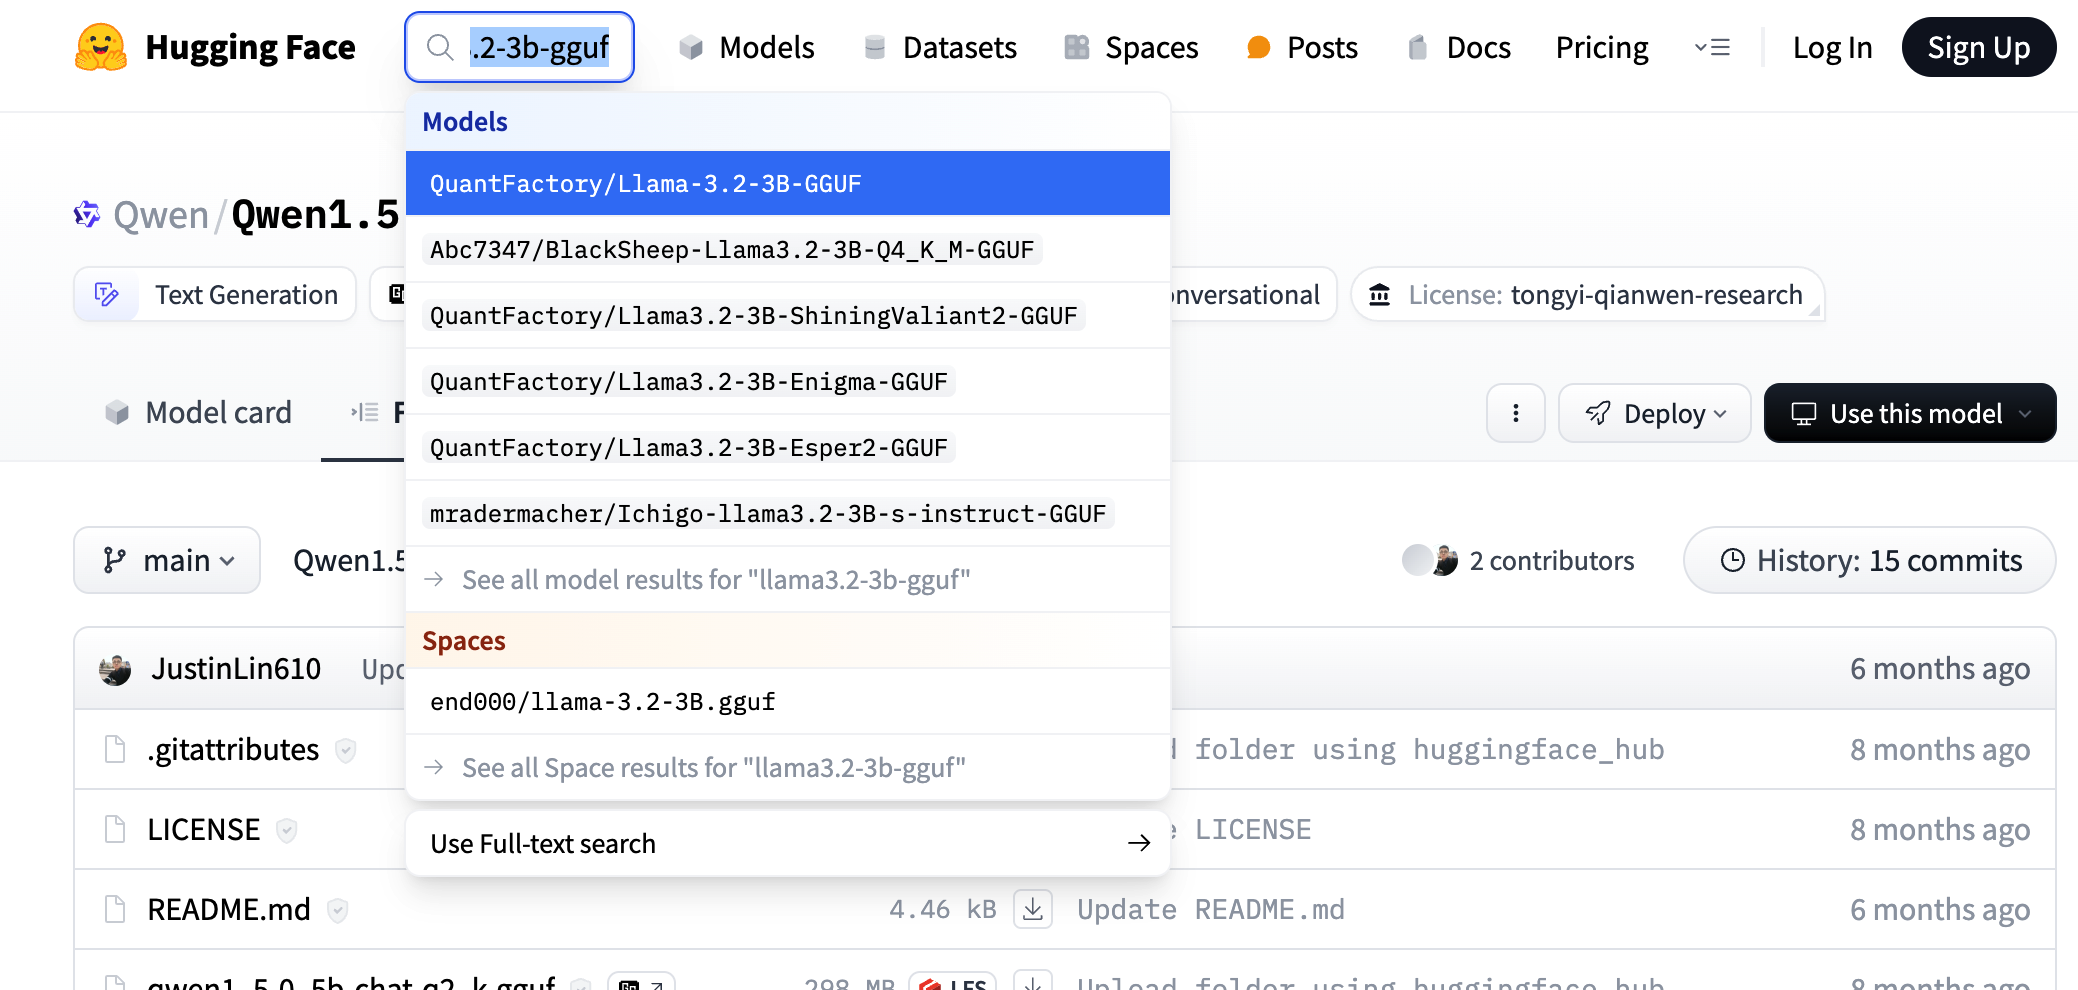 search huggingface model
具体选那个微调版本都可以, 我们这里参考 ollama 上选择的模型版本, 如下图
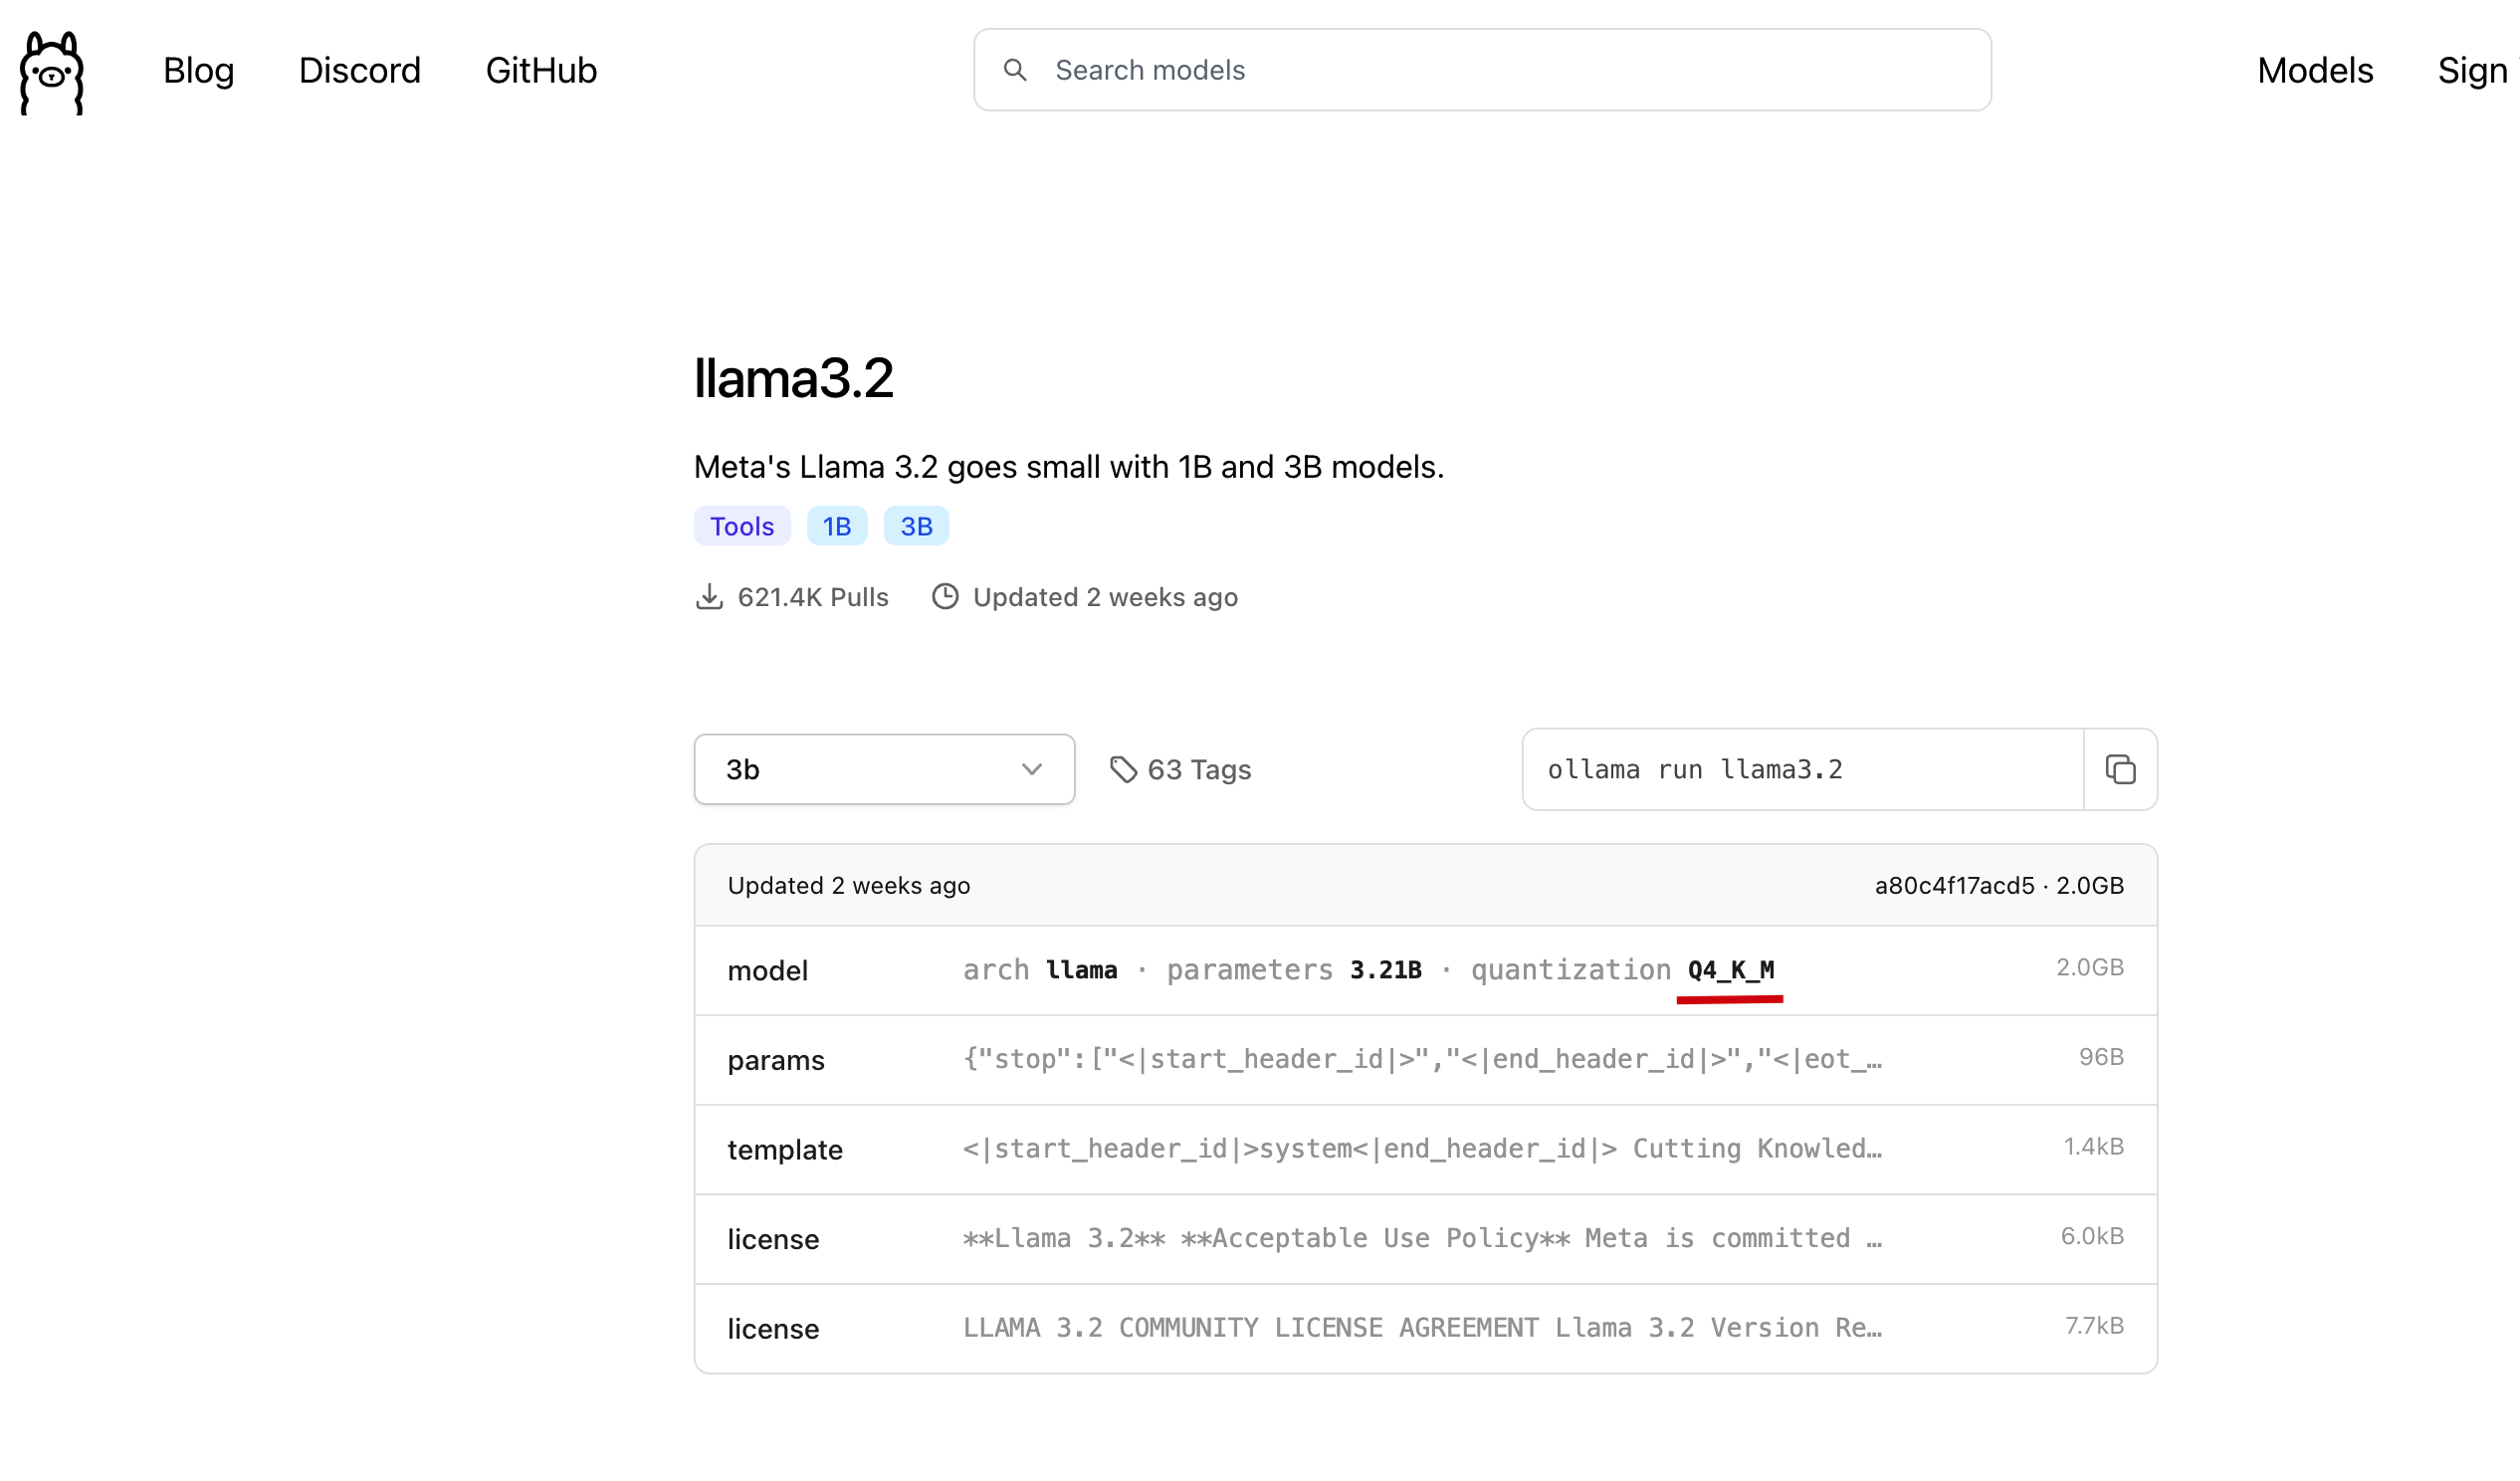 ollama llama3.2-3b model
我们直接在刚才找到的模型中, 点击
Files and versions, 找到在 ollama 中找到的版本, 点击下载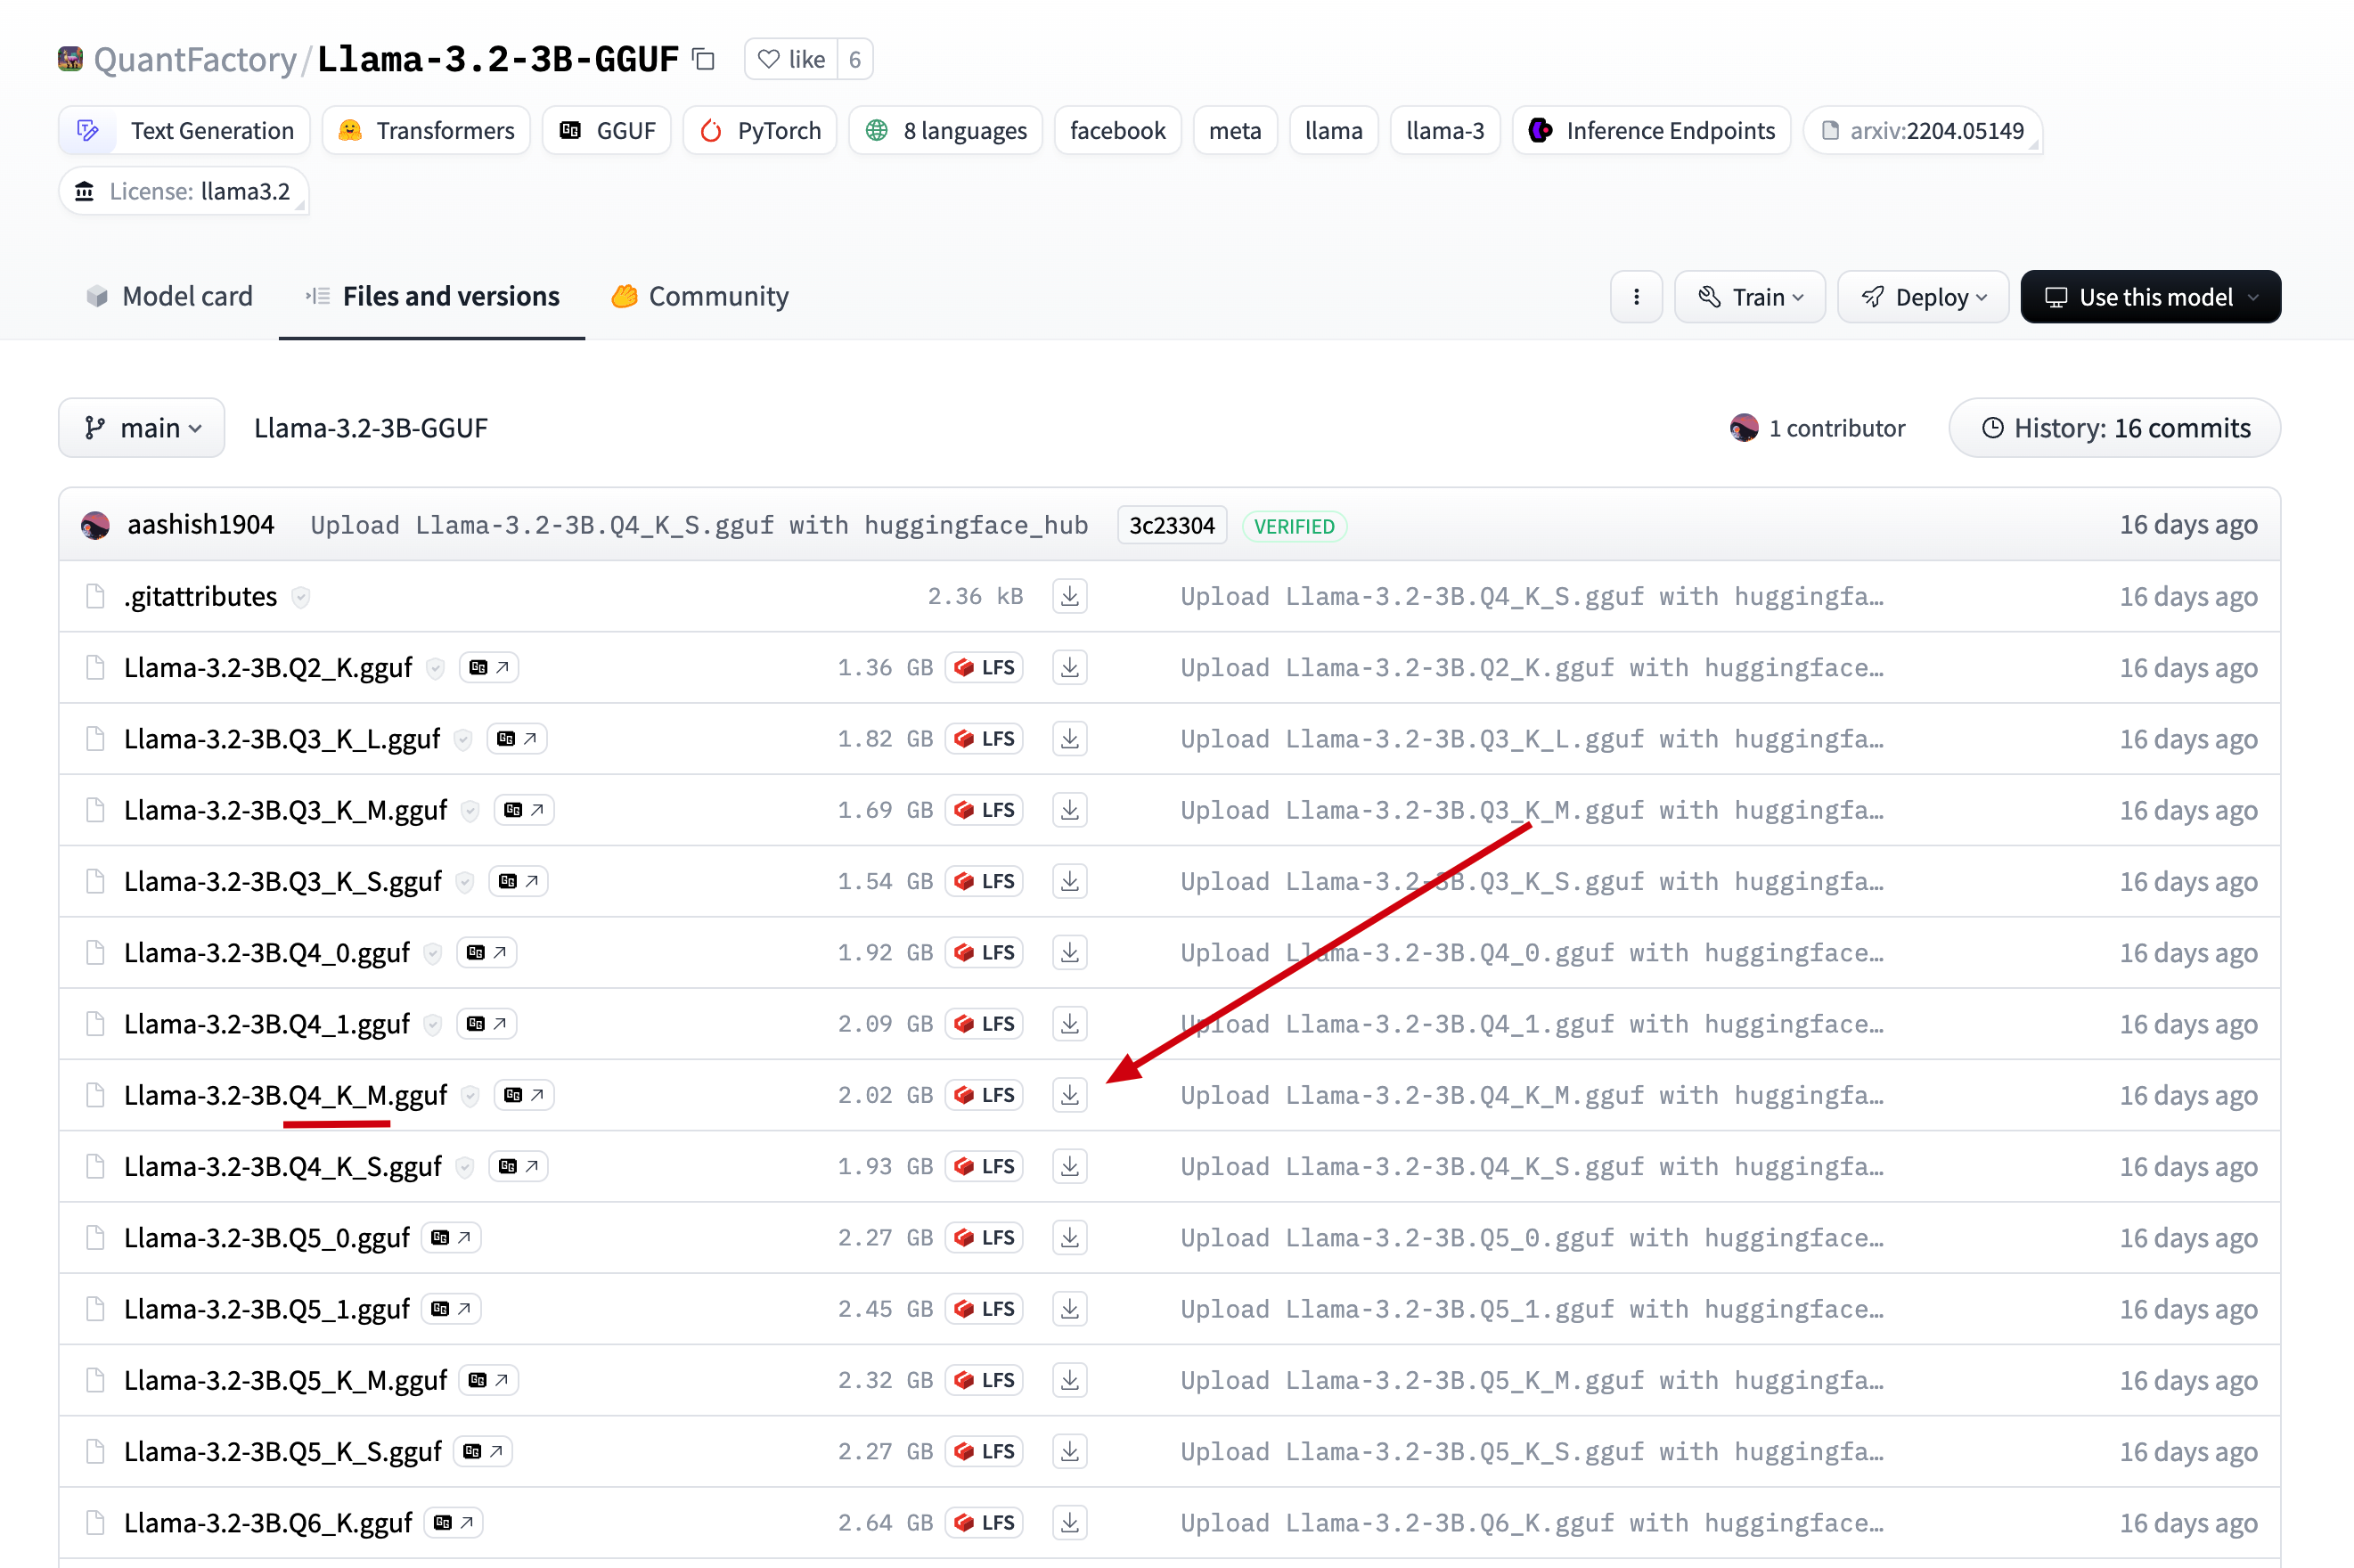 download llama3.2-3b
2.将下载后的文件上传到服务器的目录
/data/ollama, 并重命名为llama3.2-3b.gguf, (重命名为了方便后面引用)
3.在/data/ollama目录下创建文件Modelfile, 添加如下内容# 上一步的模型名 FROM ./llama3.2-3b.gguf # 可以到 ollama 网站上的模型库去寻找, 如 llama3.2-3b 的模板地址: https://ollama.com/library/llama3.2/blobs/966de95ca8a6 # 直接复制 ollama 上的 Template 到如下三个双引号中间 TEMPLATE """<|start_header_id|>system<|end_header_id|> Cutting Knowledge Date: December 2023 {{ if .System }}{{ .System }} {{- end }} {{- if .Tools }}When you receive a tool call response, use the output to format an answer to the orginal user question. You are a helpful assistant with tool calling capabilities. {{- end }}<|eot_id|> {{- range $i, $_ := .Messages }} {{- $last := eq (len (slice $.Messages $i)) 1 }} {{- if eq .Role "user" }}<|start_header_id|>user<|end_header_id|> {{- if and $.Tools $last }} Given the following functions, please respond with a JSON for a function call with its proper arguments that best answers the given prompt. Respond in the format {"name": function name, "parameters": dictionary of argument name and its value}. Do not use variables. {{ range $.Tools }} {{- . }} {{ end }} {{ .Content }}<|eot_id|> {{- else }} {{ .Content }}<|eot_id|> {{- end }}{{ if $last }}<|start_header_id|>assistant<|end_header_id|> {{ end }} {{- else if eq .Role "assistant" }}<|start_header_id|>assistant<|end_header_id|> {{- if .ToolCalls }} {{ range .ToolCalls }} {"name": "{{ .Function.Name }}", "parameters": {{ .Function.Arguments }}}{{ end }} {{- else }} {{ .Content }} {{- end }}{{ if not $last }}<|eot_id|>{{ end }} {{- else if eq .Role "tool" }}<|start_header_id|>ipython<|end_header_id|> {{ .Content }}<|eot_id|>{{ if $last }}<|start_header_id|>assistant<|end_header_id|> {{ end }} {{- end }} {{- end }} """ # 这一步参考 ollama 上的 parameters, llama3.2-3b 的 params: https://ollama.com/library/llama3.2/blobs/56bb8bd477a5 PARAMETER stop "<|start_header_id|>" PARAMETER stop "<|end_header_id|>" PARAMETER stop "<|eot_id|>"4.执行如下命令, 加载并运行离线模型
# 通过模型描述文件, 创建并运行 qwen2.5 模型
ollama create llama3.2 -f Modelfile
# 查看模型运行列表, 是否正在运行
ollama ls

# 通过 api 调用模型, 检测模型是否运行正常
curl --location --request POST 'http://127.0.0.1:11434/api/generate' \
--header 'Content-Type: application/json' \
--data '{
    "model": "llama3.2",
    "stream": false,
    "prompt": "你好, 24节气的第一个节气是什么?"
}' \
-w "Time Total: %{time_total}s\n"
如下图, 正常返回回答内容, 表示模型成功安装:
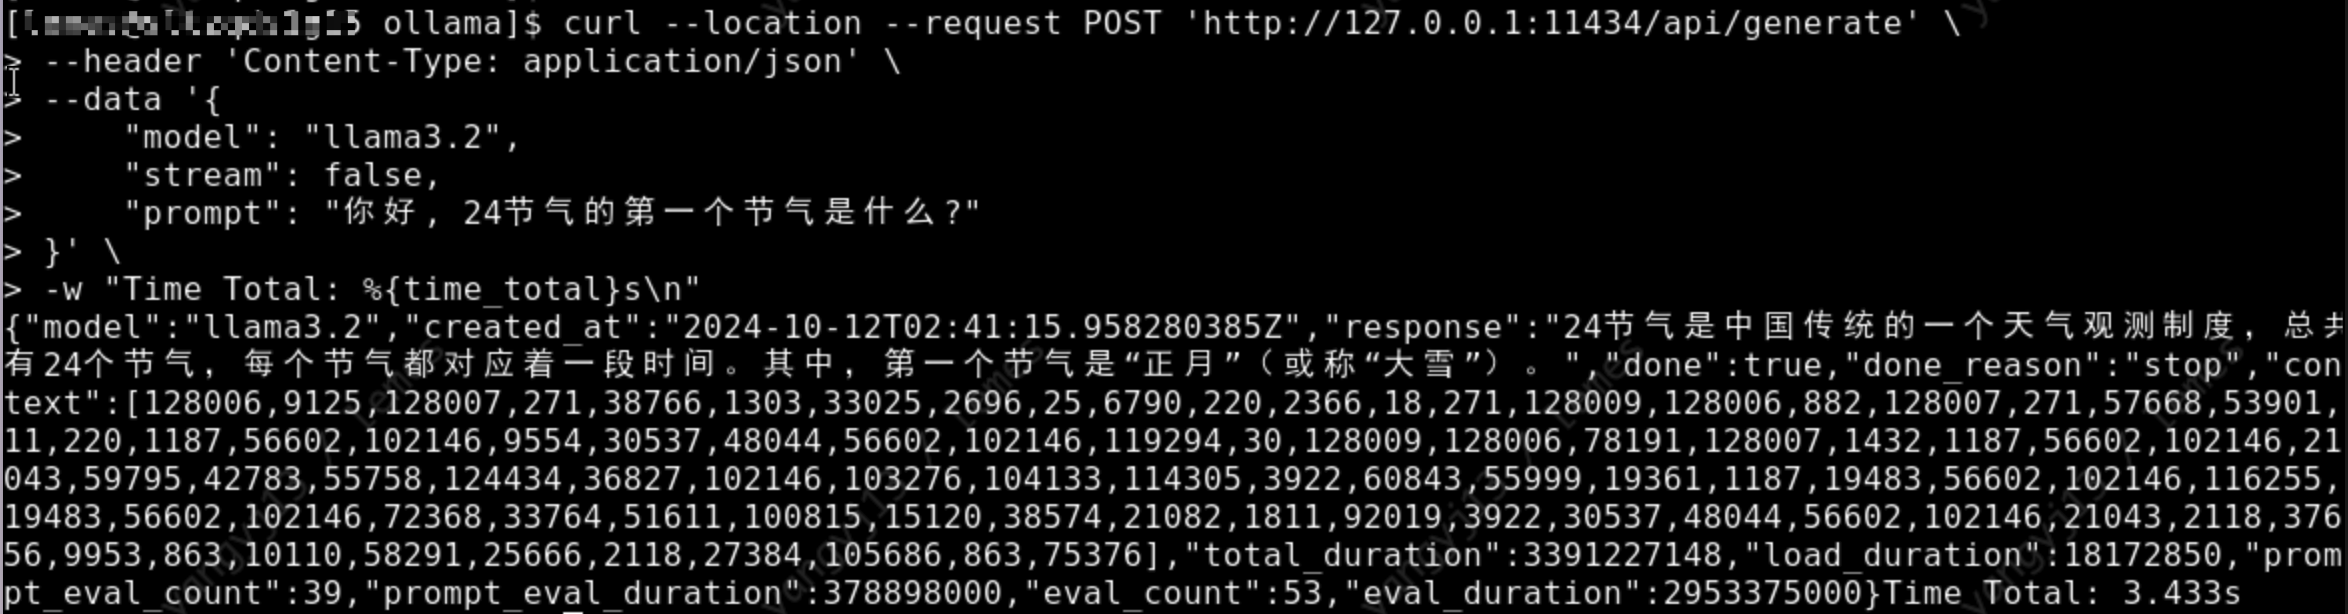 api/generate
最后
Ollama是非常好用的模型安装工具, 希望大家玩的开心!--------------------------------------------
Get up and running with Kimi-K2.6, GLM-5.1, MiniMax, DeepSeek, gpt-oss, Qwen, Gemma and other models.
Start building with open models.
curl -fsSL https://ollama.com/install.sh | shirm https://ollama.com/install.ps1 | iexcurl -fsSL https://ollama.com/install.sh | shThe official Ollama Docker image
ollama/ollamais available on Docker Hub.ollamaYou'll be prompted to run a model or connect Ollama to your existing agents or applications such as
Claude Code,OpenClaw,OpenCode,Codex,Copilot, and more.To launch a specific integration:
ollama launch claudeSupported integrations include Claude Code, Codex, Copilot CLI, Droid, and OpenCode.
Use OpenClaw to turn Ollama into a personal AI assistant across WhatsApp, Telegram, Slack, Discord, and more:
ollama launch openclawRun and chat with Gemma 4:
ollama run gemma4See ollama.com/library for the full list.
See the quickstart guide for more details.
Ollama has a REST API for running and managing models.
curl http://localhost:11434/api/chat -d '{
  "model": "gemma4",
  "messages": [{
    "role": "user",
    "content": "Why is the sky blue?"
  }],
  "stream": false
}'
See the API documentation for all endpoints.
pip install ollamafrom ollama import chat response = chat(model='gemma4', messages=[ { 'role': 'user', 'content': 'Why is the sky blue?', }, ]) print(response.message.content)
npm i ollamaimport ollama from "ollama"; const response = await ollama.chat({ model: "gemma4", messages: [{ role: "user", content: "Why is the sky blue?" }], }); console.log(response.message.content);
- llama.cpp project founded by Georgi Gerganov.
Want to add your project? Open a pull request.
- Open WebUI - Extensible, self-hosted AI interface
- Onyx - Connected AI workspace
- LibreChat - Enhanced ChatGPT clone with multi-provider support
- Lobe Chat - Modern chat framework with plugin ecosystem (docs)
- NextChat - Cross-platform ChatGPT UI (docs)
- Perplexica - AI-powered search engine, open-source Perplexity alternative
- big-AGI - AI suite for professionals
- Lollms WebUI - Multi-model web interface
- ChatOllama - Chatbot with knowledge bases
- Bionic GPT - On-premise AI platform
- Chatbot UI - ChatGPT-style web interface
- Hollama - Minimal web interface
- Chatbox - Desktop and web AI client
- chat - Chat web app for teams
- Ollama RAG Chatbot - Chat with multiple PDFs using RAG
- Tkinter-based client - Python desktop client
- Dify.AI - LLM app development platform
- AnythingLLM - All-in-one AI app for Mac, Windows, and Linux
- Maid - Cross-platform mobile and desktop client
- Witsy - AI desktop app for Mac, Windows, and Linux
- Cherry Studio - Multi-provider desktop client
- Ollama App - Multi-platform client for desktop and mobile
- PyGPT - AI desktop assistant for Linux, Windows, and Mac
- Alpaca - GTK4 client for Linux and macOS
- SwiftChat - Cross-platform including iOS, Android, and Apple Vision Pro
- Enchanted - Native macOS and iOS client
- RWKV-Runner - Multi-model desktop runner
- Ollama Grid Search - Evaluate and compare models
- macai - macOS client for Ollama and ChatGPT
- AI Studio - Multi-provider desktop IDE
- Reins - Parameter tuning and reasoning model support
- ConfiChat - Privacy-focused with optional encryption
- LLocal.in - Electron desktop client
- MindMac - AI chat client for Mac
- Msty - Multi-model desktop client
- BoltAI for Mac - AI chat client for Mac
- IntelliBar - AI-powered assistant for macOS
- Kerlig AI - AI writing assistant for macOS
- Hillnote - Markdown-first AI workspace
- Perfect Memory AI - Productivity AI personalized by screen and meeting history
- Ollama Android Chat - One-click Ollama on Android
SwiftChat, Enchanted, Maid, Ollama App, Reins, and ConfiChat listed above also support mobile platforms.
- Cline - VS Code extension for multi-file/whole-repo coding
- Continue - Open-source AI code assistant for any IDE
- Void - Open source AI code editor, Cursor alternative
- Copilot for Obsidian - AI assistant for Obsidian
- twinny - Copilot and Copilot chat alternative
- gptel Emacs client - LLM client for Emacs
- Ollama Copilot - Use Ollama as GitHub Copilot
- Obsidian Local GPT - Local AI for Obsidian
- Ellama Emacs client - LLM tool for Emacs
- orbiton - Config-free text editor with Ollama tab completion
- AI ST Completion - Sublime Text 4 AI assistant
- VT Code - Rust-based terminal coding agent with Tree-sitter
- QodeAssist - AI coding assistant for Qt Creator
- AI Toolkit for VS Code - Microsoft-official VS Code extension
- Open Interpreter - Natural language interface for computers
- LiteLLM - Unified API for 100+ LLM providers
- Semantic Kernel - Microsoft AI orchestration SDK
- LangChain4j - Java LangChain (example)
- LangChainGo - Go LangChain (example)
- Spring AI - Spring framework AI support (docs)
- LangChain and LangChain.js with example
- Ollama for Ruby - Ruby LLM library
- any-llm - Unified LLM interface by Mozilla
- OllamaSharp for .NET - .NET SDK
- LangChainRust - Rust LangChain (example)
- Agents-Flex for Java - Java agent framework (example)
- Elixir LangChain - Elixir LangChain
- Ollama-rs for Rust - Rust SDK
- LangChain for .NET - .NET LangChain (example)
- chromem-go - Go vector database with Ollama embeddings (example)
- LangChainDart - Dart LangChain
- LlmTornado - Unified C# interface for multiple inference APIs
- Ollama4j for Java - Java SDK
- Ollama for Laravel - Laravel integration
- Ollama for Swift - Swift SDK
- LlamaIndex and LlamaIndexTS - Data framework for LLM apps
- Haystack - AI pipeline framework
- Firebase Genkit - Google AI framework
- Ollama-hpp for C++ - C++ SDK
- PromptingTools.jl - Julia LLM toolkit (example)
- Ollama for R - rollama - R SDK
- Portkey - AI gateway
- Testcontainers - Container-based testing
- LLPhant - PHP AI framework
- AutoGPT - Autonomous AI agent platform
- crewAI - Multi-agent orchestration framework
- Strands Agents - Model-driven agent building by AWS
- Cheshire Cat - AI assistant framework
- any-agent - Unified agent framework interface by Mozilla
- Stakpak - Open source DevOps agent
- Hexabot - Conversational AI builder
- Neuro SAN - Multi-agent orchestration (docs)
- RAGFlow - RAG engine based on deep document understanding
- R2R - Open-source RAG engine
- MaxKB - Ready-to-use RAG chatbot
- Minima - On-premises or fully local RAG
- Chipper - AI interface with Haystack RAG
- ARGO - RAG and deep research on Mac/Windows/Linux
- Archyve - RAG-enabling document library
- Casibase - AI knowledge base with RAG and SSO
- BrainSoup - Native client with RAG and multi-agent automation
- LangBot - Multi-platform messaging bots with agents and RAG
- AstrBot - Multi-platform chatbot with RAG and plugins
- Discord-Ollama Chat Bot - TypeScript Discord bot
- Ollama Telegram Bot - Telegram bot
- LLM Telegram Bot - Telegram bot for roleplay
- aichat - All-in-one LLM CLI with Shell Assistant, RAG, and AI tools
- oterm - Terminal client for Ollama
- gollama - Go-based model manager for Ollama
- tlm - Local shell copilot
- tenere - TUI for LLMs
- ParLlama - TUI for Ollama
- llm-ollama - Plugin for Datasette's LLM CLI
- ShellOracle - Shell command suggestions
- LLM-X - Progressive web app for LLMs
- cmdh - Natural language to shell commands
- VT - Minimal multimodal AI chat app
- AppFlowy - AI collaborative workspace, self-hostable Notion alternative
- Screenpipe - 24/7 screen and mic recording with AI-powered search
- Vibe - Transcribe and analyze meetings
- Page Assist - Chrome extension for AI-powered browsing
- NativeMind - Private, on-device browser AI assistant
- Ollama Fortress - Security proxy for Ollama
- 1Panel - Web-based Linux server management
- Writeopia - Text editor with Ollama integration
- QA-Pilot - GitHub code repository understanding
- Raycast extension - Ollama in Raycast
- Painting Droid - Painting app with AI integrations
- Serene Pub - AI roleplaying app
- Mayan EDMS - Document management with Ollama workflows
- TagSpaces - File management with AI tagging
- Opik - Debug, evaluate, and monitor LLM applications
- OpenLIT - OpenTelemetry-native monitoring for Ollama and GPUs
- Lunary - LLM observability with analytics and PII masking
- Langfuse - Open source LLM observability
- HoneyHive - AI observability and evaluation for agents
- MLflow Tracing - Open source LLM observability
- pgai - PostgreSQL as a vector database (guide)
- MindsDB - Connect Ollama with 200+ data platforms
- chromem-go - Embeddable vector database for Go (example)
- Kangaroo - AI-powered SQL client
- Google Cloud
- Fly.io
- Koyeb
- Harbor - Containerized LLM toolkit with Ollama as default backend
from https://github.com/ollama/ollama
No comments:
Post a Comment