Total Pageviews

Saturday 11 January 2020

DNSUpdater - Dynamic DNS

Update DNS records on local or remote (over SSH or HTTP) DNS server.
Using this application you can update DNS records on local or remote (over SSH or HTTP) DNS server (eg. PowerDNS).
For example if you have dynamic IP you can use this application to automatically update DNS record with your external IP.

Installation

First you need to have Ruby and RubyGems. Then you can install it with:
$ gem install DNSUpdater

Install Systemd service files

$ cp service/dnsupdater.{service,timer} /etc/systemd/system/
$ systemctl enable dnsupdater.timer
Note that you'll need to edit /etc/systemd/system/dnsupdater.service to set target domain.

Configure

Create /etc/dnsupdater.yaml with your settings, take a look at config_example.yaml.
By default configuration file will be looked into current directory as config.yaml or in /etc/dnsupdater.yaml. But you can specify any config path with -c flag.

Usage

$ updateDNS -h
Usage: updateDNS [options] <target>
    -c, --config config.yaml         Path to config file
    -t, --target=PROTOCOL            Target protocol (useful for SSH)
    -s, --serve                      Serve/handle HTTP
    -h, --help                       Show this message

Supported targets are: http, https, powerdns, ssh
Target examples:
* default:///example.com/10.0.0.1
* ssh://dns.example.com:123/example.org/client
* http://example.org/dns.example.com/127.0.0.1,192.168.1.1

Update DNS record on locally installed PowerDNS

$ updateDNS powerdns:///domain.example.com/192.168.1.1
Note that you'll need to set PowerDNS HTTP API key in config.

Update DNS record on remote PowerDNS over SSH with current external IP

$ updateDNS ssh://ssh.example.org/domain.example.com/client
client as IP means that DNS record will be updated with your external IP (client IP from target DNS server point).
SSH settings can also be configured in ~/.ssh/config which will be respected.

HTTP server mode

DNSUpdater can also work as HTTP server and update DNS records from clients.
$ updateDNS --serve http://192.168.1.2/
For authentication you'll need to set SharedSecret in config. Also I recommend placing it behind Nginx.
Then clients can do
$ updateDNS http://192.168.1.2/domain.example.com/client
PS. It also accepts DynDNS format: /nic/update?hostname=yourhostname&myip=ipaddress

Update DNS record on firewalled remote PowerDNS over SSH with HTTP

Suppose you have 3 machines:
A - internal firewalled PowerDNS server which isn't accessible publicly.
B - publicly accessible HTTP server.
C - client who's external IP you want to set.
On B you would run updateDNS -s in HTTP server mode configured that it updates PowerDNS on A over SSH.
On C you would run updateDNS https://B/mydomain.example.com/client

Updaters/Providers

Basically currently there's support only for PowerDNS and don't have BIND support, but it should be pretty easy to add support for others so just send a PR :)

Documentation

YARD with markdown is used for documentation (redcarpet required)

Specs

RSpec and simplecov are required, to run tests just rake spec code coverage will also be generated
from https://github.com/davispuh/DNSUpdater
----------------------------

基于CloudFlare的DDNS解析


前提条件
要自建DDNS服务,首先必须要有自己的域名且域名已经接入 Cloudflare (即DNS为CF提供的地址),另外就是使用阿里云解析、DNSPOD云解析、Cloudflare云解析等服务,本次教程以 Cloudflare 为例。

1. 获取CFKEY

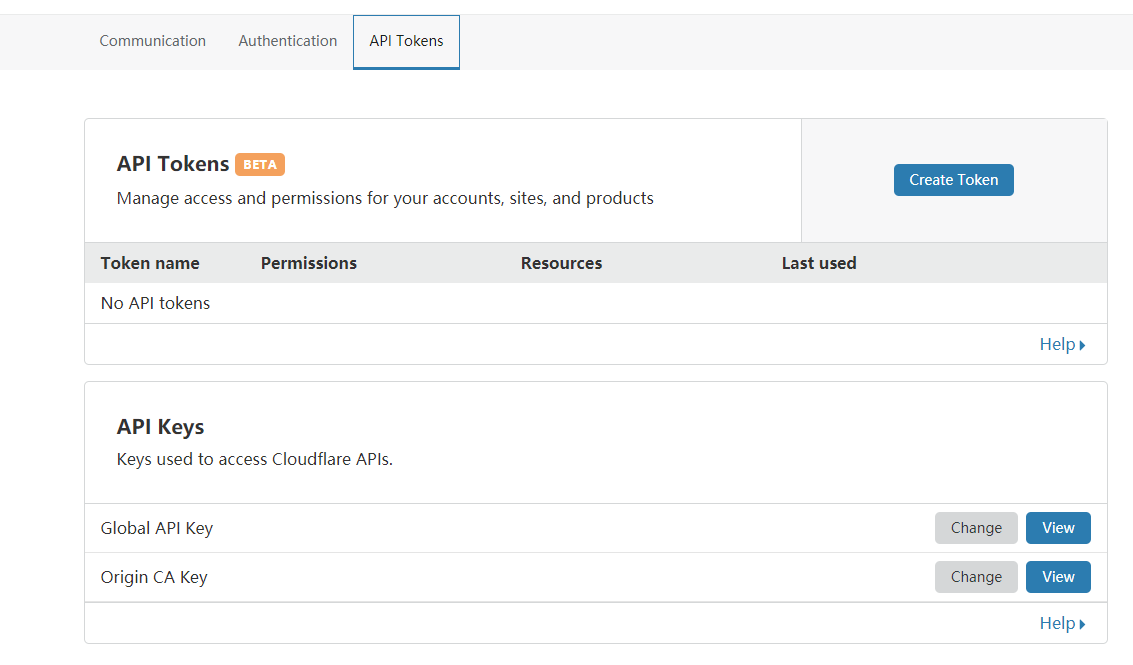
在页面下方找到【Global API Key】,点击右侧的View,查看Key,并保存下来

2. 设置用于 DDNS 解析的二级域名

在 Cloudflare 中新建一个A记录,如:ddns.yourdomain.com,指向 1.1.1.1
(可随意指定,如123.123.123.123等等,主要用于后续查看 DDNS 是否生效)

3. 下载 DDNS 脚本

4. 修改 DDNS 脚本并填写相关信息

您可在线使用 nano/vi/vim 等工具进行修改,也可以下载到本地进行修改再上传覆盖!
可以参考下面命令使用vi进行编辑
vi cf-v4-ddns.sh  
然后按小写字母 i 进入编辑模式
# API key, see https://www.cloudflare.com/a/account/my-account,  # 这里填写上一步获取的CFKEY  CFKEY=    #输入你需要解析用来DDNS解析的根域名 eg: example.com,比如我的域名是123.com,那么此处填写123.com  CFZONE=    # 登陆CF的Username, eg: user@example.com(即CF的登录邮箱)  CFUSER=    # 填写用来DDNS解析的二级域名,与上面设置的要一致, eg: ddns.yourdomain.com(例 ddns.123.com)  CFHOST=  
全部填写完毕后按左上角的Esc退出编辑模式,然后输入 :wq 它会自动保存并退出

5. 脚本授权并执行

chmod +x cf-v4-ddns.sh  ./cf-v4-ddns.sh  
如果脚本相关信息填写正确,输出内容会显示当前母鸡IP,登录 Cloudflare DNS选项 查看之前设置的 1.1.1.1 已变为母鸡IP

6. 设置定时任务

输入 crontab -e  然后会弹出 vi 编辑界面,按小写字母 i 进入编辑模式,在文件里面添加一行:    */2 * * * * /root/cf-v4-ddns.sh >/dev/null 2>&1    
如果您需要日志文件,上述代码请替换成下面代码


\#如果您需要日志文件,输入下面命令  */2 * * * * /root/cf-v4-ddns.sh >> /var/log/cf-ddns.log 2>&1    
至此,教程结束!
------------

利用CloudFlare设置Dynamic DNS(DDNS),获取动态IP


2018/07/05:增加一个Python 脚本,支持 Python2 和 Python3。Shell 脚本和 Python 脚本均支持 Cloudflare 的 v4 API,使用其中一个即可。
2018/07/04:第一版教程的脚本比较旧,用的 API 不再被 CloudFlare 支持。新教程改用Benkulbertis 的 shell 脚本,设置也更为简单。此脚本需要系统支持 grep 的-P 参数,部分系统可能无法使用,会报错grep: the -P option is not supported。目前在 CentOS 7、Ubuntu 16.04 测试通过,已知可能不支持的系统有 OS X、Debian、FreeBSD。
Larrybolt 的 shell 脚本(这个似乎已经失效)

简介

如果买了动态 IP 的 VPS 或服务器,IP 会经常改变。这时,就可以通过 DDNS 来获取动态 IP。部分商家可能不提供 DDNS,需要自己搭建。假设你已经有了一个域名 mydomain.com,想要设置域名 ddns.mydomain.com 获取最新的动态 IP。

获取 API

如果域名没有使用 CloudFlare 的 DNS 解析服务,首先要在 CloudFlare 按提示添加域名 mydomain.com,把域名的 DNS 服务器改为 CloudFlare,增加对应域名的 A 记录 ddns.mydomain.com。TTL 可设为 2 分钟或自动。注意,DDNS 使用的域名不要开启 CloudFlare 的 CDN,只用 CF 的 DNS 解析功能,也就是 status 一列对应域名的图标要是灰色的。
添加好域名解析后,前往https://www.cloudflare.com/a/profile获取 Global API,把 API 一长串字符复制保存下来。注意,这串 API 不要泄露给其他人。

Shell 脚本

获取脚本

得到 API 后,在 VPS 中下载脚本到/usr/local/bin 目录,把脚本命名为 cf-ddns.sh,并修改脚本的权限:
  1. curl https://gist.githubusercontent.com/benkulbertis/fff10759c2391b6618dd/raw > /usr/local/bin/cf-ddns.sh && chmod +x /usr/local/bin/cf-ddns.sh
一般系统都会带有 curl,但如果出错,就需要先安装 curl,具体安装方法可以谷歌或百度一下。

配置

打开脚本进行配置:
  1. vi /usr/local/bin/cf-ddns.sh
找到以下内容并修改:
  1. auth_email="user@example.com"
  2. auth_key="c2547eb745079dac9320b638f5e225cf483cc5cfdda41" # found in cloudflare account settings
  3. zone_name="example.com"
  4. record_name="www.example.com"
其中,在 auth_email 中填入 CloudFlare 账号的邮箱,在 auth_key 输入前面获取的 API,zone_name 填入域名 mydomain.com,record_name 填入 DDNS 的域名 ddns.mydomain.com
修改完后,保存退出。输入bash /usr/local/bin/cf-ddns.sh运行脚本,如果提示IP changed to: X.X.X.X,表明配置成功。

crontab 定时运行

脚本配置成功后,需要让它定时运行。这里设置每 10 分钟运行一次 cf-ddns.sh 脚本。
输入crontab -e,然后会弹出 vi 编辑界面,在里面添加一行:
  1. */10 * * * * /usr/local/bin/cf-ddns.sh >/dev/null 2>&1
保存并退出。输入service crond status,可以看到 contab 的运行状态。如果 contab 服务没有打开,建议参考http://man.linuxde.net/crontab教程,它涵盖了 crontab 服务状态的启动、重启、查看、简单配置等内容。另外也可以看看http://linuxtools-rst.readthedocs.io/zh_CN/latest/tool/crontab.htmlhttp://www.runoob.com/linux/linux-comm-crontab.html

日志文件

脚本获取 IP 更改 CloudFlare 的 DNS 记录后,会在目录中生成 ip.txt、cloudflare.ids 和 cloudflare.log 三个文件。ip.txt 记录的是本机的 IP。脚本自动获取到 IP 后,会先与 ip.txt 中的 IP 进行比较,当不一致时(检测到 IP 发生变化),才会更新 CloudFlare 的 DNS 记录,并且把新 IP 写入 ip.txt 文件中。如果 IP 没变化,运行脚本会提示IP has not changed。如果要强制运行脚本更新 DNS 记录,可以rm /usr/local/bin/ip.txt删除掉 ip.txt。
如果运行忽然出问题,可以试试rm /usr/local/bin/cloudflare.ids把 cloudflare.ids 文件和 ip.txt 文件删除掉,再重新运行脚本。

Python 脚本

获取脚本

  1. curl https://raw.githubusercontent.com/AmirAzodi/cloudflare_ddns/master/cf-ddns.py > /usr/local/bin/cf-ddns.py && curl https://raw.githubusercontent.com/AmirAzodi/cloudflare_ddns/master/cf-ddns.conf > /usr/local/bin/cf-ddns.conf && chmod +x /usr/local/bin/cf-ddns.py

配置

打开配置文件:
  1. vi /usr/local/bin/cf-ddns.conf
按提示修改以下内容:
  1. {
  2. "domains": [
  3. {
  4. "hosts": [
  5. {
  6. "id": "",
  7. "ipv4": "",
  8. "ipv6": "",
  9. "name": "ddns", #以 ddns.mydomain.com 为例,此处填入 ddns
  10. "types": ["A"]
  11. }
  12. ],
  13. "id": "",
  14. "name": "mydomain.com" #以 ddns.mydomain.com 为例,此处填入 mydomain.com
  15. }
  16. ],
  17. "user": {
  18. "api_key": "CLOUDFLARE_API_KEY_HERE", #填入 API
  19. "email": "CLOUDFLARE_EMAIL_HERE" #填入 CloudFlare 邮箱
  20. }
  21. }
保存并退出,输入python /usr/local/bin/cf-ddns.py运行脚本,如果提示内容有update successful,表明运行成功。

crontab 定时运行

跟第一个脚本类似,输入crontab -e,然后会弹出 vi 编辑界面,在里面添加一行:
  1. */10 * * * * /usr/local/bin/cf-ddns.py >/dev/null 2>&1

更多脚本

如果以上都不能使用,可以尝试换其他的,不过这些本人没尝试过:
https://github.com/gstuartj/cf-ddns.sh

from https://www.zhaozhuji.net/149.html
--------------------------------------

利用 CloudFlare API 实现自动 DDNS 功能|支持IPv4|IPv6

不知道什么时候起,宽带变成了 N 级 NAT,花生壳、ORAY、NO-IP 等基于动态公网 IP 的 DDNS 服务全线倒地,虽然 FRPNGROK 这些内网穿透依然可以实现类 DDNS 功能,但网络严重依赖于中转服务器带宽,不是非常适合有大流量需求的业务,比如监控、云盘、同步等等。
最近发现本地宽带终于支持 IPv6 了,DDNS 就又可以搞起来了,考虑到安全问题,本文将探讨使用 CloudFlare API 来实现 DDNS 功能。
对了,DDNS 是指动态 DNS(英语:Dynamic DNS)是域名系统(DNS)中的一种自动更新名称服务器(Name Server)内容的技术,根据互联网的域名订立规则,域名必须有固定的 IP 地址,动态 DNS 系统就是为动态 IP 提供一个固定的名称服务器(Name Server),通过即时更新,使外界用户能够连上使用动态 IP 用户的网址。

一、思路

虽然现在上了 IPv6,可以直接与外界通信,但仍然不是静态 IP,即重新拨号或重新联网后,IP 会发生变更,根据 DDNS 原理,可以通过实时监测公网 IP,判断是否发生变更,一旦监测到发生变更,则立即更新 DNS 记录。

二、实现

CloudFlare 以前就有介绍过,是一家功能十分强大的电信服务提供商,今天我们就是通过其 DNS 管理和 API 功能来实现上述思路。

1、SHELL 脚本代码

#!/bin/bash

###############  授权信息(需修改成你自己的) ################ 
# CloudFlare 注册邮箱
auth_email="cf@vircloud.net" 
# CloudFlare Global API Key,下一节会说到
auth_key="123456789"  
# 做 DDNS 的根域名
zone_name="vircloud.net" 
# 做 DDNS 的域名,创建成功后就是通过该域名访问内网资源
record_name="www.vircloud.net"

######################  修改配置信息 ####################### 
# 域名类型,IPv4 为 A,IPv6 则是 AAAA
record_type="AAAA"
# IPv6 检测服务,本站检测服务仅在大陆提供
ip=$(curl -s https://ipv6.vircloud.net)
# IPv4 检测服务
#ip=$(curl -s https://ipv4.vircloud.net)
# 变动前的公网 IP 保存位置
ip_file="ip.txt"
# 域名识别信息保存位置
id_file="cloudflare.ids"
# 监测日志保存位置
log_file="cloudflare.log"

######################  监测日志格式 ######################## 
log() {
    if [ "$1" ]; then
        echo -e "[$(date)] - $1" >> $log_file
    fi
}
log "Check Initiated"

######################  判断 IP 是否变化 #################### 
if [ -f $ip_file ]; then
    old_ip=$(cat $ip_file)
    if [ "$ip" == "$old_ip" ]; then
        echo "IP has not changed."
        exit 0
    fi
fi

######################  获取域名及授权 ###################### 
if [ -f $id_file ] && [ $(wc -l $id_file | cut -d " " -f 1) == 2 ]; then
    zone_identifier=$(head -1 $id_file)
    record_identifier=$(tail -1 $id_file)
else
    zone_identifier=$(curl -s -X GET "https://api.cloudflare.com/client/v4/zones?name=$zone_name" -H "X-Auth-Email: $auth_email" -H "X-Auth-Key: $auth_key" -H "Content-Type: application/json" | grep -Po '(?<="id":")[^"]*' | head -1 )
    record_identifier=$(curl -s -X GET "https://api.cloudflare.com/client/v4/zones/$zone_identifier/dns_records?name=$record_name&type=$record_type" -H "X-Auth-Email: $auth_email" -H "X-Auth-Key: $auth_key" -H "Content-Type: application/json"  | grep -Po '(?<="id":")[^"]*')
    echo "$zone_identifier" > $id_file
    echo "$record_identifier" >> $id_file
fi

######################  更新 DNS 记录 ###################### 
update=$(curl -s -X PUT "https://api.cloudflare.com/client/v4/zones/$zone_identifier/dns_records/$record_identifier" -H "X-Auth-Email: $auth_email" -H "X-Auth-Key: $auth_key" -H "Content-Type: application/json" --data "{\"id\":\"$zone_identifier\",\"type\":\"$record_type\",\"name\":\"$record_name\",\"content\":\"$ip\"}")

#########################  更新反馈 ######################### 
if [[ $update == *"\"success\":false"* ]]; then
    message="API UPDATE FAILED. DUMPING RESULTS:\n$update"
    log "$message"
    echo -e "$message"
    exit 1 
else
    message="IP changed to: $ip"
    echo "$ip" > $ip_file
    log "$message"
    echo "$message"
fi
Sh

2、获取授权信息

使用 CloudFlare "DDNS 服务" 需要把域名托管到 CloudFlare,此处不做介绍,自行搜索。
在 DNS 页面,由于我们要达到的是 DDNS 效果,所以 CDN 不要开启,即这朵云保持灰色状态(默认是开启的).
其中 Type 是你要设置的 IP 类型,Name 是要做为连接的域名, Value 第一次可以随便设一个,TTL 2 minutes 或者 Automatic 都可以,再次强调 Status 这朵云不要点亮。
在 个人信息页面 下滑到 API Keys,把 Global API Key 一串字符贴到上述脚本中的 auth_key.

3、执行结果

~# chmod +x ddns.sh 
~# ./ddns.sh
IP changed to: ****
~# ./ddns.sh 
IP has not changed.
Sh

4、定时运行

由于无法得知运营商什么时候会把 IP 变了,所以我们可以设置定时运行脚本来实现实时监控 并更新 IP 的变化。比如通过 crontab 实现:
~# crontab -e
......
0 */1 * * *  /root/ddns.sh >/dev/null 2>&1
......
Sh
可以通过 cloudflare.log 来查看历史执行记录。

5、错误分析

问题
~# ./ddns.sh 
API UPDATE FAILED. DUMPING RESULTS:
{"success":false,"errors":[{"code":6007,"message":"Malformed JSON in request body"}],"messages":[],"result":null}
Sh
分析
猜测是网络原因引起的,概率出现这个提示,如若出现忽略再执行一次即可。
问题
~# ./ddns.sh 
API UPDATE FAILED. DUMPING RESULTS:
{"success":false,"errors":[{"code":7003,"message":"Could not route to \/zones\/dns_records, perhaps your object identifier is invalid?"},{"code":"7000","message":"No route for that URI"}],"messages":[],"result":null}
Sh
分析
再次确认邮箱、域名、KEY 等信息是否正确,不然就是获取 IP 时出现错误(本站 IP 检测服务仅在大陆提供)。

三、总结

自己搭建 DDNS 最大的好处在于可以充分发挥宽带的带宽,不再局限于服务端的限制,其次安全性有了保证,可以不受服务提供者的记录。
其实并不仅仅 CloudFlare 可以实现,其他支持 API 更新 DNS 的 DNS 服务商理论上都支持通过上面的方法来实现 DDNS,而且从网络大环境而言,国内的服务商肯定会比国外的稳定。
文中 IP 检测工具是真实有效的,大家都可以引用,但是请合理使用(建议 30 分钟检测一次即可),因为最近发现服务器负载过大,查了一下日志,好几个 IP 一天几万次请求,显然已经超过正常合理使用范畴,为保证服务可用,目前已经屏蔽这些 IP。
参考:
-----------

用 cURL 自動更新 Cloudflare IP 地址實現 DDNS


 授權

這種涉及賬戶的請求肯定需要授權,首先登錄自己的 Cloudflare 帳號,然後在「My Profile」創建一個「API Token」(不是底下的 API Key 哦),並且加入 Zone.Zone, Zone.DNS 的權限。


然後就有 -H “Authorization: Bearer xxxxxxxx” 這個的用法了,下面只需要使用這個就好了。

獲得 ZoneID 和 Record ID

先拿到自己的所有的 Zones,找到自己對應域名的 Zone ID:

curl -X GET "https://api.cloudflare.com/client/v4/zones" -H "Authorization: Bearer xxxxxxxx"      -H "Content-Type:application/json"

然後找到對應的 Record 的 ID:


curl -X GET "https://api.cloudflare.com/client/v4/zones/<域名的 ZoneID>/dns_records" -H "Authorization: Bearer xxxxxxx"      -H "Content-Type:application/json"

修改 Record 解析

然後就可以通過如下來修改自己的 DNS 解析了,比如我希望修改 home.nova.moe 的解析爲 1.2.3.4,那麼可以這麼寫:

curl -X PUT "https://api.cloudflare.com/client/v4/zones/<域名的 ZoneID>/dns_records/<Record 的 ZoneID>" \

     -H "Authorization: Bearer xxxxxxx" \

     -H "Content-Type: application/json" \

     --data '{"type":"A","name":"home.nova.moe","content":"1.2.3.4","ttl":120,"proxied":false}'

連貫起來自動獲取公網 IP 並設置就是:

home_ip=$(curl ip.sb)

curl -X PUT "https://api.cloudflare.com/client/v4/zones/<域名的 ZoneID>/dns_records/<Record 的 ZoneID>" \

     -H "Authorization: Bearer xxxxxxx" \

     -H "Content-Type: application/json" \

     --data '{"type":"A","name":"home.nova.moe","content":"'$home_ip'","ttl":120,"proxied":false}'

注意上面 cURL 中的 $home_ip 是用 ‘(單引號)包裹的。


Cloudflare 對於 API 請求的限制如下:

The Cloudflare API sets a maximum of 1,200 requests in a five minute period.

https://api.cloudflare.com/#getting-started-requests

好,搞個 crontab 開跑,免費的 DDNS 成了。


References

https://api.cloudflare.com/#dns-records-for-a-zone-update-dns-record

------

https://github.com/yulewang/cloudflare-api-v4-ddns

https://github.com/EdNovas/vpstoolbox/raw/main/cf-v4-ddns.sh

https://github.com/EdNovas/vpstoolbox/blob/main/cf-v4-ddns.sh

------

Cloudflare的DDNS服务,免费解析动态域名


脚本地址

https://github.com/yulewang/cloudflare-api-v4-ddns

获取 KEY

访问 https://dash.cloudflare.com/profile 在页面下方找到 Global API Key,点击右侧的 View 查看 Key,并保存下来 ,在页面下方找到 Global API Key,点击右侧的 View 查看 Key,并保存下来

解析域名

设置用于 DDNS 解析的二级域名,流量不经过 CDN (云朵变灰)

添加一条 A 记录,例如:hkt.test.com,Proxy status 设置成 DNS only

ipv4 地址随意就行

运行脚本

下载 DNNS 脚本

curl https://raw.githubusercontent.com/aipeach/cloudflare-api-v4-ddns/master/cf-v4-ddns.sh > /root/cf-v4-ddns.sh && chmod +x /root/cf-v4-ddns.sh

配置信息

修改 DDNS 脚本并补充相关信息

vi cf-v4-ddns.sh
# incorrect api-key results in E_UNAUTH error
# 填写 Global API Key
CFKEY=

# Username, eg: user@example.com
# 填写 CloudFlare 登陆邮箱
CFUSER=

# Zone name, eg: example.com
# 填写需要用来 DDNS 的一级域名
CFZONE_NAME=

# Hostname to update, eg: homeserver.example.com
# 填写 DDNS 的二级域名(只需填写前缀)
CFRECORD_NAME=

首次运行脚本,输出内容会显示当前 IP,进入 cloudflare 查看 确保 IP 已变更为当前 IP

./cf-v4-ddns.sh

设置定时任务

crontab -e
*/2 * * * * /root/cf-v4-ddns.sh >/dev/null 2>&1
# 如果需要日志,替换上面的代码
*/2 * * * * /root/cf-v4-ddns.sh >> /var/log/cf-ddns.log 2>&1

转载自 https://aipeach.gitbook.io/blogbackup/cloudflare-da-jian-ddns-jiao-ben-ban#huo-qu-global-api-key
https://github.com/EdNovas/cloudflare-api-v4-ddns