准备工作
下面列出了笔者测试成功的环境,使用其它的版本可能出现不可预料的情况。
硬件
显卡
根据 Tensorflow 官网上对于 GPU 支持的描述,需要 CUDA® 计算能力为 3.5 或更高的 NVIDIA® GPU 卡。GeForce 900 系列及更新的 N 卡都能满足这一点,如果不确定的话,可以在官网上查看:CUDA GPUs。笔者使用了一块 NVIDIA GeForce RTX 2070 进行测试。其它
其它硬件达到主流配置即可。
软件
Windows 系统
由于 macOS Mojave 的 N 卡驱动迟迟没有更新(据说是苹果已经抛弃了 N 卡,未来很有可能不会再更新驱动);并且 Tensorflow 官方已经不再推出适配 macOS 的tensorflow-gpu了,需要自己编译;因而使用 Windows 或者 Linux 系统会是更好的选择。笔者使用的是 Windows 10。显卡驱动程序
在连接到网络时,Windows 10 会自动下载安装显卡驱动,但可能不是最新版本。建议通过 GeForce Experience 管理驱动程序。CUDA
tensorflow-gpu依赖于 CUDA,需要到 NVIDIA 官网上的 CUDA Zone 下载。Tensorflow 官网中会给出支持的 CUDA 版本号,下载时选择对应的版本即可(例如 v10.0),因为最新的版本可能不被 tensorflow 所支持。历史版本可以在这里查看:CUDA Toolkit Archive。cuDNN
cuDNN 的全称为 NVIDIA CUDA® Deep Neural Network library,是 NVIDIA 专门针对深度神经网络(Deep Neural Networks)中的基础操作而设计基于 GPU 的加速库。这也是一个重要依赖,需要准备好。其主页是 NVIDIA cuDNN,下载需要注册账号,不过也可以选择微信快捷登陆。同样需要注意的是,要正确选择与 CUDA 对应的 cuDNN 版本。Python
笔者使用的是 Python 3.7.0。建议从 Python 官网下载安装包,安装时记得勾选将 Python 添加到环境变量中,确保能够通过 PowerShell 执行python和pip即可。Microsoft Store 中也有 Python,但是安装路径太长,可能在使用pip时遇到问题。tensorflow-gpu
安装tensorflow-gpu的方法也有很多,例如 Anaconda 或者 pip。如果不想折腾环境,直接从这里找一个 wheel 就行了:tensorflow-gpu · PyPI。需要根据自己的系统和 Python 版本选择,例如tensorflow_gpu-1.13.1-cp37-cp37m-win_amd64.whl。
安装
安装 CUDA
安装过程并不复杂。运行从 NVIDIA 官网上下载的 CUDA 安装程序,将其安装在默认目录下即可。以 10.0 版本为例,安装成功后,相关组件会出现在 C:\Program Files\NVIDIA GPU Computing Toolkit\CUDA\v10.0 目录下。
安装 cuDNN
解压 cuDNN 的安装包,会得到一个文件夹,将其打开后,可以看到名为 bin,include 和 lib 的子目录。而在前面所说的 C:\Program Files\NVIDIA GPU Computing Toolkit\CUDA\v10.0 目录下也有这样几个子目录。因此,直接将 cuDNN 的相关文件复制合并进对应的目录即可。
安装 tensorflow-gpu
以 PowerShell 为例,将 CUDA 相关组件添加至环境变量:
$Env:path=$Env:Path+";C:\Program Files\NVIDIA GPU Computing Toolkit\CUDA\v10.0\bin;C:\Program Files\NVIDIA GPU Computing Toolkit\CUDA\v10.0\extras\CUPTI\libx64;" |
完成后,cd 进入下载的 whl 文件所在目录,使用 pip 安装即可
pip install tensorflow_gpu-1.13.1-cp37-cp37m-win_amd64.whl |
pip 会自动下载所需的依赖。
运行
如果一切顺利,打开 Python,执行
import tensorflow as tf |
不报错的话,就安装成功了。
本文更新于 2020 年 12 月 8 日:Tensorflow 2.0 的安装方式更加简单。在安装好支持的 CUDA(现为 v10.1)和 cuDNN 后,可以直接执行
pip install tensorflow |
测试的方法是
import tensorflow as tf |
如果提示动态库加载失败,可以重启计算机或手动设置环境变量。
--------------------------------------------------------------------
在Windows 10上,搭建TensorFlow,试玩 fast-style-transfer
本文适用于 TensorFlow 新手搭建试玩“图片快速风格迁移”,系统环境:
- Windows 10
- 显卡 NVIDIA GTX 1070
安装 TensorFlow 环境
用 Anaconda 来装环境可以省很多事。
-
安装 Anaconda,步骤中有两个选项记得勾上(添加 PATH 环境变量和使用 Anaconda 作为 Python 环境)
-
现在的 Anaconda 似乎已经内置了国内的几个镜像源,所以不用手动切换镜像,用默认配置即可
如果已经折腾过,可以考虑用如下命令恢复:
conda config --remove-key channelsconda config --add channels https://mirrors.tuna.tsinghua.edu.cn/anaconda/pkgs/free/conda config --set show_channel_urls yes-
如果你像我一样只是个入门玩家(并且平时没装过 Python 环境),那就不用搞 conda 的环境隔离了。直接执行
conda install tensorflow-gpu,然后等待
如果一切顺利的话 Tensorflow 环境就装好了(如果不顺利的话可能多半是网络问题,重试执行下试试)。
目前我用默认参数装好的 TF 版本是 1.14,lengstrom/fast-style-transfer 刚好只能在 TF v1.x 上用。
图片快速风格迁移:
克隆仓库,然后下载已经训练好的风格,放到 model 目录下。
弄好以后就可以开始玩了,仓库根目录下执行:
python evaluate.py --checkpoint model/udnie.ckpt --in-path eval/ --out-path result/如果报错,请参考报错处理解决。
如果要创建新风格,需要自己训练。先下载训练所需数据:
不要下其他的,就用 beta16 目录下的,否则后面训练时会报错。新手入门就按部就班吧,别折腾。
下载好后将 train2014.zip 解压到 data 目录下,imagenet-vgg-verydeep-19.mat 直接放到 data 目录下,可参考根目录下的 setup.sh 脚本。
├─data│ │ imagenet-vgg-verydeep-19.mat│ ││ ├─bin│ └─train2014│ COCO_train2014_000000000009.jpg│ COCO_train2014_000000000025.jpg然后根目录下执行:
python style.py --style style/1.jpg --checkpoint-dir checkpoint --content-weight 1.5e1 --checkpoint-iterations 1000 --batch-size 12大概经过 6 小时以后训练完成,在 checkpoint 目录下生成了模型文件:
checkpointfns.ckpt.data-00000-of-00001fns.ckpt.indexfns.ckpt.meta将 fns.ckpt.meta 复制一个,重命名为 fns.ckpt,然后就可以使用评估方法来生成图片了:
python evaluate.py --checkpoint checkpoint/fns.ckpt --in-path eval/ --out-path result/报错处理
AttributeError: 'module' object has no attribute 'imread',执行:
pip install --upgrade scipy==1.1.0ImportError: No module named moviepy.video.io.VideoFileClip,执行:pip install moviepycudaGetDevice() failed. Status: CUDA driver version is insufficient for runtime version,升级显卡驱动就行了tensorflow.python.framework.errors_impl.ResourceExhaustedError: OOM when allocating tensor with shape,降低--bach-size参数就行了,8G 显存的话设置为 12
其他好玩的库
该仓库的输入是待处理图片 + 风格图片,边训练边生成,优点是方便切换风格,缺点是每次生成大概需要好几分钟。imagenet-vgg-verydeep-19.mat 和 train2014 可以用上面下载好的。
python neural_style.py --content examples/test.png --styles examples/style/udnie.jpg --output test-result.jpg
--------------------------------------------------------------------------------------------------
(Facebook 的物体识别平台Detectron
Detectron是 Facebook AI
研究院(简称FAIR)开源的物体图像识别平台, 该项目自 2016 年 7 月启动, 遵循Apache 2.0
开源许可证。Detectron构建于 Caffe2 之上,包含大量机器学习算法以及超过 70 个预先训练的模型,包括 Mask
R-CNN(何恺明的研究,ICCV 2017 最佳论文)和 Focal Loss for Dense Object
Detection,(ICCV 2017 最佳学生论文),以及广泛使用的 R-CNN 算法等,
该工具包已被应用与Facebook内部团队的各类应用。训练完毕的模型可通过Caffe 2 运行部署在云服务器和移动设备上。科研社区可以重复
Facebook 论文中的实验结果,发展和应用于自己的视觉感知系统中。
[repo owner=”facebookresearch” name=”Detectron”])
Installing Detectron
This document covers how to install Detectron, its dependencies (including Caffe2), and the COCO dataset.
- For general information about Detectron, please see
README.md.
Requirements:
- NVIDIA GPU, Linux, Python2
- Caffe2, various standard Python packages, and the COCO API; Instructions for installing these dependencies are found below
Notes:
- Detectron operators currently do not have CPU implementation; a GPU system is required.
- Detectron has been tested extensively with CUDA 8.0 and cuDNN 6.0.21.
Caffe2
To install Caffe2 with CUDA support, follow the installation instructions from the Caffe2 website. If you already have Caffe2 installed, make sure to update your Caffe2 to a version that includes the Detectron module.
Please ensure that your Caffe2 installation was successful before proceeding by running the following commands and checking their output as directed in the comments.
# To check if Caffe2 build was successful
python -c 'from caffe2.python import core' 2>/dev/null && echo "Success" || echo "Failure"

# To check if Caffe2 GPU build was successful
# This must print a number > 0 in order to use Detectron
python -c 'from caffe2.python import workspace; print(workspace.NumCudaDevices())'
If the caffe2 Python package is not found, you likely need to adjust your PYTHONPATH environment variable to include its location (/path/to/caffe2/build, where build is the Caffe2 CMake build directory).
Other Dependencies
Install the COCO API:
# COCOAPI=/path/to/clone/cocoapi
git clone https://github.com/cocodataset/cocoapi.git $COCOAPI
cd $COCOAPI/PythonAPI
# Install into global site-packages
make install
# Alternatively, if you do not have permissions or prefer
# not to install the COCO API into global site-packages
python setup.py install --user
Note that instructions like # COCOAPI=/path/to/install/cocoapi indicate that you should pick a path where you'd like to have the software cloned and then set an environment variable (COCOAPI in this case) accordingly.
Detectron
Clone the Detectron repository:
# DETECTRON=/path/to/clone/detectron
git clone https://github.com/facebookresearch/detectron $DETECTRON
Install Python dependencies:
pip install -r $DETECTRON/requirements.txt
Set up Python modules:
cd $DETECTRON && make
Check that Detectron tests pass (e.g. for SpatialNarrowAsOp test):
python $DETECTRON/detectron/tests/test_spatial_narrow_as_op.py
That's All You Need for Inference
At this point, you can run inference using pretrained Detectron models. Take a look at our inference tutorial for an example. If you want to train models on the COCO dataset, then please continue with the installation instructions.
Datasets
Detectron finds datasets via symlinks from detectron/datasets/data
to the actual locations where the dataset images and annotations are
stored. For instructions on how to create symlinks for COCO and other
datasets, please see detectron/datasets/data/README.md.
After symlinks have been created, that's all you need to start training models.
Advanced Topic: Custom Operators for New Research Projects
Please read the custom operators section of the FAQ first.
For convenience, we provide CMake support for building
custom operators. All custom operators are built into a single library
that can be loaded dynamically from Python.
Place your custom operator implementation under detectron/ops/ and see detectron/tests/test_zero_even_op.py for an example of how to load custom operators from Python.
Build the custom operators library:
cd $DETECTRON && make ops
Check that the custom operator tests pass:
python $DETECTRON/detectron/tests/test_zero_even_op.py
Troubleshooting
In case of Caffe2 installation problems, please read the troubleshooting section of the relevant Caffe2 installation instructions first. In the following, we provide additional troubleshooting tips for Caffe2 and Detectron.
Caffe2 Operator Profiling
Caffe2 comes with performance profiling
support which you may find useful for benchmarking or debugging your operators
(see BatchPermutationOp test for example usage).
Profiling support is not built by default and you can enable it by setting
the -DUSE_PROF=ON flag when running Caffe2 CMake.
CMake Cannot Find CUDA and cuDNN
Sometimes CMake has trouble with finding CUDA and cuDNN dirs on your machine.
When building Caffe2, you can point CMake to CUDA and cuDNN dirs by running:
cmake .. \
  # insert your Caffe2 CMake flags here
  -DCUDA_TOOLKIT_ROOT_DIR=/path/to/cuda/toolkit/dir \
  -DCUDNN_ROOT_DIR=/path/to/cudnn/root/dir
Similarly, when building custom Detectron operators you can use:
cd $DETECTRON
mkdir -p build && cd build
cmake .. \
  -DCUDA_TOOLKIT_ROOT_DIR=/path/to/cuda/toolkit/dir \
  -DCUDNN_ROOT_DIR=/path/to/cudnn/root/dir
make
Note that you can use the same commands to get CMake to use specific versions of CUDA and cuDNN out of possibly multiple versions installed on your machine.
Protobuf Errors
Caffe2 uses protobuf as its serialization format and requires version 3.2.0 or newer.
If your protobuf version is older, you can build protobuf from Caffe2 protobuf submodule and use that version instead.
To build Caffe2 protobuf submodule:
# CAFFE2=/path/to/caffe2
cd $CAFFE2/third_party/protobuf/cmake
mkdir -p build && cd build
cmake .. \
  -DCMAKE_INSTALL_PREFIX=$HOME/c2_tp_protobuf \
  -Dprotobuf_BUILD_TESTS=OFF \
  -DCMAKE_CXX_FLAGS="-fPIC"
make install
To point Caffe2 CMake to the newly built protobuf:
cmake .. \
  # insert your Caffe2 CMake flags here
  -DPROTOBUF_PROTOC_EXECUTABLE=$HOME/c2_tp_protobuf/bin/protoc \
  -DPROTOBUF_INCLUDE_DIR=$HOME/c2_tp_protobuf/include \
  -DPROTOBUF_LIBRARY=$HOME/c2_tp_protobuf/lib64/libprotobuf.a
You may also experience problems with protobuf if you have both system and anaconda packages installed. This could lead to problems as the versions could be mixed at compile time or at runtime. This issue can also be overcome by following the commands from above.
Caffe2 Python Binaries
In case you experience issues with CMake being unable to find the required Python paths when building Caffe2 Python binaries (e.g. in virtualenv), you can try pointing Caffe2 CMake to python library and include dir by using:
cmake .. \
  # insert your Caffe2 CMake flags here
  -DPYTHON_LIBRARY=$(python -c "from distutils import sysconfig; print(sysconfig.get_python_lib())") \
  -DPYTHON_INCLUDE_DIR=$(python -c "from distutils import sysconfig; print(sysconfig.get_python_inc())")
Caffe2 with NNPACK Build
Detectron does not require Caffe2 built with NNPACK
support. If you face NNPACK related issues during Caffe2 installation,
you can safely disable NNPACK by setting the -DUSE_NNPACK=OFF CMake flag.
Caffe2 with OpenCV Build
Analogously to the NNPACK case above, you can disable OpenCV by setting the -DUSE_OPENCV=OFF CMake flag.
COCO API Undefined Symbol Error
If you encounter a COCO API import error due to an undefined symbol, as reported here, make sure that your python versions are not getting mixed. For instance, this issue may arise if you have both system and conda numpy installed.
CMake Cannot Find Caffe2
In case you experience issues with CMake being unable to find the Caffe2 package when building custom operators,
make sure you have run make install as part of your Caffe2 installation process.
from https://github.com/facebookresearch/Detectron/blob/main/INSTALL.md
-------------------------------------------------------------------------------------------------
research platform for object detection research, implementing popular algorithms like Mask R-CNN and RetinaNet.
Detectron
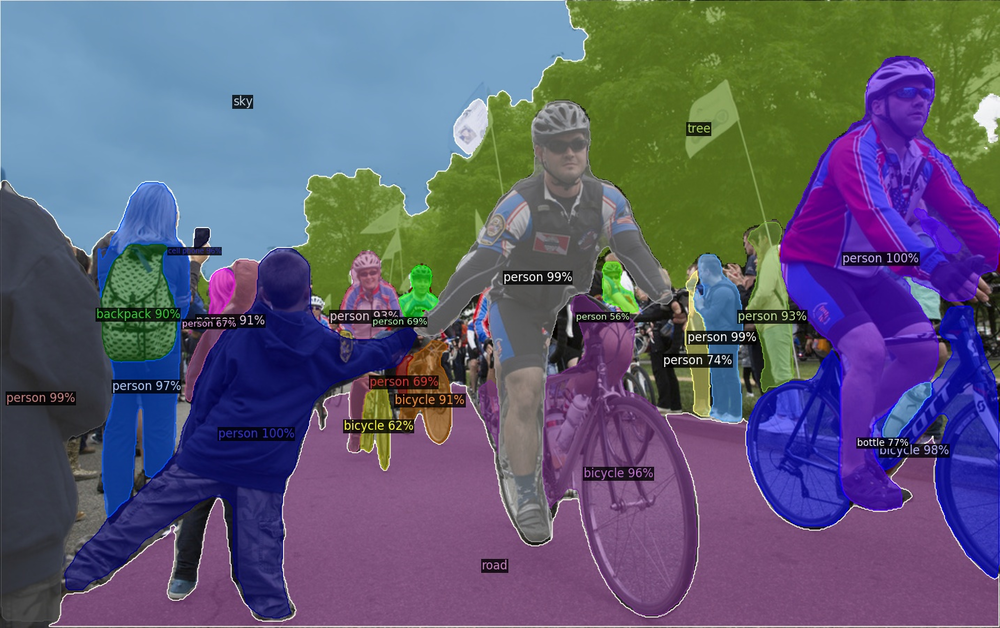
Detectron is Facebook AI Research's software system that implements state-of-the-art object detection algorithms, including Mask R-CNN. It is written in Python and powered by the Caffe2 deep learning framework.
At FAIR, Detectron has enabled numerous research projects, including: Feature Pyramid Networks for Object Detection, Mask R-CNN, Detecting and Recognizing Human-Object Interactions, Focal Loss for Dense Object Detection, Non-local Neural Networks, Learning to Segment Every Thing, Data Distillation: Towards Omni-Supervised Learning, DensePose: Dense Human Pose Estimation In The Wild, and Group Normalization.

Example Mask R-CNN output.
Introduction
The goal of Detectron is to provide a high-quality, high-performance codebase for object detection research. It is designed to be flexible in order to support rapid implementation and evaluation of novel research. Detectron includes implementations of the following object detection algorithms:
- Mask R-CNN -- Marr Prize at ICCV 2017
- RetinaNet -- Best Student Paper Award at ICCV 2017
- Faster R-CNN
- RPN
- Fast R-CNN
- R-FCN
using the following backbone network architectures:
- ResNeXt{50,101,152}
- ResNet{50,101,152}
- Feature Pyramid Networks (with ResNet/ResNeXt)
- VGG16
Additional backbone architectures may be easily implemented. For more details about these models, please see References below.
Update
- 4/2018: Support Group Normalization - see
GN/README.md
License
Detectron is released under the Apache 2.0 license. See the NOTICE file for additional details.
Citing Detectron
If you use Detectron in your research or wish to refer to the baseline results published in the Model Zoo, please use the following BibTeX entry.
@misc{Detectron2018,
  author =       {Ross Girshick and Ilija Radosavovic and Georgia Gkioxari and
                  Piotr Doll\'{a}r and Kaiming He},
  title =        {Detectron},
  howpublished = {\url{https://github.com/facebookresearch/detectron}},
  year =         {2018}
}
Model Zoo and Baselines
We provide a large set of baseline results and trained models available for download in the Detectron Model Zoo.
Installation
Please find installation instructions for Caffe2 and Detectron in INSTALL.md.
Quick Start: Using Detectron
After installation, please see GETTING_STARTED.md for brief tutorials covering inference and training with Detectron.
Getting Help
To start, please check the troubleshooting section of our installation instructions as well as our FAQ. If you couldn't find help there, try searching our GitHub issues. We intend the issues page to be a forum in which the community collectively troubleshoots problems.
If bugs are found, we appreciate pull requests (including adding Q&A's to FAQ.md and improving our installation instructions and troubleshooting documents). Please see CONTRIBUTING.md for more information about contributing to Detectron.
References
- Data Distillation: Towards Omni-Supervised Learning. Ilija Radosavovic, Piotr Dollár, Ross Girshick, Georgia Gkioxari, and Kaiming He. Tech report, arXiv, Dec. 2017.
- Learning to Segment Every Thing. Ronghang Hu, Piotr Dollár, Kaiming He, Trevor Darrell, and Ross Girshick. Tech report, arXiv, Nov. 2017.
- Non-Local Neural Networks. Xiaolong Wang, Ross Girshick, Abhinav Gupta, and Kaiming He. Tech report, arXiv, Nov. 2017.
- Mask R-CNN. Kaiming He, Georgia Gkioxari, Piotr Dollár, and Ross Girshick. IEEE International Conference on Computer Vision (ICCV), 2017.
- Focal Loss for Dense Object Detection. Tsung-Yi Lin, Priya Goyal, Ross Girshick, Kaiming He, and Piotr Dollár. IEEE International Conference on Computer Vision (ICCV), 2017.
- Accurate, Large Minibatch SGD: Training ImageNet in 1 Hour. Priya Goyal, Piotr Dollár, Ross Girshick, Pieter Noordhuis, Lukasz Wesolowski, Aapo Kyrola, Andrew Tulloch, Yangqing Jia, and Kaiming He. Tech report, arXiv, June 2017.
- Detecting and Recognizing Human-Object Interactions. Georgia Gkioxari, Ross Girshick, Piotr Dollár, and Kaiming He. Tech report, arXiv, Apr. 2017.
- Feature Pyramid Networks for Object Detection. Tsung-Yi Lin, Piotr Dollár, Ross Girshick, Kaiming He, Bharath Hariharan, and Serge Belongie. IEEE Conference on Computer Vision and Pattern Recognition (CVPR), 2017.
- Aggregated Residual Transformations for Deep Neural Networks. Saining Xie, Ross Girshick, Piotr Dollár, Zhuowen Tu, and Kaiming He. IEEE Conference on Computer Vision and Pattern Recognition (CVPR), 2017.
- R-FCN: Object Detection via Region-based Fully Convolutional Networks. Jifeng Dai, Yi Li, Kaiming He, and Jian Sun. Conference on Neural Information Processing Systems (NIPS), 2016.
- Deep Residual Learning for Image Recognition. Kaiming He, Xiangyu Zhang, Shaoqing Ren, and Jian Sun. IEEE Conference on Computer Vision and Pattern Recognition (CVPR), 2016.
- Faster R-CNN: Towards Real-Time Object Detection with Region Proposal Networks Shaoqing Ren, Kaiming He, Ross Girshick, and Jian Sun. Conference on Neural Information Processing Systems (NIPS), 2015.
- Fast R-CNN. Ross Girshick. IEEE International Conference on Computer Vision (ICCV), 2015.
from https://github.com/facebookresearch/Detectron
---------------------------------------------------------------------------------------------------
Detectron2 is a platform for object detection, segmentation and other visual recognition tasks.
https://detectron2.readthedocs.io/en/latest/
Detectron2 is Facebook AI Research's next generation library that provides state-of-the-art detection and segmentation algorithms. It is the successor of Detectron and maskrcnn-benchmark. It supports a number of computer vision research projects and production applications in Facebook.
Learn More about Detectron2
| Explain Like I’m 5: Detectron2 | Using Machine Learning with Detectron2 |
|---|---|
 |
 |
What's New
- Includes new capabilities such as panoptic segmentation, Densepose, Cascade R-CNN, rotated bounding boxes, PointRend, DeepLab, ViTDet, MViTv2 etc.
- Used as a library to support building research projects on top of it.
- Models can be exported to TorchScript format or Caffe2 format for deployment.
- It trains much faster.
See our blog post to see more demos and learn about detectron2.
Installation
See installation instructions.
Getting Started
See Getting Started with Detectron2, and the Colab Notebook to learn about basic usage.
Learn more at our documentation. And see projects/ for some projects that are built on top of detectron2.
Model Zoo and Baselines
We provide a large set of baseline results and trained models available for download in the Detectron2 Model Zoo.
from https://github.com/facebookresearch/detectron2
No comments:
Post a Comment