Update
I have discovered after writing this article that Circle CI has better built-in support for Haskell than Travis CI does. In particular Circle will cache cabal build artifacts for you automatically between builds. I’d recommend using Circle for all your Haskell projects.You can configure things to let you write blog posts directly on Github’s interface and use Travis CI to deploy your changes. Most day-to-day blogging will not require using Haskell at all or even having the Haskell environment installed on the blogger’s machine.
I’ll show you how to set everything up, including an optimized Travis config that can deploy changes in less than a minute. There is some existing information online about doing this sort of thing, but it’s all outdated in one way or another.
We’ll be using Github Pages to serve the final assets. I’ll assume you’re making a static site for a Github organization called
myorg and want it to live at myorg.io.Installation
- Create a Github organization. E.g.
myorg - Create a project
myorg/myorg.github.io - The master branch will be repeatedly overwritten and committed later
on by Travis, so you won’t make any edits there directly. For now add a
file to the root of the master branch called
CNAMEcontaining the stringmyorg.io - Create two
Arecords in the DNS formyorg.iopointing at 192.30.252.153 and 192.30.252.154 respectively. - Generate the base Hakyll project.
# in an empty directory of your choice # NOT in the git repo you've been using cabal sandbox init cabal install -j --disable-documentation hakyll cabal exec hakyll-init myorg.github.io - Create an orphan source branch in your git repo and copy the generated files there.
git checkout --orphan source git rm CNAME cp -r /path/to/generated/myorg/* . git add . - Reuse the cabal sandbox you created earlier:
cp -r /where/you/ran/cabal/install/.cabal-sandbox . - Keep build artifacts out of git by adding these lines to
.gitignore
.cabal-sandbox cabal.sandbox.config dist/ _cache _site - Run your new site locally to see that it works!
cabal sandbox init cabal run rebuild cabal run watch # now load http://localhost:8000 - Create
.travis.ymland add the following boilerplate:
language: haskell ghc: 7.8 branches: only: - source before_install: - git submodule foreach --recursive 'git checkout master; git ls-files | grep -v README | grep -v CNAME | xargs -r git rm' install: - curl http://bin.begriffs.com/hakyll/cabal-sandbox.tar.xz | tar xJ - cabal sandbox init - cabal configure --disable-library-profiling --disable-tests --disable-library-coverage --disable-benchmarks --disable-split-objs before_script: - git config --global user.email "$GIT_EMAIL" - git config --global user.name "$GIT_NAME" script: cabal run -j build after_script: - cd _site - export REMOTE=$(git config remote.origin.url | sed 's/.*:\/\///') - git remote add github https://${GH_TOKEN}@${REMOTE} - git add --all - git status - git commit -m "Built by Travis ( build $TRAVIS_BUILD_NUMBER )" - git push github master:master | grep -v http - Generate a Github auth token.
- Set encrypted environment variables to allow Travis to commit to the master branch
gem install travis travis encrypt -r myorg/myorg.github.io --add GH_NAME="J. Doe" GH_EMAIL=jdoe@myorg.io GH_TOKEN=xxxxxxxx - Commit all the files.
- Enable Travis for your repo. Instructions here.
- Push the
sourcebranch to Github. - Watch the deploy progress at https://travis-ci.org/myorg/myorg.github.io
(optional) Generating a custom cabal sandbox for Travis
You can use my shared cabal sandbox on Travis as done above, or you can build your own. It’s a little trickier. Use this Travis config as a start. It takes advantage of post-build deployment to S3.language: haskell
ghc: 7.8
branches:
only:
- source
before_install:
- travis_retry sudo add-apt-repository -y ppa:hvr/ghc
- travis_retry sudo apt-get update
- travis_retry sudo apt-get install --force-yes happy-1.19.3 alex-3.1.3
- export PATH=/opt/alex/3.1.3/bin:/opt/happy/1.19.3/bin:$PATH
install:
- cabal sandbox init
- cabal install -j --disable-documentation -fhttps pandoc
- cabal install -j --disable-documentation --disable-tests --reorder-goals
deploy:
provider: s3
access_key_id: AKIAIYJJY5B5UWSU3CFQ
bucket: YOUR_BUCKET
region: us-west-1
skip_cleanup: true
local-dir: ".cabal-sandbox"
upload-dir: hakyll
acl: !ruby/string:HighLine::String public_read
on:
repo: myorg/myorg.github.io
branch: source
secret_access_key:
secure: YOUR_SECURE_KEY fromhttps://begriffs.com/posts/2014-08-12-create-static-site-with-hakyll-github.html-----------------------
使用 Travis 自动化部署 Hexo Blog
0x00 背景
hexo d -g 会在本地生成 public 静态博客网站和向 Github 推送的 .deploy_git 文件夹。.deploy_git 文件夹内容和 public 文件夹一致,但多了 Github 博客项目的仓库信息与提交信息。最终,.deploy_git 文件夹内的全部内容被推送到 Github 仓库中,由 Github Pages 服务完成静态网站的解析。hexo d -g 手动部署。这样多次重复的工作非常低效,因此结合现在非常流行的 CI/CD 概念和工具,可以为 Hexo + Github Pages 博客集成 Travis CI 自动部署的能力。当推送博客仓库到 Github 后,由 Travis 自动获取当前 commit 并进行构建,把生成的静态网站推送到 Github Pages 分支。0x01 理解 Hexo 的自动化部署
.delpoy_git 推送到 Github 的静态博客仓库中。
.travis.yml 并把生成的静态博客网站 .deploy_git 推送 Github 静态博客仓库 xxx.github.io。
注意,这里要区分 Github 中的两个仓库:静态 blog repo 和 Hexo blog repo。前者是博客网站的静态网站项目,由 Github Pages 托管和解析;后者是 Hexo 项目,前者的内容是由后者生成的。
0x02 如何配置自动化部署
- 能够自动获取 hexo-blog 仓库的代码提交;
- 能够从 hexo-blog 仓库的源码中生成静态博客网站 .deploy_git 目录;
- 能够把静态博客网站目录文件推送到静态博客仓库 xxx.github.io 中;
1. 配置 Travis 获取 Hexo blog
2. 配置 Travis 自动编译
.travis.yml 来控制的。我们需要为 hexo-blog 项目编写一个 .travis.yml 文件,下面是一个 .travis.yml 示例。1 2 3 4 5 6 7 8 9 10 11 12 13 14 15 16 17 18 19 | language: node_js node_js: - '10' branches: only: - master before_install: - git config --global user.name "YOUR NAME" - git config --global user.email "YOUR EMAIL" - sed -i'' "s~https://github.com/ |
language和node_js指定了使用 NodeJS docker 进行构建,NodeJS 版本为 10.x;branches指定只有 master 分支的提交才进行构建;before_install用于配置推送静态博客网站项目的 git 信息,最重要的是sed -i这条命令,该命令把 hexo-blog 配置文件_config.yml中的 git remote URL 替换为携带认证ACCESS TOKEN的 URL。 这样避免了 Travis 中需要输入用户名密码的问题。关于${ACCESS_TOKEN}变量会在接下来进行说明;1 2 3 4 5 6 7
# _config.yml ... deploy: type: git repo: https://github.com/
NAME>/ REPO>.git branch: master ...install指定了每次构建之前需要先安装 hexo 和 hexo-blog 项目中的依赖;script指定了运行的 npm deploy 命令去执行hexo d -g。deploy 命令配置在了 hexo-blog 项目的 package.json 中:1 2 3 4 5 6 7
{
  ...
  "scripts": {
    "deploy": "hexo clean && hexo d -g"
  },
  ...
}
3. 配置 Travis 推送博客仓库的权限
- 一个是把 Github SSH Key 放到 Hexo-blog 项目中,Travis 构建完成推送时,使用 SSH Key 推送;
- 另一种办法是在 Github 中为 Travis 生成一个拥有读写仓库权限的 Personal access tokens。上面的 .travis.yml 中使用到的
${ACCESS_TOKEN}变量便是第二种方法。
-
 生成的 token 一定要复制保存下来。
 - 在 https://travis-ci.org/account/repositories 中点击 hexo-blog 项目的 settings,添加环境变量,把上面生成的 token 设置为变量,这里的变量名字设置为
ACCESS_TOKEN,和 .travis.yml 中的配置一致。注意,为了安全不要勾选DISPLAY VALUE IN BUILD LOG。
0x03 后记
用 Travis-CI 生成 Github Pages博客
寄宿在 Github Pages 上的静态博客通常有两种方案,其一是使用 Jekyll 方式撰写,这可以利用 Github Pages 原本就有的 Jekyll支持 生成静态网站。另一种是在 本地 也就是自己的电脑上生成好,然后把生成的 HTML 网站 push 到 Github Pages ,这种情况下 Github Pages 就完全只是一个静态页面宿主环境。
我用 Pelican 生成博客,当然就只能选择后一种方式了。这带来一些不便,比如本地配置 pelican 还是有一点点复杂的,所以不能随便找台电脑就开始写博客。有的时候只是想修正一两个错别字, 这时候必须打开某台特定的电脑才能编辑博客就显得不太方便了。再比如 pelican 本身虽然是 python 写的所以跨平台,但是具体到博客的配置方面, Windows 环境和 Linux/OSX/Unix-like 环境下还是有 些许出入 的。还有就是没有像 wordpress 那样的基于 web 的编辑环境,在手机上就不能随便写一篇博客发表出来(不知道有没有勇士尝试过在 Android 的 SL4A 环境下的 python 中跑 pelican ,还要配合一个 Android 上的 git 客户端 )。
当然并不是因此就束手无策了,感谢 Travis-CI 提供了免费的
关于 Travis-CI
持续整合
原本是
于是要用持续整合就需要一个整合服务器,幸而 Travis-CI 对 github 上的公开 repo 提供了免费的整合服务器虚拟机服务,和 github 的整合非常自然。所以我们就可以用它提供的虚拟机 为博客生成静态网站。
启用 Travis-CI 自动编译
这一步很简单,访问 https://travis-ci.org/ 并用你的 Github 账户登录, 授权它访问你的账户信息就可以了。然后在 https://travis-ci.org/repositories 里开启 需要编译的 repo ,这样 Travis-CI 就会监视对这个 repo 的所有 push 操作,并且对 每个 push 调用测试了。

在 Travis-CI 中开启对 Github Repo 的持续整合
然后在 repo 的根目录放一个
.travis.yml
文件描述编译的步骤。
暂时 测试的目的下我写的
.travis.yml
大概是下面这样。
language: python

python:
    - "2.7"

before_install:
    - sudo apt-add-repository ppa:chris-lea/node.js -y
    - sudo apt-get update
    - sudo apt-get install nodejs ditaa doxygen parallel

install:
    - sudo pip install pelican
    - sudo pip install jinja2
    - sudo pip install babel
    - sudo pip install beautifulsoup4
    - sudo pip install markdown
    - sudo npm install -g less
    - wget "http://downloads.sourceforge.net/project/plantuml/plantuml.jar?r=&ts=1424308684&use_mirror=jaist" -O plantuml.jar
    - sudo mkdir -p /opt/plantuml
    - sudo cp plantuml.jar /opt/plantuml
    - echo "#! /bin/sh" > plantuml
    - echo 'exec java -jar /opt/plantuml/plantuml.jar "$@"' >> plantuml
    - sudo install -m 755 -D plantuml /usr/bin/plantuml
    - wget https://bintray.com/artifact/download/byvoid/opencc/opencc-1.0.2.tar.gz
    - tar xf opencc-1.0.2.tar.gz
    - cd opencc-1.0.2 && make && sudo make install && cd ..
    - sudo locale-gen zh_CN.UTF-8
    - sudo locale-gen zh_HK.UTF-8
    - sudo locale-gen en_US.UTF-8
    - sudo locale-gen ja_JP.UTF-8

script:
    - git clone --depth 1 https://github.com/farseerfc/pelican-plugins plugins
    - git clone --depth 1 https://github.com/farseerfc/pelican-bootstrap3 theme
    - mkdir output
    - env SITEURL="farseerfc.me" make publish
Travis-CI 提供的虚拟机是比较标准的 Ubuntu 12.04 LTS ,打上了最新的补丁,并且根据你指定的 语言选项会把相应的解释器和编译器升级到最新版(或者指定的版本)。这里用 python 语言的配置, 所以 python 是 2.7 的最新版并且有 pip 可以直接用。 配置中的 before_install 和 install 的区别其实不大,其中任何一个失败的话算作 build errored 而不是 build fail ,而如果在 script 里失败的话算作 build fail 。
为了编译我的模板,还需要比较新的 less.js ,所以添加了 ppa 装了个最新的 nodejs 并用它装上了 less 。 还从源码编译安装上了最新版的 opencc 1.0.2 ,因为 Ubuntu 源里的 opencc 的版本比较老(0.4), 然后 doxygen 作为 opencc 的编译依赖也装上了。 其它安装的东西么,除了 pelican 之外都是插件们需要的。以及我还需要生成 4 个语言的 locale 所以调用了 4 次 locale-gen 。由于是比较标准的 Ubuntu 环境,所以基本上编译的步骤和在本地 Linux 环境中是一样的,同样的这套配置应该可以直接用于本地 Ubuntu 下编译我的博客。
写好
.travis.yml
之后把它 push 到 github ,然后 travis 这边就会自动 clone
下来开始编译。 travis 上能看到编译的完整过程和输出,一切正常的话编译结束之后
build 的状态就会变成 passing ,比如
我的这次的build 。
从 Travis-CI 推往 Github
上面的测试编译通过了之后,下一步就是让 travis-ci 编译的结果自动推到 Github Pages 并发布出来。要推往 Github 自然需要设置 Github 用户的身份,在本地设置的时候是把 ssh key 添加到 github 账户就可以了,在编译细节都通过 github repo 公开了的 travis 上 当然不能放推送用的私有 key ,所以我们需要另外一种方案传递密码。

好在 Github 支持通过 Personal Access Token 的方式验证,这个和 App Token 一样可以随时吊销,同时完全是个人创建的。另一方面 Travis-CI 支持加密一些私密数据,通过环境变量的方式传递给编译脚本,避免公开密码这样的关键数据。
首先创建一个 Personal Access Token ,这里需要勾选一些给这个 Token 的权限,我只给予了最小的 public_repo 权限,如侧边里的图。 生成之后会得到一长串 Token 的散列码。
使用
travis encrypt
命令来加密重要数据最方便,不过如果有任何原因,
比如 ruby 版本太低或者安装不方便之类的,那么不用担心,我们直接通过
travis api
也能加密数据。
第一步用这个命令得到你的repo的 pubkey :
curl -H "Accept: application/vnd.travis-ci.2+json" https://api.travis-ci.org/repos/<github-id/repo>/key | python2 -m json.tool | grep key | sed 's/.*"key": "\(.*\)"/\1/' | xargs -0 echo -en | sed 's/ RSA//' > travis.pem
其中的 <github-id/repo> 替换成 github 上的 用户名/repo名, 比如我的是
farseerfc/farseer 。travis api 获得的结果是一个 json ,所以还用 python 的
json 模块处理了一下,然后把其中包含 key 的行用
grep
提取出来,用
sed
匹配出 key 的字符串本身,然后
xargs -0 echo -en
解释掉转义字符,然后删掉其中的 "<空格>RSA" 几个字(否则 openssl 不能读),
最后保存在名为 travis.pem 的文件里。
有了 pubkey 之后用 openssl 加密我们需要加密的东西并用 base64 编码:
echo -n 'GIT_NAME="Jiachen Yang" GIT_EMAIL=farseerfc@gmail.com GH_TOKEN=<Personal Access Token>' | openssl rsautl -encrypt -pubin -inkey travis.pem | base64 -w0
替换了相应的身份信息和token之后,这行得到的结果就是 secure 里要写的加密过的内容。
然后我们需要
travis
命令来加密这个 token , archlinux 用户可以安装
aur/ruby-travis
,其它用户可以用 gems 安装:
$ gem install travis
装好之后,在设定了 Travis-CI 的 repo 的目录中执行一下
travis status
,
命令会指导你登录 Travis-CI 并验证 repo 。正常的话会显示最新的 build 状态。
然后同样在这个 repo 目录下执行:
$ travis encrypt 'GIT_NAME="Jiachen Yang" GIT_EMAIL=farseerfc@gmail.com GH_TOKEN=<Personal Access Token>'
当然上面一行里的相应信息替换为个人的信息,作为这个命令的执行结果会得到另一长串散列码,
把这串散列写入刚才的
.travis.yml
文件:
env:
    - secure: "long secure base64 string"
有了这段声明之后, Travis-CI 就会在每次编译之前,设置上面加密的环境变量。 然后在编译脚本中利用这些环境变量来生成博客:
script:
    - git config --global user.email "$GIT_EMAIL"
    - git config --global user.name "$GIT_NAME"
    - git config --global push.default simple
    - git clone --depth 1 https://github.com/farseerfc/pelican-plugins plugins
    - git clone --depth 1 https://github.com/farseerfc/pelican-bootstrap3 theme
    - git clone --depth 1 https://$GH_TOKEN@github.com/farseerfc/farseerfc.github.io output
    - env SITEURL="farseerfc.me" make publish

after_success:
    - cd output
    - git add -A .
    - git commit -m "update from travis"
    - git push --quiet
这里要注意最后
git push
的时候一定要加上
--quiet
,因为默认不加的时候会把
代入了
$GH_TOKEN
的 URL 显示出来,从而上面的加密工作就前功尽弃了……
根据 travis 的文档
, after_success 里写的步骤只有在 script 里的全都完全无错执行完之后才会执行,这正是我们
push 的条件。目前 after_success 的成功与否不会影响到 build 的状态。
具体我用的配置见
这里的最新版 。
在我的
make github
中
调用了
git push
命令,从而执行了
make github
之后就会自动部署到 github 上。
用 Web 编辑并发布静态博客
经过以上设置之后,一切正常的话,每次对主 repo 推送更新的同时, Travis-CI 就会自动
拉来更新然后编译并发布了。可以放置这样的图标  在项目的
在项目的
Readme.md
中显示编译状态。
这样设置之后的另一个好处就在于可以利用 Github 的 Web 界面编辑文章内容。在 Github 里 编辑和保存之后会自动作为一个 commit 提交,所以也会触发 Travis-CI 的自动编译。

在 Github 的 Web 界面中直接编辑文章内容
以及虽然目前还没有好用的 Github 的手机客户端,不过直接用 Android/iPhone 的浏览器登录 github 并编辑文章的可用性也还不错,所以同样的方式也可以直接在手机上发布博文了。
That is all, happy blogging ~
from https://web.archive.org/web/20241227234658/https://farseerfc.me/zhs/travis-push-to-github-pages-blog.html
-------------------------------------------
如果 sudo apt install ruby 出现 404 的情况就需要先执行 sudo apt-get update
登录服务器之后,安装 ruby. sudo apt install ruby
通过 ruby 的 gem 安装 travis . sudo gem install travis
如果有报错的话一般是需要安装 ruby-dev sudo apt-get install ruby-dev
如果 安装 travis 一直卡着不动的话,还是换用国内的 ruby 镜像吧。
gem sources -l 查看当前镜像,一般默认会显示 https://rubygems.org/
gem update --system
gem sources --add https://gems.ruby-china.com/ 换用国内镜像
gem sources -l 查看镜像是否替换成功
接下来就愉快地安装 travis sudo gem install travis
接着登录 travis, 不然你的服务器怎么知道你是谁。
$ travis login

We need your GitHub login to identify you.
This information will not be sent to Travis CI, only to api.github.com.
The password will not be displayed.

Try running with --github-token or --auto if you don't want to enter your password anyway.

Username: xxx@xxx.xxx
Password for xxx@xxx.xxx: ***
Successfully logged in as demo!----------------------------------------------------------由于 Github 访问过慢,所以博客一直放在自己的服务器上托管;博客采用了 Jekyll 生成静态展点,最近鼓捣了一下完成了 Travis CI 自动化部署,顺便在此记录下
一、原部署方式
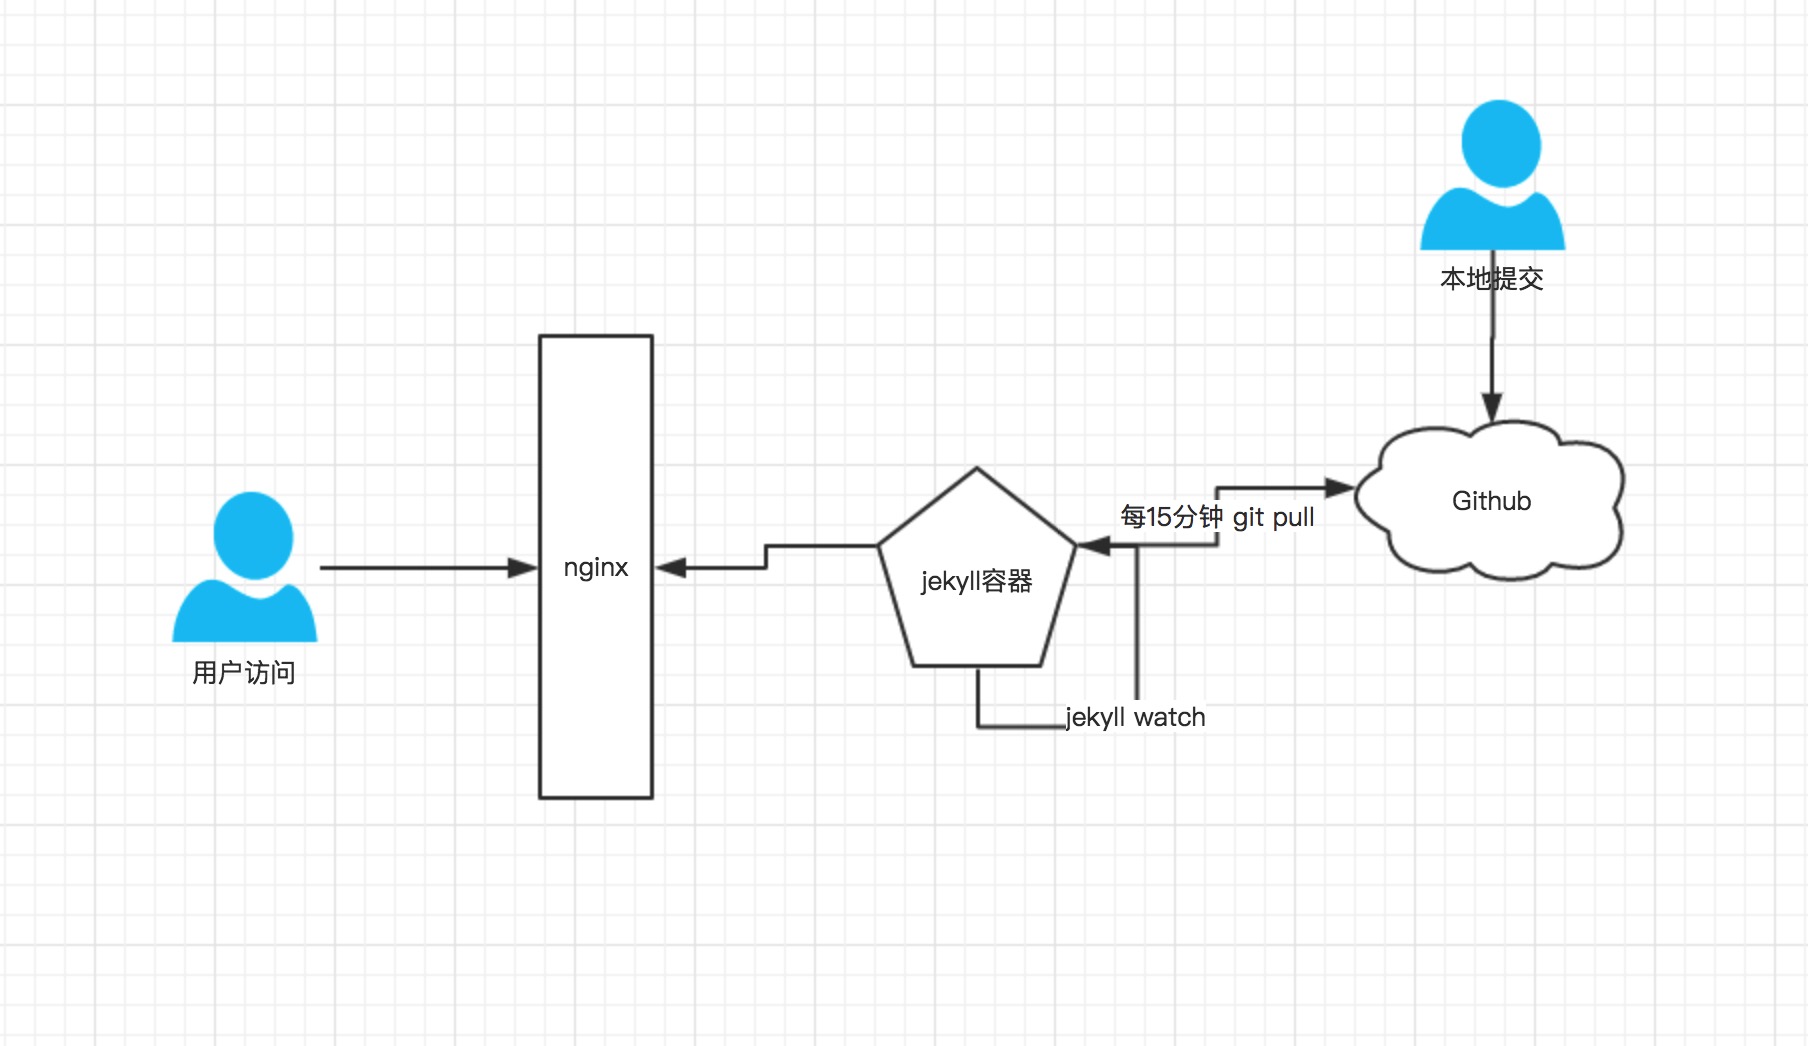
1.1、原部署流程
由于博客访问量不大,同时 jekyll 启动后会开启 http 服务器,还能自动监听文件变化实现刷新;所以以前的方式就是打了一个 docker 镜像,然后镜像每隔 15 分钟拉取 Github 仓库,实现定时更新,基本流程如下
- 本地写博客 Markdown 文件 commit 到 Github
- 服务器上将 jekyll 打成 docker 镜像启动
- 服务器镜像内使用 crond 每隔 15 分钟拉取最新代码
- jekyll 获得最新代码后自动刷新
整体 “架构” 如下
1.2、存在问题
按照以前的方式其实存在一个很大问题就是部署不及时,每次写完文章实际上都是自己 ssh 到服务器手动 pull 一下,感觉很繁琐;另一个大问题(这也不能算 bug) jekyll 的 rss 插件默认生成的 rss 引用地址为 jekyll server -H x.x.x.x 的监听地址,而容器化启动 jekyll 监听地址必然是 0.0.0.0;后果就是 feed.xml 无法访问,如下所示(这里监听的是 localhost)

1.3、新部署思路
从问题角度上来说,每次手动 pull 虽然有点烦,但是并不是大问题;而 rss 订阅由于网友反馈,再加个人强迫症感觉确实是个大毛病;随着试验发现,在进行 jekyll build 时生成的 feed.xml 中的引用地址会正确读取 _config.yml 中的网址;而 jekyll server 命令实际上也是先 build,然后生成静态文件到 _site 目录,最后搞个 http 服务器发布出去
基于以上试验可以得到一个简单的解决方案:不使用 jekyll server 启动,先 build 生成正确的 feed.xml 等静态文件,然后自己搞个 nginx 把它发布出去
二、Travis CI 自动化部署
2.1、任务拆分
从上面的结论上基本要实现自动化部署需要以下步骤:
- Github commit 后要能自动 build
- 生成的 _site 目录文件能实时更新到容器
2.2、Travis CI 配置
2.2.1、基本配置
对于自动 build,好在 Travis CI 对于开源项目完全免费,并且能自动感知到 Github 的 commit;所以自动 build 生成 静态文件这个过程就由 Travis CI 完成,以下为配置过程
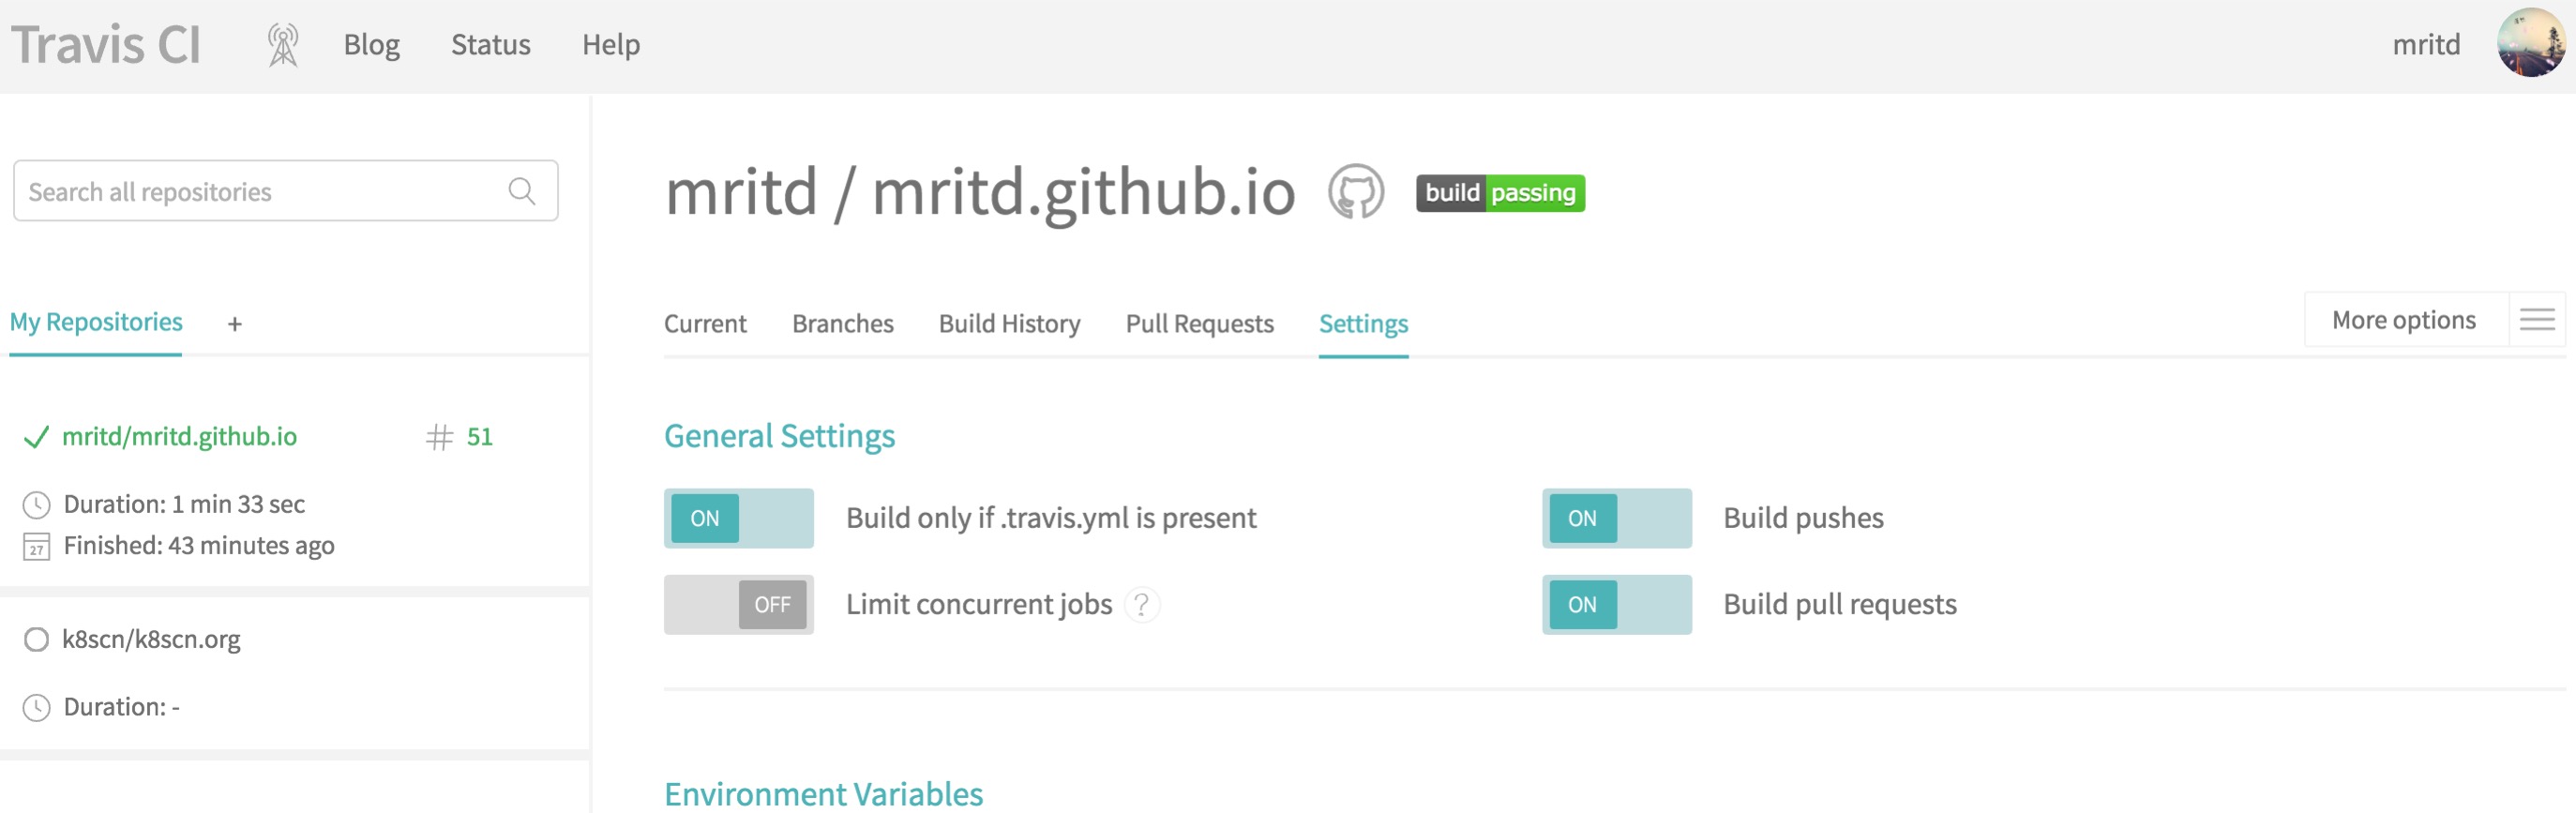
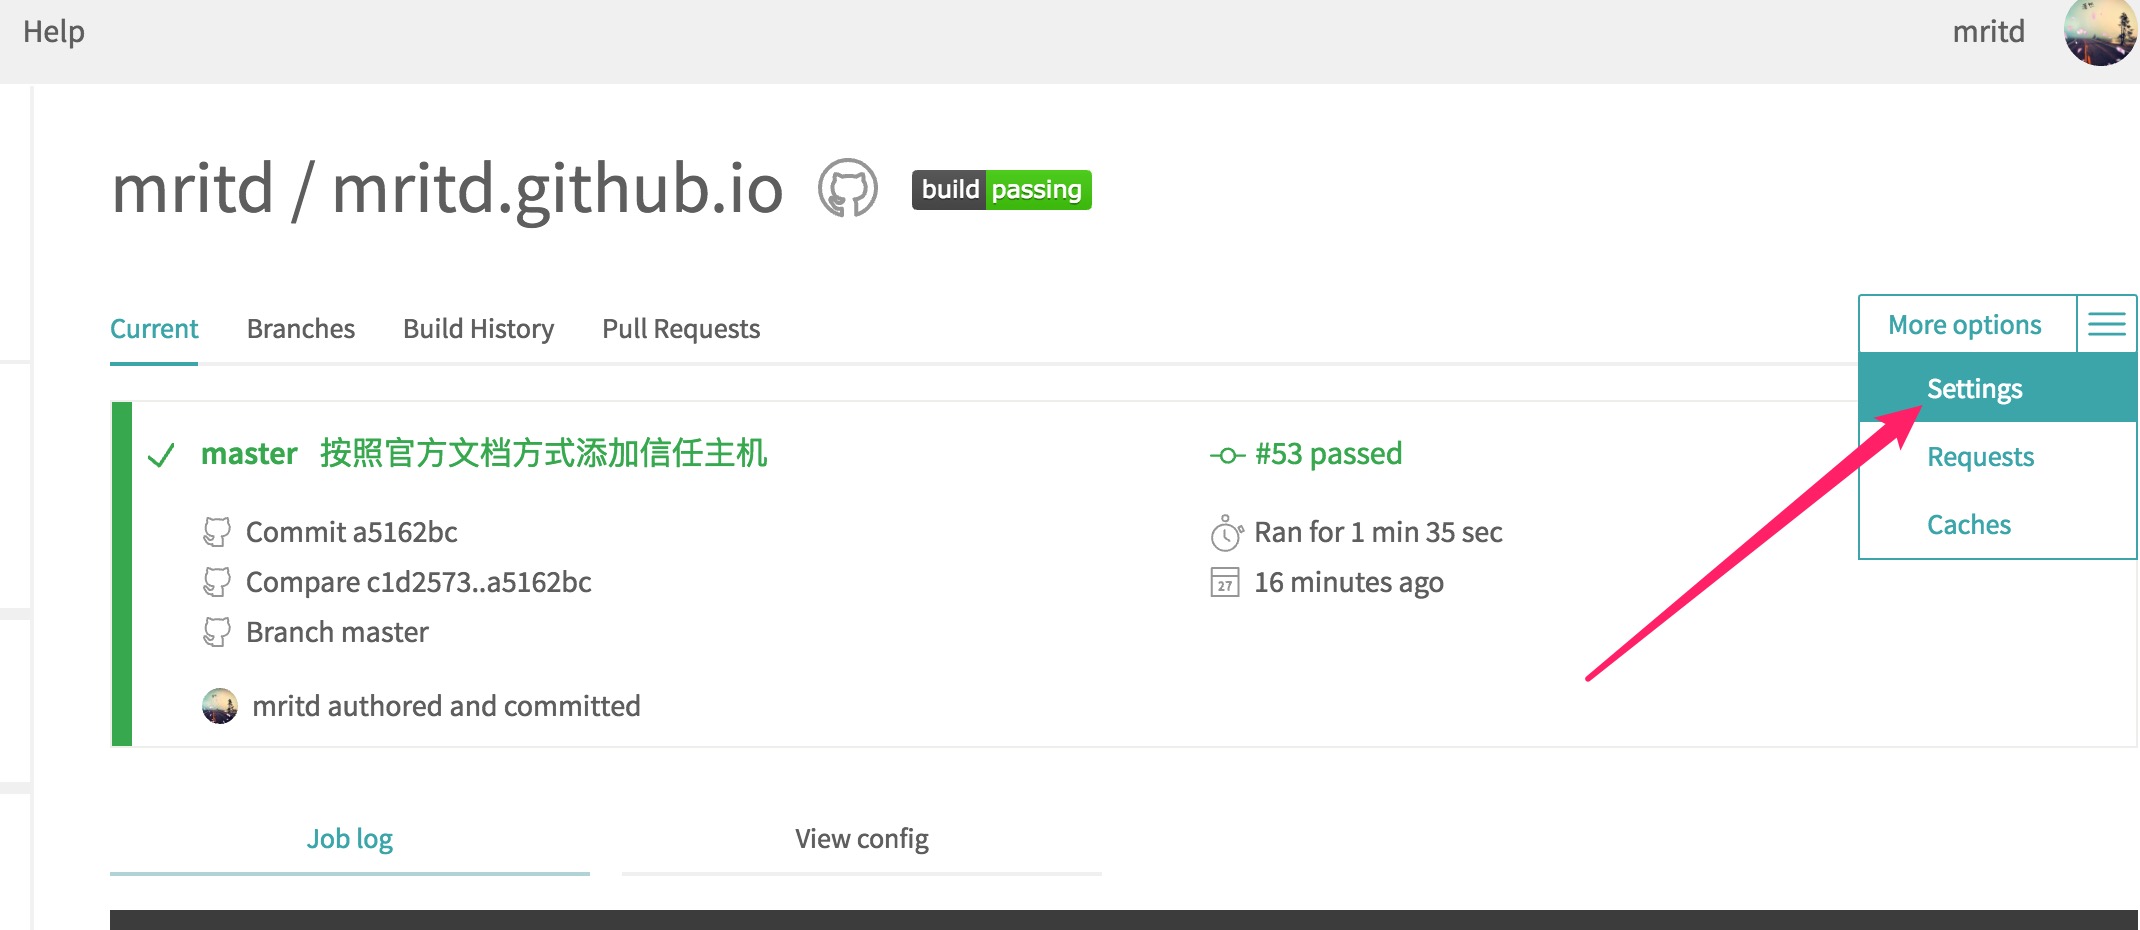
首先注册好 Travis CI 账号,然后点击最左侧 + 按钮添加项目

在想要使用 Travis CI 的项目上开启 build

点击设置按钮设置一下项目
2.2.2、.travis.yml 配置
当项目内存在 .travis.yml 文件时,Travis CI 会按照其定义完成自动 build 过程,所以开启了上述配置以后还要在项目下创建 .travis.yml 配置文件,配置文件定义如下
1 | |
其中 language声明使用的语言,rvm 是 ruby 的管理工具,并定义了 ruby 版本;before_install 定义了执行前的预处理动作,上面增加了一个密钥用于远程登录服务器;script 段真正定义了编译过程的命令,after_success 定义了如何 build 后如何处理发布物,branches 指定有哪些分支变动后触发 CI build,env 是一些环境变量,上面添加了一个变量(根据 jekyll 官方文档)用于加速 jekyll 编译(有些配置不理解往下看)
具体 .travis.yml 配置请参考 官方文档
2.3、静态文件的自动更新
Travis CI 在完成 build 后会在 _site 目录生成博客的静态文件,而如如何将这些静态文件发送到服务器完成更新是个待解决的问题
2.3.1、解决思路
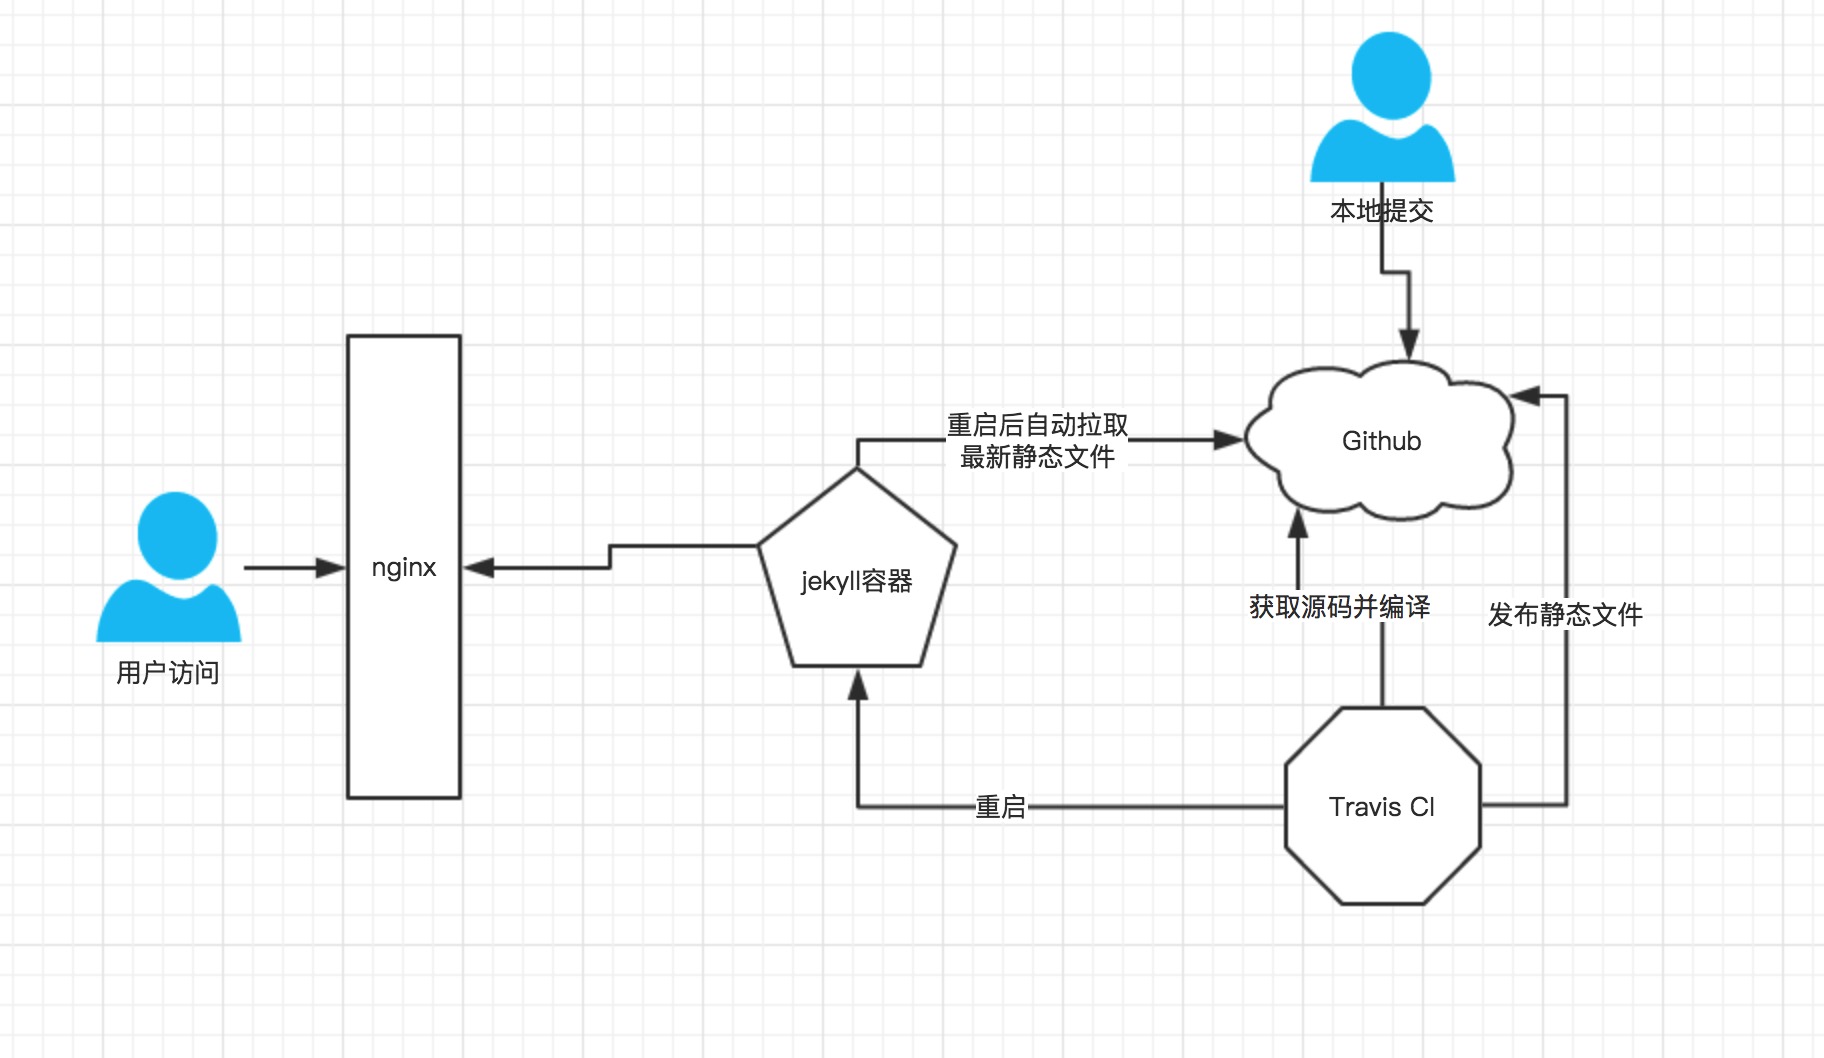
将 Travis CI 生成的静态文件推送到 Github,博客仍然 docker 化部署,采用 nginx + 静态文件 方式;每次容器启动后都要从 Github pull 最新的静态文件,流程如下
- 本地提交博客 Markdown 文件 到 Github
- Github 触发 Travis CI 执行自动编译
- Travis CI 编译后 push 静态文件到 Github
- Travis CI 通知服务器重启博客容器
- 容器重启拉取最新静态文件完成更新
流程图如下
2.3.2、实现方法
其实主要问题是从上面第三步开始:
Travis CI push 静态文件到 Github 通过 Github 的 token
实现授权,代码如下
1 | |
$DEPLOY_TOKEN 是从 Github 授权得到的,然后给于相应权限即可
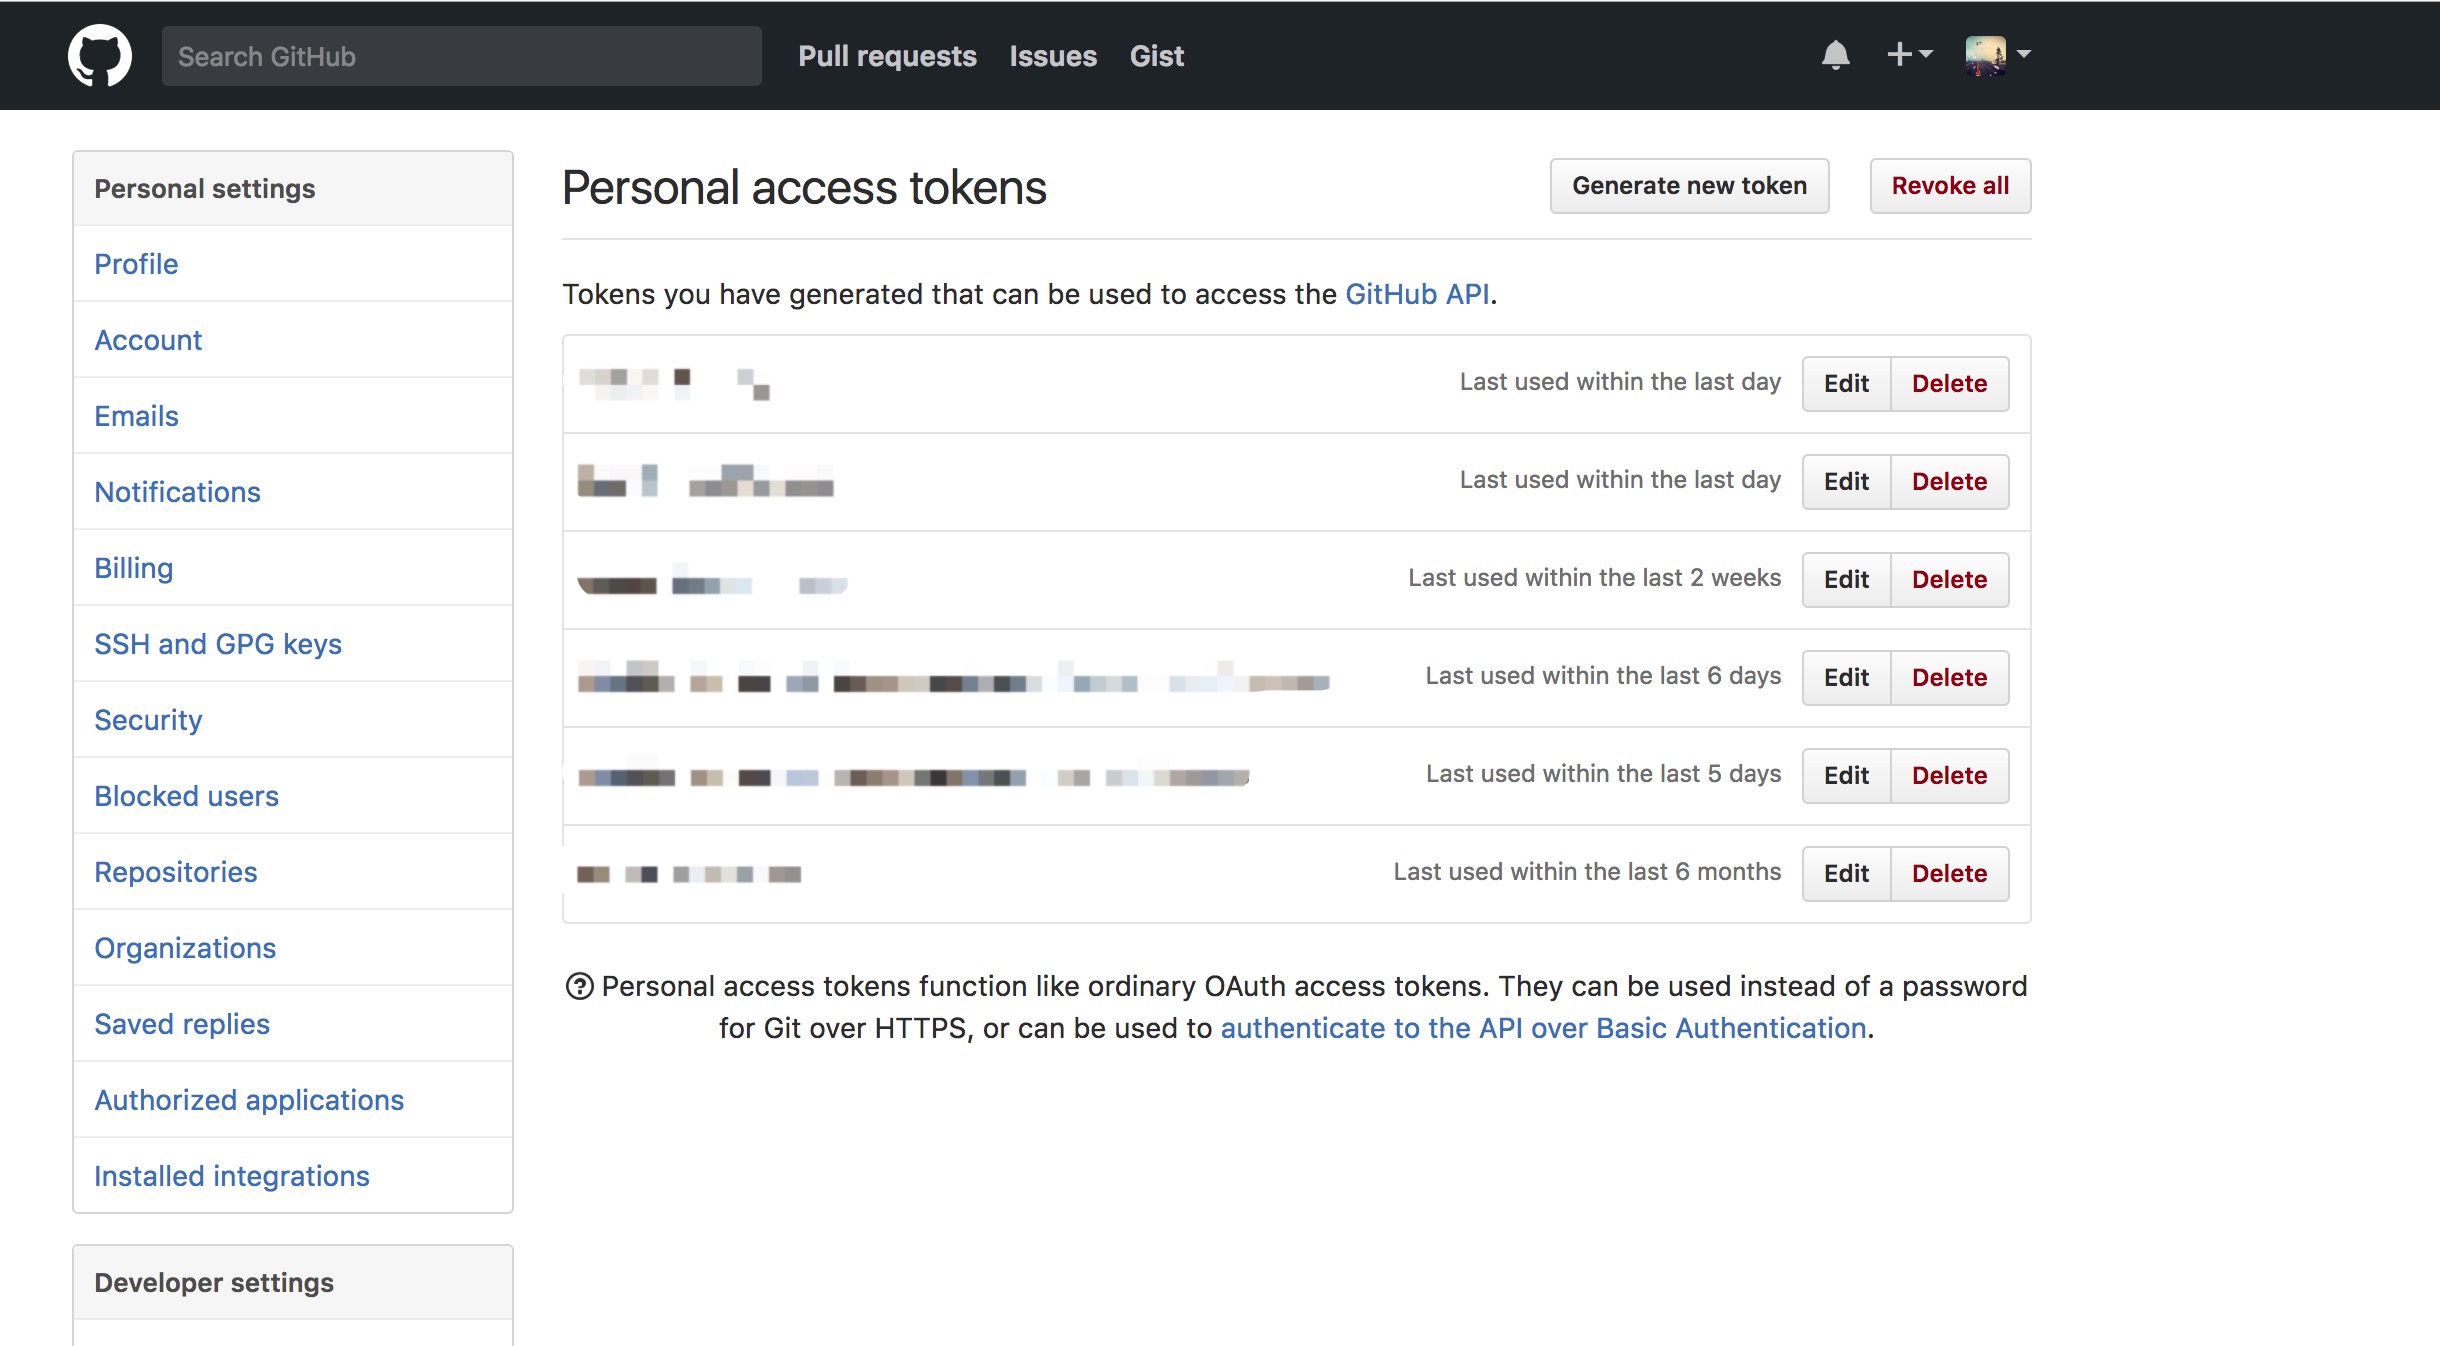
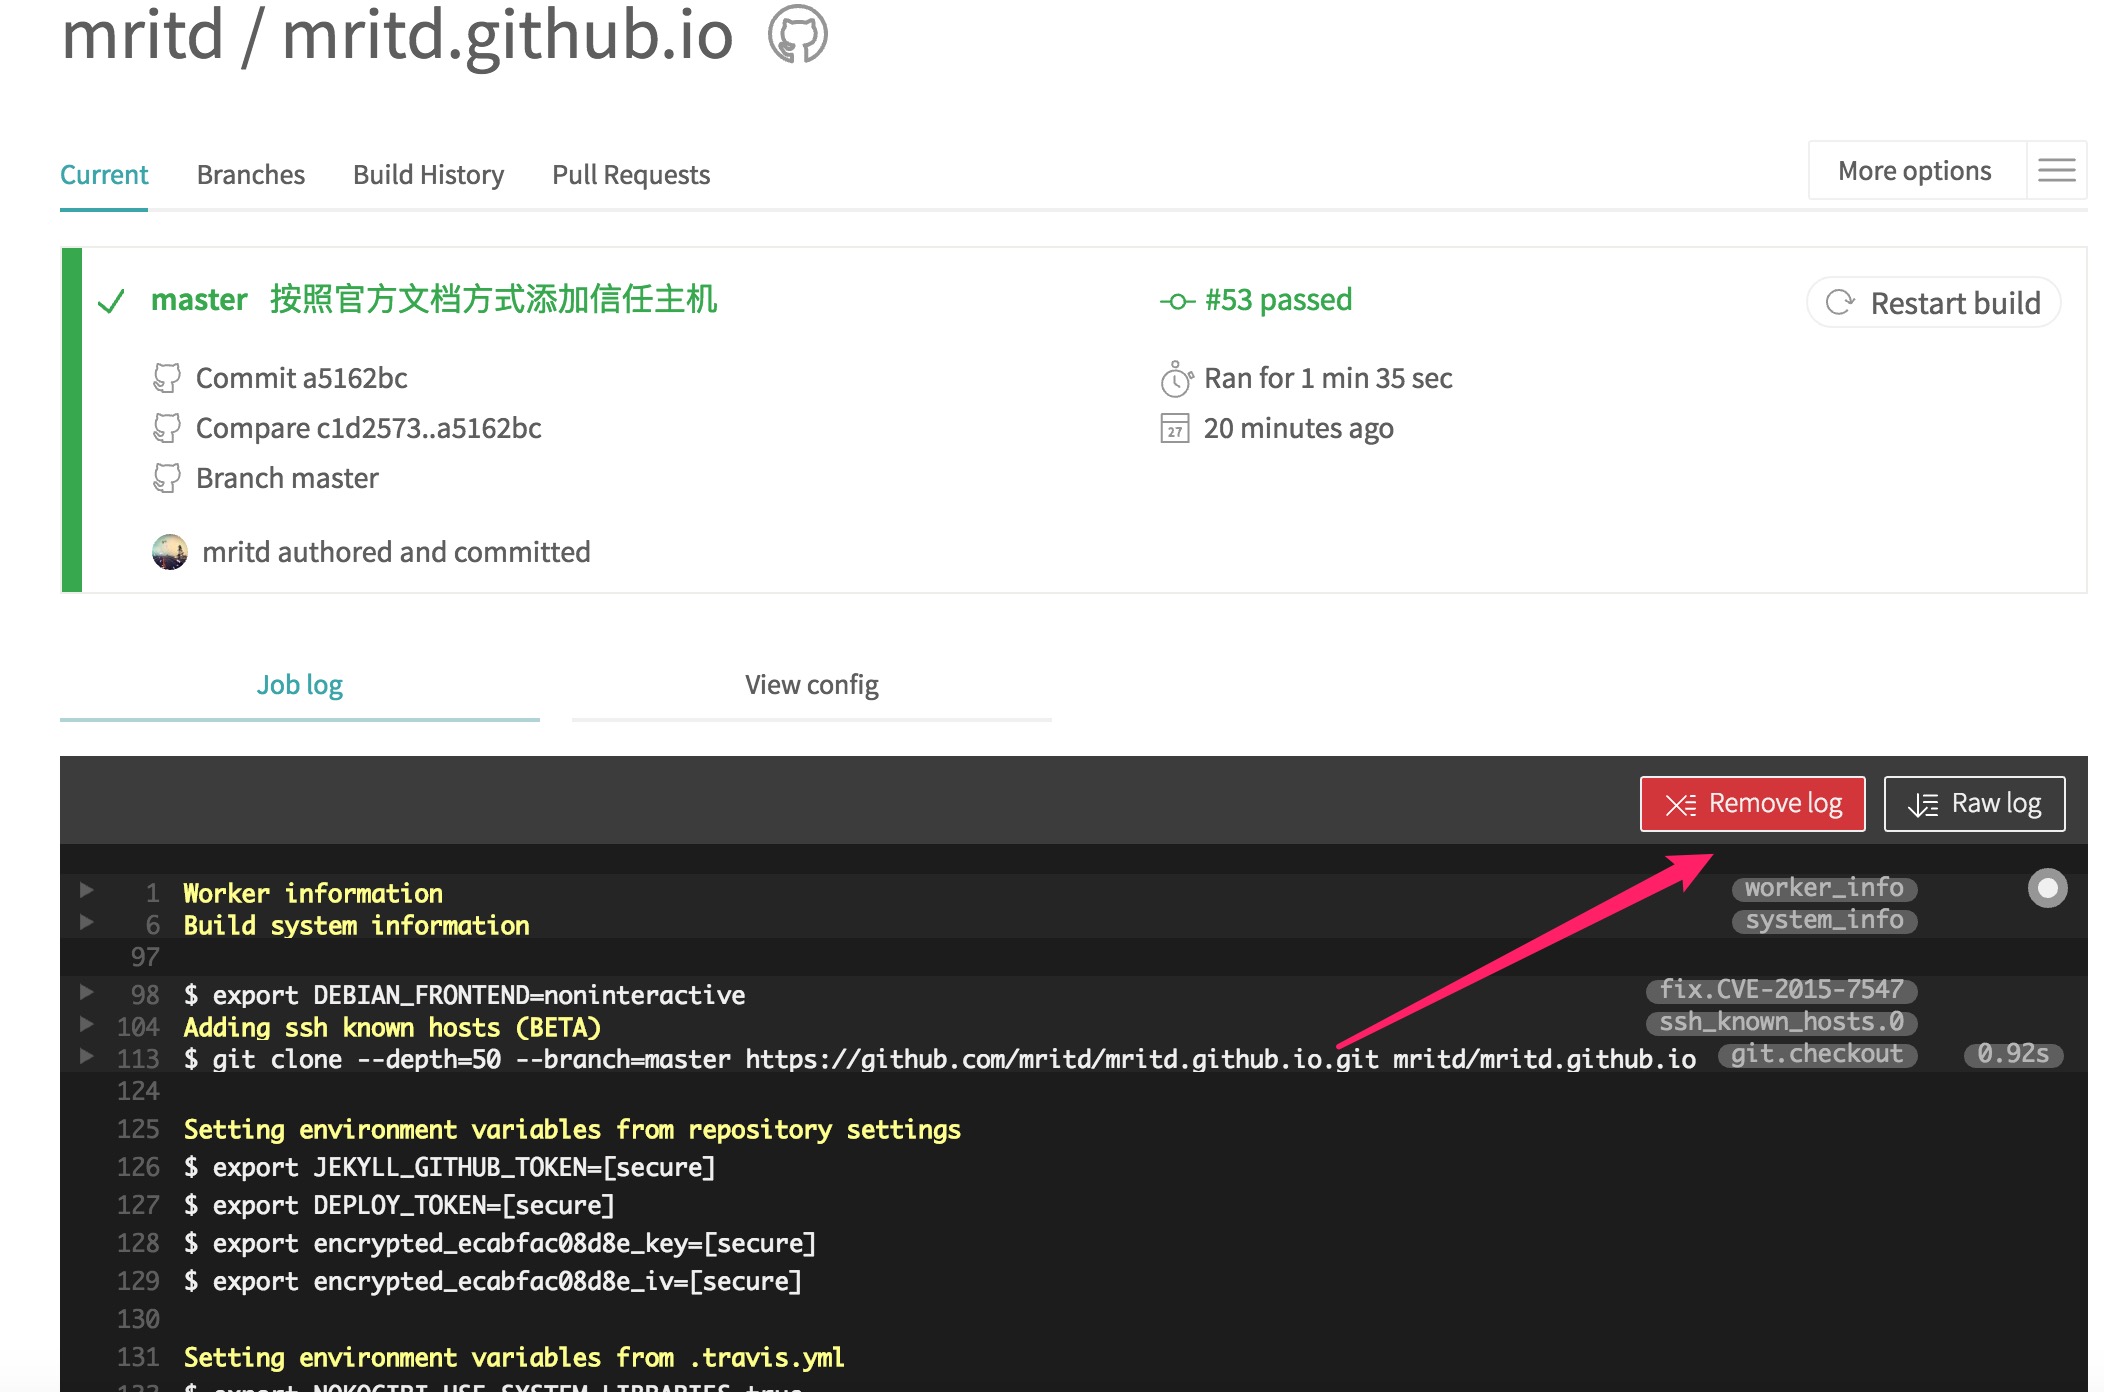
关于代码中 $DEPLOY_TOKEN 这种重要的密码类变量,Travis CI 在每个项目下提供了设置环境变量功能,如下图
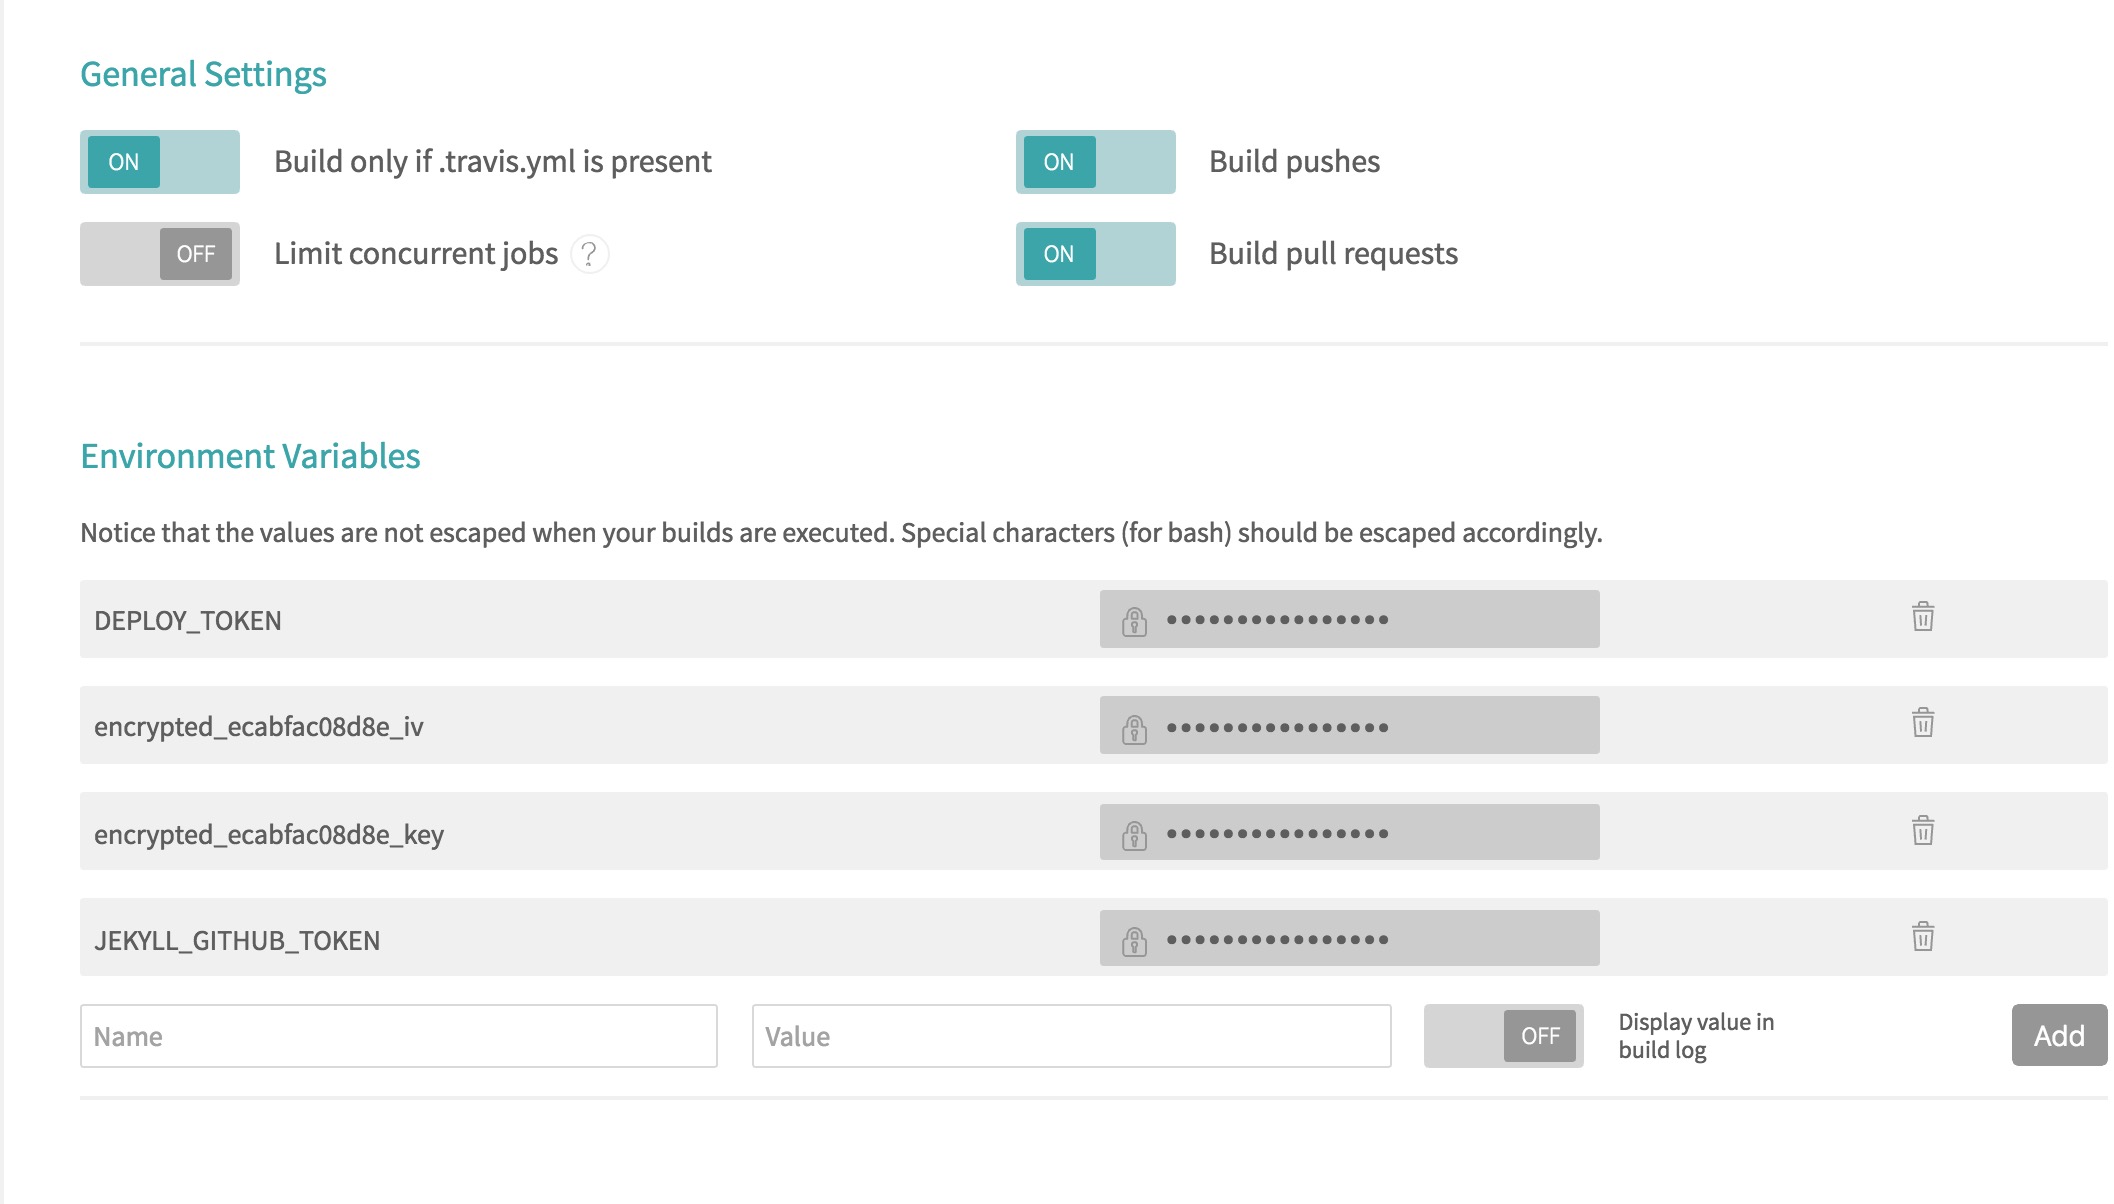
设置后可在 .travis.yml 中直接引用,不过注意一定要关闭 Display value in build log 功能,否则 CI log 中会显示 export XXXX=XXXX 这种 log 从而暴露重要密码(公有项目的 log 别人可以查看的);如果开启了那么尽快找到相应 build 并删除 log 日志,如下
在成功 push 了静态文件以后,就要实现服务器的自动更新,自动更新很简单,只需要写个脚本让容器启动后自动 pull 即可,这里不再阐述;下面说一下怎么通知服务器重启容器,这里的思路很简单,让 CI ssh 上去执行一些 docker 命令即可;但是有个很大问题是 SSH 密码怎么整?
Travis CI 提供了存放加密文件的方式,文档见 这里
简单的说就是将你的 ssh 私钥加密以后扔进去即可,按照稳当的步骤很简单:
- 先安装 ruby 环境,然后用 gem 装 travis (gem install travis)
- 然后登陆 travis (travis login)
- 登陆后加密文件 (travis encrypt-file xxxx),注意要在
.travis.yml同级目录下执行,待加密文件可在任意位置 - travis 会在
.travis.yml写入before_install段解密还原回该文件,如果是 ssh 密钥的话参考上面的配置再改一下权限即可
最后一个小问题是可能会有主机信任问题,因为 CI 服务器第一次连接我的服务器会出现 ssh 主机验证,官方给出的做法是添加 addons 配置
1 | |
三、一些想法
这只是一个小博客,所以服务中断以下无所谓;如果大型部署肯定不会直接重启容器,至少应该是 k8s 滚动升级等措施;与服务器通讯也不应该采用 ssh 方式,虽然 Travis CI 做了加密,但是总感觉不那么稳妥,最好应该写个程序开放一个 REST 接口,并做好授权,必要的话需要开启一次性认证令牌那种方式,其他的后续接着优化 ( :
------------------------------------------------------------- 用Travis CI自动化部署博客
Travis CI 是在软件开发领域中的一个在线的,分布式的持续集成服务,用来构建及测试在GitHub托管的代码。

对于 GitHub 的集成 Travis 做得很好,与 Jenkis 不同,Travis 不需要自己在服务器部署服务,并且是高度集成 GitHub 的,所以对于开源项目还是非常友好的。
注册配置 Travis
注册成功,登录,然后添加自己的 GitHub 上的 repo

选择其中一个或多个你需要集成的项目,开启 build,也就是点击叉叉变成勾勾的过程。
假设现在已经对某个项目开启了 Travis,那么先去看看 Settings 里默认开启的那几项,根据自己实际需求进行设置,没什么特殊需求默认的设置就可以了。
接下来的步骤很清楚,官方也有配图说明:

添加 .travis.yml
说白了接下来的事情都是如何去写这个配置文件,因为 Travis 全是根据这个配置文件去执行相应动作的。
根据你的语言不同,配置也会有较大差异,因为我的博客使用 PHP 的流行框架 Laravel 写的,所以这里也拿它作为例子,官方给出的最精简的 PHP 配置文件是:
language: php

php:
  - 7.1.9
  - nightly
触发构建
接下来如上面所说的第三步,将这个 .travis.yml 文件提交到 GitHub,那么 Travis 就会自动触发构建任务。
我就知道第一次不会这么简单的,失败了。。。
报错原因是执行 phpunit 时提示:
PHP Warning: require(/home/travis/build/stephencode/super-admin/bootstrap/../vendor/autoload.php): failed to open stream: No such file or directory in /home/travis/build/stephencode/super-admin/bootstrap/autoload.php on line 17
一看是自己项目的 composer 依赖包的 autoload.php 文件没找到,那应该是没有执行 composer up 之类的操作,结合网上找的资料,比较好的解决方式是在 install 层添加一行:
install:
  - composer install --prefer-dist --optimize-autoloader --quiet
这样就不会报上面这个错了,然后会报接下来的一个错。。。
1) Tests\Feature\RouteTest::testBasicTest
RuntimeException: No application encryption key has been specified.
其实这个是我在 Laravel 里面的 phpunit.xml 没有配置好的缘故。将 <env name="APP_KEY" value="base64:xxxxxx="/> 补上就好,在 <php></php> 标签里,这个 key 你自己去生成。
在经过五六次 build failed 之后,总算天不负我了。

自动部署到远程服务器
现在已经可以自动构建了,那么接下来的一步就是部署到远程服务器。Travis 提供 after_success 来实现这步骤。
等等,我们要部署到远程服务器,那么势必需要让 Travis 登录到远程服务,那么登录密码怎么处理才能保证安全?这是首先要解决的问题,明文肯定是不行的。
加密登录密码
那看来先得解决这个问题,Travis Docs 里也帮我考虑到了这个避不开的问题的解决方案(Encrypting Files)
我们一起来实践一下:
首先通过 Ruby 的 gem 安装 travis
gem install travis
哎,重试了几次发现敲完这段 shell 如同石沉大海一般,屁都不放一个。。。就算开了代理还是纹丝不动,没办法只能换镜像了。
$ gem sources -l

*** CURRENT SOURCES ***

https://rubygems.org/
查看一下当前的镜像,这货(rubygems)国内出奇的难以访问,网上一搜国内的镜像源,Ruby China 的应该很显眼吧~
$ gem update --system
$ gem sources --add https://gems.ruby-china.org/
然后再查看一下 gem 镜像,确保只有 Ruby China 的 gem 源。
好了,现在可以愉快的安装 travis 了
sudo gem install travis
接下来让我们先在命令行中登录 Travis
$ travis login

We need your GitHub login to identify you.
This information will not be sent to Travis CI, only to api.github.com.
The password will not be displayed.

Try running with --github-token or --auto if you don't want to enter your password anyway.

Username: xxx@xxx.xxx
Password for xxx@xxx.xxx: ***
Successfully logged in as demo!
会要求你输入 GitHub 的账号密码,这个是走 GitHub 的服务,所以不用担心密码泄露。
将目录切换到项目根目录下,也就是 .travis.yml 目录下。因为我们需要让 travis 远程登录自己的服务器,所以需要将本地保存着的 SSH 私钥进行加密处理(默认你也是通过 SSH 免密登录的模式哦,不清楚可以参考我这一篇 《SSH 免密登录》)。
$ travis encrypt-file ~/.ssh/id_rsa --add

Detected repository as xxx/xxx, is this correct? |yes| yes
encrypting ~/.ssh/id_rsa for xxx/xxx
storing result as id_rsa.enc
storing secure env variables for decryption

Make sure to add id_rsa.enc to the git repository.
Make sure not to add ~/.ssh/id_rsa to the git repository.
Commit all changes to your .travis.yml.
这个时候去看一下当前目录下的 .travis.yml,会多出几行
before_install:
  - openssl aes-256-cbc -K $encrypted_d89376f3278d_key -iv $encrypted_d89376f3278d_iv
  -in id_rsa.enc -out ~\/.ssh/id_rsa -d
为保证权限正常,多加一行设置权限的 shell
before_install:
  - openssl aes-256-cbc -K $encrypted_d89376f3278d_key -iv $encrypted_d89376f3278d_iv
    -in id_rsa.enc -out ~/.ssh/id_rsa -d
  - chmod 600 ~/.ssh/id_rsa
还有一点可能会用上,因为 travis 第一次登录远程服务器会出现 SSH 主机验证,这边会有一个主机信任问题。官方给出的方案是添加 addons 配置:
addons:
  ssh_known_hosts: your-ip
到这里,travis 就能够免密登录自己的远程服务器啦~
自动部署
既然已经可以免密登录服务器了,那么写一个部署脚本,在登录时执行该脚本就可以了,一切就是这么顺其自然就好~
写部署脚本
我写 Shell 脚本的水平很有限,这边也就给出一个最精简的 Demo 可以参考一下:
cd /path/to/your-project
git pull origin master
echo 'travis build done!'
执行部署脚本
在 .travis.yml 配置文件中写下这么两行:
after_success:
  - ssh your-user@your-ip "./your-shell-script"
记得将其中的 your-user、your-ip、your-shell-script 都替换成自己的哦!
高大上标志
辛苦奋斗了一天,总是希望别人看到自己的劳动成果的,除了写这篇文章意外还能做点什么呢?那自然是给自己的这个项目在 GitHub 上的 README.md 中显示一个高大上的 build:passing 标志,就像这样:

总结
这次过程中基本都是从不会到会的一个学习过程,从中了解到不少新东西,也发现一些自己的短板,比如写 shell 脚本。。。
最后,贴出我自己的 .travis.yml,里面有关涉及个人隐私的部分我会注释并说明:
language: php

php:
  - 7.1.9
  - nightly

env:
  - APP_DEBUG=false

before_install:
  - openssl aes-256-cbc -K $encrypted_d89376f3278d_key -iv $encrypted_d89376f3278d_iv
    -in id_rsa.enc -out ~/.ssh/id_rsa -d
  - chmod 600 ~/.ssh/id_rsa

install:
  - composer install --prefer-dist --optimize-autoloader --quiet

notifications:
  email:
    recipients:
    - stephenfxl@gmail.com
    on_success: always
    on_failure: always

script:
  - phpunit -c phpunit.xml --coverage-text
from https://segmentfault.com/a/1190000011218410#articleHeader3