Deluge 是一个通过PyGTK建立图形界面的BitTorrent客户端,后端使用libtorrent。Deluge可以在多个平台上使用,如Linux,*BSD,Mac OS和其他类UNIX操作系统。该项目的目标是要在GTK框架上建立一个原生和全功能的BitTorrent客户端。
Deluge由ubuntuforum的两位成员建立,Zach Tibbitts 和 Alan Zakai。在过去,它曾是Google Code的项目。
在过去的开发,Deluge曾经被命名为gTorrent,意思是 GNOME 下的BitTorrent客户端。当第一个版本在2006年9月25日释出的时候,被重新命名为Deluge,以避免别人误会gTorrent只能用于GNOME。
利用0.4.x代码重写的0.5穏定版在2007年3月18日释出。重写代码的目的是要令代码更加优良。而0.5.1.1版支持数据加密,peer exchange,Si prefixes和upnp。
安装过程
1.安装更新源.
rpm -ivh http://pkgs.repoforge.org/rpmforge-release/rpmforge-release-0.5.2-2.el6.rf.i686.rpm
rpm -ivh http://dl.fedoraproject.org/pub/epel/6/i386/epel-release-6-8.noarch.rpm
wget -c -O /etc/yum.repos.d/linuxtech.repo http://pkgrepo.linuxtech.net/el6/release/linuxtech.repo
2.安装依赖库
yum install GeoIP PyXML SOAPpy boost-filesystem boost-python boost-system boost-thread pyOpenSSL python-chardet python-fpconst python-setuptools python-simplejson python-twisted-core python-twisted-web python-zope-filesystem python-zope-interface pyxdg rb_libtorrent rb_libtorrent-python python-beaker python-mako python-markupsafe python-twisted python-twisted-web
3.编译安装deluge:
wget http://download.deluge-torrent.org/source/deluge-1.3.6.tar.gz
tar zxvf deluge-1.3.6.tar.gz
cd deluge-1.3.6
#开始编译
python setup.py build
python setup.py install
#建立账户
/usr/sbin/groupadd deluge
useradd deluge -g deluge -s /bin/false
4.配置启动文件,把以下文件保存为/etc/init.d/deluge-daemon
#!/bin/bash
#
# Startup script for deluged
#
# chkconfig: - 86 14
# description: deluged is the Deluge bit torrent daemon. It manages torrents
# processname: deluged
# pidfile: /var/run/deluged.pid
# config:
# Source function library.
. /etc/init.d/functions
# Get network config
. /etc/sysconfig/network
[ "${NETWORKING}" = "no" ] && exit 0
prog=deluged
prog2=deluge
lockfile=/var/lock/subsys/deluged
lockfile2=/var/lock/subsys/deluge
LANG="zh_CN.UTF-8"
LANGUAGE="zh_CN.UTF-8:zh_CN.UTF-8:zh_CN"
SUPPORTED="zh_CN.UTF-8:zh_CN:zh:en_US.UTF-8:en_US:en"
SYSFONT="lat0-sun16"
ulimit -HSn 65535
start() {
echo -n $"Starting deluged service: "
daemon --user deluge "$prog $OPTIONS"
RETVAL=$?
echo
[ $RETVAL -eq 0 ] && touch $lockfile
echo -n $"Starting deluge web ui: "
daemon --user deluge "$prog2 --ui web >/dev/null 2>&1 &"
RETVAL=$(($RETVAL|$?))
echo
[ $RETVAL -eq 0 ] && touch $lockfile2
return $RETVAL
}
stop() {
echo -n $"Shutting down deluged service: "
killproc $prog
RETVAL=$?
echo
[ $RETVAL -eq 0 ] && rm -f $lockfile
echo -n $"Shutting down deluge web ui: "
killproc $prog2
RETVAL2=$?
echo
[ $RETVAL2 -eq 0 ] && rm -f $lockfile2
return $(($RETVAL|$RETVAL2))
}
# See how we were called.
case "$1" in
start)
start
;;
stop)
stop
;;
status)
status $prog
status $prog2
;;
restart)
stop
start
;;
reload)
exit 3
;;
*)
echo $"Usage: $prog {start|stop|status|restart|reload}"
exit 1
esac
5.给启动脚本权限&启动deluge:
chmod 755 /etc/init.d/deluge-daemon
service deluge-daemon start
Centos 6.X 下安装Deluge的方法
--------------------------------------
Deluge BitTorrent Client - Official github mirror (PR's only) http://deluge-torrent.org
Deluge BitTorrent Client

- Authors:
- Andrew Resch Damien Churchill
- For contributors and past developers see:
- AUTHORS
Installation Instructions:
$ python setup.py build
$ sudo python setup.py install
Contact/Support:
| Forum: | http://forum.deluge-torrent.org |
|---|---|
| IRC Channel: | #deluge on irc.freenode.net |
FAQ
- How to start the various user-interfaces:
- Gtk:
deluge or deluge-gtk
Console:deluge-console
Web:deluge-web Go to http://localhost:8112/ default-password = "deluge"
- How do I start the daemon?:
- deluged
- I can't connect to the daemon from another machine:
- See: http://dev.deluge-torrent.org/wiki/UserGuide/ThinClient
- from github.com/deluge-torrent/deluge
- ============
- deluge_webui.sh脚本的内容:
#!/bin/bash
#####################################################
## Deluge BitTorrent Daemon & Web-UI Installer     ##
## v.1.3.13  -  09/06/2016                         ##
## nunim at sonicboxes.com                         ##
#####################################################
## setup variables ##
latest="http://download.deluge-torrent.org/source/deluge-1.3.13.tar.gz"
geoip="http://geolite.maxmind.com/download/geoip/database/GeoLiteCountry/GeoIP.dat.gz"
packages="python python-twisted python-twisted-web python-openssl python-simplejson python-setuptools intltool python-xdg python-chardet geoip-database python-libtorrent python-notify python-pygame python-glade2 librsvg2-common xdg-utils python-mako"
ip=$(hostname -I | awk -F ' ' '{print $2}')
# Check if we're root
if [ $(whoami) != "root" ]; then
        echo "You need to run this script as root."
        echo "Use 'sudo ./deluge_web.sh' then enter your password when prompted."
        exit 1
fi
clear
## get packages required to build deluge ##
echo "Installing Dependencies..... This will take a few moments.."
echo ""
        apt-get -qq update
        apt-get -qqy upgrade
        apt-get -qqy install $packages

## setup install dir ##
        mkdir deluge_install
        cd deluge_install
## get deluge
        wget $latest
        tar -xf deluge-*
        cd deluge-*

## install deluge ##
        echo " Installing Deluge...."
        python setup.py clean -a
        python setup.py build
        python setup.py install  --install-layout=deb

## cleanup install directory ##
        cd ../..
        rm -rf deluge_install
        clear
## install geoip database to resolve ips ##
        echo " Installing GeoIP Database...."
        wget $geoip
        gzip -d GeoIP.dat.gz
        mkdir -p /usr/share/geoip
        mv GeoIP.dat /usr/share/geoip/

## setup deluge user
        echo "Now we will setup a user for Deluge"
        read -p "What would you like the username to be?   " USERNAME
             adduser --gecos "" $USERNAME

####################### BEGIN INIT SETUP ###############################
## setup defaults ##

cat > /etc/default/deluge-daemon << EOF
# Configuration for /etc/init.d/deluge-daemon

# The init.d script will only run if this variable non-empty.
DELUGED_USER="$USERNAME"             # !!!CHANGE THIS!!!!

# Should we run at startup?
RUN_AT_STARTUP="YES"
EOF

## setup init script ##
## original script from http://apocryph.org/archives/601 ##
cat > /etc/init.d/deluge-daemon << "EOF"
#!/bin/sh
### BEGIN INIT INFO
# Provides:          deluge-daemon
# Required-Start:    $local_fs $remote_fs
# Required-Stop:     $local_fs $remote_fs
# Should-Start:      $network
# Should-Stop:       $network
# Default-Start:     2 3 4 5
# Default-Stop:      0 1 6
# Short-Description: Daemonized version of deluge and webui.
# Description:       Starts the deluge daemon with the user specified in
#                    /etc/default/deluge-daemon.
### END INIT INFO

# Author: Adolfo R. Brandes
# Updated by: Jean-Philippe "Orax" Roemer

PATH=/usr/local/sbin:/usr/local/bin:/sbin:/bin:/usr/sbin:/usr/bin
DESC="Deluge Daemon"
NAME1="deluged"
NAME2="deluge"
DAEMON1=/usr/bin/deluged
DAEMON1_ARGS="-d"             # Consult `man deluged` for more options
DAEMON2=/usr/bin/deluge-web
DAEMON2_ARGS=""               # Consult `man deluge-web` for more options
PIDFILE1=/var/run/$NAME1.pid
PIDFILE2=/var/run/$NAME2.pid
UMASK=022                     # Change this to 0 if running deluged as its own user
PKGNAME=deluge-daemon
SCRIPTNAME=/etc/init.d/$PKGNAME

# Exit if the package is not installed
[ -x "$DAEMON1" -a -x "$DAEMON2" ] || exit 0

# Read configuration variable file if it is present
[ -r /etc/default/$PKGNAME ] && . /etc/default/$PKGNAME

# Load the VERBOSE setting and other rcS variables
[ -f /etc/default/rcS ] && . /etc/default/rcS

# Define LSB log_* functions.
# Depend on lsb-base (>= 3.0-6) to ensure that this file is present.
. /lib/lsb/init-functions

if [ -z "$RUN_AT_STARTUP" -o "$RUN_AT_STARTUP" != "YES" ]
then
   log_warning_msg "Not starting $PKGNAME, edit /etc/default/$PKGNAME to start it."
   exit 0
fi

if [ -z "$DELUGED_USER" ]
then
    log_warning_msg "Not starting $PKGNAME, DELUGED_USER not set in /etc/default/$PKGNAME."
    exit 0
fi

#
# Function to verify if a pid is alive
#
is_alive()
{
   pid=`cat $1` > /dev/null 2>&1
   kill -0 $pid > /dev/null 2>&1
   return $?
}

#
# Function that starts the daemon/service
#
do_start()
{
   # Return
   #   0 if daemon has been started
   #   1 if daemon was already running
   #   2 if daemon could not be started

   is_alive $PIDFILE1
   RETVAL1="$?"

   if [ $RETVAL1 != 0 ]; then
       rm -f $PIDFILE1
       start-stop-daemon --start --background --quiet --pidfile $PIDFILE1 --make-pidfile \
       --exec $DAEMON1 --chuid $DELUGED_USER --user $DELUGED_USER --umask $UMASK -- $DAEMON1_ARGS
       RETVAL1="$?"
   else
       is_alive $PIDFILE2
       RETVAL2="$?"
       [ "$RETVAL2" = "0" -a "$RETVAL1" = "0" ] && return 1
   fi

   is_alive $PIDFILE2
   RETVAL2="$?"

   if [ $RETVAL2 != 0 ]; then
        sleep 2
        rm -f $PIDFILE2
        start-stop-daemon --start --background --quiet --pidfile $PIDFILE2 --make-pidfile \
        --exec $DAEMON2 --chuid $DELUGED_USER --user $DELUGED_USER --umask $UMASK -- $DAEMON2_ARGS
        RETVAL2="$?"
   fi
   [ "$RETVAL1" = "0" -a "$RETVAL2" = "0" ] || return 2
}

#
# Function that stops the daemon/service
#
do_stop()
{
   # Return
   #   0 if daemon has been stopped
   #   1 if daemon was already stopped
   #   2 if daemon could not be stopped
   #   other if a failure occurred

   start-stop-daemon --stop --quiet --retry=TERM/30/KILL/5 --user $DELUGED_USER --pidfile $PIDFILE2
   RETVAL2="$?"
   start-stop-daemon --stop --quiet --retry=TERM/30/KILL/5 --user $DELUGED_USER --pidfile $PIDFILE1
   RETVAL1="$?"
   [ "$RETVAL1" = "2" -o "$RETVAL2" = "2" ] && return 2

   rm -f $PIDFILE1 $PIDFILE2

   [ "$RETVAL1" = "0" -a "$RETVAL2" = "0" ] && return 0 || return 1
}

case "$1" in
  start)
   [ "$VERBOSE" != no ] && log_daemon_msg "Starting $DESC" "$NAME1"
   do_start
   case "$?" in
      0|1) [ "$VERBOSE" != no ] && log_end_msg 0 ;;
      2) [ "$VERBOSE" != no ] && log_end_msg 1 ;;
   esac
   ;;
  stop)
   [ "$VERBOSE" != no ] && log_daemon_msg "Stopping $DESC" "$NAME1"
   do_stop
   case "$?" in
      0|1) [ "$VERBOSE" != no ] && log_end_msg 0 ;;
      2) [ "$VERBOSE" != no ] && log_end_msg 1 ;;
   esac
   ;;
  restart|force-reload)
   log_daemon_msg "Restarting $DESC" "$NAME1"
   do_stop
   case "$?" in
     0|1)
      do_start
      case "$?" in
         0) log_end_msg 0 ;;
         1) log_end_msg 1 ;; # Old process is still running
         *) log_end_msg 1 ;; # Failed to start
      esac
      ;;
     *)
        # Failed to stop
      log_end_msg 1
      ;;
   esac
   ;;
  *)
   echo "Usage: $SCRIPTNAME {start|stop|restart|force-reload}" >&2
   exit 3
   ;;
esac

:
EOF
########################## END INIT SETUP ##################################

## setup daemon ##
chmod 755 /etc/init.d/deluge-daemon
update-rc.d deluge-daemon defaults
## start deluge ##
invoke-rc.d deluge-daemon start

## Finish ##
clear
echo "#####################################################"
echo "##########        Install Complete         ##########"
echo "#####################################################"
echo "If all went as planned you should be able to access"
echo "the deluge web-ui at http://$ip:8112/ "
echo "         Default password = deluge"
echo "#####################################################"
echo "##########   Installer by SonicBoxes.com   ##########"
echo "#####################################################"
echo "For FAQ and configuration options please see:"
echo "http://sonicboxes.com/bittorrent-deluge-webui-install-script/"
---------
BitTorrent – Deluge WebUI Install Script
- Deluge is a BitTorrent client written in python based on libtorrent. Deluge is my favorite BitTorrent client because it’s got some great features like:09/08/16 – Updated for Deluge 1.3.13 – Tested on Debian 8/Ubuntu 16.04
- It’s Fast!
- Full Encryption Support
- Cross-Platform Support
- Thin Client Mode
- Great Web-UI
- Plugin System
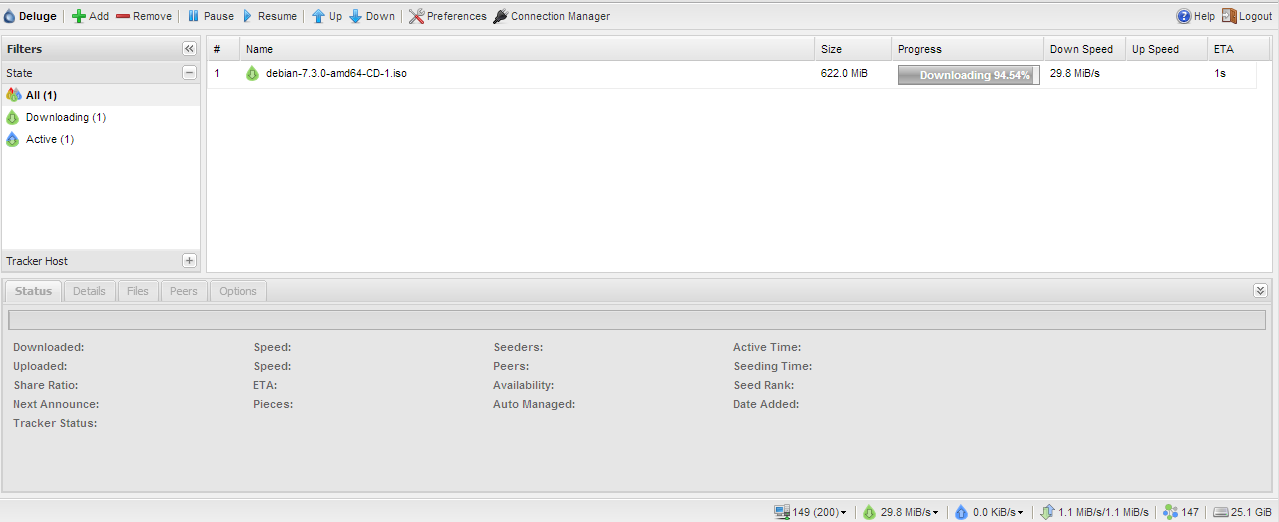
Not only have I found Deluge to be faster than many of the other BitTorrent clients that I have tried but, it’s also simple to setup and reasonably lightweight in terms of resources. Packaged versions of Deluge can be a bit old and not up to snuff, so I’ve written a simple bash script that will automatically install the latest version of Deluge from it’s source. The entire process, on a freshly installed VPS, takes approximately 5 minutes.Script Usage: This script is designed to be run on a freshly installed VPS, it has been tested on Debian 6/7/8 and Ubuntu 12.04/13.10/14.x/15.x – All other distributions are unsupported at this time.wget www.sonicboxes.com/scripts/deluge_webui.sh chmod 755 deluge_webui.sh ./deluge_webui.sh You will be asked to create a user for Deluge to run as. When the script is finished, you may access Deluge at http://<Your IP>:8112
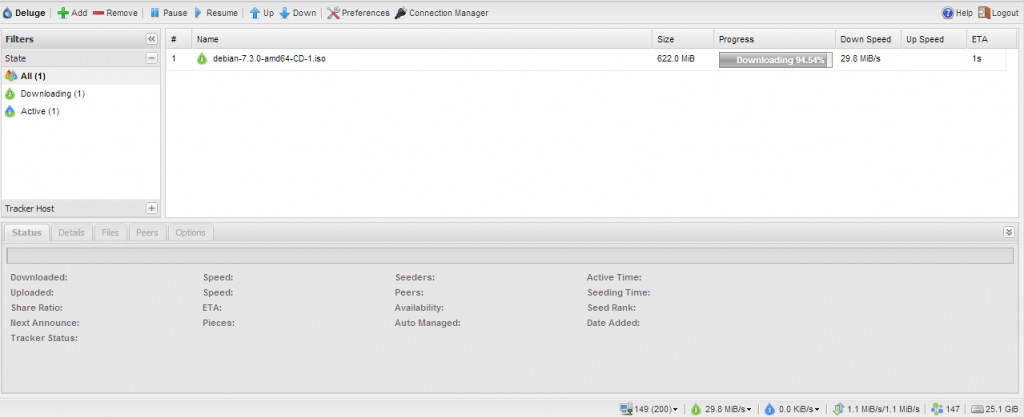 Deluge Configuration:Now that we’ve got Deluge installed, we should perform some the basic configuration tasks. Select Preferences on the top bar to bring up the menu, the first thing I always do is enable Encryption.Encryption
 The basic Encryption settings are:
- Forced – Only encrypted connections are allowed. Incoming connections that are not encrypted are closed if the encrypted outgoing connection fails, a non-encrypted retry will not be made.
- Enabled – Encrypted connections are enabled, but non-encrypted connections are allowed. An incoming non-encrypted connection will be accepted, if an outgoing encrypted connection fails, a non- encrypted connection will be tried.
- Disabled – Only non-encrypted connections are allowed.
I typically go with Forced encryption on both Incoming & Outgoing connections, the downside to this is that it places more load on the processor and there are technically less available Peers. For the best possible incoming connection, you should select Enabled, not Forced.See this link for more information on the possible Encryption settings:Bandwidth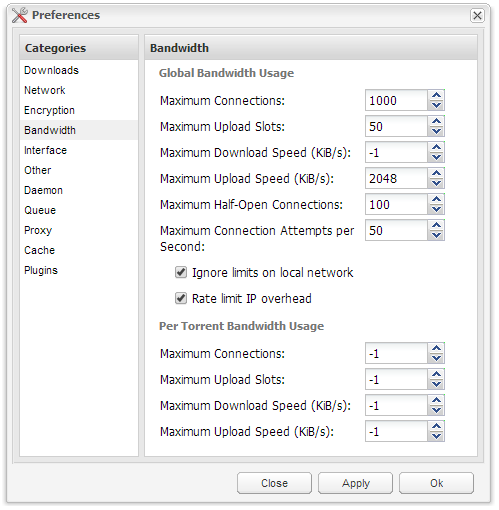 The next step is to adjust the various connection settings to meet your needs. By default Deluge will limit you to 200 connections, unless you’re only downloading one well seeded torrent at a time this is far from adequate, I typically set Maximum Connections to between 500 and 1000, depending on the server specs. If you plan to do some seeding, you’ll want to raise the Maximum Upload Slots from the default 4 to a more respectable number, say 25 or 50. It would also be advisable to limit your Maximum Upload Speed so you do not burn through a month’s bandwidth in a few days, I typically set this to between 2048KB/s and 4096KB/s, this is 16 and 32 Mb/s, a respectable number for uploading while ensuring you’re not hogging the port. I do not place any per torrent based limitations, however if you’re seeding many torrents, i.e. more than 100, at any one time you may way to limit the Maximum Upload Slots or Speed per torrent to ensure your bandwidth is being spread out evenly.Queue
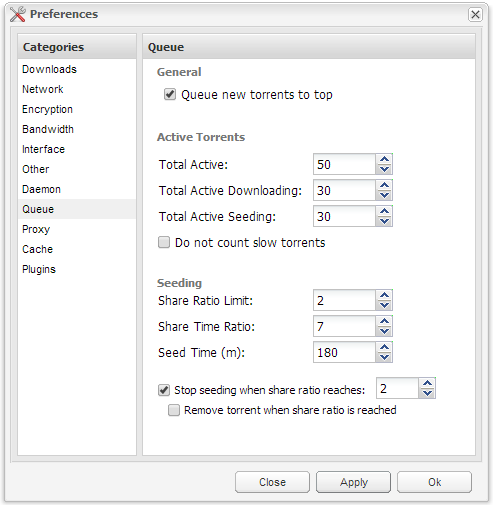 This section is rather self explanatory, set Total Active torrent to the maximum number of torrents you’d like to Seed or Leech at once, I typically set this between 25 and 50, but I am not a heavy seeder. If you do a lot of seeding you should probably set your Total Active between 100-200 along with your Total Active Seeding. Keep your resources in mind when you make these settings, a 128MB VPS will not be happy with over 100 active torrents. If you plan on using Deluge’s auto-managed seeding, you should enable Stop Seeding When Ratio Reaches: <desired ratio>.Network
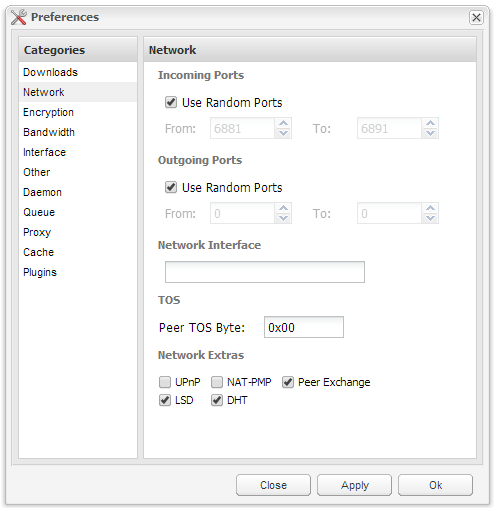 This section can be quite important, I typically go with Random ports as there are no firewall limitations in place, however if you plan to run a firewall on your VPS, such as CSF, you’ll want to use a fixed port for incoming and outgoing. If you only seed on a private tracker, make sure you disable Peer Exchange, LSD and DHT, these will get you banned on a private tracker as you may be sharing with others outside the site, and alter your tracker ratio. Almost all private trackers will direct you to disable any kind of peer sharing. If you don’t use private trackers you should leave these enabled to ensure the maximum number of possible seeds.ThinClient/Daemon Configuration
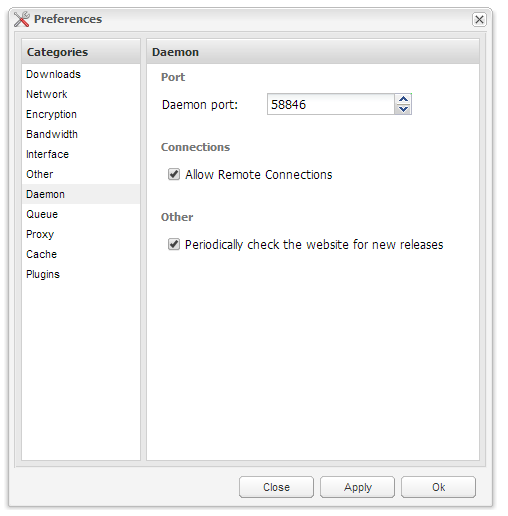 This is one of the neatest features about Deluge, you can use a local GUI client instead of the WebUI to download torrents remotely onto your VPS. There are two ways to go about this, one way is to use a VPN or SSH tunnel to connect to your VPS and then connect to the Deluge daemon locally. The easier method is to check Allow Remote Connections as shown above. Now you’ll need to install Deluge on your PC. Once installed, go to Edit >> Preferences >> Interface – You need to uncheck Classic Mode Enable. Deluge will restart after you have applied this change. Now you need to add an authenticated user, you’ll do this by going to your Deluge user’s home directory. If the user you created was deluge-torrent, it would be: cd /home/deluge-torrent/ Add your new user to the auth file like so:
echo "username:strongpassword:10" >> ./.config/deluge/auth
## Restart Deluge ##
/etc/init.d/deluge-daemon restart
Now go back to your desktop Deluge and setup the connection to your server,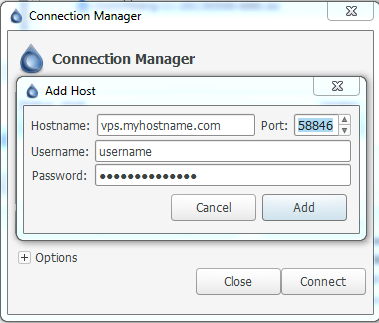 If you’ve done everything correctly, you should see a green dot next to your hostname and you’ll be able to hit Connect.
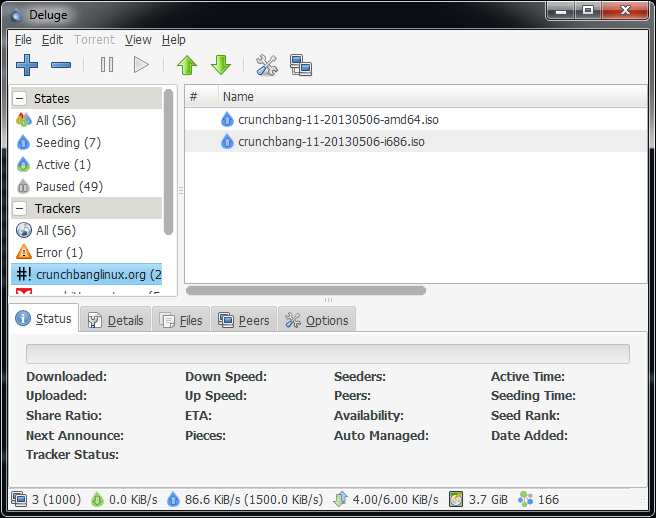 That’s it, you should now be staring at your Deluge ThinClient. You can add torrents, start, stop, remove, everything you would normally do except that it will be on your remote server. Using this method you can also use one Web-UI to manage multiple Deluge daemons, simply add them using the Connection Manager.FAQ / User Guide: For further information about Deluge, including the official FAQ and User Guide, see the official Deluge website located here: http://dev.deluge-torrent.org/wiki/UserGuide
 - from https://www.sonicboxes.com/bittorrent-deluge-webui-install-script/
------------------------
一个小巧而强大的BT种子下载客户端:Deluge一键安装脚本
说明:Deluge是一个小巧且功能强大的BT种子下载客户端,功能很多,且安装很快,界面虽然丑了点,但使用挺方便的,下载速度也很快,特别是一些热门资源,超级快。Deluge一键安装脚本在国内好像没怎么见到,所以分享一下,使用该脚本1分钟即可安装完成,有兴趣的可以试试。
简介
Deluge是一个通过PyGTK建立图形界面的BitTorrent客户端,后端使用libtorrent。Deluge可以在多个平台上使用,如Linux、OS X、Unix和Windows操作系统。该项目的目标是要在GTK框架上建立一个原生和全功能的BitTorrent客户端。体积小巧且节约系统资源,通过丰富的插件来实现核心以外的众多功能,还支持ipv6。
功能
- 可以做种
- 支持各种插件
UPnP和NAT-PMP网络支持数据加密DHT支持uTorrent种子交换BitTorrent协议加密- 可以使用代理下载
- 同时下载多个文件
- 下载完成后移动文件到指定目录
- 全局/单个文件速度、连接数限制
- 文件预览
- 可以在达到指定的分享比例后停止做种
- 可指定密码保护
安装
Github地址:https://github.com/sayem314/My-Deluge-Installer
使用以下命令安装:
wget -q --no-check-certificate https://raw.githubusercontent.com/sayem314/My-Deluge-Installer/master/install-deluge.sh -O install-deluge.sh && chmod +x install-deluge.sh && ./install-deluge.sh -installhttp://ip:8112进入界面,密码deluge。首次登录会有让你修改密码的提示,使用时需要在Connection Manage中选择后端并连接。当然,你也可以添加你已经在别的服务器上部署的后端。最后点击Add添加并下载种子文件。
卸载命令:
./install-deluge.sh -uninstall -------------------Inexistence
警告:不保证本脚本能正常使用,翻车了不负责;上车前还请三思 作者是个菜鸡,没学过程序,本脚本的不少内容是 依样画葫芦 + 抄袭 + 百度/谷歌得来的 建议重装完系统后安装本脚本,非全新安装的情况下翻车几率更高本文内容不会及时更新;可能最新的脚本在界面上和截图里有一些不一样Usage
bash -c "$(wget --no-check-certificate -qO- https://github.com/Aniverse/inexistence/raw/master/inexistence.sh)"wget --no-check-certificate -qO inexistence.sh https://github.com/Aniverse/inexistence/raw/master/inexistence.sh bash inexistence.shInstallation Guide
 脚本支持自定义参数,具体参数的说明在下文中有说明
 检查是否以 root 权限来运行脚本,检查公网 IP 地址与系统参数
 支持
支持Ubuntu 16.04 / 18.04、Debian 8 / 9;Ubuntu 14.04、Debian 7可以选择用脚本升级系统;其他系统不支持 使用-s参数可以跳过对系统是否受支持的检查,不过这种情况下脚本能不能正常工作就是另一回事了 显示系统信息以及注意事项
- 是否升级系统 如果你的系统是
Debian 7或Ubuntu 14.04,你可以用本脚本来升级到Debian 8/9或Ubuntu 16.04/18.04理论上整个升级过程应该是无交互的,应该不会碰到什么问你 Yes or No 的问题 升级完后会直接执行重启命令,重启完后你需要再次运行脚本来完成软件的安装 - 账号密码
-u <username> -p <password>你输入的账号密码会被用于各类软件以及 SSH 的登录验证 用户名需要以字母开头,长度 4-16 位;密码最好同时包含字母和数字,长度至少 8 位 恩,目前我话是这么说,但脚本里还没有检查账号密码是否合乎要求,所以还是自己注意点吧 - 系统源
--apt-yes、--apt-no目前默认直接换源不再提问,如果不想换源,请在运行脚本的使用--apt-no参数 其实大多数情况下无需换源;但某些盒子默认的源可能有点问题,所以我干脆做成默认都换源了 - 线程数量
--mt-single、--mt-double、--mt-half、--mt-max目前默认直接使用全部线程不再提问,如果不想使用全部线程,请在运行脚本的使用以上的参数来指定 编译时使用几个线程进行编译。一般来说用默认的选项,也就是全部线程都用于编译就行了 某些 VPS 可能限制下线程数量能避免编译过程中因为内存不足翻车 - 安装时是否创建 swap
--swap-yes,--swap-no目前默认对于内存小于 1926MB 的服务器直接启用 swap 不再询问,如不想使用 swap 请用--swap-no参数 一些内存不够大的 VPS 在编译安装时可能物理内存不足,使用 swap 可以解决这个问题 实测 1C1T 1GB 内存 的 Vultr VPS 安装 Flood 不开启 swap 的话会失败,开启就没问题了 目前对于物理内存小于 1926MB 的都默认启用 swap,如果内存大于这个值那么你根本就不会看到这个选项…… - 客户端安装选项
--de ppa --qb 3.3.11 --rt 0.9.4 --tr repo下面四大客户端的安装,指定版本的都是编译安装,安装速度相对较慢但可以任选版本 选择30是自己指定另外的版本来安装 (不会检查这个版本是否可用;可能会翻车) 选择40是从系统源里安装,安装速度快但版本往往比较老,且无法指定版本 选择50是从 PPA 安装( Debian 不支持所以不会显示),同样无法指定版本不过一般软件都是最新版 - qBittorrent
--qb 4.1.4、--qb ppa、--qb No都快 2019 年了,向前看吧,不推荐使用 qBittorrent 4.1.4 以前的版本 下一个版本将会移除 3.3.11 和 3.3.16 的安装选项,如果你仍然需要的话可以手动输入对应的版本号进行安装 可以跳过校验的 3.3.11 修改版已移除,不用再试了 - Deluge
--de '1.3.15 (Skip hash check)'、--de 1.3.9、--de repo、--de No1.3.9 这个古董版本主要针对那些不支持新版本 Deluge 也不支持 qBittorrent 的站点,比如 HD4FANS,KeepFRDS 2.0 版仍在开发中,不建议普通用户使用,基本上没有几个 PT 站的白名单内有它(有它的基本上都是采用黑名单而不是白名单的) 默认选项为从源码安装 1.3.15 此外还会安装一些实用的 Deluge 第三方插件:
AutoRemovePlus是自动删种插件,支持 WebUI 与 GtkUIltconfig是一个调整libtorrent-rasterbar参数的插件,在安装完后就启用了High Performance Seed模式Stats、TotalTraffic、Pieces、LabelPlus、YaRSS2、NoFolder都只能在 GUI 下设置,WebUI 下无法显示Stats和TotalTraffic、Pieces分别可以实现速度曲线和流量统计、区块统计LabelPlus是加强版的标签管理,支持自动根据 Tracker 对种子限速,刷 Frds 可用;也只有 GUI 可用YaRSS2是用于 RSS 的插件;NoFolder可以让 Deluge 在下载种子时不生成文件夹,辅种可用 隐藏选项 21,是可以跳过校验、全磁盘预分配的 1.3.15 版本 使用修改版客户端、跳过校验 存在风险,后果自负
- libtorrent-rasterbar 要安装 Deluge 或者 qBittorrent 中的任意一个,就必须安装 libtorrent-rasterbar,因为 libtorrent-rasterbar 是这两个软件所使用的后端 从 Deluge 2.0 和 qBittorrent 4.2.0 开始,libtorrent-rasterbar 的最低版本要求升级到了 1.1 需要注意的是,这个 libtorrent-rasterbar 和 rTorrent 所使用的 libtorrent 是不一样的,切勿混淆 Deluge 和 qBittorrent 使用的是 libtorrent-rasterbar,rTorrent 使用的则是 libtorrent-rakshasa
- rTorrent
--rt 0.9.4、--rt 0.9.3 --enable-ipv6、--rt No这部分是调用我修改的 rtinst 来安装的 注意,Ubuntu 18.04 和 Debian 9 因为 OpenSSL 的原因,只能使用新版本的 0.9.6 或 0.9.7,更低版本无法直接安装
- 安装 rTorrent,ruTorrent,nginx,ffmpeg 3.4.2,rar 5.5.0,h5ai 目录列表程序
- 0.9.2-0.9.4 支持 IPv6 用的是打好补丁的版本,属于修改版客户端
- 0.9.6 支持 IPv6 用的是 2018.01.30 的 feature-bind 分支,原生支持 IPv6
- 不修改 SSH 端口,FTP 使用
vsftpd,端口号 21,监听 IPv6 - 设置了 Deluge、qBittorrent、Transmission WebUI 的反代
- ruTorrent 版本为来自 master 分支的 3.8 版,此外还安装了如下的插件和主题
club-QuickBoxMaterialDesign第三方主题AutoDL-Irssi(原版 rtinst 自带)Filemanager插件可以在 ruTorrent 上管理文件、右键创建压缩包、生成 mediainfo 和截图ruTorrent Mobile插件可以优化 ruTorrent 在手机上的显示效果(不需要的话可以手动禁用此插件)spectrogram插件可以在 ruTorrent 上获取音频文件的频谱Fileshare插件创建有时限、可自定义密码的文件分享链接(有点问题,以后再修复)Mediastream插件可以在线观看盒子的视频文件
- Flood
--flood-yes、--flood-no选择不安装 rTorrent 的话这个选项不会出现 Flood 是 rTorrent 的另一个 WebUI,界面更为美观,加载速度快,不过功能上不如 ruTorrent - Transmission
--tr repo、--tr ppa、--tr 2.93 --tr-skip、--tr NoTransmission 默认选择从仓库里安装,节省时间(ban 2.93 以前版本的站点也不是很多) 此外还会安装 美化版的 WebUI,更方便易用 隐藏选项 11 和 12,分别对应可以跳过校验、无文件打开数限制的 2.92、2.93 版本 使用修改版客户端、跳过校验 存在风险,后果自负 - Remote Desktop
--rdp-vnc、--rdp-x2go、--rdp-no远程桌面选项,默认不安装 远程桌面可以完成一些 CLI 下做不了或者 CLI 实现起来很麻烦的操作,比如 BD-Remux,wine uTorrent VNC 目前在 Debian 下安装完后无法连接,建议 Debian 系统用 X2Go 或者另外想办法安装 VNC - wine & mono
--wine-yes、--wine-no这两个默认也是不安装的wine可以实现在 Linux 上运行 Windows 程序,比如 DVDFab、uTorrentmono是一个跨平台的 .NET 运行环境,BDinfoCLI、Jackett、Sonarr 等软件的运行都需要 mono - Some additional tools
--tools-yes、--tools-no安装最新版本的 ffmpeg、mediainfo、mkvtoolnix、eac3to、bluray 脚本、mktorrent
mediainfo用最新版是因为某些站发种填信息时有这方面的要求,比如 HDBitsmkvtoolnix主要是用于做 BD-Remuxffmpeg对于大多数盒子用户来说主要是拿来做视频截图用,采用 git 的 Static Buildseac3to需要 wine 来运行,做 remux 时用得上mktorrent由于 1.1 版的实际表现不是很理想,因此选择从系统源安装 1.0 版本BDinfoCLI已经自带了,需要 mono 来运行bluray其实也自带了,不过这里的版本不是及时更新的,所以还是更新下
- Flexget
--flexget-yes、--flexget-no默认不安装;我启用了 daemon 模式和 WebUI,还预设了一些模板,仅供参考 因为配置文件里的 passkey 需要用户自己修改,所以我也没有启用 schedules 或 crontab,需要的话自己设置 - rclone
--rclone-yes、--rclone-no默认不安装。安装好后自己输入 rclone config 进行配置 - BBR
--bbr-yes、--bbr-no(如果你想安装魔改版 BBR 或 锐速,请移步到 TrCtrlProToc0l 脚本) 会检测你当前的内核版本,大于 4.9 是默认不安装新内核与 BBR,高于 4.9 是默认直接启用BBR(不安装新内核) 据说 4.12 存在 VirtIO 方面的 bug,4.13 及以上无法适配南琴浪版以外的魔改 BBR,因此采用了 4.11.12 内核 注意:更换内核或多或少是有点危险性的操作,有时候会导致无法正常启动系统 不过针对常见的 Online/OneProvider Paris 的独服我是准备了五个 firmware,应该没什么问题 - 系统设置
--tweaks-yes、--tweaks-no默认启用,具体操作如下:
- 修改时区为 UTC+8
- 语言编码设置为 en.UTF-8
- 设置
alias简化命令(私货夹带) - 提高系统文件打开数
- 修改 screen 设置
- 释放最大分区的保留空间
 如果你哪里写错了,先退出脚本重新选择;没什么问题的话就敲回车继续 使用
-y可以跳过开头的信息确认和此处的信息确认,配合其他参数可以做到无交互安装
 安装完成后会输出各类 WebUI 的网址,以及本次安装花了多少时间,然后问你是否重启系统(默认是不重启)
 如果报道上出现了偏差,会提示你如何查看日志(报错时请务必附上日志!)
 最后打开浏览器检查下各客户端是否都能正常访问
To Do List
- Password 修改 SSH、Deluge、ruTorrent、Transmission、qBittorrent、Flexget 密码的脚本 实现起来不难,主要是现在没空做
- Version 升级、降级 Deluge、ruTorrent、Transmission、qBittorrent 版本的脚本,也是调用单独的脚本去实现
- Box 把各种客户端的安装每个都做成单独的脚本,然后在
inexistence、version中需要安装的时候直接调用 这个思路是从 QuickBox 那边学到的,最后的命令可能会长这样子:box install vnc、box purge qbittorrent
Under Consideration
- Multi-user
- 将 Tr/De/Qb 的运行用户从 root 换成普通用户
- 多用户模式,可以直接 adduser 并设置好 de/qb/rt/tr/flexget
碎碎念
其实mingling、box这些脚本做得再好,对于一般人而言也没有 QuickBox 那个 Dashboard 好,毕竟那个不需要用 SSHmingling
方便刷子们使用的一个脚本,有很多功能如果你没安装inexistence的话是用不了的 有些功能还没做完,不过这个脚本我有点放弃治疗了,无限期弃更,以后可能还会删掉 不做具体的介绍了,直接看图吧


Known Issues
- 有时候客户端操作菜单按了却没用
To Do List
- 自动检查脚本是否存在更新? 但考虑到新版本和老版本可能不适配,这个不一定会做
- 完善说明文档
BDinfo
这个是单独抽出来的,用于给 BDMV 扫描 BDinfo 的脚本 运行完以后可以直接在 SSH 上输出 BDinfo Quick Summary 如果没有 mono 或 BDinfo-Cli 的话,可以先运行
bluray或者inexistence脚本安装需要的软件 可以选择需要扫描的 mpls
 BDinfo 输出结果看起来五颜六色是因为使用了 lolcat,如果你没安装 lolcat 的话是不会有彩色的
IPv6
用于配置 IPv6 的脚本,如果第一次运行不成功,可以试着再跑一遍 如果你跑了 N 遍都不成功,有一种可能性是你那个 IPv6 本身不可用 2018.11.15 Update:可能跑完后机器会失联,如果这样的话试试后台重启下?bash -c "$(wget -qO- https://github.com/Aniverse/inexistence/raw/master/00.Installation/script/ipv6)"可以在命令里写上 IPv6 的信息(复制粘贴更方便一些) 第四项参数网卡名称可以让脚本自动检测,也可以手动指定wget https://github.com/Aniverse/inexistence/raw/master/00.Installation/script/ipv6 bash ipv6 [address] [subnet] [DUID] [interface] bash ipv6 2001:3bc8:2490:: 48 00:03:00:02:19:c4:c9:e3:75:26 enp2s0 bash ipv6 [address] [subnet] [DUID] bash ipv6 2001:cb6:2521:240:: 57 00:03:00:01:d3:3a:15:b4:43:ad
xiansu
用于给盒子限制全局上传速度的脚本,适用于保证带宽有限的盒子,比如 Online.net 的一些独服 更改限速速率时无需事先解除限速,脚本执行新的限速前会自动解除该网卡已经存在的限速 直接输入xiansu eth0 300的话会直接限速,不会有任何提示,适合用于需要开机自启的情况xiansu xiansu [interface] [uploadspeed,Mbps] xiansu eth0 300
jietu
用于截图和生成 mediainfo 的脚本,适合非原盘类的视频 输入文件名则对这个文件进行操作,输入文件夹则寻找该文件夹内最大的文件当做视频文件进行操作 你可以指定分辨率进行截图,也可以不写分辨率让脚本自动计算 DAR 后的分辨率 比如有一张 DVD 的原始分辨率是 720x576,DAR 是 16:9,那么脚本就会采用 1024x576 来截图jietu [path/to/file] [resloution] jietu "/home/aniverse/[VCB-Studio][Saenai Heroine no Sodatekata Flat][01][Ma10p_1080p][x265_flac_aac]" 1920x1080 jietu [path/to/folder] jietu "/home/aniverse/deluge/download/Your Name (2016) PAL DVD9"
guazai
用于把 ISO 挂载成文件夹的脚本,使用的是 mount 命令,因此需要 root 权限才能运行
guazai后输入文件名则挂载那个文件

guazai后输入路径则会寻找该路径下的所有 ISO 进行挂载 直接输入guazai,会在当前目录下寻找 ISO 挂载jiegua
解除挂载用的脚本,会把能检测到的所有已挂载的 ISO 全部解除挂载
guazai+jietu+jiegua三连Blu-ray
关于 bluray 脚本的介绍与使用,请移步到 这里 inexistence 自带 bluray,不过不包括它的软件库 (然而你可以直接用 inexistence 安装 ffmpeg、vcs、bdinfocli、mono、imagemagick)Something else
还有一些脚本,比如zuozhong,在此不作介绍了,基本看名字都知道是干什么用的了- 我不想回答 README 中已包含答案的问题
- 有 bug 的话欢迎反馈,但不保证能解决,且有些问题可能不是本脚本造成的
- 有意见或者改进也欢迎告知
如需提交 bug ,请告诉我如下的信息:- 具体日志,日志的查看方法在最后安装出错后会有提示
- 你使用的是什么盒子
- 你具体碰到了什么问题
Some references
https://github.com/arakasi72/rtinst https://github.com/QuickBox/QB https://github.com/liaralabs/swizzin https://github.com/qbittorrent/qBittorrent https://github.com/jfurrow/flood https://flexget.com https://wiki.winehq.org https://wiki.x2go.org http://www.mono-project.com https://rclone.org/install http://dev.deluge-torrent.org/wiki/UserGuide https://mkvtoolnix.download/downloads.html http://outlyer.net/etiq/projects/vcs https://amefs.net https://www.dwhd.org https://moeclub.org https://sometimesnaive.org https://www.94ish.me https://blog.gloriousdays.pw https://blog.rhilip.info https://ymgblog.com http://wilywx.com http://xiaofd.win/onekey-ruisu.html https://github.com/arfoll/unrarall https://github.com/teddysun/across https://github.com/FunctionClub https://github.com/oooldking/script https://github.com/gutenye/systemd-units https://github.com/outime/ipv6-dhclient-script https://github.com/jxzy199306/ipv6_dhclient_online_net https://github.com/GalaxyXL/qBittorrent-autoremove https://xxxxxx.org/forums/viewtopic?topicid=61434 https://github.com/superlukia/transmission-2.92_skiphashcheck https://tieba.baidu.com/p/5536354634 https://tieba.baidu.com/p/5532509017 https://tieba.baidu.com/p/5158974574 https://serverfault.com/questions/48724/100-non-interactive-debian-dist-upgrade https://github.com/Azure/azure-devops-utils https://stackoverflow.com/questions/36524872/check-single-character-in-array-bash-for-password-generator- from https://github.com/Aniverse/inexistence-------
跨平台的BT客户端-Deluge
Deluge是一款跨平台的BT开源客户端。(曾用名为gTorrent)。遵守GPL开源协议。基于python和GTK+开发,除了桌面版本,还有命令行版本,以及网页版本。内核采用libtorrent来处理BT的协议。多语言支持(包括中文)。
Deluge包含了一般BT客户端的所有功能,功能特性包括:插件支持,数据加密。在一个窗口内下载多个文件, 预置文件空间, 全局和个别文件速度限制 ,下载个别文件, 文件预览 ,选择下载目录, 使用排队管理, 可以在达到指定的上下载比例后停止上载等。
Deluge 支持网络功能: DHT 支持, uTorrent种子交换, BitTorrent协定加密, UPnP 和 NAT-PMP ,代理支持, 私人种子,限速 ,RSS 等
[repo owner=”deluge-torrent” name=”deluge”]-----------------------------------------------------Deluge BitTorrent client - Git mirror, PRs only.
www.deluge-torrent.orgDeluge BitTorrent Client

Deluge is a BitTorrent client that utilizes a daemon/client model. It has various user interfaces available such as the GTK-UI, Web-UI and Console-UI. It uses libtorrent at its core to handle the BitTorrent protocol.
Install
From PyPi:
pip install delugewith all optional dependencies:
pip install deluge[all]From source code:
pip install .with all optional dependencies:
pip install .[all]See DEPENDS and Installing/Source for dependency details.
Usage
The various user-interfaces and Deluge daemon can be started with the following commands.
Use the
--helpoption for further command options.Gtk UI
delugeordeluge-gtkConsole UI
deluge-consoleWeb UI
deluge-webOpen http://localhost:8112 with default password
deluge.Daemon
delugedSee the Thinclient guide to connect to the daemon from another computer.
Contact
- Homepage
- User guide
- Forum
- IRC Libera.Chat #deluge
- Discord
from https://github.com/deluge-torrent/deluge