Total Pageviews

Thursday, 30 June 2022

Cloudflare用于翻墙的三种方法


Cloudflare是一间总部位于旧金山的美国跨国IT企业,以向客户提供基于反向代理的内容分发网络及分布式域名解析服务为主要业务。Cloudflare可以帮助受保护站点抵御包拒绝服务攻击等网络攻击,确保该网站长期在线,同时提升网站的性能、加载速度以改善访客体验。 维基百科

本文讲述了利用 Cloudflare CDN 来将被 Block 的 IP 救活, 以及使用 Cloudflare Workers + WorkersProxy 来反代任何网站, 还有 Cloudflare Workers + GoIndex 将 Google Drive 打造成国内可以访问的直链网盘, 且 Cloudflare Workers 并不需要有服务器, 部署也十分简单。 最后介绍了 Warp VPN 可以作用备用翻墙手段。

CDN

Cloudflare CDN 是在翻墙领域最广为人知的用法, 在 2019 年 6 月 GFW 的大规模封锁海外热门 VPS 时开始流行起来, IP 被封了就套个 CDN。 CDN 除了可以防止 DDoS 最网站的直接攻击外, 也可以通过内容分发网络加快网站访问速度。

V2Ray 的 WebSocket(以下简称 WS), 可以与 Nginx 完美配合, 从而达到与 HTTP 请求完全相同的效果, 不容易被识别。

以下是 Nginx 的配置:

server {
listen 443 ssl;
ssl on;
ssl_certificate /etc/nginx/ssl/fullchain.cer; # 证书路径
ssl_certificate_key /etc/nginx/ssl/private.key; # 私钥路径
ssl_protocols TLSv1 TLSv1.1 TLSv1.2;
ssl_ciphers HIGH:!aNULL:!MD5;
server_name mydomain.com; # 你的域名
location /ray { # V2Ray WS 设置中的路径
proxy_redirect off;
proxy_pass http://127.0.0.1:10000; # 将请求转发给后端的 V2Ray 监听端口, V2Ray 则设置为只接受来自本地的请求
proxy_http_version 1.1;
proxy_set_header Upgrade $http_upgrade;
proxy_set_header Connection "upgrade";
proxy_set_header Host $http_host;
}
}

V2Ray 服务端设置:

{
"inbounds": [
{
"port": 10000, // V2Ray 监听端口
"listen":"127.0.0.1", // 只监听 127.0.0.1,避免除本机外的机器探测到开放了 10000 端口
"protocol": "vmess",
"settings": {
"clients": [
{
"id": "b831381d-6324-4d53-ad4f-8cda48b30811", // 一个 UUID 组成的密钥
"alterId": 4
}
]
},
"streamSettings": {
"network": "ws",
"wsSettings": {
"path": "/ray" // 一个路径, 请自定
}
}
}
],
"outbounds": [
{
"protocol": "freedom",
"settings": {}
}
]
}

这样设置的好处是, 避免了将 V2Ray 所使用的监听端口直接暴露在外部, 而是先通过 Nginx 监听 443 端口, 路径为 /ray 的请求, Nginx 会将其转发给真正的 V2Ray 端口 10000。 这使得外部看起来只是一个 HTTP 请求 不容易被识别。

套不套 CDN 则视情况而定, 如果 IP 被 Block, 套 CDN 的话访问域名会先经 CDN 节点, 在由 CDN 节点访问你真正的服务器, 故可以救活你的网站或代理。 但因为使用人数众多, 套 CDN 通常会导致线路速度下降。

Workers

Cloudflare Workers 允许你直接部署 JavaScript 程序, 而不需要你自己的服务器, 也不需要域名。

Cloudflare Workers 免费版的限制是每天 10 万次请求, 10 TB 流量。

你可以:

  • 部署任何你自己的 JavaScript 程序。
  • 使用 WorkersProxy 反代任何网站。
  • 使用 GoIndex 将 Google Drive 打造成国内可以访问的直链式网盘。

WorkersProxy

WorkersProxy 可以用来反代任何网站, 使其在国内可以访问。

演示: https://go.littlepotato.life/

项目地址: https://github.com/Siujoeng-Lau/WorkersProxy

(https://github.com/xiaoyang-sde/reflare)

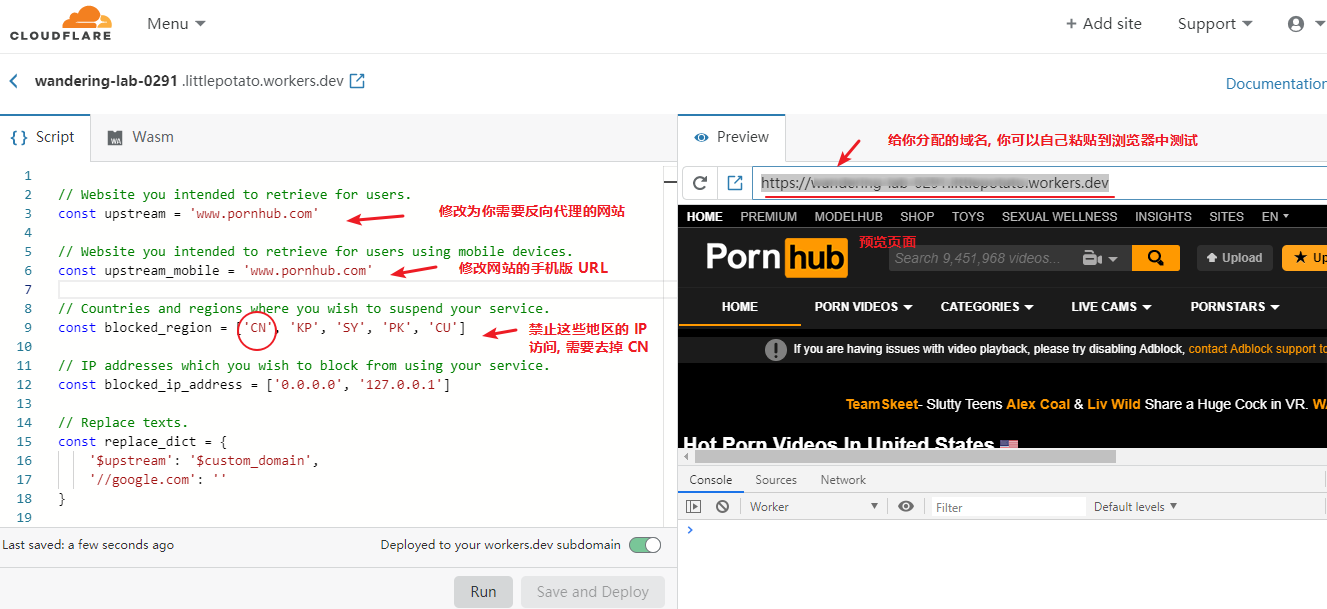
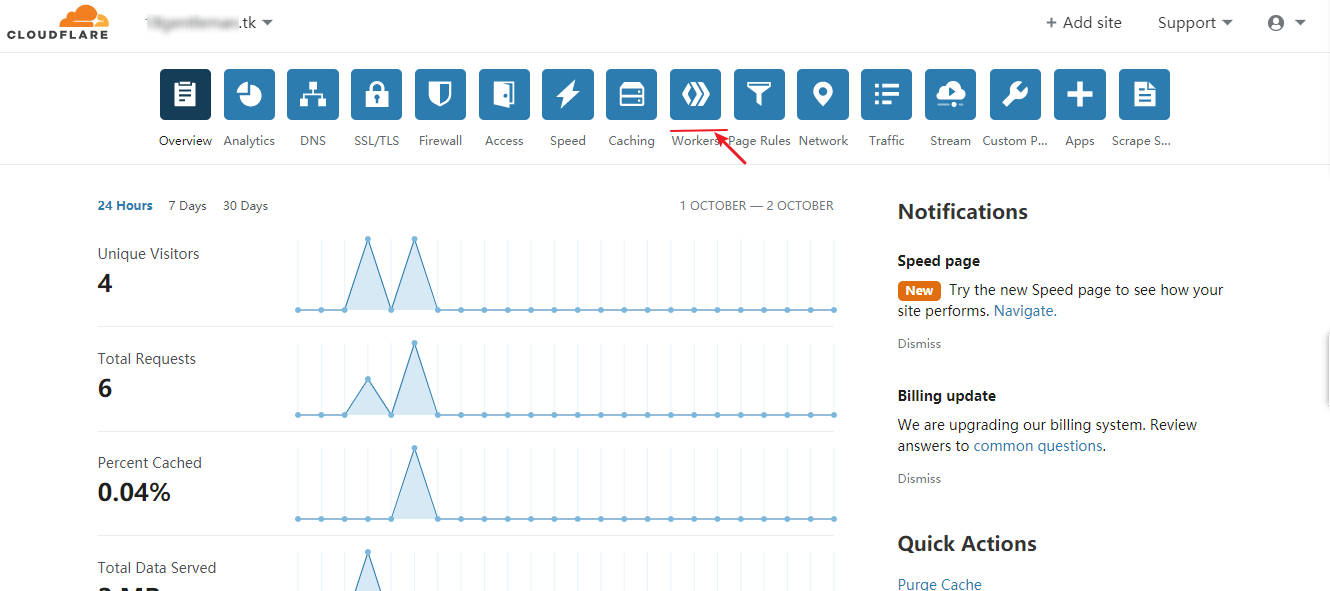
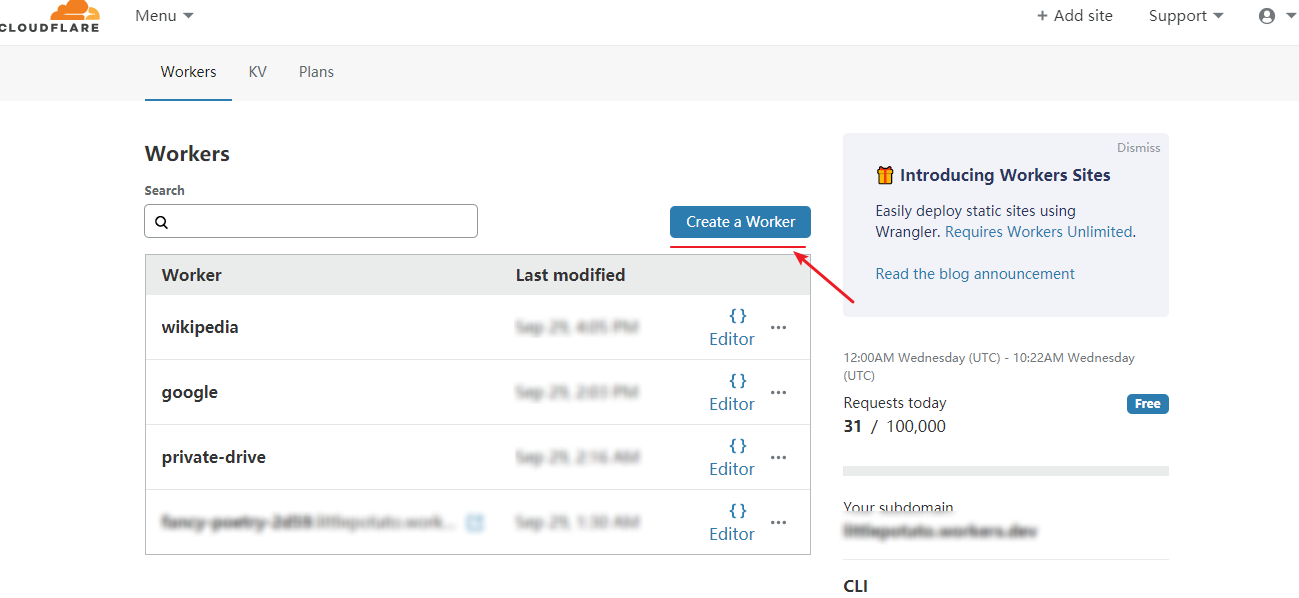
注册 Cloudflare, 并打开 Workers 选项, 点击 Create a Worker。

1

将项目中的 index。js 复制到 Script 中, 然后对其进行修改, 修改完毕后点击 Save and Deploy 右侧可以看见预览。

2

然后你就可以保存 Cloudflare 提供的域名来访问了, 但是你可以添加自己的域名。
先将域名交由 Cloudflare DNS 解析,并确保为状态为 Proxied(云朵点亮),即开启 CDN。
接下来添加一条 CNAME 记录,并将一个子域名指向之前由 Cloudflare Workers 提供的域名。
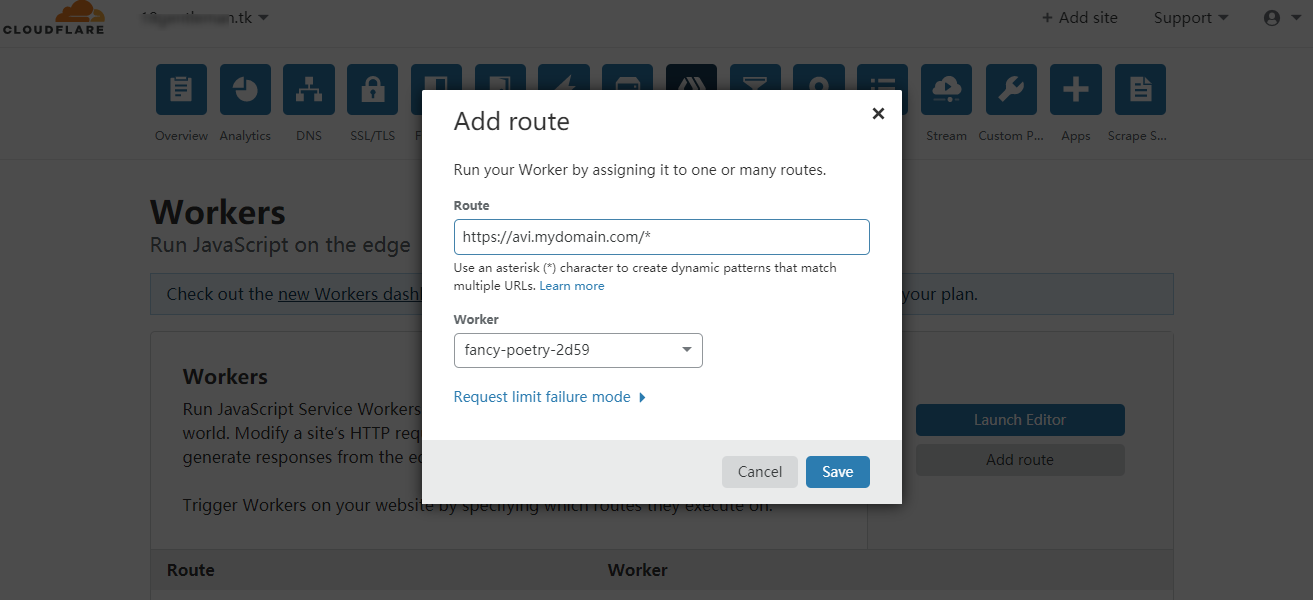
然后你需要如下图所示将子域名填入 Add route 中。

3

4

请注意,你需要将子域名写成 https://apps.mydomain.com/* 的形式注意结尾的 /*

然后你就可以使用自己的域名访问了。

如果想代理的网站较多,不想一个个设置的话,那么推荐使用下面的 JsProxy。

GoIndex

GoIndex 调用了 rclone 的接口, 同样使用了 Cloudflare Workers 部署。

演示: https://drive.littlepotato.life/

项目地址: https://github.com/donwa/goindex

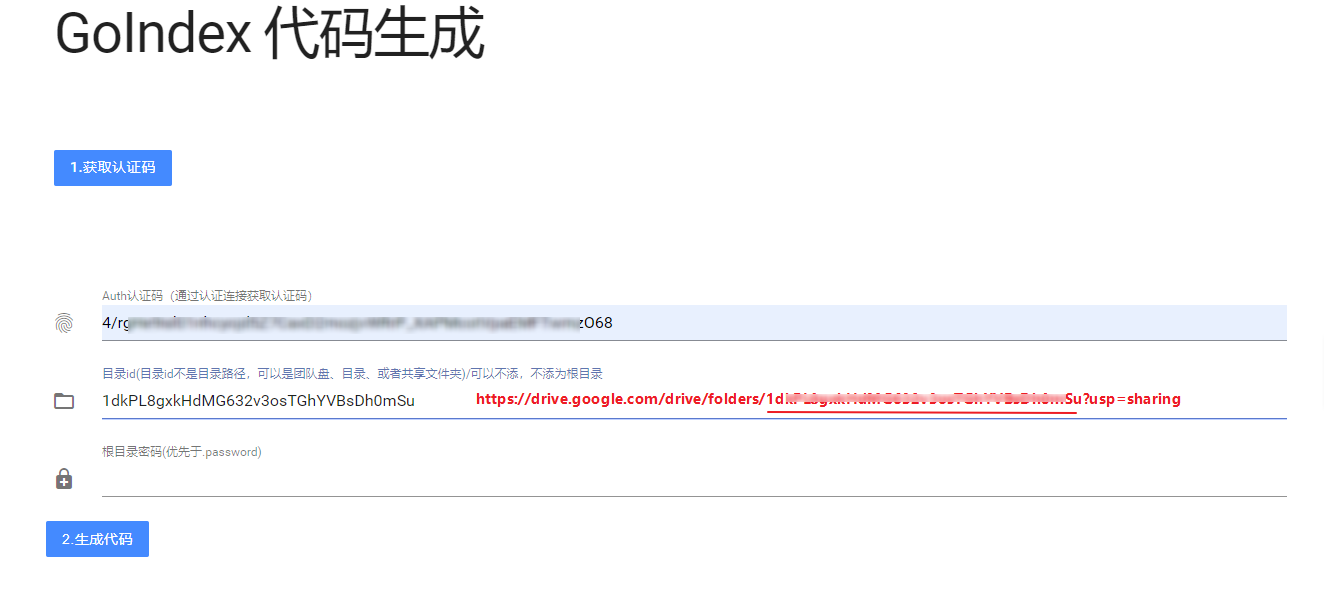
首先, 点击 https://install.gd.workers.dev/ 获取认证码。

需要你登录 Google 账号, 将获取到的验证码填入原页面。

如果你想访问全部网盘内容, 则目录 ID 不填, 如果你只想访问某个文件夹里的内容, 登录 Google Drive 并在相应的文件夹上点击右键, 选择“共享”, 复制共享连接并提取其中 folders/?usp=sharing 之间的 ID 填入原页面。

5

密码可选, 如果想用做博客, 网站等的图片外链, 就不要设置密码; 如果只想独享网盘里保存的小图片, 小电影则可以设置密码。

点击生成代码。

如之前一样将代码复制进 Cloudflare Workers 中部署。

同样的你也可以设置自己的域名访问。

JsProxy

JsProxy 也是一个使用 Workers 部署的项目,优点是不需要自己单独设置网站,通过输入网址的方式反代任何网站(包括 YouTube),使用上比 WorkersProxy 更方便。

演示:https://proxy.littlepotato.cf/

项目地址:https://github.com/EtherDream/jsproxy/

这里就省略过程了,步骤与 WorkersProxy 完全相同。

WARP

Cloudflare Warp VPN 是 Cloudflare 推出的一项网络隐私保护服务, 原本的 1.1.1.1 APP 只提供 DNS 服务, 最近新推出了 Warp VPN 服务, 完全免费, 你还可以通过邀请朋友使用升级到 Warp+, Warp+ 使用 Argo 技术速度将更快。

在 Google Play 或 iOS Store 均可下载。

有一个脚本可以刷 Warp+ 的流量, 爽撸一波。

项目地址: https://github.com/yyuueexxiinngg/some-scripts/tree/master/cloudflare

这里我使用的是 Python 版, 复制 cloudflare-warp-plus-aff.py 文件中的内容到本地, 打开 APP, 在“设置”中打开“More settings”, 打开“Diagnostics”复制下自己的“ID”。

编辑下载的 cloudflare-warp-plus-aff.py 文件, 将 referrer = "YOUR REFERRER ID" 改为自己的 ID, timesToLoop = 10 的意思是刷 10 次, 即刷 10 GB, 可适当调大。

使用 python cloudflare-warp-plus-aff.py 即可运行, 小技巧, 可以使用 nohup python cloudflare-warp-plus-aff.py & 在 Liunx 服务器上将脚本放在后台运行, 不用管它。

Warp VPN 作为备用还行, 经测试速度下载速度还行, 上传速度很慢, 高峰时段则几乎没网络。
经众多网友反应,宽带网络下皆无法连上 Warp VPN,数据网络下则正常,由于目前手机数据网络大多是 IPv6,故怀疑 Warp VPN 在 IPv4 网络下已经被封锁。

完。

PS: 在知道 Cloudflare Workers 之前, 我一直使用 Nginx 反代的方式来访问在国内被屏蔽的网站, Cloudflare Workers则可以不使用自己的服务器减少流量消耗, 并使用任播技术加快网站的访问速度, 于是马上换成 Cloudflare Workers + WorkersProxy 来部署了, Cloudflare 真乃良心大厂, 吹爆!

鸣谢

----------------------------------------------------------------

Reflare is a lightweight and scalable reverse proxy and load balancing library built for Cloudflare Workers. It sits in front of web servers (e.g. web application, storage platform, or RESTful API), forwards HTTP requests or WebSocket traffics from clients to upstream servers, and transforms responses with several optimizations to improve page loading time.

  • ⚡ Serverless: Deploy instantly to the auto-scaling serverless platform built by Cloudflare. There's no need to manage virtual machines or containers.
  • ✈️ Load Balancing: Distribute incoming traffics among different upstream services.
  • ⚙️ Hackable: Deliver unique content based on visitor attributes, conduct A/B testing, or build custom middleware to hook into the lifecycle. (Experimental)
  • 🛳️ Dynamic (Experimental): Store and update route definitions with Workers KV to avoid redundant redeployment.

📦 Installation

Start with reflare-template

Install wrangler CLI and authorize wrangler with a Cloudflare account.

npm install -g wrangler

wrangler login

Generate a new project from reflare-template and install the dependencies.

npm init cloudflare reflare-app https://github.com/xiaoyang-sde/reflare-template
cd reflare-app
npm install

Edit or add route definitions in src/index.ts. Please read the examples and route definition section below for more details.

  • Run npm run dev to preview Reflare with local development server provided by Miniflare.
  • Run npm run deploy to publish Reflare on Cloudflare Workers.

WebSocket Proxy

Reflare could proxy WebSocket traffic to upstream services. Set up a reverse proxy for wss://echo.websocket.org:

{
  path: '/*',
  upstream: {
    domain: 'echo.websocket.org',
    protocol: 'https',
  },
}

S3 Bucket with custom response headers

Reflare could set custom headers to the request and response. Set up a reverse proxy for https://example.s3.amazonaws.com:

{
  path: '/*',
  upstream: {
    domain: 'example.s3.amazonaws.com',
    protocol: 'https',
  },

  headers: {
    response: {
      'x-response-header': 'Hello from Reflare',
    },
  },

  cors: {
    origin: ['https://www.example.com'],
    methods: ['GET', 'POST'],
    credentials: true,
  },
}

⚙️ Route Definition

Route Matching

Reflare implements express-like route matching. Reflare matches the path and HTTP method of each incoming request with the list of route definitions and forwards the request to the first matched route.

  • path (string | string[]): The path or the list of paths that matches the route
  • methods (string[]): The list of HTTP methods that match the route
// Matches all requests
reflare.push({
  path: '/*',
  /* ... */
});

// Matches GET and POST requests with path `/api`
reflare.push({
  path: '/api',
  methods: ['GET', 'POST'],
});

// Matches GET requests with path ending with `.json` or `.yaml` in `/data`
reflare.push({
  path: ['/data/*.json', '/data/*.yaml'],
  methods: ['GET'],
});

Upstream

  • domain (string): The domain name of the upstream server
  • protocol (string): The protocol scheme of the upstream server (optional, defaults to 'https')
  • port (number): The port of the upstream server (optional, defaults to 80 or 443 based on protocol)
  • timeout (number): The maximum wait time on a request to the upstream server (optional, defaults to 10000)
  • weight (number): The weight of the server that will be accounted for as part of the load balancing decision (optional, defaults to 1)
  • onRequest(request: Request, url: string): The callback function that will be called before sending the request to upstream
  • onResponse(response: Response, url: string): The callback function that will be called after receiving the response from upstream
reflare.push({
  path: '/*',
  upstream: {
    domain: 'httpbin.org',
    protocol: 'https',
    port: 443,
    timeout: 10000,
    weight: 1,
  },
  /* ... */
});

The onRequest and onResponse callback functions could change the content of the request or response. For example, the following example replaces the URL of the request and sets the cache-control header of the response based on its URL.

reflare.push({
  path: '/*',
  upstream: {
    domain: 'httpbin.org',
    protocol: 'https',
    port: 443,
    timeout: 10000,
    weight: 1,

    onRequest: (request: Request, url: string): Request => {
      // Modifies the URL of the request
      return new Request(url.replace('/original/request/path', ''), request);
    },

    onResponse: (response: Response, url: string): Response => {
      // If the URL ends with `.html` or `/`, sets the `cache-control` header
      if (url.endsWith('.html') || url.endsWith('/')) {
        response.headers.set('cache-control', 'public, max-age=240, s-maxage=60');
      }
      return response;
    }
  },
  /* ... */
});

Load Balancing

To load balance HTTP traffic to a group of servers, pass an array of server configurations to upstream. The load balancer will forward the request to an upstream server based on the loadBalancing.policy option.

  • random: The load balancer will select a random upstream server from the server group. The optional weight parameter in the server configuration could influence the load balancing algorithm.
  • ip-hash: The client's IP address is used as a hashing key to select the upstream server from the server group. It ensures that the requests from the same client will always be directed to the same server.
reflare.push({
  path: '/*',
  loadBalancing: {
    policy: 'random',
  },
  upstream: [
    {
      domain: 's1.example.com',
      protocol: 'https',
      weight: 20,
    },
    {
      domain: 's2.example.com',
      protocol: 'https',
      weight: 30,
    },
    {
      domain: 's3.example.com',
      protocol: 'https',
      weight: 50,
    },
  ],
  /* ... */
});

Firewall

Each incoming request is inspected against the firewall rules defined in the firewall property of the options object. The request will be blocked if it matches at least one firewall rule.

  • field: The property of the incoming request to be inspected
    • asn: The ASN number of the incoming request (number)
    • ip: The IP address of the incoming request, e.g. 1.1.1.1 (string)
    • hostname: The content of the host header, e.g. github.com (string | undefined)
    • user-agent: The content of the user-agent header, e.g. Mozilla/5.0 (string | undefined)
    • country: The two-letter country code in the request, e.g. US (string | undefined)
    • continent: The continent of the incoming request, e.g. NA (string | undefined)
  • value (string | string[] | number | number[] | RegExp): The value of the firewall rule
  • operator: The operator to be used to determine if the request is blocked
    • equal: Block the request if field is equal to value
    • not equal: Block the request if field is not equal to value
    • match: Block the request if value matches field (Expect field to be string and value to be RegExp)
    • not match: Block the request if value doesn't match field (Expect field to be string and value to be RegExp)
    • in: Block the request if field is in value (Expect value to be Array)
    • not in: Block the request if field is not in value (Expect value to be Array)
    • contain: Block the request if field contains value (Expect field and value to be string)
    • not contain: Block the request if field doesn't contain value (Expect field and value to be string)
    • greater: Block the request if field is greater than value (Expect field and value to be number)
    • less: Block the request if field is less than value (Expect field and value to be number)
reflare.push('/', {
  path: '/*',
  /* ... */
  firewall: [
    {
      field: 'ip',
      operator: 'in',
      value: ['1.1.1.1', '1.0.0.1'],
    },
    {
      field: 'user-agent',
      operator: 'match',
      value: /Chrome/,
    }
  ],
});

Headers

  • request (Record<string, string>): Sets request header going upstream to the backend. Accepts an object. (optional, defaults to {})
  • response (Record<string, string>): Sets response header coming downstream to the client. Accepts an object. (optional, defaults to {})
reflare.push({
  path: '/*',
  /* ... */
  headers: {
    request: {
      'x-example-header': 'hello server',
    },
    response: {
      'x-example-header': 'hello client',
    },
  },
});

Cross-Origin Resource Sharing (CORS)

  • origin: Configures the Access-Control-Allow-Origin CORS header. (optional, defaults to false)

    • boolean: set to true to reflect the origin of the request, or set to false to disable CORS.
    • string[]: an array of acceptable origins.
    • *: allow any origin to access the resource.
  • methods (string[]): Configures the Access-Control-Allow-Methods CORS header. Expect an array of valid HTTP methods or *. (optional, defaults to reflecting the method specified in the request’s Access-Control-Request-Method header)

  • allowedHeaders (string[]): Configures the Access-Control-Allow-Headers CORS header. Expect an array of HTTP headers or *. (optional, defaults to reflecting the headers specified in the request’s Access-Control-Request-Headers header.)

  • exposedHeaders (string[]): Configures the Access-Control-Expose-Headers CORS header. Expect an array of HTTP headers or *. (optional, defaults to [])

  • credentials (boolean): Configures the Access-Control-Allow-Credentials CORS header. Set to true to pass the header, or it is omitted. (optional, defaults to false)

  • maxAge (number): Configures the Access-Control-Max-Age CORS header. Set to an integer to pass the header, or it is omitted. (optional)

reflare.push({
  path: '/*',
  /* ... */
  cors: {
    origin: true,
    methods: [
      'GET',
      'POST',
    ],
    allowedHeaders: [
      'Example-Header',
    ],
    exposedHeaders: [
      'Example-Header',
    ],
    credentials: true,
    maxAge: 86400,
  },
});

Optimization

Cloudflare Workers provides several optimizations by default.

  • Brotli: Speed up page load times for visitors’ HTTPS traffic by applying Brotli compression.
  • HTTP/2: Improve page load time by connection multiplexing, header compression, and server push.
  • HTTP/3 with QUIC: Accelerate HTTP requests by using QUIC, which provides encryption and performance improvements compared to TCP and TLS.
  • 0-RTT Connection Resumption: Improve performance for clients who have previously connected to the website.

from https://github.com/xiaoyang-sde/reflare


gofs, 一个跨平台的文件同步工具

 A cross-platform file synchronization tool out of the box based on golang.

Chat Build License Go Reference Go Report Card codecov Release Mentioned in Awesome Go

English | 简体中文

A cross-platform file synchronization tool out of the box based on golang.

Installation

The first need Go installed (version 1.18+ is required), then you can use the below command to install gofs.

go install github.com/no-src/gofs/...@latest

Run In Docker

If you want to run in a docker, you should install or build with the -tags netgo flag or set the environment CGO_ENABLED=0, otherwise you may get an error that the gofs not found, when the docker container is running.

go install -tags netgo github.com/no-src/gofs/...@latest

You can use the build-docker.sh script to build the docker image and you should clone this repository and cd to the root path of the repository first.

$ ./scripts/build-docker.sh

Or pull the docker image directly from DockerHub with the command below.

$ docker pull nosrc/gofs

For more scripts about release and docker, see the scripts directory.

Run In the Background

You can install a program run in the background using the following command on Windows.

go install -ldflags="-H windowsgui" github.com/no-src/gofs/...@latest

Quick Start

Prerequisites

Please ensure the source directory and dest directory exists first, replace the following path with your real path.

$ mkdir source dest

Generate the TLS cert file and key file for testing purposes.

The TLS cert and key files are just used by File Server and Remote Disk Server.

$ go run $GOROOT/src/crypto/tls/generate_cert.go --host 127.0.0.1
2021/12/30 17:21:54 wrote cert.pem
2021/12/30 17:21:54 wrote key.pem

Look up our workspace.

$ ls
cert.pem  key.pem  source  dest

Local Disk

Monitor source directory and sync change files to dest directory.

You can use the logically_delete flag to enable the logically delete and avoid deleting files by mistake.

Set the checkpoint_count flag to use the checkpoint in the file to reduce transfer unmodified file chunks, by default checkpoint_count=10, which means it has 10+2 checkpoints at most. There are two additional checkpoints at the head and tail. The first checkpoint is equal to the chunk_size, it is optional. The last checkpoint is equal to the file size, it is required. The checkpoint offset set by the checkpoint_count is always more than chunk_size, unless the file size is less than or equal to chunk_size, then the checkpoint_count will be zero, so it is optional.

By default, if the file size and file modification time of the source file is equal to the destination file, then ignore the current file transfer. You can use the force_checksum flag to force enable the checksum to compare whether the file is equal or not.

The default checksum hash algorithm is md5, you can use the checksum_algorithm flag to change the default hash algorithm, current supported algorithms: md5, sha1, sha256, sha512, crc32, crc64, adler32, fnv-1-32 , fnv-1a-32, fnv-1-64, fnv-1a-64, fnv-1-128, fnv-1a-128.

If you want to reduce the frequency of synchronization, you can use the sync_delay flag to enable sync delay, start sync when the event count is equal or greater than sync_delay_events, or wait for sync_delay_time interval time since the last sync.

$ gofs -source=./source -dest=./dest

Sync Once

Sync the whole path immediately from source directory to dest directory.

$ gofs -source=./source -dest=./dest -sync_once

Sync Cron

Sync the whole path from source directory to dest directory with cron.

# Per 30 seconds sync the whole path from source directory to dest directory
$ gofs -source=./source -dest=./dest -sync_cron="*/30 * * * * *"

Daemon Mode

Start a daemon to create subprocess to work, and record pid info to pid file.

$ gofs -source=./source -dest=./dest -daemon -daemon_pid

File Server

Start a file server for source directory and dest directory.

The file server is use HTTPS default, set the tls_cert_file and tls_key_file flags to customize the cert file and key file.

You can disable the HTTPS by set the tls flag to false if you don't need it.

If you set the tls to true, the file server default port is 443, otherwise it is 80, and you can customize the default port with the server_addr flag, like -server_addr=":443".

If you enable the tls flag on the server side, you can control whether a client skip verifies the server's certificate chain and host name by the tls_insecure_skip_verify flag, default is true.

You should set the rand_user_count flag to auto generate some random users or set the users flag to customize server users for security reasons.

The server users will output to log if you set the rand_user_count flag greater than zero.

If you need to compress the files, add the server_compress flag to enable gzip compression for response, but it is not fast now, and may reduce transmission efficiency in the LAN.

# Start a file server and create three random users
# Replace the `tls_cert_file` and `tls_key_file` flags with your real cert files in the production environment
$ gofs -source=./source -dest=./dest -server -tls_cert_file=cert.pem -tls_key_file=key.pem -rand_user_count=3

Remote Disk Server

Start a remote disk server as a remote file source.

The source flag detail see Remote Server Source Protocol.

Pay attention to that remote disk server users must have read permission at least, for example, -users="gofs|password|r".

You can use the checkpoint_count and sync_delay flags like the Local Disk.

# Start a remote disk server
# Replace the `tls_cert_file` and `tls_key_file` flags with your real cert files in the production environment
# Replace the `users` flag with complex username and password for security
$ gofs -source="rs://127.0.0.1:8105?mode=server&local_sync_disabled=true&path=./source&fs_server=https://127.0.0.1" -dest=./dest -users="gofs|password|r" -tls_cert_file=cert.pem -tls_key_file=key.pem

Remote Disk Client

Start a remote disk client to sync change files from remote disk server.

The source flag detail see Remote Server Source Protocol.

Use the sync_once flag to sync the whole path immediately from remote disk server to local dest directory, like Sync Once.

Use the sync_cron flag to sync the whole path from remote disk server to local dest directory with cron, like Sync Cron.

Use the force_checksum flag to force enable the checksum to compare whether the file is equal or not, like Local Disk.

You can use the sync_delay flag like the Local Disk.

# Start a remote disk client
# Replace the `users` flag with your real username and password
$ gofs -source="rs://127.0.0.1:8105" -dest=./dest -users="gofs|password"

Remote Push Server

Start a Remote Disk Server as a remote file source, then enable the remote push server with the push_server flag.

Pay attention to that remote push server users must have read and write permission at least, for example, -users="gofs|password|rw".

# Start a remote disk server and enable the remote push server
# Replace the `tls_cert_file` and `tls_key_file` flags with your real cert files in the production environment
# Replace the `users` flag with complex username and password for security
$ gofs -source="rs://127.0.0.1:8105?mode=server&local_sync_disabled=true&path=./source&fs_server=https://127.0.0.1" -dest=./dest -users="gofs|password|rw" -tls_cert_file=cert.pem -tls_key_file=key.pem -push_server

Remote Push Client

Start a remote push client to sync change files to the Remote Push Server.

Use the chunk_size flag to set the chunk size of the big file to upload. The default value of chunk_size is 1048576, which means 1MB.

You can use the checkpoint_count and sync_delay flags like the Local Disk.

More flag usage see Remote Disk Client.

# Start a remote push client and enable local disk sync, sync the file changes from source path to the local dest path and the remote push server
# Replace the `users` flag with your real username and password
$ gofs -source="./source" -dest="rs://127.0.0.1:8105?local_sync_disabled=false&path=./dest" -users="gofs|password"

Relay

If you need to synchronize files between two devices that are unable to establish a direct connection, you can use a reverse proxy as a relay server. In more detail, see also Relay.

Remote Server Source Protocol

The remote server source protocol is based on URI, see RFC 3986.

Scheme

The scheme name is rs.

Host

The remote server source uses 0.0.0.0 or other local ip address as host in Remote Disk Server mode, and use ip address or domain name as host in Remote Disk Client mode.

Port

The remote server source port, default is 8105.

Parameter

Use the following parameters in Remote Disk Server mode only.

Example

For example, in Remote Disk Server mode.

 rs://127.0.0.1:8105?mode=server&local_sync_disabled=true&path=./source&fs_server=https://127.0.0.1
 \_/  \_______/ \__/ \____________________________________________________________________________/
  |       |       |                                      |
scheme   host    port                                parameter

Manage API

Enable manage api base on File Server by using the manage flag.

By default, allow to access manage api by private address and loopback address only.

You can disable it by setting the manage_private flag to false.

$ gofs -source=./source -dest=./dest -server -tls_cert_file=cert.pem -tls_key_file=key.pem -rand_user_count=3 -manage

Profiling API

The pprof url address like this

https://127.0.0.1/manage/pprof/

Config API

Reading the program config, default return the config with json format, and support json and yaml format currently.

https://127.0.0.1/manage/config

Or use the format parameter to specific the config format.

https://127.0.0.1/manage/config?format=yaml

Report API

Use the report flag to enable report api route, and start to collect the report data, need to enable the manage flag first.

The details of the report api see Report API.

https://127.0.0.1/manage/report

Logger

Enable the file logger and console logger by default, and you can disable the file logger by setting the log_file flag to false.

Use the log_level flag to set the log level, default is INFO, (DEBUG=0 INFO=1 WARN=2 ERROR=3).

Use the log_dir flag to set the directory of the log file, default is ./logs/.

Use the log_flush flag to enable auto flush log with interval, default is true.

Use the log_flush_interval flag to set the log flush interval duration, default is 3s.

Use the log_event flag to enable the event log, write to file, default is false.

Use the log_sample_rate flag to set the sample rate for the sample logger, and the value ranges from 0 to 1, default is 1.

Use the log_format flag to set the log output format, current support text and json, default is text.

# set the logger config in "Local Disk" mode
$ gofs -source=./source -dest=./dest -log_file -log_level=0 -log_dir="./logs/" -log_flush -log_flush_interval=3s -log_event

Use Configuration File

If you want, you can use a configuration file to replace all the flags.It supports json and yaml format currently.

All the configuration fields are the same as the flags, you can refer to the Configuration Example or the response of Config API.

$ gofs -conf=./gofs.yaml

Checksum

You can use the checksum flag to calculate the file checksum and print the result.

The chunk_size, checkpoint_count and checksum_algorithm flags are effective here the same as in the Local Disk.

$ gofs -source=./gofs -checksum

For More Information

Help Info

$ gofs -h

Version Info

$ gofs -v

About Info

$ gofs -about
from https://github.com/no-src/gofs 
------- 

基于golang开发的一款开箱即用的跨平台文件同步工具gofs

概述

gofs是基于golang开发的一款开箱即用的跨平台文件同步工具,支持在本地磁盘之间同步、从远程服务器同步变更到本地、将本地文件变更推送到远程服务器三种模式。开源地址如下:https://github.com/no-src/gofs

安装

首先需要确保已经安装了Go (版本必须是1.18+),然后你就可以使用下面的命令来安装gofs

如果你不需要自行从源码编译安装,也可以直接下载最新发布的二进制文件Release

go install github.com/no-src/gofs/...@latest

在Docker中运行

如果你想要在docker中运行,请在安装或者编译的时候使用-tags netgo命令行参数或者设置环境变量CGO_ENABLED=0,否则当你运行docker容器时可能会报找不到gofs的错误

go install -tags netgo github.com/no-src/gofs/...@latest

你可以使用build-docker.sh脚本来构建docker镜像,首先你需要克隆本仓库并且cd到本仓库的根目录

$ ./scripts/build-docker.sh

或者使用以下命令直接从DockerHub中拉取docker镜像

$ docker pull nosrc/gofs

更多关于发布与docker的脚本参见scripts目录

后台运行

在windows系统中,你可以使用下面的命令构建一个在后台运行的不带命令行界面的程序

go install -ldflags="-H windowsgui" github.com/no-src/gofs/...@latest

快速开始

先决条件

请确保文件同步的源目录和目标目录都已经存在,如果目录不存在,则用你实际的目录替换下面的路径进行提前创建

$ mkdir source dest

生成仅用于测试的证书和密钥文件,生产中请替换为正式的证书

TLS证书和密钥文件仅用于与Web文件服务器远程磁盘服务端进行安全通讯

$ go run $GOROOT/src/crypto/tls/generate_cert.go --host 127.0.0.1
2021/12/30 17:21:54 wrote cert.pem
2021/12/30 17:21:54 wrote key.pem

查看你的工作目录

$ ls
cert.pem  key.pem  source  dest

本地磁盘

监控本地源目录将变更同步到目标目录

你可以使用logically_delete命令行参数来启用逻辑删除,从而避免误删数据

设置checkpoint_count命令行参数来使用文件中的检查点来减少传输未修改的文件块,默认情况下checkpoint_count=10,这意味着它最多有10+2个检查点。在头部和尾部还有两个额外的检查点。第一个检查点等于chunk_size,它是可选的。最后一个检查点等于文件大小,这是必需的。由checkpoint_count设置的检查点偏移量总是大于chunk_size,除非文件大小小于或等于chunk_size,那么checkpoint_count将变为0,所以它是可选的

默认情况下,如果源文件的大小和修改时间与目标文件相同,则忽略当前文件的传输。你可以使用force_checksum命令行参数强制启用校验和来比较文件是否相等

$ gofs -source=./source -dest=./dest

全量同步

执行一次全量同步,直接将整个源目录同步到目标目录

$ gofs -source=./source -dest=./dest -sync_once

定时同步

定时执行全量同步,将整个源目录同步到目标目录

# 每30秒钟将源目录全量同步到目标目录
$ gofs -source=./source -dest=./dest -sync_cron="*/30 * * * * *"

守护进程模式

启动守护进程来创建一个工作进程处理实际的任务,并将相关进程的pid信息记录到pid文件中

$ gofs -source=./source -dest=./dest -daemon -daemon_pid

Web文件服务器

启动一个Web文件服务器用于访问远程的源目录和目标目录

Web文件服务器默认使用HTTPS协议,使用tls_cert_filetls_key_file命令行参数来指定相关的证书和密钥文件

如果你不需要使用TLS进行安全通讯,可以通过将tls命令行参数指定为false来禁用它

如果将tls设置为true,则服务器默认运行端口为443,反之默认端口为80,你可以使用server_addr命令行参数来自定义服务器运行端口,例如-server_addr=":443"

如果你在服务器端启用tls命令行参数,可以通过tls_insecure_skip_verify命令行参数来控制客户端是否跳过验证服务器的证书链和主机名,默认为true

出于安全考虑,你应该设置rand_user_count命令行参数来随机生成指定数量的用户或者通过users命令行参数自定义用户信息来保证数据的访问安全,禁止用户匿名访问数据

如果rand_user_count命令行参数设置大于0,则随机生成的账户密码将会打印到日志信息中,请注意查看

如果你需要启用gzip压缩响应结果,则添加server_compress命令行参数,但是目前gzip压缩不是很快,在局域网中可能会影响传输效率

# 启动一个Web文件服务器并随机创建3个用户
# 在生产环境中请将`tls_cert_file`和`tls_key_file`命令行参数替换为正式的证书和密钥文件
$ gofs -source=./source -dest=./dest -server -tls_cert_file=cert.pem -tls_key_file=key.pem -rand_user_count=3

远程磁盘服务端

启动一个远程磁盘服务端作为一个远程文件数据源

source命令行参数详见远程磁盘服务端数据源协议

注意远程磁盘服务端的用户至少要拥有读权限,例如:-users="gofs|password|r"

你可以使用checkpoint_count命令行参数就跟本地磁盘一样

# 启动一个远程磁盘服务端
# 在生产环境中请将`tls_cert_file`和`tls_key_file`命令行参数替换为正式的证书和密钥文件
# 为了安全起见,请使用复杂的账户密码来设置`users`命令行参数
$ gofs -source="rs://127.0.0.1:8105?mode=server&local_sync_disabled=true&path=./source&fs_server=https://127.0.0.1" -dest=./dest -users="gofs|password|r" -tls_cert_file=cert.pem -tls_key_file=key.pem

远程磁盘客户端

启动一个远程磁盘客户端将远程磁盘服务端的文件变更同步到本地目标目录

使用sync_once命令行参数,可以直接将远程磁盘服务端的文件整个全量同步到本地目标目录,就跟全量同步一样

使用sync_cron命令行参数,可以定时将远程磁盘服务端的文件整个全量同步到本地目标目录,就跟定时同步一样

使用force_checksum命令行参数强制启用校验和来比较文件是否相等,就跟本地磁盘一样

source命令行参数详见远程磁盘服务端数据源协议

# 启动一个远程磁盘客户端
# 请将`users`命令行参数替换为上面设置的实际账户名密码
$ gofs -source="rs://127.0.0.1:8105" -dest=./dest -users="gofs|password"

远程推送服务端

启动一个远程磁盘服务端作为一个远程文件数据源,并使用push_server命令行参数启用远程推送服务端

注意远程推送服务端的用户至少要拥有读写权限,例如:-users="gofs|password|rw"

# 启动一个远程磁盘服务端并启用远程推送服务端
# 在生产环境中请将`tls_cert_file`和`tls_key_file`命令行参数替换为正式的证书和密钥文件
# 为了安全起见,请使用复杂的账户密码来设置`users`命令行参数
$ gofs -source="rs://127.0.0.1:8105?mode=server&local_sync_disabled=true&path=./source&fs_server=https://127.0.0.1" -dest=./dest -users="gofs|password|rw" -tls_cert_file=cert.pem -tls_key_file=key.pem -push_server

远程推送客户端

启动一个远程推送客户端将本地文件变更同步到远程推送服务端

使用chunk_size命令行参数来设置大文件上传时切分的区块大小,默认值为1048576,即1MB

你可以使用checkpoint_count命令行参数就跟本地磁盘一样

更多命令行参数用法请参见远程磁盘客户端

# 启动一个远程推送客户端并且启用本地磁盘同步,将source目录下的文件变更同步到本地dest目录和远程推送服务器上
# 请将`users`命令行参数替换为上面设置的实际账户名密码
$ gofs -source="./source" -dest="rs://127.0.0.1:8105?local_sync_disabled=false&path=./dest" -users="gofs|password"

远程磁盘服务端数据源协议

远程磁盘服务端数据源协议基于URI基本语法,详见RFC 3986

方案

方案名称为rs

主机名

远程磁盘服务端数据源在远程磁盘服务端模式下使用0.0.0.0或者其他本地网卡IP地址作为主机名,在远程磁盘客户端 模式下使用远程磁盘服务端的IP地址或者域名作为主机名

端口号

远程磁盘服务端数据源端口号,默认为8105

参数

仅在远程磁盘服务端模式下设置以下参数

示例

远程磁盘服务端模式下的示例

 rs://127.0.0.1:8105?mode=server&local_sync_disabled=true&path=./source&fs_server=https://127.0.0.1
 \_/  \_______/ \__/ \____________________________________________________________________________/
  |       |       |                                      |
 方案   主机名   端口号                                    参数

管理接口

基于Web文件服务器的应用管理接口

默认情况下,仅允许私有地址和回环地址访问管理接口的相关路由

你可以通过将manage_private命令行参数设置为false来禁用默认行为,允许公网IP访问管理接口的路由

$ gofs -source=./source -dest=./dest -server -tls_cert_file=cert.pem -tls_key_file=key.pem -rand_user_count=3 -manage

性能分析接口

pprof访问地址如下:

https://127.0.0.1/manage/pprof/

配置接口

读取应用程序配置,默认返回json格式,当前支持jsonyaml格式

https://127.0.0.1/manage/config

或者使用format参数来指定返回的配置格式

https://127.0.0.1/manage/config?format=yaml

报告接口

使用report命令行参数来启用报告接口的路由并且开始收集报告数据,需要先启用manage命令行参数

报告接口详情参见Report API

https://127.0.0.1/manage/report

日志

默认情况下会启用文件日志与控制台日志,你可以将log_file命令行参数设置为false来禁用文件日志

使用log_level命令行参数设置日志的等级,默认级别是INFO,可选项为:DEBUG=0 INFO=1 WARN=2 ERROR=3

使用log_dir命令行参数来设置日志文件目录,默认为./logs/

使用log_flush命令行参数来设置自动刷新日志到文件中,默认启用

使用log_flush_interval命令行参数设置自动刷新日志到文件中的频率,默认为3s

使用log_event命令行参数启用事件日志,所有事件都会记录到文件中,默认为禁用

使用log_sample_rate命令行参数设置采样日志的采样率,取值范围为0到1,默认值为1

# 在"本地磁盘"模式下设置日志信息
$ gofs -source=./source -dest=./dest -log_file -log_level=0 -log_dir="./logs/" -log_flush -log_flush_interval=3s -log_event

使用配置文件

如果需要的话,你可以使用配置文件来代替所有的命令行参数,当前支持jsonyaml格式

所有的配置字段名称跟命令行参数一样,你可以参考配置示例或者配置接口的响应结果

$ gofs -conf=./gofs.yaml

校验和

你可以使用checksum命令行参数来计算并打印文件的校验和

chunk_sizecheckpoint_count命令行参数在这里同在本地磁盘中一样有效

$ gofs -source=./gofs -checksum

更多信息

帮助信息

$ gofs -h

版本信息

$ gofs -v

关于信息

$ gofs -about


ohUrlShortener

适合中小型社区网站使用的短链接服务系统,支持短链接生产、查询及302转向,并自带点击量统计、独立IP数统计、访问日志.

  1. 支持 Docker One Step Start 部署、Makefile 编译打包
  2. 支持短链接生产、查询、存储、302转向
  3. 支持访问日志查询、访问量统计、独立IP数统计
  4. 支持 HTTP API 方式新建短链接、禁用/启用短链接、查看短链接统计信息、新建管理员、修改管理员密码
  5. 支持访问日志导出,方便线下分析

Portal Docker Pulls Admin Docker Pulls

快速使用

Docker 一步启动所有服务,运行 docker/one_step_start.sh ,该命令将会:

  1. 拉取 baratsemet/ohurlshortener-admin 镜像(本地构建可查看 docker/admin.Dockerfile
  2. 拉取 baratsemet/ohurlshortener-portal 镜像(本地构建镜像可查看docker/portal.Dockerfile
  3. 通过 docker/pull_build.yml 其他描述内容构建 redispostgresql 镜像及服务,并对其运行状态做判断,等待缓存和数据库服务正常之后,再启动其他必要服务 (本地构建镜像请查阅 local_build.yml)
  4. 构建名为 network_ohurlshortener 的虚拟网络供上述服务使用
  5. 开启本机 90919092 端口分别应对 ohUrlShortener-PortalohUrlShortener-Admin 应用

参数说明

ohurlshortener [-c config_file] [-s admin|portal|<omit to start both>]  

配置文件

根目录下 config.ini 中存放着关于 ohUrlShortener 短链接系统的一些必要配置,请在启动应用之前确保这些配置的正确性

[app]

# 应用是否以 debug 模式启动,主要作用会在go-gin 框架上体现(eg:日志输出等)
debug = false   

# 短链接系统本地启动端口
port = 9091

# 短链接系统管理后台本地启动端口
admin_port = 9092

# 例如:https://t.cn/ 是前缀(不要忘记最后一个/符号)
url_prefix = http://localhost:9091/

[redis]
...

[postgres]
...

Admin 后台默认帐号

默认帐号: ohUrlShortener
默认密码: -2aDzm=0(ln_9^1

数据库中存储的是加密后的密码,在 structure.sql 中标有注释,如果需要自定义其他密码,可以修改这里

加密规则 storage/users_storage.go

func PasswordBase58Hash(password string) (string, error) {
	data, err := utils.Sha256Of(password)
	if err != nil {
		return "", err
	}
	return base58.Encode(data), nil
}

亦可参照 storage/users_storage_test.go 中的 TestNewUser() 方法

HTTP API 支持

/api 接口权限说明

所有 /api/* 接口需要通过 Bearer Token 方式验证权限,亦即:每个请求 Header 须携带

 Authorization: Bearer {sha256_of_password}

sha256_of_password 的加密规则,与 storage/users_storage.go 中的 PasswordBase58Hash() 保持同步

1. 新增短链接 POST /api/url

接受参数:

  1. dest_url 目标链接,必填
  2. memo 备注信息,选填

请求示例:

curl --request POST \
  --url http://localhost:9092/api/url \
  --header 'Authorization: Bearer EZ2zQjC3fqbkvtggy9p2YaJiLwx1kKPTJxvqVzowtx6t' \
  --header 'Content-Type: application/x-www-form-urlencoded' \
  --data dest_url=http://localhost:9092/admin/dashboard \
  --data memo=dashboard

返回结果:

{
	"code": 200,
	"status": true,
	"message": "success",
	"result": {
		"short_url": "http://localhost:9091/BUUtpbGp"
	},
	"date": "2022-04-10T21:31:29.36559+08:00"
}

2. 禁用/启用 短链接 PUT /api/url/:url/change_state

接受参数:

  1. url path 参数,指定短链接,必填
  2. enable 禁用时,传入 false;启用时,传入 true

请求示例:

curl --request PUT \
  --url http://localhost:9092/api/url/33R5QUtD/change_state \
  --header 'Authorization: Bearer EZ2zQjC3fqbkvtggy9p2YaJiLwx1kKPTJxvqVzowtx6t' \
  --header 'Content-Type: application/x-www-form-urlencoded' \
  --data enable=false

返回结果:

{
	"code": 200,
	"status": true,
	"message": "success",
	"result": true,
	"date": "2022-04-10T21:31:25.7744402+08:00"
}

3. 查询短链接统计数据 GET /api/url/:url

接受参数:

  1. url path 参数,指定短链接,必填

请求示例:

curl --request GET \
  --url http://localhost:9092/api/url/33R5QUtD \
  --header 'Authorization: Bearer EZ2zQjC3fqbkvtggy9p2YaJiLwx1kKPTJxvqVzowtx6t' \
  --header 'Content-Type: application/x-www-form-urlencoded'

返回结果:

{
	"code": 200,
	"status": true,
	"message": "success",
	"result": {
		"short_url": "33R5QUtD",
		"today_count": 3,
		"yesterday_count": 0,
		"last_7_days_count": 0,
		"monthly_count": 3,
		"total_count": 3,
		"d_today_count": 1,
		"d_yesterday_count": 0,
		"d_last_7_days_count": 0,
		"d_monthly_count": 1,
		"d_total_count": 1
	},
	"date": "2022-04-10T21:31:22.059596+08:00"
}

4. 新建管理员 POST /api/account

接受参数:

  1. account 管理员帐号,必填
  2. password 管理员密码,必填,最小长度8

请求示例:

curl --request POST \
  --url http://localhost:9092/api/account \
  --header 'Authorization: Bearer EZ2zQjC3fqbkvtggy9p2YaJiLwx1kKPTJxvqVzowtx6t' \
  --header 'Content-Type: application/x-www-form-urlencoded' \
  --data account=hello1 \
  --data password=12345678

返回结果:

{
	"code": 200,
	"status": true,
	"message": "success",
	"result": null,
	"date": "2022-04-10T21:31:39.7353132+08:00"
}

5. 修改管理员密码 PUT /api/account/:account/update

接受参数:

  1. account path 参数,管理员帐号,必填
  2. password 管理员密码,必填,最小长度8

请求示例:

curl --request PUT \
  --url http://localhost:9092/api/account/hello/update \
  --header 'Authorization: Bearer EZ2zQjC3fqbkvtggy9p2YaJiLwx1kKPTJxvqVzowtx6t' \
  --header 'Content-Type: application/x-www-form-urlencoded' \
  --data password=world123

返回结果:

{
	"code": 200,
	"status": true,
	"message": "success",
	"result": null,
	"date": "2022-04-10T21:31:32.5880538+08:00"
}

6. 删除短链接 DELETE /api/url/:url

接受参数:

  1. url path 参数,要删除的短链接地址

短链接在应用启动时会存入 Redis 中

所有短链接再系统启动时会以 Key(short_url) -> Value(original_url) 的形式存储在 Redis 中。

1. 为什么要这么做?

当短链接的查询请求进入应用时,为了能够更快、更准确的将用户请求转向到目标链接,与传统的方式从数据库中查询相比,直接从 Redis 中获取目标链接就会显得更有价值。

2. 这种处理方式有什么缺点?

理论上来说,如果 Redis 所在的服务器的内存较大的话,存储10w个Key也是可以的。但是,硬件条件不允许的情况下,就需要控制 Redis 中的 Key 数量(主要是怕机器扛不住,Redis 本身的性能不会有问题)。这部分的功能扩展,考虑在将来的某个版本中实现并允许配置管理。

3. 万一

考虑到可扩展性,多封装了一层 service,以便需要的时候在业务逻辑层进行自定义扩展,eg:将 key 查询改成数据库查询等。

Give Thanks To:

由衷感谢以下开源软件、框架等(包括但不限于)

  1. gin-gonic/gin
  2. FomanticUI
  3. dchest/captcha
  4. Masterminds/sprig
  5. go-redis/redis
  6. jmoiron/sqlx
  7. go-ini/ini

ohUrlShortener

  1. ohUrlShortener 短链接系统 v1.5 发布,管理功能增强
  2. ohUrlShortener 短链接系统 v1.4 正式发布
  3. ohUrlShortener 短链接系统 v1.3 发布,支持导出访问日志
  4. ohUrlShortener 短链接系统 v1.2 正式发布
  5. ohUrlShortener 短链接服务系统 1.0 发布
  6. 软件信息收录 https://www.oschina.net/p/ohurlshortener
  7. Gitee https://gitee.com/barat/ohurlshortener
  8. Github https://github.com/barats/ohUrlShortener
  9. Gitlink https://www.gitlink.org.cn/baladiwei/ohurlshortener

from https://github.com/barats/ohUrlShortener