Cloudflare是一间总部位于旧金山的美国跨国IT企业,以向客户提供基于反向代理的内容分发网络及分布式域名解析服务为主要业务。Cloudflare可以帮助受保护站点抵御包拒绝服务攻击等网络攻击,确保该网站长期在线,同时提升网站的性能、加载速度以改善访客体验。 维基百科
本文讲述了利用 Cloudflare CDN 来将被 Block 的 IP 救活, 以及使用 Cloudflare Workers + WorkersProxy 来反代任何网站, 还有 Cloudflare Workers + GoIndex 将 Google Drive 打造成国内可以访问的直链网盘, 且 Cloudflare Workers 并不需要有服务器, 部署也十分简单。 最后介绍了 Warp VPN 可以作用备用翻墙手段。
CDN
Cloudflare CDN 是在翻墙领域最广为人知的用法, 在 2019 年 6 月 GFW 的大规模封锁海外热门 VPS 时开始流行起来, IP 被封了就套个 CDN。 CDN 除了可以防止 DDoS 最网站的直接攻击外, 也可以通过内容分发网络加快网站访问速度。
V2Ray 的 WebSocket(以下简称 WS), 可以与 Nginx 完美配合, 从而达到与 HTTP 请求完全相同的效果, 不容易被识别。
以下是 Nginx 的配置:
server { |
V2Ray 服务端设置:
{ |
这样设置的好处是, 避免了将 V2Ray 所使用的监听端口直接暴露在外部, 而是先通过 Nginx 监听 443 端口, 路径为 /ray 的请求, Nginx 会将其转发给真正的 V2Ray 端口 10000。 这使得外部看起来只是一个 HTTP 请求 不容易被识别。
套不套 CDN 则视情况而定, 如果 IP 被 Block, 套 CDN 的话访问域名会先经 CDN 节点, 在由 CDN 节点访问你真正的服务器, 故可以救活你的网站或代理。 但因为使用人数众多, 套 CDN 通常会导致线路速度下降。
Workers
Cloudflare Workers 允许你直接部署 JavaScript 程序, 而不需要你自己的服务器, 也不需要域名。
Cloudflare Workers 免费版的限制是每天 10 万次请求, 10 TB 流量。
你可以:
- 部署任何你自己的 JavaScript 程序。
- 使用 WorkersProxy 反代任何网站。
- 使用 GoIndex 将 Google Drive 打造成国内可以访问的直链式网盘。
WorkersProxy
WorkersProxy 可以用来反代任何网站, 使其在国内可以访问。
演示: https://go.littlepotato.life/
项目地址: https://github.com/Siujoeng-Lau/WorkersProxy
(https://github.com/xiaoyang-sde/reflare)
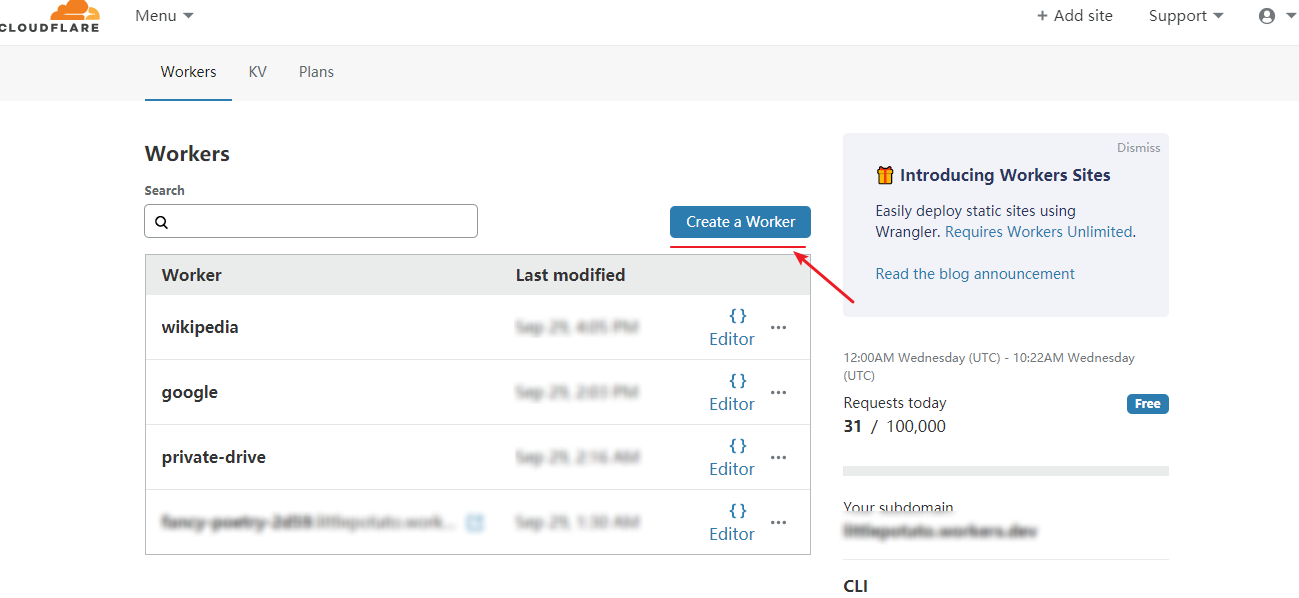
注册 Cloudflare, 并打开 Workers 选项, 点击 Create a Worker。
将项目中的 index。js 复制到 Script 中, 然后对其进行修改, 修改完毕后点击 Save and Deploy 右侧可以看见预览。
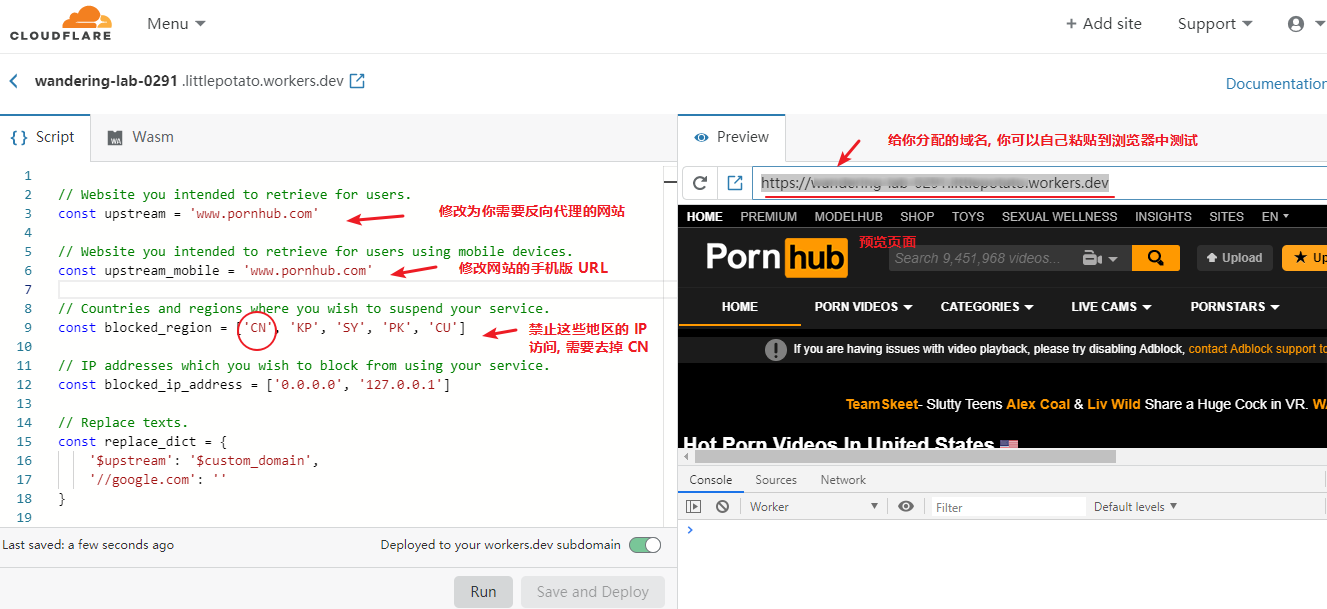
然后你就可以保存 Cloudflare 提供的域名来访问了, 但是你可以添加自己的域名。
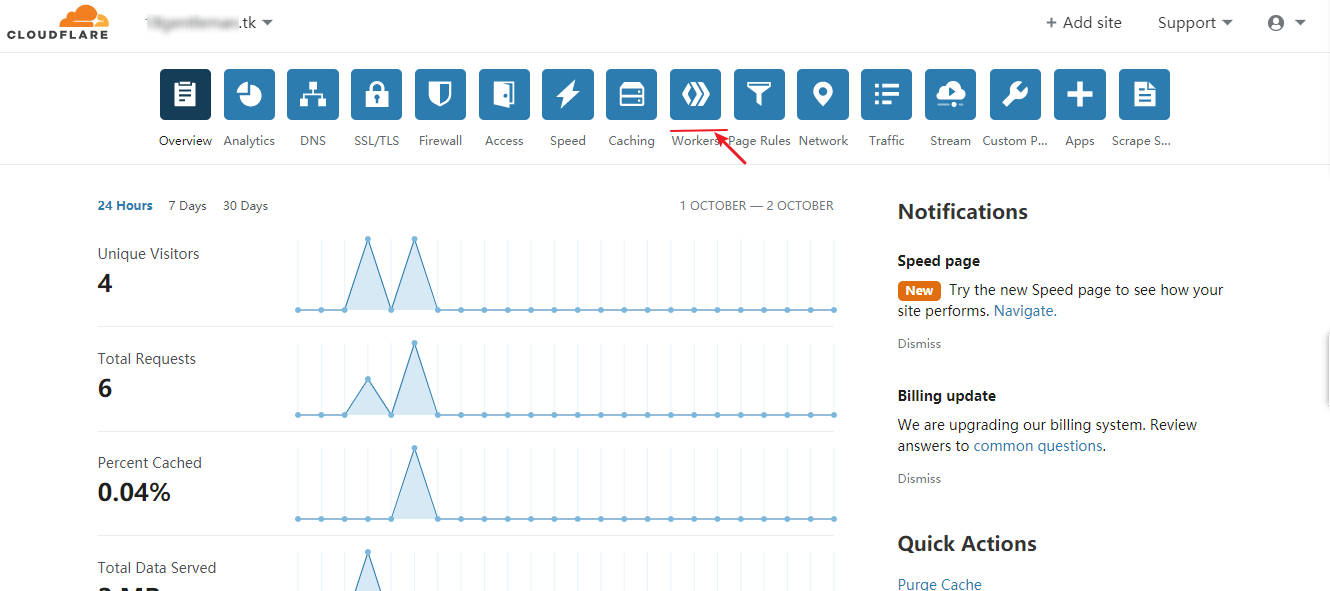
先将域名交由 Cloudflare DNS 解析,并确保为状态为 Proxied(云朵点亮),即开启 CDN。
接下来添加一条 CNAME 记录,并将一个子域名指向之前由 Cloudflare Workers 提供的域名。
然后你需要如下图所示将子域名填入 Add route 中。
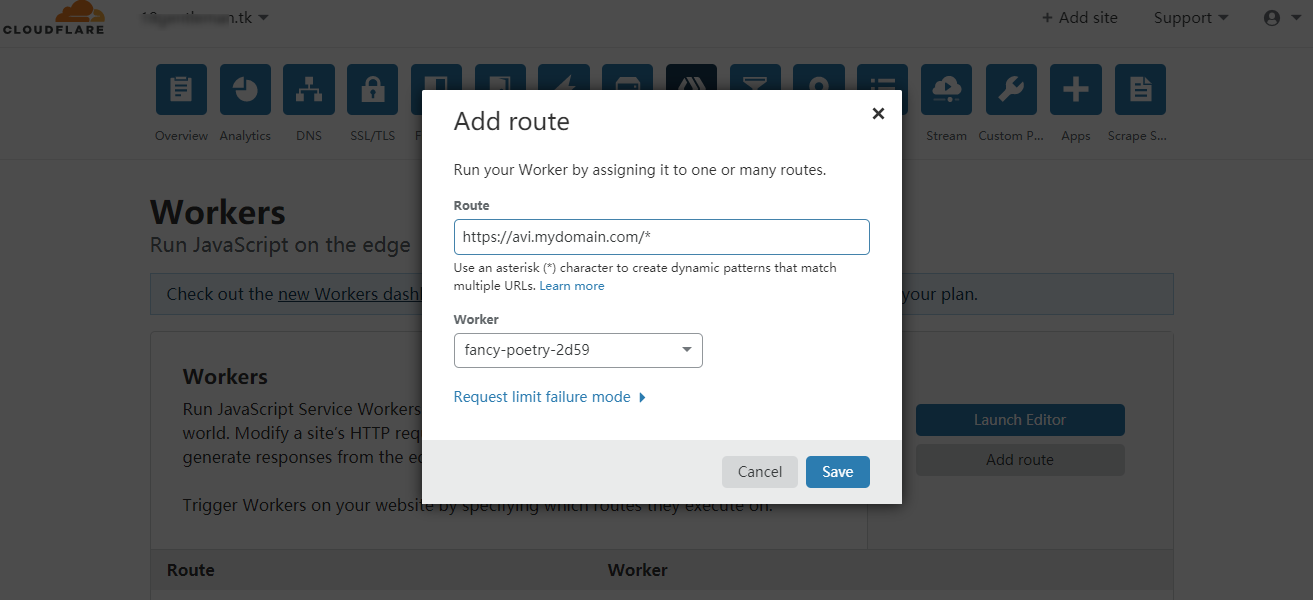
请注意,你需要将子域名写成 https://apps.mydomain.com/* 的形式注意结尾的 /*
然后你就可以使用自己的域名访问了。
如果想代理的网站较多,不想一个个设置的话,那么推荐使用下面的 JsProxy。
GoIndex
GoIndex 调用了 rclone 的接口, 同样使用了 Cloudflare Workers 部署。
演示: https://drive.littlepotato.life/
项目地址: https://github.com/donwa/goindex
首先, 点击 https://install.gd.workers.dev/ 获取认证码。
需要你登录 Google 账号, 将获取到的验证码填入原页面。
如果你想访问全部网盘内容, 则目录 ID 不填, 如果你只想访问某个文件夹里的内容, 登录 Google Drive 并在相应的文件夹上点击右键, 选择“共享”, 复制共享连接并提取其中 folders/ 到 ?usp=sharing 之间的 ID 填入原页面。

密码可选, 如果想用做博客, 网站等的图片外链, 就不要设置密码; 如果只想独享网盘里保存的小图片, 小电影则可以设置密码。
点击生成代码。
如之前一样将代码复制进 Cloudflare Workers 中部署。
同样的你也可以设置自己的域名访问。
JsProxy
JsProxy 也是一个使用 Workers 部署的项目,优点是不需要自己单独设置网站,通过输入网址的方式反代任何网站(包括 YouTube),使用上比 WorkersProxy 更方便。
演示:https://proxy.littlepotato.cf/
项目地址:https://github.com/EtherDream/jsproxy/
这里就省略过程了,步骤与 WorkersProxy 完全相同。
WARP
Cloudflare Warp VPN 是 Cloudflare 推出的一项网络隐私保护服务, 原本的 1.1.1.1 APP 只提供 DNS 服务, 最近新推出了 Warp VPN 服务, 完全免费, 你还可以通过邀请朋友使用升级到 Warp+, Warp+ 使用 Argo 技术速度将更快。
在 Google Play 或 iOS Store 均可下载。
有一个脚本可以刷 Warp+ 的流量, 爽撸一波。
项目地址: https://github.com/yyuueexxiinngg/some-scripts/tree/master/cloudflare
这里我使用的是 Python 版, 复制 cloudflare-warp-plus-aff.py 文件中的内容到本地, 打开 APP, 在“设置”中打开“More settings”, 打开“Diagnostics”复制下自己的“ID”。
编辑下载的 cloudflare-warp-plus-aff.py 文件, 将 referrer = "YOUR REFERRER ID" 改为自己的 ID, timesToLoop = 10 的意思是刷 10 次, 即刷 10 GB, 可适当调大。
使用 python cloudflare-warp-plus-aff.py 即可运行, 小技巧, 可以使用 nohup python cloudflare-warp-plus-aff.py & 在 Liunx 服务器上将脚本放在后台运行, 不用管它。
Warp VPN 作为备用还行, 经测试速度下载速度还行, 上传速度很慢, 高峰时段则几乎没网络。
经众多网友反应,宽带网络下皆无法连上 Warp VPN,数据网络下则正常,由于目前手机数据网络大多是 IPv6,故怀疑 Warp VPN 在 IPv4 网络下已经被封锁。
完。
PS: 在知道 Cloudflare Workers 之前, 我一直使用 Nginx 反代的方式来访问在国内被屏蔽的网站, Cloudflare Workers则可以不使用自己的服务器减少流量消耗, 并使用任播技术加快网站的访问速度, 于是马上换成 Cloudflare Workers + WorkersProxy 来部署了, Cloudflare 真乃良心大厂, 吹爆!
鸣谢
----------------------------------------------------------------
Reflare is a lightweight and scalable reverse proxy and load balancing library built for Cloudflare Workers. It sits in front of web servers (e.g. web application, storage platform, or RESTful API), forwards HTTP requests or WebSocket traffics from clients to upstream servers, and transforms responses with several optimizations to improve page loading time.
- ⚡ Serverless: Deploy instantly to the auto-scaling serverless platform built by Cloudflare. There's no need to manage virtual machines or containers.
- ✈️ Load Balancing: Distribute incoming traffics among different upstream services.
- ⚙️ Hackable: Deliver unique content based on visitor attributes, conduct A/B testing, or build custom middleware to hook into the lifecycle. (Experimental)
- 🛳️ Dynamic (Experimental): Store and update route definitions with Workers KV to avoid redundant redeployment.
📦 Installation
Start with reflare-template
Install wrangler CLI and authorize wrangler with a Cloudflare account.
npm install -g wrangler

wrangler login
Generate a new project from reflare-template and install the dependencies.
npm init cloudflare reflare-app https://github.com/xiaoyang-sde/reflare-template
cd reflare-app
npm install
Edit or add route definitions in src/index.ts. Please read the examples and route definition section below for more details.
- Run
npm run devto preview Reflare with local development server provided by Miniflare. - Run
npm run deployto publish Reflare on Cloudflare Workers.
WebSocket Proxy
Reflare could proxy WebSocket traffic to upstream services. Set up a reverse proxy for wss://echo.websocket.org:
{
  path: '/*',
  upstream: {
    domain: 'echo.websocket.org',
    protocol: 'https',
  },
}
S3 Bucket with custom response headers
Reflare could set custom headers to the request and response. Set up a reverse proxy for https://example.s3.amazonaws.com:
{
  path: '/*',
  upstream: {
    domain: 'example.s3.amazonaws.com',
    protocol: 'https',
  },

  headers: {
    response: {
      'x-response-header': 'Hello from Reflare',
    },
  },

  cors: {
    origin: ['https://www.example.com'],
    methods: ['GET', 'POST'],
    credentials: true,
  },
}
⚙️ Route Definition
Route Matching
Reflare implements express-like route matching. Reflare matches the path and HTTP method of each incoming request with the list of route definitions and forwards the request to the first matched route.
path(string | string[]): The path or the list of paths that matches the routemethods(string[]): The list of HTTP methods that match the route
// Matches all requests
reflare.push({
  path: '/*',
  /* ... */
});

// Matches GET and POST requests with path `/api`
reflare.push({
  path: '/api',
  methods: ['GET', 'POST'],
});

// Matches GET requests with path ending with `.json` or `.yaml` in `/data`
reflare.push({
  path: ['/data/*.json', '/data/*.yaml'],
  methods: ['GET'],
});
Upstream
domain(string): The domain name of the upstream serverprotocol(string): The protocol scheme of the upstream server (optional, defaults to'https')port(number): The port of the upstream server (optional, defaults to80or443based onprotocol)timeout(number): The maximum wait time on a request to the upstream server (optional, defaults to10000)weight(number): The weight of the server that will be accounted for as part of the load balancing decision (optional, defaults to1)onRequest(request: Request, url: string): The callback function that will be called before sending the request to upstreamonResponse(response: Response, url: string): The callback function that will be called after receiving the response from upstream
reflare.push({
  path: '/*',
  upstream: {
    domain: 'httpbin.org',
    protocol: 'https',
    port: 443,
    timeout: 10000,
    weight: 1,
  },
  /* ... */
});
The onRequest and onResponse
callback functions could change the content of the request or response.
For example, the following example replaces the URL of the request and
sets the cache-control header of the response based on its URL.
reflare.push({
  path: '/*',
  upstream: {
    domain: 'httpbin.org',
    protocol: 'https',
    port: 443,
    timeout: 10000,
    weight: 1,

    onRequest: (request: Request, url: string): Request => {
      // Modifies the URL of the request
      return new Request(url.replace('/original/request/path', ''), request);
    },

    onResponse: (response: Response, url: string): Response => {
      // If the URL ends with `.html` or `/`, sets the `cache-control` header
      if (url.endsWith('.html') || url.endsWith('/')) {
        response.headers.set('cache-control', 'public, max-age=240, s-maxage=60');
      }
      return response;
    }
  },
  /* ... */
});
Load Balancing
To load balance HTTP traffic to a group of servers, pass an array of server configurations to upstream. The load balancer will forward the request to an upstream server based on the loadBalancing.policy option.
random: The load balancer will select a random upstream server from the server group. The optionalweightparameter in the server configuration could influence the load balancing algorithm.ip-hash: The client's IP address is used as a hashing key to select the upstream server from the server group. It ensures that the requests from the same client will always be directed to the same server.
reflare.push({
  path: '/*',
  loadBalancing: {
    policy: 'random',
  },
  upstream: [
    {
      domain: 's1.example.com',
      protocol: 'https',
      weight: 20,
    },
    {
      domain: 's2.example.com',
      protocol: 'https',
      weight: 30,
    },
    {
      domain: 's3.example.com',
      protocol: 'https',
      weight: 50,
    },
  ],
  /* ... */
});
Firewall
Each incoming request is inspected against the firewall rules defined in the firewall property of the options object. The request will be blocked if it matches at least one firewall rule.
field: The property of the incoming request to be inspectedasn: The ASN number of the incoming request (number)ip: The IP address of the incoming request, e.g.1.1.1.1(string)hostname: The content of thehostheader, e.g.github.com(string | undefined)user-agent: The content of theuser-agentheader, e.g.Mozilla/5.0(string | undefined)country: The two-letter country code in the request, e.g.US(string | undefined)continent: The continent of the incoming request, e.g.NA(string | undefined)
value(string | string[] | number | number[] | RegExp): The value of the firewall ruleoperator: The operator to be used to determine if the request is blockedequal: Block the request iffieldis equal tovaluenot equal: Block the request iffieldis not equal tovaluematch: Block the request ifvaluematchesfield(Expectfieldto bestringandvalueto beRegExp)not match: Block the request ifvaluedoesn't matchfield(Expectfieldto bestringandvalueto beRegExp)in: Block the request iffieldis invalue(Expectvalueto beArray)not in: Block the request iffieldis not invalue(Expectvalueto beArray)contain: Block the request iffieldcontainsvalue(Expectfieldandvalueto bestring)not contain: Block the request iffielddoesn't containvalue(Expectfieldandvalueto bestring)greater: Block the request iffieldis greater thanvalue(Expectfieldandvalueto benumber)less: Block the request iffieldis less thanvalue(Expectfieldandvalueto benumber)
reflare.push('/', {
  path: '/*',
  /* ... */
  firewall: [
    {
      field: 'ip',
      operator: 'in',
      value: ['1.1.1.1', '1.0.0.1'],
    },
    {
      field: 'user-agent',
      operator: 'match',
      value: /Chrome/,
    }
  ],
});
Headers
request(Record<string, string>): Sets request header going upstream to the backend. Accepts an object. (optional, defaults to{})response(Record<string, string>): Sets response header coming downstream to the client. Accepts an object. (optional, defaults to{})
reflare.push({
  path: '/*',
  /* ... */
  headers: {
    request: {
      'x-example-header': 'hello server',
    },
    response: {
      'x-example-header': 'hello client',
    },
  },
});
Cross-Origin Resource Sharing (CORS)
-
origin: Configures theAccess-Control-Allow-OriginCORS header. (optional, defaults tofalse)boolean: set totrueto reflect the origin of the request, or set tofalseto disable CORS.string[]: an array of acceptable origins.*: allow any origin to access the resource.
-
methods(string[]): Configures theAccess-Control-Allow-MethodsCORS header. Expect an array of valid HTTP methods or*. (optional, defaults to reflecting the method specified in the request’sAccess-Control-Request-Methodheader) -
allowedHeaders(string[]): Configures theAccess-Control-Allow-HeadersCORS header. Expect an array of HTTP headers or *. (optional, defaults to reflecting the headers specified in the request’sAccess-Control-Request-Headersheader.) -
exposedHeaders(string[]): Configures theAccess-Control-Expose-HeadersCORS header. Expect an array of HTTP headers or*. (optional, defaults to[]) -
credentials(boolean): Configures theAccess-Control-Allow-CredentialsCORS header. Set to true to pass the header, or it is omitted. (optional, defaults tofalse) -
maxAge(number): Configures theAccess-Control-Max-AgeCORS header. Set to an integer to pass the header, or it is omitted. (optional)
reflare.push({
  path: '/*',
  /* ... */
  cors: {
    origin: true,
    methods: [
      'GET',
      'POST',
    ],
    allowedHeaders: [
      'Example-Header',
    ],
    exposedHeaders: [
      'Example-Header',
    ],
    credentials: true,
    maxAge: 86400,
  },
});
Optimization
Cloudflare Workers provides several optimizations by default.
- Brotli: Speed up page load times for visitors’ HTTPS traffic by applying Brotli compression.
- HTTP/2: Improve page load time by connection multiplexing, header compression, and server push.
- HTTP/3 with QUIC: Accelerate HTTP requests by using QUIC, which provides encryption and performance improvements compared to TCP and TLS.
- 0-RTT Connection Resumption: Improve performance for clients who have previously connected to the website.
from https://github.com/xiaoyang-sde/reflare
No comments:
Post a Comment