Introduction
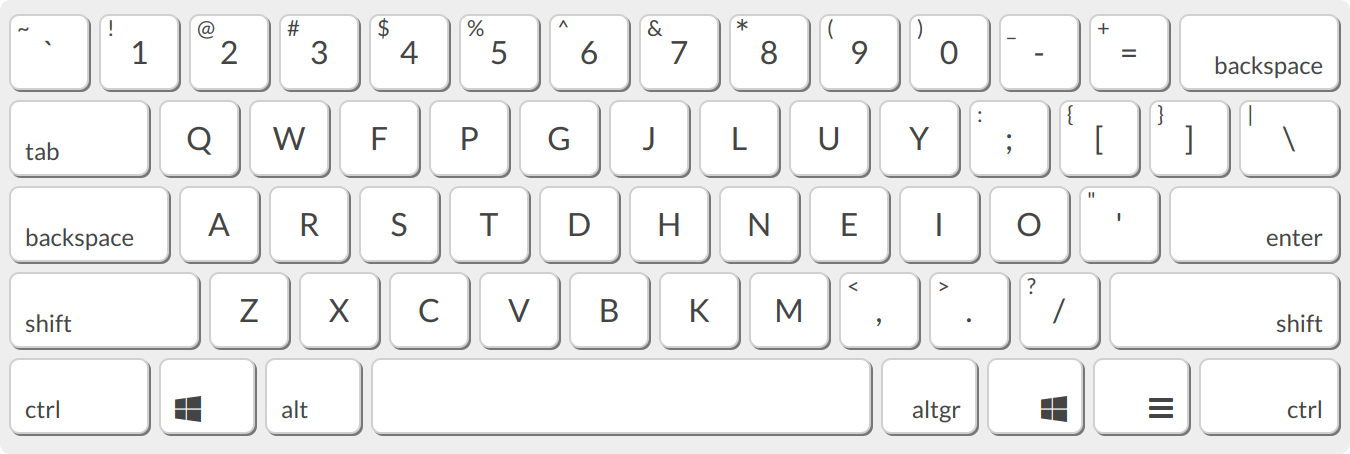
The QWERTY layout was designed in the 19th century. Colemak is a modern alternative to the QWERTY and Dvorak layouts, designed for efficient and ergonomic touch typing in English.
Learning
Colemak is a one-time investment that will allow you to enjoy faster
and pain-free typing for the rest of your life. Colemak is now the 3rd
most popular keyboard layout for touch typing in English, after QWERTY
and Dvorak and comes pre-installed on Mac and Linux systems.
The layout

On a US keyboard, keyboards in other regions will vary slightly
Learn more
- Read the FAQ
- Read reviews and experiences from people who made the switch in the forum or subreddit. Get live answers to questions in the Discord server.
- Learn the layout with a typing tutor of your choice
- Download – Download available for Windows and Unix. Pre-installed on Mac and Linux.
Advantages
- Ergonomic and comfortable – Your fingers on QWERTY move 2.2x more than on Colemak. QWERTY has 16x more same hand row jumping than Colemak. There are 35x more words you can type using only the home row on Colemak.
- Easy to learn – Allows easy transition from QWERTY. Only 2 keys move between hands. Many common shortcuts (including Ctrl+Z/X/C/V) remain the same. Typing lessons available.
- Fast – Most of the typing is done on the strongest and fastest fingers. Low same-finger ratio.
- Multilingual – Allows to type in over 40 languages and to type various symbols, e.g. "pâté", "mañana", €, em-dash, non-breaking space.
- Free – Free software released under the public domain. You don't have to buy a new keyboard, just install a program.
Misc
- Colemak Mod-DH - an unofficial variant that reduces usage of the center columns.
- Colemak.org community site
- Dreymar's Big Bag Of Kbd Tricks mods for ergonomics beyond the keyboard layout, and implementations for several platforms.
from https://colemak.com/
------
The Ultimate NeoVim Config for Colemak Users .
The Ultimate NeoVim Config for Colemak Users
Please DO NOT just copy this configuration folder without really looking at it! Please, at least, read this README file!
- Requirements
- After Installation, You Need To
- After Installation, You Might Want To
- Keyboard Shortcuts
- Plugins Keybindings (Screenshots/GIF provided!)
- Custom Snippets
- Some Weird Stuff
Requirements
- This nvim configuration REQUIRES NeoVim 0.6.0+
After Installation, You Need To
- Install
pip3, and dopip3 install --user pynvim - Install
node, and donpm install -g neovim - Install nerd-fonts (actually it's optional but it looks real good)
After Installation, You Might Want To
First of all
- Do
:checkhealth
For Python Debugger (via vimspector)
- Install
debugpy(pip)
Config Python path
- Well, make sure you have python
- See
_machine_specific.vim
For Taglist:
- Install
ctagsfor function/class/variable list
For FZF
- Install
fzf - Install
ag(the_silver_searcher)
And also...
- Install
figletfor inputing text ASCII art - Install
xclipfor system clipboard access (Linuxandxorgonly)
from https://github.com/theniceboy/nvim

No comments:
Post a Comment