Total Pageviews

Thursday, 30 June 2022

Salt与Ansible全方位比较

原文链接:http://jensrantil.github.io/salt-vs-ansible.html

之前某些时候我需要评估配置管理系统。结合从他人得到的意见,我认为PuppetChef在配置和运行方面过于复杂。由于我是Python粉,所以我时常关注AnsibleSalt。Ruby目前不是我感冒的语言,当然我也不想在这里引起语言之争。

去年我花了6个月美好的时光用Ansible来配置服务器。从而对这个工具变得很熟悉。在那个项目中Ansible可以说是最佳选择,因为它易于使用,还有完整的文档。我所工作的团队尽量遵循文档中指示的最佳实践,从而使我们快速上手,而且我们可以借鉴已经被验证过可以工作的结构。

几周前我去日本开始为期10天的休假,在一个完全没人认识我的地方,我有充足的时间来阅读一些电脑杂志和文档。享受了美味的寿司,观赏了东京美景,玩耍了滑雪之余,我发现阅读Salt PDF文档是一个很棒的休闲。

当然我花了一些时间来试用Salt并使用了States系统。现在我认为我对两个系统有了一个粗略的背景,我义无返顾的进行了一个具有个人色彩的测评。

术语

Salt及Ansible创建之初都被作为执行引擎。即,它们都可以在一台或多台远程系统中执行命令,并且可以并行执行。

Ansible支持在多个机器上执行任意的命令行命令。它也支持执行模块。一个Ansible模块基本上是以对Ansible友好的方式编写的Python模块。大多数标准的Ansible模块是幂等的。这意味着你只需告诉你的系统想要的状态,那么该模块就会尝试将你的系统调整为该状态。

Unusable也有Playbook的概念。一个playbook是为一组主机定义了一系列模块执行顺序的文件。playbook可通过执行模块来改变主机准柜台。这使得我们可以精准控制多台机器,比如在升级一个应用程序之前把机器从负载均衡器中剔除出去。

Salt有两种模块:执行模块状态模块。执行模块可以简单的执行一些命令,比如执行命令行命令,或者下载一个文件。状态模块与Ansible模块更相似,通过参数定义一个状态,而模块则尝试满足该最终状态。通常状态模块调用执行模块来完成工作。

状态模块执行时使用state执行模块。状态模块支持通过文件定义状态,该文件被称为SLS文件。而状态与主机的映射关系被定义在top.sls文件中。

playbook及SLS文件(通常)都是使用YAML格式。

另外,我想指出当任务需要使用inventory,或者需要在多台机器上运行时,使用远程执行引擎是非常有用的。

架构

Salt有一个Salt master,而很多Salt minon在初始化时会连接到该master上。通常,命令起始于master的命令行中。master然后将命令分发到minion上。初始化时,minion会交换一个秘钥建立握手,然后建立一个持久的加密的TCP连接。我可以喋喋不休的阐述Salt如何借助ZeroMQ库来通讯,但简短的来说,Salt master可以同时连接很多minion而无需担心过载,这归功于ZeroMQ。

由于minion和Salt master之间建立了持久化连接,所以Salt master上的命令能很快的到达minion上。minion也可以缓存多种数据,以便加速执行。

Ansible无需master,它使用SSH作为主要的通讯层。这意味着它比较慢,但无需master意味着它在设置及测试Ansible playbook上更加容易。有人也声称它更安全,因为它不需要额外的服务器程序。你可以在“安全”章节获取更多信息。

Ansible也有支持ZeroMQ的版本,但需要一个初始的SSH连接来设置。我尝试了这个,但说实话我并没感到速度有所提升。我猜如果playbook更大,主机更多时才会感受到速度的提升。

Ansible推荐使用inventory文件来追踪机器。inentory文件基本上包含了一组主机,可以对其分类为组,可以对一组主机或单个主机指定属性。你可以建立多个inventory文件,比如一个作为阶段环境,另一个作为产品环境。

Salt也支持使用SSH替代ZeroMQ,即Salt SSH。但请注意目前还是试用版本(而且我还没尝试用过)

社区

对于这两个项目我都有使用IRC及邮件列表的经历。我也给它们发过补丁包,包括Python代码及一些文档修正。以下是我的经历的总结:

Ansible:IRC上反馈非常快,并且很友好。但该项目貌似缺少社区影响,更像是一个人在领导,即Michael DeHaan。抱歉我这样说,其实我很喜欢社区,因为对于改进更加开放和友好。Ansible一些改进问题还未修复就关闭了,让我感觉它把问题隐藏了起来。好在所有的问题都有回答。

Salt需要继续证明其欢迎社区贡献。IRC反馈已经变得及时和友好。有时我需要借助于邮件列表。我有一些邮件,直到4天以后才得到响应,但看起来每个邮件最终都会有跟进。

我的印象是Salt有更成熟的社区,更欢迎协作。我说这句话时可能会得罪很多人,当然这是我个人观点!

速度

如果你以为你的服务器比较少,速度无所谓时,我相信你是错的。能够快速迭代永远是非常重要的。长期来说,配置缓慢会拖慢你的整个节奏。如果有些东西需要花费30秒以上来编译,我会在编译时去玩Twitter,而这意味着该编译会其实会花掉至少120秒。部署时也会这样。

Ansible始终使用SSH来初始化连接。这很慢。也许Ansible的ZeroMQ实现(之前提到过)会改善这点,但初始化依然会很慢。Salt默认使用ZeroMQ,所以很快。

之前说过,Salt拥有持久的minion进程。这使得Salt可以缓存文件,从而加速执行。

代码结构

我最不能忍受的是Ansible模块不能被导入(因为导入就会执行代码)。这意味着测试模块时会引入一些魔法。因为你无法导入任何一个模块。我不喜欢魔法,而喜欢纯粹简单的代码。这更像Salt的风格。

少用魔法意味着给Salt模块写测试更清晰。Salt完全可测。我很高兴Salt关于测试有三个章节,包括鼓励你mock一些你不具备的基础设施来增加可测性,比如mock一个MySQL实例。

以上说明Ansible通常拥有简洁干净的代码。我在其中可以快速跳转。然而,提升代码结构不是“Ansiable社区”的关注点。

Ansible和Salt都可以通过PyPi来安装。

Vagrant支持

当讨论测试时,DevOps人喜欢Vagrant。直到现在我还没用过它。Vagrant可以使用Slat和Ansible提供的模块来初始化机器。这意味着在初始化机器时,Vagrant可以轻而易举的使用master+minion模式,或者执行一个playbook。

任务编排

Ansible和Salt都支持编排,我认为Ansible中编排规则更容易理解和使用。基本上,playbook可以分割为多个任务组,每组匹配一组主机(或主机组)。每组按顺序来依次执行。这与任务的执行顺序相同。

Salt支持事件反应器。这意味Salt执行可能会触发另一个机器上的东西。Salt的执行引擎也支持监控。所以未来这块前景比较广阔。你可以使用Overstate在集群中以特定顺序设置多种角色来实现基础编排。

Ansible比Salt在编排方面更好,因为它简单。Salt将来会更好,因为在集群变化中它更具持续反应性。

Salt及Ansible都支持通过机器窗口执行任务。这对于保证服务始终可用(比如升级时)是非常有用的。

安全

Ansible使用SSH来传输数据。SSH是经历过考验的协议。一旦SSH服务器被正确配置(使用一个良好的随机数生成器),我相信大多数人会认为SSH客户端是安全的。

Ansible也可以轻松的建立多个非root用户与单个主机的连接。如果你非常反对有进程以root权限运行,那么你可以考虑使用Ansible。Ansible支持使用sudo来以root方式执行模块。所以你可以无需使用root来建立SSH连接。

Salt使用“自己”的AES实现及key管理。我想指出这里的“自己”其实是使用PyCrypto包。Salt以前有安全问题,但同时我认为Salt架构很简单,所以安全问题可以轻松的维护。

有点需要指出,Salt运行master及minion时默认以root方式。这个配置可以改,但显而易见会导致一些新问题,比如非root模式下很难安装Debian包。在master上你可以配置salt命令为非root模式。我极力推荐这样做。

敏感数据

所有敏感数据应当单独存放,然后在需要时存放在配置机器上。如果配置机器是系统管理员的机器(现在通常是笔记本电脑),那么会有数据被盗用的风险。

经过深入的长时间思考后,我认为认证master方式是更好的选择。这意味着敏感数据可以强制存放在一个受保护的地方(当然需要加密的备份)。Salt可以把安全证书存放在”Pillar”里。当然,破解master会是个毁灭性打击,但是同时我们只需要安全保护一台机器。不是所有的开发者电脑都是安全的,尤其在火车上或飞机场时。

显然,Ansible用户可以选择始终通过一个绝对安全的存放敏感数据的电脑上执行playbook。但人们通常会这样做吗?

审计能力

当讨论安全时我认为审计是相当重要的。Salt在这方面比Ansible做的要好。Salt的每次执行都会在master上存放X天。这样我们更容易调试,也容易发现可疑的事情。

部署

Ansible显然更容易些。因为它无需部署。当然,Salt支持SSH,但文档中大多数情况下假设我们使用ZeroMQ的方式。当然,SSH要慢些。

初始化minion的好处是这些minion都会连接到master。这使得我们可以快速初始化很多新机器。如果你想使用类似于亚马逊的自动化弹性扩展功能时,minion-连接架构很有用。每一个自动化弹性扩展的机器将自动变为一个minion。

Salt 初始化脚本非常好用,而且执行很快。可以处理不多种分发,文档也很丰富

学习曲线

Ansible这方面更好。Ansible更容易学习及提高。因为我们只需拷贝一份Ansible GIT代码库,然后设置一些环境变量就可以执行playbook了。

Salt可以以非master模式运行。这样可以更容易设置和运行salt。然而,对于产品环境(以及阶段环境)我推荐使用master模式来运行Salt。

通体来说,Salt功能更花哨,代价是学习曲线陡峭。Salt更加模块化。这易于组织代码结构,但是完全精通Salt需要更多学习。

升级

升级Salt取决于当时是如何安装Salt的。基于Debian的分发的话,有一个apt代码库来存放最新的Debian包。所以升级的话可以使用apt-getupgrade。对于Ubuntu机器,有PPA。这些代码库的维护很活跃。最新发布的2014.1.0版本一周内(时间有点长)就有了Debian/Ubuntu包。

升级Ansible更简单。你只需简单执行git fetch && git checkout 即可。

文档

两个项目都有详尽的文档供你设置和运行,以及开发模块及配置。过去Ansible比Salt有更好的文档结构。最近Salt花了大力气来重整文档。我也贡献了自己的力量来帮助完善这些文档。

结语

对于我来说,Ansible是个极好的工具来自动化服务器配置及自动化部署。设置Ansible并运行起来很简单,而且文档也很丰富。

进一步说,Salt具有可伸缩性,速度快,架构合理。我发现Salt的结构更适合云端部署。将来我会毫不犹豫的使用Salt。

总的来说,你在做出选择之前最好在你的项目中都试用下它们。反正配置及测试Ansible及Salt都非常快。

HashiCorp Vault


HashiCorp Vault是一款企业级私密信息管理工具。说起Vault,不得不提它的创造者HashiCorp公司。HashiCorp是一家专注于DevOps工具链的公司,其旗下明星级产品包括Vagrant、Packer、Terraform、Consul、Nomad等,再加上Vault,这些工具贯穿了持续交付的整个流程。


HashiCorp Vault在2016年四月进入了ThoughtWorks技术雷达,位于Tools分类,处于ACESS级别。在2017年3月份最新一起Tech Radar中,HashiCorp Vault已经处于TRIAL级别。

https://www.thoughtworks.com/radar/tools/hashicorp-vault

为什么要使用HashiCorp Vault?

在企业级应用开发过程中,团队每时每刻都需要管理各种各样的私密信息,从个人的登陆密码、到生产环境的SSH Key以及数据库登录信息、API认证信息等。通常的做法是将这些秘密信息保存在某个文件中,并且放置到git之类的源代码管理工具中。个人和应用可以通过拉取仓库来访问这些信息。但这种方式弊端很多,比如跨团队分享存在安全隐患、文件格式难以维护、私密信息难以回收等。

尤其是微服务大行其道的今天,如何让开发者添加私密信息、应用程序能轻松的获取私密信息、采用不同策略更新私密信息、适时回收私密信息等变得越来越关键。所以企业需要一套统一的接口来处理私密信息的方方面面,而HashiCorp Vault就是这样的一款工具。

HashiCorp Vault的特性

HashiCorp Vault作为集中化的私密信息管理工具,具有以下特点:

  • 存储私密信息。 不仅可以存放现有的私密信息,还可以动态生成用于管理第三方资源的私密信息。所有存放的数据都是加密的。任何动态生成的私密信息都有租期,并且到期会自动回收。

  • 滚动更新秘钥。用户可以随时更新存放的私密信息。Vault提供了加密即服务(encryption-as-a-service)的功能,可以随时将密钥滚动到新的密钥版本,同时保留对使用过去密钥版本加密的值进行解密的能力。 对于动态生成的秘密,可配置的最大租赁寿命确保密钥滚动易于实施。

  • 审计日志。 保管库存储所有经过身份验证的客户端交互的详细审核日志:身份验证,令牌创建,私密信息访问,私密信息撤销等。 可以将审核日志发送到多个后端以确保冗余副本。

另外,HaishiCorp Vault提供了多种方式来管理私密信息。用户可以通过命令行、HTTP API等集成到应用中来获取私密信息。HashiCorp Vault也能与Ansible、Chef、Consul等DevOps工具链无缝结合使用。

HashiCorp 架构

HashiCorp对私密信息的管理进行了合理的抽象,通过优良的架构实现了很好的扩展性和高可用。

  • Storage backend: 存储后端,可以为内存、磁盘、AWS等地方。

  • Barrier:隔离受信区域和非授信区域,保证内部数据的安全性。

  • HTTP API:通过HTTP API向外暴露服务,Vault也提供了CLI,其是基于HTTP API实现的。

Vault提供了各种Backend来实现对各种私密信息的集成和管理。比如Authentication Backend提供鉴权,Secret Backend用于存储和生成私密信息等。

总结

HashiCorp Vault作为私密信息管理工具,比传统的1password等方式功能更强大,更适合企业级的应用场景。在安全问题越来越严峻的今天,值得尝试HashiCorp Vault。

NetBox

Infrastructure resource modeling for network automation. Open source under Apache 2. Public demo: https://demo.netbox.dev

NetBox is an infrastructure resource modeling (IRM) tool designed to empower network automation, used by thousands of organizations around the world. Initially conceived by the network engineering team at DigitalOcean, NetBox was developed specifically to address the needs of network and infrastructure engineers. It is intended to function as a domain-specific source of truth for network operations.

Myriad infrastructure components can be modeled in NetBox, including:

  • Hierarchical regions, site groups, sites, and locations
  • Racks, devices, and device components
  • Cables and wireless connections
  • Power distribution
  • Data circuits and providers
  • Virtual machines and clusters
  • IP prefixes, ranges, and addresses
  • VRFs and route targets
  • FHRP groups (VRRP, HSRP, etc.)
  • AS numbers
  • VLANs and scoped VLAN groups
  • Organizational tenants and contacts

In addition to its extensive built-in models and functionality, NetBox can be customized and extended through the use of:

  • Custom fields
  • Custom links
  • Configuration contexts
  • Custom model validation rules
  • Reports
  • Custom scripts
  • Export templates
  • Conditional webhooks
  • Plugins
  • Single sign-on (SSO) authentication
  • NAPALM integration
  • Detailed change logging

NetBox also features a complete REST API as well as a GraphQL API for easily integrating with other tools and systems.

NetBox runs as a web application atop the Django Python framework with a PostgreSQL database. For a complete list of requirements, see requirements.txt. The code is available on GitHub.

The complete documentation for NetBox can be found at docs.netbox.dev. A public demo instance is available at https://demo.netbox.dev.

Thank you to our sponsors!

DigitalOcean            Equinix Metal            NS1
Sentry            Stellar Technologies

Discussion

  • GitHub Discussions - Discussion forum hosted by GitHub; ideal for Q&A and other structured discussions
  • Slack - Real-time chat hosted by the NetDev Community; best for unstructured discussion or just hanging out

Installation

Please see the documentation for instructions on installing NetBox. To upgrade NetBox, please download the latest release and run upgrade.sh.

Providing Feedback

The best platform for general feedback, assistance, and other discussion is our GitHub discussions. To report a bug or request a specific feature, please open a GitHub issue using the appropriate template.

If you are interested in contributing to the development of NetBox, please read our contributing guide prior to beginning any work.

Related projects

Please see our wiki for a list of relevant community projects.

from https://github.com/netbox-community/netbox

-------

Installation

The installation instructions provided here have been tested to work on Ubuntu 20.04 and CentOS 8.3. The particular commands needed to install dependencies on other distributions may vary significantly. Unfortunately, this is outside the control of the NetBox maintainers. Please consult your distribution's documentation for assistance with any errors.

The following sections detail how to set up a new instance of NetBox:

  1. PostgreSQL database
  2. Redis
  3. NetBox components
  4. Gunicorn
  5. HTTP server
  6. LDAP authentication (optional)

Requirements

Dependency Minimum Version
Python 3.8
PostgreSQL 10
Redis 4.0

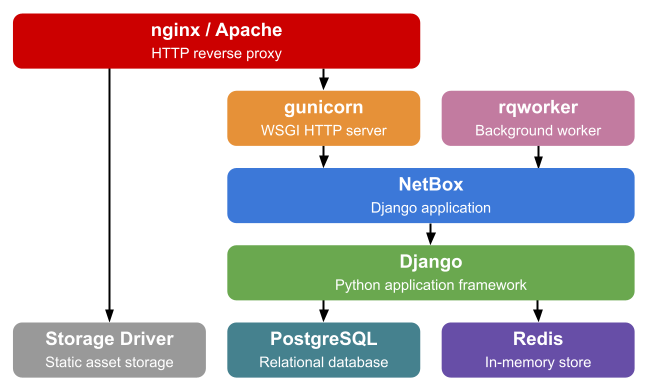
Below is a simplified overview of the NetBox application stack for reference:

NetBox UI as seen by a non-authenticated user

Upgrading

If you are upgrading from an existing installation, please consult the upgrading guide.

from https://docs.netbox.dev/en/stable/installation/


django2.0开发的博客程序: docspace


django docspace blog

demo

Installation

git clone https://github.com/Wenvki/docspace.git
Move `docspace` to your django project directory.

Add docspace to your INSTALLED_APPS setting.

urls.py

urlpatterns = [
    path(r'^admin/', admin.site.urls),
    path(r'blog/', include('docspace.urls')),
]

settings.py

INSTALLED_APPS = [
    'django.contrib.admin',
    'django.contrib.auth',
    'django.contrib.contenttypes',
    'django.contrib.sessions',
    'django.contrib.messages',
    'django.contrib.staticfiles',

    'docspace',
]
from https://github.com/Wenvki/docspace 


ipxe

 iPXE network bootloader.

ipxe.org

Quick start guide:

   cd src
   make

For any more detailed instructions, see http://ipxe.org
 from https://github.com/ipxe/ipxe 


llvm-project

 The LLVM Project is a collection of modular and reusable compiler and toolchain technologies. Note: the repository does not accept github pull requests at this moment. Please submit your patches at http://reviews.llvm.org

llvm.org  

The LLVM Compiler Infrastructure

This directory and its sub-directories contain the source code for LLVM, a toolkit for the construction of highly optimized compilers, optimizers, and run-time environments.

The README briefly describes how to get started with building LLVM. For more information on how to contribute to the LLVM project, please take a look at the Contributing to LLVM guide.

Getting Started with the LLVM System

Taken from here.

Overview

Welcome to the LLVM project!

The LLVM project has multiple components. The core of the project is itself called "LLVM". This contains all of the tools, libraries, and header files needed to process intermediate representations and convert them into object files. Tools include an assembler, disassembler, bitcode analyzer, and bitcode optimizer. It also contains basic regression tests.

C-like languages use the Clang frontend. This component compiles C, C++, Objective-C, and Objective-C++ code into LLVM bitcode -- and from there into object files, using LLVM.

Other components include: the libc++ C++ standard library, the LLD linker, and more.

Getting the Source Code and Building LLVM

The LLVM Getting Started documentation may be out of date. The Clang Getting Started page might have more accurate information.

This is an example work-flow and configuration to get and build the LLVM source:

  1. Checkout LLVM (including related sub-projects like Clang):

    • git clone https://github.com/llvm/llvm-project.git

    • Or, on windows, git clone --config core.autocrlf=false https://github.com/llvm/llvm-project.git

  2. Configure and build LLVM and Clang:

    • cd llvm-project

    • cmake -S llvm -B build -G <generator> [options]

      Some common build system generators are:

      • Ninja --- for generating Ninja build files. Most llvm developers use Ninja.
      • Unix Makefiles --- for generating make-compatible parallel makefiles.
      • Visual Studio --- for generating Visual Studio projects and solutions.
      • Xcode --- for generating Xcode projects.

      Some common options:

      • -DLLVM_ENABLE_PROJECTS='...' and -DLLVM_ENABLE_RUNTIMES='...' --- semicolon-separated list of the LLVM sub-projects and runtimes you'd like to additionally build. LLVM_ENABLE_PROJECTS can include any of: clang, clang-tools-extra, cross-project-tests, flang, libc, libclc, lld, lldb, mlir, openmp, polly, or pstl. LLVM_ENABLE_RUNTIMES can include any of libcxx, libcxxabi, libunwind, compiler-rt, libc or openmp. Some runtime projects can be specified either in LLVM_ENABLE_PROJECTS or in LLVM_ENABLE_RUNTIMES.

        For example, to build LLVM, Clang, libcxx, and libcxxabi, use -DLLVM_ENABLE_PROJECTS="clang" -DLLVM_ENABLE_RUNTIMES="libcxx;libcxxabi".

      • -DCMAKE_INSTALL_PREFIX=directory --- Specify for directory the full path name of where you want the LLVM tools and libraries to be installed (default /usr/local). Be careful if you install runtime libraries: if your system uses those provided by LLVM (like libc++ or libc++abi), you must not overwrite your system's copy of those libraries, since that could render your system unusable. In general, using something like /usr is not advised, but /usr/local is fine.

      • -DCMAKE_BUILD_TYPE=type --- Valid options for type are Debug, Release, RelWithDebInfo, and MinSizeRel. Default is Debug.

      • -DLLVM_ENABLE_ASSERTIONS=On --- Compile with assertion checks enabled (default is Yes for Debug builds, No for all other build types).

    • cmake --build build [-- [options] <target>] or your build system specified above directly.

      • The default target (i.e. ninja or make) will build all of LLVM.

      • The check-all target (i.e. ninja check-all) will run the regression tests to ensure everything is in working order.

      • CMake will generate targets for each tool and library, and most LLVM sub-projects generate their own check-<project> target.

      • Running a serial build will be slow. To improve speed, try running a parallel build. That's done by default in Ninja; for make, use the option -j NNN, where NNN is the number of parallel jobs to run. In most cases, you get the best performance if you specify the number of CPU threads you have. On some Unix systems, you can specify this with -j$(nproc).

    • For more information see CMake.

Consult the Getting Started with LLVM page for detailed information on configuring and compiling LLVM. You can visit Directory Layout to learn about the layout of the source code tree.

Getting in touch

Join LLVM Discourse forums, discord chat or #llvm IRC channel on OFTC.

The LLVM project has adopted a code of conduct for participants to all modes of communication within the project.

from https://github.com/llvm/llvm-project


tipa2unicode

 Convert LaTeX/TIPA to Unicode IPA.

npm version

Usage

npx tipa2unicode [--unicode|--hex|--html] [--debug] [<file>]
from https://github.com/b1f6c1c4/tipa2unicode