This page details how to set up an SSH VPN.
NB: You must be using OpenSSH version 4.3 or later to do this-- this means that this will not work with Ubuntu 6.06 or earlier's default packages -- it will only work with Ubuntu 6.10 or later, or with a locally compiled SSH version 4.3 or later.
This page discusses using SSH to set up SSH-based point to point connections, which can then be used to create routes that create virtual private networks.
Note that using SSH in this fashion is not the "best" way to create a permanent, stable VPN. Notably, SSH uses TCP, and TCP over TCP can provide abysmal performance under pathological conditions. See also OpenVPN, etc.
You also need to have installed uml-utilities on the "calling" machine (the one that will ask for the tunnel). You can check by trying:
sudo tunctl -u $USER
Introduction
OpenSSH version 4.3 introduced a new feature: the ability to create on-the-fly "Virtual Private Networks" via the tunnel driver, or "tun" driver. This feature allows you to create a network interface that bridges two physically disparate network segments. A quick diagram:
    +---------------+            OpenSSH 4.3           +---------------+
    |   Machine A   | tun0 -- Tunnel Interface -- tun0 |   Machine B   |
    |  Has a tunnel | <------------------------------->|  Has a tunnel |
    |  and ethernet | 10.0.0.100            10.0.0.200 |  and ethernet |
    +-------+-------+     point to point connection    +-------+-------+
       eth0 |                 creates a bridge                 | eth0
 10.0.0.100 |               that plugs machine B               | 192.168.0.100
   port 22  |                  into network A                  |
  forwarded |                                                  |
    here    |                                                  |
    +-------+-------+          +-~-~-~-~-~-~-~-+       +-------+-------+
    |   Network A   |          |               |       |   Network B   |
    |  10.0.0.1/24  | 1.2.3.4  |  The Internet |       | 192.168.0.1/24|
    |  Has internet |<-------->|               |<----->|  Has internet |
    |  NAT gateway  | Routable |               |       |  NAT gateway  |
    +---------------+ Address  +-~-~-~-~-~-~-~-+       +---------------+
What does this diagram represent? In this case, we have two machines, machine A and machine B. Machine A is connected to network A via ethernet, and machine B is connected to network B via ethernet. Machine A's IP address on Network A is 10.0.0.100, and Machine B's IP address on Network B is 192.168.0.100. Each network has an internet NAT gateway to allow for internet connectivity.
In this example, we are connecting machine B to network A via an ssh tunnel interface. Machine A already has an IP addresses on network A: its ethernet interface address (10.0.0.100). Machine B must also be allocated one IP address on network A: its tunnel interface address (10.0.0.200).
Also, Machine B must have some access to the ssh server on Machine A; the most direct way for this to happen is that Machine A must have either a globally routable address itself; or (as is diagramed), port 22 (or whatever port ssh is running on) must be forwarded to Machine A by the NAT system. There are other ways to allow Machine B access to Machine A's ssh server, but this is left as an exercise for the reader.
Once the tunnel is set up, Machine B will be able to directly access Network A. In other words, Machine B would be "plugged in" to Network A via its tunnel with Machine A. Of couse, the devil's in the details: how do you set all this up?
IP forwarding
Of course the first and most obvious thing is that you'd better have IP forwarding enabled.
on Machine A (and it wouldn't hurt on B), execute:
echo 1 | sudo tee /proc/sys/net/ipv4/ip_forward
The SSH command
The actual SSH command that gets the ball rolling is quite simple:
on Machine B, execute:
sudo ssh -w 0:0 1.2.3.4
Tip : Additional ssh options.
sudo ssh -NTCf -w 0:0 1.2.3.4
- -N Do not execute a remote command. This is useful for just forwarding ports (or in this case tunnels).
- -T Disable pseudo-tty allocation.
- -C Requests compression of all data (including stdin, stdout, stderr, and data for forwarded X11 and TCP connections). Compress can speed up or potentially slow down your speed, so try with and without.
- -f Requests ssh to go to background just before command execution.
This command creates a tunnel interface named tun0 on both the client and server systems. In keeping with our diagram above, the server is Machine A (with a globally routable IP address of 1.2.3.4), and the client is Machine B.
Note that you will need to have root access on both systems in order for ssh to be able to create these interfaces (see the security section below for security considerations and options to increase security). Additionally, you will need the following settings in your sshd_config on Machine A (the server):
 PermitRootLogin yes
 PermitTunnel yes
Security considerations
To increase security, use ssh keys - see AdvancedOpenSSH for information on keys - and change Permit Root Login yes to :
PermitRootLogin without-password
Do not let that command fool you, without-password means root can not log in with a password (see man sshd).
Also, on the server, if you use a key, you do NOT need to set a root password and your can restrict what commands can be run with the key (to ssh tunnels only).
See the "Single-purpose keys" section of this link .
On the client side, again if you do not wish to give your user complete root access , configure sudo. See RootSudo or sudoers man page.
If no errors occur, then you should be able to see a tun0 interface on both systems as existing, but unconfigured: Machine A:
 $ ip addr show tun0
 5: tun0: <POINTOPOINT,MULTICAST,NOARP,UP,LOWER_UP> mtu 1510 qdisc pfifo_fast state UNKNOWN qlen 500
    link/none
($ represents the shell prompt and not a character to type)
Machine B:
 $ ip addr show tun0
 5: tun0: <POINTOPOINT,MULTICAST,NOARP,UP,LOWER_UP> mtu 1510 qdisc pfifo_fast state UNKNOWN qlen 500
    link/none
Configuring the interfaces
At this point, we have got interfaces, but they are unconfigured. All we need to do to configure them is give them each an IP address (do this as root):
Machine A:
 ip link set tun0 up
 ip addr add 10.0.0.100/32 peer 10.0.0.200 dev tun0
Machine B:
 ip link set tun0 up
 ip addr add 10.0.0.200/32 peer 10.0.0.100 dev tun0
Once each interface is configured, we have essentially got the VPN set up; it is just minor details from here. In fact, we can now ping from Machine B to Machine A:
Machine B:
 % ping 10.0.0.100
 PING 10.0.0.100 (10.0.0.100) 56(84) bytes of data.
 64 bytes from 10.0.0.100: icmp_seq=1 ttl=64 time=74.8 ms
 64 bytes from 10.0.0.100: icmp_seq=2 ttl=64 time=73.6 ms
 64 bytes from 10.0.0.100: icmp_seq=3 ttl=64 time=74.3 ms

 --- 10.0.0.100 ping statistics ---
 3 packets transmitted, 3 received, 0% packet loss, time 2001ms
 rtt min/avg/max/mdev = 73.649/74.278/74.880/0.549 ms
And of course we can also ping from Machine A back to Machine B:
Machine A:
 % ping 10.0.0.200
 PING 10.0.0.200 (10.0.0.200) 56(84) bytes of data.
 64 bytes from 10.0.0.200: icmp_seq=1 ttl=64 time=75.2 ms
 64 bytes from 10.0.0.200: icmp_seq=2 ttl=64 time=74.0 ms
 64 bytes from 10.0.0.200: icmp_seq=3 ttl=64 time=74.0 ms

 --- 10.0.0.200 ping statistics ---
 3 packets transmitted, 3 received, 0% packet loss, time 2002ms
 rtt min/avg/max/mdev = 74.029/74.424/75.208/0.554 ms
Plugging into the network
At this point, we've created the actual link that allows Machine B to be plugged into Network A, but we haven't set up any routing information to actually get packets back and forth between Machine B and Network A. The first thing we need to do is to tell Machine B about Network A:
Machine B:
ip route add 10.0.0.0/24 via 10.0.0.200
This allows us to send packets from Machine B to any IP address on Network A, via Machine A. However, to ensure that packets have a route back to Machine B, we need to set some things up on Machine A.
Machine A:
sudo arp -sD 10.0.0.200 eth0 pub
This ensures that other machines plugged into Network A will know to send packets destined for 10.0.0.200 to Machine A (so that it can forward them back to Machine B).
At this point, we do have two way communication betweek Network A and Machine B. Therefore, we can ping another machine on Network A from Machine B:
Machine B:
 % ping 10.0.0.123
 PING 10.0.0.123 (10.0.0.123) 56(84) bytes of data.
 64 bytes from 10.0.0.123: icmp_seq=1 ttl=127 time=74.3 ms
 64 bytes from 10.0.0.123: icmp_seq=2 ttl=127 time=74.3 ms
 64 bytes from 10.0.0.123: icmp_seq=3 ttl=127 time=74.5 ms

 --- 10.0.0.123 ping statistics ---
 3 packets transmitted, 3 received, 0% packet loss, time 2001ms
 rtt min/avg/max/mdev = 74.307/74.416/74.577/0.335 ms
Expanding the scope of the VPN
At this point, we have successfully plugged Machine B into Network A, and Machine B can access Network A's resources and vice versa. However, what if we want to expand the scope of this VPN-- what if we want to pretend that Machine B's only network connection is through network A?
If we did this, then all packets coming from or going to Machine B would route through Network A; this would complete Machine B's integration into the private network. So, how do we do this?
Simple: we just switch Machine B's default gateway.
However, first, we must create a host-based route to Machine A's globally routable IP address; all packets except for the packets that actually create the link must go through the tunnel, but of course the packets that create the tunnel cannot go through the tunnel.
Machine B:
ip route add 1.2.3.4/32 via 192.168.0.1
In this case, 192.168.0.1 is Machine B's current default gateway; it is the gateway on Network B that provides internet connectivity. Before we switch Machine B's default gateway away from Network B, we must set up this explicit route so that tunnel packets will continue to flow.
After that route is in place, we can switch Machine B's default gateway:
Machine B:
ip route replace default via 10.0.0.1
In this case, again, 192.168.0.1 is Network B's default gateway, and 10.0.0.1 is Network A's default gateway. Since Machine B is now connected to Network A, we are telling it to use Network A's default gateway instead of its usual default gateway on Network B. At this point, the conversion is complete, and Machine B is now completely on Network A and has all the resources available to Network A, through the SSH tunnel. We can verify this by looking at the output of a tracepath:
Machine B:
 % tracepath example.com
 1:  10.0.0.200 (10.0.0.200)                                0.291ms pmtu 1500
 1:  10.0.0.100 (10.0.0.100)                              168.589ms
 2:  10.0.0.1 (10.0.0.1)                                  asymm  3  87.542ms
 3:  1.2.3.4 (1.2.3.4)                                    157.360ms
Automating it all with ifup/down
At this point, we have successfully created a virtual private network using SSH 4.3's tunnels. Can we automate this process with ifup/down? The answer is: yes!
Machine A:
 iface tun0 inet static
        pre-up sleep 5
        address 10.0.0.100
        pointopoint 10.0.0.200
        netmask 255.255.255.0
        up arp -sD 10.0.0.200 eth0 pub
Machine B:
 iface tun0 inet static
        pre-up ssh -f -w 0:0 1.2.3.4 'ifdown tun0; ifup tun0'
        pre-up sleep 5
        address 10.0.0.200
        pointopoint 10.0.0.100
        netmask 255.255.255.255
        up ip route add 10.0.0.0/24 via 10.0.0.200
        up ip route add 1.2.3.4/32 via 192.168.0.1
        up ip route replace default via 10.0.0.1
        down ip route replace default via 192.168.0.1
        down ip route del 10.0.0.0/24 via 10.0.0.200
        down ip route del 1.2.3.4/32 via 192.168.0.1
These example /etc/network/interface snippets show how you would, on Machine B, simply have to execute:
Machine B:
sudo ifup tun0
And the system would automatically make the ssh connection, set up the tunnel, and turn on the VPN. Additionally, the ifdown command can be used to put the routes back to normal, or turn off the VPN.
Note that the sleep commands in the snippet are there to allow ssh time to set the tunnel interface up, as it will not be instantaneous.
Where do I go from here?
There are many other possible ways to use SSH 4.3's tunnels besides creating a VPN to connect machine B to network A. For example, you could connect machine B to network A, and then route back on machine A to network B, creating a sort-of reverse VPN. Or you could connect machine B to network A, and then redirect traffic from network A to machine B to another system on network B. The possibilities are only limited by the amount of root access you have.
from https://help.ubuntu.com/community/SSH_VPN
--------------------
1) The server can be behind a firewall, but this requires some additional configuration of the firewall. Primarily, the firewall must forward some port to port 22 on the server. The firewall will need to also know how to route traffic destined for the VPN to the server.
OpenSSH has built-in TUN/TAP support using -w<local-tun-number>:<remote-tun-number>. Here, a layer 3/point-to-point/ TUN tunnel is described. It is also possible to create a layer 2/ethernet/TAP tunnel.
--------------------
Setting up a Layer 3 tunneling VPN with using OpenSSH
This article describes how to use the new tunneling features of OpenSSH V 4.3 to establish a VPN between two Debian or Debian-like systems. Note that by tunneling I am referring to layer-3 IP-in-SSH tunneling, not the TCP connection forwarding that most people refer to as tunneling.
When operational this VPN will allow you to route traffic from one computer to another network via an SSH connection.
This is a brief recipe rather than a "HOW-TO". It it assumed you are familiar with all of the basic concepts.
Requirements
- Debian Etch and/or Ubuntu Edgy systems
- SSH version 4.3 or higher is required on both ends of the VPN.
Introduction
SSH V 4.3 introduced true layer-2 and layer-3 tunneling allowing easy to configure VPNs that can be built upon existing SSH authentication mechanisms. The VPN configuration described below allows a client(or if you prefer the stupid term: road warrior) to connect to a firewall/server and access the entire private network that is behind it.
Previously I never allowed root login via SSH to any machines because I always logged in under a personal account and then used sudo. It made sense to turn off root logins via SSH(PermitRootLogin=no). With the advent of the new tunneling features there seems to be a need to have a limited root login for the purposes of establishing the SSH VPN. This is required because the user that connects to the sshd server must have the permissions to set up a tunnnel(tun) interface. Until OpenSSH allows non-root users to do so (such as: http://marc.info/?l=openssh-unix-dev&m=115651728700190&w=2) we will have to do it this way.
OpenSSH also has a few features to allow for easily tearing down an SSH connection without having to track all sorts of PIDs and such. I use thecontrol connection feature to do so. See the SSH man page for these switches: -M -O -S. This allows one to use the ifup and ifdown commands to easily control the SSH VPN.
Scenario
In this recipe two machines will be configured:
- A server which is a firewall and has access to a private network ¹
- A client which initiates the connections to the server and gains direct access to the private network
 --------         /\_/-\/\/-\       -----------------
| Client |~~~~~~~/ Internet /~~~~~~| Server/Firewall |~~~[ private net ]
 --------        \_/-\/\_/\/      / ----------------- \
    ||\                           \          ||\       \
    || {tun0}                      {eth0}    || {tun0}  {eth1}
    ||                                       ||
    \-================= tunnel ==============-/
For this recipe lets number things like this:
- the private net is 10.99.99.0/24
- eth0 on the server has public IP 5.6.7.8
- eth1 on the server has private IP 10.99.99.1
- the VPN network is 10.254.254.0/30
- tun0 on the server has private IP 10.254.254.1
- tun0 on the client has private IP 10.254.254.2
On the Client
If you do not already have them, generate an SSH keypair for root:
$ sudo ssh-keygen -t rsa
/etc/network/interfaces: Add this stanza to the file:
iface tun0 inet static
      pre-up ssh -S /var/run/ssh-myvpn-tunnel-control -M -f -w 0:0 5.6.7.8 true
      pre-up sleep 5
      address 10.254.254.2
      pointopoint 10.254.254.1
      netmask 255.255.255.252
      up route add -net 10.99.99.0 netmask 255.255.255.0 gw 10.254.254.1 tun0
      post-down ssh -S /var/run/ssh-myvpn-tunnel-control -O exit 5.6.7.8
The first time we connect to the server as root we may need to acknowledge saving the servers SSH key fingerprint:
$ sudo ssh 5.6.7.8
The authenticity of host '5.6.7.8 (5.6.7.8)' can't be established.
RSA key fingerprint is aa:fe:a0:38:7d:11:78:60:01:b0:80:78:90:ab:6a:d2.
Are you sure you want to continue connecting (yes/no)? yes
Warning: Permanently added '5.6.7.8' (RSA) to the list of known hosts.
Don't bother logging in, just hit CTRL-C.
On the server
/etc/ssh/sshd_config: Add/modify the two keywords to have the same values as below.
PermitTunnel point-to-point
PermitRootLogin forced-commands-only
The PermitRootLogin line is changed from the default of
no. You do restrict root SSH login, right?
/root/.ssh/authorized_keys: Add the following line.
tunnel="0",command="/sbin/ifdown tun0;/sbin/ifup tun0" ssh-rsa AAAA ..snipped.. == root@server
Replace everything starting with "ssh-rsa" with the contents of root's public SSH key from the client(/root/.ssh/id_rsa.pub on the client).
/etc/network/interfaces: Add the following stanza.
iface tun0 inet static
      address 10.254.254.1
      netmask 255.255.255.252
      pointopoint 10.254.254.2
/etc/sysctl.conf: Make sure
net.ipv4.conf.default.forwarding is set to 1net.ipv4.conf.default.forwarding=1
This will take effect upon the next reboot so make it active now:
$ sudo sysctl net.ipv4.conf.default.forwarding=1
Using the VPN
user@client:~$ sudo ifup tun0
RTNETLINK answers: File exists
run-parts: /etc/network/if-up.d/avahi-autoipd exited with return code 2

user@client:~$ ping -c 2 10.99.99.1
PING 10.99.99.1 (10.99.99.1) 56(84) bytes of data.
64 bytes from 10.99.99.1 icmp_seq=1 ttl=64 time=96.3 ms
64 bytes from 10.99.99.1 icmp_seq=2 ttl=64 time=94.9 ms

--- 10.99.99.1 ping statistics ---
2 packets transmitted, 2 received, 0% packet loss, time 999ms
rtt min/avg/max/mdev = 94.954/95.670/96.387/0.780 ms
user@client:~$ sudo ifdown tun0
Exit request sent.
You may get the two errors after running ifup. No problem, they are harmless.
Things to watch for
- Client side VPNs. Firewalls such as Firestarter will block all traffic to and from any tun interface. You will need to modify the scripts in /etc/firestarter to get around this.
Next steps
Once you have this running it is fairly easy to route traffic between two networks on each end of the VPN. See the first reference link below for details.
Possible improvements
- Something to monitor and restart the VPN if it fails, such as autossh: http://packages.debian.org/stable/net/autossh
- Automatic starting of the VPN upon first packet from client destined for the remote private network.
- Use of a remote DNS server by client when VPN is active.
References
- https://help.ubuntu.com/community/SSH_VPN
- http://wouter.horre.be/node/63
man sshman ssh_configman sshd_configman interfaces
1) The server can be behind a firewall, but this requires some additional configuration of the firewall. Primarily, the firewall must forward some port to port 22 on the server. The firewall will need to also know how to route traffic destined for the VPN to the server.
from https://www.debian-administration.org/article/539/Setting_up_a_Layer_3_tunneling_VPN_with_using_OpenSSH (看一下其评论)
---------------------
---------------------
How to VPN using SSH
This post will cover how to establish a VPN (Virtual Private Network) using SSH.
This is technically termed “layer-3 IP-in-SSH tunnelling” and is not using ssh to port forward (ssh -L ) or create a dynamic “application level” forwarding (SOCKS) (ssh -D ). Rather a VPN is established using a SSH connection to create a virtual interface, tun0.
If you would like a more detailed description of the commands in this tutorial, I posted more detail HERE
For this how to I will assume the following network topology , you will have to adapt to your actual IP Addresses, netmask, route, gateway, and nameserver.
Server :
Public IP Address 1.2.3.4
Private Network 172.0.0.0/24
Private IP address 172.0.0.10
default gw 172.0.0.1
Private Network 172.0.0.0/24
Private IP address 172.0.0.10
default gw 172.0.0.1
Client :
Private network 192.168.0.0/24
Private IP address 192.168.1.10
Default gw 192.168.0.1
Private IP address 192.168.1.10
Default gw 192.168.0.1
Tunnel :
Server tun0 IP address = 10.0.0.1
Client tun0 IP address = 10.0.0.2
Client tun0 IP address = 10.0.0.2
Server Configuration
1. Using any editor, open /etc/ssh/sshd_config and change the “PermitRootLogin” line and add the “PermitTunnel” line :
PermitRootLogin without-password
PermitTunnel point-to-point
PermitTunnel point-to-point
2. Allow NAT. These commands will enable NAT without the need to reboot (NAT will be persistent).
# enable now
sudo sysctl -w net.ipv4.ip_forward=1
sudo sysctl -w net.ipv4.ip_forward=1
To set as default, using any editor, open /etc/sysctl.conf and add :
# Needed to add for forwarding
net.ipv4.ip_forward = 1
net.ipv4.ip_forward = 1
Next, configure iptables to allow masquerade (NAT)
sudo iptables -t nat -A POSTROUTING -s 10.0.0.0/24 -o eth0 -j MASQUERADE
Your iptables settings will be lost when you reboot unless you configure a way of saving your settings. This can be done several ways, here I will use “iptables-save” and “iptables-restore” to setting masquerade as default.
sudo bash -c “iptables-save > /etc/iptables.rules”
Using any editor, open /etc/rc.local and add this line (above the exit 0 line)
sudo bash -c “iptables-save > /etc/iptables.rules”
Using any editor, edit /etc/rc.local and add this line (above the exit 0 line)
Using any editor, edit /etc/rc.local and add this line (above the exit 0 line)
iptables-restore < /etc/iptables.rules
3. Configure the tunnel (tun0). Using any editor, open /etc/network/interfaces and add these lines (works on Debian/Ubuntu).
iface tun0 inet static
address 10.0.0.1
netmask 255.255.255.0
pointopoint 10.0.0.2 # Client tunnel address
address 10.0.0.1
netmask 255.255.255.0
pointopoint 10.0.0.2 # Client tunnel address
The interface, tun0, will be brought up and down automatically when the client establishes a ssh connection, using forced commands on the ssh key (see below).
Client Configuration
1. Make a ssh key , call it “VPN”.
ssh-keygen -f VPN
When generating the key, simply hit enter when asked for a password. This creates a “passwordless key”. Alternately, if you wish to increase security you can enter a password.
2. On the client, put the private key (VPN) in /root/.ssh and set permissions.
#If needed, make the directory /root/.ssh first.
sudo mkdir /root/.ssh
sudo cp VPN /root/.ssh/VPN
sudo chown root:root /root/.ssh/VPN
sudo chmod 400 /root/.ssh/VPN
sudo mkdir /root/.ssh
sudo cp VPN /root/.ssh/VPN
sudo chown root:root /root/.ssh/VPN
sudo chmod 400 /root/.ssh/VPN
3. Configure the key on the server.
After transferring the public key (VPN.pub) to the server, first put it in /root/.ssh/authorized_keys.
#If needed, make the directory /root/.ssh first.
sudo mkdir /root/.ssh
sudo bash -c “cat VPN.pub >> /root/.ssh/authorized_keys”
sudo mkdir /root/.ssh
sudo bash -c “cat VPN.pub >> /root/.ssh/authorized_keys”
Next, edit /root/.ssh/authorized_keys adding a “forced command” (just before the ssh-rsa AAA …):
tunnel=”0″,command=”/sbin/ifdown tun0; /sbin/ifup tun0″,no-port-forwarding,no-ptty,no-X11-forwarding,no-agent-forwarding ssh-rsa AAAA …. (long sequence of random numbers / letters )
Keep the forced command and the rest of the key all on a single line.
Note: The options “no-port-forwarding,no-ptty,no-X11-forwarding,no-agent-forwarding” further enhance security.
4. Add the servers nameserver in the client /etc/resolv.conf
On the client, use any editor and add the server’s nameserver to /etc/resolv.conf.
5. Configure tun0 on the client.
Using any editor, add the following lines to /etc/network/interfaces :
You will need to change “1.2.3.4″ to the IP address of your server and “192.168.0.1″ to the default gateway of your client.
iface tun0 inet static
pre-up ssh -i /root/.ssh/VPN -S /var/run/ssh-vpn-tunnel-control -M -f -w 0:0 1.2.3.4 true
pre-up sleep 5
address 10.0.0.2
pointopoint 10.0.0.1
netmask 255.255.255.0
up route add -host 1.2.3.4 dev eth0
up route add default gw 10.0.0.1 dev tun0
up route del default gw 192.168.0.1 dev eth0
down route add default gw 192.168.0.1 dev eth0
down route del default gw 10.0.0.1 dev tun0
down route del -host 1.2.3.4 dev eth0
post-down ssh -i /root/.ssh/VPN -S /var/run/ssh-vpn-tunnel-control -O exit 1.2.3.4
Note : “pre-up … 1.2.3.4 true” and”post-down … exit 1.2.3.4″ are all on one line.
6. Make a new group, “vpn”, and add users you wish to use the tunnel to the vpn group. Change the user “bodhi” to your actual user name.
sudo addgroup vpn
sudo adduser bodhi vpn
sudo adduser bodhi vpn
7. Allow members of the vpn group to establish the ssh-vpn tunnel without a password.
export EDITOR=gedit && sudo -E visudo
Add this line (near the bottom, in the group section, under the line which begins %admin … )
%vpn ALL=NOPASSWD: /sbin/ifup,/sbin/ifdown
Save the file and exit gedit.
Using the VPN connection
Users in the vpn group can establish and disconnect the VPN.
Bring the connection up:
sudo ifup tun0
Bring the connection down:
sudo ifdown tun0
Testing the connection
One way to test the connection is with tracepath.
tracepath google.com
Use tracepath both before and after establishing the VPN tunnel. Before you establish the tunnel you will see the network traffic going through eth0 to your LAN, after it will go through tun0 to the remote LAN。
from http://blog.bodhizazen.net/linux/how-to-vpn-using-ssh/ (看一下其评论)
-------------------------------------------------------------------------------------------------
Overview
This page is an extension of my blog post HERE . I will cover the commands in a bit more detail here as it is too long for a blog ;) .
---------------------------------------------------------------------------------------------------------------------------------------------------------------------------------------------------
Overview
This page is an extension of my blog post HERE . I will cover the commands in a bit more detail here as it is too long for a blog ;) .
This how-to is intended to cover the details of how to establish a VPN (Virtual Private Network) over a SSH connection. Starting with open-ssh 4.3, you can now use a ssh connection to set up a VPN.
This is technically termed "layer-3 IP-in-SSH tunnelling" and is not using ssh to port forward (ssh -L ) or create a dynamic "application level" forwarding (SOCKS) (ssh -D ). Rather a VPN is established using a SSH connection to create a virtual interface, tun0.
Advantages :
- IMO, this technique is easier to set up then openvpn, especially if you are using a single client.
- Works with most Linux distributions without the need to install any additional software on the clients. The server only needs openssh-server.
- This protocol uses udp to transmit tunneled tcp connections resulting in a more stable connection compared with port forwarding (using ssh with the -L or -D options).
Disadvantages :
- As of yet I do not know of a windows client which will use this protocol.
- If you are needing to set up a VPN with numerous clients I would use openvpn.
Although there are several "how-to's" on the web, most of them assume you know something about networking and routing. This page attempts to explain some of the "missing details".
Background Information
Understanding VNC over SSH requires an understanding of ssh, "basic" networking concepts, and the "route" command.
Commands you may wish to review :
- ssh - in particular the options -M and -S .
- ssh-keygen.
- route
- ifconfig
- tracepath
- visudo / configuration of the sudoers file
In particular, taking the 5-10 minutes required to review the route man page can help enormously.
At the risk of oversimplification, the "route" command instructs the kernel where to send (route) network packets (traffic). The default gateway (gw) is where packets are sent if no route has been specified (for the destination host or network). Basic syntax for the route command is "send packets to host w.x.y.z through eth0".
Another potential stumbling blocks are the concepts of an IP Address, the difference between private / public networks, and port forwarding. Here are some links discussing networks and net masks :
- What is an IP address?
- Wikipedia Classful Network
- Wikipedia Private Network
- Assigning Private Network IP Addresses to the Internal LAN
A brief overview of public / private ip addresses and port forwarding :
Public - This is the ipaddress assigned to you by your internet provider. You can see your public ip address with this link
Private - This is the ipaddress assigned by your router. Generally 10.0.0.0 , 172.0.0.0 , and 192.168.0.0 are reserved for private networks. Wikipedia Private Networks
Port forwarding - You can not connect to a private ip address (private network) unless you have allowed (enabled) the network traffic connection from your router via a process known as port forwarding. From outside your LAN, you connect to your server useing the public ip address and the router forwards the connection to the server. The Port Forwarding Progression
Security
Establishing a tunnel as outlined in this how to requires root access on both server and client. Most of the tutorials I reviewed spent minimal time reviewing security and, in my opinion, have some concerning security liabilities.
Before explaining the details of configuring the connection I would like to digress to discuss security.
Server Security
1. Restrict root access by using the "PermitRootLogin without-password" (rather then "PermitRootLogin yes") in /etc/ssh/sshd_config . The syntax is a bit misleading, this does not allow root to log in without a password, rather it forces root to use a ssh key (logging in as root with a password is disabled). With this option you can leave the root account locked on Ubuntu.
2. Use ssh keys. You can configure a ssh key to force a command to be run at log in. In this example we will use -
tunnel="0",command="/sbin/ifdown tun0; /sbin/ifup tun0"
Basically you "force" a command by editing the authorized_keys file (~/.ssh/authorized_keys) on the server and adding command="command to be executed".
For this tutorial I will add the following to the key :
tunnel="0",command="/sbin/ifdown tun0; /sbin/ifup tun0",no-port-forwarding,no-X11-forwarding,no-agent-forwarding,no-pty
3. For a review of how to secure your ssh server see AdvancedOpenSSH
Client Security
1. Configure sudo (see Sudoers Manual for additional information) to allow users to establish the VPN tunnel, without a password, without giving full root access.
Edit /etc/sudoers with
export EDITOR=gedit && sudo -E visudo
Add this line (near the bottom, in the group section, under the line which begins %admin ... ) to allow users in the group "vpn" to run ifup and ifdown, as root, using sudo, and without entering a password:
%vpn ALL=NOPASSWD: /sbin/ifup,/sbin/ifdown
2. If you wish, you can configure sudo to use a password (user "ALL" in place of "NOPASSWD".
3. I will also be generating a ssh key without a password, which is probably sufficient as the key will use a forced command and thus does not give full shell access. If you prefer, you can increase security by using a password with the key.
IP Addresses used for this how-to
Server
Server - This is the computer you will be logging in to for VPN access.
Public IP address 1.2.3.4 - The ssh port (22 by default) is forwarded (routed) by the router from the public ip address (1.2.3.4) to the private address (172.0.0.10).
Private Network 172.0.0.0/24
Private IP address 172.0.0.10
default gw 172.0.0.1
Private IP address 172.0.0.10
default gw 172.0.0.1
Client
This is the computer you wish to connect to the server via VPN over SSH.
Public IP address - does not matter
Private network 192.168.0.0/24
Private IP address 192.168.1.10
Default gw 192.168.0.1
Private network 192.168.0.0/24
Private IP address 192.168.1.10
Default gw 192.168.0.1
VPN Tunnel ( tun0 )
A virtual interface, called "tun0", is created and configured on both the client and server and is then used to establish a VPN connection. This virtual interface, tun0, is created by ssh using the -w flag (see below) and must be separate from the server or client networks.
In this example, I will use 10.0.0.0/24 as a network for the virtual interfaces.
Server tun0 IP address = 10.0.0.1
Client tun0 IP address = 10.0.0.2
Client tun0 IP address = 10.0.0.2
STOP - If you do not understand private / public networks and that 172.0.0.0/24 , 192.168.1.0/24 , 10.0.0.0/24 , are 3 DIFFERENT NETWORKS, you may wish to review the previous links or you may have difficulty following the rest of this how-to .
How to VPN over SSH
Ok, enough background, let's set it up already.
Server Configuration
1. Using any editor, open /etc/ssh/sshd_config and change the "PermitRootLogin" line and add the "PermitTunnel" line :
PermitRootLogin without-password
PermitTunnel point-to-point
PermitTunnel point-to-point
2. Allow NAT. These commands will enable NAT without the need to reboot (NAT will be persistent).
# enable now:
sudo sysctl -w net.ipv4.ip_forward=1
To set as default, using any editor, open /etc/sysctl.conf and add :
# Needed to add for forwarding
net.ipv4.ip_forward = 1
net.ipv4.ip_forward = 1
Next, configure iptables to allow masquerade (NAT)
sudo iptables -t nat -A POSTROUTING -s 10.0.0.0/24 -o eth0 -j MASQUERADE
Your iptables settings will be lost when you reboot unless you configure a way of saving your settings. This can be done several ways, here I will use "iptables-save" and "iptables-restore" to setting masquerade as default.
sudo bash -c "iptables-save > /etc/iptables.rules"
Using any editor, open /etc/rc.local and add this line (above the exit 0 line)
iptables-restore < /etc/iptables.rules
3. Configure the tunnel (tun0). Using any editor, edit /etc/network/interfaces and add these lines (works on Debian/Ubuntu).
iface tun0 inet static
address 10.0.0.1
netmask 255.255.255.0
pointopoint 10.0.0.2 # Client tunnel address
address 10.0.0.1
netmask 255.255.255.0
pointopoint 10.0.0.2 # Client tunnel address
The interface, tun0, will be brought up and down automatically when the client establishes a ssh connection, using forced commands on the ssh key (see below).
Client Configuration
1. Make a ssh key , call it "VPN".
ssh-keygen -f VPN -b 1024
When generating the key, simply hit enter when asked for a password. This creates a "passwordless key". Alternately, if you wish to increase security you can enter a password.
Note: You can use a stronger key if you wish (increase the bits -b 4096)
2. On the client, put the private key (VPN) in /root/.ssh and set permissions.
#If needed, make the directory /root/.ssh first.
sudo mkdir /root/.ssh
sudo cp VPN /root/.ssh/VPN
sudo chown root:root /root/.ssh/VPN
sudo chmod 400 /root/.ssh/VPN
sudo mkdir /root/.ssh
sudo cp VPN /root/.ssh/VPN
sudo chown root:root /root/.ssh/VPN
sudo chmod 400 /root/.ssh/VPN
3. Configure the key on the server.
After transferring the public key (VPN.pub) to the server, first put it in /root/.ssh/authorized_keys.
sudo bash -c "cat VPN.pub >> /root/.ssh/authorized_keys"
Next, edit /root/.ssh/authorized_keys adding a "forced command" (just before the ssh-rsa AAA ...):
tunnel="0",command="/sbin/ifdown tun0; /sbin/ifup tun0",no-port-forwarding,no-ptty,no-X11-forwarding,no-agent-forwarding ssh-rsa AAAA .... (long sequence of random numbers / letters )
Note: The options "no-port-forwarding,no-ptty,no-X11-forwarding,no-agent-forwarding" further enhance security. Keep the forced command and the rest of the key all on a single line.
4. Add the servers nameserver in the client /etc/resolv.conf
On the server , show your nameserver with :
grep nameserver /etc/resolv.conf
On the client, use any editor and add the server's nameserver to /etc/resolv.conf.
5. Configure tun0 on the client.
Using any editor, add the following lines to /etc/network/interfaces :
You will need to change "1.2.3.4" to the IP address of your server and "192.168.0.1" to the default gateway of your client.
pre-up ssh -i /root/.ssh/VPN -S /var/run/ssh-vpn-tunnel-control -M -f -w 0:0 1.2.3.4 true
pre-up sleep 5
address 10.0.0.2
pointopoint 10.0.0.1
netmask 255.255.255.0
up route add -host 1.2.3.4 dev eth0
up route add default gw 10.0.0.1 dev tun0
up route del default gw 192.168.0.1 dev eth0
down route add default gw 192.168.0.1 dev eth0
down route del default gw 10.0.0.1 dev tun0
down route del -host 1.2.3.4 dev eth0
post-down ssh -i /root/.ssh/VPN -S /var/run/ssh-vpn-tunnel-control -O exit 1.2.3.4
Note : "pre-up ... 1.2.3.4 true" and"post-down ... exit 1.2.3.4" are all on one line.
Let us examine this configuration in some detail.
"pre-up" commands are run before the interface (tun0) is enabled.
ssh ...
The -M flag allows the client to control the tunnel (see man ssh).
The -S flag specifies the path for the control file
pre-up sleep 5 -> allows time for ssh to establish the tunnel before proceeding with configuration.
The -M flag allows the client to control the tunnel (see man ssh).
The -S flag specifies the path for the control file
pre-up sleep 5 -> allows time for ssh to establish the tunnel before proceeding with configuration.
Optional: add the -C flag to the ssh command to use compression. Compression may enhance the performance of the tunnel.
address 10.0.0.2 # sets the tunnel ipaddress
pointtopoint 10.0.0.1 # establishes the point - to - point connection (VPN). netmask = 255.255.255.0 #netmask for tunnel
pointtopoint 10.0.0.1 # establishes the point - to - point connection (VPN). netmask = 255.255.255.0 #netmask for tunnel
"up" commands are run once the tun0 is configured and are used to change the default route on the client to use the tunnel as default, thus establishing the VPN.
up route add -host # Specifies the route for ssh traffic to the public ip address of the server. This is necessary as we are next going to change the default gateway to the VPN connection.
up route add default gw 10.0.0.1 dev tun0
up route del default gw 192.168.0.1 dev eth0
up route del default gw 192.168.0.1 dev eth0
Those lines change the default gateway from eth0 to the tunnel. Once the gateway is changed, the VPN connection is complete and the client now behaves as if it is directly connected to the server's private network, 172.0.0.0/24 in this example. The client can now ping or connect to other computers on the private network.
The down commands reverse the routing when the tunnel is brought down.
post-down ssh ... exit 1.2.3.4 brings the ssh connection and thus the tunnel, tun0, down.
6. Make a new group, "vpn", and add users you wish to use the tunnel to the vpn group.
Change the user "bodhi" to your actual user name.
sudo addgroup vpn
sudo adduser bodhi vpn
sudo adduser bodhi vpn
7. Allow members of the vpn group to establish the ssh-vpn tunnel without a password.
Add this line (near the bottom, in the group section, under the line which begins %admin ... )
Save the file and exit gedit.
Using the VPN connection
Users in the vpn group can establish and disconnect the VPN.
Bring the connection up:
sudo ifup tun0
Bring the connection down:
sudo ifdown tun0
Testing the connection.
One way to test the connection is with tracepath.
tracepath google.com
Use tracepath both before and after establishing the VPN tunnel. Before you establish the tunnel you will see the network traffic going through eth0 to your LAN, after it will go through tun0 to the remote LAN.
Troubleshooting
If you are having trouble establishing the tunnel:
- First be sure you have configured ssh server side and port 22 is forwarded properly.
- Then work through /etc/network/interfaces on both client and server and make sure the ip address and routes (gateway) are set properly.
- Don't forget to set up NAT on the server.
- Did you add the server nameserver to the guest ?
I has a a problem when the ssh tunnel failed or is terminated unexpectedly. In that case the ifup and ifdown commands may not work and you may see error messages. In this event I have had to manually set the route on the client including the default gateway. Delete the server as a host if the tunnel is down.
References
VPN over SSH
OpenSSH's built in tunnelingCreate tun interfaces
Create tun interfaces:$ cat /etc/network.d/vpn
INTERFACE='tun5'
CONNECTION='tuntap'
MODE='tun'
USER='vpn'
GROUP='network'
IP='static'
SKIPNOCARRIER='yes'
ADDR='<IP>'
IPCFG=('ip route add <REMOTE-NETWORK/MASK> via <REMOTE-SIDE-IP>')
Then do 'netcfg -u vpn' or add it into /etc/conf.d/netcfg.
Also you may manage tun interfaces with 'ip tunnel' command.
Creating interfaces in SSH command
SSH can create both interfaces automatically, but you should configure IP and routing after the connection is established.ssh \ -o PermitLocalCommand=yes \ -o LocalCommand="sudo ifconfig tun5 192.168.244.2 pointopoint 192.168.244.1 netmask 255.255.255.0" \ -o ServerAliveInterval=60 \ -w 5:5 vpn@example.com \ 'sudo ifconfig tun5 192.168.244.1 pointopoint 192.168.244.2 netmask 255.255.255.0; echo tun0 ready'
Start SSH
ssh -f -w5:5 vpn@example.com -i ~/.ssh/key "sleep 1000000000"or you may add keep-alive options if you are behind a NAT.
ssh -f -w5:5 vpn@example.com \
        -o ServerAliveInterval=30 \
        -o ServerAliveCountMax=5 \
        -o TCPKeepAlive=yes \
        -i ~/.ssh/key "sleep 1000000000"
Troubleshooting
- ssh should have access rights to tun interface or permissions to create it. Check owner of tun interface and/or /dev/net/tun.
- Obviously if you want to access a network rather than a single machine you should properly set up IP packet forwarding, routing and maybe a netfilter on both sides.
Using PPP over SSH
pppd can easily be used to create a tunnel through an SSH server:/usr/sbin/pppd updetach noauth silent nodeflate pty "/usr/bin/ssh root@remote-gw /usr/sbin/pppd nodetach notty noauth" ipparam vpn 10.0.8.1:10.0.8.2
When the VPN is established, you can route traffic through it. To get access to an internal network:
ip route add 192.168.0.0/16 via 10.0.8.2
To route all Internet traffic through the tunnel, for example to protect your communication on an unencrypted network, first add a route to the SSH server through your regular gateway:
ip route add <remote-gw> via <current default gateway>
Next, replace the default route with the tunnel
ip route replace default via 10.0.8.2
Helper script
pvpn (available in AUR package pvpnAUR) is a wrapper script aroundpppd over SSH.
See also
Categories:
from https://wiki.archlinux.org/index.php/VPN_over_SSH
---------------------------------------------------------------------------------------


---------------------------------------------------------------------------------------
Create your own Virtual Private Network for SSH with Putty
Introduction
I have multiple Linux machines at my home. Previously, when I needed SSH access to these machines I used to setup port forwarding on my router to each of these machines. It was a tedious process of enabling port forwarding and then disabling it after use. It was also difficult to remember port number forwarded for a particular machine. But now I found a cooler way to get SSH access to all my machines at home without setting up port forwarding or remembering any port numbers and most importantly, I can address my home machines with local subnet IP address, no matter wherever I connect from the internet.
Requirements
- Remote machine with Putty installed in it.
- Home router’s internet accessible IP address or dynamic DNS (DDNS) address.
- One/more Linux/Windows machine(s) to which direct SSH access is required.
- On the router, port forwarding is enabled for SSH service to at least one of these machines.
Setup
The basic idea to get this working is that we make one initial SSH connection to our home machine. Then using this connection as a tunnel we can connect to any machines at home by addressing them with local sub-network address (such as 192.168.x.x). So the high level steps are:
- Open a putty session and configure it to act as a tunnel.
- From this session connect to your default SSH server at home.
- Open another putty session and configure it use the previous putty session as proxy.
- SSH connect to any machine at home using the local subnet IP address. Since we are using a proxy it will resolve the local subnet’s IP address properly.
- You can make any number of connections to all your home machines by just repeating steps (3) and (4).
Note: If on the remote network’s subnet is same as your home network’s subnet then you might run into IP conflicts.
Step-by-Step
1) On the remote system, open putty enter the IP address or dynamic DNS (DDNS) name in the host name field. Select “SSH” as connection type. Port 22 will be selected which can be left alone unless you run the SSH service on a different port. Note: Though your putty screen might look a little different than the one seen here due to version differences, the basic steps would be still the same
In our example,
Host Name = demo123.dyndns.org
Port= 22
Host Name = demo123.dyndns.org
Port= 22
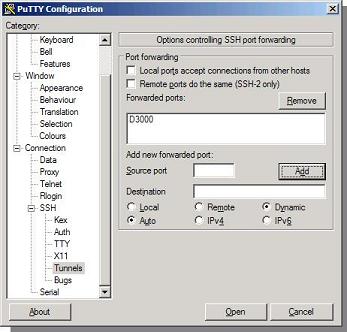
2) In putty, on the left-hand navigation panel, open SSH option and select “Tunnels”.
In the tunnels screen, set these values
Source Port: 3000 (this is the port at which our proxy service listens to, this port can be changed to any but preferably a number larger than 1024)
Destination Port: (Leave Blank)
Finally, select “Dynamic” from the radio button options.
Source Port: 3000 (this is the port at which our proxy service listens to, this port can be changed to any but preferably a number larger than 1024)
Destination Port: (Leave Blank)
Finally, select “Dynamic” from the radio button options.
3) Important: Click “Add” to add the tunnel settings to the connection.
4) On left-hand navigation panel, move the scrollbar to the top and click session. You will be seeing the settings entered in step(1). Now we can save the whole connection settings. Add a name for this connection in the saved sessions textbox and click save.
5) Click open, to open connection to home machine, and enter login and password information for the remote machine. This user need not be root user, but it needs to be an user with network access on the remote machine. That brings to the end of putty configuration. Now you have a proxy tunnel connection from remote machine to one of the home machine. Now we are ready to connect to any home machine.
6) Open another putty session. Select the options “Proxy” from the navigation panel. On the right-side proxy options, enter only the following information. Don’t change any other settings.
Proxy type : select “SOCKS 4”
Proxy hostname : enter “localhost”
Port : 3000
Proxy type : select “SOCKS 4”
Proxy hostname : enter “localhost”
Port : 3000
7) Click on the “Session” option from the navigation panel. Enter a name under “Saved Sessions” text field. Don’t enter any information in the “Host Name” field. Now click “Save”. Now we have a template connection session using our proxy.
8 ) Now enter local subnet IP address of a machine at home and click open. The connection gets routed through the proxy tunnel and you will be connected to the home machine directly. Similarly you can connect to another home machine by opening putty and loading the template we created and just filling in the machine’s local subnet IP address.
BTW, if you think just SSH access is not cool enough, you can do more cool stuff like
- Listening to music stored at home
- Viewing/sharing photos at with friends and family
- Creating schedules, Todos, notes etc., securely at a home computer
To get these functionalities checkout this free utility called Tonido. For more information on different applications bundled with Tonido you can read more Tonido related blog posts here.
from https://www.getfilecloud.com/blog/create-your-own-virtual-private-network-for-ssh-with-putty/
---------------
相关帖子:http://briteming.blogspot.sg/2016/05/ssh-tunnelvpn.html
---------------
相关帖子:http://briteming.blogspot.sg/2016/05/ssh-tunnelvpn.html