CDN到底是什么?怎么能得到免费CDN来为你加速?今天我们来讨论这个问题。
CDN的全称是Content Delivery Network,即内容分发网络。其基本思路是尽可能避开互联网上有可能影响数据传输速度和稳定性的瓶颈和环节,使内容传输的更快、更稳定。通过在网络各 处放置节点服务器所构成的在现有的互联网基础之上的一层智能虚拟网络,CDN系统能够实时地根据网络流量和各节点的连接、负载状况以及到用户的距离和响应 时间等综合信息将用户的请求重新导向离用户最近的服务节点上。其目的是使用户可就近取得所需内容,解决 Internet网络拥挤的状况,提高用户访问网站的响应速度。
接下来为大家介绍几个免费CDN:
当然上面介绍的不是主要的,主要的还有就是 CoralCDN WordPress Plugin 。这个可以加速你的wordpress。
----------------------------------------
A content delivery network, or CDN, is a system of servers spread around the world, serving files from the nearest physical location. Instead of waiting for a file to find its way from a server farm in Silicon Valley 8,000 kilometres away, I can receive it from London, Dublin, or Paris, cutting down the time I wait. The big names — Google, Yahoo, Amazon, et al — use CDNs for their sites, but they’ve always been far too expensive for us mere mortals. Until now.
There’s a service out there ready for you to use as your very own CDN. You have the company’s blessing, you won’t need to write a line of code, and — best of all — it’s free. The name? Google App Engine.
In this article you’ll find out how to set up a CDN on Google App Engine. You’ll get the development software running on your own computer, tell App Engine what files to serve, upload them to a web site, and give everyone round the world access to them.
Done that? Excellent, because that’s the hardest step. The rest is plain sailing.
You’ll need to choose a unique ‘application id’ — nothing more than a name — for your project. Make sure it consists only of lowercase letters and numbers. For this article I’ll use
On your computer, create a folder named after your application id. This folder can be anywhere you want: your desktop, your documents folder, or wherever you usually keep your web files. Within your new folder, create a folder called
That will leave you with a folder structure like this:
In the top-level folder (the one I’ve called
So now we should have a set of files and folders that look something like this:
One of the files you’ll find App Engine installed is named
Note that no-one else will be able to see your files:
You might notice a new file has turned up in your project:
So you’ve tested your project and you’ve seen it working on your own machine; now all you need to do is upload your project and the world will be able to see your files too.
Open your Mac OS X Terminal, Windows Command Prompt, or Linux shell window again, move to the project folder, and type (again, the space and the dot at the end are important):
First, once you’ve set up your site, updating it is an absolute breeze. Each time you update a file (or a batch of files) you need only run
App Engine also allows multiple people to work on one application. If you want a friend to be able to upload files to your site you can let him do so without giving him usernames and passwords — all he needs is his own Google account. App Engine also gives you a log of all actions taken by collaborators, so you can see who’s made updates, and when.
Another bonus is the simple version control App Engine offers. Do you remember the file named
One last thing to note: if you’re not happy using
Aral found the biggest problems while using App Engine as a web application platform; I wouldn’t recommend using it as such either (at least for now) but for our purposes as a CDN for static files, it’s much more worthy. Still, App Engine has two shortcomings you should be aware of.
The first is that you can’t host a file larger than one megabyte. If you want to use App Engine to host that 4.3MB download for your latest-and-greatest desktop software, you’re out of luck. The only solution is to stick to smaller files.
The second problem is the quota system. Google’s own documentation says you’re allowed 650,000 requests a day and 10,000 megabytes of bandwidth in and out (20,000 megabytes in total), which should be plenty for most sites. But people have seen sites shut down temporarily for breaching quotas — in some cases after inexplicable jumps in Google’s server CPU usage. Aral, who’s seen it happen to his own sites, seemed genuinely frustrated by this, and if you measure your hits in the hundreds of thousands and don’t want to worry about uptime, App Engine isn’t for you.
That said, for most of us, App Engine offers a fantastic resource: the ability to host files on Google’s own content delivery network, at no charge.
from http://24ways.org/2008/using-google-app-engine-as-your-own-cdn/
--------------------------------------------
When the big boys run websites (basically any brand name site you can think off) they use Content Delivery Networks (CDN’s) to host most of their content, especially images, stylesheets, files to download and other static content. The reason they do this is that the less they have to host themselves the less load they have on their servers, and the more content they can host closer to the end user the quicker the user can download it. The most famous CDN is probably Akamai, that almost run their own parallell internet. Akamai and other CDN providers cost big bucks though, so it is nothing for us mere mortals.
But thanks to Google anyone can now run their own CDN for free on Googles servers. It is really easy to set up and storing files for downloads, stylesheets etc on Google instead of on your own site takes the load of your servers (and consumes much less bandwidth of your hosting account) and speeds things up for the end users. It’s a win win situation, and it is also really really cool! If you are interested in more information about how to get the maximum performance from your web site then I recommend you read the excellent post Performance on a Shoe String on 24ways.
What is Google App Engine?
Using Google App Engine you can run web applications on Google’s servers. That means that you can benefit from Google’s huge world-wide server farms, it means that it is really easy to scale and to integrate with othe Google applications (for example using Google authentication in your applications). At the moment you have to write your applications in Python (don’t worry: no coding at all needed to use Google App Engine as a CDN, just keep reading), but hopefully they will expand it to other languages soon (personally I want to run PHP and CodeIgniter on Google App Engine!). The App Engine is Googles response to Amazons very successfull web services S3 (for storage) and EC2 (for computing). Amazons services are very powerful, but they do require a deeper level of technical knowledge to use than Google App Engine.
Currently Google App Engine is in a Preview Release (= beta), but it is free for anyone to join, all you need is a Google Account and a cell phone (more about this later). What you get is 500MB of free storage and around 5 million free pageviews a month, if you use more than that there is a small cost (see the Google App Engine blog for more details). The cost for these extra resources are almost the same as for Amazons Web Services, and with the freebies and ease of use thrown in Google App Engine is a bargin.
How to set up your own CDN
To use Google App Engine as your own personal CDN you need to install some things on your computer and edit a few configuration files. All this work is a one time thing though, after that all you need to do is run a simple program to upload new files to Google. Sorry to say that the scripts you download is for Windows only, if you are on a Mac or using Linux then you need to make your on script to do what deploy_digitalistic_cdn.bat does (if you do so please add this to the comments of this post for any one else to use).
To use the files you upload to your Google App Engine CDN you just need to use the URL to the file on your site. If you want to show an image of a cool ninja from WebHostNinja.com you would just use digitalisticcdn.appspot.com/images/ninja.gif as your image source in your HTML. The same goes for stylesheets, files to download or whatever else you want to share on your CDN.
At any time you can add new files to your digitalisticcdn subdirectories (/images, /stylesheets etc) and run the deploy_digitalistic_cdn.bat file to upload them to Google. If you remove files from your digitalisticcdn directory and then run the bat file they will be deleted from your Google application.
You can check the statistics of your Google Application at appengine.google.com. For example you can see how much bandwidth and disk space you are using. It will take quite a lot of files and usage for you to use up the resources you get for free, but if you have a super popular site then it is worth taking a look here every now and then.
If you have read so far and found all this usefull then please Digg it. Thanks!
from http://www.digitalistic.com/2008/06/09/10-easy-steps-to-use-google-app-engine-as-your-own-cdn/
CDN的全称是Content Delivery Network,即内容分发网络。其基本思路是尽可能避开互联网上有可能影响数据传输速度和稳定性的瓶颈和环节,使内容传输的更快、更稳定。通过在网络各 处放置节点服务器所构成的在现有的互联网基础之上的一层智能虚拟网络,CDN系统能够实时地根据网络流量和各节点的连接、负载状况以及到用户的距离和响应 时间等综合信息将用户的请求重新导向离用户最近的服务节点上。其目的是使用户可就近取得所需内容,解决 Internet网络拥挤的状况,提高用户访问网站的响应速度。
接下来为大家介绍几个免费CDN:
Free CoralCDN
这个CDN就好像sixxs.org一样,末尾后缀是nyud.net当然上面介绍的不是主要的,主要的还有就是 CoralCDN WordPress Plugin 。这个可以加速你的wordpress。
Free Cloudflare CDN
这个CDN就鼎鼎有名啦,不过其免费CDN的IP基本都被封啦,就不介绍了。Using Dropbox network
Dropbox大家都晓得,然后国内https也没被封,你可以用一个开发在wordpress插件上的一个叫Dropbox WordPress Plugin的试试。这个插件允许CSS,JavaScript,或者是图片文件在你的dropbox公共文件里。Using Google network
google大家也都知道,鼎鼎大名的GAE大家肯定也知道,这个就是用GAE来做CDN,各种复杂的设置,如果有经历折腾的话,然后英文也还阔以的话,你可以上24ways.org 或者在 digitalistic.com 里看下折腾下.----------------------------------------
Using Google App Engine as Your Own Content Delivery Network
Do you remember, years ago, when hosting
was expensive, domain names were the province of the rich, and you
hosted your web pages on Geocities? It seems odd to me now that there
was a time when each and every geek didn’t have his own top-level domain
and super hosting setup. But as the parts became more and more
affordable a man could become an outcast if he didn’t have his own
slightly surreal-sounding TLD.
And so it will be in the future when people realise with surprise there was a time before affordable content delivery networks.A content delivery network, or CDN, is a system of servers spread around the world, serving files from the nearest physical location. Instead of waiting for a file to find its way from a server farm in Silicon Valley 8,000 kilometres away, I can receive it from London, Dublin, or Paris, cutting down the time I wait. The big names — Google, Yahoo, Amazon, et al — use CDNs for their sites, but they’ve always been far too expensive for us mere mortals. Until now.
There’s a service out there ready for you to use as your very own CDN. You have the company’s blessing, you won’t need to write a line of code, and — best of all — it’s free. The name? Google App Engine.
In this article you’ll find out how to set up a CDN on Google App Engine. You’ll get the development software running on your own computer, tell App Engine what files to serve, upload them to a web site, and give everyone round the world access to them.
Creating your first Google App Engine project
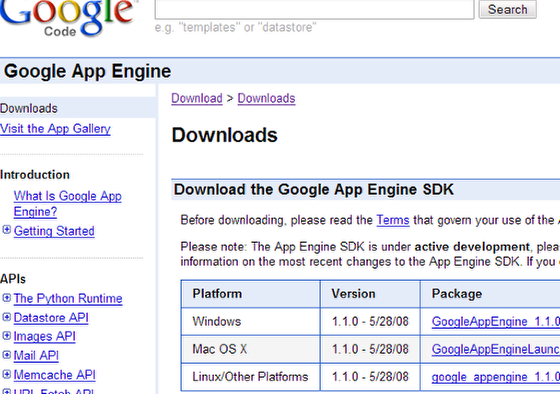
Before we do anything else, you’ll need to download the Google App Engine software development kit (SDK). You’ll need Python 2.5 too — you won’t be writing any Python code but the App Engine SDK will need it to run on your computer. If you don’t have Python, App Engine will install it for you (if you use Mac OS X 10.5 or a Linux-based OS you’ll have Python; if you use Windows you won’t).Done that? Excellent, because that’s the hardest step. The rest is plain sailing.
You’ll need to choose a unique ‘application id’ — nothing more than a name — for your project. Make sure it consists only of lowercase letters and numbers. For this article I’ll use
24ways2008, but you can choose anything you like.On your computer, create a folder named after your application id. This folder can be anywhere you want: your desktop, your documents folder, or wherever you usually keep your web files. Within your new folder, create a folder called
assets, and within that folder create three folders called images, css, and javascript.
These three folders are the ones you’ll fill with files and serve from
your content delivery network. You can have other folders too, if you
like.That will leave you with a folder structure like this:
24ways2008/
  assets/
   css/
   images/
   javascript/
In the top-level folder (the one I’ve called
24ways2008), create a file called index.html. Fill this with any content you want. In the assets/css folder, create a file named core.css and throw in a couple of CSS rules for good measure. In the assets/images directory save any image that takes your fancy — I’ve used the silver badge from the App Engine download page. Finally, to fill the JavaScript folder, add in this jQuery library file. If you’ve got the time and the inclination, you can build a page that uses all these elements.So now we should have a set of files and folders that look something like this:
24ways2008/
  assets/
    index.html
    css/
      core.css
    images/
      appengine-silver-120x30.gif
    javascript/
      jquery-1.2.6.min.js
app.yaml, it sits at the top-level (inside the folder I’ve named 24ways2008), and it needs to include these lines:application: 24ways2008
version: 1
runtime: python
api_version: 1
handlers:
- url: /
 static_files: assets/index.html
 upload: assets/index.html
- url: /
 static_dir: assets
24ways2008 on the first line to whatever you chose as your application id, but otherwise the content of your app.yaml file should be identical. And with that, you’ve created your first App Engine project. If you want it, you can download a zip file containing my project.Testing your project
As it stands, your project is ready to be uploaded to App Engine. But we couldn’t call ourselves professionals if we didn’t test it, could we? So, let’s put that downloaded SDK to good use and run the project from your own computer.One of the files you’ll find App Engine installed is named
dev_appserver.py, a Python script used to simulate App Engine on your computer. You’ll find lots of information on how to do this in the documentation on the development web server, but it boils down to running the script like so (the space and the dot at the end are important):dev_appserver.py .
cd ~/Desktop/24ways2008
cd "C:\Documents and Settings\username\Desktop\24ways2008"
INFO 2008-11-22 14:35:00,830 dev_appserver_main.py] Running application 24ways2008 on port 8080: http://localhost:8080
http://localhost:8080/, and you’ll see the page you saved as index.html. You’ll also find your CSS file at http://localhost:8080/css/core.css.
In fact, anything you put inside the assets folder in the project will
be accessible from this domain. You’re running our own App Engine web
server!Note that no-one else will be able to see your files:
localhost is a special domain that you can only see from your computer — and once you stop the development server (by pressing Control–C) you’ll not be able to see the files in your browser until you start it again.You might notice a new file has turned up in your project:
index.yaml.
App Engine creates this file when you run the development server, and
it’s for internal App Engine use only. If you delete it there are no ill
effects, but it will reappear when you next run the development server.
If you’re using version control (e.g. Subversion) there’s no need to
keep a copy in your repository.So you’ve tested your project and you’ve seen it working on your own machine; now all you need to do is upload your project and the world will be able to see your files too.
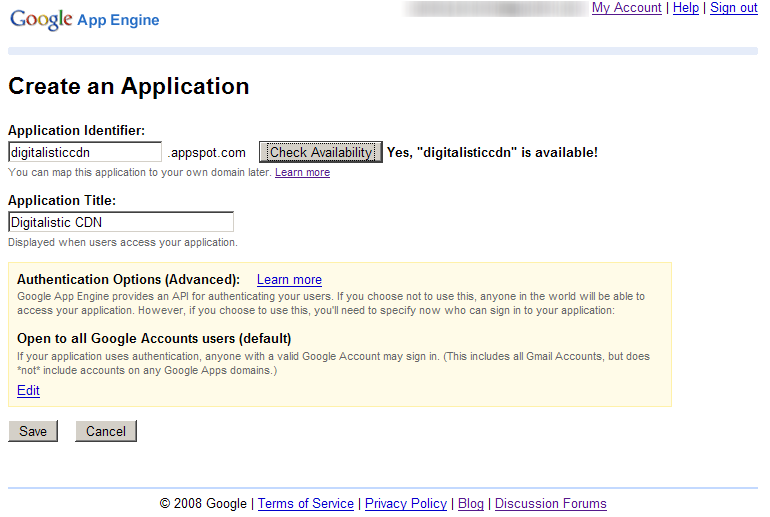
Uploading your project
If you don’t have a Google account, create one and then sign in to App Engine. Tell Google about your new project by clicking on the ‘Create an Application’ button. Enter your application id, give the application a name, and agree to the terms and conditions. That’s it. All we need do now is upload the files.Open your Mac OS X Terminal, Windows Command Prompt, or Linux shell window again, move to the project folder, and type (again, the space and the dot at the end are important):
appcfg.py update .
http://your-application-id.appspot.com/. Your files are being served up over Google’s content delivery network, at no cost to you!Benefits of using Google App Engine
The benefits of App Engine as a CDN are obvious: your own server doesn’t suck up the bandwidth, while your visitors will appreciate a faster site. But there are also less obvious benefits.First, once you’ve set up your site, updating it is an absolute breeze. Each time you update a file (or a batch of files) you need only run
appcfg.py to see the changes appear on your site. To paraphrase Joel Spolsky,
a good web site must be able to be updated in a single step. Many
designers and developers can’t make that claim, but with App Engine, you can.App Engine also allows multiple people to work on one application. If you want a friend to be able to upload files to your site you can let him do so without giving him usernames and passwords — all he needs is his own Google account. App Engine also gives you a log of all actions taken by collaborators, so you can see who’s made updates, and when.
Another bonus is the simple version control App Engine offers. Do you remember the file named
app.yaml you created a while back? The second line looked like this:version: 1
One last thing to note: if you’re not happy using
your-application-id.appspot.com as your domain, App Engine will quite happily use any domain you own.The weak points of Google App Engine
In the right circumstances, App Engine can be a real boon. I run my own site using the method I’ve discussed above, and I’m very happy with it. But App Engine does have its disadvantages, most notably those discussed by Aral Balkan in his post ‘Why Google App Engine is broken and what Google must do to fix it‘.Aral found the biggest problems while using App Engine as a web application platform; I wouldn’t recommend using it as such either (at least for now) but for our purposes as a CDN for static files, it’s much more worthy. Still, App Engine has two shortcomings you should be aware of.
The first is that you can’t host a file larger than one megabyte. If you want to use App Engine to host that 4.3MB download for your latest-and-greatest desktop software, you’re out of luck. The only solution is to stick to smaller files.
The second problem is the quota system. Google’s own documentation says you’re allowed 650,000 requests a day and 10,000 megabytes of bandwidth in and out (20,000 megabytes in total), which should be plenty for most sites. But people have seen sites shut down temporarily for breaching quotas — in some cases after inexplicable jumps in Google’s server CPU usage. Aral, who’s seen it happen to his own sites, seemed genuinely frustrated by this, and if you measure your hits in the hundreds of thousands and don’t want to worry about uptime, App Engine isn’t for you.
That said, for most of us, App Engine offers a fantastic resource: the ability to host files on Google’s own content delivery network, at no charge.
Conclusion
If you’ve come this far, you’ve seen how to create a Google App Engine project and host your own files on Google’s CDN. You’ve seen the great advantages App Engine offers — an excellent content delivery network, the ability to update your site with a single command, multiple authors, simple version control, and the use of your own domain — and you’ve come across some of its weaknesses — most importantly the limit on file sizes and the quota system. All that’s left to do is upload those applications — but not before you’ve finished your Christmas shopping.from http://24ways.org/2008/using-google-app-engine-as-your-own-cdn/
--------------------------------------------
10 Easy Steps to use Google App Engine as your own CDN
When the big boys run websites (basically any brand name site you can think off) they use Content Delivery Networks (CDN’s) to host most of their content, especially images, stylesheets, files to download and other static content. The reason they do this is that the less they have to host themselves the less load they have on their servers, and the more content they can host closer to the end user the quicker the user can download it. The most famous CDN is probably Akamai, that almost run their own parallell internet. Akamai and other CDN providers cost big bucks though, so it is nothing for us mere mortals.
But thanks to Google anyone can now run their own CDN for free on Googles servers. It is really easy to set up and storing files for downloads, stylesheets etc on Google instead of on your own site takes the load of your servers (and consumes much less bandwidth of your hosting account) and speeds things up for the end users. It’s a win win situation, and it is also really really cool! If you are interested in more information about how to get the maximum performance from your web site then I recommend you read the excellent post Performance on a Shoe String on 24ways.
What is Google App Engine?
Using Google App Engine you can run web applications on Google’s servers. That means that you can benefit from Google’s huge world-wide server farms, it means that it is really easy to scale and to integrate with othe Google applications (for example using Google authentication in your applications). At the moment you have to write your applications in Python (don’t worry: no coding at all needed to use Google App Engine as a CDN, just keep reading), but hopefully they will expand it to other languages soon (personally I want to run PHP and CodeIgniter on Google App Engine!). The App Engine is Googles response to Amazons very successfull web services S3 (for storage) and EC2 (for computing). Amazons services are very powerful, but they do require a deeper level of technical knowledge to use than Google App Engine.
Currently Google App Engine is in a Preview Release (= beta), but it is free for anyone to join, all you need is a Google Account and a cell phone (more about this later). What you get is 500MB of free storage and around 5 million free pageviews a month, if you use more than that there is a small cost (see the Google App Engine blog for more details). The cost for these extra resources are almost the same as for Amazons Web Services, and with the freebies and ease of use thrown in Google App Engine is a bargin.
How to set up your own CDN
To use Google App Engine as your own personal CDN you need to install some things on your computer and edit a few configuration files. All this work is a one time thing though, after that all you need to do is run a simple program to upload new files to Google. Sorry to say that the scripts you download is for Windows only, if you are on a Mac or using Linux then you need to make your on script to do what deploy_digitalistic_cdn.bat does (if you do so please add this to the comments of this post for any one else to use).
- Since Google App Engine only works with the programming language Python you need to download and install Python on your computer. If you have a Mac or run Linux you most probably already have Python installed, so you can skip this step. Download the correct installation file for your OS from Python 2.5.2 from http://www.python.org/download/ and install it. Use the default settings, except install it under “Program Files” instead of directly on the C: drive (or install it wherever you want, but in then you need to modify the scripts below.
Download the Google App Engine SDK from http://code.google.com/appengine/downloads.html and install it. During the SDK installation it will check if you have Python or not, so if you have a Python installation problem you will know it already here. The Google App Engine SDK is needed to be able to write and upload applications to Google. Just use the default settings when installing the SDK.
- Sign up for Google App Engine at appengine.google.com. For this you need a Google account (your GMail address for example, if you dont have one it is free to create one).
Once you are signed up you need to create an application, so just click on the button “Create an Application” and give your application a name (called “application identifier”). This name needs to be unique among all users applications, so it might take a while to find a unique one. In my case I used “digitalisticcdn”. Save your new application. After you have created your first application you need to specify your cell phone number. Google will then send you a SMS with a code that you enter into their site. This confirms that you are the owner of this Google App Engine account (so don’t use it for spamming
.
- Download the file http://digitalisticcdn.appspot.com/files/digitalisticcdn.zip (hosted on my private CDN!) and unzip it to your harddrive. If you want you can rename the unzipped directory from “digitalisticcdn” to whatevery you want, for example the name of your own application. It doesnt really matter, it just makes easier for you to keep track of things in the future.
- Use a text editor to edit the app.yaml file in the digitalisticcdn directory. Change “application: digitalisticcdn” to “application: <your application identifier” and save the file. This will tell Google App Engine what application to upload your files to.
- Now it is time to add all the images, stylesheets, files, videos etc you want to upload to Google to the folders in the digitalisticcdn directory. Put all images into the /images folder etc. You can create any number of subfolders inside the images, files, stylesheets etc folders (for example /images/webhostninja.com/ninja.gif). You can always add more files at a later time, so if you just want to set things up to work you can skip this step for now. There is already an image in the /images folder for you to test that all is working as it should be.
- Download http://digitalisticcdn.appspot.com/files/deploy_digitalistic_cdn.bat and edit it in a text editor. This file needs to point out your Python installation, your Google App Engine installation and your digitalisticcdn directory. If you installed the Google App Engine SDK in the default directory and Python in C:/Program Files/ then you don’t have to worry about those settings. Just change the last part of the file to point to your digitalisticcdn directory. Keep in mind that all paths with spaces in needs to be surrounded by quotes.
- Double click on the newly changed deploy_digitalistic_cdn.bat file to upload all the files in the digitalisticcdn directory to Google. The first time you do this you need to specify your Google username and password.
You now have your own private CDN! Go to <your-application-identifier>.appspot.com/images/ninja.gif (in my case digitalisticcdn.appspot.com/images/ninja.gif) to see that it works.

To use the files you upload to your Google App Engine CDN you just need to use the URL to the file on your site. If you want to show an image of a cool ninja from WebHostNinja.com you would just use digitalisticcdn.appspot.com/images/ninja.gif as your image source in your HTML. The same goes for stylesheets, files to download or whatever else you want to share on your CDN.
At any time you can add new files to your digitalisticcdn subdirectories (/images, /stylesheets etc) and run the deploy_digitalistic_cdn.bat file to upload them to Google. If you remove files from your digitalisticcdn directory and then run the bat file they will be deleted from your Google application.
You can check the statistics of your Google Application at appengine.google.com. For example you can see how much bandwidth and disk space you are using. It will take quite a lot of files and usage for you to use up the resources you get for free, but if you have a super popular site then it is worth taking a look here every now and then.
If you have read so far and found all this usefull then please Digg it. Thanks!
from http://www.digitalistic.com/2008/06/09/10-easy-steps-to-use-google-app-engine-as-your-own-cdn/