DNS-over-TLS
Since version 1.3.0, dnsdist supports experimental DNS-over-TLS support. To see if the installation supports this, run
Since version 1.3.0, dnsdist supports experimental DNS-over-TLS support. To see if the installation supports this, run
dnsdist --version. If the output shows dns-over-tls with one or more SSL libraries in brackets, DNS-over-TLS is supported.
----
To help increase online privacy, Unbound supports DNS-over-TLS which allows clients to encrypt their communication.
from https://nlnetlabs.nl/projects/unbound/about/
------
Instructions for setting up DNS over TLS over TOR.
------
Instructions for setting up DNS over TLS over TOR.
DNS over TLS and TOR with Pi-Hole.
These instructions will set up your Pi-Hole to run DNS over TLS and TOR.
For those unfamiliar, here is a description of the issues with regular DNS.
DNS over TLS encrypts the DNS requests between you and the DNS provider so that only you and the DNS provider know what requests you have made. The DNS provider however will have both your IP address and your request.
By adding TOR to the chain, no one has access to your request and your IP address. The DNS provider will see a Tor exit node making the request and the Tor exit node will see an encrypted message going out to the DNS provider.
Its a small step to increasing your privacy online, but its fairly easy.
To note:
Your ISP will still see all your regular traffic, this is a reduction in footprint, not a magic bullet.
DNS over TLS and TOR is slower. The instructions below should increase your caching of DNS entries (a cached DNS entry is very fast) but non-cached entries may take up to a second to resolve.
In practice, I havent noticed a slowdown. Currently with pi-hole, 50% of my requests are cached, 20% are blocked and only 30% are resolved externally.
The setup
This stack points the pi-hole DNS to use stubby (which performs DNS over TLS) which is then redirected via proxychains to TOR. These instructions assume you have set up pi-hole.
If not please install pi-hole first .
If not please install pi-hole first .
Instructions
Playing around with DNS can result in you not being able to resolve any domain names and therefore no access to the internet and no way to google how to get out of the mess. You should, at the minimum have the ip address of your pi-hole so that you can access it to turn off the new DNS server and a copy of these instructions locally. If you are not confident you can recover from DNS issues, this probably isnt for you, or test it out on a test machine rather than your main DNS server
Log into your pi-hole.
Check everything is up to date.
sudo apt-get update && sudo apt-get upgrade
Install TOR
sudo apt-get install tor
Check tor installation.
sudo netstat -tpln
Active Internet connections (only servers) Proto Recv-Q Send-Q Local Address Foreign Address State PID/Program name
tcp 0 0 0.0.0.0:22 0.0.0.0: LISTEN 504/sshd
tcp 0 0 127.0.0.1:9050 0.0.0.0:* LISTEN 3057/tor
tcp6 0 0 :::22 :::* LISTEN 504/sshd
*
tcp 0 0 0.0.0.0:22 0.0.0.0: LISTEN 504/sshd
tcp 0 0 127.0.0.1:9050 0.0.0.0:* LISTEN 3057/tor
tcp6 0 0 :::22 :::* LISTEN 504/sshd
*
We are looking for tor listening on port 9050.
Check its working Firstly my ip without tor.
curl ifconfig.me
Then your ip with tor.
torsocks curl ifconfig.me
These two should be different.
Install stubby
Stubby is now in buster so if you have buster you can just
sudo apt-get install stubby
This actually starts the program so we need to stop it.
sudo systemctl stop stubby
If you dont have stubby in your repositories there is a description here of how to build it from source.
(Note it might be worth building it from source anyway to get the latest version).
Change the port that stubby listens on.
sudo nano /etc/stubby/stubby.yml
Change the listen_addresses to
listen_addresses:
- 127.0.0.1@8053
- 0::1@8053
Save and exit.
Now start stubby
sudo systemctl start stubby
And test it.
dig @127.0.0.1 -p 8053 google.com
This should return an ip address for google.
Now lets stop stubby for the momment
sudo systemctl stop stubby
Install proxychains
sudo apt-get install proxychains
We know need to make a change to the proxychains config to not do dns resolution.
sudo nano /etc/proxychains.conf
Comment out the line
proxy_dns
so that it appears like this.
# proxy_dns
and at the end of the file change socks4 to socks5 ie.
socks5 127.0.0.1 9050
(Not sure if this is really necessary).
Save and exit.
To check it is working
proxychains curl ifconfig.me
and
curl ifconfig.me
should give different ip addresses.
Connecting them together
To test its all working type the following
proxychains stubby &
and test it.
dig @127.0.0.1 -p 8053 google.com
You should get back the ip address. In the returned records you should see the time the request took. Its probably very slow but we can speed that up later.
Now stop our test server.
killall stubby
Setting it up for the system
sudo nano /etc/systemd/system/multi-user.target.wants/stubby.service
and change the ExecStart line to be
ExecStart=/usr/bin/proxychains /usr/bin/stubby
and change the After line to be (adding tor.service)
After=network-online.target tor.service
Save it and exit.
Run the following
sudo systemctl daemon-reload
sudo systemctl start stubby
and test it.
dig @127.0.0.1 -p 8053 google.com
Adding it to Pi-hole.
Go to your pi-hole web interface and go to settings. There is a tab at the top called DNS, go there.
Turn off your other DNS providers and add Custom server
127.0.0.1#8053
Hit save at the bottom of the page and we should be done.
We can test it using
dig apple.com
We should use an address we havent checked before because the pi-hole caches dns requests. If everything is working, the dig command will probably be quite slow.
Speeding up
Firstly add a minimum TTL (Time to live) to DNS requests. This will mean DNS requests get repeated within about an hour. IP addresses rarely move but you may want a smaller value in certain cases.
Type the following.
sudo bash

cat << EOF > /etc/dnsmasq.d/min_tls.conf
min-cache-ttl=3500
EOF
exit
Secondly change the servers that stubby uses.
sudo nano /etc/stubby/stubby.yml
Increase the idle_timeout (in milliseconds)
idle_timeout: 1000000
Save and exit.
Restart pi-hole and stubby
sudo systemctl restart stubby
sudo systemctl restart pihole-FTL
Test again.
dig apple.com
which is probably not going to break any speed records, though it we try it again
dig apple.com
We should get a response in a millisecond.
To get back to old DNS servers.
If you want to remove this configuration, change the DNS server back on the pi-hole web interface to your preffered DNS server and remove the 127.0.0.1#8053 entry. Save
That should get your dns back to how it was.
To stop the stubby service from running.
sudo systemctl disable stubby
sudo systemctl stop stubby
from https://github.com/piskyscan/dns_over_tls_over_tor
-----------------------------
DNS-over-HTTPS-over-Tor
DNS-over-HTTPS-over-Tor
Based on a blog post about tunneling DNS-over-HTTPS name resolution over Tor for the purpose of anonymity. Not production quality yet, working on it :).
Prerequisites
- Install tor, privoxy and unbound
(Note that dohotcd itself is agnostic to the software you use, you can replace tor, privoxy and unbound with something else.)
apt-get install tor privoxy unbound
- Configure privoxy to forward proxied requests over tor
Make sure the following is in /etc/privoxy/config:
forward-socks5t / 127.0.0.1:9050 .
- Make sure you use your unbound as local resolver (check /etc/resolv.conf)
Installation
First time installation, preparations; run the following as root:
apt-get install libanyevent-perl \
                libanyevent-handle-udp-perl \
                libanyevent-http-perl \
                libnet-dns-perl \
                libyaml-perl
adduser --system --home /var/lib/dohotcd dohotcd
To install the software, run the following (it assumes the use of systemd as init manager):
perl Makefile.PL
and, then as root:
make install
cp config.yml /etc/dohotcd/config.yml
cp dohotcd.service /etc/systemd/system
systemctl enable dohotcd.service
systemctl start dohotcd.service
The dohotcd user is referenced from the systemd service file.
Configure unbound
I use the following unbound configuration:
server:
    do-not-query-localhost: no
    serve-expired: yes

forward-zone:
    name: .
    forward-addr: ::1@5354
serve-expired is kind of nice, because of the increased query times we see by tunneling over Tor, we can speed up our name resolution (from the perspective of the querying application) a bit by cheating through serving cached item even after they have expired. The expired item is served to the client immediately but is also queried asynchronously and the cache will be updated as the recursive response arrives.
--------------------------------
Update (2016-05-18): RFC7858, Specification for DNS over TLS describes the use TLS over DNS (using TCP port 853).
Update (2017-04-08): All those solutions use one TCP (and TLS) connection per DNS request which is quite inefficient.
Update (2017-05-17): This was written before DNS/TLS was a thing (and before it was natively implemented in resolvers). See DNS Privacy for up-to-date instructions.
Warning! You might not want to use DNS/TLS to bypass state censorship (you probably want some sort of stealthy VPN):
On the client-side:
In
With the
Example:
Other libc implementations:
Keypair and certificate generation:
Protocol stack:
With
Protocol stack:
with the same
Protocol stack:
Issues:
Protocol stack:
In the unbound code, the TLS outgoing connections are setup in
Recursive DNS over TLS
You might want to use an open recursive DNS servers if your ISP's DNS server is lying. However, if your network/ISP is intercepting all DNS requests, a standard open recursive DNS server won't help. You might have more luck by using an alternative port or by forcing the usage of TCP (use-vc option in recent versions of glibc) but it
might not work. Alternatively, you could want to talk to a (trusted)
remote recursive DNS server over secure channel such as TLS: by using
DNS over TLS over TCP port 443 (the HTTPS/TLS port), you should be able
to avoid most filtering between you and the recursive server.Update (2016-05-18): RFC7858, Specification for DNS over TLS describes the use TLS over DNS (using TCP port 853).
Update (2017-04-08): All those solutions use one TCP (and TLS) connection per DNS request which is quite inefficient.
Update (2017-05-17): This was written before DNS/TLS was a thing (and before it was natively implemented in resolvers). See DNS Privacy for up-to-date instructions.
Warning! You might not want to use DNS/TLS to bypass state censorship (you probably want some sort of stealthy VPN):
- if someone is able to censor your DNS requests, it could detect that you are communicating to forbidden hosts;
- it
is quite easy to check that the remote TLS server is not a web server
(or not only a webserver) but a DNS server (by making DNS requests)
unless you add client authentication.
Summary
On the server-side:On the client-side:
- unbound → stunnel (in client mode) if possible;
- force DNS/TCP (
use-vcinresolv.conffor glibc;tcpfor OpenBSD) → stunnel (but programs which do not rely on the libc resolver functions will probably ignore the option).
          cache      verify TLS

[DNS ]<->[DNS     ]<->------------------------------->[DNS]
[    ]   [        ]<->[   |TLS]----------->[TLS|  ]   [   ]
[UDP*]<->[UDP*|TCP]<->[TCP    ]<---------->[TCP   ]<->[TCP]
[IP  ]<->[IP      ]<->[IP     ]<---------->[IP    ]<->[IP ]
Stub R.   Forwarder   TLS Init. Internet   TLS Term.  Recursive
         (unbound)    (stunnel)            (stunnel)

*: or TCP if the reply is too long
Unbound can be use directly for TLS on the server side: cache verify TLS
[DNS ]<->[DNS ]<->-------------------->[DNS]
[ ] [ ]<->[ |TLS]----------->[TLS]
[UDP*]<->[UDP*|TCP]<->[TCP ]<---------->[TCP]
[IP ]<->[IP ]<->[IP ]<---------->[IP ]
Stub R. Forwarder TLS Init. Internet Recursive
(unbound) (stunnel) (unbound)
However, it is currently not safe to use unbound to DNS/TLS on the client-side because unbound does not verify the remote certificate1 (MITM attack). This solution is not safe: cache MITM!
[DNS ]<->[DNS ]<--------->[DNS]
[ ] [ |TLS]<--------->[TLS]
[UDP*]<->[UDP*|TCP]<--------->[TCP]
[IP ]<->[IP ]<--------->[IP ]
Stub R. Forwarder Internet Recursive
(unbound) (unbound)
Software used
stunnel
stunnel can be used to add/remove TLS layers:- it can be used on the DNS server side to wrap the DNS/TCP service into a DNS/TLS/TCP service;
- it
can be used on the client side to unwrap the DNS/TLS/TCP and provide a
local DNS/TCP service which can be consumed by most resolvers and other
DNS clients.
       verify TLS

[DNS]<-------------------------------->[DNS]
[   ]   [  |TLS]<---------->[TLS|  ]   [   ]
[TCP]<->[TCP   ]<---------->[TCP   ]<->[TCP]
[IP ]<->[IP    ]<---------->[IP    ]<->[IP ]
Stub R. TLS Init. Internet  TLS Term.  Recursive
        (stunnel)           (stunnel)
The issue is that usually the resolver will first try to make
the query over UDP. If their is not UDP reply, the resolver will not
switch to TCP. We need a way to force the resolver to use TCP.libc
The GNU libc resolver has an (undocumented) option,use-vc (see resolv/res_init.c)
to force the usage of TCP for DNS resolutions. This option is available
since glibc v2.14 (available since Debian Jessie, since Ubuntu 12.04).In
/etc/resolv.conf:options use-vc nameserver 2001:913::8
RES_OPTIONS environment variable:RES_OPTIONS="use-vc" export RES_OPTIONS
$ #Using UDP (SOCK_DGRAM):
$ strace getent hosts www.ldn-fai.net 2>&1 | grep -e PF_INET
socket(PF_INET, SOCK_DGRAM|SOCK_NONBLOCK, IPPROTO_IP) = 3
socket(PF_INET, SOCK_DGRAM|SOCK_NONBLOCK, IPPROTO_IP) = 4
socket(PF_INET, SOCK_DGRAM|SOCK_NONBLOCK, IPPROTO_IP) = 3

$ #Using TDP (SOCK_STREAM):
$ RES_OPTIONS=use-vc strace getent hosts www.ldn-fai.net 2>&1 | \
  grep -e PF_INET
socket(PF_INET, SOCK_STREAM, IPPROTO_IP) = 3
- The OpenBSD libc seems to have a
tcpoption for this.
- Neither the FreeBSD libc, nor the DragonFlyBSD libc, nor the NetBSD libc, not the bionic libc (used by Android and FirefoxOS), nor the Mac OS/X / Darwin libresolv, seem to have a similar option.
- dietlibc does not handle the
optionsat all (and does not supportRES_USEVCand DNS/TCP).
- uclibc and musl do not have the option and does not handle DNS/TCP at all.
- klibc do not have real DNS resolution.
- getdns does not handle the
optionsfield at all.
Truncate all answers
The option to force the usage of TCP for DNS resolution is not available everywhere (many stub resolvers do not handle this option and some sofware do not use the system resolver). A hack to force the stub resolver to use TCP would be to have a simple local DNS/UDP service which always replies with the truncated bit set (TC=1): this should force most implementations to switch to TCP (and talk to the local stunnel process):[Resolver] [Fake service] [local stunnel] // [Remote recursive]
| | | |
|--------->| | | Query over UDP
|<--------- over="" response="" udp="">|---------------->| Query over TCP
|<----------------------- over="" pre="" response="" tcp=""> TruncateDNSd
is a proof-of-concept implementation of this idea: I'm not sure there
is a clean way to do this so it might remain a proof-of-concept.
Unbound
The correct solution is to have a local DNS recursive server which is able to delegate to a remote recursive DNS over TCP: Unbound can talk (either as a server or as a client) over TCP (tcp-upstream) or over TLS/TCP (ssl-upstream, ssl-service-key, ssl-service-pem, ssl-port).
However, it seems it cannot validate the certificate (v1.5.1):
- when used as the local client, it cannot by itself protect against MITM attacks;
- when used as the TLS server, it cannot handle TLS-based client authentication.
Server-side configuration
Using stunnel
stunnel configuration:; /etc/stunnel/dns.conf setuid=stunnel4 setgid=stunnel4 pid=/var/run/stunnel4/dns.pid output=/var/log/stunnel4/dns.log socket = l:TCP_NODELAY=1 socket = r:TCP_NODELAY=1 [dns] cert=/etc/stunnel/dns.pem accept=443 connect=53
openssl req -days 360 -nodes -new -x509 -keyout key.pem -out cert.pem \
  -subj "/CN=$MY_IP" -sha256 -newkey rsa:2048
(cat key.pem ; echo ; cat cert.pem ; echo ) > dns.pem
sudo chmod root:root dns.pem
sudo chmod 440 dns.pem
sudo mv dns.pem /etc/stunnel/
[DNS]<----------------------->[DNS]
[TLS]<------------>[TLS|  ]   [   ]
[TCP]<------------>[TCP   ]<->[TCP]
[IP ]<------------>[IP    ]<->[IP ]
Resolver Internet  TLS Term.  Recursive
                   (stunnel)
Using unbound
Unbound can be configured to use TLS directly withssl-port, ssl-service-key, ssl-service-pem.
Client-side configuration
Using socat
sudo socat \
  TCP4-LISTEN:53,bind=127.0.0.1,fork,nodelay,su=nobody \
  OPENSSL:80.67.188.188:443,verify=1,cafile=dns.pem,nodelay
/etc/resolv.conf:
options use-vc
nameserver 127.0.0.1
      verify TLS

[DNS]<-------------------->[TLS]
[TCP]<->[TCP   ]<-------->[TCP]
[IP ]<->[IP    ]<-------->[IP ]
Stub R.  socat   Internet  Recursive
Programs and libraries trying to parse
resolv.conf directly without using the res_ (for example lwresd) functions will usually ignore the use-vc and fail to work if no DNS server replies on UDP.
Using stunnel
This is the client side stunnel configuration:setuid=stunnel4 setgid=stunnel4 pid=/var/run/stunnel4/dns.pid output=/var/log/stunnel4/dns.log client=yes socket = l:TCP_NODELAY=1 socket = r:TCP_NODELAY=1 [dns] CAfile=/etc/stunnel/dns.pem accept=127.0.0.1:53 connect=80.67.188.188:443 verify=4
resolv.conf.
Protocol stack:
       verify TLS

[DNS]<--------------------->[DNS]
[   ]   [  |TLS]<---------->[TLS]
[TCP]<->[TCP   ]<---------->[TCP]
[IP ]<->[IP    ]<---------->[IP ]
Stub R. TLS Init. Internet  Recursive
        (stunnel)
Using unbound
Warning: This configuration is vulnerable to MITM attacks1. Use the unbound + stunnel configuration instead. A better solution would be to install a local unbound. The local unbound instance will cache the results and avoid a higher latency due to TCP and TLS initialisation:server: # verbosity: 7 ssl-upstream: yes forward-zone: name: "." forward-addr: 80.67.188.188@443
# /etc/resolv.conf
nameserver 127.0.0.1
     DNSSEC valid.
         cache

[DNS]<->[DNS   ]<---------->[DNS]
[   ]   [  |TLS]<---------->[TLS]
[TCP]<->[TCP   ]<---------->[TCP]
[IP ]<->[IP    ]<---------->[IP ]
Stub R. Forwarder Internet  Recursive
        (unbound)
As a bonus, you can enable local DNSSEC validation.
Using unbound and stunnel
Unbound currently does not verify the validity of the remote X.509 certificate. In order to avoid MITM attacks, you might want to add a local stunnel between unbound and the remote DNS server. The unbound configuration uses plain TCP:server: # verbosity:7 tcp-upstream: yes do-not-query-localhost: no forward-zone: name: "." forward-addr: 127.0.0.1@1234
- By default, unbound will not
make request on localhost. If you bind youd stunnel to a localhost
address (such as 127.0.0.1), you must use
do-not-query-localhost: no. -
unboundcan be shipped with a script forresolvconfwhich modified the forwarders which will override your tunnel configuration.
/etc/resolvconf/update.d/unbound and can be disabled by setting RESOLVCONF_FORWARDERS=false in /etc/default/unbound.
A local stunnel instance handles the TLS encapsulation (with remote certificate verification):
setuid=stunnel4
setgid=stunnel4
pid=/var/run/stunnel4/dns.pid
output=/var/log/stunnel4/dns.log
socket = l:TCP_NODELAY=1
socket = r:TCP_NODELAY=1

[dns]
client=yes
CAfile=/etc/stunnel/dns.pem
accept=127.0.0.1:1234
connect=80.67.188.188:443
verify=4
     DNSSEC valid.
         cache       verify TLS

[DNS]<->[DNS   ]<------------------------>[DNS]
[   ]   [      ]<---->[  |TLS]<---------->[TLS]
[TCP]<->[TCP   ]<---->[TCP   ]<---------->[TCP]
[IP ]<->[IP    ]<---->[IP    ]<---------->[IP ]
Client   Forwarder    TLS Init. Internet   Recursive
         (unbound)    (stunnel)
Verifying that the setup is correct
# We whould see the local traffic to your unbound instance:
sudo tcpdump -i lo "port 53"

# We should see the traffix from unbound to local stunnel instance:
sudo tcpdump -i lo "port 1234"

# We should not see outgoing DNS traffic:
sudo tcpdump -i eth0 "port 53"

# Make DNS requests and see if everything works as expected:
dig attempt45.example.com

# Flush the cache:
sudo unbound-control flush_zone .

# Make DNS requests directly on the tunnel (bypass unbound):
dif +tcp @127.0.0.1 -p 1234 attempt46.example.com

# Display the list of forward servers:
sudo unbound-control list_forwards
What about DNSSEC?
If your local resolver verify the authenticity of the DNS reply with DNSSEC, it will be able to detect a spoofed DNS reply and reject it. But it will still not be able to get the correct reply. So you should use DNSSEC but you might still want to use DNS/TLS.TLS configuration
See the Mozilla SSL Configuration Generator:stunnel
[dns]
# Append this to the service [dns] section:
options = NO_SSLv2
options = NO_SSLv3
options = NO_TLSv1
options = CIPHER_SERVER_PREFERENCE
ciphers = ECDHE-RSA-AES128-GCM-SHA256:ECDHE-ECDSA-AES128-GCM-SHA256:ECDHE-RSA-AES256-GCM-SHA384:ECDHE-ECDSA-AES256-GCM-SHA384:DHE-RSA-AES128-GCM-SHA256:DHE-DSS-AES128-GCM-SHA256:kEDH+AESGCM:ECDHE-RSA-AES128-SHA256:ECDHE-ECDSA-AES128-SHA256:ECDHE-RSA-AES128-SHA:ECDHE-ECDSA-AES128-SHA:ECDHE-RSA-AES256-SHA384:ECDHE-ECDSA-AES256-SHA384:ECDHE-RSA-AES256-SHA:ECDHE-ECDSA-AES256-SHA:DHE-RSA-AES128-SHA256:DHE-RSA-AES128-SHA:DHE-DSS-AES128-SHA256:DHE-RSA-AES256-SHA256:DHE-DSS-AES256-SHA:DHE-RSA-AES256-SHA:!aNULL:!eNULL:!EXPORT:!DES:!RC4:!3DES:!MD5:!PSK
References
TLS for DNS: An IETF working group working on privacy issues of DNS exchanges with drafts:- DNS privacy considerations
- Using TLS and ALPN for Privacy Between DNS Stub and Recursive Resolvers Propose to used the "dns" string to identify the protocol DNS when negociating a protocol with ALPN. ALPN is an extension for TLS for negociation of the protocol encapsulated over a TLS connection.
- Using HTTPS for Privacy Between DNS Stub and Recursive Resolvers
Encapsulation of DNS requests over HTTP over TLS with:
https://${resolver}:${port}/.well-known/dns-in-https/${base64url(request)}The response is sent withContent-Type: application/dns-response. - Using TLS on a New Port for Privacy Between DNS Stub and Recursive Resolvers Propose reserving a new port dedicated to DNS over TLS.
- Starting TLS over DNS draft A mechanism for upgrading DNS over TCP to DNS over TLS over TCP.
- DNS over TCP and TLS (slides)
- TLS-DNS
socat as a consequence, the TLS stream does not transport the DNS requests in the TCP wire-format. I guess there should be framing problems when converting from TCP to UDP.
- RFC7858: Specification for DNS over TLS
- summary of RFC7858 by Stéphane Bortzmeyer (in French)
- Comment mettre en place un serveur DNS récursif-cache ouvert dans de bonnes conditions
- LDN's open recursive server.
- DNS Great Wall of China;
- Hijacking of public DNS servers in Turkey, through routing
- VPN et anonymisation par delà la censure from PSES2012.
- NSA's MORECOWBELL: Knell for DNS, detailed article with informations about DNSSEC, DNS/TLS, DNSCurve, DNSCrypt, Namecoin,the GNU Name System;
- Davantage de cloche à vache : la NSA espionne aussi le DNS;
- MoreCowBell: Nouvelles révélations sur les pratiques de la NSA.
- Vie privée : et le DNS alors ?
In the unbound code, the TLS outgoing connections are setup in
void* connect_sslctx_create(char* key, char* pem, char* verifypem). This function only calls SSL_CTX_set_verify() if the verifypem parameter is not NULL. However, connect_sslctx_create() is always called with verifypem set to NULL.
You can verify this by configuring a local DNS/TLS service:
openssl req -x509 -newkey rsa:2048 -keyout key.pem -out cert.pem -days 256 -nodes
socat -v OPENSSL-LISTEN:1234,fork,certificate=./cert.pem,key=./key.pem TCP:80.67.188.188:53
and configure unbound to use it as a TLS upstream:
server:
  # verbosity:7
  ssl-upstream: yes
  do-not-query-localhost: no
forward-zone:
  name: "."
  forward-addr: 127.0.0.1@1234
FROM https://www.gabriel.urdhr.fr/2015/02/14/recursive-dns-over-tls-over-tcp-443/
-----------------------------------
DNS aggregation over TLS
In a previous post, I tried different solutions for tunnelling DNS over TLS. One of those solutions was using a dedicated DNS-over-UDP fake service replying to all queries with the truncate flag set: this was causing the stub resolvers to retry the query using a TCP-based virtual-circuit. This solution is interesting because it is dead simple (it fits in a few line of codes) but it is clearly a hack. Here, I'm using a dedicated DNS forwarder aggregating all the incoming DNS-over-UDP requests over a single persistent TCP virtual-circuit. Update (2017-05-17): This was written before DNS/TLS was a thing (and before it was natively implemented in resolvers). See DNS Privacy for up-to-date instructions.Summary
The differents solutions presented in the previous post on the resolver side:- using unbound for TLS encapulation (but unbound does not check the remote certificate);
- using a dedicated TLS encapulation tool such as stunnel and forcing the stub resolvers to use TCP;
- using unbound for caching and UDP/TCP conversion and stunnel for TLS initiation.
     DNSSEC valid.   TLS Init.
         cache       verify TLS

[DNS]<->[DNS   ]<------------------------>[DNS]
[   ]   [      ]<---->[  |TLS]<---------->[TLS]
[TCP]<->[TCP   ]<---->[TCP   ]<---------->[TCP]
[IP ]<->[IP    ]<---->[IP    ]<---------->[IP ]
Stub R.  Forwarder    TLS Init. Internet   Recursive
         (unbound)    (stunnel)
However, each DNS request is using a new TCP and TLS connection
between the stub resolver and unbound. Between unbound and stunnel,
each each incoming TCP connection stream is encapsulated in a new TLS
connection. This is very inefficient and the resulting DNS service is
not very robust.
Performance considerations for DNS over TLS are summarized in the TLS for DNS: Initiation and Performance Considerations draft (emphasis mine):
Latency: Compared to UDP, DNS-over-TCP requires an additional round-trip-time […]. The TLS handshake adds another two RTTs of latency.
State: The use of connection-oriented TCP requires keeping additional state in both kernels and applications. […]
Processing: […] slightly higher CPU usage.
Number of connections: clients SHOULD minimize creation of new TCP connections. Use of a local DNS request aggregator (a particular type of forwarder) allows a single active DNS-over-TLS connection from any given client computer to its server.
DNS aggregation over a persistent TCP connection
In order to fix this problem, I wrote a prototype DNS forwarder which aggregates all the local UDP-based DNS messages over a persistent TCP stream:- all incoming datagram DNS requests are multiplexed over a shared persistent TCP connection;
- when the answer is received it is forwarded to the correct UDP endpoint (identified using the identification field).
stunnel) which encapsulates the persistent DNS stream over TCP.
In
the future, the tool might have an option to talk TLS natively. My
excuse for not adding builtin support for TLS was that it gives you the
freedom of choosing which TLS implementation you would like to use
(OpenSSL with stunnel or socat, GnuTLS with gnutls-serv and a tool such as socat with faucet, NSS but I do not know a suitable tool using this library, etc).
        VC encap. DNSSEC valid.    TLS
    Mux.        cache        TLS verify

[DNS]<->[DNS    ]<->[DNS   ]<---------------------->[DNS]
                                     [TLS]<-------->[TLS]
[UDP]<->[UDP|TCP]<->[TCP   ]<---->[TCP   ]<-------->[TCP]
[IP ]<->[IP     ]<->[IP    ]<---->[IP    ]<-------->[IP ]
Client  Aggregator  Forwarder     TLS Init. Internet  Recursive
         (dnsfwd)   (unbound)    (stunnel)
The resulting DNS service is much more robust.
Warning: This software is currently a prototype. Use at your own risk.
References
- TLS for DNS: Initiation and Performance Considerations draft
- DNS Transport over TCP - Implementation Requirements draft
- T-DNS: DNS over TCP and TLS FROM https://www.gabriel.urdhr.fr/2015/12/09/dns-aggregator-tls/
相关帖子:
http://briteming.blogspot.com/2019/06/tdns-server-proxy.html
--------------
http://briteming.blogspot.com/2019/06/tdns-server-proxy.html
--------------
DNS over TLS
DNS over TLS (DoT) is a security protocol for encrypting and wrapping Domain Name System (DNS) queries and answers via the Transport Layer Security (TLS) protocol. The goal of the method is to increase user privacy and security by preventing eavesdropping and manipulation of DNS data via man-in-the-middle attacks.
As of 2019, Cloudflare, Quad9, Google, Quadrant Information Security, CleanBrowsing and LibreOps are providing public DNS resolver services via DNS over TLS.[1][2][3][4][5][6] In April 2018, Google announced that Android Pie will include support for DNS over TLS,[7] allowing users to set a DNS server phone-wide on both WiFi and mobile connections, an option that was historically only possible on rooted devices. DNSDist, from PowerDNS also announced support for DNS over TLS in its latest version 1.3.0.[8] BIND users can also provide DNS over TLS by proxying it through stunnel.[9] Unbound has supported DNS over TLS since 22 January 2018.[10][11] Unwind has supported DoT since 29 January 2019.[12][13] With Android Pie's support for DNS over TLS, some ad blockers now support using the encrypted protocol as a relatively easy way to access their services versus any of the various work-around methods typically used such as VPNs and proxy servers.[14][15][16]
Implementations[edit]
Many public recursive servers support DoT, but client systems are often required to opt in.
Android clients use DNS over TLS by default.
Linux and Windows users can use DNS over TLS as a client through the NLnet Labs stubby daemon or Knot Resolver[17]. Alternatively they may install getdns-utils[18] to use DoT directly with the getdns_query tool.
systemd-resolved is a Linux-only implementation that must be configured to use DNS over TLS, by editing
/etc/systemd/resolved.conf and enabling the setting DNSOverTLS.See also[edit]
References[edit]
- ^ "How to keep your ISP's nose out of your browser history with encrypted DNS". Ars Technica. Retrieved 2018-04-08.
- ^ "DNS over TLS - Cloudflare Resolver". developers.cloudflare.com. Retrieved 2018-04-08.
- ^ "Google Public DNS now supports DNS-over-TLS". Google Online Security Blog. Retrieved 2019-01-10.
- ^ "Quad9, a Public DNS Resolver - with Security". RIPE Labs. Retrieved 2018-04-08.
- ^ "Troubleshooting DNS over TLS".[user-generated source]
- ^ "LibreDNS". LibreDNS. Retrieved 2019-10-20.
- ^ "DNS over TLS support in Android P Developer Preview". Google Security Blog. April 17, 2018.
- ^ "DNS-over-TLS". dnsdist.org. Retrieved 25 April 2018.
- ^ "Bind - DNS over TLS".
- ^ "Unbound version 1.7.3 Changelog".
- ^ Aleksandersen, Daniel. "Actually secure DNS over TLS in Unbound". Ctrl blog. Retrieved 2018-08-07.
- ^ "openbsd-cvs mailing list archives".
- ^ "openbsd-cvs mailing list archives".
- ^ "blockerDNS - Block Ads and Online Trackers So You Can Browse the Web Privately on Your Android Phone Without Installing an App!". blockerdns.com. Retrieved 2019-08-14.
- ^ "The official release of AdGuard DNS — a new unique approach to privacy-oriented DNS". AdGuard Blog. Retrieved 2019-08-14.
- ^ "Blahdns -- Dns service support DoH, DoT, DNSCrypt". blahdns.com. Retrieved 2019-08-14.
- ^ "Knot Resolver".
- ^ Package: getdns-utils, retrieved 2019-04-04
External links[edit]
- RFC 7858 – Specification for DNS over Transport Layer Security (TLS)
- RFC 8310 – Usage Profiles for DNS over TLS and DNS over DTLS
- DNS Privacy Project: dnsprivacy.org
from https://en.wikipedia.org/wiki/DNS_over_TLS
---------------------------------------
---------------------------------------
Building a DNS over TLS (DoT) server
There's another standard available, however - RFC 7858 DNS over TLS (DoT)
DoT isn't as censorship resistant as DoH (as it's easier to block), but does provide you with additional privacy. It also has the advantage of being natively supported in Android Pie (9), so can be used to regain control of your queries without needing to run a dedicated app link Intra, with all the issues that might entail.
In this documentation we're going to trivially build and place queries against a DoT server.
Initial Setup
This documentation assumes you've already built a DoH server, in which case we're simply bolting additional functionality on.
If that's not the case, you need to do something approaching the following sections as a minimum (if you don't want to setup DoH that's fine)
- Install Nginx
- Unbound install, or
- Pi-Hole install - alongside unbound or instead of unbound
Essentially where you want to end up is that you have Nginx running (and configured with a cert, LetsEncrypt or otherwise) and a DNS stack running on your server.
Proxying DoT
All we're going to do is use NGinx's Stream module to terminate the SSL connection and pass plain TCP over loopback to the DNS stack
So, we need to edit /etc/nginx/nginx.conf and append the following to the end (remembering to replace the SSL certificate path with the details of your cert)
stream {
        server {
                listen                  *:853 ssl;
                proxy_pass              127.0.0.1:53;
                proxy_connect_timeout   1s;
                preread_timeout         2s;
        }


        ssl_certificate /etc/letsencrypt/live/dns.bentasker.co.uk/fullchain.pem;
        ssl_certificate_key /etc/letsencrypt/live/dns.bentasker.co.uk/privkey.pem;

        ssl_session_timeout             1d;
        ssl_session_tickets             off;

        ssl_protocols                   TLSv1.2 TLSv1.3;
        ssl_prefer_server_ciphers       on;

        # If you're new enough to support DoT you're new enough not to support old broken ciphers
        ssl_ciphers ECDHE-ECDSA-AES256-GCM-SHA384:ECDHE-RSA-AES256-GCM-SHA384:ECDHE-ECDSA-CHACHA20-POLY1305:ECDHE-RSA-CHACHA20-POLY1305:ECDHE-ECDSA-AES128-GCM-SHA256:ECDHE-RSA-AES128-GCM-SHA256:ECDHE-ECDSA-AES256-SHA384:ECDHE-RSA-AES256-SHA384:ECDHE-ECDSA-AES128-SHA256:ECDHE-RSA-AES128-SHA256;

        ssl_session_cache               shared:DoT:10m;

        log_format dot '$remote_addr\t-\t-\t[$time_local]\t$ssl_protocol\t'
            '$ssl_session_reused\t$ssl_cipher\t$ssl_server_name\t$status\t'
            '$bytes_sent\t$bytes_received';

        access_log /var/log/nginx/dot.log dot;
}
What we're doing here is more or less boilerplate, we're binding a server to port 853 (the DoT port) using SSL/TLS with a fairly restricted set of ciphers.
We've also enabled TLSv1.3 - keep in mind it needs a fairly recent Nginx for that to work, so if you don't have the means to use that, just enable TLSV1.2 for now
Now we can reload Nginx and verify it's bound the the appropriate port
systemctl reload nginx
netstat -lnp | grep nginx
tcp        0      0 0.0.0.0:80              0.0.0.0:*               LISTEN      6009/nginx: master
tcp        0      0 0.0.0.0:853             0.0.0.0:*               LISTEN      6009/nginx: master
tcp        0      0 0.0.0.0:443             0.0.0.0:*               LISTEN      6009/nginx: master
tcp6       0      0 :::853                  :::*                    LISTEN      6009/nginx: master
We also need to punch a hole in the firewall so that clients can use the service
iptables -I INPUT -p tcp --dport 853 -j ACCEPT
iptables-save > /etc/iptables/rules.v4
Testing
We should now be in a position where we can place some test queries against the server.
At time of writing, this is easier said than done, as although (at a technical level) DoT is a saner solution that DoT it really suffers from a lack of adoption and lack of available tooling.
If you've got an Android Pie device, then support is baked in, so you can configure your DNS resolver on your device and it should just work.
Your best bet if it's available for your system is to install Stubby, but failing that clone down something like phpdnstls
$ php dnstls.php www.google.com dns.bentasker.co.uk A
www.google.com has address 216.58.210.196
We can see the connection at the far end in /var/log/nginx/dot.log
86.138.218.68 - - [13/Jun/2019:14:25:43 +0000] TLSv1.2 . ECDHE-RSA-AES256-GCM-SHA384 dns.bentasker.co.uk 200 50 34
You can also test at https://getdnsapi.net/query/ using the following config
- Domain name: A name to query (e.g. www.google.com)
- Extensions: return_call_reporting
- Transport Order: TLS
- TLS Resolver IP: The IP of your DoT server
- TLS Auth name: The name on your SSL Certificate
Cert status is under "call_reporting"
[
      "tls_auth_status": "Success"
and result is "just_address_answers"
  [
    {
"address_data": 216.58 Downstream Unbound Config
Assuming you're running a recent enough version of Unbound on a downstream server (for example on your LAN), it's possible to configure it to use DoT for upstream connections, It should be noted, though, that at time of writing (Unbound v1.9.1) Unbound cannot currently re-use TCP/TLS connections so will open a new one for every query that needs to be sent upstream).
There are two main steps to this, the first is to provide it with the path to your OS's cert bundle so that it validates certs. We do this by adding tls-cert-bundle to the server section of /etc/unbound/unbound.conf. The path to the bundle differs depending on your OS (you'll also need to have installed the package ca-certificates)
Debian
tls-cert-bundle: /etc/ssl/certs/ca-certificates.crt
CentOS
tls-cert-bundle: /etc/pki/tls/certs/ca-bundle.crt
The next thing to do is to tell Unbound to use our DNS server as an upstream by setting a forward zone for "."
forward-zone:
        name: "."
        forward-tls-upstream: yes
        forward-first: yes
        forward-addr: 1.2.3.4@853#dns.bentasker.co.uk
Where the format of forward-addr is [dns server ip]@[port]#[name to check on certificate]
We set forward-first to yes so that Unbound will fallback to resolving names itself if the TLS connection fails. This is a silent failure though and will lead to plaintext queries hitting the wire without notice if it triggers, so you need to think carefully about whether you actually want that set (I've removed it from my server).
Alternatively, you can set multiple forwarding addresses, for example this would spread our queries across Google and our own server
forward-zone:
        name: "."
        forward-tls-upstream: yes
        forward-addr: 1.2.3.4@853#dns.bentasker.co.uk
        forward-addr: 8.8.8.8@853#dns.google.com
However, this has a downside. Unbound spreads queries across forwarders initially, but then starts to prefer the fastest responding server (which will normally be Google rather than your own one). So you'll start finding your queries no longer get the benefit of your remote Pi-Hole. If your intention is simply to hide your queries from your ISP, though, this is fine.
Then just reload Unbound
systemctl reload unbound
Job Done. Assuming you followed the earlier DoH article too, you should now have a DNS resolver running Pi-Hole that can be used for DoT by Android Pie devices and DoH for (mostly) everything else.
----------------------------------------------------------------------------------------
----------------------------------------------------------------------------------------
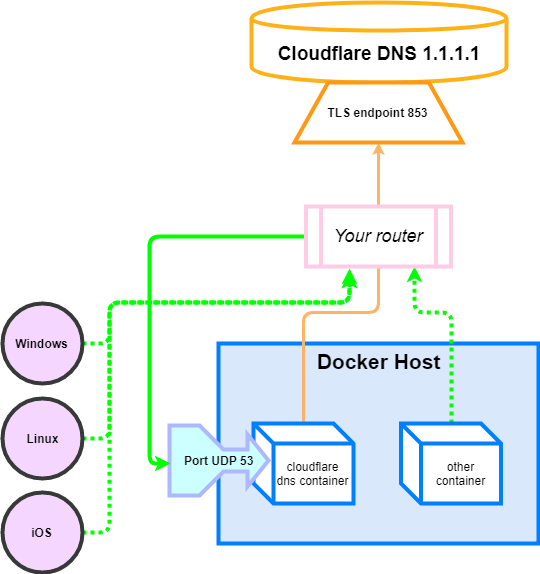
Docker DNS server on steroids to access DNS-over-TLS from Cloudflare, Google, Quad9, or CleanBrowsing https://hub.docker.com/r/qmcgaw/cloud…
DNS over TLS client caching server Docker container
DNS caching server connected to DNS over TLS (IPv4) servers with DNSSEC, DNS rebinding protection, built-in Docker healthcheck and malicious IPs + hostnames blocking


It can be connected to one or more of the following DNS-over-TLS providers:
Click to show base components
Features:
- Compatible with all ARM devices, as well as x86, S390X and ppc64le
- DNS rebinding protection
- DNSSEC Validation

- Split-horizon DNS (randomly pick one of the DoT providers)
- Optional hostnames resolution and IPs blocking
- Malicious
- Surveillance
- Custom
Diagrams are shown for router and client-by-client configurations in the Connect clients to it section.
Running it
- Run the container
docker run -it --rm -p 53:53/udp -e VERBOSITY=3 -e VERBOSITY_DETAILS=3 qmcgaw/cloudflare-dns-server
More environment variables are described in the environment variables section. - Check the log output
docker logs cloudflare-dns-server
- See the Connect clients to it section to finish testing, and you can refer to the Verify DNS connection section if you want.
Run it as a daemon
docker run -d -p 53:53/udp --restart=always qmcgaw/cloudflare-dns-server
or use docker-compose.yml with:
docker-compose up -d
More environment variables are described in the environment variables section.
Environment variables
| Environment variable | Default | Description |
|---|---|---|
VERBOSITY | 1 | From 0 (no log) to 5 (full debug log) |
VERBOSITY_DETAILS | 0 | From 0 to 4 and defaults to 0 (higher means more details) |
BLOCK_MALICIOUS | on | on or off. It blocks malicious IP addresses and malicious hostnames from being resolved. Note that it consumes about 50MB of additional RAM. |
BLOCK_NSA | off | on or off. It blocks NSA hostnames from being resolved. |
UNBLOCK | comma separated list of hostnames to leave unblocked | |
LISTENINGPORT | 53 | UDP port on which the Unbound DNS server should listen to (internally) |
PROVIDERS | cloudflare | Comma separated list of DNS-over-TLS providers from cloudflare, google, quad9, quadrant, cleanbrowsing, securedns and libredns |
CACHING | on | on or off. It can be useful if you have another DNS (i.e. Pihole) doing the caching as well on top of this container |
PRIVATE_ADDRESS | All IPv4 and IPv6 CIDRs private ranges | Comma separated list of CIDRs or single IP addresses. Note that the default setting prevents DNS rebinding |
Connect clients to it
Option 1: Router (recommended)
All machines connected to your router will use the 1.1.1.1 encrypted DNS by default
Configure your router to use the LAN IP address of your Docker host as its primary DNS address.
- Access your router page, usually at http://192.168.1.1 and login with your credentials
- Change the DNS settings, which are usually located in Connection settings / Advanced / DNS server
- If a secondary fallback DNS address is required, use a dull ip address such as the router's IP 192.168.1.1 to force traffic to only go through this container
To ensure network clients cannot use another DNS, you might want to
- Block the outbound UDP 53 port on your router firewall
- Block the outbound TCP 853 port on your router firewall, except from your Docker host
- If you have Deep packet inspection on your router, block DNS over HTTPs on port TCP 443
Option 2: Client, one by one
You have to configure each machine connected to your router to use the Docker host as their DNS server.

Docker containers
Connect other Docker containers by specifying the DNS to be the host IP address
127.0.0.1:docker run -it --rm --dns=127.0.0.1 alpine
For docker-compose.yml:
version: '3'
services:
  test:
    image: alpine:3.10
    network_mode: bridge
    dns:
      - 127.0.0.1
If the containers are in the same Docker network, you can simply set the
dns to the LAN IP address of the DNS container (i.e. 10.0.0.5)Windows
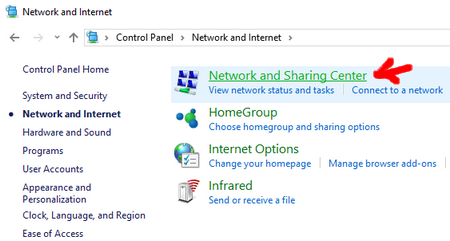
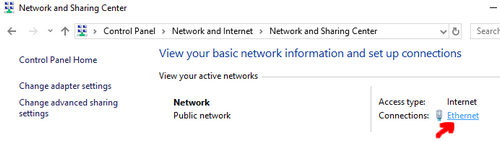
- Open the control panel and follow the instructions shown on the screenshots below.

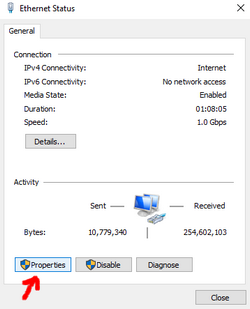

Enter the IP Address of your Docker host as the Preferred DNS server (
192.168.1.210 in my case) You can set the Cloudflare DNS server address 1.1.1.1 as an alternate DNS server although you might want to leave this blank so that no domain name request is in plaintext.

When closing, Windows should try to identify any potential problems. If everything is fine, you should see the following message:

Mac OS
Follow the instructions at https://support.apple.com/kb/PH25577
Linux
You probably know how to do that. Otherwise you can usually modify the first line of /etc/resolv.conf by changing the IP address of your DNS server.
Android
See this
iOS
See this
Extra
Block domains of your choice
- Create a file on your host
include.conf - Write the following to the file to block youtube.com for example:
local-zone: "youtube.com" static - Change the ownership and permissions of
include.conf:chown 1000:1000 include.conf chmod 400 include.conf
- Launch the Docker container with:
docker run -it --rm -p 53:53/udp -v $(pwd)/include.conf:/unbound/include.conf qmcgaw/cloudflare-dns-server
Build the image yourself
- Build the latest Docker image
- With
gitdocker build -t qmcgaw/cloudflare-dns-server https://github.com/qdm12/cloudflare-dns-server.git
- With
wgetandunzipwget -q "https://github.com/qdm12/cloudflare-dns-server/archive/master.zip" unzip -q "master.zip" cd *-master docker build -t qmcgaw/cloudflare-dns-server . cd .. && rm -r master.zip *-master
- Build an older Docker image (you need
wgetandunzip)- Go to the commits and find which commit you want to build for
- You can click on the clipboard next to the commit, in example you pick the commit
da6dbb2ff21c0af4cee93fdb92415aee167f7fd7 - Open a terminal and set
COMMIT=da6dbb2ff21c0af4cee93fdb92415aee167f7fd7 - Download the code for this commit and build the Docker image, either:
- With
gitgit clone https://github.com/qdm12/cloudflare-dns-server.git temp cd temp git reset --hard $COMMIT docker build -t qmcgaw/cloudflare-dns-server . cd .. && rm -r temp
- With
wgetandunzipwget -q "https://github.com/qdm12/cloudflare-dns-server/archive/$COMMIT.zip" unzip -q "$COMMIT.zip" cd *-$COMMIT docker build -t qmcgaw/cloudflare-dns-server . cd .. && rm -r "$COMMIT.zip" *-$COMMIT
Firewall considerations
This container requires the following connections:
- UDP 53 Inbound (only if used externally)
- TCP 853 Outbound to 1.1.1.1 and 1.0.0.1
Verify DNS connection
- Verify that you use Cloudflare DNS servers: https://www.dnsleaktest.com with the Standard or Extended test
- Verify that DNS SEC is enabled: https://en.internet.nl/connection
Note that https://1.1.1.1/help does not work as the container is not a client to Cloudflare servers but a forwarder intermediary. Hence https://1.1.1.1/help does not detect a direct connection to them.
----------------------------------
DNS over TLS
RFC 7858 specifies DNS over TLS (Transport Layer Security). This article explains how to provide a DNS over TLS service using BIND 9 and stunnel. The setup of a privacy aggregator is at the end.
BIND 9 configuration: nothing special, but if you want to limit external insecure access to the service you can play with
listen-on clause address and port, acl, or even system firewall as BIND 9 provides no per-transport protocol access control.
stunnel setup for the opportunistic privacy profile:
- Create a X.509 public key certificate, for instance by:
This creates a self-signed certificate, enough for clients performing no authentication.
- Create a stunnel configuration
dnstls.conf:
The service_name should be
dns according to documentation. The DNS over TLS well-known port is 853; stunnel will accept any TLS connection on this port and forward content in TCP to 127.0.0.1 (localhost) on port 53(dns).- Launch stunnel in daemon mode using the configuration file:
stunnel setup for the the out-of-band key-pinned privacy profile:
- You should use a real X.509 CA but for experiments you can create a CA certificate by:
- Create a X.509 public key certificate in a X.509 Certificate Authority, for instance the homemade CA:
- Add in stunnel configuration:
This makes stunnel add the CA certificate to the chain during TLS handshake (as it is supposed to do).
- Launch stunnel in daemon mode
How to test the service using getdns (https://getdnsapi.net).
- Install (or configure and compile) getdns with the
getdns_querytool you can find insrc/testof the distribution. - If you'd like to authenticate the server, the CA must be known. The simplest way to do it is:
If you have a shell or a c-shell filling the ... by the path where the OpenSSL library can find the CA certificate.
- For key-pinning you have to compute the sha256 pin, according to https://timtaubert.de/blog/2014/10/http-public-key-pinning-explained/. You can use from the key:
or from the certificate:
- A typical call could be:
-l L ask for TLS transport (vs. U for UDP or T for TCP)- or with key-pinning:
-K specifies a public key pin, -m requires authentication (vs -n for no authentication).
BIND 9 setup for a privacy aggregator uses for instance:
forwarders makes all queries to be forwarded to the designated service on another port, forward only disables fallback to standard resolution, the tcp-only clause in the server entry enforces the use of TCP transport (note this feature was added in version 9.11).
stunnel setup for a privacy aggregator is in client mode with for instance:
To test the privacy aggregator setup: --- *:53 localhost:1053 ---- *:853
-----------------------------------
TLS-DNS (要用到stunnel和socat,我未搞定)
Intro
Inspired by the HTTPS-DNS project I started to look for another approach for doing encrypted dns-requests. The following solution should work with nearly all unixoid operatingsystems ( for Microsoft Windows see below ) and can easily be applied. It works absolutly transparently for the clients and servers.
Encrypting DNS-requests is usefull, because it
- prevents manipulation of dns-requests
- prevents recognizing of dns-requests
- prevents logging of dns-requests
Implementation
The whole concept is based on socat for udp <-> tcp and stunnel for TLS-encryption between the clients and the dns-server.
On the serverside we have a normal dns-server running like bind, which is reachable on port 53. Now we use stunnel to create a new TLS-server on port 5667. stunnel forwards the packets on the localhost to socat, which forwards them to bind. You have to use socat because dns requests use udp but stunnel just supports tcp. But with socat we can forward udp to tcp, back and forth again.
On the clientside we configure socat to forward udp packets from port 53 to stunnel as tcp and stunnel to forward them to the server on port 5667. We then configure ure client to use the localhost as dns server.
Client
If you want your client machine to make dns-requests over TLS you have to install socat and stunnel .
Modify your /etc/stunnel/stunnel.conf to this:
sslVersion = TLSv1

chroot = /var/run/stunnel
setuid = stunnel
setgid = stunnel
pid = /stunnel.pid

socket = l:TCP_NODELAY=1
socket = r:TCP_NODELAY=1

client = yes
verify=0

[dns]
accept  = 5666
connect = IPOFDNSSERVER:TLS-DNS-PORT #          !!!!!!!!!!!!!!!!modify this!!!!!!!!!!!!!!
and start the stunnel-daemon. Now start socat:
$socat udp4-listen:53,reuseaddr,fork tcp:localhost:5666
That's it! Test it with:
dig @localhost www.google.de
Now all you have to do is make your system use the localhost as dns server. This is very distributionspecific, so look at the doc of your distro. To permanently use TLS-DNS, make stunnel and socat start at boot.
Server
If you are running a dns server and want to extend it to support TLS-DNS you can do this pretty easy. This won't conflict with your existing dns-server in any way. It has been tested on debian lenny with bind9. I expect in the following that you correctly installed your dns server and it is reachable by port 53.
For the stunnel-server you have to create a key:
$openssl req -new -x509 -days 3650 -nodes -out dns.pem -keyout dns.pem
, move it to /etc/stunnel/ and change its permissions to 600. Now configure your stunnel.conf like this:
cert = /etc/stunnel/dns.pem

sslVersion = TLSv1

chroot = /var/lib/stunnel4/
setuid = stunnel4
setgid = stunnel4
pid = /stunnel4.pid

socket = l:TCP_NODELAY=1
socket = r:TCP_NODELAY=1

[dns]
accept  = 5667
connect = localhost:5668
Finally start socat to foward tcp 5668 to udp 53:
$socat tcp4-listen:5668,reuseaddr,fork UDP:localhost:53
and the server setup is done.
Your server offers now:
DNS - port 53
TLS-DNS - port 5667
Windows
I haven't tested it but it could also work with Windows. At least there is a socat windows-port and stunnel too is available for Windows. If you tested it please report here!
from https://www.privacyfoundation.de/wiki/HTTPS-DNS/TLS-DNS
------
SSL-DNS
(内容跟 https://www.privacyfoundation.de/wiki/HTTPS-DNS/TLS-DNS略有不同)
------
SSL-DNS
(内容跟 https://www.privacyfoundation.de/wiki/HTTPS-DNS/TLS-DNS略有不同)
Intro
Inspired by the HTTPS-DNS project I started to look for another approach for doing encrypted dns-requests. The following solution should work with nearly all unixoid operatingsystems ( for Microsoft Windows see below ) and can easily be applied. It works absolutly transparently for the clients and servers.
Encrypting DNS-requests is usefull, because it
- prevents manipulation of dns-requests
- prevents recognizing of dns-requests
- prevents logging of dns-requests
Implementation
The whole concept is based on socat for udp <-> tcp and stunnel for TLS-encryption between the clients and the dns-server.
On the serverside we have a normal dns-server running like bind, which is reachable on port 53. Now we use stunnel to create a new TLS-server on port 5667. stunnel forwards the packets on the localhost to socat, which forwards them to bind. You have to use socat because dns requests use udp but stunnel just supports tcp. But with socat we can forward udp to tcp, back and forth again.
On the clientside we configure socat to forward udp packets from port 53 to stunnel as tcp and stunnel to forward them to the server on port 5667. We then configure ure client to use the localhost as dns server.
Client
If you want your client machine to make dns-requests over SSL you have to install socat and stunnel .
Modify your /etc/stunnel/stunnel.conf to this:
sslVersion = SSLv3

chroot = /var/run/stunnel
setuid = stunnel
setgid = stunnel
pid = /stunnel.pid

socket = l:TCP_NODELAY=1
socket = r:TCP_NODELAY=1
socket = l:SO_LINGER=1:1
socket = r:SO_LINGER=1:1

client = yes
verify=0

[dns]
accept  = 5666
connect = IPOFDNSSERVER:TLS-DNS-PORT #          !!!!!!!!!!!!!!!!modify this!!!!!!!!!!!!!!
TIMEOUTidle = 1
TIMEOUTclose = 1
TIMEOUTbusy = 1
and start the stunnel-daemon. Now start socat:
$socat udp4-listen:53,reuseaddr,fork tcp:localhost:5666
That's it! Test it with:
dig @localhost www.google.de
Now all you have to do is make your system use the localhost as dns server. This is very distributionspecific, so look at the doc of your distro. To permanently use TLS-DNS, make stunnel and socat start at boot.
Running Servers
The following servers offers SSL-DNS:
- 62.141.58.13 Port: 5353
- 88.84.155.209 Port: 5667
Setup a Server
If you are running a dns server and want to extend it to support SSL-DNS you can do this pretty easy. This won't conflict with your existing dns-server in any way. It has been tested on debian lenny with bind9. I expect in the following that you correctly installed your dns server and it is reachable by port 53.
For the stunnel-server you have to create a key:
$openssl req -new -x509 -days 3650 -nodes -out dns.pem -keyout dns.pem
, move it to /etc/stunnel/ and change its permissions to 600. Now configure your stunnel.conf like this:
cert = /etc/stunnel/dns.pem

sslVersion = SSLv3

chroot = /var/lib/stunnel4/
setuid = stunnel4
setgid = stunnel4
pid = /stunnel4.pid

socket = l:TCP_NODELAY=1
socket = r:TCP_NODELAY=1
socket = l:SO_LINGER=1:1
socket = r:SO_LINGER=1:1

[dns]
accept  = 5667
connect = localhost:53
Start stunnel and your SSL-DNS server is up and running. You do not need socat at the server, because bind9 is able to handle TCP requests.
Your server offers now:
DNS - port 53
TLS-DNS - port 5667
Windows
You need to use socat windows-port and stunnel for Windows.
Modify your stunnel.conf (Start -> Programs -> stunnel -> Edit Stunnel.conf) to this:
sslVersion = SSLv3

socket = l:TCP_NODELAY=1
socket = r:TCP_NODELAY=1
socket = l:SO_LINGER=1:1
socket = r:SO_LINGER=1:1

client = yes
verify=0

[dns]
accept  = 5666
connect = IPOFDNSSERVER:TLS-DNS-PORT #       For example 88.84.155.209:5667
TIMEOUTidle = 1
TIMEOUTclose = 1
TIMEOUTbusy = 1
and start the stunnel-daemon (run stunnel). Now start socat:
$socat udp4-listen:53,reuseaddr,fork tcp:localhost:5666
Now you need to go to your control panel and edit the network configuration. Put 127.0.0.1 as your favourite DNS server. Make sure its working, check it by opening some websites and then closing stunnel. With stunnel closed you shouldn't be able to continue browsing.
-----------------------------------------------------------
DNS over TLS
TLS 加密实际上就是我们上网的 HTTPS 所用加密了,安全性得到了很好的保障——这东西如果失效了,那整个互联网估计也就完蛋了。
DoT 使用 853 端口,使用 TCP 进行传输——基本上可以理解为加密版本的普通 DNS 了。
现如今,DoT server已经有了相当成熟的客户端.
DoT 看起来很美妙,几乎是完成了我们对加密 DNS 的一切幻想,但有一点还是应当注意,在中国这样的国家,DoT 一旦流行起来,那么它虽然不能再被污染,但却很容易被封禁——因为它有一个固定的独立端口,虽然别人不知道你在访问什么网站了,但却能够知道你在用 DoT ,干脆直接干扰你的TCP 包不就行了?
当然,DoT可以占用其他某个端口就是了。
---------------------------------------
An End-to-End, Large-Scale Measurement of DNS-over-Encryption: How Far Have We Come?
An End-to-End, Large-Scale Measurement of DNS-over-Encryption: How Far Have We Come?
Chaoyi Lu, Baojun Liu, Zhou Li, Shuang Hao, Haixin Duan, Mingming Zhang, Chunying Leng, Ying Liu, Zaifeng Zhang, Jianping Wu
https://dnsencryption.info/imc19-doe.html
Chaoyi Lu, Baojun Liu, Zhou Li, Shuang Hao, Haixin Duan, Mingming Zhang, Chunying Leng, Ying Liu, Zaifeng Zhang, Jianping Wu
https://dnsencryption.info/imc19-doe.html
This paper is an early view of the state of various forms of encrypted DNS, collectively referred to as DNS-over-Encryption, as of early 2019. Its main focus is DNS over TLS (DoT) and DNS over HTTPS (DoH). The authors scan for and count public DoT and DoH resolvers, test their worldwide reachability and performance, and attempt to quantify how much the protocols are used by end users. DoT and DoH provide satisfactory quality of service, and are less likely to be disrupted than traditional plaintext DNS. Use of DNS-over-Encryption is small compared to plaintext DNS, but growing.
The paper begins with background on several forms of encrypted DNS. Besides DoT and DoH, the authors describe DNS-over-DTLS, DNS-over-QUIC, and DNSCrypt. Of these, only DoT and DoH are standardized by the IETF and have large public resolvers.
The first step in the research was to find public DoT and DoH resolvers. The authors found DoT resolvers using ZMap scans for TCP port 853, followed by test queries to verify DNS protocol support. They scanned every 10 days for two months, finding about 1,500 public DoT servers in each scan. DoH is harder to scan for because it shares port 443 with ordinary HTTPS. So instead of live scans, they queried an industrial URL database for HTTPS URLs containing
/dns-query or /resolve, which are conventional of DoH, similarly with followup verification queries. They found 17 public DoH servers, of which all but two were already documented in the DNS Privacy Project and curl wiki lists. Large providers accounted for 75% of the discovered DoT resolvers, but there was a long tail of operators running only one or a few resolvers.
The next step was to test the discovered resolvers' reachability and performance. For vantage points the authors used two commercial SOCKS proxy services: ProxyRack, which provides access to 166 countries; and Zhima, which is only in China (chosen because DNS tampering is known to be pervasive in China). From these vantages they sent DoT, DoH, and plaintext TCP DNS queries to four resolvers: Cloudflare at 1.1.1.1, Google Public DNS at 8.8.8.8, Quad9 at 9.9.9.9, and a private resolver they set up themselves. The use of SOCKS proxies unfortunately precluded testing plaintext UDP DNS, but the authors argue that the performance of TCP DNS is similar, once a persistent TCP connection is established. The results of these tests appear in Table 4, which is worth studying for a bit. DNS-over-Encryption is overall more than 99% reachable, which is better than plaintext DNS. A surprising 16% of clients cannot access plaintext DNS at 1.1.1.1 (mostly in Indonesia, Vietnam, and India), but the failure rate drops to 1% with DoT. This is possibly because of DNS interception devices that can handle plaintext DNS but not DoT. In China, nearly all clients can access Google's plaintext resolver at 8.8.8.8, but none can reach its DoH resolver. (Tests of DoT in China were not available.) While 8.8.8.8 is not blocked in China, the DoH server name (formerly dns.google.com, now dns.google) resolves to some other IP address that is blocked under the China-wide ban of Google addresses. Cloudflare's 1.1.1.1 is generally somewhat less reachable than other resolvers because of network equipment that wrongly treats 1.1.1.1 as a private or internal address. The Quad9 DoH resolver failed 13% of queries because of a too-short timeout.
Regarding performance, DoT and DoH add only a few milliseconds of latency over plaintext TCP DNS in the case where connections are reused. If connections are not reused, the added latency may be hundreds of milliseconds. Connection reuse is critical for performance, but also widely implemented and common.
The last part of the paper is an attempt to quantify how much DoT and DoH are used. For DoT, the authors looked at 1.5 years of netflow data from a Chinese ISP on port 853, retaining flows that matched the IP address of one of the known DoT resolvers. Use of DoT was only about 0.1%–1.0% that of plaintext DNS, but increasing. DoH usage is not easy to infer from netflow data because it does not use a separate port number. Instead the authors approximated the usage of public DoH servers by taking advantage of DNS itself: they searched the DNSDB and 360 PassiveDNS passive DNS databases for queries for the hostnames of known DoH servers. Only four domains had more than 10,000 queries: dns.google.com, mozilla.cloudflare-dns.com, doh.cleanbrowsing.org, and doh.crypto.sx. Google's hostname was the most queried and the Firefox-specific Cloudflare name was second; all were growing.
相关帖子:
https://briteming.blogspot.com/2020/01/unbounddns-over-tls.html (此贴不错)
https://briteming.blogspot.com/2018/01/trust-dnsrustdns.html