git clone https://www.bamsoftware.com/git/dnstt- It works with DNS over HTTPS (DoH) and DNS over TLS (DoT) resolvers, which makes it more difficult for a network observer to tell that a tunnel is being used.
- It embeds a proper reliability and session protocol (KCP+smux). The client and server can send and receive simultaneously, and the client doesn't have to wait for one query to receive a response before sending the next query. Having multiple queries in flight helps with performance. (This is the Turbo Tunnel concept.)
- It encrypts and authenticates the tunnel end to end, separately from the DoH/DoT encryption, using a Noise protocol.
.------.  |            .--------.               .------.
|tunnel|  |            | public |               |tunnel|
|client|<---doh ot---="">|resolver|<---udp dns---="">|server|
'------'  |c           '--------'               '------'
   |      |e                                       |
.------.  |n                                    .------.
|local |  |s                                    |remote|
| app  |  |o                                    | app  |
'------'  |r                                    '------'
DNS zone setup
A tns.example.com points to 203.0.113.2
AAAA tns.example.com points to 2001:db8::2
NS t.example.com is managed by tns.example.com
tns and t labels can be anything you want, but the tns label should not be a subdomain of the t label (everything under that subdomain is reserved for tunnel payloads). The t label should be short because there is limited space in a DNS message, and the domain name takes up part of it.Tunnel server setup
cd dnstt-server
go build
./dnstt-server -gen-key -privkey-file server.key -pubkey-file server.pub
privkey written to server.key
pubkey  written to server.pub
127.0.0.1:8000 is the TCP address ("remote app" in the diagram above) to which incoming tunnelled stream will be forwarded../dnstt-server -udp :5300 -privkey-file server.key t.example.com 127.0.0.1:8000
-udp :53), but that would require you to run the server as root. It's better to run the server on a non-privileged port as shown above, and use port forwarding to forward port 53 to it. On Linux, these command will forward port 53 to port 5300:sudo iptables -I INPUT -p udp --dport 5300 -j ACCEPT
sudo iptables -t nat -I PREROUTING -i eth0 -p udp --dport 53 -j REDIRECT --to-ports 5300
sudo ip6tables -I INPUT -p udp --dport 5300 -j ACCEPT
sudo ip6tables -t nat -I PREROUTING -i eth0 -p udp --dport 53 -j REDIRECT --to-ports 5300
sudo apt install ncat
ncat -lkv 127.0.0.1 8000
Tunnel client setup
cd dnstt-client
go build
- https://dnsprivacy.org/wiki/display/DP/DNS+Privacy+Public+Resolvers#DNSPrivacyPublicResolvers-DNS-over-TLS%28DoT%29
- https://dnsencryption.info/imc19-doe.html
-doh option:./dnstt-client -doh https://doh.example/dns-query -pubkey-file server.pub t.example.com 127.0.0.1:7000
-dot:./dnstt-client -dot dot.example:853 -pubkey-file server.pub t.example.com 127.0.0.1:7000
127.0.0.1:7000 specifies the client end of the tunnel. Anything that connects to that port ("local app" in the diagram above) will be tunnelled through the resolver and connected to 127.0.0.1:8000 on the tunnel server. You can test it using an Ncat client; run this command, and anything you type into the client terminal will appear on the server, and vice versa.ncat -v 127.0.0.1 7000
How to make a standard proxy
ncat -lkv --proxy-type http 127.0.0.1 3128
./dnstt-server -udp :5300 -privkey-file server.key t.example.com 127.0.0.1:3128
127.0.0.1:7000) as an HTTP/HTTPS proxy:./dnstt-client -doh https://doh.example/dns-query -pubkey-file server.pub t.example.com 127.0.0.1:7000
curl -x http://127.0.0.1:7000/ https://example.com/
Local testing
./dnstt-server -gen-key -privkey-file server.key -pubkey-file server.pub
./dnstt-server -udp 127.0.0.1:5300 -privkey-file server.key t.example.com 127.0.0.1:8000
ncat -lkv 127.0.0.1 8000
./dnstt-client -udp 127.0.0.1:5300 -pubkey-file server.pub t.example.com 127.0.0.1:7000
ncat -v 127.0.0.1 7000
2020/04/20 01:48:58 pubkey 0000111122223333444455556666777788889999aaaabbbbccccddddeeeeffff
2020/04/20 01:49:00 begin session 468d274a
2020/04/20 01:49:03 begin stream 468d274a:3
2020/04/20 01:49:00 MTU 134
2020/04/20 01:49:00 begin session 468d274a
2020/04/20 01:49:03 begin stream 468d274a:3
Caveats
-mtu option. The default is -mtu 1232. You can use -mtu 512 for maximum compatibility with resolvers, at the expense of bandwidth. If you know the resolver you are using supports larger UDP payloads, you can increase the value. The Cloudflare resolver supports -mtu 1452, for example; but I don't recommend going higher than that because you start to risk IP fragmentation. If you use an -mtu value that is larger than what the resolver supports, the tunnel won't work at all and you will get error messages in the server log that tell you what value to use.| resolver | transport | download rate |
|---|---|---|
| none | iodine | 14.6 KB/s |
| iodine | 1.8 KB/s | |
| Cloudflare | iodine | 1.4 KB/s |
| Quad9 | iodine | 0.3 KB/s |
git annex get the data files you want after git clone. The .csv files are sufficient to reproduce the graph. See procedure.txt for the commands to run to reproduce the experiment. .keylog files are TLS secrets in NSS Key Log Format; you can use these in Wireshark to decrypt the DoH and DoT streams.git clone https://www.bamsoftware.com/git/dnstt-tests.git
cd dnstt-tests
git annex get 2020-04-30/*.csv
Rscript graphs.R
https://www.bamsoftware.com/software/dnstt/
https://www.bamsoftware.com/software/dnstt/protocol.html
Iodine is very unstable in these conditions, while dnstt is stable and fast.
(DNS隧道可以实现 DoH和DoT
dnstt是一种新的DNS隧道,可以与DNS over HTTPS和DNS over TLS解析器一起使用,根据Turbo Tunnel的理念设计。
https://www.bamsoftware.com/software/dnstt/
git clone https://www.bamsoftware.com/git/dnstt
它与其他DNS隧道有何不同?
它可以与DNS over HTTPS(DoH)和DNS over TLS(DoT)解析器一起使用,这使得网络观察者更难以判断是否使用了隧道。
它嵌入了一个适当的可靠性和会话协议(KCP+smux)。客户端和服务器可以同时发送和接收数据,客户端无需等待一个查询接收到响应后再发送下一个查询。同时进行多个查询有助于提高性能。(这就是Turbo Tunnel的概念。)
它使用Noise协议对隧道进行端到端的加密和认证,与DoH/DoT加密分开。
.------. | .--------. .------.
|tunnel| | | public | |tunnel|
|client|<---DoH/DoT--->|resolver|<---UDP DNS--->|server|
'------' |c '--------' '------'
| |e |
.------. |n .------.
|local | |s |remote|
| app | |o | app |
'------' |r '------'
这样的DNS隧道对于绕过审查是有用的。想象一下,一个审查者可以观察到客户端⇔解析器的连接,但无法观察到解析器⇔服务器的连接(图中的垂直线)。传统基于UDP的DNS隧道通常被认为很容易被检测到,因为它们生成的DNS消息的格式不同寻常,而且每个DNS消息必须带有隧道服务器的域名标记,因为中间的递归解析器需要知道将它们转发到哪里。但是使用DoH或DoT,客户端⇔解析器的DNS消息是加密的,因此审查者不能轻易地看到正在使用隧道。(当然,根据加密流量的数量和时序可能仍然可能启发式地检测到隧道,仅仅加密本身并不能解决这个问题。)
我希望这个软件发布可以展示这种类型的隧道设计的潜力。目前,该软件不提供TUN/TAP网络接口,甚至不提供SOCKS或HTTP代理接口。它只是将本地TCP套接字连接到远程TCP套接字。不过,您可以相对容易地设置它以像普通的SOCKS或HTTP代理一样工作,见下文。
DNS区设置
DNS隧道通过使隧道服务器充当特定DNS区的权威解析器来工作。中间的解析器通过将该区域的子域的查询转发到隧道服务器来充当代理。要设置DNS隧道,您需要一个域名和一个可以运行服务器的主机。
假设您的域名是example.com,您的主机的IP地址是203.0.113.2和2001:db8::2。转到您的域名注册商的配置面板,并添加三个新记录:
A tns.example.com 指向203.0.113.2
AAAA tns.example.com 指向2001:db8::2
NS t.example.com 由tns.example.com管理
tns和t标签可以是任何您想要的内容,但tns标签不应是t标签的子域(该子域下的所有内容都保留给隧道负载)。t标签应该很短,因为DNS消息中的空间有限,而且域名占用其中的一部分。
隧道服务器设置
在服务器主机上运行以下命令;即在上面的示例中的tns.example.com / 203.0.113.2 / 2001:db8::2上运行。
cd dnstt-server
go build
首先,您需要为端到端隧道加密生成加密密钥。
./dnstt-server -gen-key -privkey-file server.key -pubkey-file server.pub
privkey写入server.key
pubkey写入server.pub
现在运行服务器。127.0.0.1:8000是将转发隧道流的TCP地址(图中的“远程应用程序”)。
./dnstt-server -udp :5300 -privkey-file server.key t.example.com 127.0.0.1:8000
隧道服务器需要在端口53上可访问。您可以直接绑定到端口53(-udp :53),但这需要您以root身份运行服务器。最好像上面显示的那样在非特权端口上运行服务器,并使用端口转发将端口53转发到它。在Linux上,以下命令将端口53转发到端口5300:
sudo iptables -I INPUT -p udp --dport 5300 -j ACCEPT
sudo iptables -t nat -I PREROUTING -i eth0 -p udp --dport 53 -j REDIRECT --to-ports 5300
sudo ip6tables -I INPUT -p udp --dport 5300 -j ACCEPT
sudo ip6tables -t nat -I PREROUTING -i eth0 -p udp --dport 53 -j REDIRECT --to-ports 5300
您还需要为隧道服务器连接到的内容提供一些内容。它可以是代理服务器或其他任何内容。为了测试,您可以使用Ncat监听器:
sudo apt install ncat
ncat -lkv 127.0.0.1 8000
隧道客户端设置
cd dnstt-client
go build
将服务器上的server.pub(公钥文件)复制到客户端。您不需要在客户端上使用server.key(私钥文件)。
选择一个DoH或DoT解析器。这里有一个DoH解析器的列表:
https://github.com/curl/curl/wiki/DNS-over-HTTPS#publicly-available-servers
以及这里有一个DoT解析器的列表:
https://dnsprivacy.org/wiki/display/DP/DNS+Privacy+Public+Resolvers#DNSPrivacyPublicResolvers-DNS-over-TLS%28DoT%29
https://dnsencryption.info/imc19-doe.html
要使用DoH解析器,请使用-doh选项:
./dnstt-client -doh https://doh.example/dns-query -pubkey-file server.pub t.example.com 127.0.0.1:7000
对于DoT,请使用-dot:
./dnstt-client -dot dot.example:853 -pubkey-file server.pub t.example.com 127.0.0.1:7000
127.0.0.1:7000指定了隧道的客户端端口。连接到该端口的任何内容(图中的“本地应用程序”)将通过解析器进行隧道传输,并连接到隧道服务器上的127.0.0.1:8000。您可以使用Ncat客户端测试它;运行此命令,您在客户端终端中键入的任何内容都将显示在服务器上,反之亦然。
ncat -v 127.0.0.1 7000
如何创建标准代理
您可以通过使隧道服务器转发到标准代理服务器来使隧道工作像普通的代理服务器。我发现使用Ncat的HTTP代理服务器模式很方便。
ncat -lkv --proxy-type http 127.0.0.1 3128
./dnstt-server -udp :5300 -privkey-file server.key t.example.com 127.0.0.1:3128
在客户端上,将您的应用程序配置为使用隧道的本地端口(127.0.0.1:7000)作为HTTP/HTTPS代理:
./dnstt-client -doh https://doh.example/dns-query -pubkey-file server.pub t.example.com 127.0.0.1:7000
curl -x http://127.0.0.1:7000/ https://example.com/
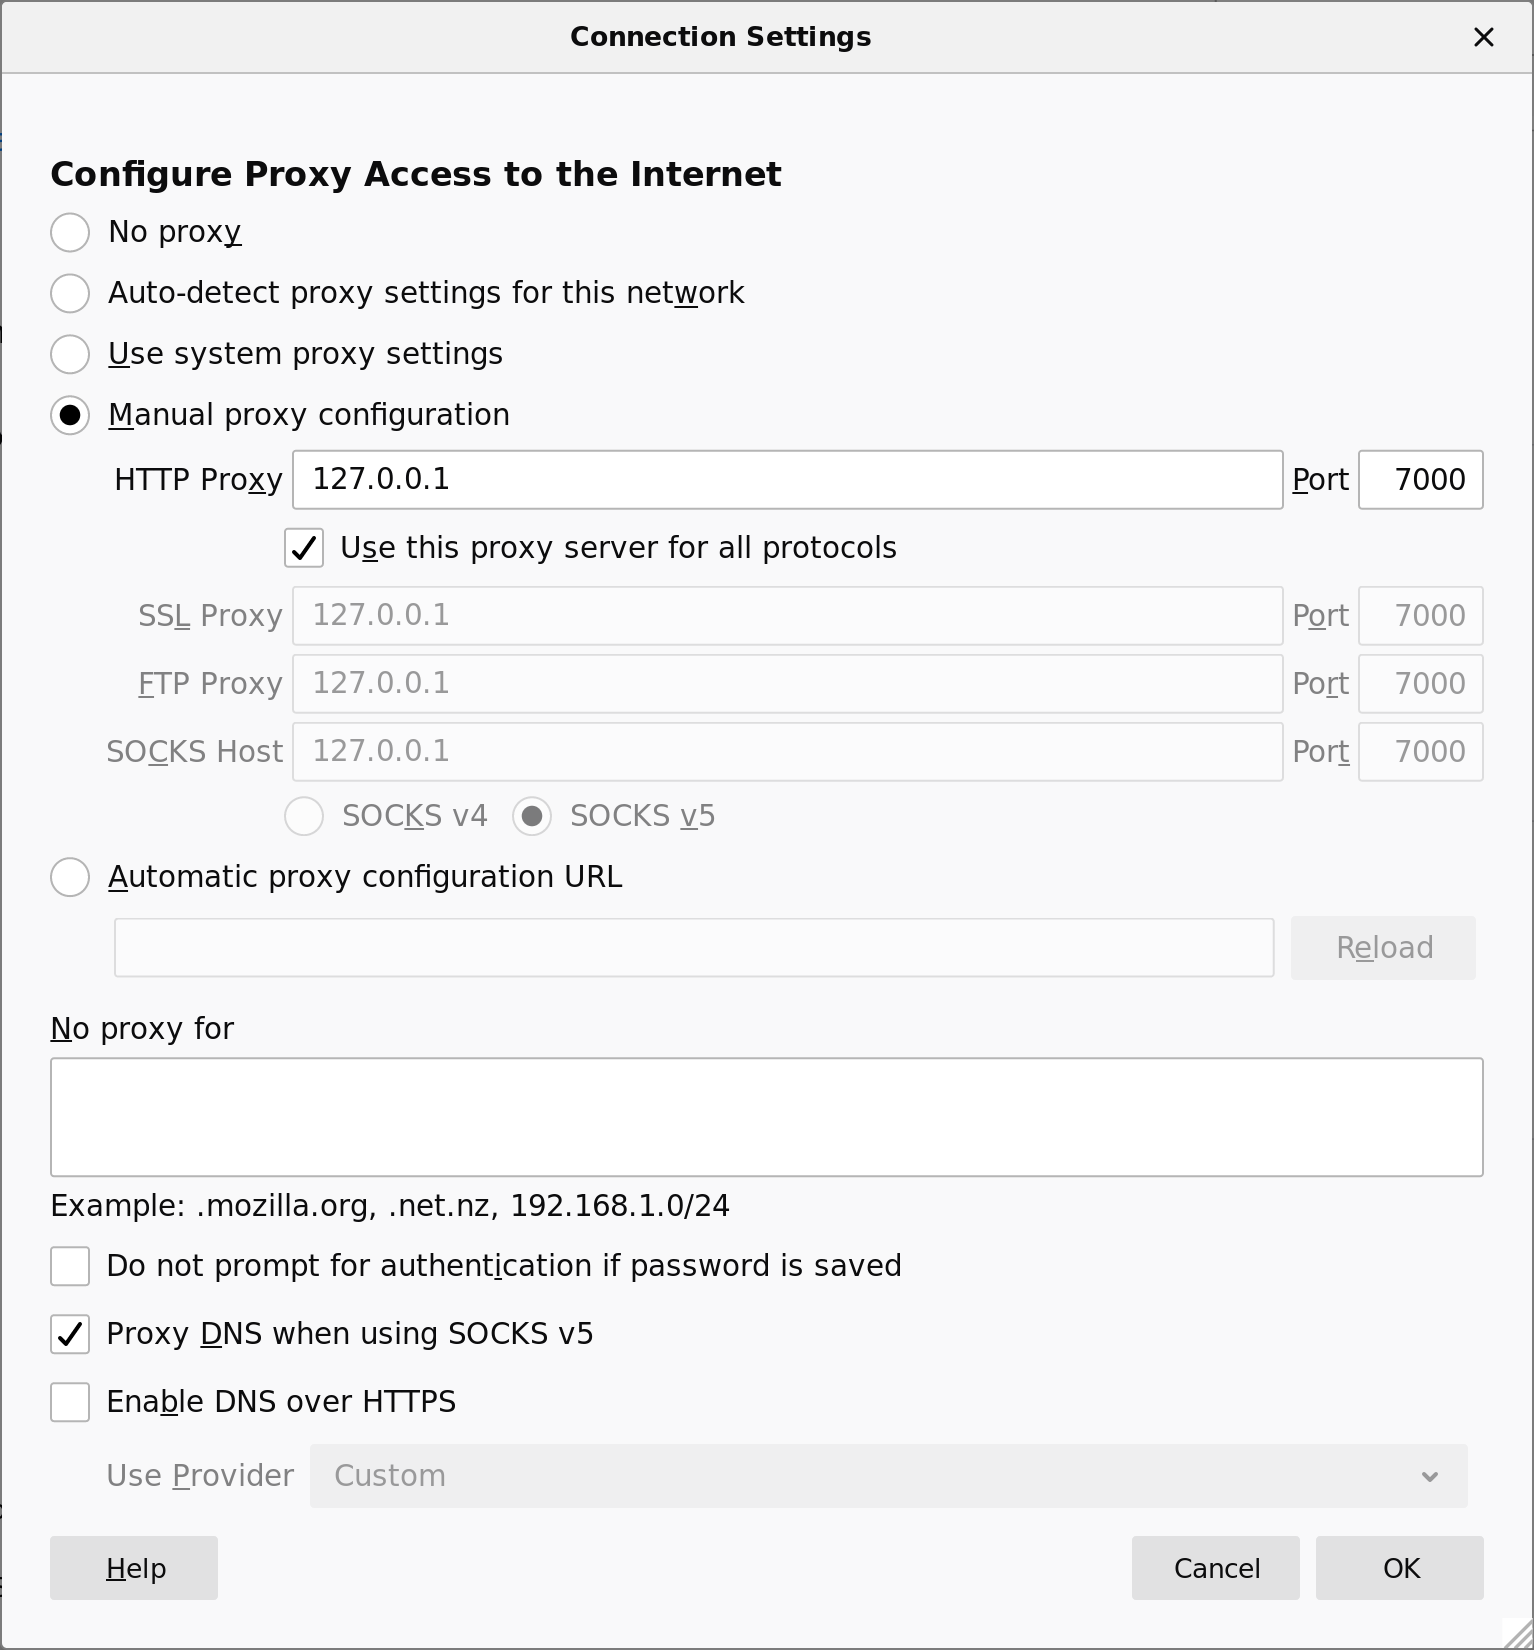
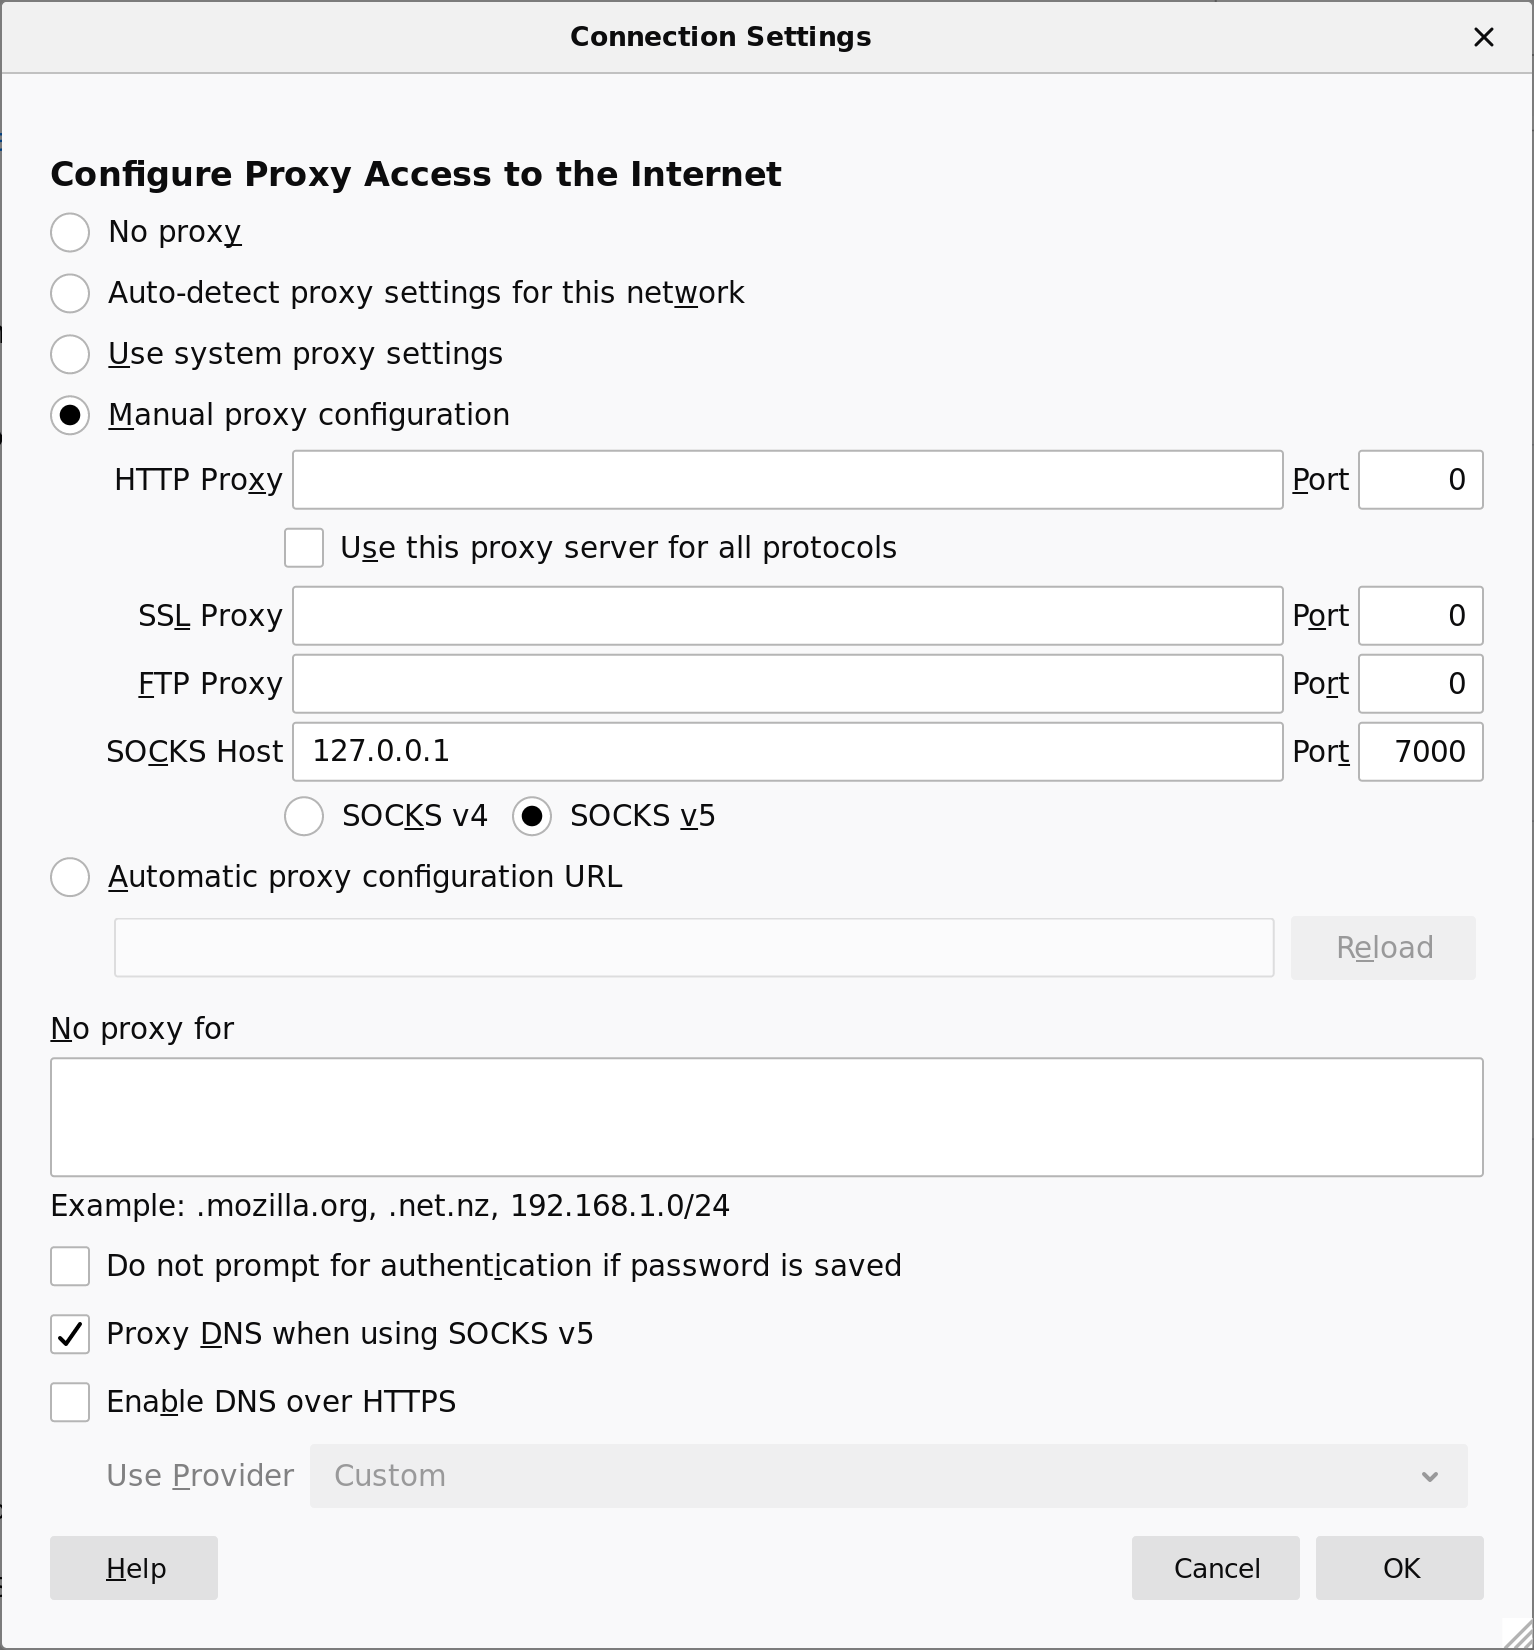
我尝试使用Firefox通过DNS隧道连接到Ncat HTTP代理,它可以正常工作。
本地测试
如果您只想看看它是如何工作的,而不想费心设置DNS区域或网络服务器,您可以在本地主机上运行隧道的两端。这种方式使用明文UDP DNS,所以不用说,跨互联网使用这样的配置是不隐蔽的。因为在这种情况下没有中间解析器,您可以使用任何您想要的域名;只需在客户端和服务器上保持一致即可。
./dnstt-server -gen-key -privkey-file server.key -pubkey-file server.pub
./dnstt-server -udp 127.0.0.1:5300 -privkey-file server.key t.example.com 127.0.0.1:8000
ncat -lkv 127.0.0.1 8000
./dnstt-client -udp 127.0.0.1:5300 -pubkey-file server.pub t.example.com 127.0.0.1:7000
ncat -v 127.0.0.1 7000
当它工作时,您将在服务器上看到如下的日志消息:
2020/04/20 01:48:58 pubkey 0000111122223333444455556666777788889999aaaabbbbccccddddeeeeffff
2020/04/20 01:49:00 begin session 468d274a
2020/04/20 01:49:03 begin stream 468d274a:3
以及在客户端上看到如下的日志消息:
2020/04/20 01:49:00 MTU 134
2020/04/20 01:49:00 begin session 468d274a
2020/04/20 01:49:03 begin stream 468d274a:3
注意事项
对于外部观察者来说,DoH或DoT隧道是隐蔽的,但对于中间的解析器来说并非如此。如果解析器想要阻止您使用隧道,他们可以很容易地做到,只需不递归解析隧道服务器的DNS区域的请求。然而,隧道仍然对恶意解析器的窃听或篡改是安全的;解析器可以拒绝服务,但无法更改或读取隧道的内容。
出于技术原因,该隧道要求解析器支持至少1232字节的UDP负载大小,这比DNS保证的最小值512要大。我怀疑大多数公共的DoH或DoT服务器都满足这个要求,但我没有进行过调查或其他任何操作。
我没有进行任何系统性能测试,但我对Google、Cloudflare和Quad9解析器进行了一些初步测试。使用Google和Cloudflare时,通过Ncat传输文件时,我可以获得超过100 KB/s的下载速度。Cloudflare的DoH解析器偶尔会发送“400 Bad Request”响应(当隧道客户端看到这样的意外状态码时,它会自动限制自身的速度)。Quad9解析器的性能似乎明显不如其他解析器,但我不知道原因。)
dnstt
dnstt is a DNS tunnel that can use DNS over HTTPS (DoH) and DNS over TLS (DoT) resolvers.A DNS tunnel is one way of circumventing network censorship. A recursive DNS resolver's purpose is to receive packets and forward them somewhere else—in effect, working as a kind of network proxy. DNS tunnels over plaintext UDP are generally considered easy to detect because of the unusual DNS messages they use. However DoH and DoT are encrypted—an outside observer can see that you are communicating with a public resolver, but cannot decrypt the raw DNS messages to see that they embed a tunnel protocol. (The resolver itself can still easily tell that you are using a tunnel.)

Idea: DNS-over-HTTP transport, .
Original announcement thread, .
Last updated: .
Download
dnstt-20200506.zip (signature, public key)git clone https://www.bamsoftware.com/git/dnstt.gitThe code is written in Go. dnstt is in the public domain.
How to set it up
dnstt doesn't offer a TUN/TAP network interface, or even a SOCKS or HTTP proxy interface, only a netcat-like connection between a local TCP socket and a remote TCP socket. However, it's fairly easy to make the tunnel act like a standard proxy server by running a proxy at the tunnel server.A DNS tunnel works by having the tunnel server act as an authoritative resolver for a specific domain name. The recursive resolver in the middle acts as a proxy by forwarding queries for that domain to the tunnel server. To set up a DNS tunnel, you need a domain name and a host that can receive UDP packets, where you run the tunnel server. In these instructions, we'll assume the following example setup:
| Your domain name | example.com |
|---|---|
| Your server's IPv4 address | 203.0.113.2 |
| Your server's IPv6 address | 2001:db8::2 |
DNS setup
Go into your name registrar's configuration panel and add three records:| A | tns.example.com | points to | 203.0.113.2 |
| AAAA | tns.example.com | points to | 2001:db8::2 |
| NS | t.example.com | is managed by | tns.example.com |
The "tns" and "t" labels can be anything you want, but the "tns" label should not be a subdomain of the "t" label (everything under that subdomain is reserved for tunnel payloads). The "t" label should be short, because there is limited space available in a DNS message, and the domain name takes up part of it.
Tunnel server setup
tunnel-server$ cd dnstt/dnstt-server
tunnel-server$ go build
First you need to generate private and public keys for the end-to-end tunnel encryption.
tunnel-server$ ./dnstt-server -gen-key -privkey-file server.key -pubkey-file server.pub
privkey written to server.key
pubkey  written to server.pub
Now run the server. 127.0.0.1:8000 is the TCP address to which incoming tunnelled streams will be forwarded ("remote app" in the diagram).
tunnel-server$ ./dnstt-server -udp :5300 -privkey-file server.key t.example.com 127.0.0.1:8000The tunnel server needs to be reachable on UDP port 53. You could have it bind to port 53 directly (
-udp :53), but that would require you to run the server as root. It's better to run the server on a non-privileged port as shown above, and use port forwarding to forward port 53 to it. On Linux, these commands will forward port 53 to port 5300:tunnel-server$ sudo iptables -I INPUT -p udp --dport 5300 -j ACCEPT tunnel-server$ sudo iptables -t nat -I PREROUTING -i eth0 -p udp --dport 53 -j REDIRECT --to-ports 5300 tunnel-server$ sudo ip6tables -I INPUT -p udp --dport 5300 -j ACCEPT tunnel-server$ sudo ip6tables -t nat -I PREROUTING -i eth0 -p udp --dport 53 -j REDIRECT --to-ports 5300You need something at 127.0.0.1:8000 for the tunnel server to connect to. Down below there are instructions for running a proxy server. For testing purposes, you can use an Ncat listener to print incoming data to the terminal:
tunnel-server$ sudo apt install ncat
tunnel-server$ ncat -l -k -v 127.0.0.1 8000
Ncat: Version 7.70 ( https://nmap.org/ncat )
Ncat: Listening on 127.0.0.1:8000
By default, dnstt-server assumes that the recursive resolver supports DNS responses up to a certain size, namely 1232 bytes. If your chosen resolver does not support responses that large (there will be error messages in the server output), you can specify a smaller limit using the
-mtu option, for example -mtu 512.Tunnel client setup
tunnel-client$ cd dnstt/dnstt-client
tunnel-client$ go build
Copy server.pub (the public key file) from the server to the client. You don't need server.key (the private key file) on the client.
Choose a DoH or DoT resolver.
- DoH resolvers
- DoT resolvers
-doh option:tunnel-client$ ./dnstt-client -doh https://doh.example/dns-query -pubkey-file server.pub t.example.com 127.0.0.1:7000To use a DoT resolver, use
-dot:tunnel-client$ ./dnstt-client -dot dot.example:853 -pubkey-file server.pub t.example.com 127.0.0.1:7000127.0.0.1:7000 is the client end of the tunnel ("local app" in the diagram). Anything that connects to that port on the tunnel client will be tunnelled through the public resolver and connected to 127.0.0.1:8000 on the tunnel server. You can test it using an Ncat client. Run this command, and anything you type into the client terminal will appear on the server, and vice versa.
tunnel-client$ ncat -v 127.0.0.1 7000
How to integrate with a proxy server
dnstt is only a tunnel; it's up to you what you want to connect to it. You can make the tunnel work like an ordinary SOCKS or HTTP proxy by having the tunnel server forward to a standard proxy server. There are many ways to set it up; here are some examples.Ncat HTTP proxy
For testing, I find it convenient to use Ncat's HTTP proxy server mode. But be aware that Ncat's proxy isn't intended for use by untrusted clients; it won't prevent them from connecting to localhost ports on the tunnel server, for example.tunnel-server$ ncat -l -k -v --proxy-type http 127.0.0.1 3128 tunnel-server$ ./dnstt-server -udp :5300 -privkey-file server.key t.example.com 127.0.0.1:3128
tunnel-client$ ./dnstt-client -doh https://doh.example/dns-query -pubkey-file server.pub t.example.com 127.0.0.1:7000On the client, configure applications to use the local end of the tunnel (127.0.0.1:7000) as an HTTP/HTTPS proxy.
tunnel-client$ curl --proxy http://127.0.0.1:7000/ https://wtfismyip.com/text
SSH SOCKS proxy
OpenSSH has a built-in SOCKS proxy. If you run an SSH server on the tunnel server, you can use dnstt to tunnel the SSH connection, and the SSH server will proxy connections for you. Let's assume you already have the SSH details configured so that you can runssh tunnel-server on the tunnel client. Make sure AllowTcpForwarding is set to yes (the default value) in sshd_config.Run the tunnel server and have it forward directly to the SSH port.
# sshd is already running at port 22
tunnel-server$ ./dnstt-server -udp :5300 -privkey-file server.key t.example.com 127.0.0.1:22
Run the tunnel client with the local listening port at 127.0.0.1:2222. Run ssh to connect to the tunnel server as if it were at 127.0.0.1:2222, and open a SOCKS port at 127.0.0.1:7000. Replace
tunnel-server with the hostname or IP address of the tunnel and SSH server.tunnel-client$ ./dnstt-client -doh https://doh.example/dns-query -pubkey-file server.pub t.example.com 127.0.0.1:2222 tunnel-client$ ssh -v -N -D 127.0.0.1:7000 -o HostKeyAlias=tunnel-server -p 2222 127.0.0.1On the client, configure applications to use the SSH SOCKS port (127.0.0.1:7000) as a SOCKS proxy.
tunnel-client$ curl --proxy socks5://127.0.0.1:7000/ https://wtfismyip.com/text
Tor bridge
You can run a Tor bridge on the tunnel server and tunnel the connection to the bridge with dnstt, using dnstt as something like a pluggable transport. The Tor client provides a SOCKS interface that other programs can use.Have the tunnel server forward to the Tor ORPort:
# tor is already running at port 9001
tunnel-server$ ./dnstt-server -udp :5300 -privkey-file server.key t.example.com 127.0.0.1:9001
Have the tunnel client open a local listener at 127.0.0.1:7000. Connections to this port will be forwarded to the bridge's ORPort through the tunnel.
tunnel-client$ ./dnstt-client -doh https://doh.example/dns-query -pubkey-file server.pub t.example.com 127.0.0.1:7000Add a Bridge line to /etc/tor/torrc (if you use a system Tor), or paste it into Tor Browser. If you use a system Tor, restart the Tor daemon. You can get
FINGERPRINT from the file /var/lib/tor/fingerprint on the bridge.Bridge 127.0.0.1:7000 FINGERPRINTConfigure applications to use the Tor SocksPort as a SOCKS proxy. If you use a system Tor, the SocksPort is 127.0.0.1:9050; if you use Tor Browser, the SocksPort is 127.0.0.1:9150.
tunnel-client$ curl --proxy socks5://127.0.0.1:9050/ https://wtfismyip.com/text
tunnel-client$ curl --proxy socks5://127.0.0.1:9150/ https://wtfismyip.com/text
Original post (): How to run Tor Browser through a DoH/DoT tunnel.
Protocol
See the protocol page.The "tt" in dnstt stands for Turbo Tunnel, a design paradigm for circumvention protocols. It just means that embeds a sequencing and reliability layer, independent of the DNS transport.
I made a survey of the protocols of some other DNS tunnels.
Performance
See the performance page.Acknowledgements
Thanks to kcp-go, smux, Noise and its mailing list, the Flynn implementation of Noise, ValdikSS, and net4people/bbs and NTC correspondents. This software was developed under a contract with the Counter-Power Lab at UC Berkeley.from https://www.bamsoftware.com/software/dnstt/
--------------------------------------------
One-click dnstt DNS tunnel server deployment and management script for Linux. Supports multiple distributions, automatic configuration, systemd integration, and interactive management menu.
🚀 One-click dnstt server deployment and management
A comprehensive automation script for deploying and managing dnstt DNS tunnel servers on Linux systems. This script handles everything from installation to configuration, making DNS tunnel deployment effortless.
Before using this script, you need to properly configure your domain's DNS records. Here's the required setup:
- Your domain name:
example.com - Your server's IPv4 address:
203.0.113.2 - Your server's IPv6 address:
2001:db8::2(optional) - Tunnel subdomain:
t.example.com - Server hostname:
tns.example.com
Go into your name registrar's configuration panel and add these records:
| Type | Name | Points to |
|---|---|---|
| A | tns.example.com |
203.0.113.2 |
| AAAA | tns.example.com |
2001:db8::2 (if IPv6 available) |
| NS | t.example.com |
tns.example.com |
Important: Wait for DNS propagation (can take up to 24 hours) before testing your tunnel.
- Multi-distribution support: Fedora, Rocky Linux, CentOS, Debian, Ubuntu
- Interactive management menu: Easy-to-use interface for all operations
- Self-updating capability: Built-in update mechanism for the script
- Automatic detection: OS, architecture, and SSH port detection
- Systemd service integration: Creates and manages a dedicated systemd service for reliable operation, automatic startup on boot, and comprehensive logging
- Security hardened: Non-root service execution with systemd security features
- Smart configuration: Persistent settings and automatic key reuse
- Flexible tunneling: SSH mode or SOCKS proxy mode
- Network ready: Automatic firewall and iptables configuration
- Binary verification: MD5, SHA1, and SHA256 checksum validation
- Official binaries: Downloads from dnstt.network
- Linux server (Fedora, Rocky, CentOS, Debian, or Ubuntu)
- Root access or sudo privileges
- Internet connection for package downloads
- Domain name with proper DNS configuration (see DNS Domain Setup section above)
One-command installation:
bash <(curl -Ls https://raw.githubusercontent.com/bugfloyd/dnstt-deploy/main/dnstt-deploy.sh)This command will:
- Download and install the script to
/usr/local/bin/dnstt-deploy - Start the interactive setup process
- Configure your dnstt server automatically
After installation, you can manage your dnstt server using the installed command:
dnstt-deployThis will show an interactive menu with these options:
- Install/Reconfigure dnstt server - Set up or modify configuration
- Update dnstt-deploy script - Check for and install script updates
- Check service status - View current service status
- View service logs - Monitor real-time logs (Ctrl+C to exit)
- Exit - Quit the menu
During the setup (option 1), you'll be prompted for:
- Nameserver subdomain (e.g.,
t.example.com) - MTU value (default: 1232)
- Tunnel mode (SSH or SOCKS)
SOCKS Mode (Option 1)
- Sets up integrated Dante SOCKS5 proxy
- Listens on
127.0.0.1:1080 - Provides full internet proxy capabilities
SSH Mode (Option 2)
- Tunnels DNS traffic to your SSH service
- Automatically detects SSH port (default: 22)
- Perfect for secure shell access via DNS
- Compatible with mobile apps
- Default: 1232 bytes
- Range: 512-1400 bytes
- Recommended values:
- Stable/Fast networks: 1400
- Standard networks: 1232
- Unstable/Slow networks: 1200
- Restricted mobile networks: 512
To change MTU or other settings:
- Run
dnstt-deploy - Choose option 1 (Install/Reconfigure dnstt server)
- Enter new values when prompted
The script will automatically update the configuration and restart services.
Download the appropriate dnstt client binary for your platform from dnstt.network:
Common platforms:
- Linux x64:
dnstt-client-linux-amd64 - Windows x64:
dnstt-client-windows-amd64.exe - macOS Intel:
dnstt-client-darwin-amd64 - macOS Apple Silicon:
dnstt-client-darwin-arm64
After server deployment, you'll receive a public key. Use it to connect:
dnstt-client -udp DNS_SERVER_IP:53 -pubkey-file server.pub t.example.com 127.0.0.1:7000The DNS server IP depends on your system:
Linux:
systemd-resolve --status | grep "DNS Servers"Common options: 127.0.0.53:53, 127.0.0.1:53, or your router's IP
Windows:
ipconfig /all | findstr /C:"DNS Servers"macOS:
scutil --dns | grep nameserverYou can also use:
- Your router/modem internal IP (e.g.,
192.168.1.1:53) - Your ISP's DNS server IP
- Public DNS servers like
8.8.8.8:53or1.1.1.1:53(If Available)
For SSH tunnels, you can use these Android/iOS apps without needing a computer:
Android:
iOS:
The easiest way to manage your dnstt server is through the interactive menu:
dnstt-deployThis provides quick access to:
- Server reconfiguration
- Script updates
- Service status monitoring
- Real-time log viewing
/usr/local/bin/dnstt-deploy             # Management script
/usr/local/bin/dnstt-server             # Main binary
/etc/dnstt/                             # Configuration directory
├── dnstt-server.conf                  # Main configuration
├── {domain}_server.key                # Private key (per domain)
└── {domain}_server.pub                # Public key (per domain)
/etc/systemd/system/dnstt-server.service  # Systemd service
If you prefer command-line management:
dnstt-server Service:
sudo systemctl status dnstt-server    # Check status
sudo systemctl start dnstt-server     # Start service
sudo systemctl stop dnstt-server      # Stop service
sudo systemctl restart dnstt-server   # Restart service
sudo journalctl -u dnstt-server -f    # View logs
Dante SOCKS Service (SOCKS mode only):
sudo systemctl status danted          # Check status
sudo systemctl start danted           # Start service
sudo systemctl stop danted            # Stop service
sudo systemctl restart danted         # Restart service
sudo journalctl -u danted -f # View logsThe script can update itself in two ways:
Method 1: Using the menu (recommended)
dnstt-deploy
# Choose option 2: Update dnstt-deploy script
Method 2: Re-run the curl command
bash <(curl -Ls https://raw.githubusercontent.com/bugfloyd/dnstt-deploy/main/dnstt-deploy.sh)
# The script will detect and install updates automaticallyThe management menu provides quick access to troubleshooting tools:
- Check service status (menu option 3): Shows if services are running properly
- View service logs (menu option 4): Real-time monitoring of service logs
If you see errors like this:
FORMERR: requester payload size 512 is too small (minimum 1232)
Lower the MTU to the mentioned number:
- Run
dnstt-deploy - Choose option 1 (Install/Reconfigure dnstt server)
- Enter the suggested MTU value when prompted
Consider the performance trade-offs when using very low MTU values.
Service Won't Start:
dnstt-deploy  # Use menu option 3 to check status
# Or manually:
sudo systemctl status dnstt-server    # Check service status
sudo journalctl -u dnstt-server -n 50 # Check logs for errors
ls -la /usr/local/bin/dnstt-server    # Verify binary permissions
DNS Configuration Issues:
dig @YOUR_SERVER_IP t.mydomain.com           # Test DNS tunnel (from client)
sudo iptables -t nat -L PREROUTING -n -v     # Check iptables rules
SOCKS Proxy Issues:
curl --socks5 127.0.0.1:1080 http://httpbin.org/ip  # Test SOCKS proxy locally
sudo cat /etc/danted.conf                           # Check Dante configuration
Port Check:
sudo ss -tulnp | grep 5300  # Check dnstt-server port
sudo ss -tulnp | grep 1080 # Check SOCKS proxy port (if enabled)The script supports multiple domains by generating separate key pairs for each domain. However, only one domain configuration can be active at a time since all configurations use port 53 for DNS traffic. To switch between domains:
- Run
dnstt-deploy - Choose option 1 (Install/Reconfigure dnstt server)
- Enter the new subdomain when prompted
For DNS-over-HTTPS (DoH) or DNS-over-TLS (DoT) configurations, refer to the official dnstt documentation for detailed setup instructions.
Use the built-in log viewer (menu option 4) or manual commands:
sudo ss -tulnp | grep -E "(5300|1080)"        # Monitor connection count
sudo systemctl status dnstt-server            # Check service resources
sudo journalctl -u dnstt-server -f --no-pager # Monitor logs for errorsContributions are welcome! Please feel free to submit a Pull Request. For major changes, please open an issue first to discuss what you would like to change.
- dnstt by David Fifield
- Dante SOCKS server for SOCKS proxy functionality
- Issues: GitHub Issues
- Discussions: GitHub Discussions
- Official project website: dnstt.network
from https://github.com/bugfloyd/dnstt-deploy
https://dnstt.network/
------------------------------------------------------------
https://www.usenix.org/system/files/conference/foci14/foci14-anonymous.pdf
No comments:
Post a Comment