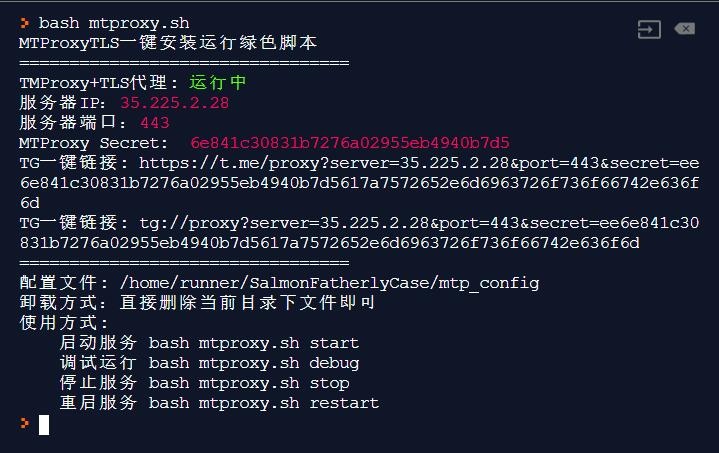
MTProxyTLS一键安装绿色脚本。
mtproxy
交流群组
Telegram群组:https://t.me/EllerHK
安装方式
执行如下代码进行安装
mkdir /home/mtproxy && cd /home/mtproxy
curl -s -o mtproxy.sh https://raw.githubusercontent.com/ellermister/mtproxy/master/mtproxy.sh && chmod +x mtproxy.sh && bash mtproxy.sh
使用方式
运行服务
bash mtproxy.sh start调试运行
bash mtproxy.sh debug停止服务
bash mtproxy.sh stop重启服务
bash mtproxy.sh restart卸载安装
因为是绿色版卸载极其简单,直接删除所在目录即可。
rm -rf /home/mtproxy开机启动
开机启动脚本,如果你的rc.local文件不存在请检查开机自启服务。
通过编辑文件/etc/rc.local将如下代码加入到开机自启脚本中:
cd /home/mtproxy && bash mtproxy.sh start > /dev/null 2>&1 &from https://github.com/ellermister/mtproxy------编译安装最新版 mtproxy-go 一键脚本
因为go版mtproxy代码更新了抗重放攻击等功能后,原作者没有直接放出编译好的程序,所以根据逗比原版一键脚本魔改,直接拉取最新代码进行编译,最新版已经支持 TLS 伪装
- 脚本说明: Mtproto Proxy Go版 一键编译安装管理脚本
- 系统支持: CentOS6+ / Debian7+ / Ubuntu14+
- 使用参考: https://doubibackup.com/es5fj9se.html
下载安装:
wget -N --no-check-certificate https://github.com/whunt1/onekeymakemtg/raw/master/mtproxy_go.sh && chmod +x mtproxy_go.sh && bash mtproxy_go.sh
配置文件在 /usr/local/mtproxy-go/mtproxy.conf ,可以手动修改,配置项详细介绍参见 mtg 文档
go 安装目录在 /tmp/go ,可以手动删除
编译安装最新go版mtproxy教程
有空的话我会更新编译好的文件到 builds
使用如下命令下载安装(以 linux-amd64 为例)
# Ubuntu/Debian
apt-get install -y psmisc
wget -O mtg --no-check-certificate https://raw.githubusercontent.com/whunt1/onekeymakemtg/master/builds/mtg-linux-amd64
mv mtg /usr/local/bin/mtg
chmod +x /usr/local/bin/mtg
# CentOS
yum install -y psmisc
wget -O mtg --no-check-certificate https://raw.githubusercontent.com/whunt1/onekeymakemtg/master/builds/mtg-linux-amd64
mv mtg /usr/local/bin/mtg
chmod +x /usr/local/bin/mtg下载完成后直接参考使用方法,以下为详细手动安装步骤
安装基础环境
选择对应系统执行以下命令
# Ubuntu/Debian
apt-get install -y git gcc automake autoconf libtool make psmisc
# CentOS
yum install -y git gcc automake autoconf libtool make psmisc
安装 go
下载安装go语言编译环境
wget -N --no-check-certificate https://dl.google.com/go/go1.13.4.linux-amd64.tar.gz
tar -xvf go1.13.4.linux-amd64.tar.gz && rm -rf go1.13.4.linux-amd64.tar.gz
mv go /usr/local
export GOROOT=/usr/local/go
export GOPATH=$HOME/mtg/tmp
export PATH=$GOPATH/bin:$GOROOT/bin:$PATH
cd $HOME
编译安装
拉取 mtproxy-go 源码并编译安装,编译完成过后,输出在当前目录,文件名为 mtp
git clone -b master https://github.com/9seconds/mtg.git $HOME/mtg
cd $HOME/mtg
go mod download
go build
mv $HOME/mtg/mtg /usr/local/bin/mtg
chmod +x /usr/local/bin/mtg
运行
直接输入 mtg 即可调用
查看帮助:mtg -h
查看生成密钥帮助:mtg help generate-secret
查看运行帮助:mtg help run
生成普通密钥:mtg generate-secret simple
生成普通安全密钥:generate-secret secured
生成TLS伪装密钥(以 itunes.apple.com 为例):mtg generate-secret -c itunes.apple.com tls
运行示例:
mtg run -b 0.0.0.0:443 --cloak-port=443 ee055a9b283c6ef2fbea89a374df31e7966974756e65732e6170706c652e636f6d后台运行:
nohup mtg run -b 0.0.0.0:443 --cloak-port=443 ee055a9b283c6ef2fbea89a374df31e7966974756e65732e6170706c652e636f6d >> /tmp/mtg.log 2>&1 &查看日志:cat /tmp/mtg.log
结束进程:killall mtg
更多运行参数参见 mtg 文档
[Merged]一键编译安装最新的 MTProxy-Go(修复版)
修复记录
- 2021/06/22: 修复 MTProxy-Go 升级至 v2 版本后,仓库分支名变更
- 2020/12/05: 修复 Golang 下载地址错误
如何使用
wget -N --no-check-certificate https://github.com/if1y/MTProxy-GO_OnekeyMake/raw/master/mtproxy_go.sh && chmod +x mtproxy_go.sh && bash mtproxy_go.sh其它信息
- 系统支持: CentOS6+ / Debian7+ / Ubuntu14+
- 配置路径:
/usr/local/mtproxy-go/mtproxy.conf - Golang路径:
/tmp/go - 原版作者: https://github.com/whunt1/onekeymakemtg
from https://github.com/whunt1/onekeymakemtg
-----
Oneline distbute and install script for mtg.
mtg-dist
Oneline distbute and install script for mtg ( https://github.com/9seconds/mtg ).
Note
mtg 2.0+ supports FakeTLS mode only. Re-run this script to upgrade.
Install
bash <(wget -qO- https://git.io/mtg.sh)
Offline Install
For machines have difficulties visiting github, download the following files:
mtg-dist.binfrom releasemtg-2.x.x-linux-amd64.tar.gzfrom mtg/release
then run:
sh mtg-dist.bin mtg-2.0.1-linux-amd64.tar.gz
Uninstall
systemctl disable mtg
systemctl stop mtg
rm -f /usr/local/bin/mtg /etc/systemd/system/mtg.service /etc/mtg.toml
for version 0.0.6 and prior
systemctl disable mtg
systemctl stop mtg
rm -f /usr/local/bin/mtg /lib/systemd/system/mtg.service /etc/mtg.conf
Customize
The configure file is at /etc/mtg.toml, refer to the offcial document for whatever you want to custom.
After edited just restart the mtg service:
systemctl restart mtg
Compile
This project uses makeself to generate a .bin file.
./makebin.sh from https://github.com/cutelua/mtg-dist ----MTProxy
Simple MT-Proto proxy
Building
Install dependencies, you would need common set of tools for building from source, and development packages for openssl and zlib.
On Debian/Ubuntu:
apt install git curl build-essential libssl-dev zlib1g-devOn CentOS/RHEL:
yum install openssl-devel zlib-devel
yum groupinstall "Development Tools"
Clone the repo:
git clone https://github.com/TelegramMessenger/MTProxy
cd MTProxy
To build, simply run make, the binary will be in objs/bin/mtproto-proxy:
make && cd objs/binIf the build has failed, you should run make clean before building it again.
Running
- Obtain a secret, used to connect to telegram servers.
curl -s https://core.telegram.org/getProxySecret -o proxy-secret- Obtain current telegram configuration. It can change (occasionally), so we encourage you to update it once per day.
curl -s https://core.telegram.org/getProxyConfig -o proxy-multi.conf- Generate a secret to be used by users to connect to your proxy.
head -c 16 /dev/urandom | xxd -ps- Run
mtproto-proxy:
./mtproto-proxy -u nobody -p 8888 -H 443 -S <secret> --aes-pwd proxy-secret proxy-multi.conf -M 1... where:
nobodyis the username.mtproto-proxycallssetuid()to drop privilegies.443is the port, used by clients to connect to the proxy.8888is the local port. You can use it to get statistics frommtproto-proxy. Likewget localhost:8888/stats. You can only get this stat via loopback.<secret>is the secret generated at step 3. Also you can set multiple secrets:-S <secret1> -S <secret2>.proxy-secretandproxy-multi.confare obtained at steps 1 and 2.1is the number of workers. You can increase the number of workers, if you have a powerful server.
Also feel free to check out other options using mtproto-proxy --help.
- Generate the link with following schema:
tg://proxy?server=SERVER_NAME&port=PORT&secret=SECRET(or let the official bot generate it for you). - Register your proxy with @MTProxybot on Telegram.
- Set received tag with arguments:
-P <proxy tag> - Enjoy.
Random padding
Due to some ISPs detecting MTProxy by packet sizes, random padding is added to packets if such mode is enabled.
It's only enabled for clients which request it.
Add dd prefix to secret (cafe...babe => ddcafe...babe) to enable
this mode on client side.
Systemd example configuration
- Create systemd service file (it's standard path for the most Linux distros, but you should check it before):
nano /etc/systemd/system/MTProxy.service- Edit this basic service (especially paths and params):
[Unit]
Description=MTProxy
After=network.target

[Service]
Type=simple
WorkingDirectory=/opt/MTProxy
ExecStart=/opt/MTProxy/mtproto-proxy -u nobody -p 8888 -H 443 -S <secret> -P <proxy tag> <other params>
Restart=on-failure

[Install]
WantedBy=multi-user.target- Reload daemons:
systemctl daemon-reload- Test fresh MTProxy service:
systemctl restart MTProxy.service
# Check status, it should be active
systemctl status MTProxy.service- Enable it, to autostart service after reboot:
systemctl enable MTProxy.servicefrom https://github.com/TelegramMessenger/MTProxy

No comments:
Post a Comment