安装客户端
github 下载地址: https://github.com/2dust/v2rayN/releases/download/6.23/zz_v2rayN-With-Core-SelfContained.7z
下载之后解压缩,找到 exe 文件直接运行即可.
注册 cloudflare 账号
正常注册即可.
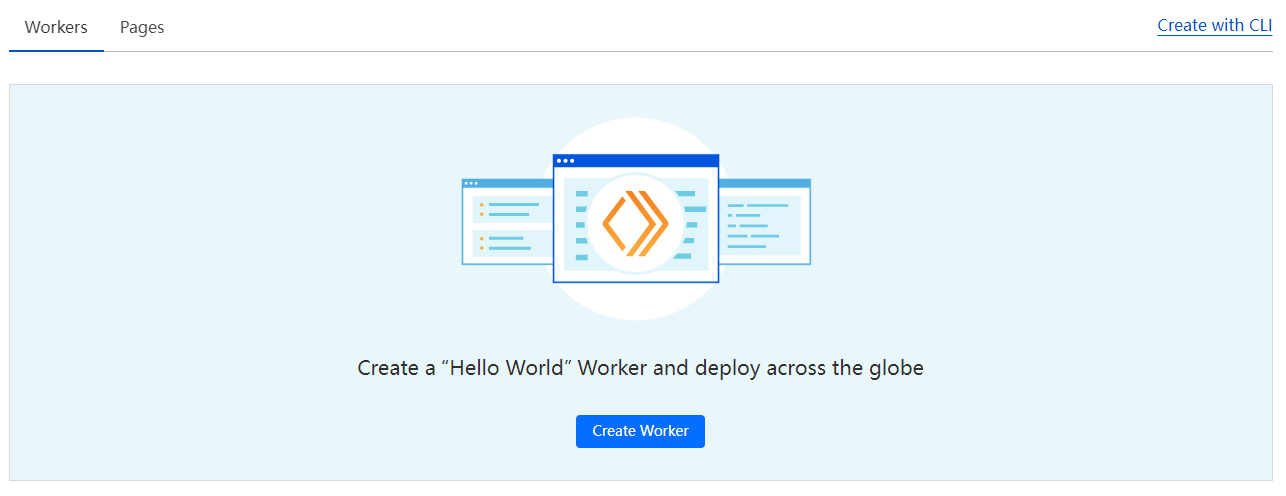
点击Workers 和 Pages
创建Workers
点击编辑代码
注意:Cloudfare 的代码编辑页面可能会有BUG,打开显示空白页面,说连接已重置 建议使用浏览器无痕模式再次登录 Cloudfare 编辑代码,或打开F12看看网络
拷贝代码
大佬 github 仓库: https://github.com/zizifn/edgetunnel/blob/main/src/worker-vless.js
修改代码
只需修改两行代码
1// 第7行
2let userID = ‘UUID’
3// 打开cmd 使用命令 Powershell -NoExit -Command “[guid]::NewGuid()” 获取 UUID
4
5// 第9行
6let proxyIP = ‘代理IP’
7// 下面地址选一个填写
8// edgetunnel.anycast.eu.org(美国的加速CDN)
9// cdn.anycast.eu.org(香港日本新加坡加速CDN)
10// 香港优选IP: 20.187.89.16
11// 韩国高速优选IP: 129.154.199.251
12// 日本高速优选IP: 146.56.149.205
获取节点链接
点击部署,点击跳转到节点页面
在网站后面加上 / 和代码中你的uuid
确认之后就生成 v2ray 和 clash-meta 节点配置信息
复制 2ray 下方的 vless 连接
导入 v2ray 客户端
右键任务栏的 v2ray 图标
获取优选IP
在下面的连接中,根据自身运营商选择延迟最低IP : https://stock.hostmonit.com/CloudFlareYes
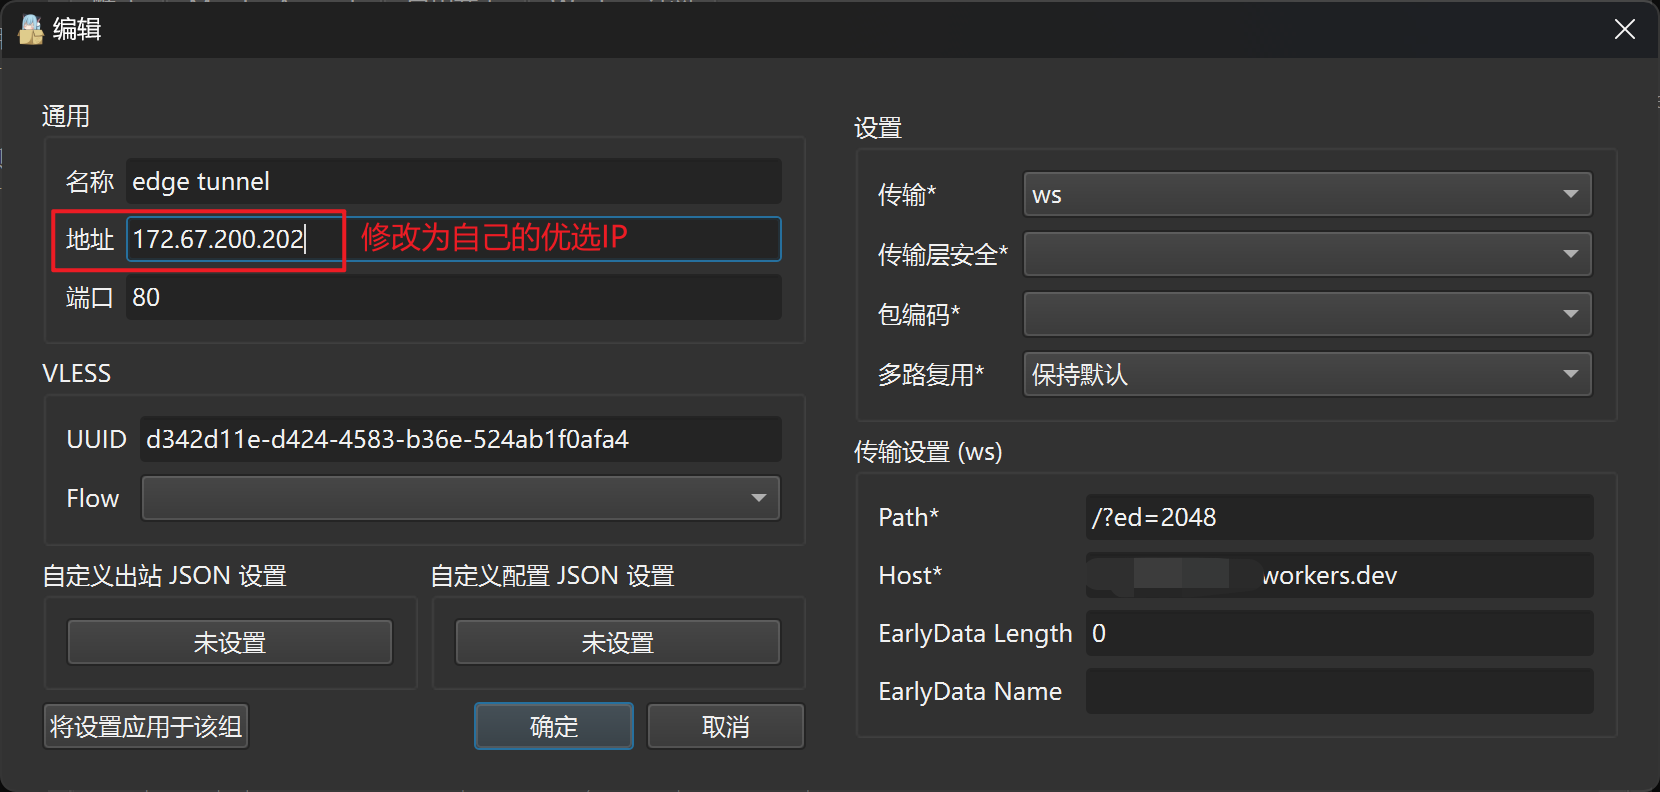
v2ray 连接修改
左键双击任务栏的 v2ray 图标
做以下修改
1、修改地址,改成自己运营商的优选 IP
2、端口修改为 2052 或者 80
3、关闭 tls
保存.
--------------------------------------------------------------------
最近在GitHub上看到一个特别有意思的项目,可以使用CloudFlare的Worker功能构建Vless隧道,需要注意的是,和传统的理解中使用Worker把已经被墙的节点或路由特别差的节点进行反代,以使用被墙的IP服务器上的Vmess服务或加速已有Vmess节点的作用不同,此方法的好处是直接使用Worker构建Vless隧道,不需要额外服务器即可实现便捷的机票购买服务,CF虽然国内的路由不太行,很多地方都延迟高,但是速度还是相当可观的,且完全免费,流量自然不用担心,而且Worker每天都有10W的免费请求可用,一个人使用几乎不可能用到上限,当然这种钻空子的办法也不知道能活多久,能用一天是一天吧。
原项目地址:https://github.com/zizifn/edgetunnel/
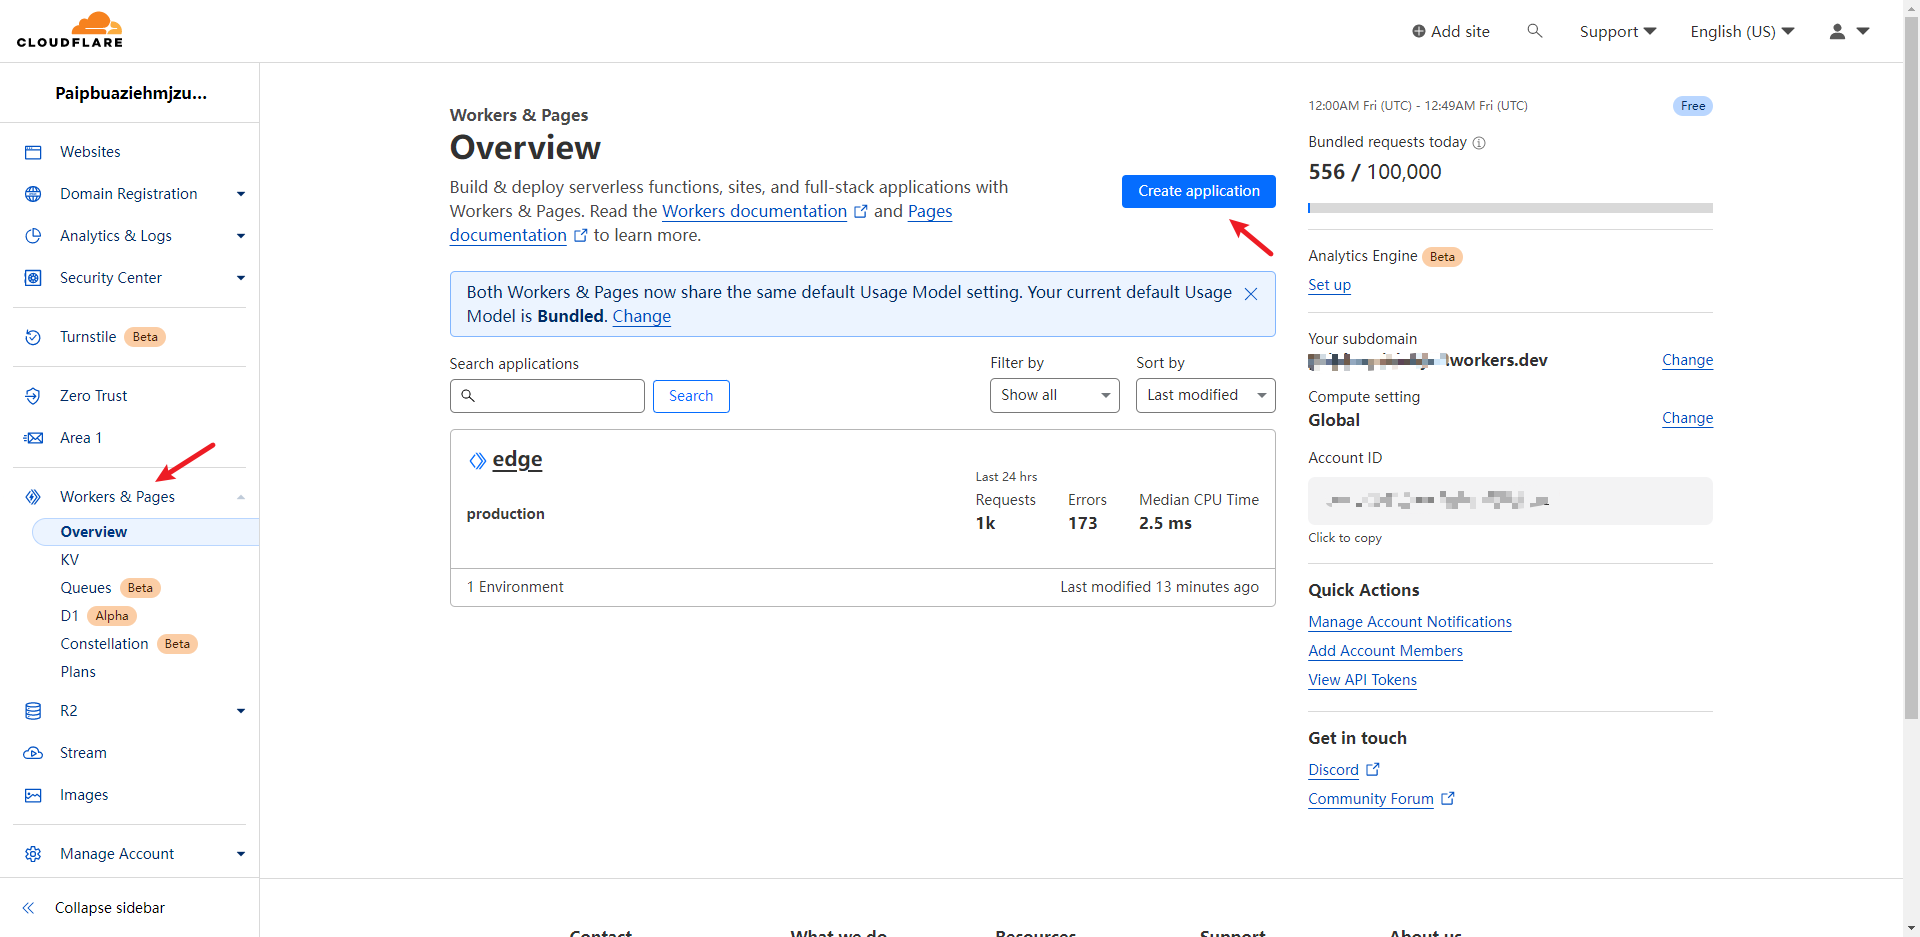
0x01 进入CF控制台创建Worker
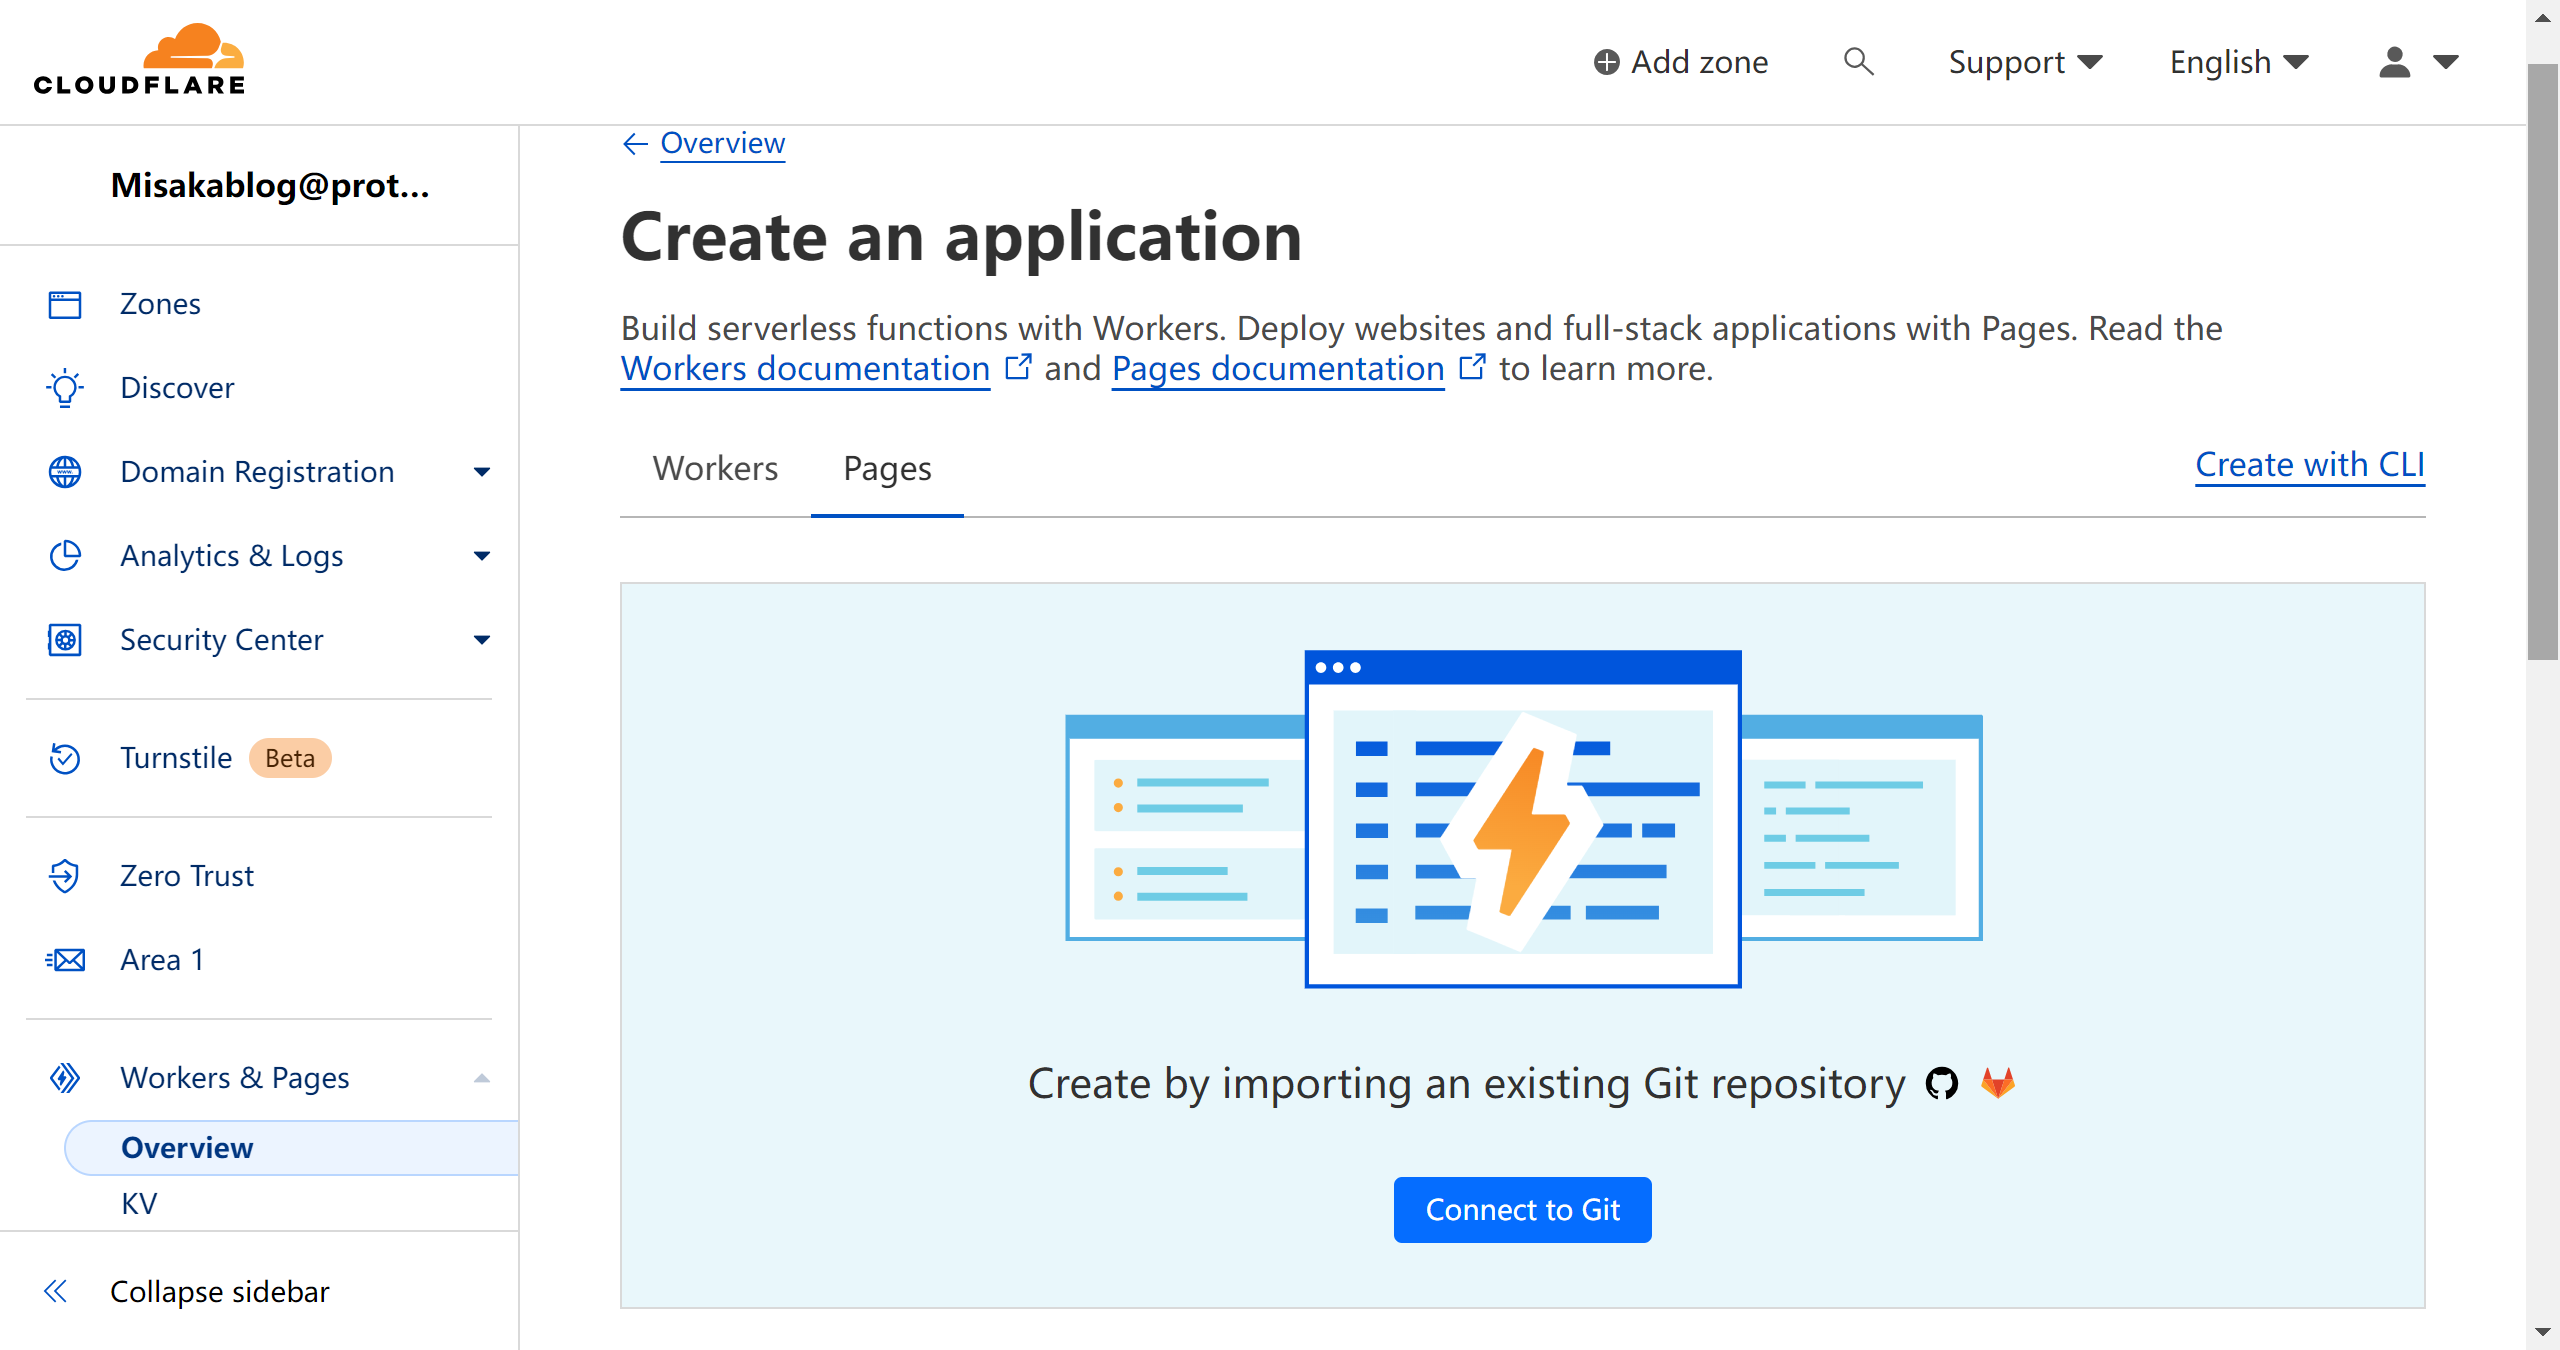
进入CF控制台首页,点击左侧侧栏中的Workers和Pages功能后点击创建应用程序:
http://web.archive.org/web/20231123193155im_/https://img.gitlx.com/images/2023/07/27/cf-ma.png
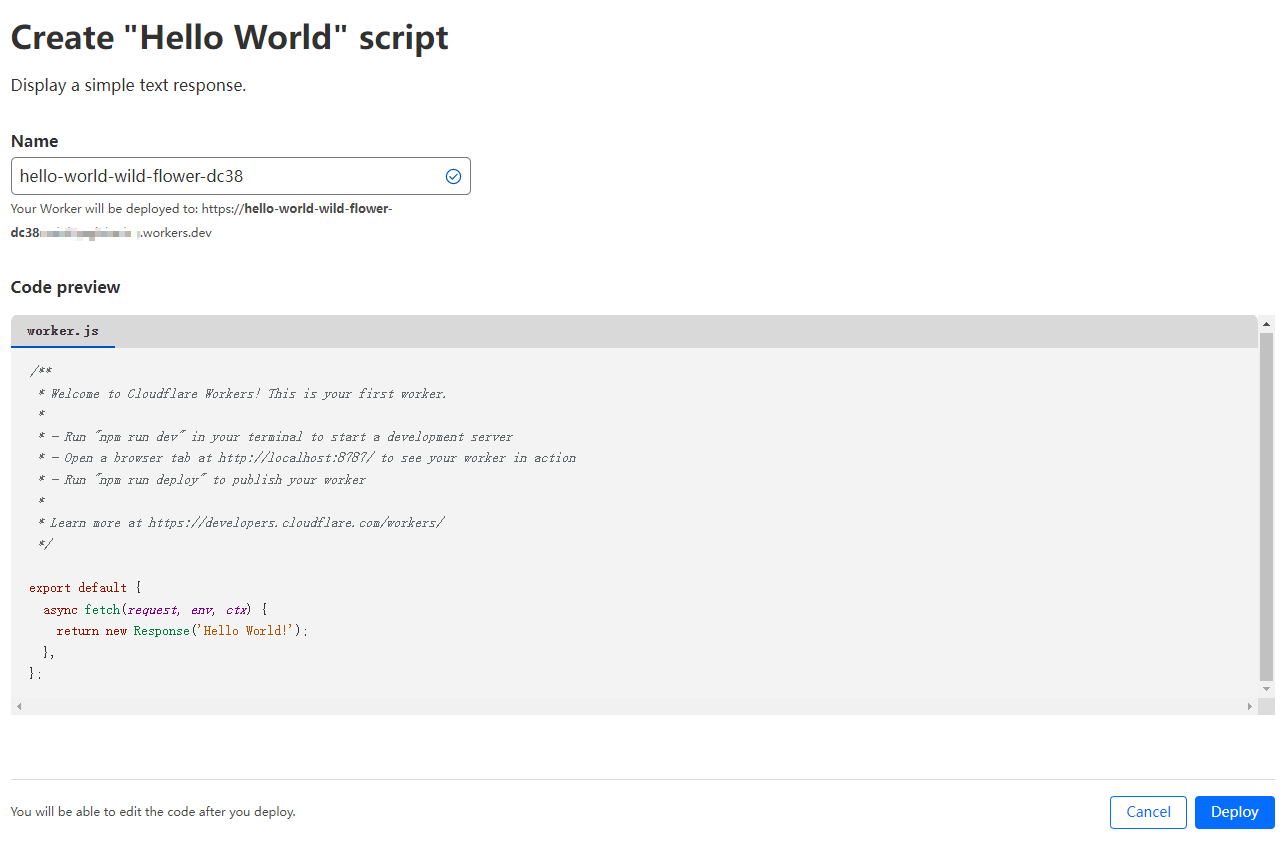
创建应用程序后名称自己随便写一个再点击右下角的部署:
http://web.archive.org/web/20231123193155im_/https://img.gitlx.com/images/2023/07/27/cf-ma1.png
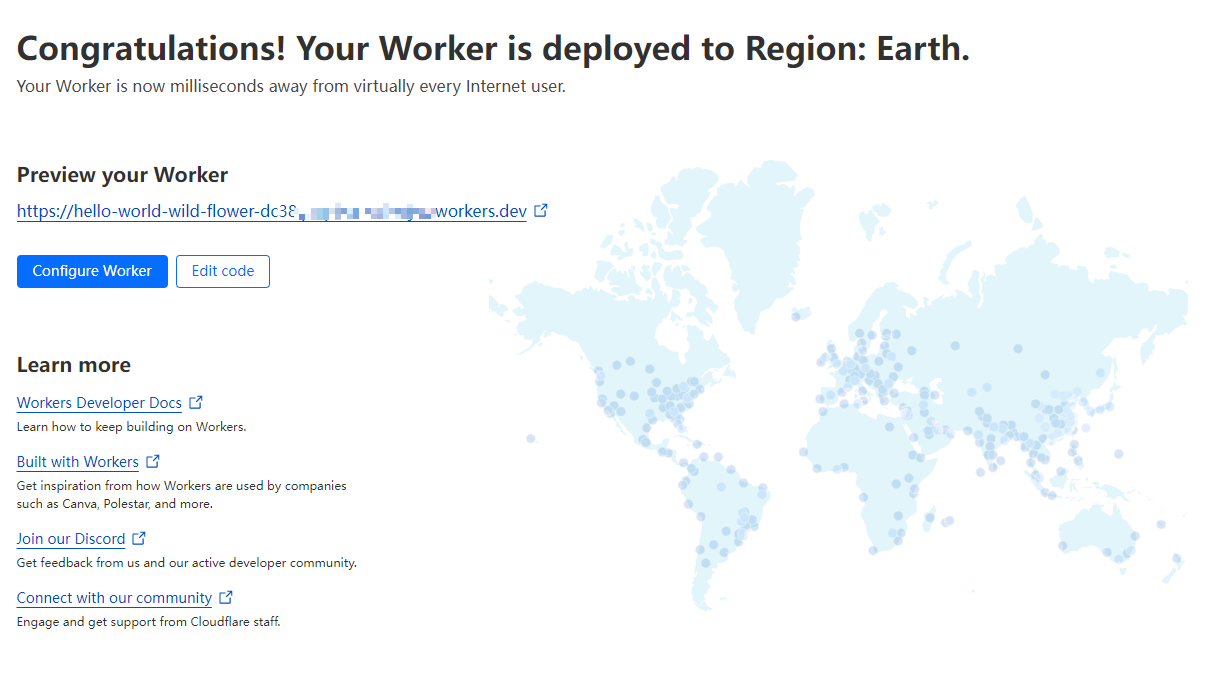
部署完成后点击配置Worker:
http://web.archive.org/web/20231123193155im_/https://img.gitlx.com/images/2023/07/27/cf-ma2.png
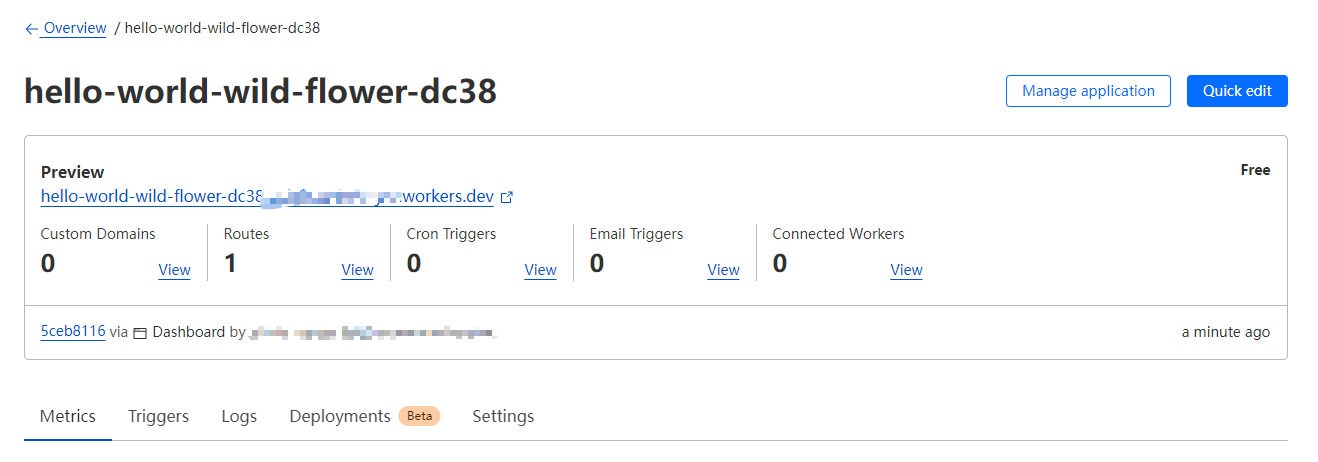
在配置Worker页面首先点击触发器,然后添加自定义域:
http://web.archive.org/web/20231123193155im_/https://img.gitlx.com/images/2023/07/27/cf-ma3.png
添加你的自定义域名,比如你托管在CF的域名是abc.com,那这里可以填123.abc.com,填写完成后先点添加,然后点击快速编辑:
http://web.archive.org/web/20231123193157im_/https://img.gitlx.com/images/2023/07/27/cf-ma6.png
将原项目地址的worker-vless.js内容复制到Worker的代码编辑页面,需要更改的参数已在图中标示,其中"let userID"可以通过linux系统中uuid软件包的uuidgen命令生成,"let proxyIP"需要去扫描国外除开CF官方以外的反代了CF分发服务器的IP,不能使用CF官方的IP:
http://web.archive.org/web/20231123193156im_/https://img.gitlx.com/images/2023/07/27/cf-ma5.png
0x02 使用masscan扫描国外AS机房开放了443端口的IP,这步有一定的风险,这种扫描算是SYN攻击,所以我就不详细写了。
该部分操作所有IP均非实际扫描的IP,如果有需要请自己寻找你觉得好用的IP,并使用whois或者在线工具查询IP所在AS号,并扫描该AS拥有的网段
查找IP所在ASN和该AS关联的IP段
命令含义:查询baidu.com域名的A记录并使用grep命令过滤出IPV4地址
$ dig -t A baidu.com | grep -v -e '^;' -e '^$' 130 ↵
baidu.com. 52 IN A 110.242.68.66
baidu.com. 52 IN A 39.156.66.10
命令含义:查询IP110.242.68.66的注册信息并使用grep命令过滤出origin字段(AS编号通常在origin 或 OriginAS 等字段中)
$ whois 110.242.68.66 | grep -i origin
origin: AS4837
命令含义:查询IP110.242.68.66的注册信息并使用grep命令过滤出route字段(该字段就是我们需要扫描的IP段)
$ whois 110.242.68.66|grep route
mnt-routes: MAINT-CNCGROUP-RR
route: 110.240.0.0/12
扫描上面取得的IP段并过滤出有用的信息
命令含义:扫描111.0.0.0/8网段所有IP的443端口,并将开放了443端口的IP信息输出到scanip.txt文件
$ masscan 111.0.0.0/8 -p443 --rate=10000 --open-only -oG scanip.txt
命令含义:使用sed命令正则表达式匹配scanip.txt中所有Host字段后的IP地址并输出到scanip1.txt
$ sed -n 's/.*Host: \([0-9.]*\).*/\1/p' scanip.txt > scanip1.txt
0x03 使用CloudflareSpeedTest工具测试刚刚取得的地址是否可用
CF的的地址使用IP访问时会有一个特殊的错误页面,只要你上面扫描的地址不在CF官方公布使用的IP段内该地址,切直接访问会出现类似以下的特殊报错页面,那该IP就可以用于我们的代理隧道。
http://web.archive.org/web/20231123193157im_/https://img.gitlx.com/images/2023/07/27/cf-e.png
工具的使用详细说明请自行参照项目README,选择延迟和下载速度好的IP
命令含义:扫描scanip1.txt中的IP,总共输出10个结果,延迟超过200,或丢包的均不显示。
$ ./CloudflareST -p 10 -tl 200 -tlr 0 -f scanip1.txt
0x04 使用隧道
经过上面一系列繁杂的步骤选择好IP后再次进入worker的代码编辑页面,填入”let proxyIP”并部署后即可开始使用,在worker-vless.js的最后,有一个示例配置,将自己的信息填入示例配置即可在Clash中启用该节点。
其中,变量hostName为Worker中配置的自定义域。如:123.abc.com,变量userID则是worker-vless.js中"let userID"行的值
#示例配置
- type: vless
name: ${hostName}
server: ${hostName}
port: 443
uuid: ${userID}
network: ws
tls: true
udp: false
sni: ${hostName}
client-fingerprint: chrome
ws-opts:
path: "/?ed=2048"
headers:
host: ${hostName}
#填写完成后类似于这样
- type: vless
name: 随便写
server: 123.abc.com
port: 443
uuid: d342d11e-d424-4583-b36e-524ab1f0afa4
network: ws
tls: true
udp: false
sni: 123.abc.com
client-fingerprint: chrome
ws-opts:
path: "/?ed=2048"
headers:
host: 123.abc.com
openClash使用的单行简化配置
- {name: CF, server: 123.abc.com, port: 443, type: vless, uuid: d342d11e-d424-4583-b36e-524ab1f0afa4, alterId: 0, cipher: auto, tls: true, network: ws, ws-opts: {path: "/?ed=2048", headers: {Host: 123.abc.com}}}
0x05 使用效果,
可以看到速度还是相当快的,虽然看起来延迟感人,但是跑满500M还是不在话下。十分甚至九分快.
0x06
由群友提供的AS45102/AS4134的可用IP列表:
47.254.69.186
47.89.241.33
198.11.180.182
47.251.33.29
47.88.57.75
47.251.1.129
47.89.240.9
47.251.10.147
47.88.106.22
47.88.91.186
47.251.37.185
47.88.11.193
47.88.29.163
47.89.213.20
47.88.88.172
47.89.227.179
47.89.248.208
47.88.88.225
47.89.211.223
47.251.4.62
47.88.52.61
47.88.26.229
47.88.50.63
47.251.3.62
47.254.47.181
47.251.62.121
47.88.65.50
47.88.57.31
47.254.65.110
47.89.210.14
47.254.65.41
47.89.247.203
47.88.29.3
47.254.67.224
47.251.8.206
47.88.33.132
47.89.210.198
47.254.31.122
47.88.17.93
47.254.27.27
47.254.72.57
47.251.39.76
47.251.63.225
47.254.17.255
其他可能可以使用的AS还有:AS9808(京东CF合作),120.241.124.0/24(京东广州移动),建议使用国外ip,国内ip都很慢
至于为什么必须要扫描反代CF的IP用是因为边缘节点IP无法访问套了CF的站点,所以需要一个三方中转,那些没套CF站点就是边缘节点IP,套了CF的就是proxy ip,扫出来的反代IP的作用是让CF边缘节点去连接那些IP。
也可以参考这个连接:https://blog.mareep.net/posts/10934/
from http://web.archive.org/web/20231123193148/https://www.gitlx.com/2023/07/cloudflare-worker-tunnel/
---------------------------------------------------------------------------------------------
用cloudflare worker 搭建 vless
无需域名,无需 vps,白嫖梯子.
视频教程:https://youtu.be/wa0spd7ZOrA
项目地址: https://github.com/zizifn/edgetunnel
搭建教程
注册 cloudflare
点击 workers 和 pages
创建 worker:


修改名称(随意)点击部署,再编辑代码
:- 打开项目的.js 文件 https://github.com/zizifn/edgetunnel/blob/main/src/worker-vless.js 全选复制里面的代码,粘贴到 workers 中:

- 修改
UUID和proxyIP,UUID可选择在线生成 https://1024tools.com/uuid 复制粘贴,这里提供一个 IPlet proxyIP = ‘103.200.112.108’;同样复制粘贴,最后点击保存并部署,那这个 ip 的作用是啥呢
这是一些神奇的 ip,可以无条件的转发所有 cf 流量,大致来说就是此方法搭建的节点是无法访问托管在 cloudflare 平台上的网站的,所以需要有一个中间人去转发流量访问这些网站
如果上面的 proxyip 用不了了,可以替换成下面这些域名: -


 :
:


 修改
修改 cdn-all.xn--b6gac.eu.org
cdn.xn--b6gac.eu.org
cdn-b100.xn--b6gac.eu.org
edgetunnel.anycast.eu.org
cdn.anycast.eu.org另外可以参考这个 issues 进行 proxyip 查找
issues:https://github.com/zizifn/edgetunnel/issues/162


方式一:自己有域名(可选)
添加域名:

添加完成之后,可能要等几分钟等待域名生效.
查看 vless 并导入链接
输入你的域名 + uuid(例如:test.pornhug.top/d342d11e-d424-4583-b36e-524ab1f0afa4):

优选 ip
因为 cloudflare 在国内访问速度很慢,所以需要优选 ip
将服务器地址换成优选 ip 即可
https://stock.hostmonit.com/CloudFlareYes
获取,或者加入 TG 群 https://t.me/CF_NAT
客户端导入
小火箭的例子:

方式二:没有域名
有些小伙伴可能没有域名,其实不用自定义域名也是可以的,客户端里去掉 tls 加密,端口改为 80 或者 2052 即可:


导入之后,记得关闭 tls,修改端口,有需要就修改优选 ip.
小火箭的例子:


clashmeta 和 v2rayN 例子
v2rayN
v2rayN 会在视频中演示
clashmeta
格式已经给出,修改方法和小火箭的修改方法一致
没有域名的例子:

有域名的例子:只需要替换优选 ip,然后 sni 和 host 检查时自己的域名哦。
------------------------------------------------------------------------------------
部署v2ray到 Cloudflare Worker
Fork edgetunnel项目:
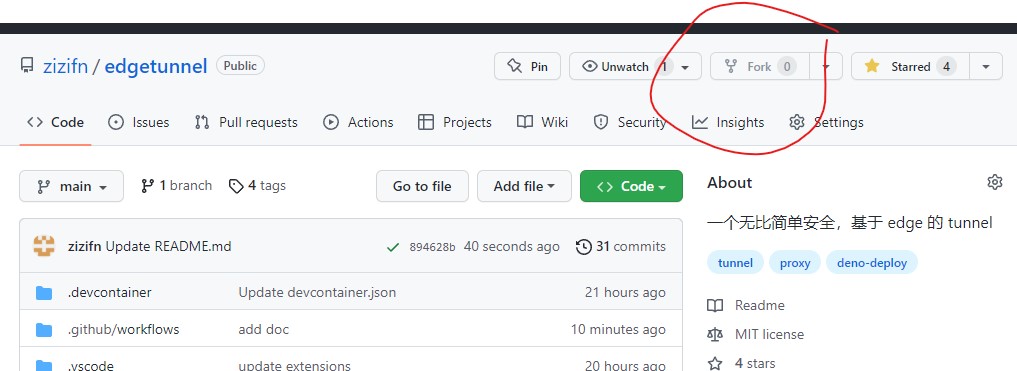
请一定要定期同步 fork,具体方式请参考 Github 文档open in new window。
#注册 Cloudflare 账户
#访问 https://dash.cloudflare.com/
#创建 Cloudflare Pages

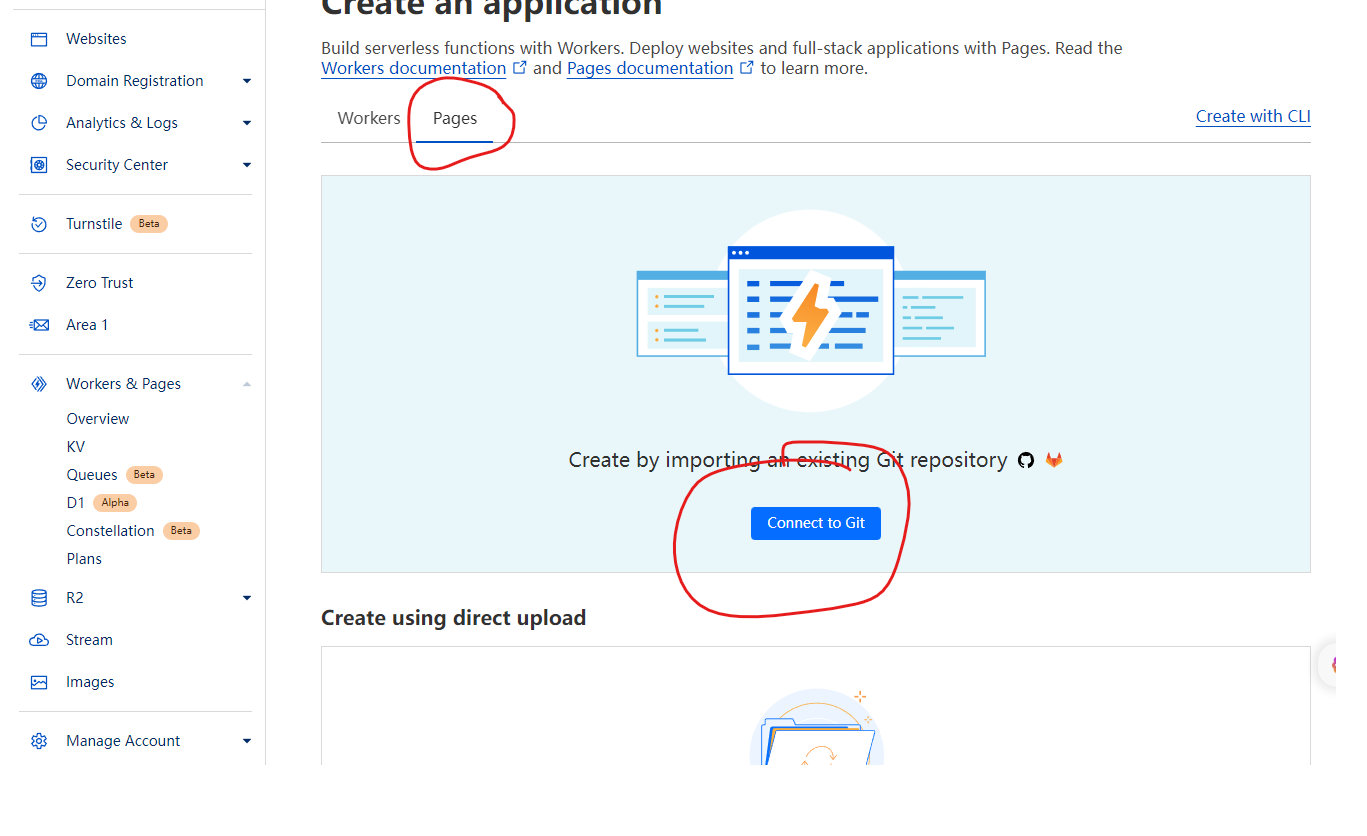
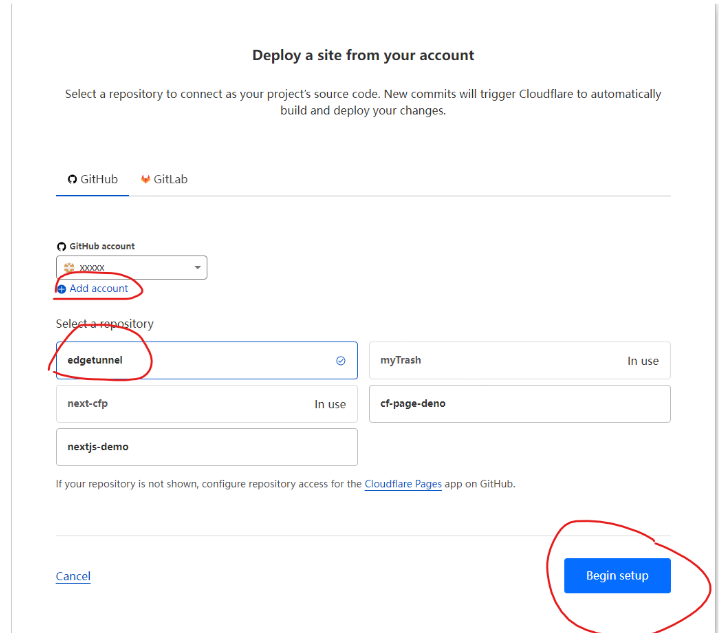
#连接 GITHUB 账户 和 repo
连接 GITHUB 账户, 并且要选择你 fork 的 repo。
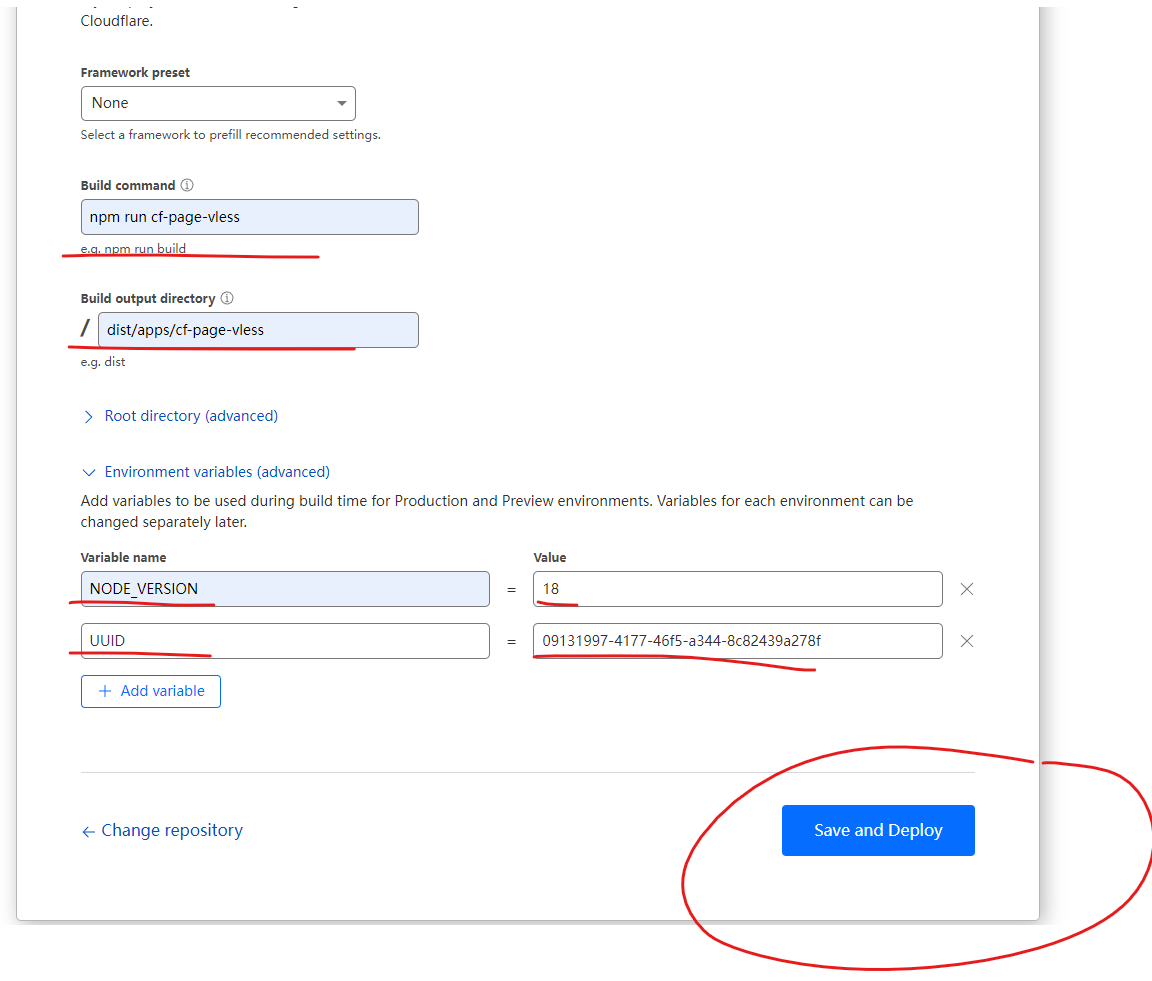
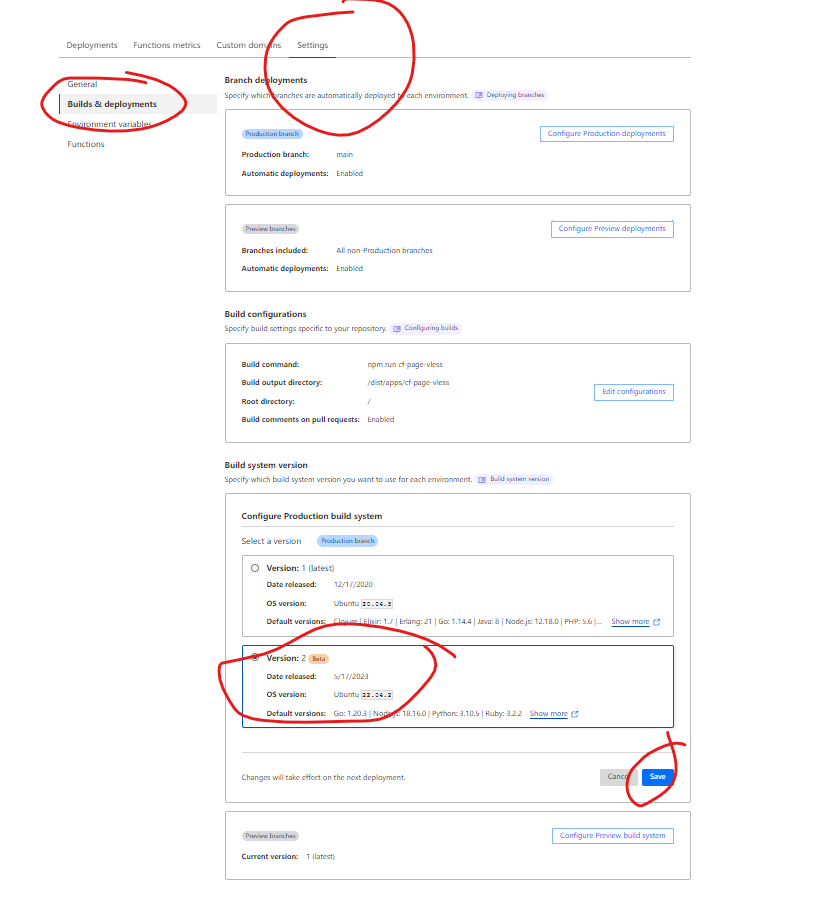
#填写 Pages build 信息
| 选项 | 值 |
|---|---|
| Build Command | npm run cf-page-vless |
| Build Directory | dist/apps/cf-page-vless |
| 环境变量 | 值 |
|---|---|
| UUID | b7625108-80fb-4544-a1f2-aa40c931aa52 |
| NODE_VERSION | 18 |
请自己生成一个 UUID
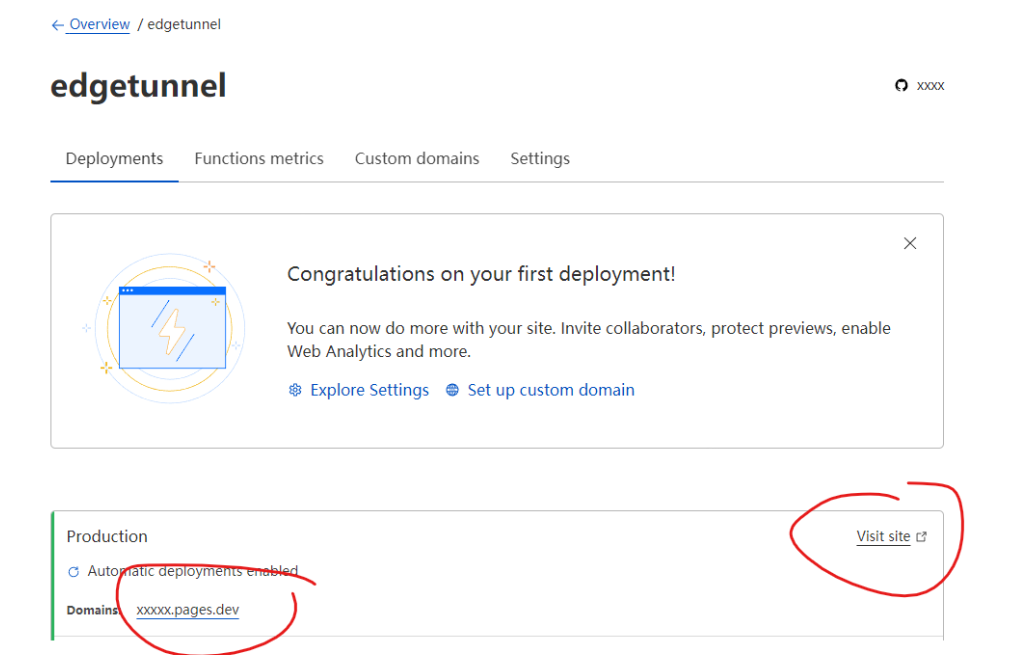
#部署成功访问 Pages URL
WARNING
页面的账户和密码,就是之前设置的 UUID
访问 Pages 项目地址,并且点击分享 Vless,扫码导入配置。
#修改 Cloudflare Pages 的设置 (可选但是推荐设置)
如果忘记 UUID 或者想修改配置,可以在 Pages 的设置里面修改。
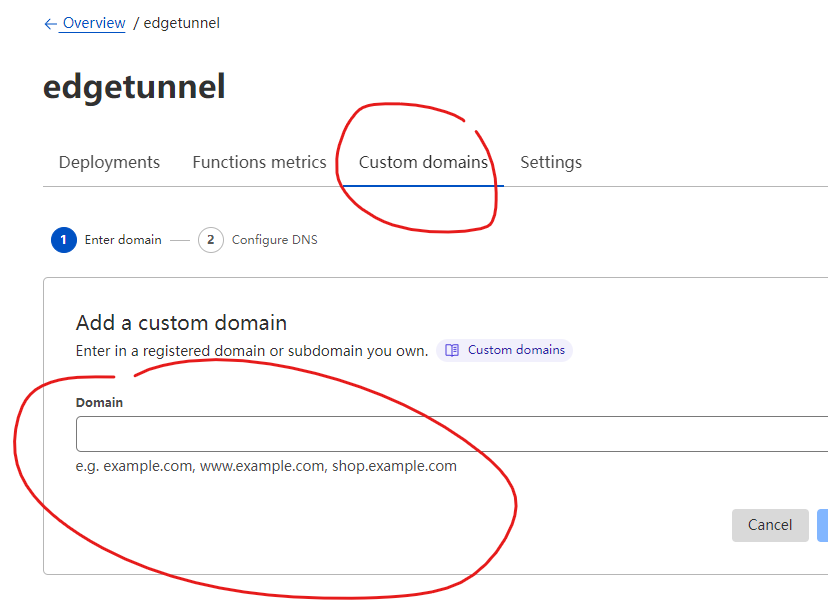
#自定义域名
#使用 Cloudflare Pages 最新 build V2 系统
#Cloudflare TOS
按照我对 Cloudflare TOS 理解。Cloudflare Pages 是可以运行代理软件的。
Unlike most Cloudflare products, the Developer Platform can be used to host content. Content stored on the Developer Platform (whether in conjunction with a Cloudflare storage offering or not) that we determine in our sole judgment to be illegal, harmful, or in violation of Section 5 of the Cloudflare Developer Platforms Supplemental Terms may be blocked or removed, and use of the Developer Platform for storage of such illegal or harmful content may result in suspension or termination of Cloudflare Services. While we generally try to provide notice of such action, we reserve the right to take action without notice as appropriate. For these purposes, illegal or harmful content includes but is not limited to: (a) content containing, promoting, or facilitating child sexual abuse material or human trafficking; (b) content that infringes on another person’s intellectual property rights or is otherwise unlawful; (c) content that discloses sensitive personal information, incites or exploits violence, or is intended to defraud the public; and (d) content that seeks to distribute malware, facilitate phishing, or otherwise constitutes technical abuse.
按照我对协议理解,Cloudflare Worker 是可以运行代理软件的。
from https://edgetunnel.github.io/edgetunnel/guide/cf-pages.html
--------------------------------------------------------------------------------
使用 CF worker给 V2ray 节点加速
假如你已经搭建了一个v2ray 服务器,但觉得速度有些慢,可以尝试使用 cloudflare 的 workers 给节点 CDN 加速一下。虽然有不少人感觉 cloudflare 的 CDN 就是一个减速器,但从个人体验来说,加速效果还是很明显的,尤其是在使用一些国外小水管服务器的时候。
操作步骤
登录 cloudflare,新建一个 worker。

然后把下面的 JS 代码粘贴到对应区域,记得把 url.hostname 替换成想要加速的 v2ray 节点域名(只是域名,不要添加前面的 http 和后面的路径那些)。
addEventListener(
  "fetch",event => {
     let url=new URL(event.request.url);
     url.hostname="xxxx-elecv2.cloud.okteto.net";
     let request=new Request(url,event.request);
     event. respondWith(
       fetch(request)
     )
  }
)
然后点击保存,会看到一个 workers 的服务器域名,类似: https://xxxxxx.xxxx.workers.dev ,这就是我们所需要的 CDN 域名。
使用方法
把客户端中被加速节点的信息复制一份,然后把域名换成 workers 服务器的域名(xxxxxx.xxxx.workers.dev)即可。
例如,原来被加速的节点信息为:
vmess=xxxx-xxxxxx.cloud.okteto.net:443, method=aes-128-gcm, password=fc784596-c17d-46da-bbb4-7d5142b8866a, obfs=wss, obfs-uri=/elecV2, fast-open=false, udp-relay=false, tag=EVOKTETO
那么可以直接复制上面的信息,修改一下域名,然后添加一个新的节点:
vmess=xxxxxx.xxxx.workers.dev:443, method=aes-128-gcm, password=fc784596-c17d-46da-bbb4-7d5142b8866a, obfs=wss, obfs-uri=/elecV2, fast-open=false, udp-relay=false, tag=EVOKTETO-CDN
这个操作完全不影响原来节点的使用,只是多了一个 CDN 的加速节点,很值得尝试一下。
from https://github.com/elecV2/blog/blob/master/%E4%BD%BF%E7%94%A8%20CF%20workers%20%E7%BB%99%20V2ray%20%E8%8A%82%E7%82%B9%E5%8A%A0%E9%80%9F.md
---------------------------------------------------------------------------
在 CloudFlare Workers 或 CloudFlare Pages部署vless 节点.
cf-wkrs-pages-vless
部署教程
- Workers 教程地址:https://blog.misaka.rest/2023/07/29/cf-wkrs-vless/
- Pages 教程地址:https://blog.misaka.rest/2023/07/29/cf-pages-vless/
鸣谢项目
注意事项
- 由于 Workers 节点的 IP 变动频繁,因此请勿在此节点登录重要账号
- 由于 pages.dev 域名默认启用了 HSTS,所以无法使用非 TLS 端口的节点
- 请勿滥用!
from https://github.com/Misaka-blog/cf-wkrs-pages-vless
(https://github.com/luckypoem/cf-wkrs-pages-vless)
--------------------------------------------------------------------
在 CloudFlare Workers 部署 VLESS 节点
在近期,大家应该不满足于 CloudFlare WARP 有限的速度,开始去尝试在 CloudFlare 里头研究 workers 节点了。相信大家已经看到了各类博主对于在 Workers 节点部署的教程。其实之前博主就已经研究了,但是想着不必给 CloudFlare 增加太多麻烦而一直没发布教程。不过,由于近期关于 workers 节点教程的泛滥,让我得以重新将教程发布给大家。在此感谢 zizifn 和 3Kmfi6HP 大佬的贡献,让我们得以在 CloudFlare Workers 部署 VLESS 节点.
准备材料
- CloudFlare 账号
注意事项
- 由于 Workers 节点的 IP 变动频繁,因此请勿在此节点登录重要账号
- 请勿滥用!
部署步骤
- 注册 CloudFlare 账户,转到“Workers & Pages”页面,点击“Create Application”按钮
- 点击“Create Worker”按钮
- 设置workers的名称,点击“Deploy”按钮
- 点击“Configure Worker”按钮
- 点击“Quick Edit”按钮,修改代码。
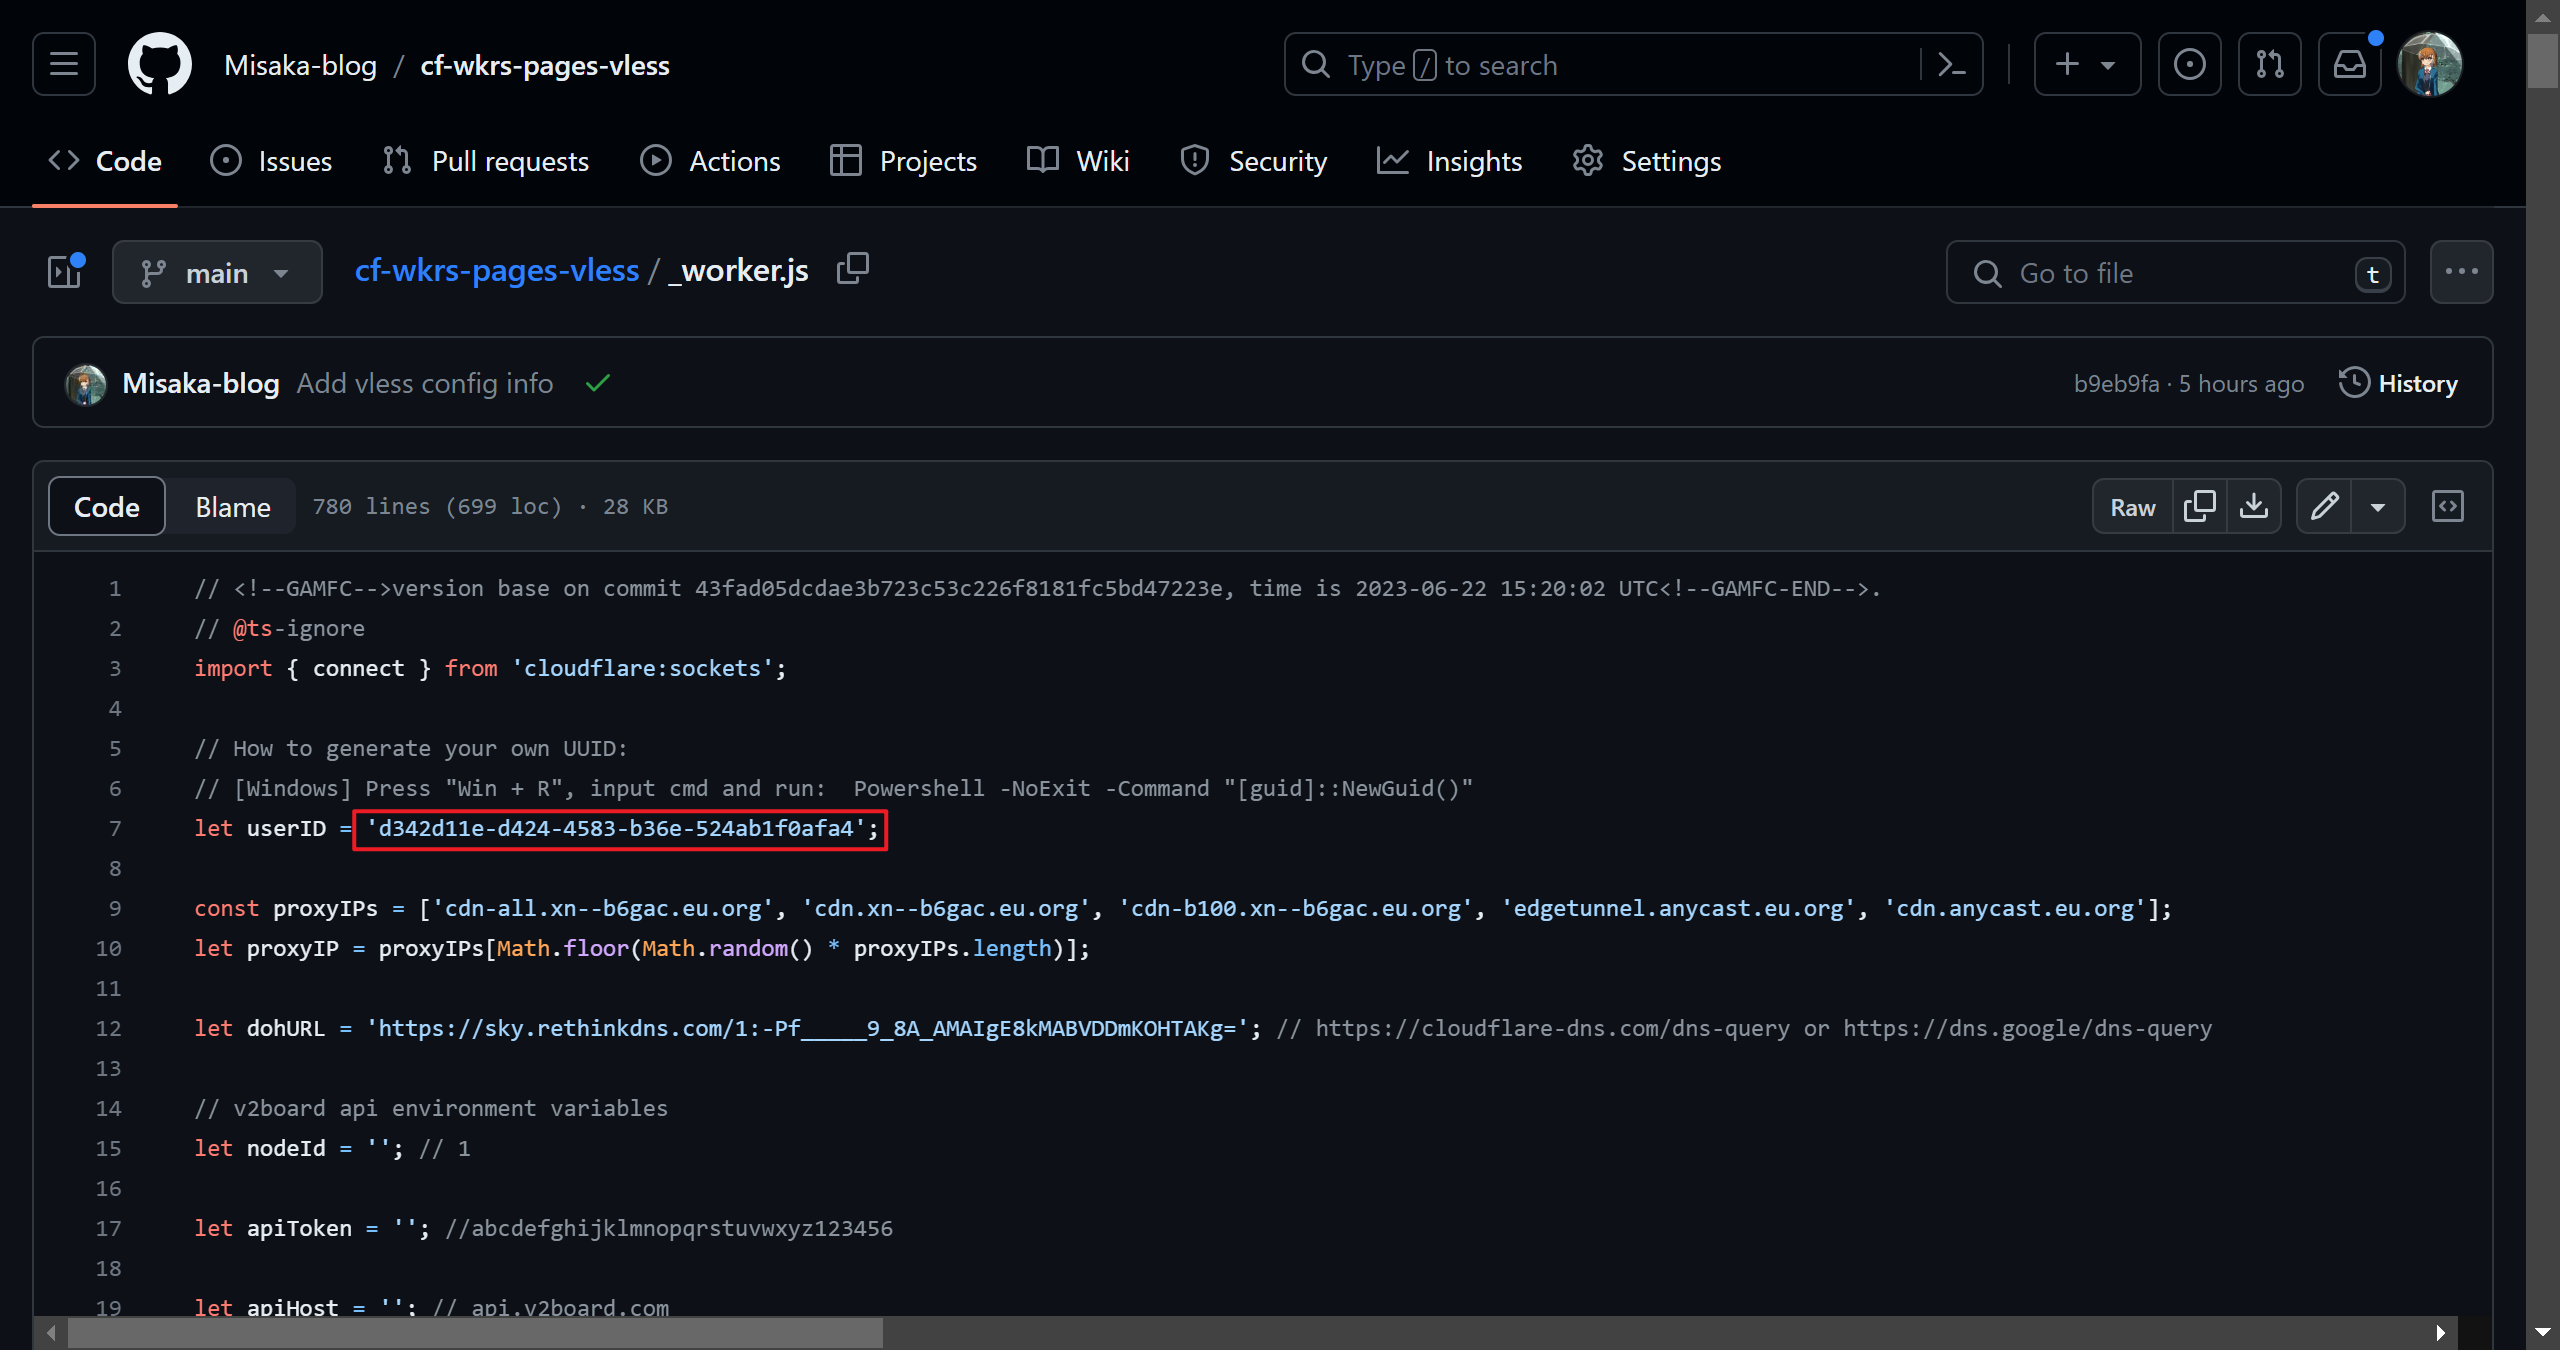
- 转到项目文件:https://github.com/Misaka-blog/cf-wkrs-pages-vless/blob/main/_worker.js ,点击复制按钮将文件内容全部复制,然后粘贴进workers中
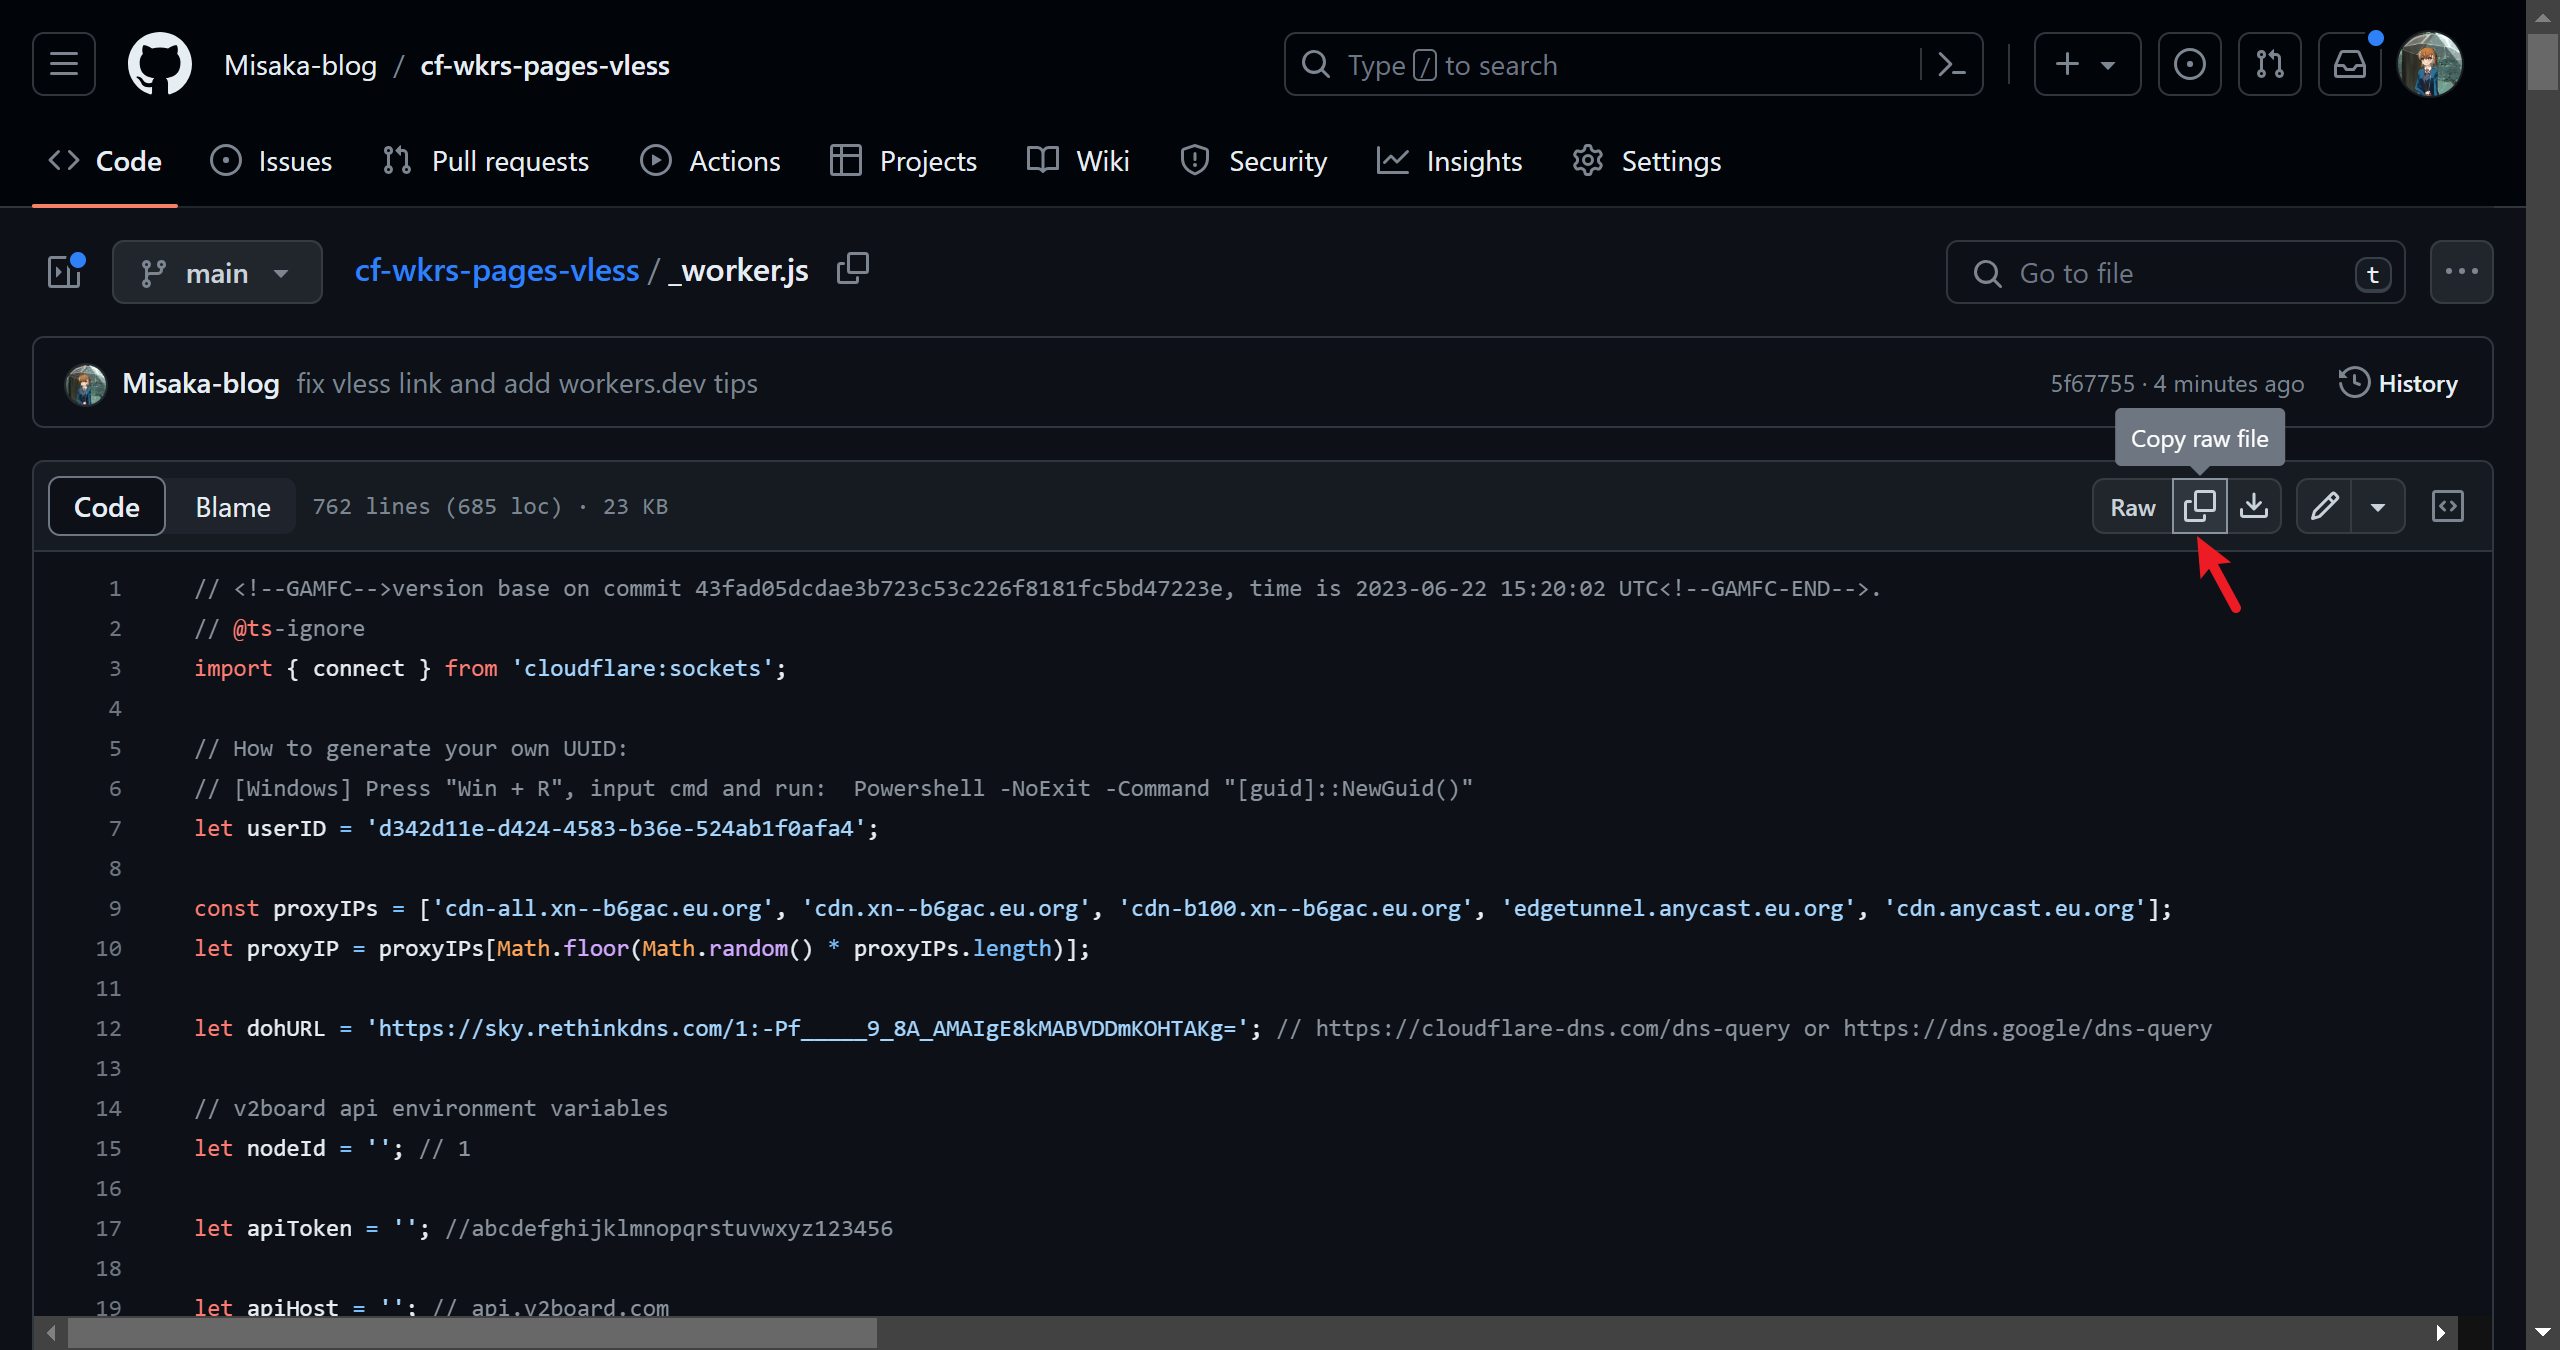
- 从 https://www.uuidgenerator.net/ 生成一个新的 UUID,然后替换第7行默认的 UUID,然后点击“Save and deploy”按钮,保存代码。
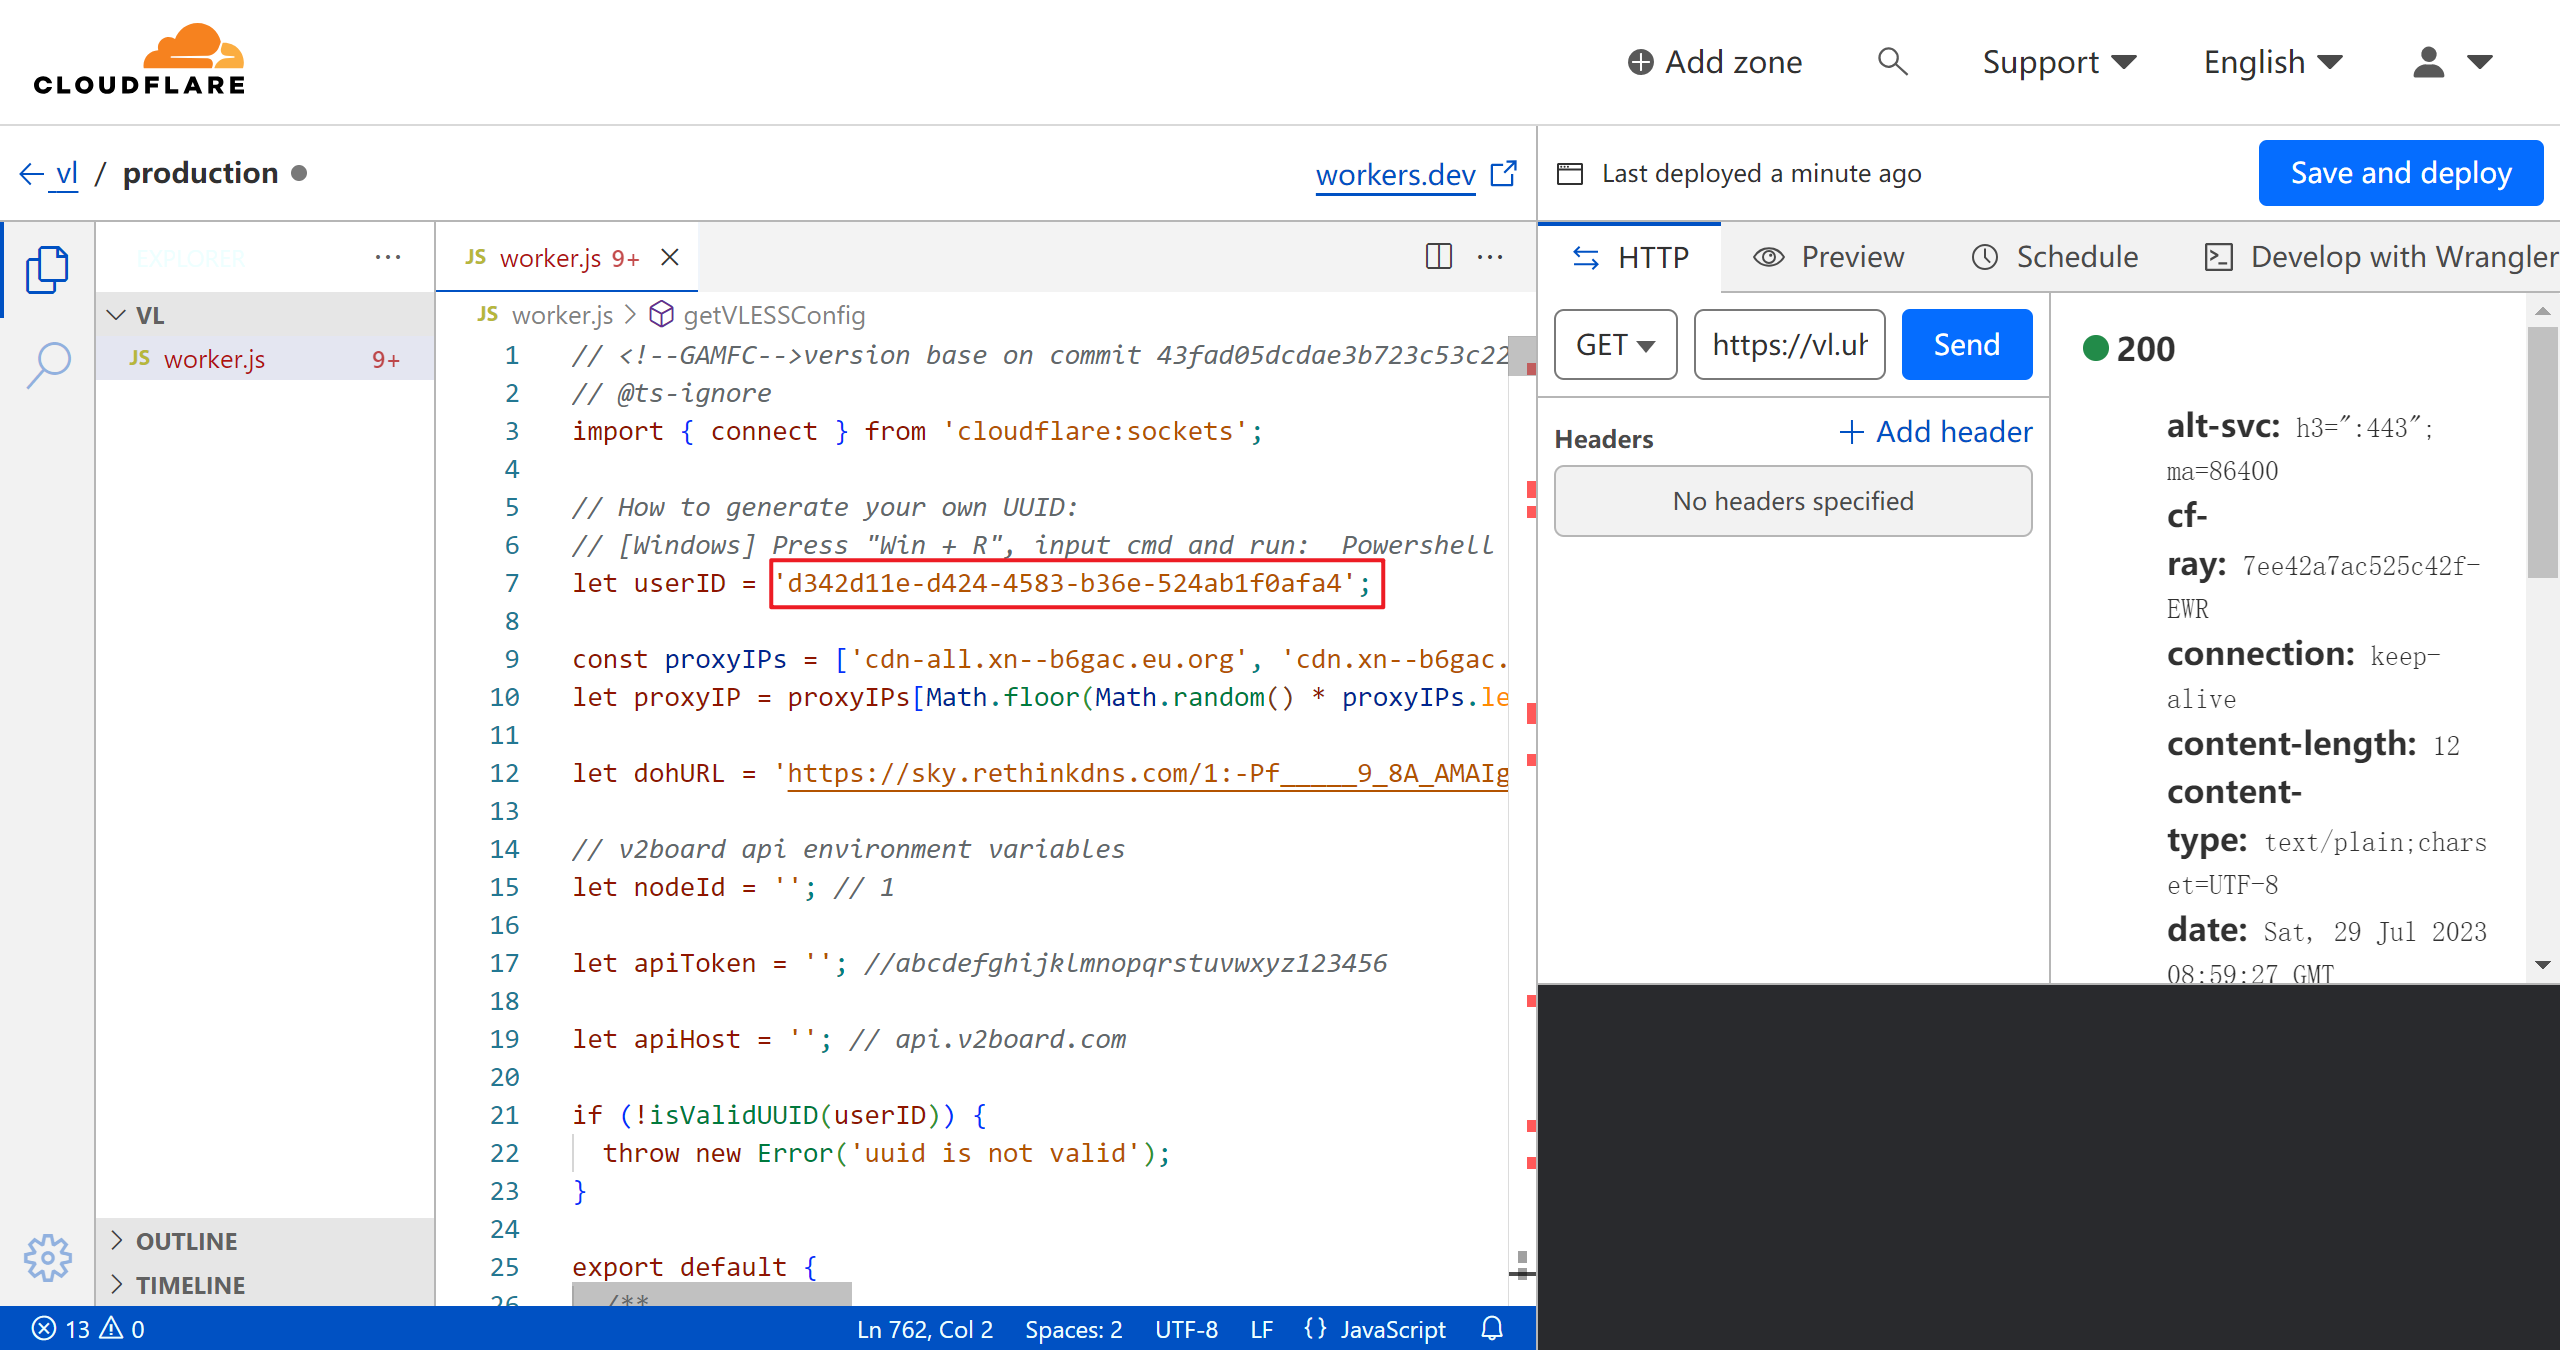
- 在右侧的侧边栏中,转到“Preview”选项卡,然后点击打开新窗口按钮
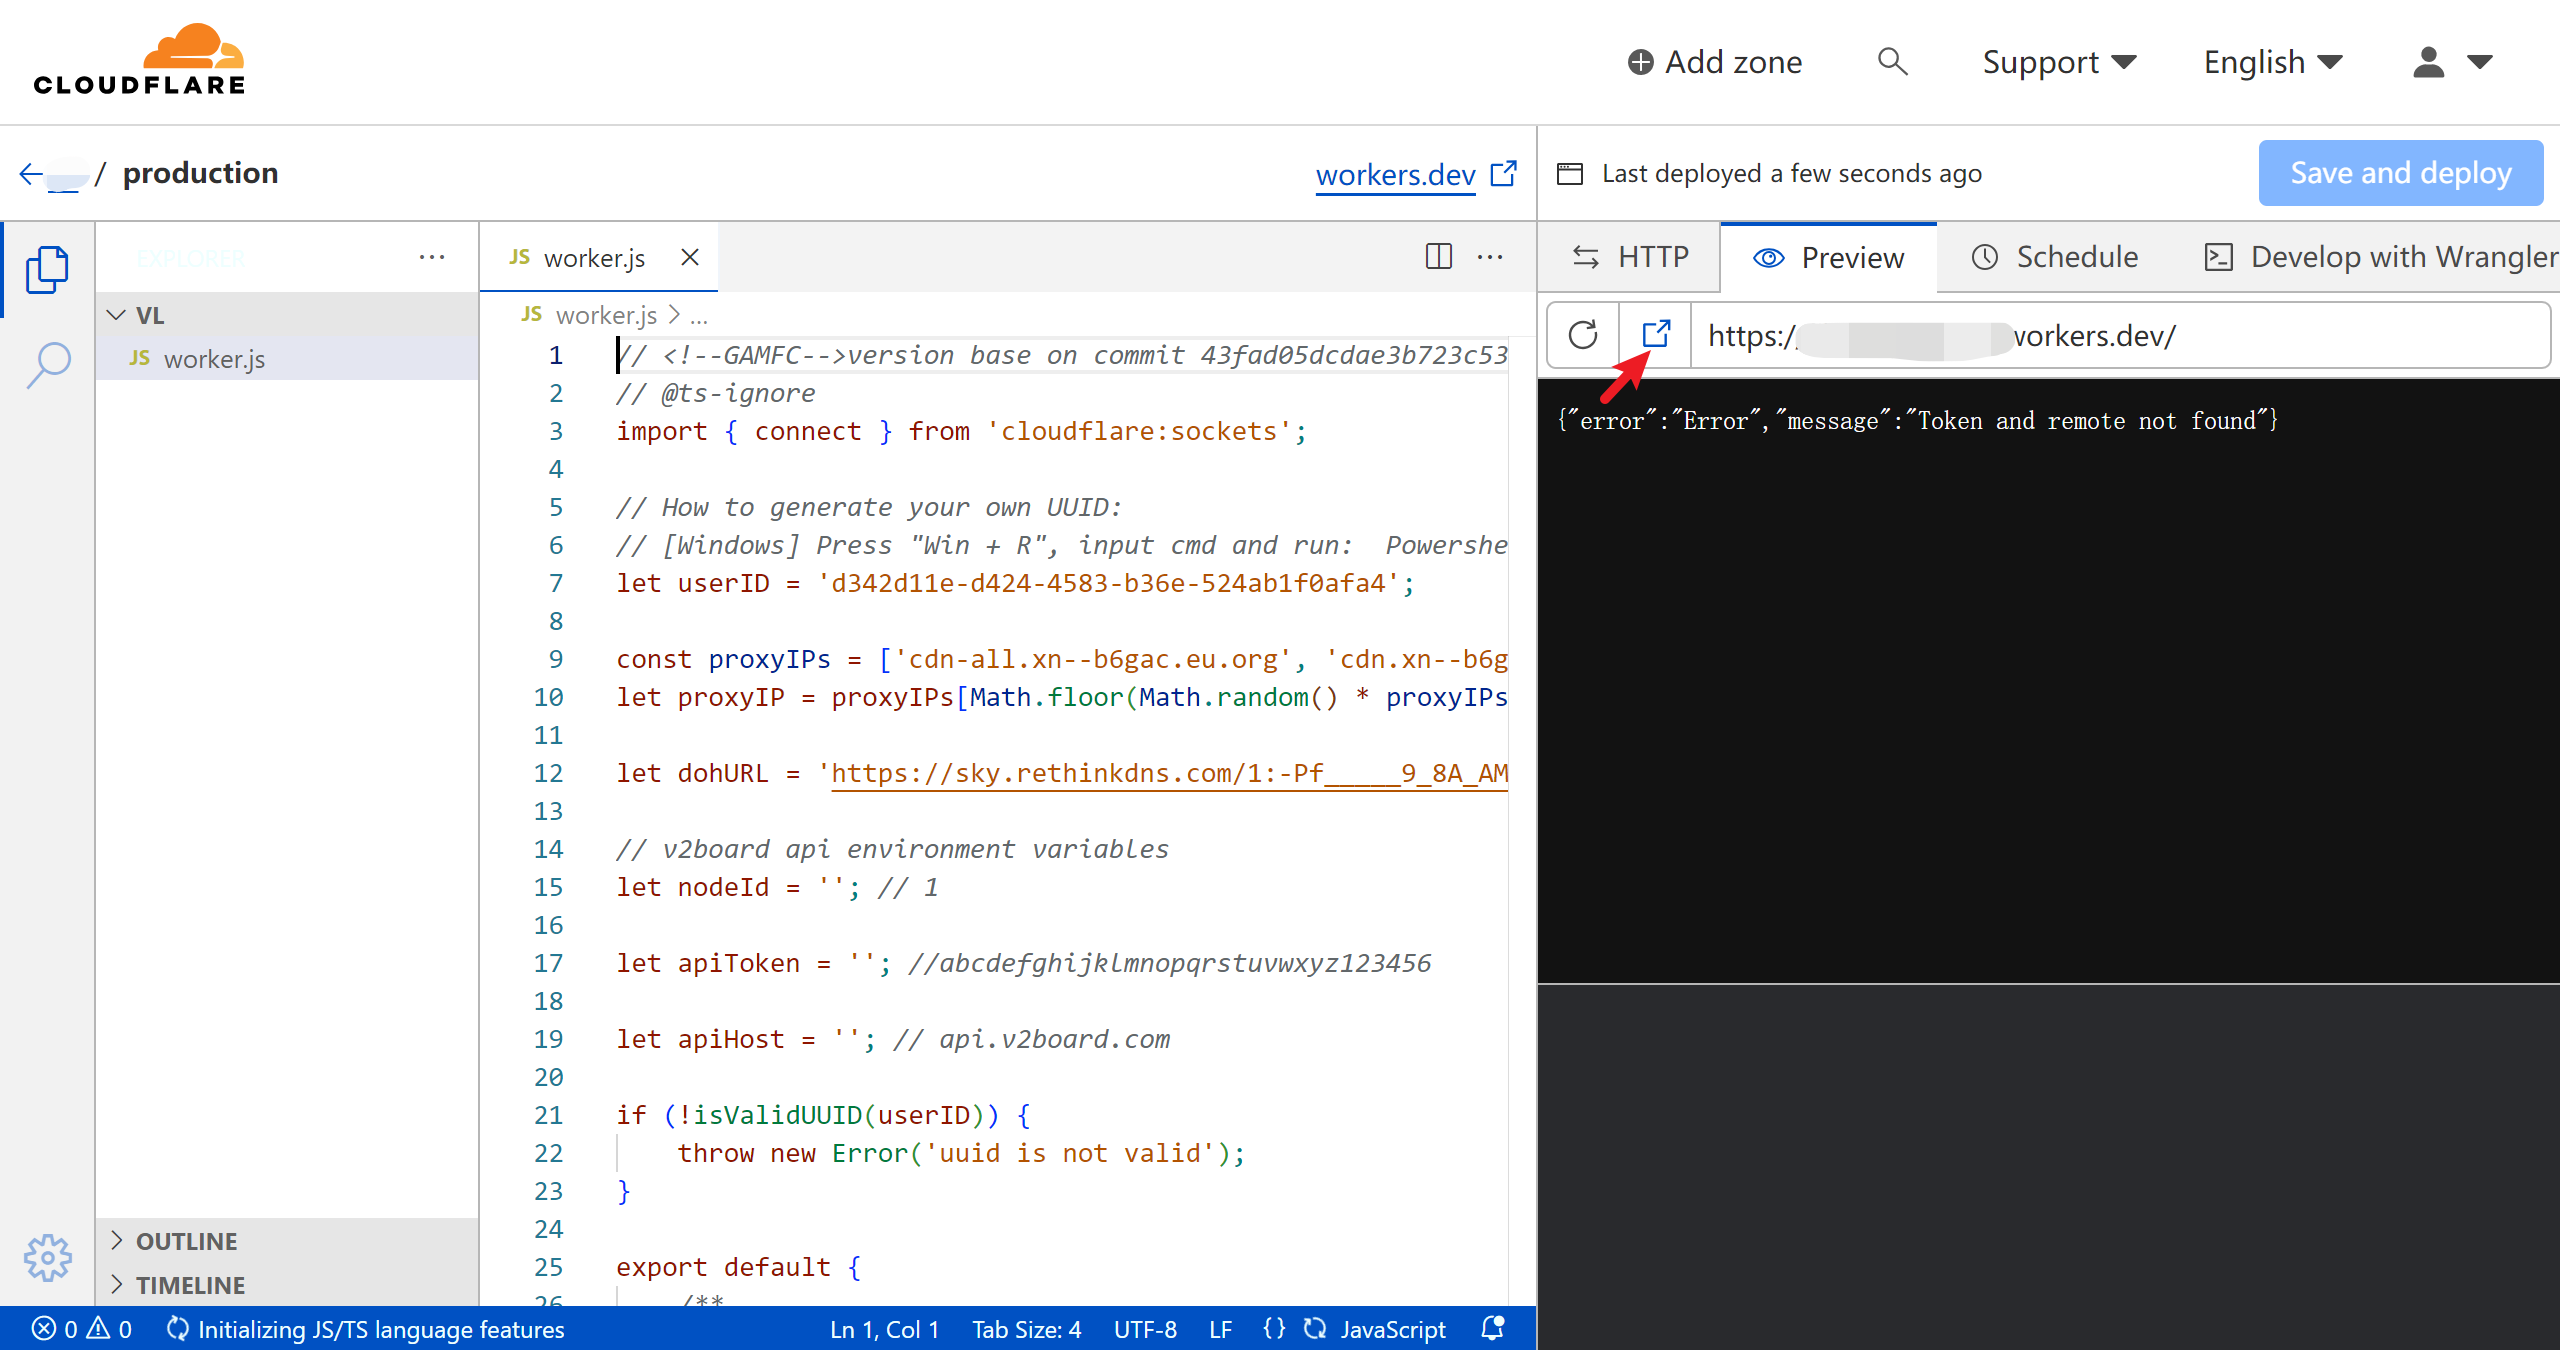
- 在访问的域名后面加上
/UUID(例如:https://edge.tunnel.workers.dev/d342d11e-d424-4583-b36e-524ab1f0afa4),可以得到关于 workers 节点的分享链接信息
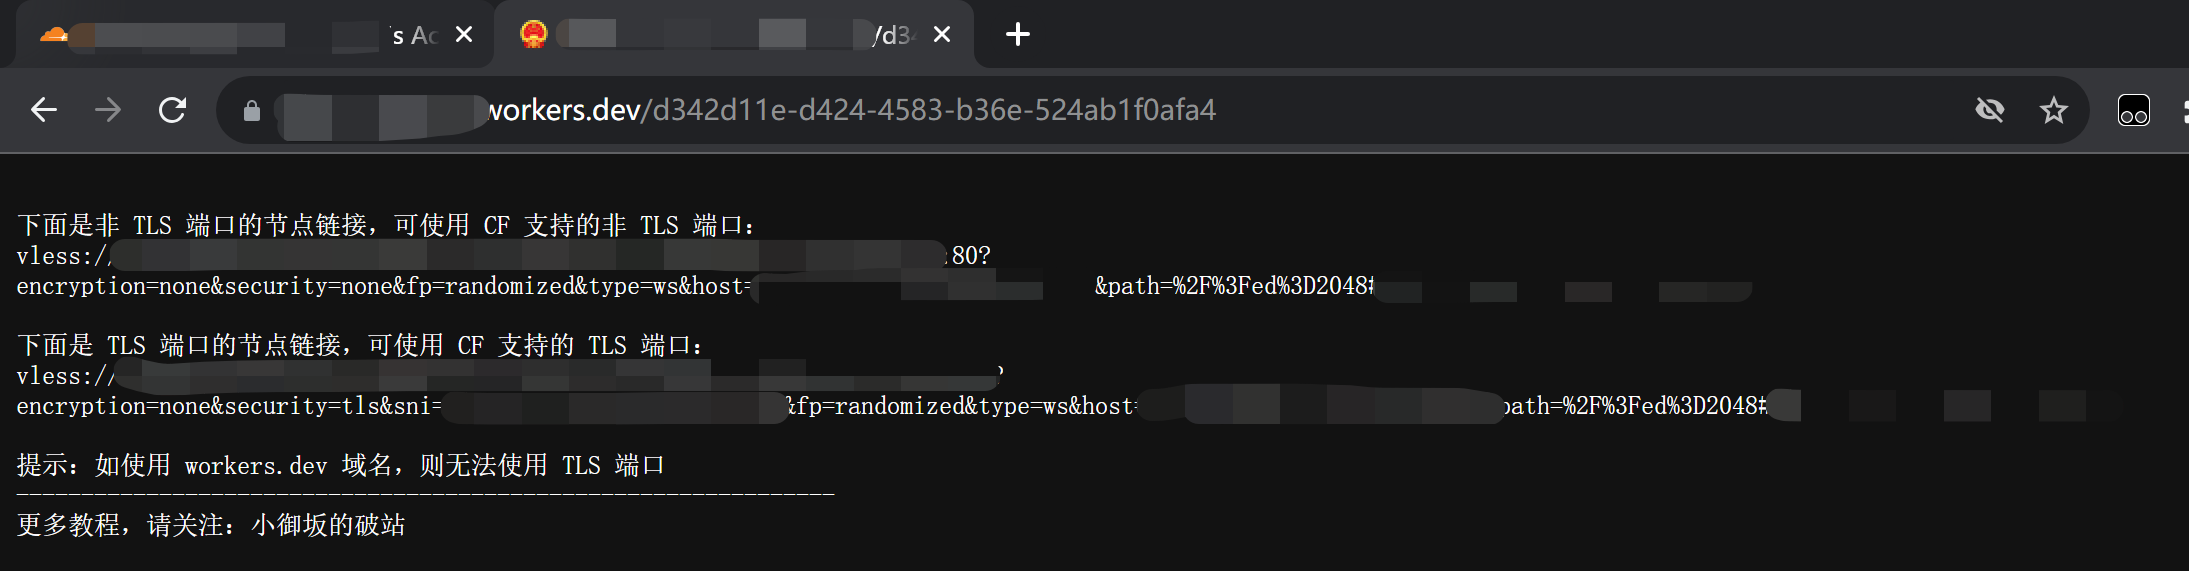
- 复制任意一条分享链接(如使用默认
workers.dev域名则只能复制非 TLS 端口的链接),导入至客户端。然后修改链接的IP为自己的优选IP
- 如需要绑定自己的域名,则转到“触发器”,点击“添加自定义域”
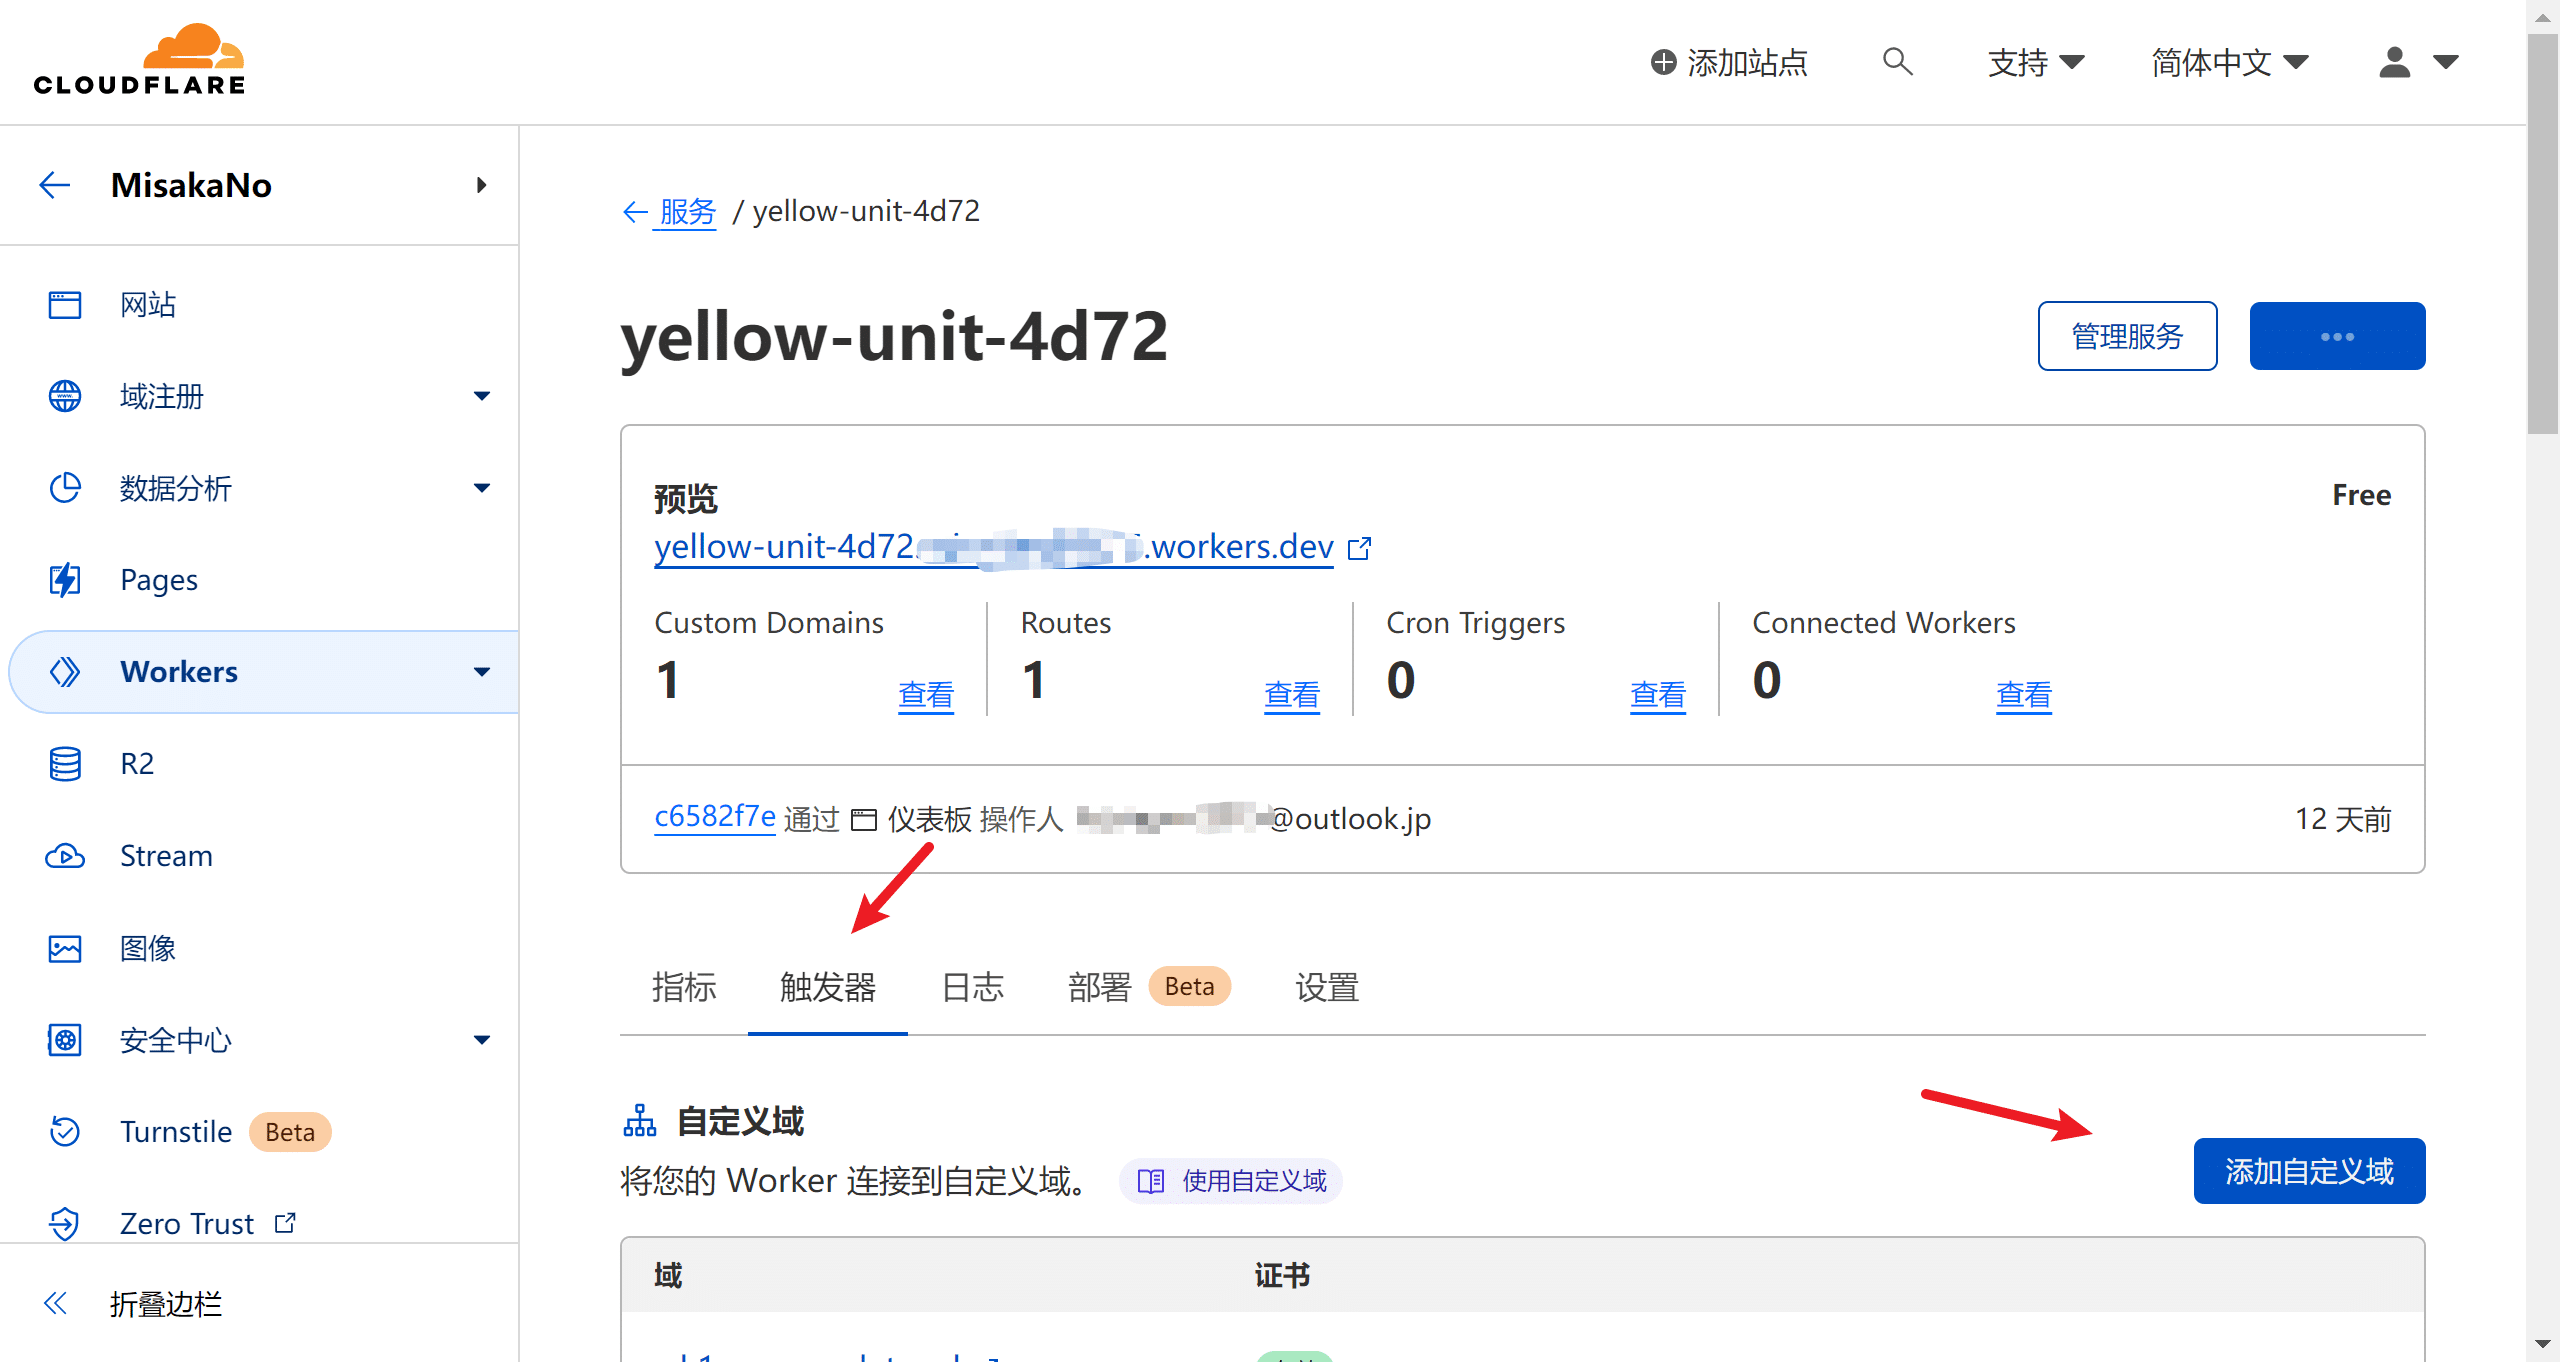
- 输入你想要绑定的域名(备注:一级域名需要绑定在CloudFlare账号里面)
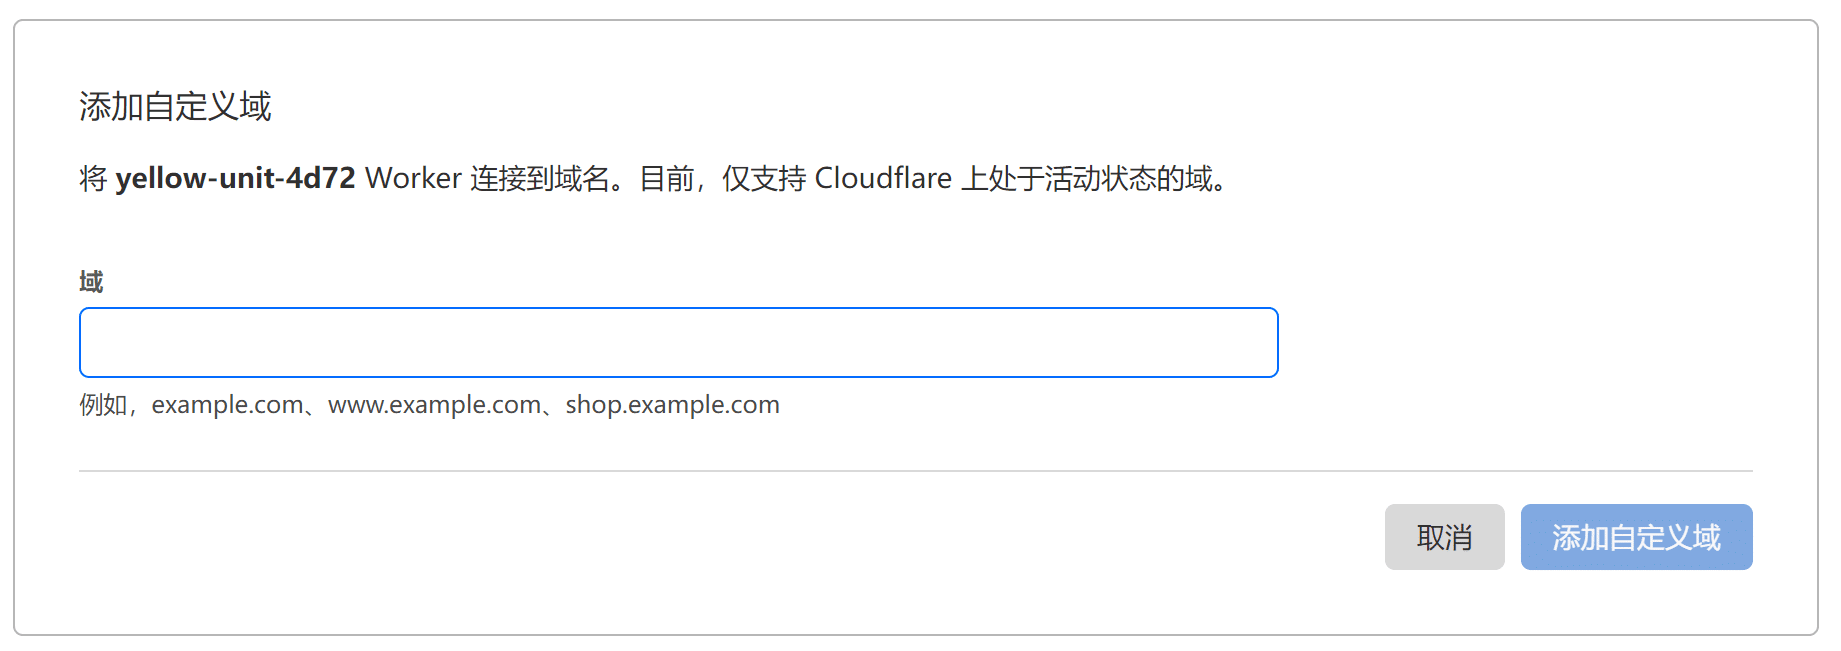
from https://blog.misaka.rest/2023/07/29/cf-wkrs-vless/
-----------------------------------------------------------------------
在 CloudFlare Pages 部署 vless 节点
在上一篇文章中,我讲解了如何使用 CloudFlare Workers 部署 vless 节点。但是某些读者想在使用默认域名的时候使用 TLS 端口的节点,再加上 CloudFlare Pages 支持 workers 的部署代码,所以说这篇教程就来和大家一起来在 CloudFlare Pages 部署 vless 节点。
准备材料
- GitHub 账户
- CloudFlare 账户
注意事项
- 由于 Pages 节点的 IP 变动频繁,因此请勿在此节点登录重要账号
- 请勿滥用!
部署步骤
- 打开GitHub 项目:https://github.com/Misaka-blog/cf-wkrs-pages-vless ,依次点击“Use this template” → “Create a new repository”

- 设置仓库名称,然后点击“Create repository”

- 如需修改UUID,请修改
_worker.js中的第七行,改为自己的UUID(可从 https://www.uuidgenerator.net/ 生成)
- 打开 CloudFlare 仪表板,转到“Workers & Pages”页面,点击“Create Application”按钮
- 点击“Pages”选项,然后点击“Connect to Git”按钮
- 选择自己的仓库

- 输入项目名称,其他保持默认即可。然后点击“Save and deploy”部署

- 如果可以打开伪装页面,则说明节点部署成功

- 在访问的域名后面加上
/UUID(例如:https://edge.tunnel.pages.dev/d342d11e-d424-4583-b36e-524ab1f0afa4),可以得到关于 pages 节点的分享链接信息

- 复制TLS的分享链接,导入至客户端。然后修改链接的IP为自己的优选IP
- 可以在自定义域这里绑定自己的域名

from https://blog.misaka.rest/2023/07/29/cf-pages-vless/
------------------------------------------------------------------------------------------
Use Cloudflare pages and worker serverless to implement VLESS protocol.
EDtunnel
GitHub Repository for https://github.com/zizifn/edgetunnel
Cloudflare pure IP update: https://t.me/edtunnel
Deploy in pages.dev
-
See YouTube Video:
-
Clone this repository deploy in cloudflare pages.
Deploy in worker.dev
-
Copy
_worker.jscode from here. -
Alternatively, you can click the button below to deploy directly.
Lazy to deploy
aHR0cHM6Ly9vc3MudjJyYXlzZS5jb20vcHJveGllcy9kYXRhLzIwMjMtMDctMzAvRnJFS1lvQS50eHQ= (free clash.meta subscribe config)
UUID Setting (Optional)
-
When deploy in cloudflare pages, you can set uuid in
wrangler.tomlfile. variable name isUUID.wrangler.tomlfile is also supported. (recommended) in case deploy in webpages, you can not set uuid inwrangler.tomlfile. -
When deploy in worker.dev, you can set uuid in
_worker.jsfile. variable name isuserID.wrangler.tomlfile is also supported. (recommended) in case deploy in webpages, you can not set uuid inwrangler.tomlfile. in this case, you can also set uuid inUUIDenviroment variable.
Note: UUID is the uuid you want to set. pages.dev and worker.dev all of them method supported, but depend on your deploy method.
UUID Setting Example
-
single uuid environment variable
UUID = "uuid here your want to set"
multiple uuid environment variable
UUID = "uuid1,uuid2,uuid3"
note: uuid1, uuid2, uuid3 are separated by commas
,. when you set multiple uuid, you can usehttps://edtunnel.pages.dev/uuid1to get the clash config and vless:// link.
subscribe vless:// link (Optional)
-
visit
https://edtunnel.pages.dev/uuid your setto get the subscribe link. -
visit
https://edtunnel.pages.dev/sub/uuid your setto get the subscribe content withuuid your setpath.note:
uuid your setis the uuid you set in UUID enviroment orwrangler.toml,_worker.jsfile. when you set multiple uuid, you can usehttps://edtunnel.pages.dev/sub/uuid1to get the subscribe content withuuid1path.(only support first uuid in multiple uuid set) -
visit
https://edtunnel.pages.dev/sub/uuid your set/?format=clashto get the subscribe content withuuid your setpath andclashformat. content will return with base64 encode.note:
uuid your setis the uuid you set in UUID enviroment orwrangler.toml,_worker.jsfile. when you set multiple uuid, you can will usehttps://edtunnel.pages.dev/sub/uuid1/?format=clashto get the subscribe content withuuid1path andclashformat.(only support first uuid in multiple uuid set)
multiple port support (Optional)
For a list of Cloudflare supported ports, please refer to the official documentation.
By default, the port is 80 and 443. If you want to add more ports, you can use the following ports:
80, 8080, 8880, 2052, 2086, 2095, 443, 8443, 2053, 2096, 2087, 2083
http port: 80, 8080, 8880, 2052, 2086, 2095
https port: 443, 8443, 2053, 2096, 2087, 2083
if you deploy in cloudflare pages, https port is not supported. Simply add multiple ports node drictly use subscribe link, subscribe content will return all Cloudflare supported ports.
proxyIP (Optional)
-
When deploy in cloudflare pages, you can set proxyIP in
wrangler.tomlfile. variable name isPROXYIP. -
When deploy in worker.dev, you can set proxyIP in
_worker.jsfile. variable name isproxyIP.
note: proxyIP is the ip or domain you want to
set. this means that the proxyIP is used to route traffic through a
proxy rather than directly to a website that is using Cloudflare's
(CDN). if you don't set this variable, connection to the Cloudflare IP
will be cancelled (or blocked)...
resons: Outbound TCP sockets to Cloudflare IP ranges are temporarily blocked, please refer to the tcp-sockets documentation
Usage
frist, open your pages.dev domain https://edtunnel.pages.dev/ in your browser, then you can see the following page:
The path /uuid your seetting to get the clash config and vless:// link.
from https://github.com/3Kmfi6HP/EDtunnel
No comments:
Post a Comment