Total Pageviews

Saturday, 29 October 2016

Network accelerating extensions for OpenWrt

OpenWrt extension packages for special applications。

Network accelerating extensions for OpenWrt (valuable Pull Requests are welcomed) 

Components

  • ipset-lists: 'ipset' lists with China IP assignments (data from apnic.net)
  • proto-bridge: Protocol-filtered ethernet bridging drivers and a VLAN implementation with compressed VLAN header (YaVLAN)
  • shadowsocks-libev: Shadowsocks binaries
  • shadowsocks-tools: Shadowsocks configuration toolset for OpenWrt
  • minivtun-tools: Fast secure VPN in a custom protocol for rapidly deploying VPN services or getting through firewalls (refer to: https://github.com/rssnsj/minivtun)
  • file-storage: Toolset for auto-setup Samba file shares with attached USB storages and SD cards

How to install

mkdir -p /etc/opkg
# Run the following two lines according to the architecture of your router (DON'T run both)
echo "src/gz rssnsj http://rssn.cn/roms/feeds/ar71xx" > /etc/opkg/rssnsj.conf  # ar71xx-based
echo "src/gz rssnsj http://rssn.cn/roms/feeds/ramips" > /etc/opkg/rssnsj.conf  # ramips-based

opkg update
opkg install dnsmasq-full --force-overwrite
opkg install ipset-lists shadowsocks-libev shadowsocks-tools minivtun file-storage

rm -f /etc/opkg/rssnsj.conf
OpenWrt firmwares with this toolset integrated (only for the major "smart" models)

from https://github.com/rssnsj/network-feeds
---------
翻译:

包含的组件

  • ipset-lists: 包含所有中国IP地址段的ipset列表(数据来自 apnic.net)
  • proto-bridge: 区分协议的以太网桥接驱动,以及一种可压缩VLAN头的非标准VLAN技术(YaVLAN)
  • shadowsocks-libev: Shadowsocks服务程序(来自: https://github.com/shadowsocks/shadowsocks-libev)
  • shadowsocks-tools: OpenWrt下的Shadowsocks配置、启动脚本以及luci界面
  • minivtun-tools: 一种安全、快速、部署便捷的非标准协议VPN,可用于防火墙穿越(服务器配置方法请见: https://github.com/rssnsj/minivtun )
  • file-storage: USB存储、SD卡自动挂载与samba自动配置工具

如何安装

mkdir -p /etc/opkg
# 以下两条根据你的路由器架构选择执行(不要两条都执行)
echo "src/gz rssnsj http://rssn.cn/roms/feeds/ar71xx" > /etc/opkg/rssnsj.conf  # 基于ar71xx的路由器
echo "src/gz rssnsj http://rssn.cn/roms/feeds/ramips" > /etc/opkg/rssnsj.conf  # 基于ramips的路由器

opkg update
opkg install dnsmasq-full --force-overwrite
opkg install pdnsd ipset-lists shadowsocks-libev shadowsocks-tools minivtun file-storage

rm -f /etc/opkg/rssnsj.conf
集成本项目的OpenWrt固件(仅支持市面上主流智能路由)

利用minivtun vpn翻墙

A fast, secure and reliable VPN service based on non-standard protocol.

A fast secure and reliable VPN service in non-standard protocol for rapidly deploying VPN servers/clients or getting through firewalls

Key features
Fast: direct UDP-encapsulated without complex authentication handshakes.
Secure: both header and tunnel data are encrypted, which is impossible to be tracked by protocol characteristics and blocked, unless all UDP ports are blocked by your firewall; spoofed packets from unauthorized peer are dropped immediately.
Reliable: communication recovers immediately from next received packet from client after the previous session was dead, which makes the connection extremely reliable.
Rapid to deploy: a standalone program to run; all configuration are specified in command line with very few options.
Installation for Linux
Install required development components

sudo apt-get install build-essential libssl-dev   # for Ubuntu / Debian
sudo yum install make gcc openssl-devel   # for CentOS / Fedora / RedHat

Installation for Mac OS X
Install TUNTAP driver for Mac OS X: http://tuntaposx.sourceforge.net

git clone https://github.com/rssnsj/minivtun
cd minivtun/src
make (这步会在当前目录下,生成可执行文件minivtun.)
./minivtun -h
Usage
Mini virtual tunneller in non-standard protocol.
Usage:
  minivtun [options]
Options:
  -l, --local <ip:port>               IP:port for server to listen
  -r, --remote <ip:port>              IP:port of server to connect
  -a, --ipv4-addr <tun_lip/tun_rip>   pointopoint IPv4 pair of the virtual interface
                  <tun_lip/pfx_len>   IPv4 address/prefix length pair
  -A, --ipv6-addr <tun_ip6/pfx_len>   IPv6 address/prefix length pair
  -m, --mtu <mtu>                     set MTU size, default: 1300.
  -t, --keepalive <keepalive_timeo>   interval of keep-alive packets, default: 13
  -n, --ifname <ifname>               virtual interface name
  -p, --pidfile <pid_file>            PID file of the daemon
  -e, --key <encryption_key>          shared password for data encryption
  -v, --route <network/prefix=gateway>
                                      route a network to a client address, can be multiple
  -w, --wait-dns                      wait for DNS resolve ready after service started.
  -d, --daemon                        run as daemon process
  -h, --help                          print this help
Examples
Server: Run a VPN server on port 1414, with local virtual address 10.7.0.1, client address space 10.7.0.0/24, encryption password 'Hello':

/usr/sbin/minivtun -l 0.0.0.0:1414 -a 10.7.0.1/24 -e Hello -d
Client: Connect VPN to the above server (assuming address vpn.abc.com), with local virtual address 10.7.0.33:

/usr/sbin/minivtun -r vpn.abc.com:1414 -a 10.7.0.33/24 -e Hello -d
Multiple clients on different devices can be connected to the same server:

/usr/sbin/minivtun -r vpn.abc.com:1414 -a 10.7.0.34/24 -e Hello -d
/usr/sbin/minivtun -r vpn.abc.com:1414 -a 10.7.0.35/24 -e Hello -d
/usr/sbin/minivtun -r vpn.abc.com:1414 -a 10.7.0.36/24 -e Hello -d

from https://github.com/rssnsj/minivtun
-------------

我的补充说明

登陆Linux vps(最好是kvm vps.若是openvz vps,容易遇错)
git clone https://github.com/rssnsj/minivtun
cd minivtun/src
make (这步会在当前目录下,生成可执行文件minivtun.)
./minivtun -l 0.0.0.0:1414 -a 10.7.0.1/24 --key my-key -d
会显示:
Mini virtual tunneling server on 0.0.0.0:1414, interface: mv0.
(会在vps中,生成虚拟网卡mv0)
以上的命令/root/minivtun/src/minivtun -l 0.0.0.0:1414 -a 10.7.0.1/24 --key my-key -d
并不会随着vps的启动而自动运行,所以建议用systemd来设置一下:
nano /etc/systemd/system/minivtun.service
内容如下:
[Unit]
After=network.target 

[Service]
ExecStart=/root/minivtun/src/minivtun -l 0.0.0.0:1414 -a 10.7.0.1/24 --key my-key
Restart=always

[Install]
WantedBy=multi-user.target

然后,
systemctl start minivtun
systemctl enable minivtun

root@wh:~/minivtun/src# nano /etc/sysctl.conf,
(把net.ipv4.ip_forward那一行的#号去掉并把net.ipv4.ip_forward的值改为1)
sysctl -p
会显示:
net.ipv4.ip_forward = 1

root@wh:~/minivtun/src# iptables -t nat -A POSTROUTING -s 10.7.0.1/24 -o eth0 -j MASQUERADE
服务器端设置完毕。

在客户机器mac上。
安装TUNTAP driver for Mac OS X: http://tuntaposx.sourceforge.net,然后,

git clone https://github.com/rssnsj/minivtun
cd minivtun/src
make (这步会在当前目录下,生成可执行文件minivtun.)
sudo ./minivtun -r my-vps-ip:1414 -a 10.7.0.2/24 --key my-key
Password:

会显示:
Mini virtual tunnelling client to my-vps-ip:1414, interface: tun0.
(会在mac机器中,生成虚拟网卡tun0)
保持该terminal窗口不要关闭。
然后新开一个terminal窗口,
ping 10.7.0.1
显示:
PING 10.7.0.1 (10.7.0.1): 56 data bytes
64 bytes from 10.7.0.1: icmp_seq=0 ttl=64 time=26.829 ms
64 bytes from 10.7.0.1: icmp_seq=1 ttl=64 time=22.975 ms
64 bytes from 10.7.0.1: icmp_seq=2 ttl=64 time=23.071 ms
64 bytes from 10.7.0.1: icmp_seq=3 ttl=64 time=23.547 ms
64 bytes from 10.7.0.1: icmp_seq=4 ttl=64 time=23.713 ms
64 bytes from 10.7.0.1: icmp_seq=5 ttl=64 time=23.456 ms
64 bytes from 10.7.0.1: icmp_seq=6 ttl=64 time=23.693 ms
64 bytes from 10.7.0.1: icmp_seq=7 ttl=64 time=25.982 ms
^C
--- 10.7.0.1 ping statistics ---
8 packets transmitted, 8 packets received, 0.0% packet loss
round-trip min/avg/max/stddev = 22.975/24.158/26.829/1.338 ms

可见,可以成功ping通vps的内网ip:10.7.0.1,
不过光能ping通vps的内网ip是不够的,mac机器依然不能翻墙。
(可以把sudo ./minivtun -r my-vps-ip:1414 -a 10.7.0.2/24 --key my-key保存为:
start-minivtun.sh文件)

紧接着运行:
sudo route delete default 
sudo route add default vps-internal-ip 
sudo route add vps-public-ip 192.168.1.1

(router-ip指路由器的ip,比如192.168.1.1,你需根据你的路由器的具体ip,写出其值,比如
有的是10.0.0.1;vps-internal-ip指vps在内网的ip,比如10.7.0.1)

然后运行:
sudo networksetup -setdnsservers "Wi-Fi" 127.0.0.1

然后运行某款dns proxy程序:

cd ~/dns2socks/DNS2SOCKS && sudo ./DNS2SOCKS 127.0.0.1:1080 8.8.8.8:53 127.0.0.1:53

(dns2socks的搭建,请参见https://briteming.blogspot.com/2019/07/socksdns-query-dns2socks.html

这样,mac机器就可以用此minivtun vpn翻墙了。

每隔25分钟,第一步会断开所以需要重新运行所有的4步:
sudo killall minivtun && cd ~/minivtun/src && sudo ./minivtun -r my-vps-ip:1414 -a 10.7.0.2/24 --key my-key

sudo route delete default 
sudo route add default vps-internal-ip 
sudo route add vps-public-ip 192.168.1.1 

sudo networksetup -setdnsservers "Wi-Fi" 127.0.0.1

cd ~/dns2socks/DNS2SOCKS && sudo ./DNS2SOCKS 127.0.0.1:1080 8.8.8.8:53 127.0.0.1:53
参见https://github.com/rssnsj/minivtun/issues/11

在终止minivtun进程后,还需运行:
sudo route add default 192.168.1.1  

sudo networksetup -setdnsservers "Wi-Fi" empty

这样,才恢复为墙内状态。

https://github.com/fanyueciyuan/eazy-for-ss/tree/master/minivtun ,此脚本我没用过。
---------------

minivtun在 windows下的客户端: minivtun-win

The minivtun is a tiny layer 3 vpn service on posix platform. And this is a windows client for it.

No IPv6 tunnel and point-to-point mode due to limitation of driver

Installation:
Install windows tap driver
site: https://github.com/OpenVPN/tap-windows https://github.com/OpenVPN/tap-windows6

precompiled binary:

NIDS 5 (windows xp and above) https://swupdate.openvpn.org/community/releases/tap-windows-9.9.2_3.exe
NIDS 6 (windows vista and above) https://swupdate.openvpn.org/community/releases/tap-windows-9.21.1.exe

Install required development components

python 2.7 python package: ipaddress pywin32 M2Crypto

Compile and pack

python setup.py py2exe

Usage
Mini virtual tunneller in non-standard protocol.
Usage:
  minivtun [options]
Options:
  -r, --remote <ip:port>            IP:port of server to connect
  -a, --ipv4-addr <tun_lip/pfx_len> IPv4 address/prefix length pair
  -k, --keepalive <keepalive_timeo> seconds between sending keep-alive packets, default: 13
  -t, --type <encryption_type>      encryption type, default: aes_128_cbc
  -e, --key <encrypt_key>           shared password for data encryption (if this option is missing, turn off encryption)
  -d                                run as daemon process
  -h, --help                        print this help
Supported encryption types:
  rc4, des, desx, aes-256, aes-128

Examples

Client: Connect VPN to the server (assuming address vpn.abc.com), with local virtual address 10.7.0.33, encryption with password "Hello":

python tun.py -r vpn.abc.com:1414 -a 10.7.0.33/24 -e Hello

Client: Connect VPN to the server (assuming address vpn.abc.com), with local virtual address 10.7.0.33, no encryption:

python tun.py -r vpn.abc.com:1414 -a 10.7.0.33/24

from https://github.com/boytm/minivtun-win
https://libraries.io/github/boytm/minivtun-win
---------------

利用minivtun实现点对点非公网NAT穿透,在学校轻松访问家里的路由器。 
一般这种情况用于:
  • 家里路由器挂载离线下载
  • 家里的WEB网络摄像头监控
  • 远程修改某些路由设置
  • 远程控制路由器相关的“智能家居”
现在仅考虑以下拓朴图,本文的目的是想让路由C访问路由A,实现C远程控制A。其中A是非智能路由器,使用非Openwrt系统。A下面挂接一个Openwrt路由器B
前提是A和C能顺利访问该VPS,而且B工作正常。

minivtun互访

这个minivtun是我常用的tun点对点隧道软件,工作原理与shadowvpn类似,可以当梯子使用。现有我移植的的minivtun-openwrt,可以自行编译安装在路由上面。
按照文档编译安装,服务端运行监听555端口
/usr/sbin/minivtun -l 0.0.0.0:555 -a 172.16.0.1/24 -e password -n mv0 -d
路由器B和C,同样使用minivtun实现与VPS对接,这里指定网络设备为mv001
# Router B: ip 172.16.0.3
/usr/sbin/minivtun -r [YOUR_VPS]:555 -a 172.16.0.3/24 -e password -n mv001 -d

# Router C: ip 172.16.0.55
/usr/sbin/minivtun -r [YOUR_VPS]:555 -a 172.16.0.55/24 -e password -n mv001 -d
使用Ping等工具测试路由B能否顺利访问VPS
ping 172.16.0.1

Openwrt端口转发

以下三个步骤均在路由B操作

新建接口

在network->interface标签下添加一个interface: 命名随意,这里命名为minivtun_intf,协议为DHCP Client,手动输入mv001这个物理接口进行绑定(因上面minivtun启动参数设定了mv001网络设备)
检查这个接口minivtun_intf是否获得正确的172.16.0.3/24地址,并且从数字变化过程中看到能有Tx/Rx流量通过。

入站防火墙

切换到Network->Firewall->Gerneral,添加一个新的Zone,随意命名为minivtun,指定入站出站转发三个都accept,勾选masquerading和MSS clamping进行伪装路由器。Covered Network只需要勾选两个区域即可,其中必选的是minivtun_intf表示源,另一个是目的地根据需要,可以选WAN或者LAN,如果访问Openwrt局域网就指定LAN,如果要访问WAN(比如上一级路由)就指定WAN
因为我是利用B去访问上一级的A,因此我勾选了WAN

端口转发

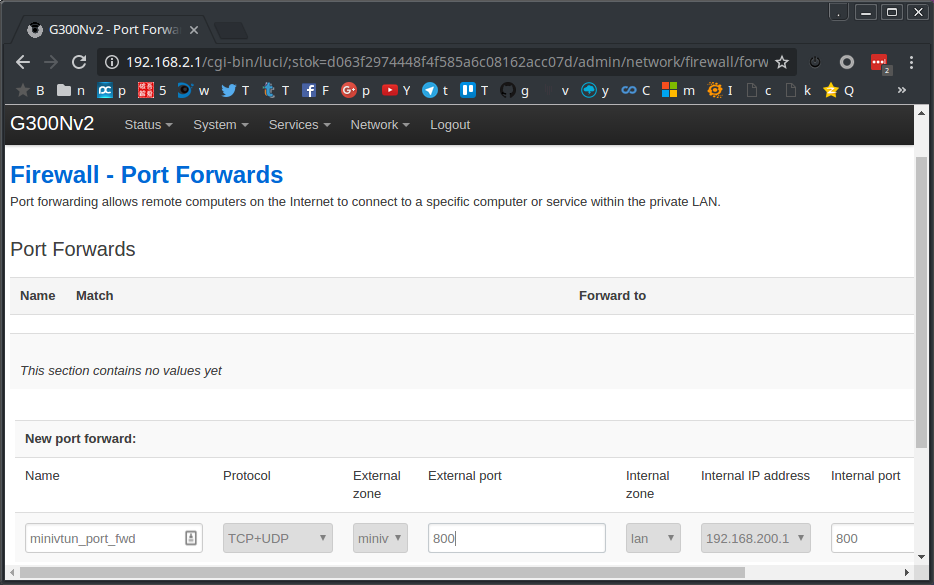
切换到Network->Firewall->Port Forward,新建一个转发规则
外部端口随意,(比如外部端口是444,那么在路由C使用minivtun访问172.16.0.3:444就触发端口转发条件)
项目备注我的值
名字随意起名minivtun_port_fwd
外部区域入站防火墙名字minivtun
外部端口供外部访问端口800
内部区域目的端口区域LAN
内部IP目的地址192.168.200.1
内部端口目的端口800

测试方法

从路由器C浏览器地址栏输入http://172.16.0.3:800即可访问路由A的800端口。
from http://lixingcong.github.io/2016/10/03/openwrt-port-forward/
----------
A simple tunnel for Linux. 
This repo is an unoffical port of minivtun for openwrt.

minivtun-openwrt

A fast secure and reliable VPN service in non-standard protocol for rapidly deploying VPN servers/clients or getting through firewall. Created by @rssnsj
It's a very simple point-to-point tunnel client/server. only less than 20kB size.
This repo is an unoffical port for openwrt, if you prefer the offical one, please visit minivtun-tools.
The default route and init.d files was copied from openwrt-shadowvpn. I am so lazy!

For Linux

Show you the Offical compile guide below
Install devel libs
# ubuntu
sudo apt-get install build-essential libssl-dev
# CentOS
sudo yum install make gcc openssl-devel
Compile and install
git clone https://github.com/rssnsj/minivtun.git minivtun
cd minivtun/src
make
sudo make install
Run and listen(my script copied from shadowvpn, not offical)
# modify your listenig port and password, etc
cd minivtun/linux-server
vi run.sh

# use bash to run, not sh
bash run.sh
if your want to run as linux-client, do the same as linux-server but under linux-client folders. You could turn the China-route mode on, just set isUseRouteFile to True
Enjoy it!

Complie for Openwrt (Client-side)

# ar71xx platform
tar xjf OpenWrt-SDK-ar71xx-for-linux-x86_64-gcc-4.8-linaro_uClibc-0.9.33.2.tar.bz2
cd OpenWrt-SDK-ar71xx-*
cd openwrt
git clone https://github.com/lixingcong/minivtun-openwrt package/minivtun-openwrt

# Select Network -> minivtun
make menuconfig
make package/minivtun-openwrt/compile V=99

Configuration for Openwrt

Change password or port
vi /etc/config/minivtun
# Switch: enable = 1 or 0
Restart service
/etc/init.d/minivtun restart
Use Chnroute.txt
Same as ShadowVPN or Shadowsocks, the chnroute.txt is available for Chinese user to change route.
Please visit  openwrt-shadowvpn for more details on route-mode.
# update route file
wget -O- 'http://ftp.apnic.net/apnic/stats/apnic/delegated-apnic-latest' | awk -F\| '/CN\|ipv4/ { printf("%s/%d\n", $4, 32-log($5)/log(2)) }' > /tmp/chinadns_chnroute.txt
cp /tmp/chinadns_chnroute.txt /etc/

vi /etc/config/minivtun
# set the route-mode to 1 (Domestic Mode)
# set route-file to /etc/chinadns_chnroute.txt

/etc/init.d/minivtun restart

Luci-app

A luci-app-minivtun was available, please vist openwrt-dist-luci.

Wiki

Please visit offical page minivtun
from https://github.com/lixingcong/minivtun-openwrt
------------------------

minivtun-rs

A Rust implementation of minivtun.

Usage

minivtun-rs 0.1
Mini virtual tunneller in non-standard protocol

USAGE:
    minivtun-rs [FLAGS] [OPTIONS]

FLAGS:
    -d, --daemon     run as daemon process
    -h, --help       Prints help information
    -V, --version    Prints version information

OPTIONS:
    -F, --fwmark <fwmark_num>              fwmark set on vpn traffic
    -n, --ifname <ifname>                  virtual interface name
    -a, --ipv4-addr <tun_lip/prf_len>      pointopoint IPv4 pair of the virtual interface
    -A, --ipv6-addr <tun_ip6/pfx_len>
    -K, --keepalive <N>                    seconds between keep-alive tests, default:7
    -e, --key <encryption_key>             shared password for data encryption
    -l, --local <ip:port>                  local IP:port for server to listen
    -M, --metric <metric>                  metric of attached routes
    -m, --mtu <mtu>                        set MTU size, default:1300
    -R, --reconnect-timeo <N>              maximum inactive time (seconds) before reconnect, default:47
    -r, --remote <host:port>               host:port of server to connect (brace with [] for bare IPv6)
    -v, --route <network/prefix[=gw>...    attached IPv4/IPv6 route on this link, can be multiple
    -T, --table <table_name>               route table of the attached routes
    -t, --type <encryption_type>           encryption type(aes-128, aes-256), default:aes-128
from https://github.com/optman/minivtun-rs

在Ubuntu桌面系统上,搭建android编译环境总结

Android源码:官方下载
Android编译版本: PLATFORM_VERSION=4.2.2
OS 操作系统平台: Linux carson-pc 3.0.0-12-generic #20-Ubuntu SMP Fri Oct 7 14:56:25 UTC 2011 x86_64 x86_64 x86_64 GNU/Linux(Ubuntu11.04  64bit)

1. 要用jdk1.6,不能用jdk1.7

2. /bin/bash: bison: command not found

方法:sudo apt-get install bison

3.  /bin/bash: xsltproc: command not found

方法:sudo apt-get install xsltproc

4./bin/bash: flex: command not found
make: *** [out/host/linux-x86/obj/EXECUTABLES/aidl_intermediates/aidl_language_l.cpp] Error 127

方法:sudo apt-get install flex

5. sh: gperf: not found
calling gperf failed: 32512 at ./makeprop.pl line 140.

方法:sudo apt-get install gperf

6. gcc: error trying to exec 'cc1plus': execvp: No such file or directory

方法:sudo apt-get install g++

7.collect2: error: ld terminated with signal 9

方法:增加ubuntu的虚拟内存。具体操作如下:

setp1:查看系统虚拟内存,命令:free -m

[html] view plain copy
carson@carson-pc:~$ free -m
             total       used       free     shared    buffers     cached
Mem:          1998       1528        469          0          6        423
-/+ buffers/cache:       1098        900
Swap:         2036        361       1675
我这是已经增加swap的,一般swap2G左右就足够编译android用的。在编译过程中,虽然增加了2G,但在编译时,若做一些操作比较占用swap的话,也会出现此问题。比如从移动硬盘copy android 源码。
setp2.创建一个 Swap 文件。

mkdir swap
cd swap
sudo dd if=/dev/zero of=swapfile bs=1024 count=100000
出现下列提示,上面命令中的 count 即代表swap文件大小,即增加的虚拟内存大小。此命令出现如下信息

[html] view plain copy
100000+0 records in
100000+0 records out
102400000 bytes (102 MB) copied, 0.377325 s, 271 MB/s
setp3:把生成的文件转换成 Swap 文件
sudo mkswap swapfile
此命令出现如下信息:

[html] view plain copy
Setting up swapspace version 1, size = 99996 KiB
no label, UUID=b26fe88c-11c2-40ad-8139-6e69e96b6b68
setp4:激活 Swap 文件。
sudo swapon swapfile
此时free -m 查看Swap信息

[html] view plain copy
total       used       free     shared    buffers     cached
 1998     <span style="font-family:Arial, Helvetica, sans-serif;">  1189        809          0         34        624</span>
[html] view plain copy
-/+ buffers/cache:        530       1468
Swap:         2134        986       1148
至此,swap已经增加成功了,如果想卸载刚增加的swap;
sudo swapoff swapfile
如果需要一直保持这个 swap ,可以sudo -s换到root
然后把它写入 /etc/fstab 文件。

swapfilepath swap swap defaults 0 0
8. In file included from /usr/include/semaphore.h:22:0,
                 from cts/suite/audio_quality/lib/include/Semaphore.h:21,
                 from cts/suite/audio_quality/lib/src/Semaphore.cpp:17:
/usr/include/features.h:323:26: fatal error: bits/predefs.h: No such file or directory
compilation terminated.
make: In file included from /usr/include/stdlib.h:25:0,
                 from cts/suite/audio_quality/lib/src/Adb.cpp:16:
/usr/include/features.h:323:26: fatal error: bits/predefs.h: No such file or directory
compilation terminated.

方法:sudo apt-get install libc6-dev:i386

     sudo apt-get install build-essential

     sudo apt-get install gcc-multilib

9./bin/sh: gcc: not found

方法:sudo apt-get install gcc,gcc是C的编译器

10.gccgcc: error trying to exec 'cc1plus': execvp: gcc: error trying to exec 'No such file or directory

方法:sudo apt-get install g++,g++是C++的编译器

11. /bin/bash: xmllint: command not found
方法:sudo apt-get  install libxml2-utils

12.make[1]: lzma: Command not found

方法:sudo apt-get  install lama

创建Repo仓库

随着项目的外部库越来越多,每次更新代码都要敲一堆的Git命令,手指有点抽筋,借着今天下午有空,学习了下Repo的用法,并搭建了一个Repo的客户端,这下感觉舒服了。
Repo是用Python实现的,本质上仍然是通过Git来管理代码的,下面具体说下repo服务端仓库的搭建方法:
  • 首先安装repo和git:
    1
    2
    3
    4
    5
    6
    7
    8
    # Ubuntu安装git 
    sudo apt-get install git-core 
      
    # 安装repo 
    mkdir ~/bin
    $ PATH=~/bin:$PATH
    $ curl https://dl-ssl.google.com/dl/googlesource/git-repo/repo > ~/bin/repo
    chmod a+x ~/bin/repo
  • 创建manifest.git仓库:
    1
    2
    3
    4
    mkdir -p /path/to/repo/dic
    cd /path/to/repo/dic
    mkdir manifest.git; cd manifest.git 
    $ git init --bare
    这个仓库用来放置repo配置文件default.xml,配置文件里描述了项目的仓库url、修订版本和项目列表,用来同步项目代码。
  • 将自己的项目的git仓库组织到repo目录中
  • 克隆manifest.git仓库,添加配置文件default.xml,按照下面的格式说明编辑配置文件,可参考Android的default.xml文件,编辑完成后向仓库提交文件:
    1
    2
    3
    4
    5
    6
    7
    cd /path/to/tmp
    $ git clone url_to_manifest.git
    cd manifest 
      
    # 创建并编辑default.xml,然后提交到manifest.git
    $ git add default.xml; git commit -m "fc"
    $ git push origin master
  • 这样一个repo仓库就建好了,我们到自己的工作目录去通过repo取项目代码:
    1
    2
    3
    4
    cd /path/to/work/dic
    mkdir Project_name; cd Project_name 
    $ repo init -u url
    $ repo sync
    repo init -u url 命令创建了repo工作目录.repo,以及克隆项目配置仓库manifest.git
同步完项目代码,就可以开始工作了,使用Repo和Git控制版本以及工作流程见下面参考
参考:

搭建走代理的无线热点

本文将描述如何使用无线网卡自建无线热点,并让连接到这个热点上的客户端都通过自定义的代理访问网络。本文侧重路由设置。
创建这样一个无线接入点的主要步骤如下:
  1. 创建无线接入点。让客户端可以接入自建的无线网络
  2. 创建虚拟局域网。无线接入点上的客户端将通过此虚拟局域网访问互联网
  3. 设置路由。让无线接入点客户端的网络请求转发到虚拟局域网上

0. 网络结构

使用无线网卡自建无线网络是需要一台电脑的,这台电脑连接着有线网络,并且需要在上面建立 VPN 连接。
地址网关
有线网络192.168.0.11192.168.0.1
VPN 网络10.8.30.1110.8.30.1
无线网络DHCP 分配,192.168.2.100-200192.168.2.1

1. 创建无线接入点

1.1 创建无线网络

使用 hostapd 可以很轻松地创建无线网络。在这份文档中,创建一个名为 GLADDER 的无线网络,使用 WPA2 加密。

1.2 设置无线网络的网关

hostapd 启动无线网络后,虽然搜索无线网络的时候已经能看到 GLADDER 这个无线网络了,但此时无线网卡是没有 IP 地址(也就是无线网络的网关)的,需要手动给无线网卡设置一个 IP 地址作为无线网络的网关。
假设无线网卡的名字是 wlan0,执行下面的命令
  1. ifconfig wlan0 192.168.2.1 netmask 255.255.255.0  

1.3 设置 DHCP 服务

使用 isc-dhcp-server 给无线网络提供 DHCP 服务。安装 isc-dhcp-server 后,修改其配置文件,添加如下内容:
  1. subnet 192.168.2.0 netmask 255.255.255.0 {  
  2.     range 192.168.2.100 192.168.2.200;  
  3.     option routers 192.168.2.1;  
  4. }  
之后重新启动 isc-dhcp-server
  1. /etc/init.d/isc-dhcp-server restart  
isc-dhcp-server 启动之后会遍历所有网卡,如果网卡的 IP 地址属于 192.168.2.0/24 这个网段内,就在这个网卡上提供 DHCP 服务。
上面一段的配置文件的意思是,在 192.168.2.0/24 这个网络上提供 DHCP 服务,地址池为 192.168.2.100-200,网关为 192.168.2.1

2. 创建虚拟局域网

本文档使用 OpenVPN 创建虚拟局域网作。
OpenVPN 的配置很简单,如果遇到干扰,可以使用 OpenVPN 的 static key 模式,并使用非标准端口,这样就可以避免遭到干扰。另外请使用 UDP 模式,如果使用 TCP 模式,在某些情况下网速可能会急剧下降,有关详情请搜索”TCP over TCP problem”。
在 OpenVPN 的配置文件中增加如下配置:
  1. up /your/path/openvpn-up.sh  
这样 OpenVPN 在连接成功后,tun 设备初始化完毕之后,就会执行 openvpn-up.sh 脚本。我们需要通过这个脚本去设置路由。该脚本的内容在下文给出。
这样做的好处是,在 OpenVPN 断线重连后,可以自动重新设定路由信息,不需要人工进行干预。

3. 设置路由信息 

3.1 创建路由表

编辑 /etc/iproute2/rt_tables 文件,在文件末尾添加如下内容:
  1. 200  gladder  
这样我们就创建了一个名为 gladder 的路由表

3.2 启用 IP 转发

修改 /etc/sysctl.conf 文件,将 net.ipv4.ip_forward 设置的值改为 1,然后执行:
  1. sysctl -p  
这样就可以开启 IP 转发功能了

3.3 设置 IP 转发及路由信息

新建 openvpn-up.sh 文件,输入以下内容:
  1. #!/bin/bash  
  2.   
  3. tun=$1  
  4.   
  5. echo 设置 iptables  
  6. iptables -t nat -A POSTROUTING -o $tun -s 192.168.2.0/24 -j MASQUERADE  
  7.   
  8. echo 清空 gladder 表中的路由信息  
  9.   
  10. ip route flush table gladder  
  11.   
  12. echo 设置 gladder 表的路由信息  
  13. ip route add 10.8.30.0 dev $tun src 192.168.30.11 table gladder  
  14. ip route add default via 10.8.30.1 dev $tun table gladder  
  15.   
  16. echo 设置主路由表到 192.168.2.0/24 子网的路由  
  17. route add -net 192.168.2.0/24 gw 192.168.2.1  
  18.   
  19. exit 0  
该脚本的作用是:
1. 首先在 tun0 上为来自无线网络的数据包设置 MASQUERADE
2. 接着在 gladder 路由表上设置路由信息,让所有的数据包都从 10.8.30.0 这个 OpenVPN 的网络走出去
3. 最后设定让来自 192.168.2.0/24 的数据包使用 gladder 这个路由表进行路由,如下:
  1. ip rule add from 192.168.2.0/24 table gladder  

如果一切正常的话,现在就可以连接 GLADDER 热点通过 OpenVPN 连接来访问互联网了.
from https://www.gsea.com.cn/blog/topic/wireless-lan-via-openvpn-howto/