A fast, secure and reliable VPN service based on non-standard protocol.
A fast secure and reliable VPN service in non-standard protocol for rapidly deploying VPN servers/clients or getting through firewalls
Key features
Fast: direct UDP-encapsulated without complex authentication handshakes.
Secure: both header and tunnel data are encrypted, which is impossible to be tracked by protocol characteristics and blocked, unless all UDP ports are blocked by your firewall; spoofed packets from unauthorized peer are dropped immediately.
Reliable: communication recovers immediately from next received packet from client after the previous session was dead, which makes the connection extremely reliable.
Rapid to deploy: a standalone program to run; all configuration are specified in command line with very few options.
Installation for Linux
Install required development components
sudo apt-get install build-essential libssl-dev # for Ubuntu / Debian
sudo yum install make gcc openssl-devel # for CentOS / Fedora / RedHat
Installation for Mac OS X
Install TUNTAP driver for Mac OS X: http://tuntaposx.sourceforge.net
git clone https://github.com/rssnsj/minivtun
cd minivtun/src
make (这步会在当前目录下,生成可执行文件minivtun.)
./minivtun -h
Usage
Mini virtual tunneller in non-standard protocol.
Usage:
minivtun [options]
Options:
-l, --local <ip:port> IP:port for server to listen
-r, --remote <ip:port> IP:port of server to connect
-a, --ipv4-addr <tun_lip/tun_rip> pointopoint IPv4 pair of the virtual interface
<tun_lip/pfx_len> IPv4 address/prefix length pair
-A, --ipv6-addr <tun_ip6/pfx_len> IPv6 address/prefix length pair
-m, --mtu <mtu> set MTU size, default: 1300.
-t, --keepalive <keepalive_timeo> interval of keep-alive packets, default: 13
-n, --ifname <ifname> virtual interface name
-p, --pidfile <pid_file> PID file of the daemon
-e, --key <encryption_key> shared password for data encryption
-v, --route <network/prefix=gateway>
route a network to a client address, can be multiple
-w, --wait-dns wait for DNS resolve ready after service started.
-d, --daemon run as daemon process
-h, --help print this help
Examples
Server: Run a VPN server on port 1414, with local virtual address 10.7.0.1, client address space 10.7.0.0/24, encryption password 'Hello':
/usr/sbin/minivtun -l 0.0.0.0:1414 -a 10.7.0.1/24 -e Hello -d
Client: Connect VPN to the above server (assuming address vpn.abc.com), with local virtual address 10.7.0.33:
/usr/sbin/minivtun -r vpn.abc.com:1414 -a 10.7.0.33/24 -e Hello -d
Multiple clients on different devices can be connected to the same server:
/usr/sbin/minivtun -r vpn.abc.com:1414 -a 10.7.0.34/24 -e Hello -d
/usr/sbin/minivtun -r vpn.abc.com:1414 -a 10.7.0.35/24 -e Hello -d
/usr/sbin/minivtun -r vpn.abc.com:1414 -a 10.7.0.36/24 -e Hello -d
from https://github.com/rssnsj/minivtun
-------------
我的补充说明
登陆Linux vps(最好是kvm vps.若是openvz vps,容易遇错)
git clone https://github.com/rssnsj/minivtun
cd minivtun/src
make (这步会在当前目录下,生成可执行文件minivtun.)
./minivtun -l 0.0.0.0:1414 -a 10.7.0.1/24 --key my-key -d
会显示:
Mini virtual tunneling server on 0.0.0.0:1414, interface: mv0.
(会在vps中,生成虚拟网卡mv0)
以上的命令/root/minivtun/src/minivtun -l 0.0.0.0:1414 -a 10.7.0.1/24 --key my-key -d
并不会随着vps的启动而自动运行,所以建议用systemd来设置一下:
nano /etc/systemd/system/minivtun.service
内容如下:
[Unit]
After=network.target
[Service]
ExecStart=/root/minivtun/src/minivtun -l 0.0.0.0:1414 -a 10.7.0.1/24 --key my-key
Restart=always
[Install]
WantedBy=multi-user.target
然后,
systemctl start minivtun
systemctl enable minivtun
root@wh:~/minivtun/src# iptables -t nat -A POSTROUTING -s 10.7.0.1/24 -o eth0 -j MASQUERADE
服务器端设置完毕。
在客户机器mac上。
安装TUNTAP driver for Mac OS X: http://tuntaposx.sourceforge.net,然后,
git clone https://github.com/rssnsj/minivtun
cd minivtun/src
make (这步会在当前目录下,生成可执行文件minivtun.)
sudo ./minivtun -r my-vps-ip:1414 -a 10.7.0.2/24 --key my-key
Password:
会显示:
Mini virtual tunnelling client to my-vps-ip:1414, interface: tun0.
(会在mac机器中,生成虚拟网卡tun0)
保持该terminal窗口不要关闭。
然后新开一个terminal窗口,
ping 10.7.0.1
显示:
PING 10.7.0.1 (10.7.0.1): 56 data bytes
64 bytes from 10.7.0.1: icmp_seq=0 ttl=64 time=26.829 ms
64 bytes from 10.7.0.1: icmp_seq=1 ttl=64 time=22.975 ms
64 bytes from 10.7.0.1: icmp_seq=2 ttl=64 time=23.071 ms
64 bytes from 10.7.0.1: icmp_seq=3 ttl=64 time=23.547 ms
64 bytes from 10.7.0.1: icmp_seq=4 ttl=64 time=23.713 ms
64 bytes from 10.7.0.1: icmp_seq=5 ttl=64 time=23.456 ms
64 bytes from 10.7.0.1: icmp_seq=6 ttl=64 time=23.693 ms
64 bytes from 10.7.0.1: icmp_seq=7 ttl=64 time=25.982 ms
^C
--- 10.7.0.1 ping statistics ---
8 packets transmitted, 8 packets received, 0.0% packet loss
round-trip min/avg/max/stddev = 22.975/24.158/26.829/1.338 ms
可见,可以成功ping通vps的内网ip:10.7.0.1,
不过光能ping通vps的内网ip是不够的,mac机器依然不能翻墙。
(可以把sudo ./minivtun -r my-vps-ip:1414 -a 10.7.0.2/24 --key my-key保存为:
紧接着运行:
sudo route delete default
并不会随着vps的启动而自动运行,所以建议用systemd来设置一下:
nano /etc/systemd/system/minivtun.service
内容如下:
[Unit]
After=network.target
[Service]
ExecStart=/root/minivtun/src/minivtun -l 0.0.0.0:1414 -a 10.7.0.1/24 --key my-key
Restart=always
[Install]
WantedBy=multi-user.target
然后,
systemctl start minivtun
systemctl enable minivtun
root@wh:~/minivtun/src# nano /etc/sysctl.conf,
(把net.ipv4.ip_forward那一行的#号去掉并把net.ipv4.ip_forward的值改为1)
sysctl -p
会显示:
net.ipv4.ip_forward = 1
会显示:
net.ipv4.ip_forward = 1
root@wh:~/minivtun/src# iptables -t nat -A POSTROUTING -s 10.7.0.1/24 -o eth0 -j MASQUERADE
服务器端设置完毕。
安装TUNTAP driver for Mac OS X: http://tuntaposx.sourceforge.net,然后,
git clone https://github.com/rssnsj/minivtun
cd minivtun/src
make (这步会在当前目录下,生成可执行文件minivtun.)
sudo ./minivtun -r my-vps-ip:1414 -a 10.7.0.2/24 --key my-key
Password:
会显示:
Mini virtual tunnelling client to my-vps-ip:1414, interface: tun0.
(会在mac机器中,生成虚拟网卡tun0)
保持该terminal窗口不要关闭。
然后新开一个terminal窗口,
ping 10.7.0.1
显示:
PING 10.7.0.1 (10.7.0.1): 56 data bytes
64 bytes from 10.7.0.1: icmp_seq=0 ttl=64 time=26.829 ms
64 bytes from 10.7.0.1: icmp_seq=1 ttl=64 time=22.975 ms
64 bytes from 10.7.0.1: icmp_seq=2 ttl=64 time=23.071 ms
64 bytes from 10.7.0.1: icmp_seq=3 ttl=64 time=23.547 ms
64 bytes from 10.7.0.1: icmp_seq=4 ttl=64 time=23.713 ms
64 bytes from 10.7.0.1: icmp_seq=5 ttl=64 time=23.456 ms
64 bytes from 10.7.0.1: icmp_seq=6 ttl=64 time=23.693 ms
64 bytes from 10.7.0.1: icmp_seq=7 ttl=64 time=25.982 ms
^C
--- 10.7.0.1 ping statistics ---
8 packets transmitted, 8 packets received, 0.0% packet loss
round-trip min/avg/max/stddev = 22.975/24.158/26.829/1.338 ms
可见,可以成功ping通vps的内网ip:10.7.0.1,
不过光能ping通vps的内网ip是不够的,mac机器依然不能翻墙。
(可以把sudo ./minivtun -r my-vps-ip:1414 -a 10.7.0.2/24 --key my-key保存为:
start-minivtun.sh文件)
紧接着运行:
sudo route delete default
sudo route add default vps-internal-ip
sudo route add vps-public-ip 192.168.1.1
(router-ip指路由器的ip,比如192.168.1.1,你需根据你的路由器的具体ip,写出其值,比如
有的是10.0.0.1;vps-internal-ip指vps在内网的ip,比如10.7.0.1)
然后运行:
sudo networksetup -setdnsservers "Wi-Fi" 127.0.0.1
然后运行某款dns proxy程序:
这样,mac机器就可以用此minivtun vpn翻墙了。
sudo route delete default
(router-ip指路由器的ip,比如192.168.1.1,你需根据你的路由器的具体ip,写出其值,比如
有的是10.0.0.1;vps-internal-ip指vps在内网的ip,比如10.7.0.1)
然后运行:
sudo networksetup -setdnsservers "Wi-Fi" 127.0.0.1
然后运行某款dns proxy程序:
cd ~/dns2socks/DNS2SOCKS && sudo ./DNS2SOCKS 127.0.0.1:1080 8.8.8.8:53 127.0.0.1:53
(dns2socks的搭建,请参见https://briteming.blogspot.com/2019/07/socksdns-query-dns2socks.html)
每隔25分钟,第一步会断开,所以需要重新运行所有的4步:
sudo killall minivtun && cd ~/minivtun/src && sudo ./minivtun -r my-vps-ip:1414 -a 10.7.0.2/24 --key my-keysudo route delete default
sudo route add default vps-internal-ip
sudo route add vps-public-ip 192.168.1.1
sudo networksetup -setdnsservers "Wi-Fi" 127.0.0.1
cd ~/dns2socks/DNS2SOCKS && sudo ./DNS2SOCKS 127.0.0.1:1080 8.8.8.8:53 127.0.0.1:53
参见https://github.com/rssnsj/minivtun/issues/11
https://github.com/fanyueciyuan/eazy-for-ss/tree/master/minivtun ,此脚本我没用过。
---------------
minivtun在 windows下的客户端: minivtun-win
The minivtun is a tiny layer 3 vpn service on posix platform. And this is a windows client for it.
No IPv6 tunnel and point-to-point mode due to limitation of driver
Installation:
Install windows tap driver
site: https://github.com/OpenVPN/tap-windows https://github.com/OpenVPN/tap-windows6
precompiled binary:
NIDS 5 (windows xp and above) https://swupdate.openvpn.org/community/releases/tap-windows-9.9.2_3.exe
NIDS 6 (windows vista and above) https://swupdate.openvpn.org/community/releases/tap-windows-9.21.1.exe
Install required development components
python 2.7 python package: ipaddress pywin32 M2Crypto
Compile and pack
python setup.py py2exe
Usage
Mini virtual tunneller in non-standard protocol.
Usage:
minivtun [options]
Options:
-r, --remote <ip:port> IP:port of server to connect
-a, --ipv4-addr <tun_lip/pfx_len> IPv4 address/prefix length pair
-k, --keepalive <keepalive_timeo> seconds between sending keep-alive packets, default: 13
-t, --type <encryption_type> encryption type, default: aes_128_cbc
-e, --key <encrypt_key> shared password for data encryption (if this option is missing, turn off encryption)
-d run as daemon process
-h, --help print this help
Supported encryption types:
rc4, des, desx, aes-256, aes-128
Examples
Client: Connect VPN to the server (assuming address vpn.abc.com), with local virtual address 10.7.0.33, encryption with password "Hello":
python tun.py -r vpn.abc.com:1414 -a 10.7.0.33/24 -e Hello
Client: Connect VPN to the server (assuming address vpn.abc.com), with local virtual address 10.7.0.33, no encryption:
python tun.py -r vpn.abc.com:1414 -a 10.7.0.33/24
from https://github.com/boytm/minivtun-win
https://libraries.io/github/boytm/minivtun-win
---------------
sudo networksetup -setdnsservers "Wi-Fi" 127.0.0.1
cd ~/dns2socks/DNS2SOCKS && sudo ./DNS2SOCKS 127.0.0.1:1080 8.8.8.8:53 127.0.0.1:53
参见https://github.com/rssnsj/minivtun/issues/11
在终止minivtun进程后,还需运行:
sudo route add default 192.168.1.1 和
sudo networksetup -setdnsservers "Wi-Fi" empty
这样,才恢复为墙内状态。
https://github.com/fanyueciyuan/eazy-for-ss/tree/master/minivtun ,此脚本我没用过。
---------------
minivtun在 windows下的客户端: minivtun-win
The minivtun is a tiny layer 3 vpn service on posix platform. And this is a windows client for it.
No IPv6 tunnel and point-to-point mode due to limitation of driver
Installation:
Install windows tap driver
site: https://github.com/OpenVPN/tap-windows https://github.com/OpenVPN/tap-windows6
precompiled binary:
NIDS 5 (windows xp and above) https://swupdate.openvpn.org/community/releases/tap-windows-9.9.2_3.exe
NIDS 6 (windows vista and above) https://swupdate.openvpn.org/community/releases/tap-windows-9.21.1.exe
Install required development components
python 2.7 python package: ipaddress pywin32 M2Crypto
Compile and pack
python setup.py py2exe
Usage
Mini virtual tunneller in non-standard protocol.
Usage:
minivtun [options]
Options:
-r, --remote <ip:port> IP:port of server to connect
-a, --ipv4-addr <tun_lip/pfx_len> IPv4 address/prefix length pair
-k, --keepalive <keepalive_timeo> seconds between sending keep-alive packets, default: 13
-t, --type <encryption_type> encryption type, default: aes_128_cbc
-e, --key <encrypt_key> shared password for data encryption (if this option is missing, turn off encryption)
-d run as daemon process
-h, --help print this help
Supported encryption types:
rc4, des, desx, aes-256, aes-128
Examples
Client: Connect VPN to the server (assuming address vpn.abc.com), with local virtual address 10.7.0.33, encryption with password "Hello":
python tun.py -r vpn.abc.com:1414 -a 10.7.0.33/24 -e Hello
Client: Connect VPN to the server (assuming address vpn.abc.com), with local virtual address 10.7.0.33, no encryption:
python tun.py -r vpn.abc.com:1414 -a 10.7.0.33/24
from https://github.com/boytm/minivtun-win
https://libraries.io/github/boytm/minivtun-win
---------------
利用minivtun实现点对点非公网NAT穿透,在学校轻松访问家里的路由器。
一般这种情况用于:
- 家里路由器挂载离线下载
- 家里的WEB网络摄像头监控
- 远程修改某些路由设置
- 远程控制路由器相关的“智能家居”
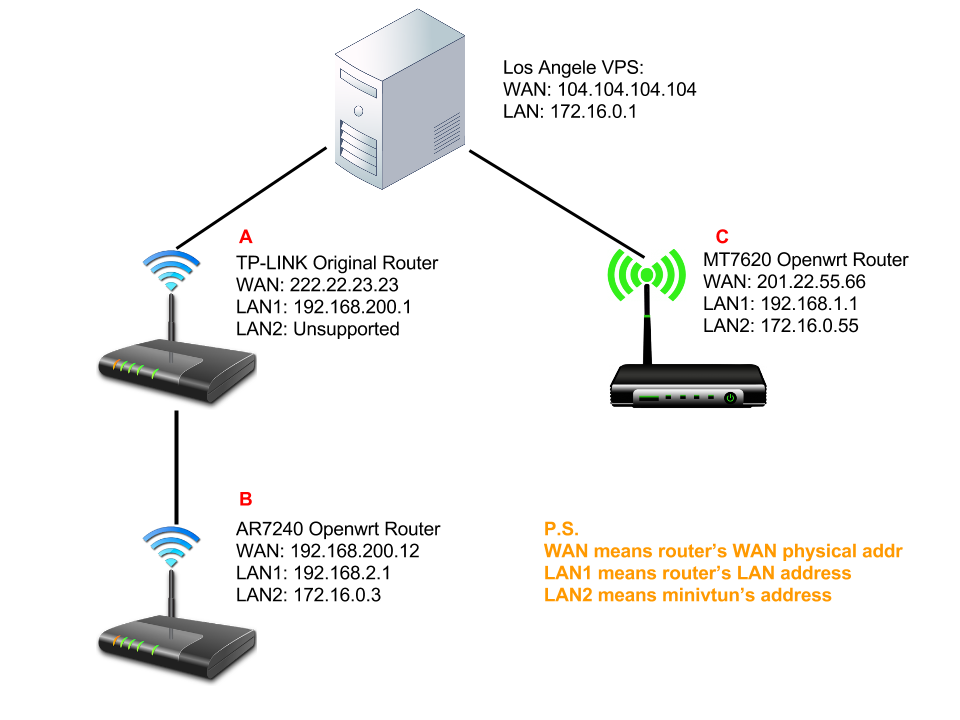
现在仅考虑以下拓朴图,本文的目的是想让路由C访问路由A,实现C远程控制A。其中A是非智能路由器,使用非Openwrt系统。A下面挂接一个Openwrt路由器B
 前提是A和C能顺利访问该VPS,而且B工作正常。
minivtun互访
这个minivtun是我常用的tun点对点隧道软件,工作原理与shadowvpn类似,可以当梯子使用。现有我移植的的minivtun-openwrt,可以自行编译安装在路由上面。
按照文档编译安装,服务端运行监听555端口
/usr/sbin/minivtun -l 0.0.0.0:555 -a 172.16.0.1/24 -e password -n mv0 -d
路由器B和C,同样使用minivtun实现与VPS对接,这里指定网络设备为mv001
# Router B: ip 172.16.0.3
/usr/sbin/minivtun -r [YOUR_VPS]:555 -a 172.16.0.3/24 -e password -n mv001 -d
# Router C: ip 172.16.0.55
/usr/sbin/minivtun -r [YOUR_VPS]:555 -a 172.16.0.55/24 -e password -n mv001 -d
使用Ping等工具测试路由B能否顺利访问VPS
ping 172.16.0.1
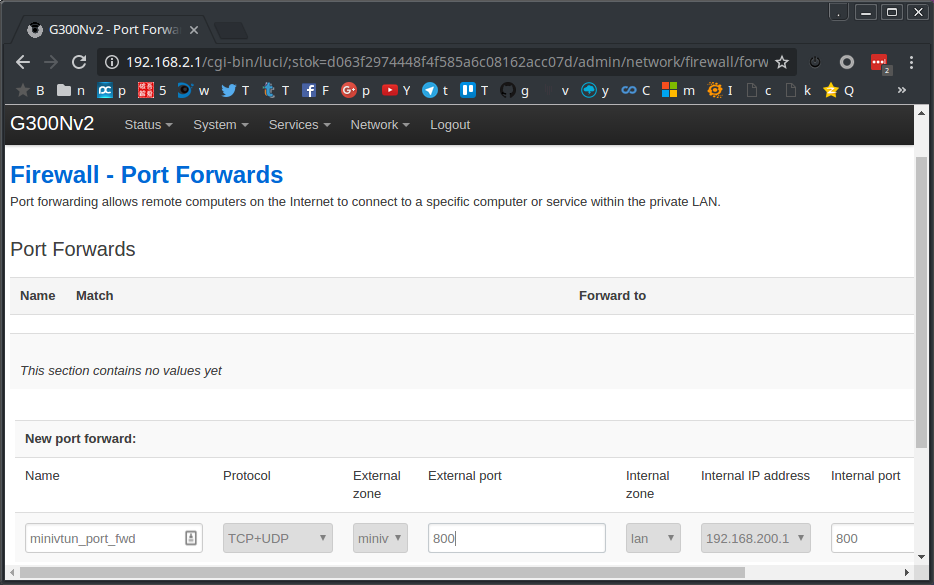
Openwrt端口转发
以下三个步骤均在路由B操作
新建接口
在network->interface标签下添加一个interface: 命名随意,这里命名为minivtun_intf,协议为DHCP Client,手动输入mv001这个物理接口进行绑定(因上面minivtun启动参数设定了mv001网络设备)
 检查这个接口minivtun_intf是否获得正确的172.16.0.3/24地址,并且从数字变化过程中看到能有Tx/Rx流量通过。
入站防火墙
切换到Network->Firewall->Gerneral,添加一个新的Zone,随意命名为minivtun,指定入站出站转发三个都accept,勾选masquerading和MSS clamping进行伪装路由器。Covered Network只需要勾选两个区域即可,其中必选的是minivtun_intf表示源,另一个是目的地根据需要,可以选WAN或者LAN,如果访问Openwrt局域网就指定LAN,如果要访问WAN(比如上一级路由)就指定WAN
因为我是利用B去访问上一级的A,因此我勾选了WAN

端口转发
切换到Network->Firewall->Port Forward,新建一个转发规则
外部端口随意,(比如外部端口是444,那么在路由C使用minivtun访问172.16.0.3:444就触发端口转发条件)
项目 备注 我的值 名字 随意起名 minivtun_port_fwd 外部区域 入站防火墙名字 minivtun 外部端口 供外部访问端口 800 内部区域 目的端口区域 LAN 内部IP 目的地址 192.168.200.1 内部端口 目的端口 800

测试方法
从路由器C浏览器地址栏输入http://172.16.0.3:800即可访问路由A的800端口。
from http://lixingcong.github.io/2016/10/03/openwrt-port-forward/
----------
A simple tunnel for Linux.
This repo is an unoffical port of minivtun for openwrt.
minivtun-openwrt
A fast secure and reliable VPN service in non-standard protocol for rapidly deploying VPN servers/clients or getting through firewall. Created by @rssnsj.
It's a very simple point-to-point tunnel client/server. only less than 20kB size.
This repo is an unoffical port for openwrt, if you prefer the offical one, please visit minivtun-tools.
The default route and init.d files was copied from openwrt-shadowvpn. I am so lazy!
For Linux
Show you the Offical compile guide below
Install devel libs
# ubuntu
sudo apt-get install build-essential libssl-dev
# CentOS
sudo yum install make gcc openssl-devel
Compile and install
git clone https://github.com/rssnsj/minivtun.git minivtun
cd minivtun/src
make
sudo make install
Run and listen(my script copied from shadowvpn, not offical)
# modify your listenig port and password, etc
cd minivtun/linux-server
vi run.sh
# use bash to run, not sh
bash run.sh
if your want to run as linux-client, do the same as linux-server but under linux-client folders. You could turn the China-route mode on, just set isUseRouteFile to True
Enjoy it!
Complie for Openwrt (Client-side)
# ar71xx platform
tar xjf OpenWrt-SDK-ar71xx-for-linux-x86_64-gcc-4.8-linaro_uClibc-0.9.33.2.tar.bz2
cd OpenWrt-SDK-ar71xx-*
cd openwrt
git clone https://github.com/lixingcong/minivtun-openwrt package/minivtun-openwrt
# Select Network -> minivtun
make menuconfig
make package/minivtun-openwrt/compile V=99
Configuration for Openwrt
Change password or port
vi /etc/config/minivtun
# Switch: enable = 1 or 0
Restart service
/etc/init.d/minivtun restart
Use Chnroute.txt
Same as ShadowVPN or Shadowsocks, the chnroute.txt is available for Chinese user to change route.
Please visit openwrt-shadowvpn for more details on route-mode.
# update route file
wget -O- 'http://ftp.apnic.net/apnic/stats/apnic/delegated-apnic-latest' | awk -F\| '/CN\|ipv4/ { printf("%s/%d\n", $4, 32-log($5)/log(2)) }' > /tmp/chinadns_chnroute.txt
cp /tmp/chinadns_chnroute.txt /etc/
vi /etc/config/minivtun
# set the route-mode to 1 (Domestic Mode)
# set route-file to /etc/chinadns_chnroute.txt
/etc/init.d/minivtun restart
Luci-app
A luci-app-minivtun was available, please vist openwrt-dist-luci.
Wiki
Please visit offical page minivtun
from https://github.com/lixingcong/minivtun-openwrt------------------------minivtun-rs
A Rust implementation of minivtun.
Usage
minivtun-rs 0.1
Mini virtual tunneller in non-standard protocol
USAGE:
minivtun-rs [FLAGS] [OPTIONS]
FLAGS:
-d, --daemon run as daemon process
-h, --help Prints help information
-V, --version Prints version information
OPTIONS:
-F, --fwmark <fwmark_num> fwmark set on vpn traffic
-n, --ifname <ifname> virtual interface name
-a, --ipv4-addr <tun_lip/prf_len> pointopoint IPv4 pair of the virtual interface
-A, --ipv6-addr <tun_ip6/pfx_len>
-K, --keepalive <N> seconds between keep-alive tests, default:7
-e, --key <encryption_key> shared password for data encryption
-l, --local <ip:port> local IP:port for server to listen
-M, --metric <metric> metric of attached routes
-m, --mtu <mtu> set MTU size, default:1300
-R, --reconnect-timeo <N> maximum inactive time (seconds) before reconnect, default:47
-r, --remote <host:port> host:port of server to connect (brace with [] for bare IPv6)
-v, --route <network/prefix[=gw>... attached IPv4/IPv6 route on this link, can be multiple
-T, --table <table_name> route table of the attached routes
-t, --type <encryption_type> encryption type(aes-128, aes-256), default:aes-128
from https://github.com/optman/minivtun-rs