In this tinc example, I will show you how to set up a VPN connection between two hosts via tinc. Let's call these hosts "alice" and "bob" respectively. Note that these are just symbolic names used by tinc, not necessarily hostnames. In this example, I assume that host "bob" will initiate a VPN connection to host "alice".
First, install tinc on both hosts:
For CentOS system:
$ wget http://packages.sw.be/rpmforge-release/rpmforge-release-0.5.2-2.el5.rf.i386.rpm
$ rpm -ivh rpmforge-release-0.5.2-2.el5.rf.i386.rpm
$ yum install tinc -y
For Debian/Ubuntu system:
$ apt-get install tinc
Now, let's go ahead and configure tinc VPN on both hosts as follows.
On host "alice", do the following.
First, create tinc configuration file called.
$ mkdir -p /etc/tinc/myvpn/hosts
$ vi /etc/tinc/myvpn/tinc.conf
Name = alice
AddressFamily = ipv4
Interface = tun0
$ vi /etc/tinc/myvpn/hosts/alice
Address = 1.2.3.4 (globally reachable IP address of alice)
Subnet = 10.0.0.1/32 (VPN IP address to be assigned to alice)
In the above tinc.conf example, "myvpn" is the name of the VPN network to be established between alice and bob. You can choose your own name.
Next, generate public/private keys:
$ tincd -n myvpn -K4096
The above command will generate 4096-bit public/private keys for host "alice". The private key will be stored as /etc/tinc/myvpn/rsa_key.priv, and the public key will be located in /etc/tinc/myvpn/hosts/alice.
Next, configure the scripts that will be run right after tinc daemon has been started, as well as right before tinc daemon is terminated.
$ vi /etc/tinc/myvpn/tinc-up
#!/bin/sh
ifconfig $INTERFACE 10.0.0.1 netmask 255.255.255.0
$ vi /etc/tinc/myvpn/tinc-down
#!/bin/sh
ifconfig $INTERFACE down
$ chmod 755 /etc/tinc/myvpn/tinc-*
Similar to host "alice", configure tinc on host "bob" as follows.
$ mkdir -p /etc/tinc/myvpn
$ vi /etc/tinc/myvpn/tinc.conf
Name = bob
AddressFamily = ipv4
ConnectTo = alice
Interface = tun0
In the above, note that unlike host "alice", we put "ConnectTo" field in bob's tinc configuration, since host "bob" will initiate a VPN connection to host "alice" when tinc daemon is up.
$ vi /etc/tinc/myvpn/hosts/bob
Subnet = 10.0.0.2/32 (VPN IP address to be assigned to bob)
$ tincd -n myvpn -K4096
Similarly, the bob's private key will be stored as /etc/tinc/myvpn/rsa_key.priv, and its public key will be located in /etc/tinc/myvpn/hosts/bob
$ scp /etc/tinc/myvpn/hosts/bob alice:/etc/tinc/myvpn/hosts/
$ vi /etc/tinc/myvpn/tinc-up
ifconfig $INTERFACE 10.0.0.2 netmask 255.255.255.0
$ vi /etc/tinc/myvpn/tinc-down
ifconfig $INTERFACE down
$ chmod 755 /etc/tinc/myvpn/tinc-*
Once you are done with configuring tinc on all hosts as above, copy each host's public key file onto the other host:
On host "alice": scp /etc/tinc/myvpn/hosts/alice bob:/etc/tinc/myvpn/hosts/
On host "bob": scp /etc/tinc/myvpn/hosts/bob alice:/etc/tinc/myvpn/hosts/
Finally, start tinc daemon on them as follows. Since host "bob" initiates a VPN connection, you will need to start tinc daemon on host "alice" first.
$ tincd --config /etc/tinc/myvpn
Two hosts should now be able to talk to each other via VPN.
from http://xmodulo.blogspot.co.uk/2012/05/how-to-install-and-configure-tinc-vpn.html
related post: http://briteming.blogspot.co.uk/2011/11/tinc-vpn.html
----------------------------------------------------------
说起这稀奇古怪的VPN有个Tinc一直感觉好玩,可惜国内搜索不到搭建教程,搜到个国外的(http://xmodulo.blogspot.com/2012/05/how-to-install-and-configure-tinc-vpn.html)也不怎么懂,有没有高人能根据其官方文档写一个Linux上搭建服务器端和Windows系统上使用Tinc VPN的教程啊。这个Tinc VPN支持IPv6,有Windows客户端和Android客户端,mac、Linux、BSD、iOS也都有支持。
Tinc-VPN官网:http://www.tinc-vpn.org/
Android客户端下载:https://play.google.com/store/apps/details?id=org.poirsouille.tinc_gui
另外还有连个项目感觉也可以看看https://github.com/ptrhere/tincie(据称可以实现无tun设备的VPN)和https://github.com/geniedb/tinc-tailor(简化tinc vpn)
---------------------
tinc vpn的搭建
tinc
wget http://www.rendoumi.com/soft/tinc-1.0.26.tar.gz
tar -xf tinc-1.0.26.tar.gz
cd tinc-1.0.26
./configure
make
make install


Name=dockserver
Interface=dock
Mode=switch
TCPOnly=yes
Port=12345
PrivateKeyFile=/etc/tinc/dock/rsa_key.priv
Compression=9
Subnet=192.168.0.1/32
Address=114.22.31.77
Port=54321
#!/bin/sh
ifconfig $INTERFACE 192.168.0.1 netmask 255.255.255.0
#!/bin/sh
ifconfig $INTERFACE down
tincd -n dock -K
Name=client01
ConnectTo=dockserver
Interfce=dock
Mode=switch
TCPOnly=yes
PrivateKeyFile=/etc/tinc/dock/rsa_key.priv
Compression=9
Subnet=192.168.0.2/32
Compression=9
Subnet=192.168.0.1/32
Address=114.22.31.77
Port=54321
-----BEGIN RSA PUBLIC KEY-----
MIIBCgKCAQEAnrPrxnmSfx1OHkK5k+cxPCv+VFXJvYkVuOQIBibWlAMnQR4L9+qe
xM/c5avNWtTvRRXSYlN2vV6ibbzpWgZN1EiTDNEC00hkGexiXBPoT/KHQ5Hnc/4i
ZzQ6gyn0dVJ7zwu7c/vzkey0cTrW10jAKuyBzZzAweNKjh8oMJe8V92zQgQ+kBCA
tbczZ3G26WwbT1QsBM37LPb6Bqivn0Hj2QN0jsOB1f+dpqYZ4bOMcXbQlMHz+fN7
ZmrMe3ro/qXP3eEZBclnqtx44orCYWfRhWCD58LMIETTpX4thHwdYKsUg1J4EkaE
NRCYH11rqhrlbK/VPXQbcc9sAdANWulD0QIDAQAB
-----END RSA PUBLIC KEY-----
#!/bin/sh
ifconfig $INTERFACE 192.168.0.2 netmask 255.255.255.0
#!/bin/sh
ifconfig $INTERFACE down
tincd -n dock -K
tincd -n dock
dock      Link encap:Ethernet  HWaddr 4A:20:E7:17:82:F9
          inet addr:192.168.0.1  Bcast:192.168.0.255  Mask:255.255.255.0
          inet6 addr: fe80::4820:e7ff:fe17:82f9/64 Scope:Link
          UP BROADCAST RUNNING MULTICAST  MTU:1500  Metric:1
          RX packets:1361 errors:0 dropped:0 overruns:0 frame:0
          TX packets:1292 errors:0 dropped:0 overruns:0 carrier:0
          collisions:0 txqueuelen:500
          RX bytes:561551 (548.3 KiB)  TX bytes:96678 (94.4 KiB)
tincd -n dock -D -d 5
TincVPN:组建虚拟局域网
TincVPN是一个P2PVPN,即两端可以直接通信,虚拟局域网内只需要一台机器(VPS)能够有外网访问的能力即可,一旦两端建立起连接,流量就不会再经过VPS。
其实TincVPN可以代替ZeroTier,虽然ZeroTier免费版也足够用,但用着ZeroTier的公共Moon/WEB面板,总感觉差了点意思。而TincVPN就是全部资源都归自己管,当然部署起来也就会麻烦许多。
在Debian10(VPS)上安装配置TincVPN(用作服务端):
apt -y install tinc net-tools
开启IPv4转发:
echo "net.ipv4.ip_forward = 1" >> /etc/sysctl.conf && sysctl -p
创建一个名为imlala的虚拟网络(目录):
mkdir -p /etc/tinc/imlala && mkdir -p /etc/tinc/imlala/hosts
新建tinc.conf配置文件:
nano /etc/tinc/imlala/tinc.conf
网络名就是imlala,网卡接口名vpn,使用switch模式,以及如下的加密方式:
Name=imlala
Interface=vpn
Mode=switch
Cipher=aes-256-cbc
Digest=sha512
新建hosts文件,这个文件名必须和tinc.conf内的Name一致:
nano /etc/tinc/imlala/hosts/imlala
写入如下配置:
Address = 你的VPS公网IP
Subnet = 10.0.0.1/32
完成之后生成密匙对:
tincd -n imlala -K4096
按两下回车全部保持默认配置,生成完成之后,对应的文件路径:
/etc/tinc/imlala/rsa_key.priv # 私钥
/etc/tinc/imlala/hosts/imlala # 公钥
配置虚拟网卡tinc-up:
nano /etc/tinc/imlala/tinc-up
写入:
#!/bin/sh
ifconfig $INTERFACE 10.0.0.1 netmask 255.255.255.0
配置虚拟网卡tinc-down:
nano /etc/tinc/imlala/tinc-down
写入:
#!/bin/sh
ifconfig $INTERFACE down
给执行权限:
chmod +x /etc/tinc/imlala/tinc-*
启动:
systemctl start tinc@imlala
systemctl enable tinc@imlala
在第二台Debian10上(我这边还是VPS)上安装配置TincVPN(用作客户端)
安装和之前一模一样:
apt -y install tinc net-tools
同样和之前一样新建一个imlala的目录以及hosts目录:
mkdir -p /etc/tinc/imlala && mkdir -p /etc/tinc/imlala/hosts
新建tinc.conf配置文件:
nano /etc/tinc/imlala/tinc.conf
写入如下配置,其中需要注意的是ConnectTo的值需要指定为服务端的网络名称,如果你和我一样配置了加密,那么加密方式也需要和服务端对应:
Name=node_us
Interface=vpn
Mode=switch
ConnectTo=imlala
Cipher=aes-256-cbc
Digest=sha512
新建hosts文件:
nano /etc/tinc/imlala/hosts/node_us
写入:
Subnet = 10.0.0.2/32
生成密匙对:
tincd -n imlala -K4096
配置虚拟网卡tinc-up:
nano /etc/tinc/imlala/tinc-up
写入:
#!/bin/sh
ifconfig $INTERFACE 10.0.0.2 netmask 255.255.255.0
配置虚拟网卡tinc-down:
nano /etc/tinc/imlala/tinc-down
写入:
#!/bin/sh
ifconfig $INTERFACE down
给执行权限:
chmod +x /etc/tinc/imlala/tinc-*
启动TincVPN:
systemctl start tinc@imlala
systemctl enable tinc@imlala
现在我们需要交换公钥,首先把服务端的公钥复制到客户端内:
scp /etc/tinc/imlala/hosts/imlala root@vpsip:/etc/tinc/imlala/hosts
再把客户端的公钥复制到服务端内:
scp /etc/tinc/imlala/hosts/node_us root@vpsip:/etc/tinc/imlala/hosts
这样两台Linux之间就实现了内网互通。
接下来最主要的是如何把TincVPN放到Windows上运行(当作客户端。)因为我的主力机都是Windows,所以这非常关键。其实配置起来大同小异,我主要是参考了官方的这个文档:
https://www.tinc-vpn.org/examples/windows-install/
首先下载安装包:
https://www.tinc-vpn.org/packages/windows/tinc-1.0.35-install.exe
安装的时候一定要勾选TAP-Win64:

进到安装软件的根目录,打开tap-win64目录,用管理员权限运行addtap.bat:

安装驱动程序:

之后打开网络连接看看有没有新增加一个TAP设备:

回到软件根目录,新建一个网络(文件夹)我这边建立文件夹名称为imlala,然后在imlala这个文件夹内再新建一个hosts文件夹。
接着在imlala这个文件夹内新建一个tinc.conf,配置内容如下:
Name=node_family
Interface=vpn
Mode=switch
ConnectTo=imlala
Cipher=aes-256-cbc
Digest=sha512
在hosts文件夹内新建一个node_family文件(名字必须和tinc.conf内的Name一致)写入如下配置:
Subnet = 10.0.0.3/32
之后用管理员权限打开CMD或者PowerShell,进入到软件根目录,生成密匙对:
d:
cd tinc
./tincd -n imlala -K4096
最后和服务端(VPS)交换公钥,也就是把node_family公钥文件上传到VPS的/etc/tinc/imlala/hosts目录。
同理,服务端上的imlala公钥文件下载到本地的hosts文件夹下即可。
可能有点懵?目录结构,软件根目录结构:


还没完,还有非常关键的几个步骤,注意到我们之前在tinc.conf配置的虚拟网卡接口名是:
Interface=vpn
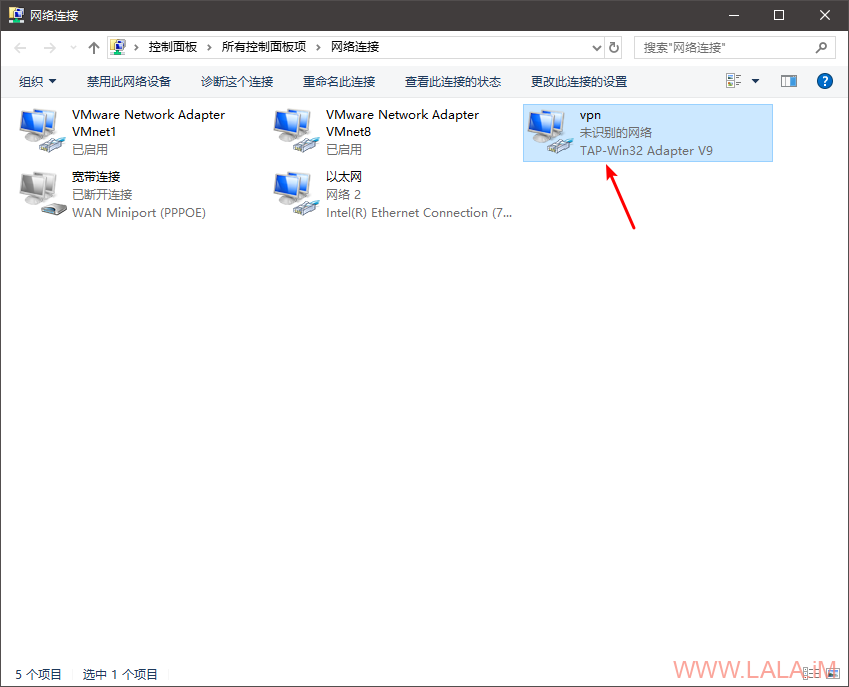
现在需要打开Windows的网络连接界面,把TAP-Win32 Adapter V9这个设备的名称改为vpn:
接着为这个设备配置IP,配置的IP必须和node_family文件内的保持一致:

创建服务:
tincd -n imlala
最后在Windows的计算机管理,启动服务:

现在测试,三台机器应该都可以相互Ping通:

在第二台客户端机器内测试Ping,一切正常:

------------------------------------------------------------------------
使用 Tinc 组建虚拟局域网
以前曾经用过 ZeroTier 给自己多个分布在不同地方的设备组建大内网,后来用不着了,就没再折腾,前段时间又想重新组一下网,于是尝试了一下另一个同类的开源软件 Tinc。本文记录一下使用 Tinc 搭建虚拟网的关键步骤。
安装
Ubuntu/Debian 上直接 apt-get install tinc 安装,其它系统可以网上搜索,基本默认包管理器都可以直接安装。
节点结构
首先想好网络中的节点要如何相连,以三个节点、其中一个有公网 IP 为例,如下图,node2 和 node3 需要主动连接到 node1,从而交换相关元信息,并在 node1 的辅助下建立连接。
目录结构
在每个节点上创建如下目录结构:
/etc/tinc
└── mynet
    ├── hosts
    │   ├── .
    │   └── ..
    ├── .
    ├── ..
这里 mynet 是网络的名字,可以随意。mynet 目录里创建一个 hosts 子目录。
编写配置文件和启动脚本
在三个节点上分别编写配置文件和启动脚本。
node1
/etc/tinc/mynet/tinc.conf:
Name = node1
Interface = tinc # ip link 或 ifconfig 中显示的接口名,下同
Mode = switch
Cipher = aes-256-cbc
Digest = sha512/etc/tinc/mynet/tinc-up(需可执行,以使用 ifconfig 为例):
#!/bin/sh
ifconfig $INTERFACE 172.30.0.1 netmask 255.255.255.0 # IP 根据需要设置,下同/etc/tinc/mynet/tinc-down(需可执行,以使用 ifconfig 为例):
#!/bin/sh
ifconfig $INTERFACE down
node2
/etc/tinc/mynet/tinc.conf:
Name = node2
Interface = tinc
Mode = switch
ConnectTo = node1
Cipher = aes-256-cbc
Digest = sha512
/etc/tinc/mynet/tinc-up(需可执行,以使用 iproute 为例):
ip link set $INTERFACE up
ip addr add 172.30.0.2/24 dev $INTERFACE
/etc/tinc/mynet/tinc-down(需可执行,以使用 iproute 为例):
ip link set $INTERFACE downnode3
基本和 node2 相同,除了 Name = node3 以及 IP 不同。
生成 RSA 密钥对
在每个节点上执行下面命令来生成节点的公私钥:
tincd -n mynet -K 4096私钥默认保存在 /etc/tinc/mynet/rsa_key.priv,公钥在 /etc/tinc/mynet/hosts/<node-name>,这里 <node-name> 在每个节点上分别是 node1、node2 和 node3(Tinc 能够从 tinc.conf 中知道当前节点名)。
交换密钥
将 node2 和 node3 的 /etc/tinc/mynet/hosts/node2 和 /etc/tinc/mynet/hosts/node3 拷贝到 node1 上的 /etc/tinc/mynet/hosts 中,此时 node1 目录结构如下:
/etc/tinc
└── mynet
    ├── hosts
    │   ├── node1
    │   ├── node2
    │   └── node3
    ├── rsa_key.priv
    ├── tinc.conf
    ├── tinc-down
    └── tinc-up
将 node1 的 /etc/tinc/mynet/hosts/node1 拷贝到 node2 和 node3,并在该文件开头加上一行:
Address = 1.2.3.4 # node1 的公网 IP

-----BEGIN RSA PUBLIC KEY-----
...
-----END RSA PUBLIC KEY-----
此时 node2 的目录结构如下:
/etc/tinc
└── mynet
    ├── hosts
    │   ├── node1 # 包含 node1 的 Address
    │   ├── node2
    ├── rsa_key.priv
    ├── tinc.conf
    ├── tinc-down
    └── tinc-up
node3 和 node2 类似。
启动 Tinc
在每个节点上分别使用下面命令测试运行:
tincd -D -n mynet该命令会在前台运行 Tinc,之后即可使用配置文件中配置的 IP 互相访问。
测试成功后可以杀掉刚刚运行的 tincd 进程,改用 systemctl 运行并开机自启动:
systemctl start tinc@mynet
systemctl enable tinc@mynet
参考资料