# npm install -g hexo
Update
# npm update -g ( 这一步是多余的,不建议进行,以节省内存)
Getting Started
Setup a project:# hexo init project
# cd project
# hexo new "title of Post"
# hexo generate (这一步将在project目录下的空目录public里生成网站文件,这个public目录
就是网站的根目录。你可绑定域名到此public目录)
# hexo server (这是dev server.这一步好像是多余的,我没运行它,我的网站http://hx.brite.biz/仍然可以访问。)
from https://github.com/tommy351/hexo,
http://zespia.tw/hexo ,http://hexo.io
http://github.com/hexojs/site,http://github.com/hexojs/hexo
(https://github.com/mcxiaoke/mcxiaoke.github.io,
https://github.com/mcxiaoke/mcxiaoke.github.io.source)
示例: http://hx.brite.biz/ https://starlit-puffpuff-1302e1.netlify.app/
related post: http://briteming.blogspot.co.uk/2013/06/hexo-dropbox.html
-----------
常见问题
- 替换hexo-livereload (TypeError: Cannot read property 'modified' of undefined at Router...)
npm uninstall hexo-livereload --save
npm install hexo-browsersync --save
- Error: Cannot find module './build/Release/DTraceProviderBindings']...
发布流程
clone项目
git clone git@github.com:HopperClouds/hopperclouds.github.io.git -b source --depth=1
安装
npm install -g cnpm --registry=https://registry.npm.taobao.org
cnpm install hexo -g
cnpm install
git submodule update --init --recursive
打开本地开发环境
npm run dev
添加文章
复制markdown格式的文章到 source/_posts 目录下, 并进行add, commit, push。 另外可以参考该目录下的聘宝招聘Python实习生.md文档在文档头部添加一些说明信息。
如何发布到hopperclouds.github.io?
cd hopperclouds.github.io
npm run generate
npm run deploy
其它(可选)
安装指定主题
可参考上面关于submodule的部分或者直接运行:cd themes && git submodule update --init --recursive --depth=1
安装本地运行环境
npm install
本地运行
hexo server
使用图片粘贴上传服务
##关于submodule添加submodule:
git submodule add 仓库地址 路径
注意:路径不能以 / 结尾(会造成修改不生效)、不能是现有工程已有的目录(不能順利 Clone)
初始化
git submodule init
更新
git submodule update
部署
git submodule update --init --recursive
要是加上 --recursive 参数, git clone 也可以把所有一起 clone 过来哦
git clone --recursive 仓库地址
同步
git submodule foreach --recursive git pull origin master
git submodule status
删除
submodule的删除稍微麻烦点:首先,要在“.gitmodules”文件中删除相应配置信息。然后,执行“git rm –cached ”命令将子模块所在的文件从git中删除。
$ git rm --cached node_modules/submodule && rm -rf node_modules/submodule/
下载的工程带有submodule
初始的时候,submodule的内容并不会自动下载下来的,此时,只需执行如下命令:
git submodule update --init --recursive
from https://github.com/HopperClouds/hopperclouds.github.io
----------------------------------------------------------------------
A Lightweight \ Multi Platform \ Out of The Box hexo backend Manager | 轻量级\多平台\开箱即用的hexo后端管理器
Wexagonal
With backend Hex(agonal)
A Lightweight \ Multi Platform \ Out of The Box hexo backend Manager
安装平台与数据库兼容性
标记~为暂时未支持的内容
| ↓数据库/安装平台→ | 服务器Node | CloudFlareWorker | Vercel | Heroku | SCF | ~Deno |
|---|---|---|---|---|---|---|
| CloudFlareKV | × | √ | × | × | × | × |
| MongoDB | √ | × | √ | √ | √ | × |
| ~FireBase | √ | √ | √ | √ | √ | √ |
| HTTP简易数据库 | √ | √ | √ | √ | √ | √ |
此仓库将处于归档状态.不过,为什么不试试Wexagonal呢?Wexa更快,支持的平台和数据库更多,并且有着更强大的功能.
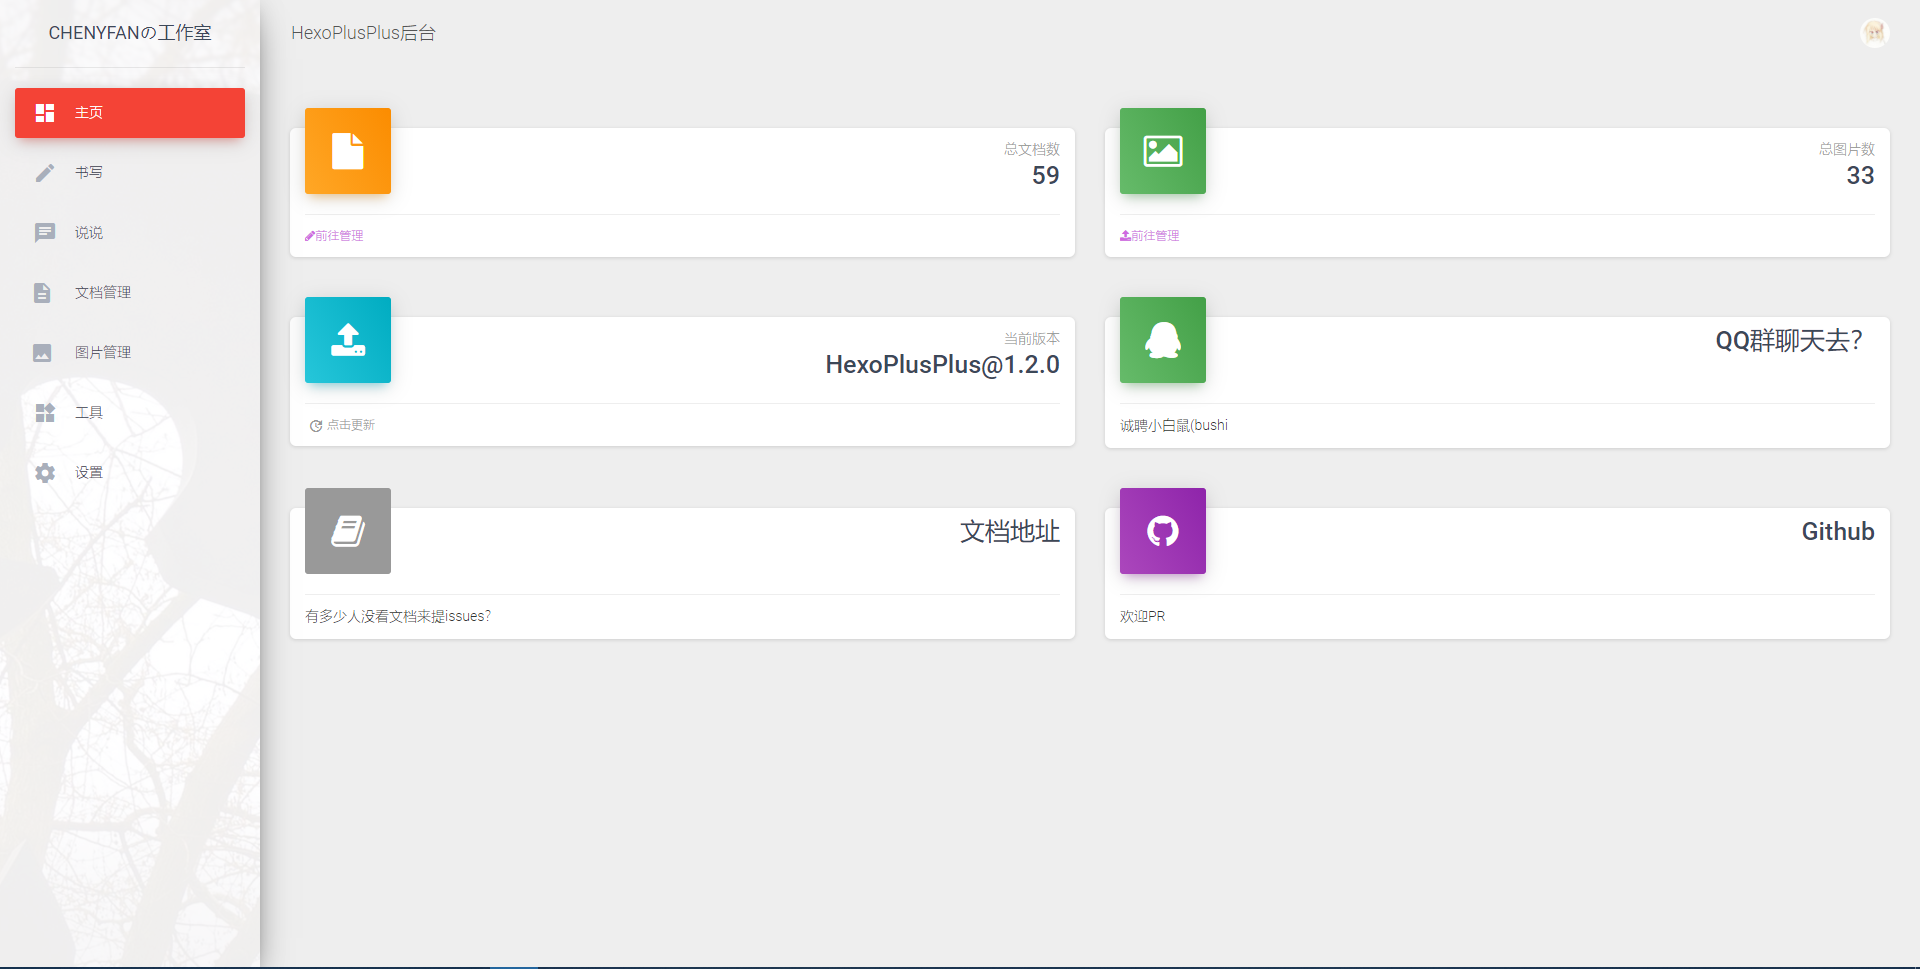
HexoPlusPlus
A powerful Hexo dashboard
HexoPlusPlus也叫Hexo艹,是一个基于CloudFlareWorkers和CloudFlareKV技术的Hexo后端程序,目的是解决Hexo无后端带来的种种麻烦,支持但不限于Hexo等静态博客;利用CloudFlareWorkers当中间件,有效避免直接上传到Github易失败问题。
注意,HexoPlusPlus在使用前您的博客必须保证已完成集成部署
特色
- 免费
- 易上手
- 图形化安装,KV数据库
- 高度自适应编辑器,手机端流畅写作,支持代码高亮,支持草稿写作,支持随时备份,允许上传文件,高度适配自带图床
- 登录验证码
- 全主题适配
- Material Dashboard,细腻书写新体验
- 快,服务端处理不超过10ms[主要是CloudFlare的限制,很多高负荷运算只能拉到前端处理]
功能
- 文章在线编辑
- Github图床支持
- 文件管理
- 活跃时间统计
- 说说功能
- Twikoo加强
- Imgur图床+镜像支持
- 7bu图床支持
- i8n国际化
完整文档请前往https://hexoplusplus.js.org/
依赖
HexoPlusPlus的诞生离不开以下项目的支持:
- jquery
- bootstrap
- material-dashboard
- marked.js
- sweetalert
- notyf
由于仍处于快速迭代期,HPP尚未使用NPM发包,请使用Jsdelivr+Github访问静态资源.
对于开发者来说
npm i @cloudflare/wrangler -g
npm i修改wrangler.toml
wrangler dev默认情况下,依赖已直接集成在主脚本,但在开发环境下仍需额外引入。
只需将最前面的依赖注释去掉即可。
from https://github.com/HexoPlusPlus/HexoPlusPlus
------
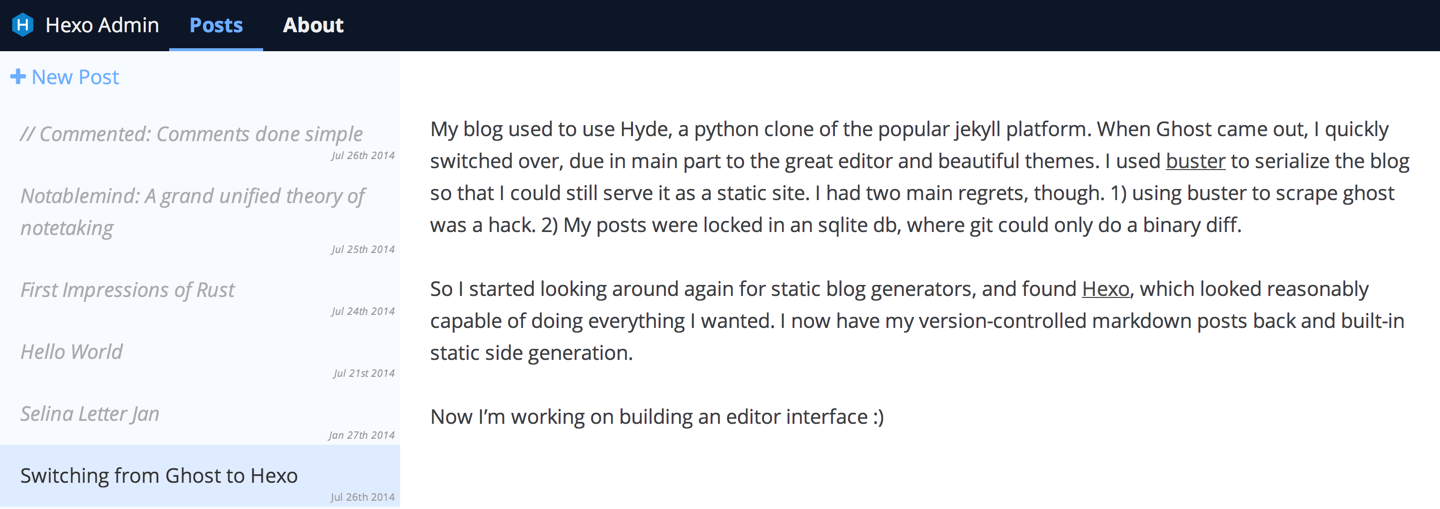
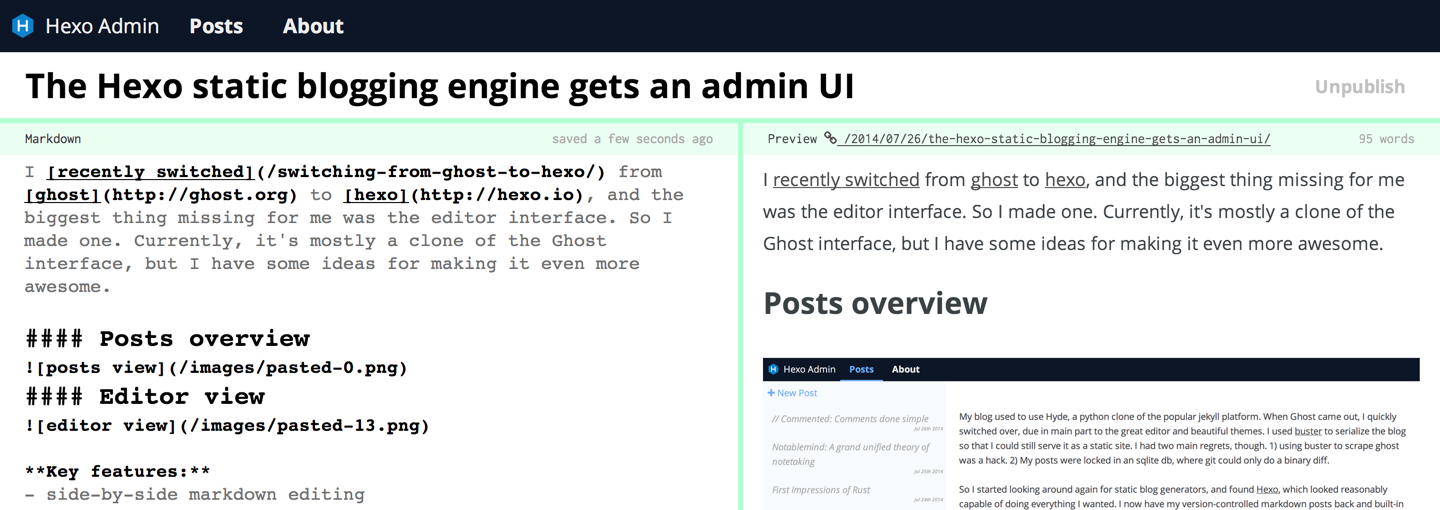
An Admin Interface for Hexo.
jaredly.github.io/hexo-admin/An admin UI for the Hexo blog engine. Based off of the Ghost interface, with inspiration from svbtle and prose.io.
Hexo Version
For 2.x, use version 0.3.0 of this plugin. Version 1.x and beyond only
support Hexo v3.x.
Contents
Local use vs deployment
This plugin was originally designed as a local editor -- you run hexo locally, use hexo-admin to author posts, and then use hexo generate or hexo deploy to send the generated static HTML files up to github pages or some other static server.
However, hexo-admin can be run on your live
blog, as long as you're using a non-static hosting service such as
Heroku, DigitalOcean, etc. Static hosting services such as Github pages
and Surge.sh does not support running hexo-admin from your live site.
If you're using Hexo admin from your live blog, you should definitely
set up a password (see below) -- otherwise anyone will be able to edit
your content.
Screenshots
Quickstart
1. Setup hexo & create a blog
npm install -g hexo
cd ~/
hexo init my-blog
cd my-blog
npm install
2. Install the admin & start things up
npm install --save hexo-admin
hexo server -d
open http://localhost:4000/admin/
3. Profit!
The UI should be pretty discoverable -- let me know if you can't find something.
4. Password protection
If you're using Hexo admin on your live server, you want some password
protection. To enable this, you just add a few config variables to your hexo
_config.yml:
admin:
  username: myfavoritename
  password_hash: be121740bf988b2225a313fa1f107ca1
  secret: a secret something
The password_hash is the bcrypt hash of your password. The secret is used
to make the cookies secure, so it's a good idea to have it be long and
complicated.
A utility in Hexo admin's Settings can hash your password and generate the admin
section for you. Start Hexo and go to Settings > Setup authentification
and fill out your information. Copy the generated YAML into your _config.yml.
Once that's in place, start up your hexo server and going to /admin/ will
require you to enter your password.
5. Custom post metadata
To add and edit your own post metadata with the admin interface, add the
metadata variable and your custom variables to your hexo _config.yml:
metadata:
  author_id: defaultAuthorId
  language:

-------------------------------------------------------------
Git deployer plugin for Hexo.
![]()
Git deployer plugin for Hexo.
Update Git for Windows to the latest version. (Details)
$ npm install hexo-deployer-git --saveYou can configure this plugin in _config.yml.
# You can use this:
deploy:
  type: git
  repo: <repository url>
  branch: [branch]
  token: ''
  message: [message]
  name: [git user]
  email: [git email]
  extend_dirs: [extend directory]
  ignore_hidden: false # default is true
  ignore_pattern: regexp  # whatever file that matches the regexp will be ignored when deploying

# or this:
deploy:
  type: git
  message: [message]
  repo: <repository url>[,branch]
  extend_dirs:
    - [extend directory]
    - [another extend directory]
  ignore_hidden:
    public: false
    [extend directory]: true
    [another extend directory]: false
  ignore_pattern:
    [folder]: regexp  # or you could specify the ignore_pattern under a certain directory

# Multiple repositories
deploy:
  repo:
    # Either syntax is supported
    [repo_name]: <repository url>[,branch]
    [repo_name]:
      url: <repository url>
branch: [branch]- url: Url of your repositury to pull from and push
to. If you've configured SSH key authentication for git, ensure you use
the SSH protocol format (for example,
git@github.com:) for your repository URL to avoid password prompts or access denial due to security policies. - branch: Optional git branch to deploy the static site to.
- Defaults to
gh-pageson GitHub. - Defaults to
coding-pageson Coding.net. - Otherwise defaults to
master.
- Defaults to
- token: Optional token value to authenticate with the repo. Prefix with
$to read token from environment variable (recommended). Repo must be a http(s) url. More details. - repo_name: Unique name when deploying to multiple repositories.
- Example:
deploy:
  repo:
    # Either syntax is supported
    github: https://github.com/user/project.git,branch
    gitee:
      url: https://gitee.com/user/project.git
      branch: branch_name
repo: takes priority.Site updated: {{ now("yyyy-MM-dd HH:mm:ss") }}.demo, examples.nojekyll in root.
- Boolean: for all dirs.
- Object: for public dir and extend dir:
public: the public dir defaults.- [extend directory]
- RegExp: for all dirs.
- Object: specify the ignore pattern under certain directory. For example, if you want to push the source files and generated files at the same time to two different branches. The option should be like
# _config.yaml
deploy:
  - type: git
    repo: git@github.com:<username>/<username>.github.io.git
    branch: master
  - type: git
    repo: git@github.com:<username>/<username>.github.io.git
    branch: src
    extend_dirs: /
    ignore_hidden: false
    ignore_pattern:
public: .While
this plugin can parse authentication token from the config, only use
this method if you are sure the config will not be committed, including
to a private repo. A more secure approach is to add it to the CI as an
environment variable, then simply add the name of the environment
variable to this plugin's config (e.g. $GITHUB_TOKEN).
Additional guides:
The hexo-deployer-git plugin employs a force push (git push --force)
strategy when deploying updates to your site. This approach ensures
that the remote repository aligns exactly with your local deployment,
providing a clean, consistent state for each update. However, it comes
with an important consideration regarding custom modifications.
Using force push means that any changes made directly in the remote repository (e.g., via GitHub's web interface or through a separate git workflow) will be overwritten when the next deployment occurs. This is because force push does not merge changes; it replaces the remote content with the local version entirely.
To prevent unintended loss of work, we strongly advise adhering to the following best practices:
-
Centralize Changes in Your Hexo Source: Make all content and configuration changes within your local Hexo root directory. This ensures all modifications are included in the deployment process and preserved in your source control.
-
Avoid Direct Remote Modifications: Refrain from directly editing files in the GitHub repository through the web interface or other git methods. Doing so could lead to these changes being lost on the next deployment.
If
you are using a custom domain with GitHub Pages, you might have
encountered an issue where your custom domain configuration gets lost
after deploying updates to your site. This problem occurs due to the
overwritten / deletion of the CNAME file in the root of the deployed directory during the git commit and push process performed by the hexo-deployer-git plugin.
GitHub requires the CNAME file to be present
in your repository to associate your custom domain with your GitHub
Pages site. When this file is missing, GitHub resets the custom domain
setting, leading to the site being accessible only through the default github.io domain.
To ensure your custom domain remains active with each deployment, you need to include the CNAME file in your blog's source/ directory. Here's how you can do it:
- Create a
CNAMEFile: In the root of your blog'ssource/directory, create a file namedCNAME. Inside this file, enter your custom domain name. For example, if your custom domain isexample.com, the content of theCNAMEfile should be:example.com
- Deploy Your Site: Use the
hexo-deployer-gitplugin to deploy your site as usual. Runhexo g -dcommand, the plugin will now include theCNAMEfile in the deployment, and your custom domain configuration will remain intact.
hexo-deployer-git works by generating the site in .deploy_git and force pushing to the repo(es) in config.
If .deploy_git does not exist, a repo will initialized (git init).
Otherwise the curent repo (with its commit history) will be used.
Users can clone the deployed repo to .deploy_git to keep the commit history.
git clone <gh-pages repo> .deploy_git
Remove .deploy_git folder.
$ rm -rf .deploy_git
from https://github.com/hexojs/hexo-deployer-git
------
项目地址:
https://github.com/cloudswave/blog
https://github.com/briteming/cb/
https://github.com/briteming/cb/tree/master/source/_posts
https://github.com/briteming/cb/blob/master/source/_posts/fh.md?plain=1
我的博客地址:https://cb-mu-dun.vercel.app/
-------------------
项目地址:
https://github.com/hexojs/hexo-starter
https://github.com/briteming/hhs
https://github.com/briteming/hhs/tree/master/source/_posts
https://github.com/briteming/hhs/blob/master/source/_posts/fh.md?plain=1
我的博客地址:
https://hhs-beta.vercel.app/
-----------------------------------------
https://github.com/briteming/hsb
https://github.com/briteming/hsb/tree/main/source/_posts
https://github.com/briteming/hsb/blob/main/source/_posts/2026-04-01-fh.md?plain=1
blog url: https://hsb-six.vercel.app/