Kubernetes is an open-source Production-Grade container orchestration tool that helps to automate deploying, scaling, managing containerized applications. Google initially designed Kubernetes and now maintained by the Cloud Native Computing Foundation.
You can call Kubernetes is a cluster manager for Docker, and it provides almost same functionalities that of Docker Swarm. With Kubernetes, you can deploy any number of container replicas onto a node cluster, and Kubernetes will handle remainings (where to bring up containers) for you.
We can run Kubernetes in local-machine using below methods,
1. MinKube – A single node Kubernetes cluster for development and testing.
2. Kubeadm-dind (Kuberadm) – A multi-node Kubernetes cluster
2. Kubeadm-dind (Kuberadm) – A multi-node Kubernetes cluster
You can read all the methods here.
Here, we will deploy a multi-node Kubernetes cluster using the kubeadm. In this multi-node setup, we will have one master node and multiple worker nodes (minions).
Components
Master Node
kube-API server: It is an API server, runs on the master node that exposes Kubernetes API
etcd: A key store that stores Kubenetes cluster data
kube-scheduler: It is a scheduler that runs on the master node which monitors newly created pods and runs those pods on select nodes depends on resource availability.
kube-controller-manager: It is a control manager that runs on the manager who is responsible for monitoring nodes and maintaining pods replication.
cloud-controller-manager: A cloud control manager that interact with underlying cloud providers (Ex: DigitalOcean, Rancher, etc..).
Worker Nodes
kubelet: It runs on all worker nodes and handles tasks like starting pods and containers.
kube-proxy: It is a Kubernetes network proxy that forwards TCP/UDP incoming requests to backend container.
Container Runtime: It is container software (Docker)
kube-proxy: It is a Kubernetes network proxy that forwards TCP/UDP incoming requests to backend container.
Container Runtime: It is container software (Docker)
Environment
| Node | Hostname | IP Address | OS | CPU | RAM |
|---|---|---|---|---|---|
| Master Node | master.itzgeek.local | 192.168.1.10 | CentOS 7 / RHEL 7 | 2 | 2GB |
| Minion Node 1 | node1.itzgeek.local | 192.168.1.20 | Ubuntu 18.04 / 16.04 | 2 | 2GB |
| Minion Node 2 | node2.itzgeek.local | 192.168.1.30 | Debian 9 | 2 | 2GB |
You must disable swap for Kubernetes to work properly
Here, I am using a mixed environment for this demo. But, I request you use the similar operating system only for ease troubleshooting.
Prerequisites
Become the root user.
su -
OR
sudo su -
Set Hostname
Set unique hostname for all your nodes. Example:
hostnamectl set-hostname master.itzgeek.local
Make a host entry or DNS record to resolve hostname for all nodes.
vi /etc/hosts
Entry:
192.168.1.10 master.itzgeek.local master 192.168.1.20 node1.itzgeek.local node1 192.168.1.30 node2.itzgeek.local node2
Firewall
Configure Firewall for Kubernetes to work correctly.
ON MASTER NODE
FirwallD:
firewall-cmd --permanent --add-port=6443/tcp firewall-cmd --permanent --add-port=2379-2380/tcp firewall-cmd --permanent --add-port=10250/tcp firewall-cmd --permanent --add-port=10251/tcp firewall-cmd --permanent --add-port=10252/tcp firewall-cmd --permanent --add-port=10255/tcp firewall-cmd --reload
UFW:
ufw allow 6443/tcp ufw allow 2379tcp ufw allow 2380/tcp ufw allow 10250/tcp ufw allow 10251/tcp ufw allow 10252/tcp ufw allow 10255/tcp ufw reload
ON WORKER NODES
FirwallD:
firewall-cmd --permanent --add-port=10251/tcp firewall-cmd --permanent --add-port=10255/tcp firewall-cmd --reload
UFW:
ufw allow 10251/tcp ufw allow 10255/tcp ufw reload
SELinux
Consider disabling SELinux on CentOS 7 / RHEL 7 nodes.
setenforce 0 sed -i 's/SELINUX=enforcing/SELINUX=disabled/g' /etc/selinux/config
Kernel Settings
In RHEL 7 /CentOS 7, set net.bridge.bridge-nf-call-iptables to 1 in your sysctl config.
cat <<EOF > /etc/sysctl.d/k8s.conf net.bridge.bridge-nf-call-ip6tables = 1 net.bridge.bridge-nf-call-iptables = 1 EOF sysctl -p
Install Docker
Install Docker on all of your nodes (Master and Minions). Docker version v18.06 is recommended, but v1.11, v1.12, v1.13 and 17.03 also work well with Kubernetes.
CentOS 7 / RHEL 7
### Install Docker from CentOS/RHEL repository ### yum install -y docker systemctl enable docker systemctl start docker OR ### Install Docker CE 18.06 from Docker's CentOS repositories ### # Install Prerequisites yum install -y yum-utils device-mapper-persistent-data lvm2 # Add Docker repository yum-config-manager --add-repo https://download.docker.com/linux/centos/docker-ce.repo # Install Docker yum update yum install -y docker-ce-18.06.1.ce # Create Docker Directory mkdir /etc/docker # Setup Docker Daemon cat > /etc/docker/daemon.json <<EOF { "exec-opts": ["native.cgroupdriver=systemd"], "log-driver": "json-file", "log-opts": { "max-size": "100m" }, "storage-driver": "overlay2", "storage-opts": [ "overlay2.override_kernel_check=true" ] } EOF mkdir -p /etc/systemd/system/docker.service.d # Restart Docker Daemon systemctl daemon-reload systemctl restart docker systemctl enable docker
Ubuntu 18.04 / Ubuntu 16.04
### Install Docker from Ubuntu's repositories ### apt-get update apt-get install -y docker.io OR ### Install Docker CE 18.06 from Docker's repositories for Ubuntu ### # Install Prerequisites apt-get update apt-get install -y apt-transport-https ca-certificates curl software-properties-common # Download GPG Key curl -fsSL https://download.docker.com/linux/ubuntu/gpg | apt-key add - # Add Docker's Repository add-apt-repository "deb [arch=amd64] https://download.docker.com/linux/ubuntu $(lsb_release -cs) stable" # Install Docker apt-get update apt-get install -y docker-ce=18.06.0~ce~3-0~ubuntu # Setup Daemon cat > /etc/docker/daemon.json <<EOF { "exec-opts": ["native.cgroupdriver=systemd"], "log-driver": "json-file", "log-opts": { "max-size": "100m" }, "storage-driver": "overlay2" } EOF mkdir -p /etc/systemd/system/docker.service.d # Restart Docker Daemon systemctl daemon-reload systemctl restart docker
Debian 9
### Install Docker from Debian's repositories ### apt-get update apt-get install -y docker.io OR ### Install Docker CE 18.06 from Docker's repositories for Debian ### # Install Prerequisites apt-get update apt-get install -y apt-transport-https ca-certificates curl software-properties-common # Download GPG Key curl -fsSL https://download.docker.com/linux/debian/gpg | apt-key add - # Add Docker's Repository add-apt-repository "deb [arch=amd64] https://download.docker.com/linux/debian $(lsb_release -cs) stable" # Install Docker apt-get update apt-get install -y docker-ce=18.06.0~ce~3-0~debian # Setup Daemon cat > /etc/docker/daemon.json <<EOF { "exec-opts": ["native.cgroupdriver=systemd"], "log-driver": "json-file", "log-opts": { "max-size": "100m" }, "storage-driver": "overlay2" } EOF mkdir -p /etc/systemd/system/docker.service.d # Restart Docker Daemon systemctl daemon-reload systemctl restart docker
Configure Kubernetes Repository
Kubernetes packages are not available in OS repositories, so you need to follow the below steps to configure its repository on all your nodes.
### CentOS 7 / RHEL 7 ### cat <<EOF > /etc/yum.repos.d/kubernetes.repo [kubernetes] name=Kubernetes baseurl=https://packages.cloud.google.com/yum/repos/kubernetes-el7-x86_64 enabled=1 gpgcheck=1 repo_gpgcheck=1 gpgkey=https://packages.cloud.google.com/yum/doc/yum-key.gpg https://packages.cloud.google.com/yum/doc/rpm-package-key.gpg exclude=kube* EOF ### Ubuntu 18.04 / 16.05 & Debian 9 ### apt-get update apt-get install -y curl apt-transport-https curl -s https://packages.cloud.google.com/apt/doc/apt-key.gpg | apt-key add - echo "deb http://apt.kubernetes.io/ kubernetes-xenial main" | sudo tee /etc/apt/sources.list.d/kubernetes.list
Install kubeadm, kubelet and kubectl
On all of your nodes, run the following commands to install required packages.
kubeadm: the command to create the cluster.
kubelet: Runs on all of the machines in your cluster and does things like starting pods and containers.
kubectl: the command line utility to manage your cluster.
### CentOS 7 / RHEL 7 ### yum install -y kubelet kubeadm kubectl --disableexcludes=kubernetes systemctl enable kubelet systemctl start kubelet ### Ubuntu 16.04 / Debian 9 ### apt-get update apt-get install -y kubelet kubeadm kubectl
Initialize Kubernetes Master
On the Master node, execute the kubeadm init command in the terminal to initialize the cluster.
Depending upon the network add-on you use, you may need to set the
--pod-network-cidr to a specific value. Here, I am using Wave pod network which doesn’t require any extra arguments.kubeadm init
Output:
[init] Using Kubernetes version: v1.13.0 [preflight] Running pre-flight checks [WARNING Firewalld]: firewalld is active, please ensure ports [6443 10250] are open or your cluster may not function correctly [preflight] Pulling images required for setting up a Kubernetes cluster [preflight] This might take a minute or two, depending on the speed of your internet connection [preflight] You can also perform this action in beforehand using 'kubeadm config images pull' [kubelet-start] Writing kubelet environment file with flags to file "/var/lib/kubelet/kubeadm-flags.env" [kubelet-start] Writing kubelet configuration to file "/var/lib/kubelet/config.yaml" [kubelet-start] Activating the kubelet service [certs] Using certificateDir folder "/etc/kubernetes/pki" [certs] Generating "ca" certificate and key [certs] Generating "apiserver-kubelet-client" certificate and key . . . . . . . . . [bootstraptoken] configured RBAC rules to allow certificate rotation for all node client certificates in the cluster [bootstraptoken] creating the "cluster-info" ConfigMap in the "kube-public" namespace [addons] Applied essential addon: CoreDNS [addons] Applied essential addon: kube-proxy Your Kubernetes master has initialized successfully! To start using your cluster, you need to run the following as a regular user: mkdir -p $HOME/.kube sudo cp -i /etc/kubernetes/admin.conf $HOME/.kube/config sudo chown $(id -u):$(id -g) $HOME/.kube/config You should now deploy a pod network to the cluster. Run "kubectl apply -f [podnetwork].yaml" with one of the options listed at: https://kubernetes.io/docs/concepts/cluster-administration/addons/ You can now join any number of machines by running the following on each node as root: kubeadm join 192.168.1.10:6443 --token d1dyaj.31zxywbg93s1ywjy --discovery-token-ca-cert-hash sha256:71a91721595fde66b6382908d801266602a14de8e16bdb7a3cede21509427009
Manage Cluster
Run these commands in the terminal to manage and work on the cluster as a regular user.
mkdir -p $HOME/.kube sudo cp -i /etc/kubernetes/admin.conf $HOME/.kube/config sudo chown $(id -u):$(id -g) $HOME/.kube/config
Run the kubectl get pods –all-namespaces command to check the status of the cluster.
kubectl get pods --all-namespaces
Output:
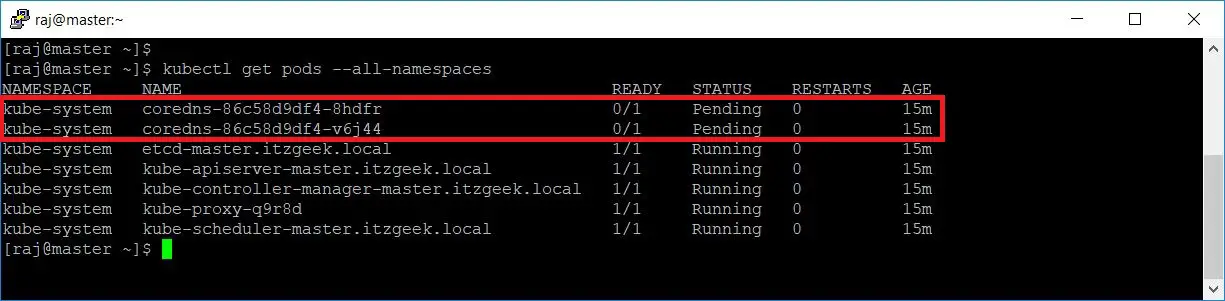
You can see that coredns pod is in pending state and the status should change once you install pod network.
Setup Pod Network
We need to set up a pod network add-on on the cluster so that pods can communicate with each other. There are several projects provide Kubernetes pod networks namely, calico, canal, flannel, etc.
Here, we will use Wave pod network for this demo.
export kubever=$(kubectl version | base64 | tr -d 'n') kubectl apply -f "https://cloud.weave.works/k8s/net?k8s-version=$kubever"
Output:
serviceaccount/weave-net created clusterrole.rbac.authorization.k8s.io/weave-net created clusterrolebinding.rbac.authorization.k8s.io/weave-net created role.rbac.authorization.k8s.io/weave-net created rolebinding.rbac.authorization.k8s.io/weave-net created daemonset.extensions/weave-net created
Check the cluster status once again. The coredns pod should now be running state.
kubectl get pods --all-namespaces
Output:
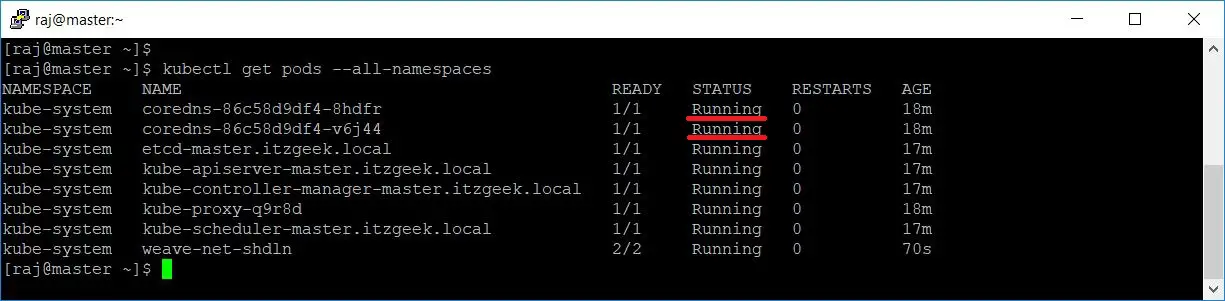 Install Kubernetes on CentOS 7 – Cluster Status post installing Network Add-on
Join worker nodes to Kuberenete cluster
If you remember, there was token in the output of kubeadm init command for joining nodes. Use the token and join all of your worker nodes.
kubeadm join 192.168.1.10:6443 --token d1dyaj.31zxywbg93s1ywjy --discovery-token-ca-cert-hash sha256:71a91721595fde66b6382908d801266602a14de8e16bdb7a3cede21509427009
Output:
[preflight] Running pre-flight checks [discovery] Trying to connect to API Server "192.168.1.10:6443" [discovery] Created cluster-info discovery client, requesting info from "https://192.168.1.10:6443" [discovery] Requesting info from "https://192.168.1.10:6443" again to validate TLS against the pinned public key [discovery] Cluster info signature and contents are valid and TLS certificate validates against pinned roots, will use API Server "192.168.1.10:6443" [discovery] Successfully established connection with API Server "192.168.1.10:6443" [join] Reading configuration from the cluster... [join] FYI: You can look at this config file with 'kubectl -n kube-system get cm kubeadm-config -oyaml' [kubelet] Downloading configuration for the kubelet from the "kubelet-config-1.13" ConfigMap in the kube-system namespace [kubelet-start] Writing kubelet configuration to file "/var/lib/kubelet/config.yaml" [kubelet-start] Writing kubelet environment file with flags to file "/var/lib/kubelet/kubeadm-flags.env" [kubelet-start] Activating the kubelet service [tlsbootstrap] Waiting for the kubelet to perform the TLS Bootstrap... [patchnode] Uploading the CRI Socket information "/var/run/dockershim.sock" to the Node API object "node1.itzgeek.local" as an annotation This node has joined the cluster: * Certificate signing request was sent to apiserver and a response was received. * The Kubelet was informed of the new secure connection details. Run 'kubectl get nodes' on the master to see this node join the cluster.
The above output confirms that the node has been successfully added to the cluster.
Now, check the worker nodes status on the master node using the following command.
kubectl get nodes
Output:
 Install Kubernetes on CentOS 7 – Nodes List
You should see worker nodes are in ready state.
In our next article, we will deploy pods, services, and replication controllers in Kubernetes.
That’s All.
from https://www.itzgeek.com/how-tos/linux/centos-how-tos/how-to-install-kubernetes-on-centos-7-ubuntu-18-04-16-04-debian-9.html
No comments:
Post a Comment