ShadowVPN 是一个基于 libsodium 的高速、安全的 VPN。特别为低端硬件,如 OpenWRT 路由器设计。
安装
在Linux vps上。
用 git clone 项目,然后编译。 请确保 configure 时使用了
--sysconfdir=/etc参数。sudo apt-get install build-essential automake libtool
git clone https://github.com/shadowsocks-backup/ShadowVPNcd ShadowVPNgit submodule update --init
./autogen.sh
./configure --enable-static --sysconfdir=/etc
make && sudo make install可执行文件shadowvpn将生成在/usr/local/bin/里面,同时还会生成/etc/shadowvpn/目录及其里面的东西。
在运行nano /etc/shadowvpn/server.conf之前,先运行:
在运行nano /etc/shadowvpn/server.conf之前,先运行:
ifconfig 查看vps 里已有的tun device, 比如已有tun0.
nano /etc/shadowvpn/server.conf
password的值改为你自己的密码。mtu的值改为1200.intf的值改为tun1(必须是vps里尚未存在的tun设备名)
shadowvpn -c /etc/shadowvpn/server.conf -s start
(-s start让shadowvpn运行在后台。建议用systemd来运行shadowvpn -c /etc/shadowvpn/server.conf 为service:killall shadowvpnnano /etc/systemd/system/shadowvpn.service内容为:[Unit]
After=network.target
[Service]
ExecStart=/usr/local/bin/shadowvpn -c /etc/shadowvpn/server.conf
Restart=always
[Install]
WantedBy=multi-user.target 然后,systemctl start shadowvpnsystemctl enable shadowvpn服务器端设置完成)
在Linux桌面系统也做如上的操作,或者你偷懒,把linux vps上编译好的可执行文件shadowvpn下载到Linux桌面系统上,来运行也可,这样Linux桌面系统上就无需编译该程序了。但需下载服务器上生成的client.conf,client_down.sh,client_up.sh到Linux桌面系统。我在linux桌面系统翻墙成功,但速度不快,远没有udp tun vpn(http://briteming.blogspot.jp/2015/09/udpip-udpipvpn.html)快!https://github.com/clowwindy/ShadowVPN已被原作者删除,这里有fork:https://github.com/shadowsocks-backup/ShadowVPNhttps://github.com/WeShadowsocks/ShadowVPNhttps://github.com/rains31/ShadowVPN 在本地机器mac上:
git clone https://github.com/shadowsocks-backup/ShadowVPNcd ShadowVPNgit submodule update --init
./autogen.sh
./configure --enable-static --sysconfdir=/etcmake && sudo make install(shadowvpn 将生成在/usr/local/bin/里面,同时还会生成/etc/shadowvpn/目录及其里面的东西)cd /etc/shadowvpn/
yudeMacBook-Air:shadowvpn brite$ ls
client.conf client_up.sh server_down.sh
client_down.sh server.conf server_up.sh
yudeMacBook-Air:shadowvpn brite$ rm -rf client_down.sh client_up.sh
yudeMacBook-Air:shadowvpn brite$ sudo wget https://github.com/shadowsocks-backup/ShadowVPN/raw/master/samples/darwin/darwin_client_up.sh
yudeMacBook-Air:shadowvpn brite$ sudo wget https://github.com/shadowsocks-backup/ShadowVPN/raw/master/samples/darwin/darwin_client_down.sh
yudeMacBook-Air:shadowvpn brite$ ls
client.conf server.conf
darwin_client_down.sh server_down.sh
darwin_client_up.sh server_up.sh
yudeMacBook-Air:shadowvpn brite$ nano client.conf
(把up=/etc/shadowvpn/client_up.sh改为up=/etc/shadowvpn/darwin_client_up.sh ;
把down=/etc/shadowvpn/client_down.sh改为down=/etc/shadowvpn/darwin_client_down.sh)
yudeMacBook-Air:shadowvpn brite$ sudo shadowvpn -c client.conf
Thu Nov 22 11:29:24 2018 warning: concurrency is temporarily disabled on this version, make sure to set concurrency=40 on the other side.(注意:把concurrency的值改为40,加大并发数。然后设置你的客户端并发数为 40, 切记要和服务端设置的一样,不然会出现丢包现象.)
add net vps-public-ip: gateway 10.0.0.1
changing default route
add net 128.0.0.0: gateway 10.7.0.1
add net 0.0.0.0: gateway 10.7.0.1
add net 10.7.0.1: gateway 10.0.0.1
default route changed to 10.7.0.1
/etc/shadowvpn/darwin_client_up.sh done
不要关闭此terminal window.
sudo networksetup -setdnsservers "Wi-Fi" 127.0.0.1
sudo dns-over-tls-forwarder -a 127.0.0.1:53 -s urdomain.com:853@vps-public-ip(dns-over-tls-forwarder的用法见https://briteming.blogspot.com/2020/01/unbounddns-over-tls.html)
OpenWRT:
下载预编译版: ar71xx, brcm63xx, brcm47xx, ramips_24kec.
或者自行编译: 进入 SDK 根目录,然后:
pushd package
git clone https://github.com/clowwindy/ShadowVPN.git
popd
make menuconfig # select Network/ShadowVPN
make V=s
scp bin/xxx/ShadowVPN-xxx-xxx.ipk root@192.168.1.1
# then log in your box and use opkg to install that ipk file
配置
- 可以在
/etc/shadowvpn目录下找到所有配置文件。 - 对于客户端,编辑
client.conf。 - 对于服务器端,编辑
server.conf。 - 修改配置文件中的
server和password等字段。 up字段指定的脚本会在 VPN 启动后执行。down字段指定的脚本会在 VPN 退出后执行。- 如果需要自定义路由,可以修改上面两个脚本。在脚本最后有一段注释, 可以把修改路由的命令放在相应的位置。
需要注意的是 ShadowVPN 是一个点对点 VPN。意味着对于每个客户端,需要一个对应的服务端。 可以开启多个服务端进程,用
-c参数指定不同的配置文件。请确保对于不同的服务端和客户端, 在 up和 down脚本中指定了不同的 IP。
客户端:
sudo shadowvpn -c /etc/shadowvpn/client.conf
客户端(OpenWRT):
/etc/init.d/shadowvpn start
/etc/init.d/shadowvpn stop
对于 DNS 污染,可以直接使用 Google DNS 8.8.8.8,或者使用 ChinaDNS 综合使用国内外 DNS 得到更好的解析结果。
可选: OpenWRT 用户可以看看 LuCI Configuration。
-----------------------------------------
Debian server下,搭建Shadowvpn服务端
Shadowvpn衍生自libsodium,主要是为低端硬件编写的,比如一些路由器.
但是也能当做vps之间的传输工具(比如国内跳板?) 而Github上的项目更新到2.0后安装说明没有得到及时更新...前几天按照旧的说明始终不行 目前的安装流程是这样的:
但是也能当做vps之间的传输工具(比如国内跳板?) 而Github上的项目更新到2.0后安装说明没有得到及时更新...前几天按照旧的说明始终不行 目前的安装流程是这样的:
安装编译依赖
apt-get install build-essential automake libtool git
从github得到源码
git clone https://github.com/moonagic/ShadowVPN.git
cd ShadowVPN
git clone https://github.com/moonagic/libsodium.git
安装
./autogen.sh
./configure --enable-static --sysconfdir=/etc
make
sudo make install
然后就可以修改
/etc/shadowvpn下的配置文件然后启动shadowvpn了shadowvpn -c /etc/shadowvpn/server.conf -s start
-----------------------------
ShadowVPN配合路由器使用
ShadowVPN已经停止开发,这里使用0.1.6版本进行说明。
为了方便游戏,作为二级路由全局使用。
1,服务器端源码编译安装
为了以后方便,这里直接做成deb包。先安装依赖
sudo apt-get install build-essential automake libtool gawk debhelper git
原来项目已经和谐,只好找些fork版的源码下载,例如下面的
https://github.com/langlichuan123/ShadowVPN/archive/0.1.7.tar.gz
下载的包解压后是不带libsodium库的,需要额外git下来。
cd ShadowVPN-0.1.7
git clone https://github.com/jedisct1/libsodium.git
./autogen.sh
dpkg-buildpackage
cd ..
可以发现shadowvpn_0.1.6-1_amd64.deb安装包。
这样x64服务器可以直接安装deb包了,不必再重新构建。
sudo dpkg -i shadowvpn_0.1.6-1_amd64.deb
2,服务器端配置
确保/etc/default/shadowvpn文件中的CONFFILE="/etc/shadowvpn/server.conf"。
然后修改/etc/shadowvpn/server.conf文件中相应的配置。
#建议使用53端口,一般网络53限制小。
port=53
# 使用下面命令
# dd if=/dev/urandom bs=64 count=1 | md5sum
# 可以获取一串随机密码,服务端客户端一致
password=aac3671137e54ee6e7b5c73d2cc499e2
#mtu需要根据自己需要修改
mtu=1400
配置完成后,重新启动服务端。
需要注意的是如何获取适合的mtu数值。
mtu=X(Ethernet) - 20(IPv4, or 40 for IPv6) - 8(UDP) - 24(ShadowVPN)
本地电脑,如Windows系统下,cmd执行
ping -f -l 1452 www.baidu.com
逐步加大或者减少1452这个数值,直到恰好不会出现DF拆包的提示或者百分百丢包。记下这个X。
例如,记下X是1452,计算得到mtu=1452-20-8-24=1400。
那么在服务端的server.conf填入1400。
3,路由端获取ipk
获取ipk文件,a、b方法任取其一。
a,下载预编译版本
http://sourceforge.net/projects/openwrt-dist/files/shadowvpn/0.1.6-ae532bc/
b,使用SDK编译ipk文件
在deibian或者ubuntu上先安装依赖,
sudo apt-get update
sudo apt-get install libncurses5-dev mercurial zlib1g-dev gawk unzip build-essential subversion libncurses5-dev zlib1g-dev gawk gcc-multilib flex git-core gettext libssl-dev quilt xsltproc libxml-parser-perl bzr ecj cvs
sudo apt-get install ccache
然后按照需求下载SDK,以编译ar71xx平台的ipk为例,到openwrt的官网下载所需SDK。
https://downloads.openwrt.org/chaos_calmer/15.05/ar71xx/
然后执行:
tar xf OpenWrt-SDK-15.05-ar71xx-*
cd OpenWrt-SDK-15.05-ar71xx-*
cd package
curl -OSL 'https://github.com/aa65535/openwrt-shadowvpn/archive/v0.1.6.tar.gz'
tar xvf v0.1.6.tar.gz
cd ..
make defconfig
make prereq
make menuconfig
#选择要编译的包 Network -> ShadowVPN(按键M 独立安装包),然后save,之后退出即可。
make V=99
在bin/ar71xx/packages/base/目录下可以找到编译好的ShadowVPN_0.1.6-1_ar71xx.ipk。
4,路由端安装ipk
将ipk文件通过WinSCP放到自己的路由/tmp目录下。
先更新一下源,该ipk依赖kmod-tun、ip。
opkg update
opkg -i ShadowVPN_0.1.6-1_ar71xx.ipk
5,路由端配置
只需修改/etc/shadowvpn/client.conf文件中相应配置。
# 服务器ip地址
server=x.x.x.x
#端口
port=53
#与服务端一致
password=aac3671137e54ee6e7b5c73d2cc499e2
#与服务端一致
mtu=1400
#为了防止日志积累,塞满内存,把日志释放掉。
logfile=/dev/null
在/etc/config/network文件中修改lan接口中内网网关,防止冲突。然后添加额外dns,一般用8.8.8.8,这里用香港的某dns优先。
config interface 'lan'
.....
option ipaddr '192.168.77.1'
......
option dns '203.80.96.10 8.8.4.4'
开机自动启动如下
/etc/init.d/shadowvpn enable
TTL值默认情况下,Linux系统的TTL值为64或255,Windows NT/2000/XP系统的默认TTL值为128,Win7系统的TTL值是64,Windows 98系统的TTL值为32。255-248 = 7,经过了7路由.
-----------------------------------------
中文说明ShadowVPN配合路由器使用
ShadowVPN已经停止开发,这里使用0.1.6版本进行说明。
为了方便游戏,作为二级路由全局使用。
1,服务器端源码编译安装
为了以后方便,这里直接做成deb包。先安装依赖
sudo apt-get install build-essential automake libtool gawk debhelper git
原来项目已经和谐,只好找些fork版的源码下载,例如下面的
https://github.com/langlichuan123/ShadowVPN/archive/0.1.7.tar.gz
下载的包解压后是不带libsodium库的,需要额外git下来。
cd ShadowVPN-0.1.7
git clone https://github.com/jedisct1/libsodium.git
./autogen.sh
dpkg-buildpackage
cd ..
可以发现shadowvpn_0.1.6-1_amd64.deb安装包。
这样x64服务器可以直接安装deb包了,不必再重新构建。
sudo dpkg -i shadowvpn_0.1.6-1_amd64.deb
2,服务器端配置
确保/etc/default/shadowvpn文件中的CONFFILE="/etc/shadowvpn/server.conf"。
然后修改/etc/shadowvpn/server.conf文件中相应的配置。
#建议使用53端口,一般网络53限制小。
port=53
# 使用下面命令
# dd if=/dev/urandom bs=64 count=1 | md5sum
# 可以获取一串随机密码,服务端客户端一致
password=aac3671137e54ee6e7b5c73d2cc499e2
#mtu需要根据自己需要修改
mtu=1400
配置完成后,重新启动服务端。
需要注意的是如何获取适合的mtu数值。
mtu=X(Ethernet) - 20(IPv4, or 40 for IPv6) - 8(UDP) - 24(ShadowVPN)
本地电脑,如Windows系统下,cmd执行
ping -f -l 1452 www.baidu.com
逐步加大或者减少1452这个数值,直到恰好不会出现DF拆包的提示或者百分百丢包。记下这个X。
例如,记下X是1452,计算得到mtu=1452-20-8-24=1400。
那么在服务端的server.conf填入1400。
3,路由端获取ipk
获取ipk文件,a、b方法任取其一。
a,下载预编译版本
http://sourceforge.net/projects/openwrt-dist/files/shadowvpn/0.1.6-ae532bc/
b,使用SDK编译ipk文件
在deibian或者ubuntu上先安装依赖,
sudo apt-get update
sudo apt-get install libncurses5-dev mercurial zlib1g-dev gawk unzip build-essential subversion libncurses5-dev zlib1g-dev gawk gcc-multilib flex git-core gettext libssl-dev quilt xsltproc libxml-parser-perl bzr ecj cvs
sudo apt-get install ccache
然后按照需求下载SDK,以编译ar71xx平台的ipk为例,到openwrt的官网下载所需SDK。
https://downloads.openwrt.org/chaos_calmer/15.05/ar71xx/
然后执行:
tar xf OpenWrt-SDK-15.05-ar71xx-*
cd OpenWrt-SDK-15.05-ar71xx-*
cd package
curl -OSL 'https://github.com/aa65535/openwrt-shadowvpn/archive/v0.1.6.tar.gz'
tar xvf v0.1.6.tar.gz
cd ..
make defconfig
make prereq
make menuconfig
#选择要编译的包 Network -> ShadowVPN(按键M 独立安装包),然后save,之后退出即可。
make V=99
在bin/ar71xx/packages/base/目录下可以找到编译好的ShadowVPN_0.1.6-1_ar71xx.ipk。
4,路由端安装ipk
将ipk文件通过WinSCP放到自己的路由/tmp目录下。
先更新一下源,该ipk依赖kmod-tun、ip。
opkg update
opkg -i ShadowVPN_0.1.6-1_ar71xx.ipk
5,路由端配置
只需修改/etc/shadowvpn/client.conf文件中相应配置。
# 服务器ip地址
server=x.x.x.x
#端口
port=53
#与服务端一致
password=aac3671137e54ee6e7b5c73d2cc499e2
#与服务端一致
mtu=1400
#为了防止日志积累,塞满内存,把日志释放掉。
logfile=/dev/null
在/etc/config/network文件中修改lan接口中内网网关,防止冲突。然后添加额外dns,一般用8.8.8.8,这里用香港的某dns优先。
config interface 'lan'
.....
option ipaddr '192.168.77.1'
......
option dns '203.80.96.10 8.8.4.4'
开机自动启动如下
/etc/init.d/shadowvpn enable
TTL值默认情况下,Linux系统的TTL值为64或255,Windows NT/2000/XP系统的默认TTL值为128,Win7系统的TTL值是64,Windows 98系统的TTL值为32。255-248 = 7,经过了7路由.
-----------------------------------------
ShadowVPN is a fast, safe VPN based on libsodium. Designed for low end devices, i.e. OpenWRT routers.
For more details, check here.
ShadowVPN is currently beta and have much work to do. If you want a stable version, please come by here a few months later.
Install
apt-get install shadowvpn
service shadowvpn restart (或者:/usr/bin/shadowvpn -c /etc/shadowvpn/server.conf -s restart )
Unix
Currently Linux, FreeBSD and OS X are supported. Download a release and build. Do not clone the repo, since it's not stable. Make sure to set--sysconfdir=/etc. You'll find conf files under /etc.# For Debian-based Linuxsudo apt-get update
sudo apt-get install build-essential automake libtool -ywget https://github.com/clowwindy/ShadowVPN/releases/download/0.1.6/shadowvpn-0.1.6.tar.gz
tar zxvfshadowvpn-0.1.6.tar.gz
cdshadowvpn-0.1.6
./configure --enable-static --sysconfdir=/etc
make && sudo make install
OpenWRT
Download precompiled for OpenWRT Barrier Breaker.Or build yourself: cd into SDK root, then
pushd package
git clone https://github.com/clowwindy/ShadowVPN.git
popd
make menuconfig # select Network/ShadowVPN
make V=s
scp bin/xxx/ShadowVPN-xxx-xxx.ipk root@192.168.1.1
# then log in your box and use opkg to install that ipk file
Windows
See Build for Windows.Configuration
- You can find all the conf files under
/etc/shadowvpn. - For the client, edit
client.conf. - For the server, edit
server.conf. - Update
serverandpasswordin those files. - The script file specified by
upwill be executed after VPN is up. - The script file specified by
downwill be executed after VPN is down. - If you need to specify routing rules, modify those scripts. You'll see a placeholder at the end of those scripts.
- If you are using Windows, the IP address of TUN/TAP device
tunipis required to be specified in the conf file.
-c
argument. Make sure to use different IP for each instance in each up and
down scripts.Usage
Server:sudo shadowvpn -c /etc/shadowvpn/server.conf -s start
sudo shadowvpn -c /etc/shadowvpn/server.conf -s stop
sudo service shadowvpn start instead.Client:
sudo shadowvpn -c /etc/shadowvpn/client.conf -s start
sudo shadowvpn -c /etc/shadowvpn/client.conf -s stop
/etc/init.d/shadowvpn start
/etc/init.d/shadowvpn stop
Wiki
You can find all the documentation in the wiki: https://github.com/clowwindy/ShadowVPN/wikiFROM https://github.com/clowwindy/ShadowVPN ( 已被作者删除)
https://github.com/warriorpaw/ShadowVPN
https://github.com/clowwindy/ShadowVPN/wiki
--------------------------------------------------------------
ShadowVPN与Shadowsocks/OpenVPN的比较
| OpenVPN | ShadowSocks | ShadowVPN | |
|---|---|---|---|
| Layer | IP | TCP/UDP | IP |
| Frontend | VPN | socks/iptables | VPN |
| Security | CCA | CPA | CCA |
| Protocol Sniffing | possible | difficult | difficult |
| Tamper Proof | Y | N | Y |
| Disruption Proof | N | N | Y |
| Speed | fast(UDP) | fast | fast |
| CPU utilization | high | medium | low |
| RAM | low | medium | low |
- Stateless VPN
- Low resource comsumption
- Faster encryption
- Use multiple UDP sockets
- User friendly configuration with scripting support
- Builtin daemon and logging support
- Lower packet overhead
- Does not crash easily
- Use GNU Autotools, making it easier to build and port。
--------------------
32位Windows下的客户端exe文件的生成方法
To run ShadowVPN, You need to install the TUN/TAP driver first:
It's recommended to build ShadowVPN on Debian, since it's simple.
Build on Debian
Download a release and build:apt-get install build-essential mingw-w64 -ywget https://github.com/clowwindy/ShadowVPN/releases/download/0.1.6/shadowvpn-0.1.6.tar.gz tar zxvf shadowvpn-0.1.6.tar.gz cd shadowvpn-0.1.6 ./configure --host=i686-w64-mingw32 --enable-static
make shadowvpn.exe in src/.from https://github.com/clowwindy/ShadowVPN/wiki/Build-for-Windows
-----------
ShadowVPN for iOS
ShadowVPN for iOS 9, using the new Network Extension API.
Features
- Stateless VPN
- Server NAT support
- CHNRoutes
- ChinaDNS
Work in progress. Checkout the development plan.
Please contact us if you're interested in testing the alpha version.
from https://github.com/warriorpaw/ShadowVPN-iOS
--------
How To Test Beta Version for ShadowVPN-iOS
- Send your iOS 9 device's UDID to https://twitter.com/clowwindy (limit: 100 people)
- Set up ShadowVPN on your server
- Set MTU to 1350 or lower on your server. If you have changed MTU, run
iptables -t mangle -Fbefore restarting ShadowVPN - Download ShadowVPN on iOS and configure
- Set MTU to the same value as your server on your phone
- Make sure client and server IP are in the same subnet
- Leave User Token field empty if you don't want to test the NAT feature
- If CHNRoutes doesn't work, try to turn it off
- If you use CHNRoutes, set DNS to
8.8.8.8,114.114.114.114(a China DNS + a foreign DNS) - If you don't use CHNRoutes, set DNS to
8.8.8.8(foreign only) - Try
tcpdump port your_UDP_portandtcpdump -i tun0on your server to check if anything is wrong - You can also check logs on your device using Xcode->Window->Devices
- ShadowVPN for iOS is beta and may have a lot of bugs. Please report problems to issues. Please include screenshots if possible.
from https://github.com/clowwindy/ShadowVPN-iOS/wiki/How-To-Test-Beta-Version
--------------
为了方便游戏,作为二级路由全局使用。
1,服务器端源码编译安装
为了以后方便,这里直接做成deb包。先安装依赖
这样x64服务器可以直接安装deb包了,不必再重新构建。
确保/etc/default/shadowvpn文件中的CONFFILE="/etc/shadowvpn/server.conf"。
然后修改/etc/shadowvpn/server.conf文件中相应的配置。
需要注意的是如何获取适合的mtu数值。
例如,记下X是1452,计算得到mtu=1452-20-8-24=1400。
那么在服务端的server.conf填入1400。
3,路由端获取ipk
获取ipk文件,a、b方法任取其一。
a,下载预编译版本
http://sourceforge.net/projects/openwrt-dist/files/shadowvpn/0.1.6-ae532bc/
b,使用SDK编译ipk文件
在deibian或者ubuntu上先安装依赖,
https://downloads.openwrt.org/chaos_calmer/15.05/ar71xx/
然后执行

在bin/ar71xx/packages/base/目录下可以找到编译好的ShadowVPN_0.1.6-1_ar71xx.ipk。
4,路由端安装ipk
将ipk文件通过WinSCP放到自己的路由/tmp目录下。
先更新一下源,该ipk依赖kmod-tun、ip。
只需修改/etc/shadowvpn/client.conf文件中相应配置。

TTL值默认情况下,Linux系统的TTL值为64或255,Windows NT/2000/XP系统的默认TTL值为128,Win7系统的TTL值是64,Windows 98系统的TTL值为32。255-248 = 7,经过了7路由。
from https://www.fanyueciyuan.info/fq/sv-openwrt.html

--------------
ShadowVPN配合路由器使用备要
ShadowVPN已经停止开发,这里使用0.1.6版本进行说明。为了方便游戏,作为二级路由全局使用。
1,服务器端源码编译安装
为了以后方便,这里直接做成deb包。先安装依赖
sudo apt-get install build-essential automake libtool gawk debhelper git原来项目已经和谐,只好找些fork版的源码下载,例如下面的
https://github.com/langlichuan123/ShadowVPN/archive/0.1.7.tar.gz下载的包解压后是不带libsodium库的,需要额外git下来。
cd ShadowVPN-0.1.7 git clone https://github.com/jedisct1/libsodium.git ./autogen.sh dpkg-buildpackage cd ..可以发现shadowvpn_0.1.6-1_amd64.deb安装包。
这样x64服务器可以直接安装deb包了,不必再重新构建。
sudo dpkg -i shadowvpn_0.1.6-1_amd64.deb2,服务器端配置
确保/etc/default/shadowvpn文件中的CONFFILE="/etc/shadowvpn/server.conf"。
然后修改/etc/shadowvpn/server.conf文件中相应的配置。
#建议使用53端口,一般网络53限制小。 port=53 # 使用下面命令 # dd if=/dev/urandom bs=64 count=1 | md5sum # 可以获取一串随机密码,服务端客户端一致 password=aac3671137e54ee6e7b5c73d2cc499e2 #mtu需要根据自己需要修改 mtu=1400配置完成后,重新启动服务端。
需要注意的是如何获取适合的mtu数值。
mtu=X(Ethernet) - 20(IPv4, or 40 for IPv6) - 8(UDP) - 24(ShadowVPN)本地电脑,如Windows系统下,cmd执行
ping -f -l 1452 www.baidu.com逐步加大或者减少1452这个数值,直到恰好不会出现DF拆包的提示或者百分百丢包。记下这个X。
例如,记下X是1452,计算得到mtu=1452-20-8-24=1400。
那么在服务端的server.conf填入1400。
3,路由端获取ipk
获取ipk文件,a、b方法任取其一。
a,下载预编译版本
http://sourceforge.net/projects/openwrt-dist/files/shadowvpn/0.1.6-ae532bc/
b,使用SDK编译ipk文件
在deibian或者ubuntu上先安装依赖,
sudo apt-get update sudo apt-get install libncurses5-dev mercurial zlib1g-dev gawk unzip build-essential subversion libncurses5-dev zlib1g-dev gawk gcc-multilib flex git-core gettext libssl-dev quilt xsltproc libxml-parser-perl bzr ecj cvs sudo apt-get install ccache然后按照需求下载SDK,以编译ar71xx平台的ipk为例,到openwrt的官网下载所需SDK。
https://downloads.openwrt.org/chaos_calmer/15.05/ar71xx/
然后执行
tar xf OpenWrt-SDK-15.05-ar71xx-* cd OpenWrt-SDK-15.05-ar71xx-* cd package curl -OSL 'https://github.com/aa65535/openwrt-shadowvpn/archive/v0.1.6.tar.gz' tar xvf v0.1.6.tar.gz cd .. make defconfig make prereq make menuconfig #选择要编译的包 Network -> ShadowVPN(按键M 独立安装包),然后save,之后退出即可。 make V=99
在bin/ar71xx/packages/base/目录下可以找到编译好的ShadowVPN_0.1.6-1_ar71xx.ipk。
4,路由端安装ipk
将ipk文件通过WinSCP放到自己的路由/tmp目录下。
先更新一下源,该ipk依赖kmod-tun、ip。
opkg update opkg -i ShadowVPN_0.1.6-1_ar71xx.ipk5,路由端配置
只需修改/etc/shadowvpn/client.conf文件中相应配置。
# 服务器ip地址 server=x.x.x.x #端口 port=53 #与服务端一致 password=aac3671137e54ee6e7b5c73d2cc499e2 #与服务端一致 mtu=1400 #为了防止日志积累,塞满内存,把日志释放掉。 logfile=/dev/null在/etc/config/network文件中修改lan接口中内网网关,防止冲突。然后添加额外dns,一般用8.8.8.8,这里用香港的某dns优先。
config interface 'lan'
.....
option ipaddr '192.168.77.1'
......
option dns '203.80.96.10 8.8.4.4'
开机自动启动如下/etc/init.d/shadowvpn enable
TTL值默认情况下,Linux系统的TTL值为64或255,Windows NT/2000/XP系统的默认TTL值为128,Win7系统的TTL值是64,Windows 98系统的TTL值为32。255-248 = 7,经过了7路由。
from https://www.fanyueciyuan.info/fq/sv-openwrt.html
-----------
shadowvpn
shadowvwvpn服务端设置
Debian & Ubuntu
For Debian 7 and Ubuntu 12+
vim /etc/apt/sources.list
添加
deb http://shadowvpn.org/debian wheezy main
Then
apt-get update
apt-get install shadowvpn
修改server.conf
vim /etc/shadowvpn/server.conf
修正如下
# ShadowVPN config example
# Notice: do not put space before or after "="
# Server listen address
server=0.0.0.0 #无须改动
# Server listen port
port=1123 #此处修改为自己想要的监听端口
# Users allowed. Each must be HEX of 8 bytes. You can generate on by running:
# xxd -l 8 -p /dev/random
# See `net` for more information.
# user_token=7e335d67f1dc2c01,ff593b9e6abeb2a5,e3c7b8db40a96105
# Password to encrypt traffic. You can generate one by running:
# dd if=/dev/urandom bs=64 count=1 | md5sum
password=my_password #此处改为自己想要的连接密码
# Server or client mode
mode=server #此处确保为‘server’
# Max source ports. Must be the SAME with client or it won't work properly.
concurrency=40
# MTU of VPN tunnel device. Use the following formula to calculate:
# 1492 (Ethernet) - 20 (IPv4, or 40 for IPv6) - 8 (UDP) - 32 (ShadowVPN)
mtu=1432
# Tunnel device name. tunX for Linux or BSD, utunX for Darwin.
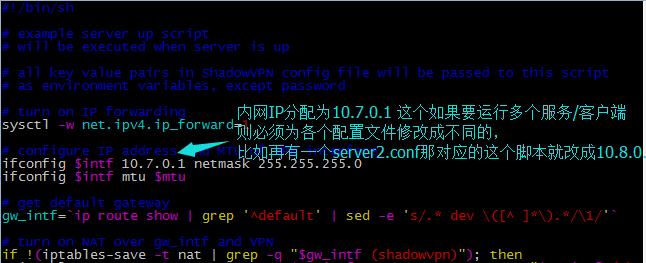
intf=tun0
# Local IP and subnet of the VPN tunnel.
#
# If user_token is specified, NAT mode will be enabled on server side, and
# the client does not need to have the same network with the server.
# In NAT mode, each user will be assigned an IP automatically.
# for example:
# tun0 is 10.7.0.1
# client IPs will be 10.7.0.2, 10.7.0.3, 10.7.0.4, etc
# You'll see them in the log when ShadowVPN starts with -v:
# assigning 10.7.0.2 to user 7e335d67f1dc2c01
# assigning 10.7.0.3 to user ff593b9e6abeb2a5
# assigning 10.7.0.4 to user e3c7b8db40a96105
# VPN started
net=10.7.0.1/16
# Script to run after VPN is created. All key-value pairs (except password) in
# this file will be passed to the script as environment variables. Use this
# script to set up routes, turn on NAT, etc.
up=/etc/shadowvpn/server_up.sh
# Script to run before stopping VPN. All key-value pairs (except password) in
# this file will be passed to the script as environment variables. Use this
# script to restore routes, turn off NAT, etc.
down=/etc/shadowvpn/server_down.sh
# PID file path
pidfile=/var/run/shadowvpn.pid
# Log file path
logfile=/var/log/shadowvpn.log
启动服务端
service shadowvpn restarthttps://mba811.gitbooks.io/web-study/content/vpn/vpn2.html
https://github.com/shadowsocks-backup/ShadowVPN
----------------
ShadowVPN配置记录v2
本人日常使用的是SS,发现在代理某些udp流量(例如语音流、外服游戏数据包)有点力不从心,因此尝鲜试了这个ShadowVPN,可以做到全局代理
2018-06-11友情提示:该shadowvpn版本较老,作者基本不再维护,而且国内ISP对UDP丢包近似疯狂状态,不建议使用。2018-06-10友情提示:文档太老,本文某些内容(依赖库或者相关URL链接)或者已经发生变化安装
在vps(ubuntu 14.04.3 x64)上面操作:方法一:源安装
vi /etc/apt/sources.list 添加deb http://shadowvpn.org/debian wheezy main
apt-get update
apt-get install shadowvpn
/etc/init.d/shadowvpn start
方法二:编译安装
获取源码
安装必要的编译工具apt-get install build-essential mingw-w64 autoconf libtool
cd ~
wget https://github.com/rains31/ShadowVPN/archive/0.2.0.tar.gz
tar -zvf 0.2.0.tar.gz
cd ShadowVPN-0.2.0
更新libsodium 这个crypto库.
rm -rf libsodium
git clone https://github.com/jedisct1/libsodium/
cd libsodium
./autogen.sh
./configure
make && make install
ldconfig #刷新链接库
cd ..
./autogen.sh./configure --sysconfdir=/etc
make && make install
shadowvpn -c /etc/shadowvpn/server.conf -s start
make uninstall
编译出deb package
apt-get install libssl-dev gawk debhelper dh-systemd init-system-helpers pkg-config
dpkg-buildpackage -b -us -uc -i
cd ..
ll | grep shadowvpn
dpkg -i shadowvpn*.deb #根据编译出的deb确定文件名
apt-get install -f #修复依赖关系
dpkg -l | grep shadowvpn #理论上应该显示shadowvpn包的名称
dpkg -r shadowvpn #仅删除程序
dpkg -P shadowvpn #把残留的配置文件删掉
编译出windows客户端
想偷懒的话,可以直接下载我的预编译版本,不需要自行编译了。获取源码方法跟上面linux客户端一致
cd ~/ShadowVPN-0.2.0
./configure --host=i686-w64-mingw32 --enable-static
make clean
make
编译出openwrt客户端
这里假设你已经掌握了Openwrt SDK的使用方法,没有的话自行学习,比较简单,先试试路由器上移植ipk,实现在路由上面printf(“hello world”),参考这篇文章:Print Hello on Openwrt编译ShadowVPN openwrt客户端,请移步至《从Openwrt SDK编译出ShadowVPN包》
配置
服务端
在vps上面操作:cd /etc/shadowvpn

这是server_up.sh
我修改的小结:
- 打开server.conf文件
- 若要监听ipv6,修改server=::0
- 修改port=666
- 修改密码
- 添加token,方便多用户,不填就默认单用户
- 修改mtu
- 修改子网netmask(CIDR格式)
xxd -l 8 -p /dev/random
详细的mtu设置讨论帖子:帖子点击这里
大概意思就是如帖子里面linhua55所说的方法:
MTU of PPPoE is 1452, But it differs between your network.
首先用Windows插上网线
进行正常的拨号(若是DHCP,则跳过这步,主要目的是模拟路由器拨号)
cmd执行 ping -f -l 1452 www.baidu.com
逐步加大或者减少该值,直到恰好不会出现DF拆包的提示。记下这个mtu
例如,记下的mtu是1492,计算得到1492-20-8-24=1440(这是ipv4,对ipv6再减20,)
注意:mtu减去多少,取决于你的shadowvpn版本,详细看server.conf里面的mtu注释
那么在服务端的server.conf填入1440
客户端也一致填写1440
参考维基百科进行内网的设置。这里都是假设你具有基本的网络层ip知识。如果你对计算机网络ip不那么熟悉,建议保持shadowvpn默认值网关10.7.0.1。
首先在电脑上拨号,查看isp给的是否是内网地址
若是公网地址,那么恭喜你,保留默认的netmask即可
若是内网地址(10、100、172开头的ip地址),需要参考维基百科的地址设置一个不冲突的内网地址
比如我的isp分配的地址是10.9.120.2,那我可以在server.conf设netmask为为172.16.0.1/16(不唯一)
客户端的mtu与服务端一致
客户端
linux版
配置
修改配置文件与服务器配置一致:(如:ip,port,MTU,token值,password,netmask,CIDR地址)
vi /etc/shadowvpn/client.conf
# net=10.7.0.2/xx
# 计算规则是把服务端 net=10.7.0.1/xx 作为网关加上1,总之跟网关在同一个网段即可
启动
修改启动模式为客户端。vi /etc/default/shadowvpn
把 CONFIG 改为 /etc/shadowvpn/client.conf
sudo update-rc.d shadowvpn disable
vi /etc/shadowvpn/client_up.sh
# 在倒数第三行加上
echo 'namesever 8.8.8.8' > /etc/reslov.conf

vi /etc/shadowvpn/client_down.sh
# 在倒数第三行加上
echo 'namesever 114.114.114.114' > /etc/reslov.conf
/etc/init.d/shadowvpn restart
shadowvpn -c /etc/shadowvpn/client.conf -s restart
测试
测试一下tun通道是否成功:# 观察tun0的数据RX TX变化
# 若TX有数值,而RX没有数值,说明被丢包或者配置错误
ifconfig
# 观察ping延迟
ping [YOUR_SHADOWVPN_GATEWAY] -w 5
停止
跟启动差不多,只需把start换成stopwindows版
配置
先安装tun/tap隧道:安装地址(需翻墙)选择并下载tap-windows-xxx.exe安装
假设我们通过无线网络连接来进行vpn
安装后,重命名网络连接名称(共需重命名2个)
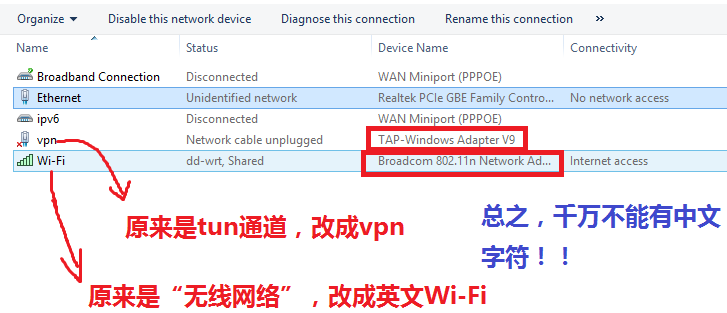
把编译后的shadowvpn.exe放到一个目录下
然后下载client.conf等文件,放到同目录
client.conf
client_up.bat
client_down.bat
若有user_token,也要照样在client.conf里填上。
tunip=服务端的server.conf中的网关+0.0.0.1
如果我的Shadowvpn服务端netmask设置为10.7.0.1,那么:
tunip=10.7.0.2
intf=vpn
改动服务端的网关
remote_ip=10.7.0.1
orig_intf="Wi-Fi"
启动
创建一个快捷方式,输入shadowvpn.exe -c client.conf -s start
待出现 “ server_up.bat Done ” 即可上网
停止
注意不能点击右上角x关闭,要按ctrl+c进行还原操作关闭openwrt版
详见openwrt-shadowvpn项目,自行参考上文的配置对于 DNS 污染,可以直接使用 Google DNS 8.8.8.8,或者使用 ChinaDNS 综合使用国内外 DNS 得到更好的解析结果。
最傻瓜的抗污染:使用Chinadns设置上游服务器114.114.114.114,8.8.8.8,然后让dns走加密隧道
路由追踪一下是否走Shadowvpn,正常来说应该能走你的vps路由。
traceroute 8.8.8.8
另一种方式是使用dnsmasq(2.73以上),使用openwrt(15.05.1以上)预装的dnsmasq 2.73可以过滤DNS解析,效果等同于ChinaDNS,比ChinaDNS工作要稳定!推荐大家使用。
到aa65535的github页面下载一份带有黑名单的默认配置加入到/etc/dnsmasq.conf,重启服务
/etc/init.d/dnsmasq restart
其他
梯子优化
若vps是kvm或者xen可以参考以下优化:clowwindy的优化方法vi/etc/security/limits.conf
* soft nofile 51200 #追加这句
* hard nofile 51200 #追加这句
vi /etc/profile
ulimit -SHn 51200 #追加这句
vps上自建dns服务器
在vps上面安装pdnsd或者dnsmasq,监听5353端口的dns请求。有个奇怪的问题:搬瓦工的装pdnsd会启动会被kill掉,内核太老了吗?我用的机子另一家KVM就能启动pdnsd正常。
假设vps的tun0网关是10.7.0.1/24,且在vps监听DNS端口5353,那么
在路由器的ChinaDNS上游dns填入
114.114.114.114,10.7.0.1:5353
server=10.7.0.1#5353
# 配合dns过滤(dnsmasq 2.73+)
ignore-address=1.2.3.4
使用问题
目前使用ShadowVPN遇到的问题:- 搬瓦工使用ipv6地址时候,客户端填入xxxx:xxxx:xxxx:xxxx::1会失败,填入xxxx:xxxx:xxxx:xxxx::成功。好诡异。差一个1就这样
- 加载并发多线程的网页(例如tumblr加载图片)的效率明显不如shadowsocks,而对于连续的udp数据流,则比ss流畅(例Youtube)
- 某些地区对udp包丢包严重:例如广东电信,根本连不上shadowvpn。
- 高峰期稳定性不如ss,因为对于ISP来说,udp包优先级低于tcp,受到岐视被丢包嘛!
- 偶尔Connection reset,具体表现为ssh中断,或者网页打不开,刷新就ok
后记
窃认为,Shadowvpn是一个比Shadowsocks更强大的工具,可惜的是,在遭受政府审查中流产了。留下给我们的,是一个早产、带有各种未知bug的版本,使用上会出现各种不方便,难以开展多用户,不适合商家售卖等诸多缺点。因此,各位与GFW斗争的勇士应该知道,在互联网上做这样擦边球的应用,切记人身安全第一,要开小号,匿名。参考“编程随想”博客:《如何防止跨省追捕》
截止2015.8.22,作者已经停止维护ShadowVPN,并删除相关代码,因为众所周知的喝茶原因。

最后,请仔细阅读下面的话,姑且称之为作者有话说。@clowwindy的原话:
Shadowsocks没有办法离开去中心化的服务器。要么自己花钱买 VPS,要么用有人分享的账号,要么用有人提供的付费服务,他们各有所长,适合不同的人。所以作为开发者,保持中立,不偏袒其中任何一方,顺其自然发展下去是最好的吧。clowwindy是我在Twitter上面最崇拜的人,他耐心解答问题,为人低调。不过最近避风头没有在出现过我的视线了。哎,可惜。
很多人要么一窝蜂的支持,要么一窝蜂的反对,还要把它给封禁掉,大概这种心理鲁迅先生也曾批判过。如果你们真的那么讨厌商业,那你们应该首先把你们的苹果设备给摔了,因为它就是商业社会巅峰造极的产物。我反对不喜欢一个东西就要拿出简单粗暴的制裁手段,正是这种习性成就了 GFW。
维护这个项目到现在大概总共回复过几千个问题,开始慢慢想清楚了一件事,为什么会存在 GFW。从这些提问可以看出,大部分人的自理能力都很差,只是等着别人帮他。特别是那些从 App Store 下载了 App 用着公共服务器的人,经常发来一封只有四个字的邮件:“不能用了?” 我觉得这是一个社会常识,花一分钟写的问题,不能期待一个毫无交情的陌生人花一个小时耐心地问你版本和操作步骤,模拟出你的环境来帮你分析解决。
Windows 版加上 GFWList(注:就是自动分流,PAC) 功能以来,我反复呼吁给 GFWList 提交规则,但是一个月过去了竟然一个提交都没有。如果没有人做一点什么,它自己是不会更新的啊,没有人会义务地帮你打理这些。我觉得,政府无限的权力,都是大部分人自己放弃的。假货坑爹,让政府审核。孩子管不好,让政府关网吧。房价太高,让政府去限购。我们的文化实在太独特,创造出了家长式威权政府,GFW 正是在这种背景下产生的,一个社会矛盾的终极调和器,最终生活不能自理的你每天做的每一件事情都要给政府审查一遍,以免伤害到其他同样生活不能自理的人。这是一个零和游戏,越和这样的用户打交道,越对未来持悲观态度,觉得 GFW 可能永远也不会消失,而墙内的这个局域网看起来还似乎生机勃勃的自成一体,真是让人绝望。
from https://lixingcong.github.io/2015/12/17/shadowvpn-conf-lixingcongv2/
--------
https://github.com/simpzan/ShadowVPN-wiki
---------
https://github.com/koolshare/koolshare.github.io/tree/acelan_softcenter_ui/shadowvpn
----------
https://github.com/janeforvps/ShadowVPN-with-TCP
-------------
https://github.com/wJsJwr/ShadowVpnSharp/releases