##ngx_lua_waf
ngx_lua_waf是我刚入职趣游时候开发的一个基于ngx_lua的web应用防火墙。
代码很简单,开发初衷主要是使用简单,高性能和轻量级。
现在开源出来,遵从MIT许可协议。其中包含我们的过滤规则。如果大家有什么建议和想fa,欢迎和我一起完善。
###用途:
防止sql注入,本地包含,部分溢出,fuzzing测试,xss,SSRF等web攻击
防止svn/备份之类文件泄漏
防止ApacheBench之类压力测试工具的攻击
屏蔽常见的扫描黑客工具,扫描器
屏蔽异常的网络请求
屏蔽图片附件类目录php执行权限
防止webshell上传
推荐使用lujit2.1做lua支持
ngx_lua如果是0.9.2以上版本,建议正则过滤函数改为ngx.re.find,匹配效率会提高三倍左右。
###使用说明:
nginx安装路径假设为:/usr/local/nginx/conf/
把ngx_lua_waf下载到conf目录下,解压命名为waf
在nginx.conf的http段添加
 lua_package_path "/usr/local/nginx/conf/waf/?.lua";
    lua_shared_dict limit 10m;
    init_by_lua_file  /usr/local/nginx/conf/waf/init.lua;
 access_by_lua_file /usr/local/nginx/conf/waf/waf.lua;
RulePath = "/usr/local/nginx/conf/waf/wafconf/"
然后重启nginx即可
###配置文件详细说明:
 RulePath = "/usr/local/nginx/conf/waf/wafconf/"
    --规则存放目录
    attacklog = "off"
    --是否开启攻击信息记录,需要配置logdir
    logdir = "/usr/local/nginx/logs/hack/"
    --log存储目录,该目录需要用户自己新建,切需要nginx用户的可写权限
    UrlDeny="on"
    --是否拦截url访问
    Redirect="on"
    --是否拦截后重定向
    CookieMatch = "on"
    --是否拦截cookie攻击
    postMatch = "on"
    --是否拦截post攻击
    whiteModule = "on"
    --是否开启URL白名单
    black_fileExt={"php","jsp"}
    --填写不允许上传文件后缀类型
    ipWhitelist={"127.0.0.1"}
    --ip白名单,多个ip用逗号分隔
    ipBlocklist={"1.0.0.1"}
    --ip黑名单,多个ip用逗号分隔
    CCDeny="on"
    --是否开启拦截cc攻击(需要nginx.conf的http段增加lua_shared_dict limit 10m;)
    CCrate = "100/60"
    --设置cc攻击频率,单位为秒.
    --默认1分钟同一个IP只能请求同一个地址100次
    html=[[Please go away~~]]
    --警告内容,可在中括号内自定义
    备注:不要乱动双引号,区分大小写
部署完毕可以尝试如下命令:
    curl http://xxxx/test.php?id=../etc/passwd
    返回"Please go away~~"字样,说明规则生效。
from https://github.com/loveshell/ngx_lua_waf
LuaWAF
一个用Lua写的WEB应用防火墙(WAF)。
新版本将会陆续更新。
如果你发现了绕过漏洞,请在Issues中提交详细细节。
全新版本
一年来,我断断续续对此WAF进行了更新,目前已经完成了以下工作,有时间我会陆陆续续上传代码:
- 访问控制功能:IP黑白名单控制、地域黑白名单控制(国家省市)、URI级别的CC防御
- 检测正则升级,支持更多更新的攻击类型检测防护
- 尝试更改为分布式版本
- AI引擎测试,效果并不理想。
- 新写了Go语言版本的中心控制节点、Vue版本的前端控制中心
- SSL配置
- 测试性的边缘函数(不成熟的)
- 完善了扫描器、机器人识别规则
- 新增了全自动封禁恶意IP功能
新版本目录
/
    luawaf           -waf引擎(lua)
    webFrontend      -前端(vue)
    webBackend       -后端(Go)
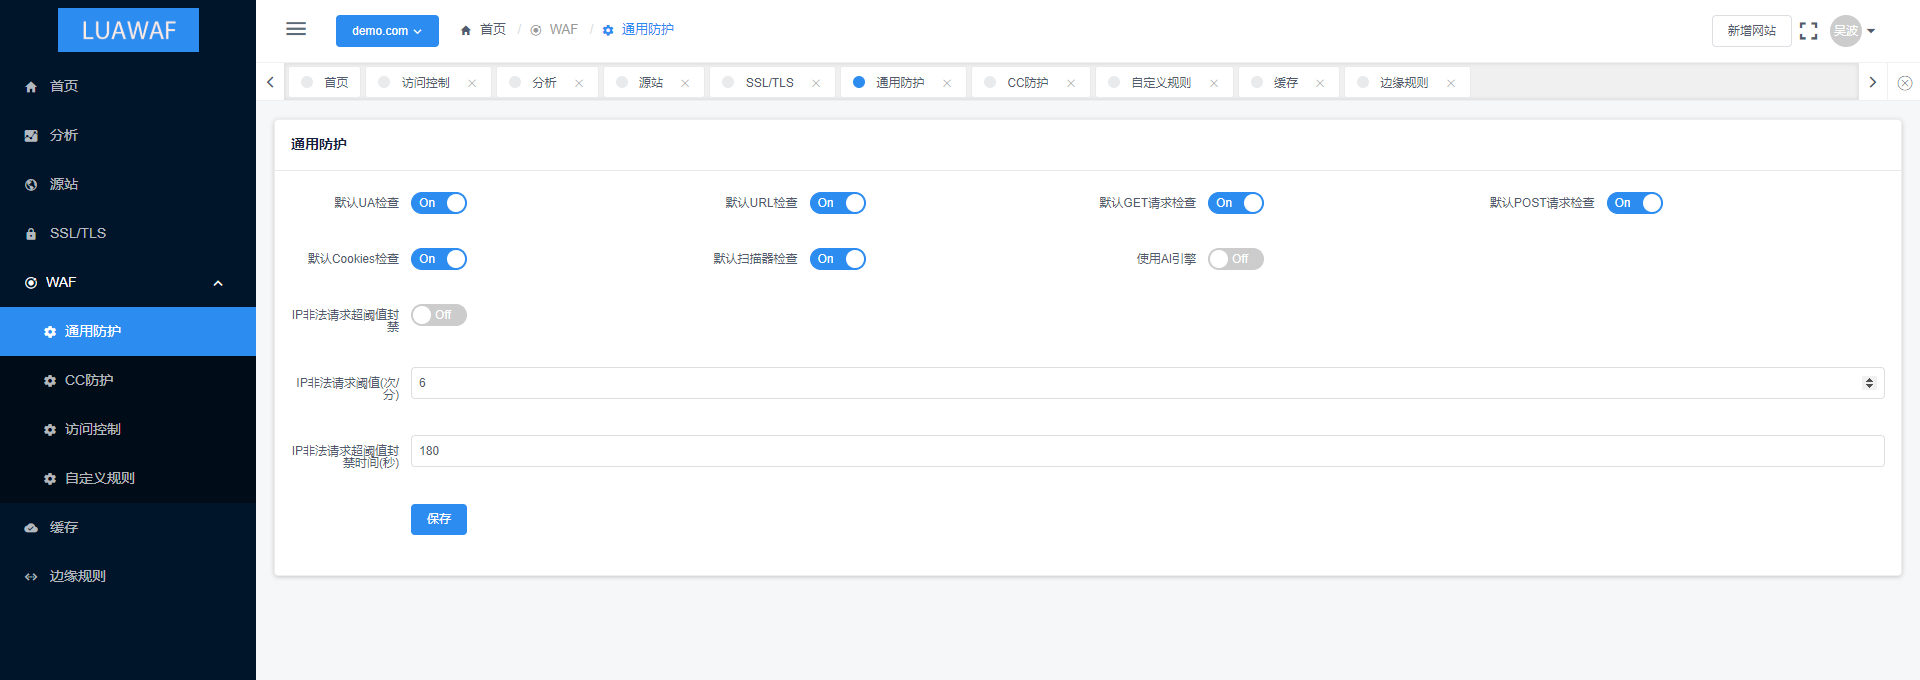
新版概览
WAF配置页面
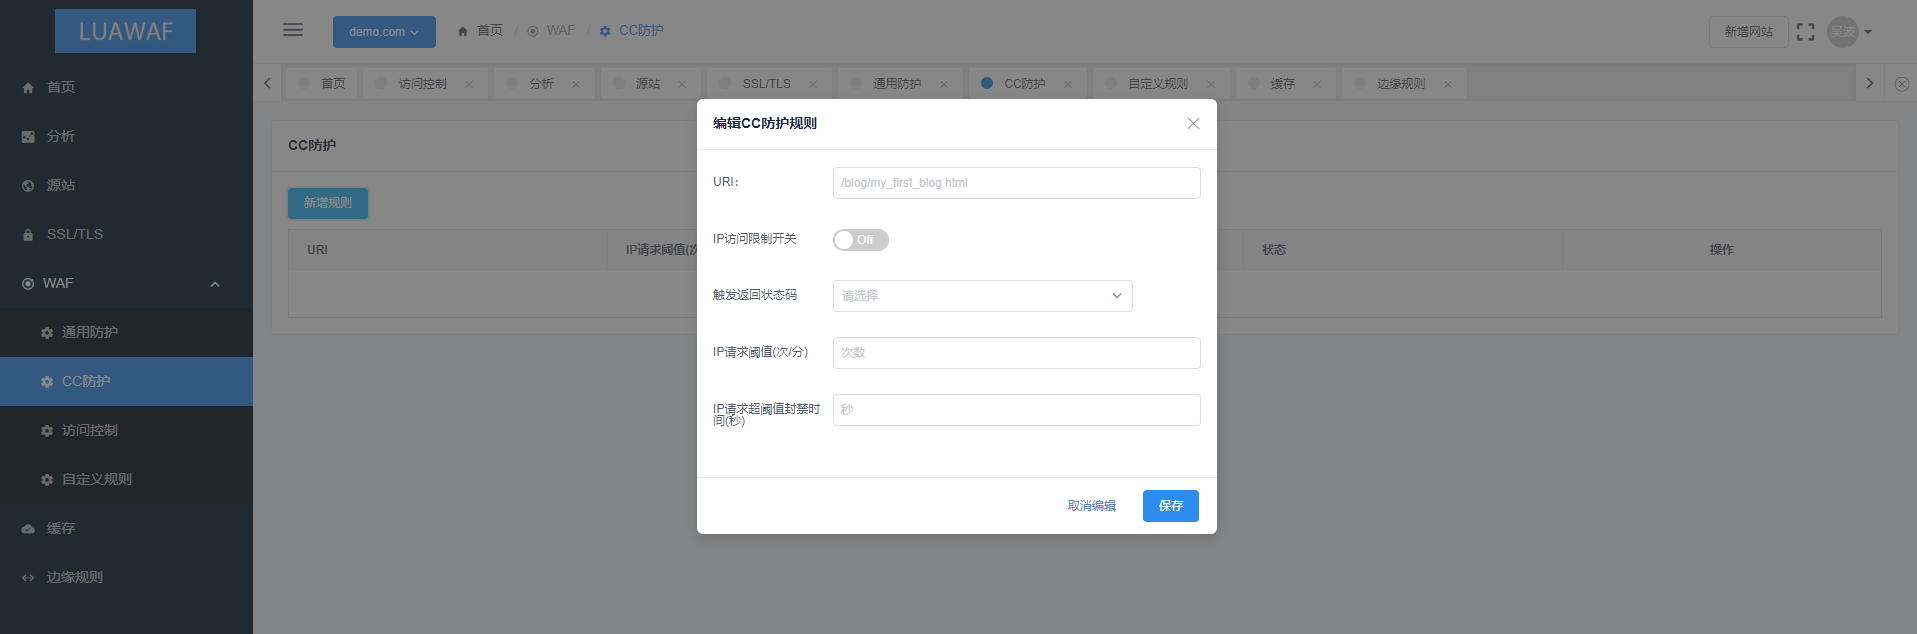
CC防护规则页面
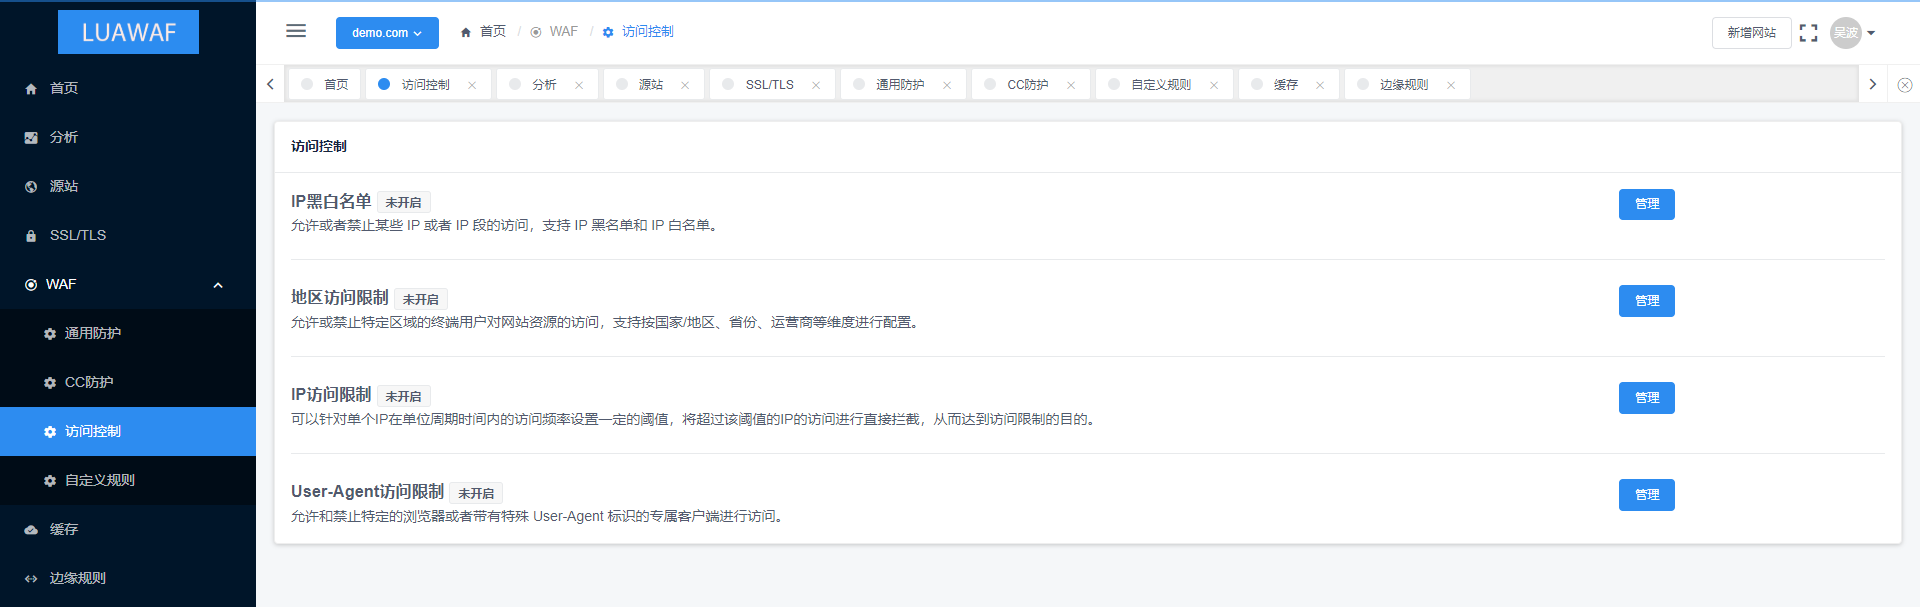
访问控制页面
旧版本
以下内容均为旧版本内容,新版本将会陆续更新。
如何使用
安装 OpenResty
在不同的操作系统上安装OpenResty有不同的方法。这里我只拿CentOS7做演示。
yum update -y
yum install readline-devel pcre-devel openssl-devel perl gcc automake autoconf libtool make epel-release redis -y
cd Downloads
wget https://openresty.org/download/openresty-1.15.8.1.tar.gz
tar -xzvf openresty-1.15.8.1.tar.gz
cd openresty-1.15.8.1
./configure --with-luajit\
            --with-http_iconv_module
gmake
gmake install
echo export PATH=$PATH:/usr/local/openresty/nginx/sbin >> /etc/profile
echo export LUAJIT_LIB=/usr/local/openresty/luajit/lib >> /etc/profile
echo export LUAJIT_INC=/usr/local/openresty/luajit/include/luajit-2.1 >> /etc/profile
source /etc/profile

mkdir /usr/local/openresty/nginx/logs/luawaf
chown nobody /usr/local/openresty/nginx/logs/luawaf
克隆这个项目
这个项目能在任何安装了OpenResty的操作系统上运行,包括但不限于CentOS。
git clone https://github.com/wubonetcn/luawaf.git
cp luawaf /usr/local/openresty/nginx/conf/
编辑 /usr/local/openresty/nginx/conf/nginx.conf
vim /usr/local/openresty/nginx/conf/nginx.conf/usr/local/openresty/nginx/conf/nginx.conf
user  nobody;
worker_processes  1;

error_log  logs/error.log;
#error_log  logs/error.log  notice;
#error_log  logs/error.log  info;

#pid        logs/nginx.pid;


events {
    worker_connections  1024;
}


http {
    include       mime.types;
    default_type  application/octet-stream;

    #log_format  main  '$remote_addr - $remote_user [$time_local] "$request" '
    #                  '$status $body_bytes_sent "$http_referer" '
    #                  '"$http_user_agent" "$http_x_forwarded_for"';

    #access_log  logs/access.log  main;

    sendfile        on;
    #tcp_nopush     on;

    #keepalive_timeout  0;
    keepalive_timeout  65;

    #gzip  on;

    server {
        listen       80;
        server_name  localhost;

        #charset koi8-r;

        #access_log  logs/host.access.log  main;

        location / {
            root   html;
            index  index.html index.htm;
        }

        #error_page  404              /404.html;

        # redirect server error pages to the static page /50x.html
        #
        error_page   500 502 503 504  /50x.html;
        location = /50x.html {
            root   html;
        }

        # proxy the PHP scripts to Apache listening on 127.0.0.1:80
        #
        #location ~ \.php$ {
        #    proxy_pass   http://127.0.0.1;
        #}

        # pass the PHP scripts to FastCGI server listening on 127.0.0.1:9000
        #
        #location ~ \.php$ {
        #    root           html;
        #    fastcgi_pass   127.0.0.1:9000;
        #    fastcgi_index  index.php;
        #    fastcgi_param  SCRIPT_FILENAME  /scripts$fastcgi_script_name;
        #    include        fastcgi_params;
        #}

        # deny access to .htaccess files, if Apache's document root
        # concurs with nginx's one
        #
        #location ~ /\.ht {
        #    deny  all;
        #}
    }


    # another virtual host using mix of IP-, name-, and port-based configuration
    #
    #server {
    #    listen       8000;
    #    listen       somename:8080;
    #    server_name  somename  alias  another.alias;

    #    location / {
    #        root   html;
    #        index  index.html index.htm;
    #    }
    #}


    # HTTPS server
    #
    #server {
    #    listen       443 ssl;
    #    server_name  localhost;

    #    ssl_certificate      cert.pem;
    #    ssl_certificate_key  cert.key;

    #    ssl_session_cache    shared:SSL:1m;
    #    ssl_session_timeout  5m;

    #    ssl_ciphers  HIGH:!aNULL:!MD5;
    #    ssl_prefer_server_ciphers  on;

    #    location / {
    #        root   html;
    #        index  index.html index.htm;
    #    }
    #}
    lua_package_path "/usr/local/openresty/nginx/conf/luawaf/?.lua;/usr/local/openresty/lualib/?.lua;;";
    lua_shared_dict limit 10m;
    init_by_lua_file  /usr/local/openresty/nginx/conf/luawaf/init.lua;
    access_by_lua_file /usr/local/openresty/nginx/conf/luawaf/main.lua;

}
运行 Nginx
nginx享受它!
详细设计文档
请阅读如下文章。
- 《基于OpenResty的WAF构建笔记》
- 《使用wrk2压力测试WAF》
- 《Web应用防火墙执行流程(执行模块)》
- 《OpenResty学习笔记》
- 《SQL注入学习笔记》
- 《XSS(跨站脚本攻击)学习笔记》
- 《Lua学习笔记》
- 《扫描器扫描、路径穿越攻击、CC攻击特征学习笔记》
这个项目借鉴了 loveshell/ngx_lua_waf,感谢 神奇的魔法师. 这个项目修复了原项目存在的一些绕过漏洞。
更新日志
- 2019.07.09 增加了LUAJIT_LIB与LUAJIT_INC配置项以支持LUAJIT
- 2019.06.12 开源此项目
ngx_waf:方便且高性能的Nginx防火墙模块
这是一个新开发的nginx防火墙模块,前段时间作者加入了一个类似cloudflare防cc攻击的5秒盾功能,这里就搭建起来试试看。
系统debian10,通过包管理器安装的nginx1.14.2,下面通过编译动态模块的方式来使用。
安装编译nginx所需的依赖:
apt -y update
apt -y install wget git build-essential zlib1g-dev libssl-dev libpcre3-dev libgeoip-dev libgd-dev libxml2-dev libxslt1-dev
安装编译此模块所需的依赖:
apt -y install uthash-dev libsodium23 libsodium-dev
下载nginx1.14.2的源码解压:
mkdir -p /opt/build && cd /opt/build
wget http://nginx.org/download/nginx-1.14.2.tar.gz
tar -xzvf nginx-1.14.2.tar.gz
拉取ngx_waf的源码:
git clone https://github.com/ADD-SP/ngx_waf.git
cd ngx_waf
git clone https://github.com/libinjection/libinjection.git inc/libinjection
进入到nginx的源码目录:
cd /opt/build/nginx-1.14.2
查看当前机器nginx的编译参数:
nginx -V
回显类似于:

去掉上图内所有“添加动态模块”的参数:
--add-dynamic-module=/build/nginx-m1Thpq/nginx-1.14.2/debian/modules/http-auth-pam
--add-dynamic-module=/build/nginx-m1Thpq/nginx-1.14.2/debian/modules/http-dav-ext
--add-dynamic-module=/build/nginx-m1Thpq/nginx-1.14.2/debian/modules/http-echo
--add-dynamic-module=/build/nginx-m1Thpq/nginx-1.14.2/debian/modules/http-upstream-fair
--add-dynamic-module=/build/nginx-m1Thpq/nginx-1.14.2/debian/modules/http-subs-filter
其他的参数复制保留下来,加入到下面的配置中:
./configure --add-dynamic-module=/opt/build/ngx_waf \
--<除去原Nginx的所有add-dynamic-module参数后,剩下的参数都应该加在这里,也记得去掉这个括号>
之后编译模块:
make modules把编译好的模块复制到nginx的模块加载目录:
cp objs/ngx_http_waf_module.so /usr/share/nginx/modules
编辑nginx主配置文件:
nano /etc/nginx/nginx.conf
在顶行加入下面的配置:
load_module modules/ngx_http_waf_module.so;
重启nginx:
systemctl restart nginx如果正常的话,现在就可以来配置模块了。
ngx_waf的配置需要写到server段内,下面新建一个nginx站点配置文件:
nano /etc/nginx/conf.d/waf.conf
一个示例配置:
server {
  listen      80;
  server_name ngxwaf.233.fi;
  root        /var/www/html/flappyfrog;
  index       index.html;

  waf on; # 是否启用模块
  waf_rule_path /opt/build/ngx_waf/assets/rules/; # 模块规则
  waf_mode STD !CC; # 启用普通模式并关闭CC防护
  waf_cache capacity=50; # 缓存配置
  waf_under_attack on uri=/under-attack.html; # 配置5秒盾
}
把测试用的html复制到站点的根目录下:
cp /opt/build/ngx_waf/assets/under-attack.html /var/www/html/flappyfrog
重载nginx:
systemctl reload nginx关于此模块还有很多其他可配置项,具体的可以看官方的文档:
https://add-sp.github.io/ngx_waf/zh-cn/advance/directive.html