- NanoPi R2S CNC 官方金属壳版 购买链接: https://s.click.taobao.com/ZPSFRyu
- 推荐朗科 32G TF 卡 ¥17.90 购买链接: https://u.jd.com/wDywo8y
说明
- 管理 IP: 192.168.2.1
- 默认管理密码: password
特色
- 支持 RTL8821CU/RTL8822BU/RTL8812AU 芯片的 USB WiFi 设备,已知支持列表:
- 集成 OpenClash 及其 core/tun/game binaries
- 集成 HelloWorld
- 集成 Passwall
- 集成 luci-app-adguardhome
- 集成 coolsnowwolf/packages, coolsnowwolf/luci 与 coolsnowwolf/lede/package/lean
- 集成 luci-theme-argon
- 集成 luci-app-r2sflasher
- 集成 Smartdns 与 luci-app-smartdns
- 集成 luci-app-oled
- 集成 luci-app-jd-dailybonus
- 集成 luci-app-dockerman
用法
Fork 到自己的账号下,将 .github/workflows 下 .yml 文件中的 runs-on: self-hosted 改成 runs-on: ubuntu-latest(因为我是自己的服务器上编译,更快),编辑文件 CHANGELOG.md 触发编译动作。
注意
产品发布初期,官方代码每天都在变,遇到无法编译时,请过来查看 .yml 与 config 最新异动。
参考
- 使用Github的Actions功能在线编译NanoPi-R1S固件(包含H5和H3)
- skytotwo/NanoPi-R1S-Build-By-Actions
- klever1988/nanopi-openwrt
- yangliu/NanoPi-R2S
- maxming2333/NanoPi-R2S
- songchenwen/nanopi-r2s
- fanck0605/nanopi_r2s
自动编译Nanopi R2S的openwrt固件
融合了lean大的软件包.
from https://github.com/tiantianxiaoxiaoxyz/AutoBuild-Nanopi-R2S
---------
使用Github的Actions功能在线编译NanoPi-R1S固件(包含H5和H3)
之前我们要编译OpenWrt固件,就需要自己准备好虚拟机,或者租好服务器,准备好梯子,编译一次耗时4,5个小时都有,很费力劳神。实际上像这种编译的操作完全可以放在Github上来执行,最近入手了NanoPi-R1s H5,自己也用传统方式编译了几个固件,但也想着能否尝试更方便的编译。随后,便尝试编写了NanoPi-R1s的Actions的YML执行文件,自己尝试了下,编译很成功,整个过程就是“简单,顺畅”,一共耗时大概2小时,一旦启动了Actions服务,你就可以关闭网页该干嘛干嘛,随时可以打开页面查看进度 下图是编译的结果页面: 

Actions-OpenWrt


A template for building OpenWrt with GitHub Actions
Usage
- Click the Use this template button to create a new repository.
- Generate
.configfiles using Lean's OpenWrt source code. ( You can change it through environment variables in the workflow file. ) - Push
.configfile to the GitHub repository. - Select
Build OpenWrton the Actions page. - Click the
Run workflowbutton. - When the build is complete, click the
Artifactsbutton in the upper right corner of the Actions page to download the binaries.
Tips
- It may take a long time to create a
.configfile and build the OpenWrt firmware. Thus, before create repository to build your own firmware, you may check out if others have already built it which meet your needs by simply searchActions-Openwrtin GitHub. - Add some meta info of your built firmware (such as firmware architecture and installed packages) to your repository introduction, this will save others' time.
Credits
- Microsoft Azure
- GitHub Actions
- OpenWrt
- Lean's OpenWrt
- tmate
- mxschmitt/action-tmate
- csexton/debugger-action
- Cowtransfer
- WeTransfer
- Mikubill/transfer
- softprops/action-gh-release
- ActionsRML/delete-workflow-runs
- dev-drprasad/delete-older-releases
- peter-evans/repository-dispatch
使用 GitHub Actions 云编译 OpenWrt
前言
Github Actions 是 Microsoft 收购 GitHub 后推出的 CI/CD 服务,它提供了性能配置非常不错的虚拟服务器环境(E5 2vCPU/7G RAM),基于它可以进行构建、测试、打包、部署项目。对于公开仓库可免费无时间限制的使用,且单次使用时间长达6个小时,这对于编译 OpenWrt 来说是非常充足的。不过 GitHub Actions 有一定的使用门槛,首先要了解如何编写 workflow 文件。不过不用担心,博主已经编写好了相关的 workflow 文件模版,只需要按照教程的步骤来操作即可。
方案特点
- 免费
- 一键快速编译
- 定时自动编译
- 客制化编译
- 并发编译(可同时进行20个编译任务)
- 无需搭建编译环境(在线
make menuconfig生成配置文件) - 无需消耗自己的计算机与服务器的计算资源(性感E5在线编译)
- 无需担心磁盘空间不足(近60G磁盘空间)
- 无需使用清理文件(内核更新不怕 boom )
- 编译速度快(编译时间1-2小时)
- 编译成功率提升200%(万兆自由网络环境)
- 全新环境(杜绝编译环境不干净导致编译失败)
本解决方案是一个开放平台,任何人都可以基于此打造自己专属的编译方案。
项目地址
https://github.com/P3TERX/Actions-OpenWrt
支持项目请随手点个star,让更多的人发现、使用并受益。
准备工作
- GitHub 账号
- 搭建编译环境,生成
.config文件。(可选)
TIPS: 关于编译环境的搭建,推荐去看我之前写的相关文章,Windows 10 可以使用 WSL ,macOS、Linux 可以使用 Docker 。
教程更新
- 2021-01-03 新增源码更新自动编译使用说明
- 2020-10-11 新触发方式使用方法、更新上传固件到 releases 页面说明。
- 2020-04-25 更新 DIY 脚本说明、添加自定义 feeds 配置文件说明
- 2020-04-09 新增上传固件到 WeTransfer
- 2020-03-30 新增上传固件到奶牛快传
- 2020-02-01 新图文教程
- 2019-12-10 新增 macOS 编译方案使用说明
- 2019-12-06 添加 tmate 网页终端链接说明
- 2019-12-05 优化基础使用教程,添加 @lietxia 大佬的图文教程链接
- 2019-12-04 新增云menuconfig使用方法
- 2019-12-03 新增并发编译使用方法
- 2019-11-30 新增自定义源码编译使用方法
- 2019-11-14 全网独家首发
基础使用
首先你必须要熟悉整个 OpenWrt 的编译过程,这会让你非常容易的理解如何使用 GitHub Actions 进行编译,即使你没有成功过。因为实际上本地编译近 90% 失败的原因是因为网络问题导致的,中国大陆特色,咱也不敢多说。GitHub Actions 服务器由 Microsoft Azure 提供,拥有万兆带宽,可以使编译成功率大大提升。
- 在自己搭建编译环境中使用 Lean's OpenWrt 源码生成
.config文件。(或使用直接 SSH 连接到 Actions 进行操作,后面有说明。)
TIPS: 方案默认引用 Lean 的源码,因为他的 README 影响了我开始学习编译,也就有了这个项目,而且他的源码非常的优秀。有其它需求可自行修改 workflow 文件,方法后面的进阶使用中有说明。
- 进入 P3TERX/Actions-OpenWrt 项目页面,点击页面中的 Use this template (使用这个模版)按钮。
- 填写仓库名称,然后点击
Create repository from template(从模版创建储存库)按钮。 - 经过几秒钟的等待,页面会跳转到新建的仓库,内容和我的项目是相同的。然后点击
Create new file(创建新文件)按钮。 - 文件名填写为
.config,把生成的.config文件的内容复制粘贴到下面的文本框中。 - 翻到页面最下方,点击
Commit new file(提交新文件)按钮。 - 在 Actions 页面选择
Build OpenWrt,然后点击Run Workflow按钮,即可开始编译。(如果需要 SSH 连接则把SSH connection to Actions的值改为true。其它详情参见进阶使用相关章节) - 在等待编译完成的过程中,你可以进入这个页面点击右上角的
star,这是对博主最大的支持,而且还可以加快编译速度哦(雾 - 最后经过一两个小时的等待,不出意外你就可以在 Actions 页面看到已经打包好的固件目录压缩包。


TIPS: 如需 ipk 文件可以在进阶使用章节找到方法。因为大多数人只需要固件,而且总是有萌新问固件在哪,所以现在默认只上传固件。
进阶使用
自定义环境变量与功能
点击查看
DIY 脚本
点击查看
添加额外的软件包
点击查看
自定义 feeds 配置文件
把feeds.conf.default文件放入仓库根目录即可,它会覆盖 OpenWrt 源码目录下的相关文件。
Custom files(自定义文件)
俗称“files 大法”,在仓库根目录下新建files目录,把相关文件放入即可。有关详情请自行搜索了解。
自定义源码
默认引用的是 Lean 的源码,如果你有编译其它源码的需求可以进行替换。
点击查看
源码更新自动编译
在检测到源码更新后自动进行编译。
点击查看
编译多个固件
多 repository 方案
通过 P3TERX/Actions-OpenWrt 项目创建多个仓库来编译不同架构机型的 OpenWrt 固件。
多 workflow 方案
基于 GitHub Actions 可同时运行多个工作流程的特性,最多可以同时进行至少20个编译任务。也可以单独选择其中一个进行编译,这充分的利用到了 GitHub Actions 为每个账户免费提供的20个 Ubuntu 虚拟服务器环境。
点击查看
SSH 连接到 Actions
通过 tmate 连接到 GitHub Actions 虚拟服务器环境,可直接进行make menuconfig操作生成编译配置,或者任意的客制化操作。也就是说,你不需要再自己搭建编译环境了。这可能改变之前所有使用 GitHub Actions 的编译 OpenWrt 方式。
点击查看
上传固件到奶牛快传
奶牛快传是中国大陆的一款临时文件传输分享服务网盘,特点是不限速。因国情所致,中国大陆地区 GitHub 访问速度缓慢,有些小伙伴可能无法正常下载固件,上传固件到奶牛快传是个非常好的选择。
点击查看
上传固件到 WeTransfer
WeTransfer 是荷兰的一款临时文件传输分享服务网盘,前面提到的奶牛快传实际上师从自它,二者的网站都非常相似。WeTransfer 使用的是 Amazon S3 存储并通过 Amazon CloudFront CDN 全球加速,它在中国大陆的下载体验完全不输奶牛快传,甚至某些情况下要更好。
点击查看
上传固件到 Releases 页面
GitHub 的 Releases 页面通常用于发布打包好的二进制文件,无需登录即可下载。Artifacts 和网盘有保存期限,Releases 则是永久保存的。
点击查看
定时自动编译(已弃用)
点击查看
点击 star 开始编译(已弃用)
点击查看
macOS 虚拟机编译方案(已弃用)
点击查看
尾巴
感谢 Microsoft 为我们提供 GitHub Actions 这样强大的工具。希望大家合理使用免费的资源,必要时再编译,过度占用资源虽然使用者不会得到任何实质性的惩罚,但会为中国抹黑,造成很多国际争端。只有让开发者来充分利用才能产生更多更好的软件,这样大家才能受益。
from http://web.archive.org/web/20210706100447/https://p3terx.com/archives/build-openwrt-with-github-actions.html
-----------------------------------------------------
Build OpenWrt using GitHub Actions | 使用 GitHub Actions 编译 OpenWrt | 感谢P3TERX的项目源码|感谢KFERMercer的项目源码
AutoBuild-OpenWrt


Build OpenWrt firware Lean's OpenWrt using GitHub Actions
Hereby thank P3TERX for his amazing job: https://github.com/P3TERX/Actions-OpenWrt/
Hereby thank KFERMercer for his amazing job: https://github.com/KFERMercer/OpenWrt-CI
You could edit and enable "Sync Code" YAML file to let your forked repo keep updated.
Usage
1. Prerequisite
- Sign up for GitHub Actions
- Fork this GitHub repository
2. Compile Firmware
- Click
[.github/workflows]folder on the top of repo and you could see few workflow files, Each for one particular architecture(device). - Edit the workflow file you desire,uncomment push section 3 lines together and submit the commit.(Other 2 methods wait you to discover)
- The build starts automatically. Progress can be viewed on the Actions page.
- When the build is complete, click the
Artifactsbutton in the upper right corner of the Actions page to download the binaries. - Default Web Admin IP:
192.168.5.1, usernameroot,passwordpassword
3. Sync Code
- Uncomment 'push-branches-master' 3 lines under
Onsection and commit changes to let the script sync the code once for you. - Uncomment 'schedule-cron' 2 lines under
Onsection and commit changes to let the script sync the code everyday on 3 am[UTC +8]
借助 GitHub Actions 的 OpenWrt 在线集成自动编译.


支持自动定制固件, 自动调整依赖及生成配置文件, 无需上传配置. 兼容 coolsnowwolf/lede 以及 OpenWrt trunk.
同时支持自动合并推送上游提交 (也就是自动更新), 直接把merge-upstream.yml放入.github/workflows/即可 (默认上游为 coolsnowwolf/lede, 高级玩家请自行改写).
感谢P3TERX珠玉在前.
使用教程:
在一切开始前, 你需要的是:
相关文章: 作者-糖炒栗子
1. 注册GitHub账号并开启GitHub Actions (自行搜索方法).
2. fork coolsnowwolf/lede 或者 OpenWrt trunk.
3. 上传openwrt-ci.yml和merge-upstream.yml到/.github/workflows/下.
4. 定制固件:
如果你希望定制你的固件:
代码里的注释部分详细介绍了如何在脚本中客制化你的固件. 简单来说, 你只需要解除注释相应行即可.
5. 大功告成.
集成编译环境会自动开始编译. 现在返回你的库首页, 点击页面上方的Actions按钮就可以查看进度.
如何下载到编译完成的固件?
进入Actions标签页后, 如果相应的集成活动顺利完成 (显示为绿色), 点击页面右上方的Artifacts即可看到你的固件 (通常是一个压缩包). 点击即可开始下载.
from https://github.com/KFERMercer/OpenWrt-CI
------
Nanopi R1S R2S R2C R4S R5S X86 Openwrt 固件
刷机工具
下载地址
更新说明
使用提示
固件特性
在线升级
1分钟生成自己所需固件
下载地址:
https://github.com/klever1988/nanopi-openwrt/tags
(img.gz档不需要解压,可以直接使用刷机工具刷入)
使用提示:
默认用户名是root, 密码是password,局域网IP为192.168.2.1
烧制完固件插入tf卡并启动完成,电脑端显示“网络(已连接)”之后,在浏览器输入 http://immortalwrt/ 可以直接打开路由器后台,无需修改本地连接设置或者查看IP地址。
如果网络状态一直是未识别(上电超过5分钟),请直接插拔一次电源重启试试。
终端内在线升级方法:
wget -qO- https://github.com/klever1988/nanopi-openwrt/raw/master/scripts/autoupdate-bash.sh | bashslim版
wget -qO- https://github.com/klever1988/nanopi-openwrt/raw/master/scripts/autoupdate-bash.sh | ver=-slim bash(脚本由gary lau提供,非常感谢!)
固件特性:
- slim版固件只有OpenWrt本体,但内置了“本地软件源”,包含大部分常用插件,不喜欢固件预装繁杂插件的人可以选择这个版本,进入后台软件包选装所需插件
- 采用ext4文件系统,刷卡之后可自行使用分区工具对sd卡扩容根分区至最大
- 支持usb无线网卡(RTL8821CU芯片,例如COMFAST 811AC),可以驱动无线网卡运行在5G频段
- 使用在线升级时,根分区会自动扩容,方便折腾
1分钟生成自己所需固件
因为本项目预编译了Image
builder,生成固件仅需1-3分钟,如果有兴趣自定义固件可以Fork本项目,编辑设备对应的config.seed文件,例如r2s.config.seed,
去掉(整行删除)不需要的luci app软件包配置行,添加自己所需的软件,可用软件的列表可以在github actions构件输出处获取,例如


完成之后进入Actions,点击左侧Build,点击右侧Run workflow输入设备名(r2s/r2c/r4s/r1s/r1s-h3/r1p/r1p-lts)

再点击Run即可获取自己所需的固件
更新说明:
https://github.com/klever1988/nanopi-openwrt/blob/master/CHANGELOG.md
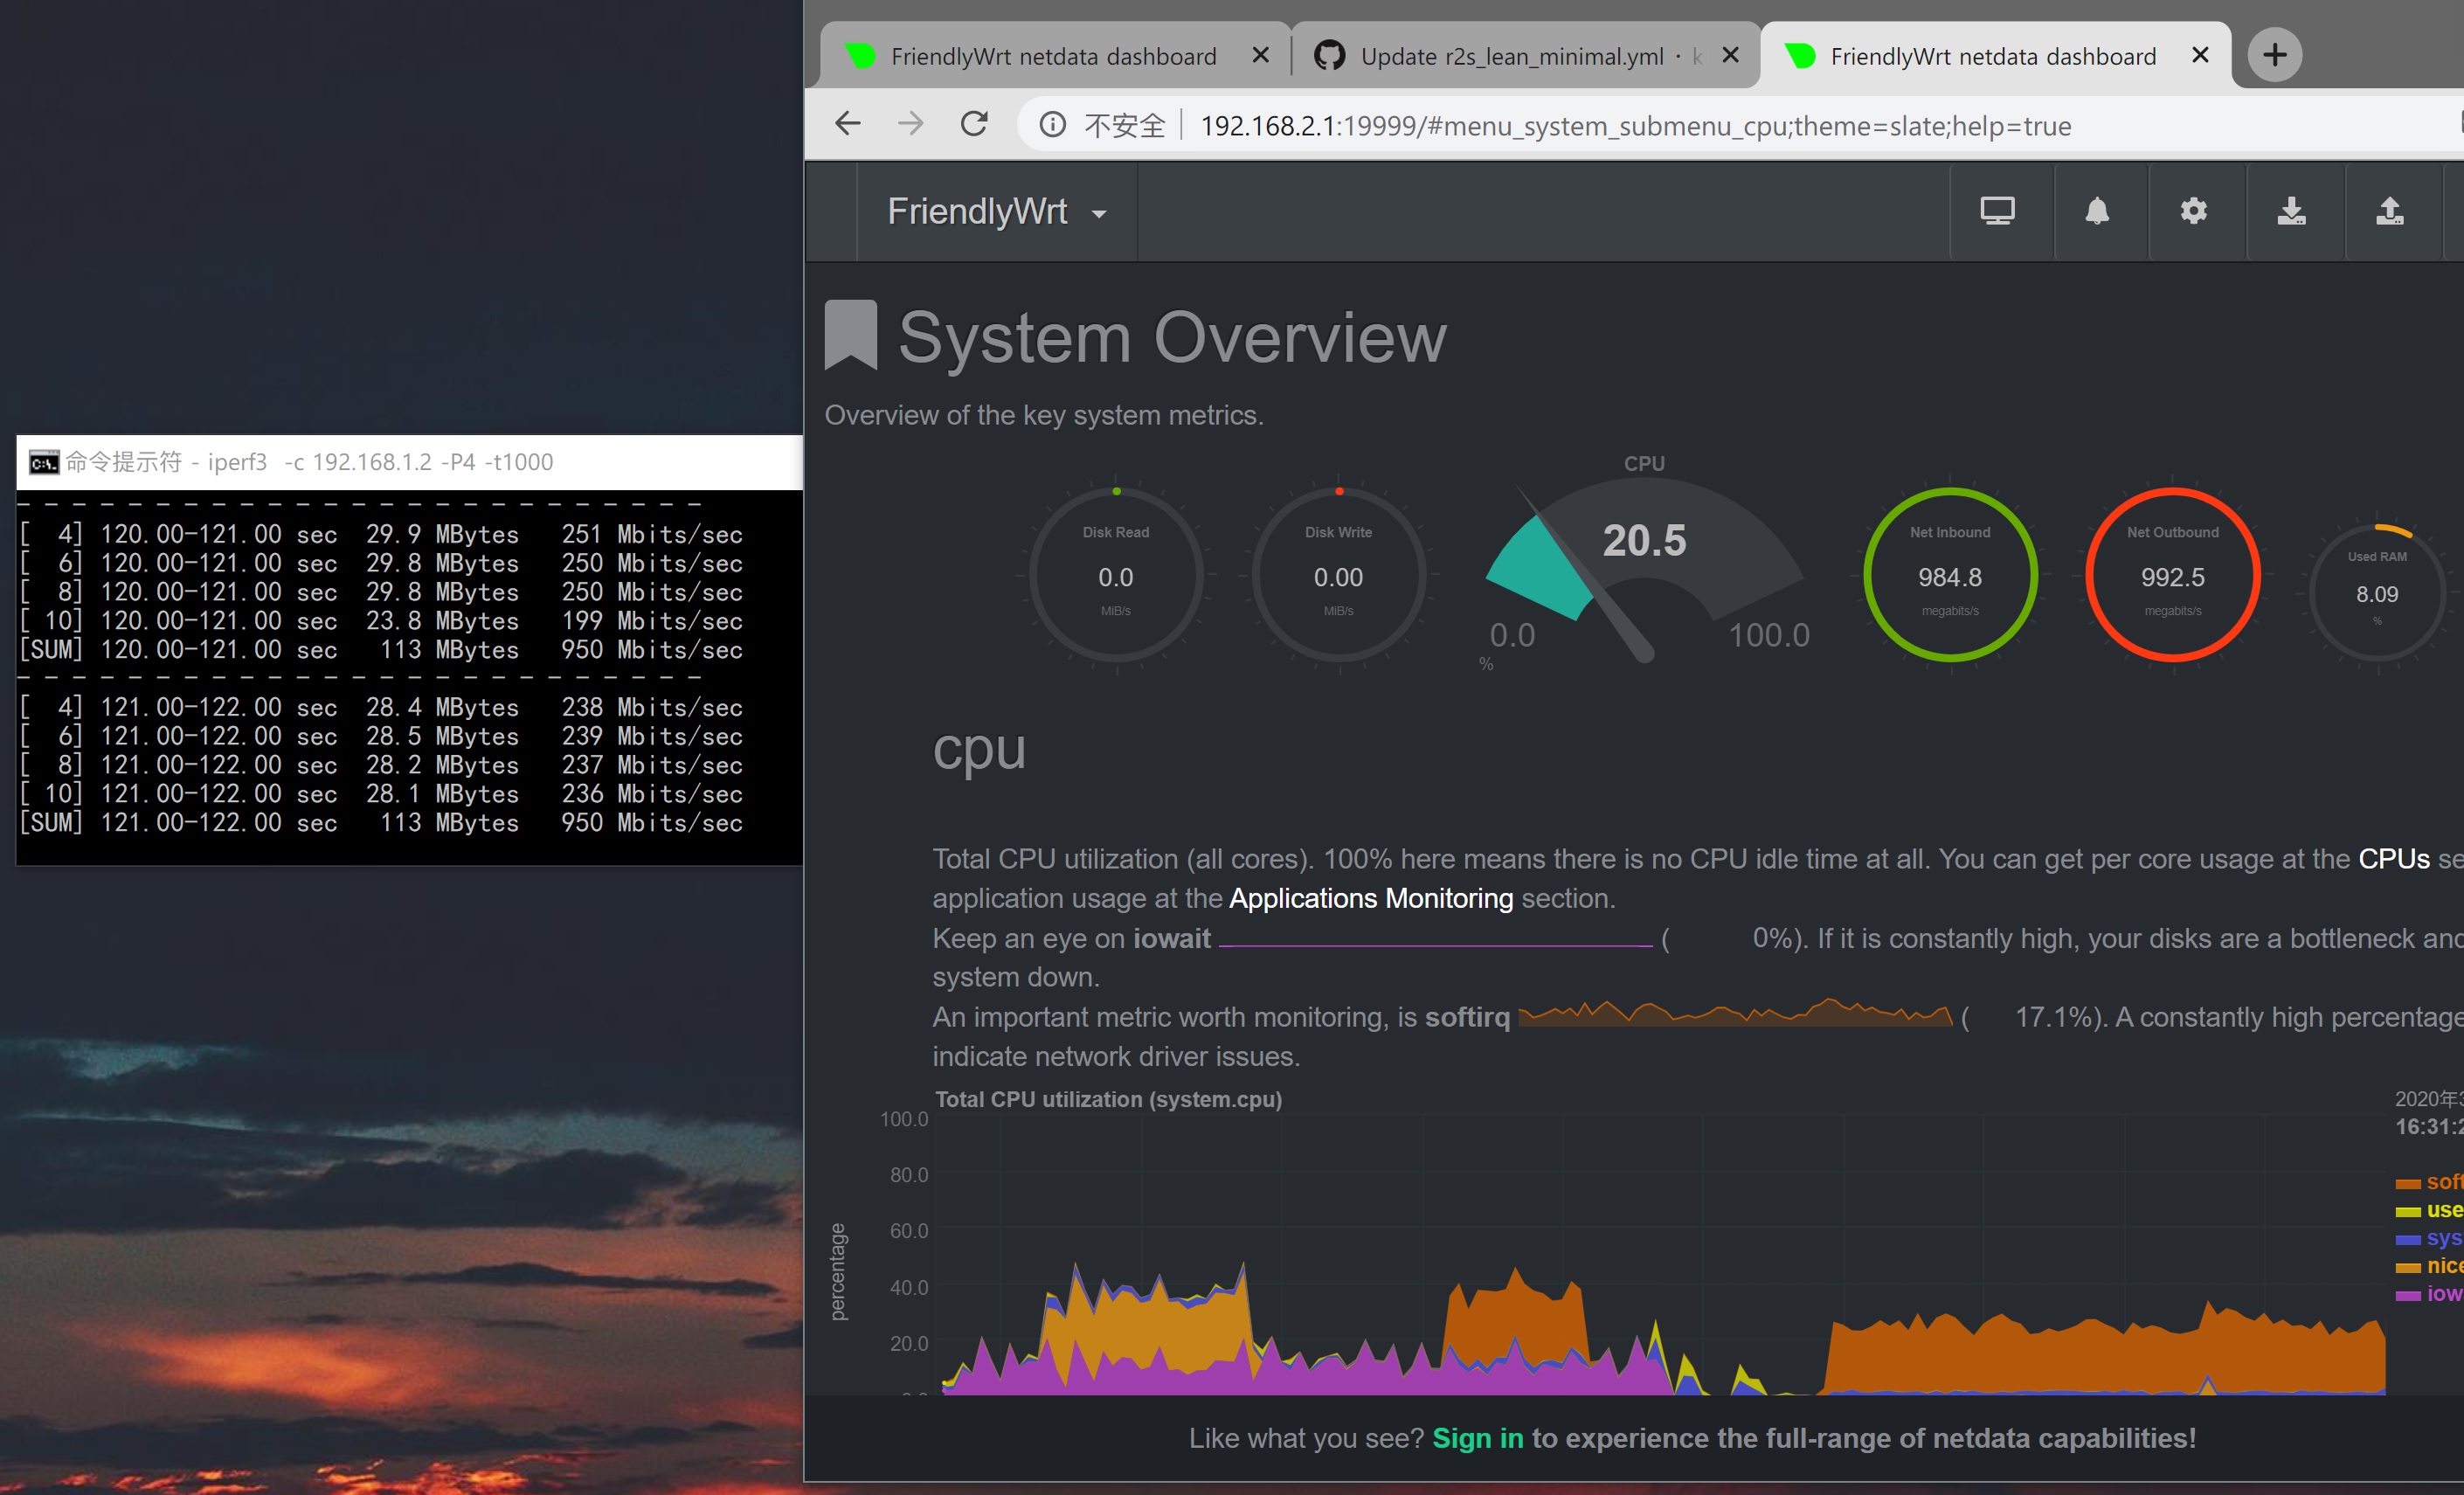
本固件NAT基准性能测试:
固件源码:
https://github.com/coolsnowwolf/lede
https://github.com/immortalwrt/immortalwrt
from https://github.com/klever1988/nanopi-openwrt
--------------------------------------------------------------------------------------------------------
all in one,基于github actions的openwrt 编译脚本,支持x86,x86_64,WRTACS1900。
手上的openwrt设备比较多,因此结合了几个开源github actions,集成成一个项目。可以支持的设备有x86-64,N1 docker,wrt1900acs,NAS DOCKER,虚拟机等。云编译完成后,可以到Release页面下载固件或到dockerhub拉取。
需修改的地方:
REPOSITORY: 自己的dockerhub repository (x86-64、n1脚本修改)
github的Secrets中添加Repository secrets
| KEY | VALUE |
|---|---|
| DOCKER_USERNAME | dockerhub 帐号名 |
| DOCKER_TOKEN | dockerhub 密码 |
Build OpenWrt using GitHub Actions
Read the details in my blog (in Chinese) | 中文教程
- Click the Use this template button to create a new repository.
- Generate
.configfiles using Lean's OpenWrt source code. ( You can change it through environment variables in the workflow file. ) - Push
.configfile to the GitHub repository. - Select
Build OpenWrton the Actions page. - Click the
Run workflowbutton. - When the build is complete, click the
Artifactsbutton in the upper right corner of the Actions page to download the binaries.
- It may take a long time to create a
.configfile and build the OpenWrt firmware. Thus, before create repository to build your own firmware, you may check out if others have already built it which meet your needs by simply searchActions-Openwrtin GitHub. - Add some meta info of your built firmware (such as firmware architecture and installed packages) to your repository introduction, this will save others' time.
- Microsoft Azure
- GitHub Actions
- OpenWrt
- Lean's OpenWrt
- tmate
- mxschmitt/action-tmate
- csexton/debugger-action
- Cowtransfer
- WeTransfer
- Mikubill/transfer
- softprops/action-gh-release
- ActionsRML/delete-workflow-runs
- dev-drprasad/delete-older-releases
- peter-evans/repository-dispatch
支持自动定制固件, 自动调整依赖及生成配置文件, 无需上传配置. 兼容 coolsnowwolf/lede 以及 OpenWrt trunk.
同时支持自动合并推送上游提交 (也就是自动更新), 直接把merge-upstream.yml放入.github/workflows/即可 (默认上游为 coolsnowwolf/lede, 高级玩家请自行改写).
感谢P3TERX珠玉在前.
在一切开始前, 你需要的是:
2. fork coolsnowwolf/lede 或者 OpenWrt trunk.
如果你希望定制你的固件:
代码里的注释部分详细介绍了如何在脚本中客制化你的固件. 简单来说, 你只需要解除注释相应行即可.
集成编译环境会自动开始编译. 现在返回你的库首页, 点击页面上方的Actions按钮就可以查看进度.
进入如何下载到编译完成的固件?
Actions标签页后, 如果相应的集成活动顺利完成 (显示为绿色), 点击页面右上方的Artifacts即可看到你的固件 (通常是一个压缩包). 点击即可开始下载.
No comments:
Post a Comment