from http://www.tinc-vpn.org/download/,
Download
Here is a full listing of all versions of tinc that have been made public. If you wish to get the current development version, please get it from our git repository. The source code is the primary means of distribution of tinc. In addition, we try to make packages for operating system distributions available and provide static binaries for some operating systems and architectures. We do not support the packages and static binaries though. If there are any problems with the packages you should contact its maintainer.Latest stable release
Version 1.0.16 released.
- Fixed a performance issue with TCP communication under Windows.
- Fixed code that, during network outages, would cause tinc to exit when it thought two nodes with identical Names were on the VPN.
| Version | 1.0.16 |
| Source | tinc-1.0.16.tar.gz (sig) |
| Packages | Windows XP/Vista/7 |
Latest pre-release from the 1.1 branch
Version 1.1pre2 released.
- .cookie files are renamed to .pid files, which are compatible with 1.0.x.
- Experimental protocol enhancements that can be enabled with the option ExperimentalProtocol = yes:
- Ephemeral ECDH key exchange will be used for both the meta protocol and UDP session keys.
- Key exchanges are signed with ECDSA.
- ECDSA public keys are automatically exchanged after RSA authentication if nodes do not know each other’s ECDSA public key yet.
| Version | 1.1pre2 |
| Source | tinc-1.1pre2.tar.gz (sig) |
| Packages | Windows XP/Vista/7 |
Distributions providing tinc
This is a list of distributions and unofficial package repositories that provide packages for tinc:This list is not complete and may not be up to date. If you want to add a distribution or repository to the list, please contact us. We do not support any of these packages, contact the respective package maintainer if you have problems using one of these packages.
Older versions
| Version | 1.0.15 |
| Source | tinc-1.0.15.tar.gz (sig) |
| Packages | Windows XP/Vista/7 |
| Version | 1.1pre1 |
| Source | tinc-1.1pre1.tar.gz (sig) |
| Packages | Windows XP/Vista/7 |
| Remarks | One header file is missing, save this file as src/tincctl.h before compiling. |
| Version | 1.0.14 |
| Source | tinc-1.0.14.tar.gz (sig) |
| Packages | Windows XP/Vista/7 |
| Version | 1.0.13 |
| Source | tinc-1.0.13.tar.gz (sig) |
| Packages | Windows XP/Vista/7 |
| Version | 1.0.12 |
| Source | tinc-1.0.12.tar.gz (sig) |
| Packages | Windows XP/Vista/7 |
| Version | 1.0.11 |
| Source | tinc-1.0.11.tar.gz (sig) |
| Packages | Windows XP/Vista/7 |
| Version | 1.0.10 |
| Source | tinc-1.0.10.tar.gz (sig) |
| Packages | Windows XP/Vista/7 |
| Version | 1.0.9 |
| Source | tinc-1.0.9.tar.gz (sig) |
| Packages | Windows 2000/XP |
| Version | 1.0.8 |
| Source | tinc-1.0.8.tar.gz (sig) |
| Packages | Windows 2000/XP |
| Extra | When compiling with an old version of GCC, try the following patch, kindly provided by “Borg”: tinc-1.0.8-gcc-2.95.patch. |
| Version | 1.0.7 |
| Source | tinc-1.0.7.tar.gz (sig) |
| Static binaries | OpenBSD i386 (sig), |
| Packages | Windows 2000/XP |
| Version | 1.0.6 |
| Source | tinc-1.0.6.tar.gz (sig) |
| Static binaries | FreeBSD i386 (sig), OpenBSD i386 (sig), NetBSD i386 (sig), |
| Packages | Windows 2000/XP |
| Version | 1.0.5 |
| Source | tinc-1.0.5.tar.gz (sig) |
| Static binaries | FreeBSD i386 (sig), |
| Packages | Windows 2000/XP, Debian on Nokia 770 |
| Version | 1.0.4 |
| Source | tinc-1.0.4.tar.gz (sig) |
| Static binaries | Linux x86_64 (sig), FreeBSD i386 (sig), NetBSD i386 (sig), OpenBSD i386 (sig), Solaris sparc32* (sig), |
| Packages | Windows 2000/XP |
| Version | 1.0.3 |
| Source | tinc-1.0.3.tar.gz (sig) |
| Static binaries | Linux i386 (sig), FreeBSD i386 (sig), NetBSD i386 (sig), OpenBSD i386 (sig), Darwin powerpc (sig), Solaris sparc32 (sig), |
| Packages | Windows 2000/XP, OpenWRT |
| Version | 1.0.2 |
| Source | tinc-1.0.2.tar.gz (sig) |
| Static binaries | Linux i386 (sig), NetBSD i386 (sig), OpenBSD i386 (sig), Solaris sparc32* (sig), |
| Packages | Slackware 9.1, Windows 2000/XP |
| Version | 1.0.1 |
| Source | tinc-1.0.1.tar.gz (sig) |
| Static binaries | Linux i386 (sig), NetBSD i386 (sig), OpenBSD i386 (sig), Solaris sparc32 (sig), Darwin powerpc (sig), Windows 2000/XP (sig), |
| Packages | Slackware 9.1, Windows 2000/XP |
| Version | 1.0 |
| Source | tinc-1.0.tar.gz (sig) |
| Static binaries | Linux i386 (sig), NetBSD i386 (sig), Solaris sparc32 (sig), Darwin powerpc (sig), Windows 2000/XP (sig), |
| Packages | Windows 2000/XP |
| Remarks | When compiling under OpenBSD, you will need a small patch (sig). |
| Version | 1.0pre8 |
| Source | tinc-1.0pre8.tar.gz (sig) |
| Static binaries | Linux i386 (sig), OpenBSD i386 (sig), FreeBSD i386 (sig), Solaris sparc32* (sig), |
| Packages | Debian i386 (woody), Slackware i386 (Slackware 9), |
| Version | 1.0pre7 |
| Source | tinc-1.0pre7.tar.gz (sig) |
| Static binaries | Linux i386 (sig), OpenBSD i386 (sig), FreeBSD i386 (sig), Solaris sparc32* (sig) |
| Packages | Debian i386, Redhat, Slackware i386 |
| Version | 1.0pre6 |
| Source | tinc-1.0pre6.tar.gz (sig) |
| Static binaries | Linux i386 (sig), OpenBSD i386 (sig), FreeBSD i386 (sig), Solaris sparc32* (sig) |
| Packages | Debian i386 |
| Remarks | Doesn’t like signals and prefixlengths which are not divisible by 8. |
| Version | 1.0pre5 |
| Source | tinc-1.0pre5.tar.gz (sig) |
| Static binaries | Linux i386 (sig), OpenBSD i386 (sig), FreeBSD i386 (sig), Solaris sparc32* (sig) |
| Packages | Debian i386, Debian potato i386 |
| Remarks | Blocking connect()s. |
| Version | 1.0pre4 |
| Source | tinc-1.0pre4.tar.gz (sig) |
| Static binaries | Linux i386 (sig), FreeBSD i386 (sig), |
| Remarks | Contains key expiry bug, see FAQ. |
| Version | 1.0pre3 |
| Source | tinc-1.0pre3.tar.gz (sig) |
| Static binaries | Linux i386 (sig), |
| Packages | Debian i386, Debian potato i386 |
| Version | 1.0pre2 |
| Source | tinc-1.0pre2.tar.gz (sig) |
| Packages | Debian i386, Redhat i386 |
| Remarks | Contains security hole, see news. |
| Version | 1.0pre1 |
| Source | tinc-1.0pre1.tar.gz (sig) |
| Packages | Debian i386, Redhat i386 |
| Remarks | Contains security hole, see news. |
| Version | 0.3.3 |
| Source | tinc-0.3.3.tar.gz (sig) |
| Remarks | Contains security hole, see news. |
| Version | 0.2.19 |
| Source | tinc-0.2.19.tar.gz (sig) |
How To Install Tinc and Set Up a Basic VPN on Ubuntu 14.04
A few of the features that Tinc has that makes it useful include encryption, optional compression, automatic mesh routing (VPN traffic is routed directly between the communicating servers, if possible), and easy expansion. These features differentiate Tinc from other VPN solutions such as OpenVPN, and make it a good solution for creating a VPN out of many small networks that are geographically distributed. Tinc is supported on many operating systems, including Linux, Windows, and Mac OS X.Note: If you want to set up a Tinc mesh VPN quickly and easily, check out this tutorial: How To Use Ansible and Tinc VPN to Secure Your Server Infrastructure.
Prerequisites
To complete this tutorial, you will require root access on at least three Ubuntu 14.04 servers. Instructions to set up root access can be found here (steps 3 and 4): Initial Server Setup with Ubuntu 14.04.If you are planning on using this in your own environment, you will have to plan out how your servers need to access each other, and adapt the examples presented in this tutorial to your own needs. If you are adapting this to your own setup, be sure to substitute the highlighted values in the examples with your own values.
If you would like to follow this tutorial exactly, create two VPSs in the same datacenter, with private networking, and create another VPS in a separate datacenter. We will create two VPSs in the NYC2 datacenter and one in AMS2 datacenter with the following names:
- externalnyc: All of the VPN nodes will connect to this server, and the connection must be maintained for proper VPN functionality. Additional servers can be configured in a similarly to this one to provide redundancy, if desired.
- internalnyc: Connects to externalnyc VPN node using its private network interface
- ams1: Connects to externalnyc VPN node over the public Internet
Our Goal
Here is a diagram of the VPN that we want to set up (described in Prerequisites):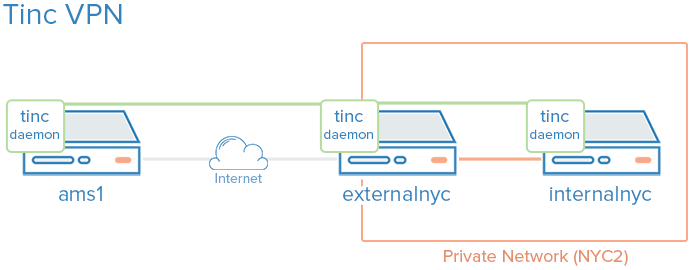
The green represents our VPN, the gray represents the public Internet, and the orange represents the private network. All three servers can communicate on the VPN, even though the private network is inaccessible to ams1.
Let's get started by installing Tinc!
Install Tinc
On each VPS that you want to join the private network, install Tinc. Let's start by updating apt:sudo apt-get update
sudo apt-get install tinc
Tinc Configuration
Tinc uses a "netname" to distinguish one Tinc VPN from another (in case of multiple VPNs), and it is recommended to use a netname even if you are only planning on configuring one VPN. We will call our VPN "netname" for simplicity.Every server that will be part of our VPN requires the following three configuration components:
- Configuration files: tinc.conf, tinc-up, and tinc-down, for example
- Public/private key pairs: For encryption and node authentication
- Host configuration files: Which contain public keys and other VPN configuration
Configure externalnyc
On externalnyc, create the configuration directory structure for our VPN called "netname":sudo mkdir -p /etc/tinc/netname/hosts
sudo vi /etc/tinc/netname/tinc.conf
Name = externalnyc
AddressFamily = ipv4
Interface = tun0
Next, let's create an externalnyc hosts configuration file:
sudo vi /etc/tinc/netname/hosts/externalnyc
Address = externalnyc_public_IP
Subnet = 10.0.0.1/32
Now generate the public/private keypair for this host with the following command:
sudo tincd -n netname -K4096
Now we must create
tinc-up, the script that will run whenever our netname VPN is started. Open the file for editing now:sudo vi /etc/tinc/netname/tinc-up
#!/bin/sh
ifconfig $INTERFACE 10.0.0.1 netmask 255.255.255.0
Let's also create a script to remove network interface when our VPN is stopped:
sudo vi /etc/tinc/netname/tinc-down
#!/bin/sh
ifconfig $INTERFACE down
Lastly, make tinc network scripts executable:
sudo chmod 755 /etc/tinc/netname/tinc-*
Let's move on to our other nodes.
Configure internalnyc and ams1
These steps are required on both internalnyc and ams1, with slight variations that will be noted.On internalnyc and ams1, create the configuration directory structure for our VPN called "netname" and edit the Tinc configuration file:
sudo mkdir -p /etc/tinc/netname/hosts
sudo vi /etc/tinc/netname/tinc.conf
Name = node_name
AddressFamily = ipv4
Interface = tun0
ConnectTo = externalnyc
Next, let's create the hosts configuration file:
sudo vi /etc/tinc/netname/hosts/node_name
Subnet = 10.0.0.2/32
Subnet = 10.0.0.3/32
Next, generate the keypairs:
sudo tincd -n netname -K4096
sudo vi /etc/tinc/netname/tinc-up
ifconfig $INTERFACE 10.0.0.2 netmask 255.255.255.0
ifconfig $INTERFACE 10.0.0.3 netmask 255.255.255.0
Now create the network interface stop script:
sudo vi /etc/tinc/netname/tinc-down
ifconfig $INTERFACE down
Lastly, make tinc network scripts executable:
sudo chmod 755 /etc/tinc/netname/tinc-*
Now we must distribute the hosts configuration files to each node.
Distribute the Keys
If you happen to use a configuration management system, here is a good application. Minimally, each node that wants communicate directly with another node must have exchanged public keys, which are inside of the hosts configuration files. In our case, for example, only externalnyc needs to exchange public keys with the other nodes. It is easier to manage if you just copy each public key to all members of the node. Note that you will want to change the "Address" value in externalnyc's hosts configuration file to its private IP address when it is copied to internalnyc, so that connection is established over the private network.Because our VPN is called "netname", here is the location of the hosts configuration files:
/etc/tinc/netname/hostsExchange Keys Between externalnyc and internalnyc
On internalnyc, copy its hosts configuration file to externalnyc:scp /etc/tinc/netname/hosts/internalnyc user@externalnyc_private_IP:/tmp
cd /etc/tinc/netname/hosts; sudo cp /tmp/internalnyc .
scp /etc/tinc/netname/hosts/externalnyc user@internalnyc_private_IP:/tmp
cd /etc/tinc/netname/hosts; sudo cp /tmp/externalnyc .
sudo vi /etc/tinc/netname/hosts/externalnyc
Address = externalnyc_private_IP
Exchange Keys Between externalnyc and ams1
On ams1, copy its hosts configuration file to externalnyc:scp /etc/tinc/netname/hosts/ams1 user@externalnyc_public_IP:/tmp
cd /etc/tinc/netname/hosts; sudo cp /tmp/ams1 .
scp /etc/tinc/netname/hosts/externalnyc user@ams1_public_IP:/tmp
cd /etc/tinc/netname/hosts; sudo cp /tmp/externalnyc .
Exchange Keys Between Additional Nodes
If you are creating a larger VPN, now is a good time to exchange the keys between those other nodes. Remember that if you want two nodes to directly communicate with each other (without a forwarding server between), they need to have exchanged their keys/hosts configuration files, and they need to be able to access each other's real network interfaces. Also, it is fine to just copy each hosts configuration to every node in the VPN.Test Our Configuration
On each node, starting with externalnyc, start Tinc in debug mode like so (netname is the name of our VPN):sudo tincd -n netname -D -d3
In a separate window, on ams1, ping internalnyc's VPN IP address (which we assigned to 10.0.0.2, earlier):
ping 10.0.0.2
You may also use the VPN interfaces to do any other network communication, like application connections, copying files, and SSH.
On each Tinc daemon debug window, quit the daemon by pressing CTRL-\.
Note: If the connections aren't working, ensure that your firewall is not blocking the connections or forwarding.
Configure Tinc To Startup on Boot
Before the Tinc init script will function properly, we have to put our VPN's name into thenets.boot configuration file.On each node, edit nets.boot:
sudo vi /etc/tinc/nets.boot
# This file contains all names of the networks to be started on system startup.
netname
service command. If you would like to start it now run the following command on each of your nodes:sudo service tinc start
Conclusion
Now that you have gone through this tutorial, you should have a good foundation to build out your VPN to meet your needs. Tinc is very flexible, and any node can be configured to connect to any other node (that it can access over the network) so it can act as a mesh VPN, not relying on a single node.Good luck!
from https://www.digitalocean.com/community/tutorials/how-to-install-tinc-and-set-up-a-basic-vpn-on-ubuntu-14-04
-----------------------------------------------------------
tinc类型vpn的安装设置
vpn有很多种做法。
之前是一直用openvpn和ppp,但是openvpn有个毛病,就是如果服务器ip是192.168.0.1,第一台客户端ip是192.168.0.2,那么第二台客户端就不能是192.168.0.3,因为每台客户端占了一对ip,而且ifconfig的话
这个无比难看的mac地址真是受不了:HWaddr 00-00-00-00-00-00-00-00-00-00-00-00-00-00-00-00,而且要固定ip的话也很麻烦,需要写个文件。
ppp就更不用说了,链接根本不可控。比来必去还是tinc比较自由,ip都是可控的,且路由也是可以写脚本控制的。
安装很简单:
1

2
3
4
5
6
|
wget http://tinc-vpn.org/packages/tinc-1.0.24.tar.gz
tar -xf tinc-1.0.24.tar.gz
cd tinc-1.0.24
./configure
make
sudo make install
tinc的配置文件架构如下图,其中interface_name就是系统中多出的那块网卡的名称,在这里我们起名叫做dock.
一、服务器端的配置:
/etc/tinc/dock/tinc.conf
注意上面:Port=12345指的是服务器本地监听的端口12345.
/etc/tinc/dock/dockserver
注意:Subnet是vpn的地址。而Address和Port需要填写通过firewall映射出去的公网ip和端口。
/etc/tinc/dock/tinc-up,权限是755
/etc/tinc/dock/tinc-down,权限是755.
都建立好之后,运行
会自动生成秘钥和公钥放到文件中,服务器就暂告一段落。
二、客户端的配置:
/etc/tinc/dock/tinc.conf
注意上面:没有Port=这行了,客户端缺省监听655,多了个ConnectTo连接到服务器。
/etc/tinc/dock/client01
注意:Subnet是vpn建立成功后的地址。
把服务器端的文件dockserver拷贝到客户端的/etc/tinc/dock/hosts下:
/etc/tinc/dock/dockserver
注意:已经生成了公钥。
/etc/tinc/dock/tinc-up,权限是755
/etc/tinc/dock/tinc-down,权限是755
都建立好之后,运行
会自动生成秘钥和公钥放到文件中,客户端就配好了。
同样把带着公钥的client01文件拷贝到服务器上/etc/tinc/dock/hosts/client01
三、运行并调试
分别在服务器和客户端运行:
服务器端查看一下,多了一块dock网卡,ip是192.168.0.1:
如果要调试的话,运行:
在客户端同样查看ifconfig, 可以看到起来一块网卡dock,ip是192.168.0.2,就成功了.
--------------------------
|
Tinc 配置笔记
http://www.jianshu.com/p/e030dabafd61
http://www.tinc-vpn.org/packages/cydia/
https://www.digitalocean.com/community/tutorials/how-to-install-tinc-and-set-up-a-basic-vpn-on-ubuntu-14-04
http://blog.emzee.be/2015/08/07/fuck-games-for-windows-via-tinc/
http://www.h3c.com.cn/Service/Channel_Service/Operational_Service/ICG_Technology/
-----------
相关帖子:http://briteming.blogspot.com/2013/09/tinc-vpnlibrevpn.html
------------
tinc配置笔记
tinc是一个基于网状网络的VPN软件,使用tinc架设VPN,对于远程办公、文件传输等需求都是十分方便的。
而作为VPN,我们同样可以通过redirect gateway的方式来实现科学上网。本文将介绍通过使用tinc VPN和配置策略路由的方式,实现Linux平台下的科学上网(国内请求不走代理,国外请求走代理)。
本文教程以Arch Linux和OpenWRT为例,配置思路同样适用于其他Linux发行版。
相比于使用shadowsocks进行科学上网,tinc+策略路由有以下优势:
为了方便各位配置,博主已经写好了配置脚本。
以下操作在本地机器上进行:
以下操作在本地机器上进行:
TINC - 构建 IPv6 隧道及私有网络
目前已有一台 ping 值较低的 VPS ,并且这台 VPS 通过 TunnelBroker 已经接入到 he.net 的 IPv6 网络中。
已有 IPv6 前缀:
Tinc 隧道中分配:
假定 VPS 的网络名叫(这个在配置中会用到):
静态路由按照下面所示即可,这两个文件需要赋予可执行权限。
一切妥当后同样执行密钥的生成。
VPS 上的
一切妥当后,启动 tinc 服务即可。
抓包可以看出,我本地与服务器之间的连接已经数据传输是加密的,而如果你对数据的传输有兴趣的话,只需要将抓包的网卡设置成上面设置的网卡(tinc)即可,在 tinc 传输的数据已经是经过解密的了,因此抓包可以很好的复原传输的过程。
另外如果有你懂的需求的话,似乎 tinc 也是可以做到的。
FROM https://imlonghao.com/46.html
osx上,使用tinc的问题
出于一点虚荣心买了一台mac air,osx是freebsd演化的,命令行什么的和linux有一定的差异,刚开始还真有点不习惯啊。
比如tinc,我用来翻墙上google的工具,在苹果上一直没跑起来,开始是找不到隧道设备,安装了TunTap之后(tuntaposx.sourceforge.net),tincd-up运行不成功,提示需要指定个网关,指定之后连ping本地的vpn地址都不通,看到这篇帖子后(http://www.tinc-vpn.org/pipermail/tinc/2012-April/002944.html)果断加上
WLAN Ethernet Tunnel
Device<-------->Router<-------->VPN Client<========>VPN Server<-------->Internet
192.168.3.x .3.10 .3.1 .30.254 .40.1 1.2.3.4
\______________________________________|________________,^
NAT(for traffic) \_______________/
NAT(for DNS)
VPN client: 一台安装了FreeBSD 10.0 X64的电脑(同时兼具DNS缓存服务器)。
4.路由及NAT配置

DHCP配置:

VPN Server:
2. 配置里将所有的NAT都放在VPN
server上做,当然,在Client先做次NAT也可以,这样就不用在VPN
Server上添加额外的路由。但是两次NAT的映射表并不是同步保持的,在某些情况下可能会导致网络问题,因此并不建议在非公网接口进行NAT.
-----------
相关帖子:http://briteming.blogspot.com/2013/09/tinc-vpnlibrevpn.html
------------
tinc配置笔记
比 OpenVPN 好配多了。 打算组建两个节点的 Tinc over IPv6 VPN 服务,目的是使 Bob(客户端) 能够拥有跟 Alice(服务端)几乎一样的网络环境(访问内网服务器或浏览互联网)。采用路由器模式搭建 VPN。 环境:Linux Mint 16 + tinc version 1.0.23作者:digiter 链接:http://www.jianshu.com/p/e030dabafd61
安装前先回答以下问题
- What are the nodes (computers running tinc)? Alice 和 Bob. Alice 作为服务端,Bob 作为客户端。
- What IP addresses/subnets do they have? Alice 和 Bob 都有 IPv6 地址并且是互通的。
- What is the network mask of the entire VPN? 计划在 VPN 内使用 10.8.0.0/24 这个子网(和 OpenVPN 默认的子网相同)
- Do you need special firewall rules? 不需要。
- Do you have to set up masquerading or forwarding rules? 需要设置路由转发规则(后面会写)。
- Do you want to run tinc in router mode or switch mode? 路由器模式。
服务端配置
编辑mkdir -p /etc/tinc/myvpn/hosts cd /etc/tinc/myvpn/ su # 获得管理员权限 touch tinc.conf tinc-up tinc-down hosts/alice # 创建空白配置文件 chmod a+x 755 tinc-up tinc-down # 给予执行权限(这两个脚本会被 tinc 在建立连接前后调用)tinc.conf如下,其中 AddressFamily 表示监听哪种协议的端口(默认都监听),Interface 是创建的设备名(类似虚拟网卡),Mode 用来指定工作方式(默认是路由器),Name 是本节点的名字。
编辑#AddressFamily = <ipv4|ipv6|any> (any) Interface = myvpn #Mode = <router|switch|hub> (router) Name = alicetinc-up如下
编辑#!/bin/sh ip link set $INTERFACE up # 启动接口,$INTERFACE = myvpn,由 tinc 传入 ip addr add 10.8.0.1/32 dev $INTERFACE # 设定网卡地址为 10.8.0.1 # 将目的地址为 10.8.0.2 的包从 dev myvpn 接口转发出去,并且将包的源地址改写为 10.8.0.1 ip route add 10.8.0.2 dev $INTERFACE proto kernel scope link src 10.8.0.1 # 将目的地址 10.8.0.0/24 网段的包的目的地址改写为10.8.0.2,并从 dev myvpn 接口转发 ip route add 10.8.0.0/24 via 10.8.0.2 dev $INTERFACE # 配置 NAT 转发,将 10.8.0.0/24 这个子网的数据包以 nat 的方式从 eth0 接口转发 iptables -A POSTROUTING -t nat -s 10.8.0.0/24 -j MASQUERADE -o eth0tinc-down如下
编辑#!/bin/sh ip link set $INTERFACE down # 系统会自动删除在 tinc-up 脚本中添加的路由项 iptables -D POSTROUTING -t nat -s 10.8.0.0/24 -j MASQUERADE -o eth0hosts/alice如下
然后为 Alice 生成 RSA 公钥和私钥。# Address = <IP address|hostname> [<port>] [recommended] Address = <Alice的IPv6地址> # 为了让 Bob 共享到 Alice 的全部网络,特意将 Subnet 设置为最大的网段 Subnet = 0.0.0.0/1 Subnet = 128.0.0.0/1
tincd -n ipv6net -K4096
客户端配置(与服务端非常类似)
$ mkdir -p /etc/tinc/myvpn/hosts $ cd /etc/tinc/myvpn/ $ su $ touch tinc.conf tinc-up tinc-down hosts/bob $ chmod a+x 755 tinc-up tinc-down $ cat tinc.conf ConnectTo = alice Interface = myvpn Name = bob $ cat tinc-up #!/bin/bash ip link set $INTERFACE up # 启动接口,$INTERFACE = myvpn,由 tinc 传入 ip addr add 10.8.0.2/32 dev $INTERFACE # 设定网卡地址为 10.8.0.2 # 将目的地址为 10.8.0.5 的包从 dev myvpn 接口转发出去,并且将包的源地址改写为 10.8.0.2 ip route add 10.8.0.5 dev $INTERFACE proto kernel scope link src 10.8.0.2 # 将所有包的目的地址改写为10.8.0.5,并从 dev myvpn 接口转发 ip route add 0.0.0.0/1 via 10.8.0.5 dev $INTERFACE ip route add 128.0.0.0/1 via 10.8.0.5 dev $INTERFACE $ cat tinc-down #!/bin/bash ip link set $INTERFACE down $ cat hosts/bob Subnet = 10.8.0.2/32 tincd -n ipv6net -K4096 # 为 Bob 生成 RSA 公钥和私钥
交换主机配置和公钥
将服务端的/etc/tinc/myvpn/hosts/alice拷贝到客户端的/etc/tinc/myvpn/hosts/目录中。 并且将客户端的/etc/tinc/myvpn/hosts/bob拷贝到服务端的/etc/tinc/myvpn/hosts/目录中。
启动和关闭(服务端和客户端一样)
将 "myvpn" 加入到/etc/tinc/nets.boot可以使 tinc 自动启动 "myvpn" 这个网络。
tincd -n myvpn -D --debug=3 # 以排错方式启动 tincd -n myvpn -k # 关闭
另一种配置方式
上面的路由设置是从 OpenVPN 抄过来的,下面采用更简单的配置方法。其原理是当 Alice 的地址是单个地址时,ip addr add不添加路由项,而当其地址是网段时则添加如下路由项。
$ ip route show 10.8.0.0/24 dev myvpn proto kernel scope link src 10.8.0.1Alice
$ cat tinc-up #!/bin/sh ip link set $INTERFACE up ip addr add 10.8.0.1/24 dev $INTERFACE $ cat hosts/alice # Address = <IP address|hostname> [<port>] [recommended] Address = 2001:cc0:2026:1a00:21a:4dff:fed2:84ac Subnet = 0.0.0.0/1 Subnet = 128.0.0.0/1 -----BEGIN RSA PUBLIC KEY----- ... -----END RSA PUBLIC KEY-----Bob
$ cat tinc-up #!/bin/bash ip link set $INTERFACE up ip addr add 10.8.0.2/24 dev $INTERFACE ip route add 0.0.0.0/1 via 10.8.0.1 dev $INTERFACE ip route add 128.0.0.0/1 via 10.8.0.1 dev $INTERFACE
参考
- How to set up a small tinc VPN using IPv6 payloads over IPv4 and iproute2
- VPN with tinc and IPv6 (Using OpenWrt Routers)
- IPv6 VPN
- https://github.com/gsliepen/tinc
- Using tinc VPN
- IPROUTE2 Utility Suite Howto 解释
ip route的命令格式- Tinc FAQ 解释了 Destination Net Unknown 的原因
- 关于VPN
----------------
tinc VPN+策略路由:Linux桌面系统下,更好的科学上网方式
而作为VPN,我们同样可以通过redirect gateway的方式来实现科学上网。本文将介绍通过使用tinc VPN和配置策略路由的方式,实现Linux平台下的科学上网(国内请求不走代理,国外请求走代理)。
本文教程以Arch Linux和OpenWRT为例,配置思路同样适用于其他Linux发行版。
相比于使用shadowsocks进行科学上网,tinc+策略路由有以下优势:
- VPN是工作在IP层(网络层)的,因此可以实现对IP层packet进行代理,比如基于ICMP的ping和traceroute命令;而shadowsocks只能代理传输层的TCP和UDP请求。
- tincd进程和服务器间的通信是基于UDP的(对于屏蔽UDP的ISP,tinc会自动failover到TCP),而该socket数量是一直固定的,对于本地发出的需要代理的连接(无论是IP层还是传输层),可实现多路复用,大大提高性能。而shadowsocks对于每一个本地TCP连接,均需要向服务器建立一次新的TCP连接,速度十分有限。
- shadowsocks服务器有可能因为同时打开太多的TCP连接而拒绝请求,需要几分钟才能恢复。这种拒绝有可能是在ASP的防火墙上发生的,修改vps的内核参数如
file-max等也不能解决。博主的VPS服务器上的shadowsocks服务每隔几天就会遇到一次这样的情况。而tinc因为基于多路复用,则没有这个问题。
条件
要架设可用于科学上网的tinc服务,你需要拥有:- 一台境外的tinc服务器。你可能需要自行搭建一台tinc服务器,要求:tun/tap设备可用,操作系统为Linux发行版。
- 一台本地的Linux机器,可以是你的PC、软路由,或者是一台OpenWRT路由器,同样要求tun/tap可用。
- 确认服务器和本地机器上已安装iptables, iproute2, ipset。
- 本文非傻瓜教程,无法涵盖全部Linux发行版的操作,你需要熟悉自己所使用的发行版,如service,systemd等基本操作,遇到问题要知道如何排查。
tinc安装及配置
你可以参考Arch Linux wiki来安装和配置tinc。这里博主简要介绍快速部署方法。- 在服务器和本地机器上安装tinc。
Arch Linux:
12# pacman -Syu# pacman -S tincOpenWRT:
12# opkg update# opkg install tinc - 在服务器和本地机器上创建tinc配置文件夹。请替换
myvpn为你喜欢的vpn名称。
12# mkdir -p /etc/tinc/myvpn# mkdir /etc/tinc/myvpn/hosts - 服务端配置文件(在服务器上操作):
你可以将alpha替换为自己喜欢的服务器标识名,下同。
/etc/tinc/myvpn/tinc.conf
/etc/tinc/myvpn/tinc-up12Name = alphaDevice = /dev/net/tun
/etc/tinc/myvpn/tinc-down1234#!/bin/ship link set $INTERFACE upip addr add 192.168.100.1/32 dev $INTERFACEip route add 192.168.100.0/24 dev $INTERFACE
添加脚本执行权限:1234#!/bin/ship route del 192.168.100.0/24 dev $INTERFACEip addr del 192.168.100.1/32 dev $INTERFACEip link set $INTERFACE down
12# chmod +x /etc/tinc/myvpn/tinc-up# chmod +x /etc/tinc/myvpn/tinc-down - 本地机配置文件(在本地机器上操作):
你可以将beta替换为自己喜欢的客户端标识名,下同。
/etc/tinc/myvpn/tinc.conf
/etc/tinc/myvpn/tinc-up123Name = betaDevice = /dev/net/tunConnectTo = alpha
/etc/tinc/myvpn/tinc-down1234#!/bin/ship link set $INTERFACE upip addr add 192.168.100.100/32 dev $INTERFACEip route add 192.168.100.0/24 dev $INTERFACE
添加脚本执行权限:1234#!/bin/ship route del 192.168.100.0/24 dev $INTERFACEip addr del 192.168.100.100/32 dev $INTERFACEip link set $INTERFACE down
12# chmod +x /etc/tinc/myvpn/tinc-up# chmod +x /etc/tinc/myvpn/tinc-down - 在服务器上建立host配置文件并生成密钥:
/etc/tinc/myvpn/hosts/alpha 请将10.0.0.1替换为服务器的公网IP。
生成密钥:123Address = 10.0.0.1Port = 655Subnet = 0.0.0.0/0
1# tincd -n myvpn -K - 在本地机器上建立host配置文件并生成密钥:
/etc/tinc/myvpn/hosts/beta
生成密钥:12Port = 655Subnet = 192.168.100.100/32
1# tincd -n myvpn -K - 在服务器和本地机上交换host配置文件:
复制服务器上的/etc/tinc/myvpn/hosts/alpha到本地机器的/etc/tinc/myvpn/hosts/alpha。
复制本地机器上的/etc/tinc/myvpn/hosts/beta到服务器上的/etc/tinc/myvpn/hosts/beta。
- 在服务器和本地机上启动tinc服务:(先启动服务器上的)
Arch Linux和其他基于systemd管理的linux发行版:
1# systemctl start tinc@myvpn.serviceOpenWRT和其他发行版:
1# tincd -n myvpn - 测试VPN是否正常:
123$ ifconfig #是否找到了myvpn接口?分配的IPv4地址是否正确?$ ping 192.168.100.1 #ping服务器$ ping 192.168.100.100 #ping客户端
配置服务器路由规则
以下操作在tinc服务器上进行:- 开启ip_forward:
Arch Linux:
12# echo 'net.ipv4.ip_forward=1' > /etc/sysctl.d/99-ipforword.conf# sysctl --system其他Linux发行版:
将1# vim /etc/sysctl.confnet.ipv4.ip_forward=0修改为net.ipv4.ip_forward=1。如果文件为空或没有这行,则添加一行net.ipv4.ip_forward=1即可。
随后运行这条命令使配置生效:
1# sysctl -p - 开启masquerade:
首先通过ifconfig命令(Arch Linux上使用ip addr),找出外网IP对应的接口名称。这里假设外网接口是eth0。
运行命令:
你可以保存当前的iptables配置:1# iptables -t nat -A POSTROUTING -o eth0 -s 192.168.100.0/24 -j MASQUERADE
在Arch Linux上,需要开启1# iptables-save > /etc/iptables/iptables.rulesiptables.service来实现重启后保留配置:
在CentOS6上,需要开启1# systemctl enable iptables.serviceiptables服务来实现重启后保留配置:
1# chkconfig iptables on
配置策略路由
确认VPN架设成功,客户端和服务端能够互相ping通后,我们可以进行策略路由的配置了。为了方便各位配置,博主已经写好了配置脚本。
以下操作在本地机器上进行:
- 下载国内IP段文件,保存至
/etc/chn_route.list:
1# wget https://raw.githubusercontent.com/Chion82/soft-router/master/tinc_proxy/chn_route.list -O /etc/chn_route.list - 下载策略路由初始化和停止脚本,保存至
/usr/bin/目录:
12345# cd /usr/bin# wget https://raw.githubusercontent.com/Chion82/soft-router/master/tinc_proxy/init_tinc_proxy -O init_tinc_proxy# wget https://raw.githubusercontent.com/Chion82/soft-router/master/tinc_proxy/stop_tinc_proxy -O stop_tinc_proxy# chmod +x init_tinc_proxy# chmod +x stop_tinc_proxy - 修改启动脚本:
将第2行1# vim /usr/bin/init_tinc_proxyVPN_SERVER=XX.XX.XX.XX的XX.XX.XX.XX修改为tinc服务器的外网IP地址。
将第5行VPN_INTERFACE=chionvpn的chionvpn修改为myvpn,或者是刚才你自定义的vpn名称。
如果你的Linux发行版不是Arch Linux,请删除最后这两行:
12#Set rp_filterecho 2 > /proc/sys/net/ipv4/conf/$VPN_INTERFACE/rp_filter - 修改停止脚本:
将第2行1# vim /usr/bin/stop_tinc_proxyVPN_INTERFACE=chionvpn的chionvpn修改为myvpn,或者是刚才你自定义的vpn名称。
如果你的Linux发行版不是Arch Linux,请删除第7和第8行:
12#Restore rp_filterecho 1 > /proc/sys/net/ipv4/conf/$VPN_INTERFACE/rp_filter - 修改
tinc-up文件:
在最后一行添加:1# vim /etc/tinc/myvpn/tinc-up
1/usr/bin/init_tinc_proxy & - 修改
tinc-down文件:
在第一行1# vim /etc/tinc/myvpn/tinc-down#!/bin/sh
下方插入一行:
1/usr/bin/stop_tinc_proxy - 重启tinc来测试配置是否正确:
Arch Linux:
1# systemctl restart tinc@myvpn.service其他Linux发行版:
进行测试:12# tincd -n myvpn -k# tincd -n myvpn
如果能够ping通,说明以上配置正确。1$ ping 172.217.27.132
配置ChinaDNS和dnsmasq
至此,我们的VPN和策略路由已经配置完成。为了避免国内DNS污染,我们需要使用ChinaDNS。ChinaDNS的配置方法与之前的OpenWRT科学上网类似,唯一不同处是,这里的国外上游DNS服务器我们可以直接填写8.8.8.8,而不需要shadowsocks的ss-tunnel隧道。以下操作在本地机器上进行:
- 安装并配置ChinaDNS
Arch Linux:
123# yaourt -S chinadns# cp /etc/chn_route.list /etc/chnroute.txt# system start chinadns.serviceOpenWRT:
参照https://blog.chionlab.moe/2016/01/23/openwrt-bypass-gfw-solution/#安装ChinaDNS ,来安装ChinaDNS,然后执行:
进入OpenWRT管理网页,进入services->ChinaDNS,勾选1# cp /etc/chn_route.list /etc/chinadns_chnroute.txtEnable,中国路由表(CHNRoute File)填/etc/chinadns_chnroute.txt,设置Upstream Servers为:114.114.114.114,8.8.8.8。
- 配置dnsmasq
Arch Linux:
修改1# pacman -S dnsmasq/etc/dnsmasq.conf,清空文件并填入以下内容:
启动dnsmasq:1234listen-address=127.0.0.1 #如果机器(如软路由)绑定了静态IP,请在这里加上静态IP,以逗号分割no-resolvserver=127.0.0.1#5353
修改本机的DNS配置,使其指向1# systemctl start dnsmasq.service127.0.0.1。
如果你的网络配置文件管理器是netctl,在对应的配置文件(位于/etc/netctl/下)中设置:
1DNS=('127.0.0.1')OpenWRT:
进入网络(Network)->DHCP and DNS。
将DNS转发(DNS forwardings)设置为127.0.0.1#5353。
还要记得勾选“忽略解析文件”(ignore resolve file)。
- 测试
现在应该能够ping通谷歌域名了:
12$ dig www.google.com$ ping www.google.com
配置自启动
如果需要在机器启动时自动开启科学上网,可按照以下步骤进行:- 自启动tinc服务,在服务器和本地机器上操作:
Arch Linux:
1# systemctl enable tinc@myvpn.service其他Linux发行版:
在/etc/rc.local脚本文件最后添加一行:
当然,更好的方法是编写一个init服务脚本(位于1tincd -n myvpn/etc/init.d/)。
- 自启动ChinaDNS服务,在本地机上操作:
Arch Linux:
12# systemctl enable chinadns.service# systemctl enable dnsmasq.serviceOpenWRT:
不需要特别设置,ChinaDNS和dnsmasq服务在安装后默认是自启动的。
策略路由原理及常见问题
init_tinc_proxy这个脚本都做了些什么?
- 首先,读取
/etc/chn_route.list文件,这个文件的内容是国内IPv4的CIDR地址段。创建一个ipset集合chn_route,将这些国内地址段写入该集合。 - 添加一个路由表,id为
200,该路由表接受全部IP段(0.0.0.0/0,或default),经由接口myvpn,网关(下一跳)是VPN服务器192.168.100.1。即执行:
1# ip route add default via 192.168.100.1 dev myvpn tabel 200 - 添加一个路由规则,将MARK为
200的IP报使用id为200的路由表进行路由。即执行:
1# ip rule add fwmark 200 table 200 - 在iptables的mangle表增加一个自定义链
tinc_proxy,并在该链中添加如下规则:
目的地址在BYPASS指定的例外IP段中的packet,采取RETURN处理;
目的地址在chn_route集合中的packet,采取RETURN处理;
恢复CONNMARK的值到MARK(CONNMARK:用于跟踪一个连接的标记值);
对MARK的值为0的packet,设置其MARK为200;
将MARK的值保存到CONNMARK;
- 在mangle表的
PREROUTING和OUTPUT链中插入自定义链tinc_proxy - 在nat表的
POSTROUTING链中,对出口接口为myvpn的packet,采取MASQUERADE处理。
- 首先,读取
- 为什么在Arch Linux下,需要将内核参数
/proc/sys/net/ipv4/conf/$VPN_INTERFACE/rp_filter设为2?rp_filter是Reverse Path Filtering (反向路径过滤),其原理是:
内核对目的地址为本机的每个IP报文,先检查其来源地址,然后根据本机路由表,查找到该来源地址的路由(即反向路径查找),若查找到的路由对应的接口与该报文实际到达所经过的接口不相符,则抛弃该包。显然,这对基于fwmark的策略路由是不适用的,因此需要关闭反向路径过滤功能。
Arch Linux下默认使用严格的反向路径过滤策略,需要将该值设置为2。
而其他发行版,只需要将该值保持为默认的0即可。
- tinc VPN架设成功后,服务器和客户端能够互相ping通,但是无法经由服务器科学上网?
请逐步排查,特别注意服务器的tinc host配置文件中,Subnet是否正确设置为0.0.0.0。
参考Example: redirecting the default gateway to a host on the VPN将全部流量都经过VPN,看看能否正常访问外网.
from https://blog.chionlab.moe/2016/12/12/better-way-to-bypass-gfw-with-tinc/
TINC - 构建 IPv6 隧道及私有网络
Tinc VPN 简介
Tinc VPN 是一个轻量型的 GNU 协议下的开源软件,通过隧道以及加密技术在互联网点与点之间创立隧道。VPN 是 IP 层面上的,所以可以像普通的网络设备那样,不需要去适配其他已经存在的软件。所以他就可以很安全的在点与点之间传输数据,并不需要担心泄露。他还有其他几大的特点:- 加密 / 认证 / 压缩
- 自动全网状路由
- 易于扩展网络节点
- 能够进行网络的桥接
- 跨平台支持
- IPv6 支持
IPv6 隧道实例
需求及现有资源
在学校内网中,由于学校网络暂未支持 IPv6 ,有时候想在外面访问回去自己的笔记本,因此想要将自己的笔记本或者将自己的路由器通过某种方法支持并接入到 IPv6 网络。目前已有一台 ping 值较低的 VPS ,并且这台 VPS 通过 TunnelBroker 已经接入到 he.net 的 IPv6 网络中。
已有 IPv6 前缀:
2001:DB8:1::/48 (使用文档保留前缀 RFC 3849 )Tinc 隧道中分配:
2001:DB8:1::/64 ,VPS 使用 2001:DB8:1::1/64,笔记本使用2001:DB8:1::2/64,并且划分2001:DB8:1:2::/64给我的笔记本或者路由器。假定 VPS 的网络名叫(这个在配置中会用到):
vps , 我笔记本的网络名叫: laptopTinc 配置
安装
tinc 在各个发行版的仓库中都可以找到,例如 Debian / Ubuntu 系列的系统就可以通过下面的命令安装:apt-get install tinc
目录结构
/etc/tinc
└── vps
    ├── hosts
    │   ├── laptop
    │   └── vps
    ├── rsa_key.priv
    ├── tinc.conf
    ├── tinc-down
    └── tinc-up
/etc/tinc/vps目录下的文件都属于vps这个网络/etc/tinc/vps/hosts目录是存放其他用户或者说是其他网络的 public key 以及他们的 ip 地址rsa_key.priv本网络的私钥tinc.conf本网络的配置文件tinc-down本网络关闭时执行的脚本tinc-up本网络启动时执行的脚本
详细配置
服务器端
服务器端使用的是 Debian 系统,因此为了能够使用systemctl 进行管理以及自启动,添加本台服务器的网络名到 /etc/tinc/nets.boot。root@vps:/etc/tinc# cat nets.boot
## This file contains all names of the networks to be started on system startup.
vps
tinc.conf 相对也比较简单,我这里只设置了三个参数,更多的参数设置请参考 Main configuration variablesName 是本台服务器的网络名;Interface 是隧道所使用的网卡(随便设置即可);Mode 有三种模式,分别是 router / switch / hub ,相对应我们平时使用到的路由、交换机、集线器,同样使用 switch 即可root@vps:/etc/tinc/vps# cat tinc.conf
Name = vps
Interface = tinc
Mode = switch
tinc-up 以及 tinc-down 类似,只不过一个是 up 一个是 down ,一个是 add 一个是 del$INTERFACE 在 tinc 启动时会作为环境变量自动代入,这里不需要修改。静态路由按照下面所示即可,这两个文件需要赋予可执行权限。
root@vps:/etc/tinc/vps# cat tinc-up
#!/bin/sh

ip -6 link set $INTERFACE up
ip -6 addr add 2001:DB8:1::1/64 dev $INTERFACE
ip -6 route add 2001:DB8:1:2::/64 via 2001:DB8:1::2

root@vps:/etc/tinc/vps# cat tinc-down
#!/bin/sh

ip -6 link set $INTERFACE down
ip -6 route del 2001:DB8:1:2::/64 via 2001:DB8:1::2

root@vps:/etc/tinc/vps# chmod +x tinc-*
root@vps:/etc/tinc/vps# tincd -n vps -K 4096
客户端
客户端的配置基本相同,按照自己的设置进行配置即可。但还是需要注意几个地方tinc.conf 文件需要 ConnectTo = vps ,这样程序才会去主动连接root@laptop:/etc/tinc/laptop# cat tinc.conf
Name = laptop
Interface = tinc
Mode = switch
ConnectTo = vps
tinc-up 与 tinc-down 文件进行相应的调换即可。一切妥当后同样执行密钥的生成。
客户端服务器之间的连接
在之前我们提到了/etc/tinc/vps/hosts 这个文件夹,我们需要将公钥分配给对方。VPS 上的
/etc/tinc/vps/hosts/vps 需要复制到 laptop 的相同位置,同时第一行需要加上下面这行,以明确客户端连接的对象。这里正如上面所说,VPS 有公网 IP ,laptop 在内网环境中。Address = 222.222.222.222
/etc/tinc/vps/hosts/laptop 同样需要复制到 vps 的相同位置,但这里就不需要加上 Address =了,因为客户端连接的 IP 并不确定,因此不需要设置,只需要公钥即可。一切妥当后,启动 tinc 服务即可。
使用分享
经过了我的搭建之后,一切都按部就班地进行着。抓包可以看出,我本地与服务器之间的连接已经数据传输是加密的,而如果你对数据的传输有兴趣的话,只需要将抓包的网卡设置成上面设置的网卡(tinc)即可,在 tinc 传输的数据已经是经过解密的了,因此抓包可以很好的复原传输的过程。
另外如果有你懂的需求的话,似乎 tinc 也是可以做到的。
FROM https://imlonghao.com/46.html
osx上,使用tinc的问题
出于一点虚荣心买了一台mac air,osx是freebsd演化的,命令行什么的和linux有一定的差异,刚开始还真有点不习惯啊。
比如tinc,我用来翻墙上google的工具,在苹果上一直没跑起来,开始是找不到隧道设备,安装了TunTap之后(tuntaposx.sourceforge.net),tincd-up运行不成功,提示需要指定个网关,指定之后连ping本地的vpn地址都不通,看到这篇帖子后(http://www.tinc-vpn.org/pipermail/tinc/2012-April/002944.html)果断加上
Device = /dev/tap0,谢天谢地。
from http://blog.csdn.net/jollyjumper/article/details/23613657
-------
忍无可忍之下我决定长期翻墙。翻墙有很多种办法,但是真正适合手机使用的并不多。因为GFW的升级,对于协议特征的分析更强了,pptp以及openvpn都已经受到严重干扰。这里简要说下如何使用tinc建立VPN,并且让路由器的wlan接口支持连接到其上的设备,相当于直连了vpn服务器。
网络拓扑如下:
1.使用到的网络设备
Router: 刷了OpenWrt
PandoraBox 12.09.1系统的极1S,当然这个使用任何一款路由器都可以,因为路由器经常被搞坏,所以我没有把VPN
client放在路由器上。如果没有单独的机器作为客户端接入,openwrt也可以直接安装tinc程序作为VPN
client。VPN client: 一台安装了FreeBSD 10.0 X64的电脑(同时兼具DNS缓存服务器)。
VPN
Server: 一个安装了Ubuntu 12.4 x86的vps。
2.安装必要的程序
VPN
Server:
apt-get install tinc
VPN
Client:
cd/usr/ports/security/tinc; make install
3.tinc配置
tinc是个类似于openvpn的程序,可以建立三层或者二层隧道,这里使用默认配置,也就是三层隧道。
VPN Server:
配置文件目录结构:
/etc/tinc|-- nets.boot#包含需要启动的tinc实例名字,一行一个实例名字 `-- vpn1#tinc 实例目录 |-- hosts | |-- host1 #VPN Client主机配置文件(包含Client公钥,从Client拷贝) | `-- server #VPN Server主机配置文件 |-- rsa_key.priv #该tinc实例使用的rsa私钥 |-- tinc-up #tinc启动时 `-- tinc.conf #该实例的配置
a) 新建各级目录,vpn1目录下添加tinc.conf文件
# cat tinc.confName = server#主机配置文件名字 Device = /dev/tun#tun设备,如果是3.x内核,则是/dev/net/tun TCPonly = no#隧道默认使用UDP ReplayWindow = 0#因为丢包的缘故,重放检测会导致更严重的丢包
b) 在hosts目录下添加server文件,该文件名对应tinc配置中的Name
# cat hosts/server
Address = 1.2.3.4#本机公网地址
Port = 6550#使用的端口号,默认为655
Subnet = 0.0.0.0/0#使得tinc接受任意源地址的包 c) 新建rsa密钥对
# tincd -n vpn1 -K#一路回车吧,骚年! d) 添加tinc-up文件,添加完记得运行chmod +x tinc-up来添加执行权限
# cat tinc-up#!/bin/shifconfig $INTERFACE 192.168.40.1 netmask 255.255.255.0#tun接口地址 route add -host 192.168.30.254 dev $INTERFACE#到tun对端的路由 route add -net192.168.30.0 netmask 255.255.255.0 gw 192.168.30.254 dev $INTERFACE #到对端地址段的路由(如果有该地址段的话) route add -net192.168.3.0 netmask 255.255.255.0 gw 192.168.30.254 dev $INTERFACE #到连接到wifi的设备地址的路由 e) 到这里VPN Server的VPN还缺少客户端的主机公钥配置文件(hosts/host1),需要待VPN Client生成密钥对后从Client拷贝该文件到hosts目录下
VPN Client:
目录结构:# tree /usr/local/etc/tinc/vpn1/usr/local/etc/tinc/vpn1|-- hosts||-- host1 |`-- server #从VPN Server拷贝(包含Server的公钥) |-- rsa_key.priv|-- tinc-down|-- tinc-up`-- tinc.conf这里配置文件与Server类似,不再赘述
# cat tinc.confName = host1ConnectTo = server#连接到server主机配置中指定的主机 Device = /dev/tun0TCPonly = no所有文件编辑完成后生成密钥对,最后将hosts/host1文件上传到VPN Server的hosts目录中ReplayWindow = 0# cat hosts/host1Address = 192.168.2.202Subnet = 192.168.30.0/24Subnet = 192.168.3.0/24# cat tinc-up#!/bin/shifconfig $INTERFACE 192.168.30.254 netmask 255.255.255.0route add -host 192.168.40.1/32 192.168.30.254route add -host 8.8.4.4/32 192.168.30.254route add -host 8.8.8.8/32 192.168.30.254route add -net 192.168.40.0/24192.168.40.1 # cat tinc-down#!/bin/shifconfig $INTERFACE downifconfig $INTERFACE destroy &
# tincd -n vpn1 -K
4.路由及NAT配置
VPN Server:
NAT:
VPN Client:# cat /etc/rc.local#!/bin/sh -eecho 1 > /proc/sys/net/ipv4/ip_forwardiptables -t nat -A POSTROUTING -s 192.168.3.0/24 -j SNAT --to-source 1.2.3.4iptables -t nat -A POSTROUTING -s 192.168.30.0/24 -j SNAT --to-source 1.2.3.4exit 0打开接口间转发以及使用iptables作NAT,这里用了SNAT,用MASQUERADE效果是一样的。同样也可以把iptables的配置加入到/etc/network/if-up.d/tinc或者tinc-up中,对于修改不是太多的情况,我个人更喜欢最直接的配置方法。
添加以下内容至rc.local
pf_enable="YES"tincd_enable="YES"tincd_cfg="vpn1"使用pf做源地址路由,pf配置如下
# cat /etc/pf.confext_if = "tun0"pass quick from 192.168.3.1 to 192.168.3.0/24 no state
pass quick from 192.168.3.0/24 to 192.168.3.1 no statepass in quick route-to $ext_if from 192.168.3.0/24 to any no state因为要在VPN Client上做DNS缓存,所以目标地址为.3.1的包直接按照内核路由表进行路由。pf的配置同样可以用tinc-up来执行
# echo “pf confs" |pfctl -f-
5. DNS缓存
VPN Client:
# unbound-control-setup#自动配置
关闭自动添加DNS地址
6.无线路由器配置# cat /etc/resolvconf.conf# Generated by local-unbound-setupresolv_conf="/dev/null" # prevent updating /etc/resolv.conf#unbound_conf="/var/unbound/forward.conf"unbound_pid="/var/run/local_unbound.pid"unbound_service="local_unbound"unbound_restart="service local_unbound reload"编辑forward.conf# cat /etc/unbound/forward.confforward-zone:name: "." forward-addr: 8.8.4.4 forward-addr: 8.8.8.8
有线接口:
DHCP配置:
7.启动服务
VPN Server:
service tinc startiptables规则手动输入
VPN Client:
service local_unbound startservice tincd startservice pf start
几点说明:
1. 源地址路由并非是必须的,默认网关设置为tun接口也可以达到相同的目的,这里因为VPN Client还有其他服务要提供,所以不能修改默认路由。
from http://blog.sina.com.cn/s/blog_a0aacb430102uyr7.html
----------------------------------------------
https://www.tinc-vpn.org/examples/osx-install/
https://news.ycombinator.com/item?id=16325394
--------------
https://wiki.archlinux.org/index.php/Tinc
https://github.com/gsliepen/tinc
---------
https://zhiwei.li/text/2015/06/29/tinc-vpn/, 没看懂
----------
https://medium.com/@HowardZhCn/%E7%BF%BB%E5%A2%99%E6%8F%90%E9%80%9F%E7%9A%84%E4%B8%80%E4%B8%AA%E5%8A%9E%E6%B3%95-%E4%BD%BF%E7%94%A8-tinc-vpn-94ccf5bfb5bf ,翻墙提速的一个办法,使用 Tinc VPN
https://www.tinc-vpn.org/examples/osx-install/
https://news.ycombinator.com/item?id=16325394
--------------
https://wiki.archlinux.org/index.php/Tinc
https://github.com/gsliepen/tinc
---------
https://zhiwei.li/text/2015/06/29/tinc-vpn/, 没看懂
----------
https://medium.com/@HowardZhCn/%E7%BF%BB%E5%A2%99%E6%8F%90%E9%80%9F%E7%9A%84%E4%B8%80%E4%B8%AA%E5%8A%9E%E6%B3%95-%E4%BD%BF%E7%94%A8-tinc-vpn-94ccf5bfb5bf ,翻墙提速的一个办法,使用 Tinc VPN


No comments:
Post a Comment