TL-WR703N
蓝色魅力
这款150M迷你型3G无线路由器TL-WR703N,可以轻松将3G网络转为Wi-Fi信号,使没有3G功能的iPad、笔记本电脑以及一部分保有GSM手机号码但正在使用智能手机的用户得以通过Wi-Fi共享3G网络。只需将3G上网卡插上TL-WR703N的USB接口,Wi-Fi上网就可以变得轻松、自如。

面积同样仅信用卡的一半
TL-WR703N同样采用高精度的模具工艺和一流的表面抛光处理水准,表面光滑如镜。采用蓝色做为主题,色彩清透典雅,工艺精致,视觉精彩,大方时尚。它的体积为57×57×18mm,面积同样仅信用卡的一半,携带轻便,使用轻巧。
TL-WR703N支持中国电信(CDMA2000)、中国联通(WCDMA)、中国移动(TD-SCDMA)三种制式,兼容市面上各式主流的3G上网卡,兼容性强,无线信号稳定。
同样TL-WR703N采用11N技术,无线传输速率最高可达150Mbps,也支持IP带宽控制、WDS无线桥接、ARP攻击防护等丰富实用功能。
应用灵活
在旅途中,只有一个3G上网卡,而笔记本、Wi-Fi手机、iPod touch、iPad都想上网怎么办?

应用图示一
将随身携带的3G上网卡插在TL-WR703N上,通过笔记本电脑的USB接口为TL-WR703N供电,这个问题就可以轻松解决,TL-WR703N将3G信号转化为Wi-Fi无线信号,Wi-Fi手机、iPad、iPod touch、包括笔记本本身等所有支持WiFi无线上网的设备,均可在旅途中随时随地无线上网。
只有一个有线网口,笔记本、Wi-Fi手机、iPod touch、iPad都想上网怎么办?

应用图示二
在已经提供有线网络的酒店,可以把TL-WR703N当作一台普通无线路由器使用,只需网线插到TL-WR703N的以太网口,再通过随机附带的电源适配器向TL-WR703N供电,整个房间就已可以轻松实现Wi-Fi覆盖。智能手机、平板电脑等支持Wi-Fi无线上网的设备,就可以在房间内任何地方无线上网。
现在TL-WR703N的售价在96-140元之间不等,请大家关注价格变化。
通过上面的介绍,希望大家可以发现自己心仪的3G无线路由器供自己或朋友选择使用.
from http://net.zol.com.cn/253/2534898.html
http://www.tp-link.cn/pages/product-detail.asp?d=225
TL-WR703N这款路由器可以刷openwrt(见http://wiki.openwrt.org/toh/start#tp-link,
http://wiki.openwrt.org/toh/tp-link/tl-wr703n)
腾达也有一款类似产品-http://www.tenda.com.cn/tendacn/Product/show.aspx?productid=217,
/!\ Before starting, you need to download the latest version of OpenWRT for the TP-Link router here : http://downloads.openwrt.org/snapshots/trunk/ar71xx/openwrt-ar71xx-generic-tl-wr703n-v1-squashfs-factory.bin /!\

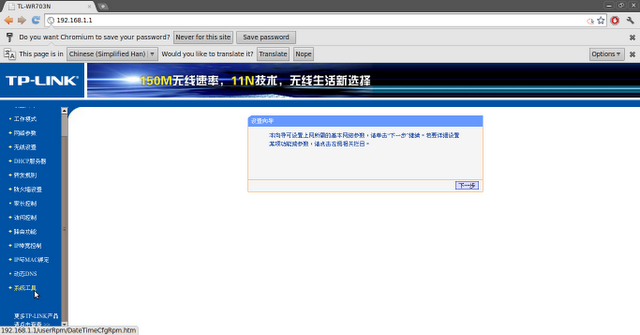
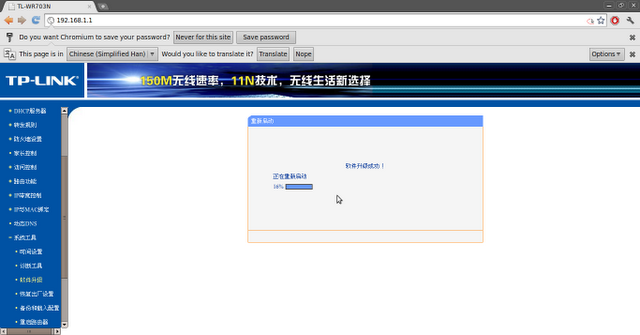
and then 软件升级 to get this screen:
Click on the upload button (TRANSLATION OF upload IN CHINESE), select the openWRT file previously downloaded (here if you missed it, but you might have to disconnect the TP-link to have an Internet access again) validate ( on the left corner TRANSLATION OF validate IN CHINESE ), and confirm on the pop-up screen.

Then wait until the router reboot.
/!\ Do not turn off the router, your computer, or disconnect any cables at this point, or you will risk to block you router (and you don't want to do that...) /!\
When the upload is done, the administration interface should be gone.

Which means that your distribution is successfully installed. You now need to secure your connection, by typing:
Now, everytime you will want to connect to your router, you will have to use a ssh connection:
Edit the file by pressing 'i'. You need to comment the line 'option disabled 1' by adding '#' in the front of the line. Then edit the existing configuration:
When it's done, press 'Esc' to quit the edit mode, and type:
You need now to reboot the device:
Et voila! Your router is connected, configured, and you can start messing with it ;)
More informations on OpenWRT :http://openwrt.org/
Credits to BitArtist.org from where most informations come from ;) http://www.bitartist.org/2012/02/motion-tracking-on-wireless-router.html
from http://wiki.xinchejian.com/wiki/Install_OpenWRT_on_TPlink_WR703N
----------------------------------------------------------------------------------------
It is marketed as a travel router so it is extremely compact, and for ~$20-25 shipped to most places it represents great value for hacking and learning.
A bunch of us at the Sydney hackerspace have purchased “non insignificant” quantities of these routers for all sorts of fun. I have committed to providing limited support in providing pre-built OpenWRT images suitable for hacking and writing up some instructions and short HOWTOs.
蓝色魅力

这款150M迷你型3G无线路由器TL-WR703N,可以轻松将3G网络转为Wi-Fi信号,使没有3G功能的iPad、笔记本电脑以及一部分保有GSM手机号码但正在使用智能手机的用户得以通过Wi-Fi共享3G网络。只需将3G上网卡插上TL-WR703N的USB接口,Wi-Fi上网就可以变得轻松、自如。
面积同样仅信用卡的一半
TL-WR703N支持中国电信(CDMA2000)、中国联通(WCDMA)、中国移动(TD-SCDMA)三种制式,兼容市面上各式主流的3G上网卡,兼容性强,无线信号稳定。
同样TL-WR703N采用11N技术,无线传输速率最高可达150Mbps,也支持IP带宽控制、WDS无线桥接、ARP攻击防护等丰富实用功能。
应用灵活
在旅途中,只有一个3G上网卡,而笔记本、Wi-Fi手机、iPod touch、iPad都想上网怎么办?
应用图示一
只有一个有线网口,笔记本、Wi-Fi手机、iPod touch、iPad都想上网怎么办?
应用图示二
现在TL-WR703N的售价在96-140元之间不等,请大家关注价格变化。
通过上面的介绍,希望大家可以发现自己心仪的3G无线路由器供自己或朋友选择使用.
from http://net.zol.com.cn/253/2534898.html
http://www.tp-link.cn/pages/product-detail.asp?d=225
TL-WR703N这款路由器可以刷openwrt(见http://wiki.openwrt.org/toh/start#tp-link,
http://wiki.openwrt.org/toh/tp-link/tl-wr703n)
腾达也有一款类似产品-http://www.tenda.com.cn/tendacn/Product/show.aspx?productid=217,
A6
150M mini型无线路由器
---------------------------------------------------------Install OpenWRT on TPlink WR703N router
Contents[hide] |
Install OpenWRT on a TP-Link WR703N
This tutorial aim to install and run the Open WRT distribution on a TP-Link TL-WR703N.Open WRT
Open WRT is a light distribution aim to be install on modem and wifi routers. This distribution is free and open-source, and have a strong community of hackers, developers using it. You can find more information here : Open WRT wikiTP-Link WR703N
The TP-Link router is a small wifi hotspot, with a USB port that make highly customizable. Moreover, this unit cost less than 100RMB on your favorite online shop!- Specifications :
- Atheros AR7240 CPU (400Mhz)
- Atheros AR9331 Chipset (integrated wireless)
- 802.11 b/g/n 150Mbps (130Mbps real)
- wireless power output 20dBm - 100mW
- 4 MB flash memory
- 32 MB RAM
- Tiny form factor: 5.7cm x 5.7cm
- 1x LAN port
- 1x USB 2.0 port
- 1x mini USB port, for power
- 1x LED (customisable once OpenWRT is installed)
How-to install Open WRT ?
This guide is intented to be for total beginner, with all the code to write./!\ Before starting, you need to download the latest version of OpenWRT for the TP-Link router here : http://downloads.openwrt.org/snapshots/trunk/ar71xx/openwrt-ar71xx-generic-tl-wr703n-v1-squashfs-factory.bin /!\
Linux
Our Linux version is Ubuntu 12.04 LTS, up-to-date, with Firefox 13.0.1Plug it! And install
You first need to plug the router on your computer, using an ethernet cable, and the mini-usb cable provided in the router's box. Open your favorite internet browser and connect to http://192.168.1.1/. A pop-up appears and you have to enter the login:admin and password:admin. You will arrived on the administration interface. But horror! It's all in Chinese! If like 1/4 of the mondial population you don't read this beautifull language, don't run to your closest Chinesse class, but look on the left for this button (Even if having a chinese class still is a good idea):
and then 软件升级 to get this screen:

Click on the upload button (TRANSLATION OF upload IN CHINESE), select the openWRT file previously downloaded (here if you missed it, but you might have to disconnect the TP-link to have an Internet access again) validate ( on the left corner TRANSLATION OF validate IN CHINESE ), and confirm on the pop-up screen.

Then wait until the router reboot.
/!\ Do not turn off the router, your computer, or disconnect any cables at this point, or you will risk to block you router (and you don't want to do that...) /!\
When the upload is done, the administration interface should be gone.
Configure OpenWRT
To configure the distribution, you need to open Terminal, and type:telnet 192.168.1.1You should get this screen :

Which means that your distribution is successfully installed. You now need to secure your connection, by typing:
passwdAnd follows the instructions to set your password.
Now, everytime you will want to connect to your router, you will have to use a ssh connection:
ssh root@192.168.1.1The next thing you will want to be is probably to connect your freshly hacked router to your wifi network, to be able to update it and have an wireless access to it ;)
Configure Wifi
The material configuration file are in /etc/config, so you need to edit it first.vi /etc/config/networkthen edit the file by pressing 'i', and adding the following lines:
 config interface 'wan'
        option ifname 'wlan0'
        option proto 'dhcp'
To save, press 'esc' to be sure to be out of the edit mode, and then type:
:wqNow we need to edit the configuration file to connect to your network:
vi /etc/config/wirelessYou should have this screen: [SCREENSHOT]
Edit the file by pressing 'i'. You need to comment the line 'option disabled 1' by adding '#' in the front of the line. Then edit the existing configuration:
 config wifi-iface
              option device radio0
              option network wan
              option mode sta
              option ssid '''Your network name here'''
              option encryption psk
              option key '''Your network password here'''
You need to change the ssid and the key according to your own
network. The encryption here correspond to WPA, please refer to OpenWRT
wiki for other configuration: http://wiki.openwrt.org/doc/uci/wireless
When it's done, press 'Esc' to quit the edit mode, and type:
:wqto save the modifications and quit the file.
You need now to reboot the device:
rebootAfter the reboot, your router should be connected to your wireless network. If not, check the configuration files again ;)
GUI Luci
Now that we have a wireless connection, most of the users will want to have something more... simple and intuitive to use the network functions or the router. Use ssh to connect to the router:ssh root@192.168.1.1then update the packages, and install Luci without HTTPS support
opkg update
opkg install luciand then enable and start uHTTPd (it will restart too at every reboot):
/etc/init.d/uhttpd enable
/etc/init.d/uhttpd start
After that, you should be able to connect to your router with your web browser on this address : http://192.168.1.1 The password is the one you set at the beginning, same one you use for the ssh connection!
Et voila! Your router is connected, configured, and you can start messing with it ;)
WAIT! BEFORE YOU MESS WITH IT
install this package:opkg install restorefactoryit'll save you a lot of pain!
Troubleshooting
It can happen, that for an unknown reason, the router turn to a failsafe mode (Mostly when you fully fill the memory...). This mode is recognizable by the blinking LED (same speed that when it's supposed to boot). In this mode, the router is no more accessible by ssh. Don't panic, we have the solution:Connect through Failsafe mode
Configure your computer on IP 192.168.1.2, with netmask 255.255.255.0 (no gateway), connect your router by ethernet, and plug the usb power. When the LED start blinking ( after around 10 seconds ) press the reset button. The LED will blink fast, and you can connect to your router with the command:telnet 192.168.1.1Then enter to the JSSF2 read-write mode:
mount_root
- You can then restore the router to factory settings, with the following commands (I don't know which one exactly, try them'all!):
firstbootor
mtd -r erase rootfs_dataor
rm -r /overlay/*Done! You can now exit the failsafe mode, and reboot the router:
reboot -fYour router should be accessible again, via ssh or telnet, and you can start back to #Configure OpenWRT! :D Good Luck!
More informations
More informations on Luci : http://wiki.openwrt.org/doc/howto/luci.essentialsMore informations on OpenWRT :http://openwrt.org/
Credits to BitArtist.org from where most informations come from ;) http://www.bitartist.org/2012/02/motion-tracking-on-wireless-router.html
from http://wiki.xinchejian.com/wiki/Install_OpenWRT_on_TPlink_WR703N
----------------------------------------------------------------------------------------
TP-Link TL-WR703N
Introduction
The TP-Link TL-WR703N is a low cost, commercially available wireless router that supports OpenWRT and thus is extremely ‘hackable’.It is marketed as a travel router so it is extremely compact, and for ~$20-25 shipped to most places it represents great value for hacking and learning.
A bunch of us at the Sydney hackerspace have purchased “non insignificant” quantities of these routers for all sorts of fun. I have committed to providing limited support in providing pre-built OpenWRT images suitable for hacking and writing up some instructions and short HOWTOs.
Specifications
(From OpenWRT Wiki)- Atheros AR7240 CPU (400Mhz)
- Atheros AR9331 Chipset (integrated wireless)
- 802.11 b/g/n 150Mbps (130Mbps real)
- wireless power output 20dBm – 100mW
- 4 MB flash memory
- 32 MB RAM
- USB 2.0 port
- Powered via micro-USB socket
- Tiny form factor: 5.7cm x 5.7cm
Firmware Images
Three (3) standard pre-built images are available-
Standard (Download 2012-06-25 / Download 2012-10-04 )
- This is the standard ‘hacker’ image with a suite of goodies built in
- Luci – for easy configuration and setting
- USB Video support
- mjpg-streamer for webcam streaming
- USB Serial support
- belkin, ch431, cp210x, ftdi, option, pl2303, ti-usb
- ser2net for easy serial to Ethernet conversion
- stty for configuring serial
- Lua for simple scripting
- lualibusb
- luasocket
- USB ACM Support for 3G modems and other devices (New in 2012-10-04 : usb_modeswitch)
- USB Storage and network filesystems
- ext4, nfs, ntfs, vfat
- block-mount for mounting extroot pivot overlays (i.e. adding USB storage for installing programs)
- This is the standard ‘hacker’ image with a suite of goodies built in
-
USBIP (Download 2012-10-04)
- Default installation + Luci + USBIP Server + A few Luci apps like ntpc and upnp
- Untested and not recommended for beginners! [OK tested a little bit... works with Up! Printer and a Microsoft webcam]
- WARNING: The kernel modules from the repositories will not work for this image.
-
Base (Download 2012-06-25 / Download 2012-10-04 )
- Default installation + Luci
- Basic install allows you to login and customize your router
- Significantly more (>1MB) available space compared to the Standard version
- Untested and not recommended for beginners!
- WARNING: The kernel modules from the repositories will not work for these images. If you’re after a really basic custom image, try look on the openwrt ones.
Installation & Setup
There are differences from a factory installation and a upgrade from an existing OpenWRT install. Follow the appropriate instructions below.Factory Install
Due to the router being targeted for sale within China only, the web interface will be in Chinese. Follow the instructions and use the status bar of the browser (showing URL of the links) to guide you.- Power on the router via USB cable
- Connect wired Ethernet connection to PC
- Access http://192.168.1.1/ using your browser
- Login to access the web interface, the default user:password is admin:admin
- On the left navigation bar – select “系统工具” (System Tools)
- Then select “软件升级” (Software Upgrade)
- In the main frame – select “浏览…” (Browse…)
- Browse and select the “openwrt-ar71xx-generic-tl-wr703n-v1-squashfs-factory.bin” file from one of the pre-built image packages.
- Then click “升 级”. (Upgrade)
- Press “OK” on the confirmation.
- Wait for the software to load (patiently).
- The router should reboot into OpenWRT, press login without a password entered.
- Go to password configuration and set up a password if required.


OpenWRT Upgrade
Upgrading from OpenWRT should be simple- Power on the router via USB cable
- Connect wired Ethernet connection to PC
- Access http://192.168.1.1/ using your browser
- Login to access the web interface (Luci)
- Select the “System” tab at the top
- Then select “Backup / Flash Firmware”
- Check or Uncheck “Keep Settings” as you desire
- Click “Choose File” and select the “openwrt-ar71xx-generic-tl-wr703n-v1-squashfs-sysupgrade.bin” file from one of the pre-built image packages.
- Follow the prompts…missing the last step here…

Madox/John will add a separate sub-page for recovery/unbricking, because those are for naughty boys and girls…
Add-ons and Accessories
- http://www.thingiverse.com/thing:25257 - Generic 3D printed replacement case for the router.
- http://ww.kean.com.au/oshw/WR703N/ -Kean’s IO expander board for the router. Featuring USB Hub & FTDI dual serial/GPIO/JTAG.
- http://www.thingiverse.com/thing:25389 - 3D printed case for the router + Kean’s Expander board.
Project Ideas, Examples & Guides
To be updated- Wireless Webcam
- http://www.youtube.com/watch?v=si4hVqvS-vw
- https://sydney-hackspace.googlegroups.com/attach/d091593f7264f22f/IMAG0085.jpg?view=1&part=4
- Madox/John will be writing a guide for this
- Helicopter controller replacement
- Wireless/Internet connectivity for your projects
- http://www.thebmwz3.co.uk/article.php?story=20120611144749730
- Madox/John will be writing a guide for this
- Light Painting for Long Exposure Photography
- WiFi Remote Contro Toy
-
from http://www.madox.net/blog/projects/tp-link-tl-wr703n/