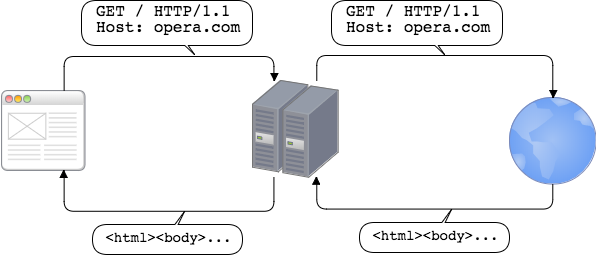
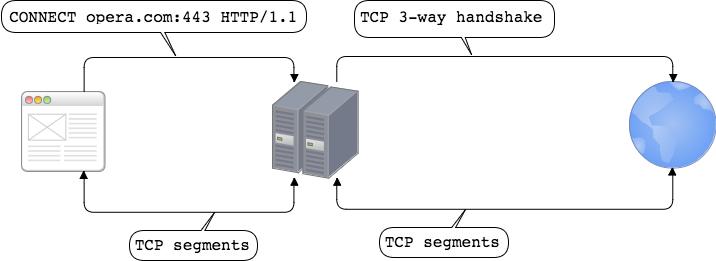
The goal is to implement a proxy server for HTTP and HTTPS. Handling of HTTP is a matter of parsing request, passing such request to destination server, reading response and passing it back to the client. All we need for that is built-in HTTP server and client (net/http). HTTPS is different as it’ll use technique called HTTP CONNECT tunneling. First client sends request using HTTP CONNECT method to set up the tunnel between the client and destination server. When such tunnel consisting of two TCP connections is ready, client starts regular TLS handshake with destination server to establish secure connection and later send requests and receive responses.
Certificates
Our proxy will be an HTTPS server (when
—-proto https
will be used) so we need certificate and private key. For the purpose
of this post let’s use self-signed certificate. To generate one use such
script:#!/usr/bin/env bash
case `uname -s` in
    Linux*)     sslConfig=/etc/ssl/openssl.cnf;;
    Darwin*)    sslConfig=/System/Library/OpenSSL/openssl.cnf;;
esac
openssl req \
    -newkey rsa:2048 \
    -x509 \
    -nodes \
    -keyout server.key \
    -new \
    -out server.pem \
    -subj /CN=localhost \
    -reqexts SAN \
    -extensions SAN \
    -config <(cat $sslConfig \
        <(printf '[SAN]\nsubjectAltName=DNS:localhost')) \
    -sha256 \
    -days 3650
It’s required to convince your OS to trust such certificate. In OS X it can be done with Keychain Access — https://tosbourn.com/getting-os-x-to-trust-self-signed-ssl-certificates/.
HTTP
To support HTTP we’ll use built-in HTTP server and client. The role of proxy is to handle HTTP request, pass such request to destination server and send response back to the client.
HTTP CONNECT tunneling
Suppose
client wants to use either HTTPS or WebSockets in order to talk to
server. Client is aware of using proxy. Simple HTTP request / response
flow cannot be used since client needs to e.g. establish secure
connection with server (HTTPS) or wants to use other protocol over TCP
connection (WebSockets). Technique which works is to use HTTP CONNECT
method. It tells the proxy server to establish TCP connection with
destination server and when done to proxy the TCP stream to and from the
client. This way proxy server won’t terminate SSL but will simply pass
data between client and destination server so these two parties can
establish secure connection.
Implementation:
package main
import (
    "crypto/tls"
    "flag"
    "io"
    "log"
    "net"
    "net/http"
    "time"
)
func handleTunneling(w http.ResponseWriter, r *http.Request) {
    dest_conn, err := net.DialTimeout("tcp", r.Host, 10*time.Second)
    if err != nil {
        http.Error(w, err.Error(), http.StatusServiceUnavailable)
        return
    }
    w.WriteHeader(http.StatusOK)
    hijacker, ok := w.(http.Hijacker)
    if !ok {
        http.Error(w, "Hijacking not supported", http.StatusInternalServerError)
        return
    }
    client_conn, _, err := hijacker.Hijack()
    if err != nil {
        http.Error(w, err.Error(), http.StatusServiceUnavailable)
    }
    go transfer(dest_conn, client_conn)
    go transfer(client_conn, dest_conn)
}
func transfer(destination io.WriteCloser, source io.ReadCloser) {
    defer destination.Close()
    defer source.Close()
    io.Copy(destination, source)
}
func handleHTTP(w http.ResponseWriter, req *http.Request) {
    resp, err := http.DefaultTransport.RoundTrip(req)
    if err != nil {
        http.Error(w, err.Error(), http.StatusServiceUnavailable)
        return
    }
    defer resp.Body.Close()
    copyHeader(w.Header(), resp.Header)
    w.WriteHeader(resp.StatusCode)
    io.Copy(w, resp.Body)
}
func copyHeader(dst, src http.Header) {
    for k, vv := range src {
        for _, v := range vv {
            dst.Add(k, v)
        }
    }
}
func main() {
    var pemPath string
    flag.StringVar(&pemPath, "pem", "server.pem", "path to pem file")
    var keyPath string
    flag.StringVar(&keyPath, "key", "server.key", "path to key file")
    var proto string
    flag.StringVar(&proto, "proto", "https", "Proxy protocol (http or https)")
    flag.Parse()
    if proto != "http" && proto != "https" {
        log.Fatal("Protocol must be either http or https")
    }
    server := &http.Server{
        Addr: ":2288",
        Handler: http.HandlerFunc(func(w http.ResponseWriter, r *http.Request) {
            if r.Method == http.MethodConnect {
                handleTunneling(w, r)
            } else {
                handleHTTP(w, r)
            }
        }),
        // Disable HTTP/2.
        TLSNextProto: make(map[string]func(*http.Server, *tls.Conn, http.Handler)),
    }
    if proto == "http" {
        log.Fatal(server.ListenAndServe())
    } else {
        log.Fatal(server.ListenAndServeTLS(pemPath, keyPath))
    }
}
The above Presented code is not a production-grade solution. It lacks e.g. handling hop-by-hop headers, setting up timeouts while copying data between two connections or the ones exposed by net/http — more on this in “The complete guide to Go net/http timeouts”.
Our
server while getting request will take one of two paths: handling HTTP
or handling HTTP CONNECT tunneling. This is done with:
http.HandlerFunc(func(w http.ResponseWriter, r *http.Request) {
    if r.Method == http.MethodConnect {
        handleTunneling(w, r)
    } else {
        handleHTTP(w, r)
    }
})
Function to handle HTTP — handleHTTP is self-explanatory so let’s focus on handling tunneling. The first part of handleTunneling is about setting connection to destination server:
dest_conn, err := net.DialTimeout("tcp", r.Host, 10*time.Second)
if err != nil {
    http.Error(w, err.Error(), http.StatusServiceUnavailable)
    return
 }
 w.WriteHeader(http.StatusOK)
Next we’ve a part to hijack connection maintained by HTTP server:
hijacker, ok := w.(http.Hijacker)
    if !ok {
        http.Error(w, "Hijacking not supported", http.StatusInternalServerError)
        return
    }
    client_conn, _, err := hijacker.Hijack()
    if err != nil {
        http.Error(w, err.Error(), http.StatusServiceUnavailable)
    }
Hijacker interface allows to take over the connection. After that the caller is responsible to manage such connection (HTTP library won’t do it anymore).
Once we’ve two TCP connections (client→proxy, proxy→destination server) we need to set tunnel up:
go transfer(dest_conn, client_conn)
go transfer(client_conn, dest_conn)
In two goroutines data is copied in two directions: from the client to the destination server and backward.
Testing
To test our proxy you can use e.g. Chrome in windows:
chrome.exe --proxy-server=https://vps-ip:2288
from https://medium.com/@mlowicki/http-s-proxy-in-golang-in-less-than-100-lines-of-code-6a51c2f2c38c
-----------
我的补充说明
测试可行。登陆linux vps.先安装go环境。然后,
openssl req -x509 -nodes -days 3650 -newkey rsa:2048 -keyout server.key -out server.pem
会在当前目录/root下面生成server.key和server.pem文件。
然后新建文件https-proxy.go ,把上面的橘红色代码复制粘贴到https-proxy.go文件中,里面我已把端口改为了2288,
把"path to pem file"和 "path to key file"分别改为 "/root/server.pem"和 "/root/server.key"
然后运行:go build https-proxy.go
此命令会在当前目录下生成可执行文件https-proxy,
./https-proxy &
不过命令:./https-proxy &容易退出运行,我们可利用systemd把该命令运行为service:
nano /etc/systemd/system/https-proxy-in-go.service
内容为:
[Unit]After=network.target[Service]WorkingDirectory=/root/ExecStart=/root/https-proxyRestart=always[Install]WantedBy=multi-user.target然后运行:
systemctl start https-proxy-in-gosystemctl enable https-proxy-in-go服务器端搭建完成。在本地机器mac上。运行命令:open "/applications/vivaldi.app/" --args --proxy-server=https://vps-ip:2288 --ignore-certificate-errors就会启动基于chrome内核的浏览器vivaldi,然后在浏览器vivaldi里面,即可翻墙。你可把命令:open "/applications/vivaldi.app/" --args --proxy-server=https://vps-ip:2288 --ignore-certificate-errors保存为start.sh ,然后chmod 755 start.sh ,以后运行./start.sh ,即可启动浏览器vivaldi,进行翻墙。
更新:
现在由于letsencrypt.org提供了免费证书,所以可以把“绑定的域名:2288"作为代理服务器的地址。具体操作如下:
在linux vps上。
按此文https://briteming.blogspot.com/2018/10/acmeshletsencryptssl.html ,生成你所绑定的域名
的证书文件和私匙文件,然后复制该证书文件和私匙文件到/root/目录,并分别重命名为server.pem和server.key,
(当然要先删除以前用openssl命令生成的server.key和server.pem文件)
在本地机器mac上。安装chrome的switchyomega插件。在switchyomega里面,新建情景模式,代理协议选择https,
'代理服务器'地址栏填写你的域名,代理端口填写2288,点击“应用选项”。选择该情景模式,即可在chrome里面翻墙。
---------------
Go和HTTPS
对HTTPS、数字证书等的基本原理并未求甚解。于是想趁这次的机会,对HTTPS做一些深度挖掘。主要途 径:翻阅网上资料、书籍,并利用golang编写一些实验examples。一、HTTPS简介日常生活中,我们上网用的最多的应用层协议就是HTTP协议了,直至目前全世界的网站中大多数依然只支持HTTP访问。使用Go创建一个HTTP Server十分Easy,十几行代码就能搞定://gohttps/1-http/server.go package mainimport ( "fmt" "net/http" )func handler(w http.ResponseWriter, r *http.Request) { fmt.Fprintf(w, "Hi, This is an example of http service in golang!") }func main() { http.HandleFunc("/", handler) http.ListenAndServe(":8080", nil) }执行这段代码: $ go run server.go打开浏览器,在地址栏输入"http://localhost:8080", 你会看到“ Hi, This is an example of http service in golang!"输出到浏览器窗口。不过HTTP毕竟是明文的,在这样一个不安全的世界里,随时存在着窃听(sniffer工具可以简单办到)、篡改甚至是冒充等风险,因此对于一些 对安全比较care的站点或服务,它们需要一种安全的HTTP协议,于是就有了HTTPS。HTTPS只是我们在浏览器地址栏中看到协议标识,实际上它可以被理解为运行在SSL(Secure Sockets Layer)或TLS(Transport Layer Security)协议所构建的安全层之上的HTTP协议,协议的传输安全性以及内容完整性实际上是由SSL或TLS保证的。关于HTTPS协议原理的详细说明,没有个百八十页是搞不定的,后续我会在各个实验之前将相关的原理先作一些说明,整体原理这里就不赘述了。有兴 趣的朋友可以参考以下资料: 1、《HTTP权威指南》第十四章 2、《图解HTTP》第七章 3、阮一峰老师的两篇博文“SSL/TLS协议运行机制的概述"和"图解SSL/TLS协议"。二、实现一个最简单的HTTPS Web ServerGolang的标准库net/http提供了https server的基本实现,我们修改两行代码就能将上面的HTTP Server改为一个HTTPS Web Server:// gohttps/2-https/server.go package mainimport ( "fmt" "net/http" )func handler(w http.ResponseWriter, r *http.Request) { fmt.Fprintf(w, "Hi, This is an example of https service in golang!") }func main() { http.HandleFunc("/", handler) http.ListenAndServeTLS(":8081", "server.crt", "server.key", nil) }我们用http.ListenAndServeTLS替换掉了http.ListenAndServe,就将一个HTTP Server转换为HTTPS Web Server了。不过ListenAndServeTLS 新增了两个参数certFile和keyFile,需要我们传入两个文件路径。到这里,我们不得不再学习一点HTTPS协议的原理了。不过为 了让这个例子能先Run起来,我们先执行下面命令,利用openssl生成server.crt和server.key文件,供程序使用,原 理后续详述:$openssl genrsa -out server.key 2048Generating RSA private key, 2048 bit long modulus …………….+++ ……………+++ e is 65537 (0×10001)$openssl req -new -x509 -key server.key -out server.crt -days 365You are about to be asked to enter information that will be incorporated into your certificate request. What you are about to enter is what is called a Distinguished Name or a DN. There are quite a few fields but you can leave some blank For some fields there will be a default value, If you enter '.', the field will be left blank. —– Country Name (2 letter code) [AU]: State or Province Name (full name) [Some-State]: Locality Name (eg, city) []: Organization Name (eg, company) [Internet Widgits Pty Ltd]: Organizational Unit Name (eg, section) []: Common Name (e.g. server FQDN or YOUR name) []:localhost Email Address []:执行程序:go run server.go 通过浏览器访问:https://localhost:8081,chrome浏览器会显示如下画面:忽略继续后,才能看到"Hi, This is an example of https service in golang!"这个结果输出在窗口上。也可以使用curl工具验证这个HTTPS server:curl -k https://localhost:8081 Hi, This is an example of http service in golang!注意如果不加-k,curl会报如下错误:$curl https://localhost:8081 curl: (60) SSL certificate problem: Invalid certificate chain More details here: http://curl.haxx.se/docs/sslcerts.htmlcurl performs SSL certificate verification by default, using a "bundle" of Certificate Authority (CA) public keys (CA certs). If the default bundle file isn't adequate, you can specify an alternate file using the –cacert option. If this HTTPS server uses a certificate signed by a CA represented in the bundle, the certificate verification probably failed due to a problem with the certificate (it might be expired, or the name might not match the domain name in the URL). If you'd like to turn off curl's verification of the certificate, use the -k (or –insecure) option.三、非对称加密和数字证书前面说过,HTTPS的数据传输是加密的。实际使用中,HTTPS利用的是对称与非对称加密算法结合的方式。对称加密,就是通信双方使用一个密钥,该密钥既用于数据加密(发送方),也用于数据解密(接收方)。 非对称加密,使用两个密钥。发送方使用公钥(公开密钥)对数据进行加密,数据接收方使用私钥对数据进行解密。实际操作中,单纯使用对称加密或单纯使用非对称加密都会存在一些问题,比如对称加密的密钥管理复杂;非对称加密的处理性能低、资源占用高等,因 此HTTPS结合了这两种方式。HTTPS服务端在连接建立过程(ssl shaking握手协议)中,会将自身的公钥发送给客户端。客户端拿到公钥后,与服务端协商数据传输通道的对称加密密钥-对话密钥,随后的这个协商过程则 是基于非对称加密的(因为这时客户端已经拿到了公钥,而服务端有私钥)。一旦双方协商出对话密钥,则后续的数据通讯就会一直使用基于该对话密 钥的对称加密算法了。上述过程有一个问题,那就是双方握手过程中,如何保障HTTPS服务端发送给客户端的公钥信息没有被篡改呢?实际应用中,HTTPS并非直接 传输公钥信息,而是使用携带公钥信息的数字证书来保证公钥的安全性和完整性。数字证书,又称互联网上的"身份证",用于唯一标识一个组织或一个服务器的,这就好比我们日常生活中使用的"居民身份证",用于唯一标识一个 人。服务端将数字证书传输给客户端,客户端如何校验这个证书的真伪呢?我们知道居民身份证是由国家统一制作和颁发的,个人向户 口所在地公安机关申请,国家颁发的身份证才具有法律 效力,任何地方这个身份证都是有效和可被接纳的。大悦城的会员卡也是一种身份标识,但你若用大悦城的会员卡去买机票,对不起, 不卖。航空公司可不认大悦城的会员卡,只认居民身份证。网站的证书也是同样的道理。一般来说数字证书从受信的权威证书授权机构 (Certification Authority,证书授权机构)买来的(免费的很少)。一般浏览器在出厂时就内置了诸多知名CA(如Verisign、GoDaddy、美国国防部、 CNNIC等)的数字证书校验方法,只要是这些CA机构颁发的证书,浏览器都能校验。对于CA未知的证书,浏览器则会报错(就像上面那个截图一 样)。主流浏览器都有证书管理功能,但鉴于这些功能比较高级,一般用户是不用去关心的。初步原理先讲到这,我们再回到上面的例子。四、服务端私钥与证书接上面的例子,我们来说说服务端私钥与证书的生成。go的http.ListenAndServeTLS需要两个特别参数,一个是服务端的私钥 文件路径,另外一个是服务端的数字证书文件路径。在测试环境,我们没有必要花钱去购买什么证书,利用openssl工具,我们可以自己生成相 关私钥和自签发的数字证书。openssl genrsa -out server.key 2048 用于生成服务端私钥文件server.key,后面的参数2048单位是bit,是私钥的长度。 openssl生成的私钥中包含了公钥的信息,我们可以根据私钥生成公钥:$openssl rsa -in server.key -out server.key.public我们也可以根据私钥直接生成自签发的数字证书:$openssl req -new -x509 -key server.key -out server.crt -days 365server.key和server.crt将作为ListenAndServeTLS的两个输入参数。我们编写一个Go程序来尝试与这个HTTPS server建立连接并通信。//gohttps/4-https/client1.go package mainimport ( "fmt" "io/ioutil" "net/http" )func main() { resp, err := http.Get("https://localhost:8081") if err != nil { fmt.Println("error:", err) return } defer resp.Body.Close() body, err := ioutil.ReadAll(resp.Body) fmt.Println(string(body)) }运行这个client,我们得到如下错误:$go run client1.go error: Get https://localhost:8081: x509: certificate signed by unknown authority此时服务端也给出了错误日志提示: 2015/04/30 16:03:31 http: TLS handshake error from 127.0.0.1:62004: remote error: bad certificate显然从客户端日志来看,go实现的Client端默认也是要对服务端传过来的数字证书进行校验的,但客户端提示:这个证书是由不知名CA签发 的!我们可以修改一下client1.go的代码,让client端略过对证书的校验://gohttps/4-https/client2.go package mainimport ( "crypto/tls" "fmt" "io/ioutil" "net/http" )func main() { tr := &http.Transport{ TLSClientConfig: &tls.Config{InsecureSkipVerify: true}, } client := &http.Client{Transport: tr} resp, err := client.Get("https://localhost:8081")if err != nil { fmt.Println("error:", err) return } defer resp.Body.Close() body, err := ioutil.ReadAll(resp.Body) fmt.Println(string(body)) }通过设置tls.Config的InsecureSkipVerify为true,client将不再对服务端的证书进行校验。执行后的结果 也证实了这一点: $go run client2.go Hi, This is an example of http service in golang!五、对服务端的证书进行校验多数时候,我们需要对服务端的证书进行校验,而不是像上面client2.go那样忽略这个校验。我大脑中的这个产品需要服务端和客户端双向 校验,我们先来看看如何能让client端实现对Server端证书的校验呢?client端校验证书的原理是什么呢?回想前面我们提到的浏览器内置了知名CA的相关信息,用来校验服务端发送过来的数字证书。那么浏览器 存储的到底是CA的什么信息呢?其实是CA自身的数字证书(包含CA自己的公钥)。而且为了保证CA证书的真实性,浏览器是在出厂时就内置了 这些CA证书的,而不是后期通过通信的方式获取的。CA证书就是用来校验由该CA颁发的数字证书的。那么如何使用CA证书校验Server证书的呢?这就涉及到数字证书到底是什么了!我们可以通过浏览器中的"https/ssl证书管理"来查看证书的内容,一般服务器证书都会包含诸如站点的名称和主机名、公钥、签发机构 (CA)名称和来自签发机构的签名等。我们重点关注这个来自签发机构的签名,因为对于证书的校验,就是使用客户端CA证书来验证服务端证书的签名是否这 个CA签的。通过签名验证我们可以来确认两件事: 1、服务端传来的数字证书是由某个特定CA签发的(如果是self-signed,也无妨),数字证书中的签名类似于日常生活中的签名,首先 验证这个签名签的是Tony Bai,而不是Tom Bai, Tony Blair等。 2、服务端传来的数字证书没有被中途篡改过。这类似于"Tony Bai"有无数种写法,这里验证必须是我自己的那种写法,而不是张三、李四写的"Tony Bai"。一旦签名验证通过,我们因为信任这个CA,从而信任这个服务端证书。由此也可以看出,CA机构的最大资本就是其信用度。CA在为客户签发数字证书时是这样在证书上签名的:数字证书由两部分组成: 1、C:证书相关信息(对象名称+过期时间+证书发布者+证书签名算法….) 2、S:证书的数字签名其中的数字签名是通过公式S = F(Digest(C))得到的。Digest为摘要函数,也就是 md5、sha-1或sha256等单向散列算法,用于将无限输入值转换为一个有限长度的“浓缩”输出值。比如我们常用md5值来验证下载的大文件是否完 整。大文件的内容就是一个无限输入。大文件被放在网站上用于下载时,网站会对大文件做一次md5计算,得出一个128bit的值作为大文件的 摘要一同放在网站上。用户在下载文件后,对下载后的文件再进行一次本地的md5计算,用得出的值与网站上的md5值进行比较,如果一致,则大 文件下载完好,否则下载过程大文件内容有损坏或源文件被篡改。F为签名函数。CA自己的私钥是唯一标识CA签名的,因此CA用于生成数字证书的签名函数一定要以自己的私钥作为一个输入参数。在RSA加密 系统中,发送端的解密函数就是一个以私钥作 为参数的函数,因此常常被用作签名函数使用。签名算法是与证书一并发送给接收 端的,比如apple的一个服务的证书中关于签名算法的描述是“带 RSA 加密的 SHA-256 ( 1.2.840.113549.1.1.11 )”。因此CA用私钥解密函数作为F,对C的摘要进行运算得到了客户数字证书的签名,好比大学毕业证上的校长签名,所有毕业证都是校长签发的。接收端接收服务端数字证书后,如何验证数字证书上携带的签名是这个CA的签名呢?接收端会运用下面算法对数字证书的签名进行校验: F'(S) ?= Digest(C)接收端进行两个计算,并将计算结果进行比对: 1、首先通过Digest(C),接收端计算出证书内容(除签名之外)的摘要。 2、数字证书携带的签名是CA通过CA密钥加密摘要后的结果,因此接收端通过一个解密函数F'对S进行“解密”。RSA系统中,接收端使用 CA公钥对S进行“解密”,这恰是CA用私钥对S进行“加密”的逆过程。将上述两个运算的结果进行比较,如果一致,说明签名的确属于该CA,该证书有效,否则要么证书不是该CA的,要么就是中途被人篡改了。但对于self-signed(自签发)证书来说,接收端并没有你这个self-CA的数字证书,也就是没有CA公钥,也就没有办法对数字证 书的签名进行验证。因此如果要编写一个可以对self-signed证书进行校验的接收端程序的话,首先我们要做的就是建立一个属于自己的 CA,用该CA签发我们的server端证书,并将该CA自身的数字证书随客户端一并发布。这让我想起了在《搭建自己的ngrok服务》一文中为ngrok服务端、客户端生成证书的那几个步骤,我们来重温并分析一下每一步都在做什么。(1)openssl genrsa -out rootCA.key 2048 (2)openssl req -x509 -new -nodes -key rootCA.key -subj "/CN=*.tunnel.tonybai.com" -days 5000 -out rootCA.pem(3)openssl genrsa -out device.key 2048 (4)openssl req -new -key device.key -subj "/CN=*.tunnel.tonybai.com" -out device.csr (5)openssl x509 -req -in device.csr -CA rootCA.pem -CAkey rootCA.key -CAcreateserial -out device.crt -days 5000(6)cp rootCA.pem assets/client/tls/ngrokroot.crt (7)cp device.crt assets/server/tls/snakeoil.crt (8)cp device.key assets/server/tls/snakeoil.key自己搭建ngrok服务,客户端要验证服务端证书,我们需要自己做CA,因此步骤(1)和步骤(2)就是生成CA自己的相关信息。 步骤(1) ,生成CA自己的私钥 rootCA.key 步骤(2),根据CA自己的私钥生成自签发的数字证书,该证书里包含CA自己的公钥。步骤(3)~(5)是用来生成ngrok服务端的私钥和数字证书(由自CA签发)。 步骤(3),生成ngrok服务端私钥。 步骤(4),生成Certificate Sign Request,CSR,证书签名请求。 步骤(5),自CA用自己的CA私钥对服务端提交的csr进行签名处理,得到服务端的数字证书device.crt。步骤(6),将自CA的数字证书同客户端一并发布,用于客户端对服务端的数字证书进行校验。 步骤(7)和步骤(8),将服务端的数字证书和私钥同服务端一并发布。接下来我们来验证一下客户端对服务端数字证书进行验证(gohttps/5-verify-server-cert)!首先我们来建立我们自己的CA,需要生成一个CA私钥和一个CA的数字证书:$openssl genrsa -out ca.key 2048 Generating RSA private key, 2048 bit long modulus ……….+++ ………………………….+++ e is 65537 (0×10001)$openssl req -x509 -new -nodes -key ca.key -subj "/CN=tonybai.com" -days 5000 -out ca.crt接下来,生成server端的私钥,生成数字证书请求,并用我们的ca私钥签发server的数字证书:openssl genrsa -out server.key 2048 Generating RSA private key, 2048 bit long modulus ….+++ …………………….+++ e is 65537 (0×10001)$openssl req -new -key server.key -subj "/CN=localhost" -out server.csr$openssl x509 -req -in server.csr -CA ca.crt -CAkey ca.key -CAcreateserial -out server.crt -days 5000 Signature ok subject=/CN=localhost Getting CA Private Key现在我们的工作目录下有如下一些私钥和证书文件: CA: 私钥文件 ca.key 数字证书 ca.crtServer: 私钥文件 server.key 数字证书 server.crt接下来,我们就来完成我们的程序。Server端的程序几乎没有变化:// gohttps/5-verify-server-cert/server.go package mainimport ( "fmt" "net/http" )func handler(w http.ResponseWriter, r *http.Request) { fmt.Fprintf(w, "Hi, This is an example of http service in golang!") }func main() { http.HandleFunc("/", handler) http.ListenAndServeTLS(":8081", "server.crt", "server.key", nil) }client端程序变化较大,由于client端需要验证server端的数字证书,因此client端需要预先加载ca.crt,以用于服务端数字证书的校验:// gohttps/5-verify-server-cert/client.go package mainimport ( "crypto/tls" "crypto/x509" "fmt" "io/ioutil" "net/http" )func main() { pool := x509.NewCertPool() caCertPath := "ca.crt"caCrt, err := ioutil.ReadFile(caCertPath) if err != nil { fmt.Println("ReadFile err:", err) return } pool.AppendCertsFromPEM(caCrt)tr := &http.Transport{ TLSClientConfig: &tls.Config{RootCAs: pool}, } client := &http.Client{Transport: tr} resp, err := client.Get("https://localhost:8081") if err != nil { fmt.Println("Get error:", err) return } defer resp.Body.Close() body, err := ioutil.ReadAll(resp.Body) fmt.Println(string(body)) }运行server和client:$go run server.gogo run client.go Hi, This is an example of http service in golang!六、对客户端的证书进行校验(双向证书校验)服务端可以要求对客户端的证书进行校验,以更严格识别客户端的身份,限制客户端的访问。要对客户端数字证书进行校验,首先客户端需要先有自己的证书。我们以上面的例子为基础,生成客户端的私钥与证书。$openssl genrsa -out client.key 2048 Generating RSA private key, 2048 bit long modulus ………………..+++ ………………..+++ e is 65537 (0×10001) $openssl req -new -key client.key -subj "/CN=tonybai_cn" -out client.csr $openssl x509 -req -in client.csr -CA ca.crt -CAkey ca.key -CAcreateserial -out client.crt -days 5000 Signature ok subject=/CN=tonybai_cn Getting CA Private Key接下来我们来改造我们的程序,首先是server端。首先server端需要要求校验client端的数字证书,并且加载用于校验数字证书的ca.crt,因此我们需要对server进行更加灵活的控制:// gohttps/6-dual-verify-certs/server.go package mainimport ( "crypto/tls" "crypto/x509" "fmt" "io/ioutil" "net/http" )type myhandler struct { }func (h *myhandler) ServeHTTP(w http.ResponseWriter, r *http.Request) { fmt.Fprintf(w, "Hi, This is an example of http service in golang!\n") }func main() { pool := x509.NewCertPool() caCertPath := "ca.crt"caCrt, err := ioutil.ReadFile(caCertPath) if err != nil { fmt.Println("ReadFile err:", err) return } pool.AppendCertsFromPEM(caCrt)s := &http.Server{ Addr: ":8081", Handler: &myhandler{}, TLSConfig: &tls.Config{ ClientCAs: pool, ClientAuth: tls.RequireAndVerifyClientCert, }, }err = s.ListenAndServeTLS("server.crt", "server.key") if err != nil { fmt.Println("ListenAndServeTLS err:", err) } }可以看出代码通过将tls.Config.ClientAuth赋值为tls.RequireAndVerifyClientCert来实现Server强制校验client端证书。ClientCAs是用来校验客户端证书的ca certificate。Client端变化也很大,需要加载client.key和client.crt用于server端连接时的证书校验:// gohttps/6-dual-verify-certs/client.gopackage main import ( "crypto/tls" "crypto/x509" "fmt" "io/ioutil" "net/http" )func main() { pool := x509.NewCertPool() caCertPath := "ca.crt"caCrt, err := ioutil.ReadFile(caCertPath) if err != nil { fmt.Println("ReadFile err:", err) return } pool.AppendCertsFromPEM(caCrt)cliCrt, err := tls.LoadX509KeyPair("client.crt", "client.key") if err != nil { fmt.Println("Loadx509keypair err:", err) return }tr := &http.Transport{ TLSClientConfig: &tls.Config{ RootCAs: pool, Certificates: []tls.Certificate{cliCrt}, }, } client := &http.Client{Transport: tr} resp, err := client.Get("https://localhost:8081") if err != nil { fmt.Println("Get error:", err) return } defer resp.Body.Close() body, err := ioutil.ReadAll(resp.Body) fmt.Println(string(body)) }好了,让我们来试着运行一下这两个程序,结果如下:$go run server.go 2015/04/30 22:13:33 http: TLS handshake error from 127.0.0.1:53542: tls: client's certificate's extended key usage doesn't permit it to be used for client authentication$go run client.go Get error: Get https://localhost:8081: remote error: handshake failure失败了!从server端的错误日志来看,似乎是client端的client.crt文件不满足某些条件。根据server端的错误日志,搜索了Golang的源码,发现错误出自crypto/tls/handshake_server.go。k := false for _, ku := range certs[0].ExtKeyUsage { if ku == x509.ExtKeyUsageClientAuth { ok = true break } } if !ok { c.sendAlert(alertHandshakeFailure) return nil, errors.New("tls: client's certificate's extended key usage doesn't permit it to be used for client authentication") }大致判断是证书中的ExtKeyUsage信息应该包含clientAuth。翻看openssl的相关资料,了解到自CA签名的数字证书中包含的都是一些basic的信息,根本没有ExtKeyUsage的信息。我们可以用命令来查看一下当前client.crt的内容:$ openssl x509 -text -in client.crt -noout Certificate: Data: Version: 1 (0×0) Serial Number: d6:e3:f6:fa:ae:65:ed:df Signature Algorithm: sha1WithRSAEncryption Issuer: CN=tonybai.com Validity Not Before: Apr 30 14:11:34 2015 GMT Not After : Jan 6 14:11:34 2029 GMT Subject: CN=tonybai_cn Subject Public Key Info: Public Key Algorithm: rsaEncryption RSA Public Key: (2048 bit) Modulus (2048 bit): 00:e4:12:22:50:75:ae:b2:8a:9e:56:d5:f3:7d:31: 7b:aa:75:5d:3f:90:05:4e:ff:ed:9a:0a:2a:75:15: … … Exponent: 65537 (0×10001) Signature Algorithm: sha1WithRSAEncryption 76:3b:31:3e:9d:b0:66:ad:c0:03:d4:19:c6:f2:1a:52:91:d6: 13:31:3a:c5:d5:58:ea:42:1d:b7:33:b8:43:a8:a8:28:91:ac: … …而偏偏golang的tls又要校验ExtKeyUsage,如此我们需要重新生成client.crt,并在生成时指定extKeyUsage。经过摸索,可以用如下方法重新生成client.crt:1、创建文件client.ext 内容: extendedKeyUsage=clientAuth2、重建client.crt$openssl x509 -req -in client.csr -CA ca.crt -CAkey ca.key -CAcreateserial -extfile client.ext -out client.crt -days 5000 Signature ok subject=/CN=tonybai_cn Getting CA Private Key再通过命令查看一下新client.crt:看到输出的文本中多了这么几行: X509v3 extensions: X509v3 Extended Key Usage: TLS Web Client Authentication这说明client.crt的extended key usage已经添加成功了。我们再来执行一下server和client:$ go run client.go Hi, This is an example of http service in golang!client端证书验证成功,也就是说双向证书验证均ok了。七、小结通过上面的例子可以看出,使用golang开发https相关程序十分便利,Golang标准库已经实现了TLS 1.2版本协议。上述所有example代码均放在我的github上的experiments/gohttps中。------------------------------
