In this tutorial, we are going to deploy Kubernetes on Linux containers (LXC/LXD) using conjure-up.
Please take note that this tutorial is for learning purpose only.
Let’s get started.
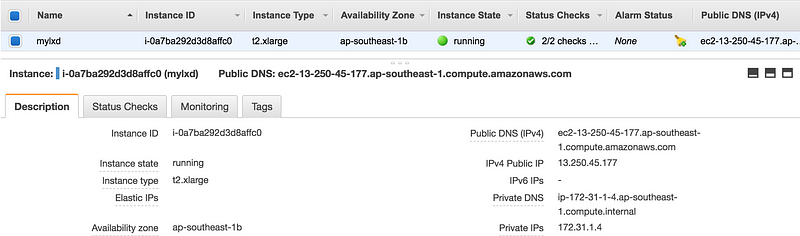
- Spin up AWS EC2 Ubuntu 16.04 LTS “t2.xlarge” since I have AWS Credits to spend. (You can sping up Ubuntu VM on your laptop or on cloud).
- Allow HTTP, HTTPS, TCP:8443, SSH in Security Group
- SSH into EC2 instance and verify pre-installed LXD version. And then Install conjure-up.
$ ssh -i aws.pem ubuntu@13.250.45.177
ubuntu@ip-172-31-1-4:~$ lxd --version
2.0.11
ubuntu@ip-172-31-1-4:~$ which lxd
/usr/bin/lxd
ubuntu@ip-172-31-1-4:~$ sudo snap install conjure-up --classic --edge
ubuntu@ip-172-31-1-4:~$ conjure-up
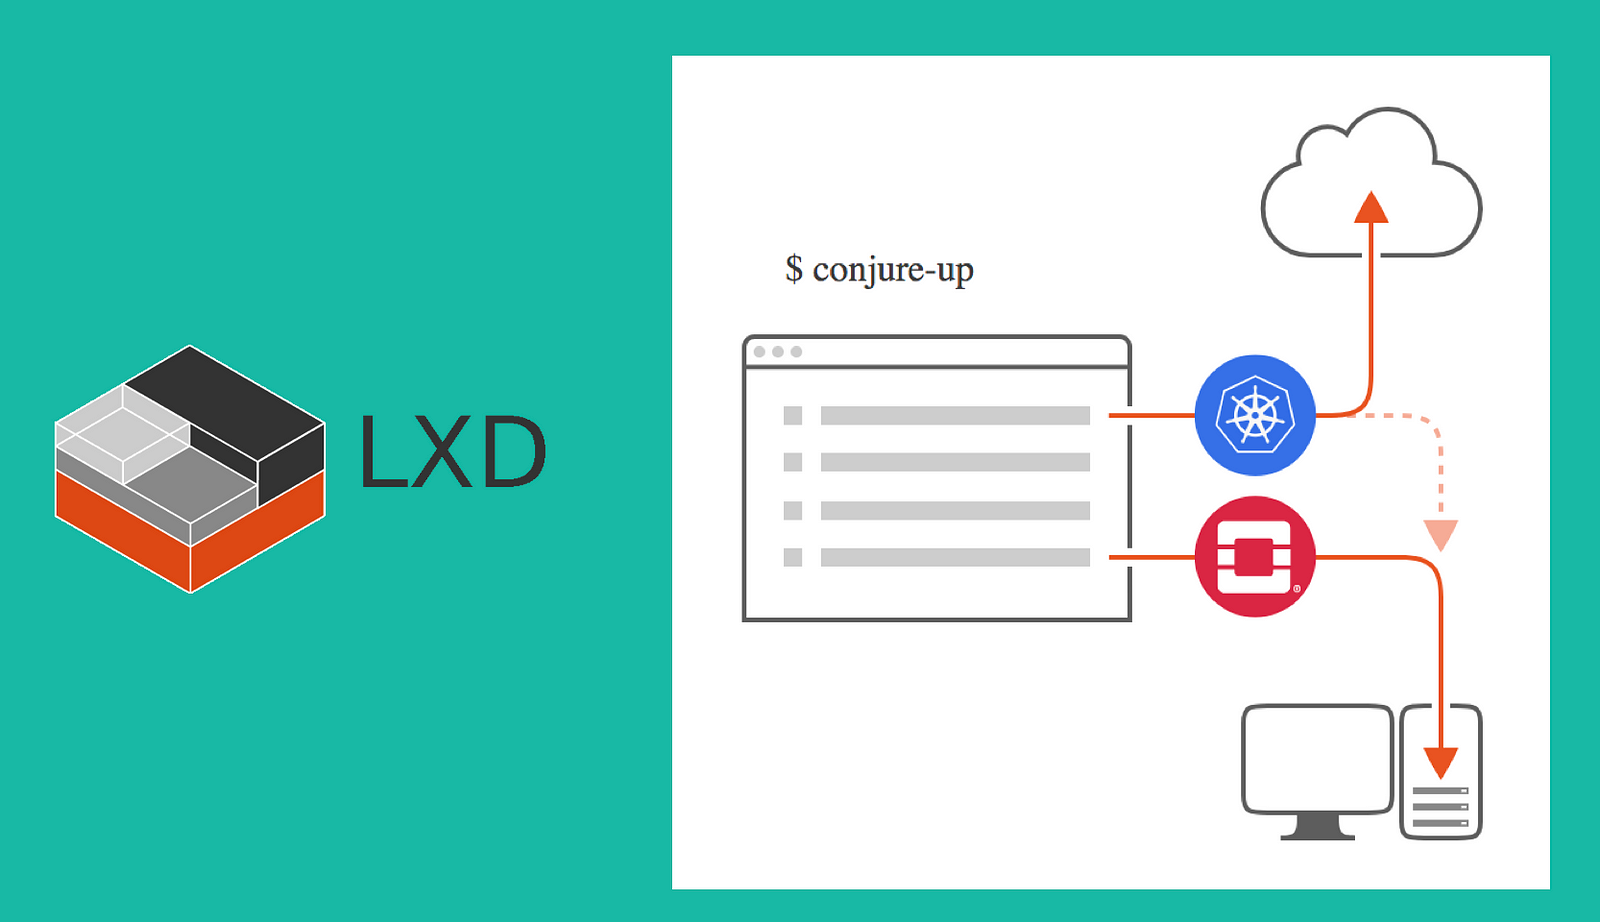
conjure-up lets us deploy software-stack suck as bigdata, kubernetes, openstack as a “spell”.
# conjure-up usage (bigdata, kubernetes, openstack)
$ conjure-up
# or
$ conjure-up kubernetes
# or
$ conjure-up openstack
# or
$ conjure-up bigdata


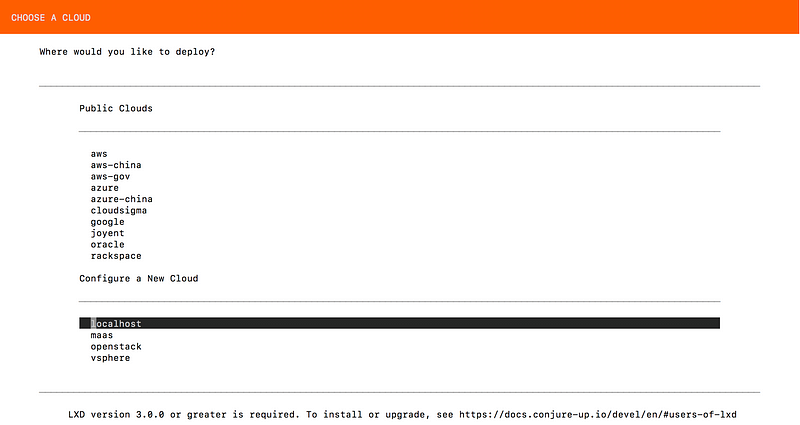
We
can deploy “spells” on Public Clouds, Private Clouds or Local. (In this
tutorial gonna be “local” eventhough AWS EC2 instance, and LXD version
3.0.0 or greater is required for Kubernetes Deployment).
- Let’s uninstall built-in LXD version 2.0.11 and Install LXD 3.0.0 or greater. Please take note that Snaps will be the only recommended way of installing and using LXD.
ubuntu@ip-172-31-1-4:~$ sudo apt-get remove lxd lxd-client
ubuntu@ip-172-31-1-4:~$ sudo snap install lxd
lxd 3.0.0 from 'canonical’ installed
ubuntu@ip-172-31-1-4:~$ which lxd
/snap/bin/lxd
- Let’s do LXD Initial Configuration where we need to setup storage, network, etc. Please go through the setup line by line carefully.
ubuntu@ip-172-31-1-4:~$ /snap/bin/lxd init
Would you like to use LXD clustering? (yes/no) [default=no]:
Do you want to configure a new storage pool? (yes/no) [default=yes]:
Name of the new storage pool [default=default]:
Name of the storage backend to use (btrfs, ceph, dir, lvm) [default=btrfs]: dir
Would you like to connect to a MAAS server? (yes/no) [default=no]:
Would you like to create a new local network bridge? (yes/no) [default=yes]:
What should the new bridge be called? [default=lxdbr0]:
What IPv4 address should be used? (CIDR subnet notation, “auto” or “none”) [default=auto]: auto
What IPv6 address should be used? (CIDR subnet notation, “auto” or “none”) [default=auto]: none
Would you like LXD to be available over the network? (yes/no) [default=no]: yes
Address to bind LXD to (not including port) [default=all]:
Port to bind LXD to [default=8443]:
Trust password for new clients:
Again:
Would you like stale cached images to be updated automatically? (yes/no) [default=yes]
Would you like a YAML "lxd init" preseed to be printed? (yes/no) [default=no]:
- LXD initial config is complete, and check the LXD containers running on our host (of course, we don’t have anything at the moment)
ubuntu@ip-172-31-1-4:~$ lxc list
If this is your first time running LXD on this machine, you should also run: lxd init
To start your first container, try: lxc launch ubuntu:16.04

+------+-------+------+------+------+-----------+
| NAME | STATE | IPV4 | IPV6 | TYPE | SNAPSHOTS |
+------+-------+------+------+------+-----------+
- Launch our first LXD container using ubuntu image. (Check currently available images here: https://uk.images.linuxcontainers.org/)
ubuntu@ip-172-31-1-4:~$ lxc launch ubuntu:16.04 webserver
Creating webserver
Starting webserver

Now we have our first LXD container running.
ubuntu@ip-172-31-1-4:~$ lxc list
+-----------+---------+---------------------+------+------------+-----------+
|   NAME    |  STATE  |        IPV4         | IPV6 |    TYPE    | SNAPSHOTS |
+-----------+---------+---------------------+------+------------+-----------+
| webserver | RUNNING | 10.217.72.74 (eth0) |      | PERSISTENT | 0         |
+-----------+---------+---------------------+------+------------+-----------+
ubuntu@ip-172-31-1-4:~$ lxc info webserver
Name: webserver
Remote: unix://
Architecture: x86_64
Created: 2018/05/20 03:52 UTC
Status: Running
Type: persistent
Profiles: default
Pid: 14296
Ips:
  eth0:inet10.217.72.74vethJS9UBV
  eth0:inet6fe80::216:3eff:fea5:e984vethJS9UBV
  lo:inet127.0.0.1
  lo:inet6::1
Resources:
  Processes: 28
  CPU usage:
    CPU usage (in seconds): 4
  Memory usage:
    Memory (current): 34.40MB
    Memory (peak): 155.04MB
  Network usage:
    eth0:
      Bytes received: 276.12kB
      Bytes sent: 9.75kB
      Packets received: 131
      Packets sent: 120
    lo:
      Bytes received: 0B
      Bytes sent: 0B
      Packets received: 0
      Packets sent: 0
- Let’s launch another container using alpine image.
ubuntu@ip-172-31-1-4:~$ lxc launch images:alpine/3.7 my-alpine-lxd-container
Creating my-alpine-lxd-container
Starting my-alpine-lxd-container

ubuntu@ip-172-31-1-4:~$ lxc list
+-------------------------+---------+----------------------+------+------------+-----------+
|          NAME           |  STATE  |         IPV4         | IPV6 |    TYPE    | SNAPSHOTS |
+-------------------------+---------+----------------------+------+------------+-----------+
| my-alpine-lxd-container | RUNNING | 10.217.72.102 (eth0) |      | PERSISTENT | 0         |
+-------------------------+---------+----------------------+------+------------+-----------+
| webserver               | RUNNING | 10.217.72.74 (eth0)  |      | PERSISTENT | 0         |
+-------------------------+---------+----------------------+------+------------+—————+
ubuntu@ip-172-31-1-4:~$ lxc image list
+-------+--------------+--------+---------------------------------------------+--------+----------+------------------------------+
| ALIAS | FINGERPRINT | PUBLIC | DESCRIPTION | ARCH | SIZE | UPLOAD DATE |
+-------+--------------+--------+---------------------------------------------+--------+----------+------------------------------+
| | 09ef606a183d | no | ubuntu 16.04 LTS amd64 (release) (20180509) | x86_64 | 156.99MB | May 20, 2018 at 3:52am (UTC) |
+-------+--------------+--------+---------------------------------------------+--------+----------+------------------------------+
| | 9a8851d41d04 | no | Alpine 3.7 amd64 (20180519_17:50) | x86_64 | 1.80MB | May 20, 2018 at 4:00am (UTC) |
+-------+--------------+--------+---------------------------------------------+--------+----------+------------------------------+
- Let’s do shell access to our webserver container.
ubuntu@ip-172-31-1-4:~$ lxc exec webserver /bin/bash
root@webserver:~#
root@webserver:~# ls -la
total 20
drwx------  3 root root 4096 May 20 03:52 .
drwxr-xr-x 22 root root 4096 May  9 01:53 ..
-rw-r--r--  1 root root 3106 Oct 22  2015 .bashrc
-rw-r--r--  1 root root  148 Aug 17  2015 .profile
drwx------  2 root root 4096 May 20 03:52 .ssh
Congratulations !!! Now we can launch LXD containers and play around.
Please continue Tutorial Part2 where we will be deploying Kubernetes on Linux Containers (LXC/LXD).
from https://itnext.io/tutorial-part-1-kubernetes-up-and-running-on-lxc-lxd-b760c79cd53f
----------
part 2
Please take note that this tutorial is for learning purpose only.
You can check Tutorial Part 1: Kubernetes up and running on LXC/LXD.
Let’s
deploy kubernetes. And We have 3 options to deploy. We can also try
Canonical Distribution of Kubernetes where it includes:
- Graylog
- Helm
- JFrog Artifactory
- KubeFlow
- Prometheus
- Rancher2.0 (beta)
But we gonna choose Kubernetes Core and deploy on localhost in this tutorial.
ubuntu@ip-172-31-1-4:~$ conjure-up kubernetes


Select ‘network bridge’ and ‘storage pool’.

Select
‘flannel’ for Kubernetes network plug-in. Flannel is a virtual network
that gives a subnet to each host for use with container runtimes. And
follow along the screen by screen.


While
waiting Juju controller, we can setup “lxc client’” on our laptop which
is running MacOS. We can manage our LXD which is running on AWS EC2 via
remotely.
Open a new Terminal and Install lxc (🍺 /usr/local/Cellar/lxc/3.1: 6 files, 17.6MB) — lxc is LXD client for MacOS.
$ brew install lxc
$ lxc remote list
+-----------------+------------------------------------------+---------------+-----------+--------+--------+
|      NAME       |                   URL                    |   PROTOCOL    | AUTH TYPE | PUBLIC | STATIC |
+-----------------+------------------------------------------+---------------+-----------+--------+--------+
| images          | https://images.linuxcontainers.org       | simplestreams |           | YES    | NO     |
+-----------------+------------------------------------------+---------------+-----------+--------+--------+
| local (default) | unix://                                  | lxd           | tls       | NO     | YES    |
+-----------------+------------------------------------------+---------------+-----------+--------+--------+
| ubuntu          | https://cloud-images.ubuntu.com/releases | simplestreams |           | YES    | YES    |
+-----------------+------------------------------------------+---------------+-----------+--------+--------+
| ubuntu-daily    | https://cloud-images.ubuntu.com/daily    | simplestreams |           | YES    | YES    |
+-----------------+------------------------------------------+---------------+-----------+--------+————+
Let’s configure ‘lxc client’ on our laptop to manage LXD which is running as EC2 instance on AWS. “13.250.45.177” is the public IP of EC2 instance where LXD is running.
$ lxc remote add mylxd 13.250.45.177
Certificate fingerprint: 438e80f5dcca7c26acbeef60fff82615feda7cb43e49cc794c199788113ce960
ok (y/n)? yes
Admin password for mylxd:
Client certificate stored at server:  mylxd

$ lxc remote set-default mylxd

$ lxc remote list
+-----------------+------------------------------------------+---------------+-----------+--------+--------+
|      NAME       |                   URL                    |   PROTOCOL    | AUTH TYPE | PUBLIC | STATIC |
+-----------------+------------------------------------------+---------------+-----------+--------+--------+
| images          | https://images.linuxcontainers.org       | simplestreams |           | YES    | NO     |
+-----------------+------------------------------------------+---------------+-----------+--------+--------+
| local           | unix://                                  | lxd           | tls       | NO     | YES    |
+-----------------+------------------------------------------+---------------+-----------+--------+--------+
| mylxd (default) | https://13.250.45.177:8443               | lxd           | tls       | NO     | NO     |
+-----------------+------------------------------------------+---------------+-----------+--------+--------+
| ubuntu          | https://cloud-images.ubuntu.com/releases | simplestreams |           | YES    | YES    |
+-----------------+------------------------------------------+---------------+-----------+--------+--------+
| ubuntu-daily    | https://cloud-images.ubuntu.com/daily    | simplestreams |           | YES    | YES    |
+-----------------+------------------------------------------+---------------+-----------+--------+————+
Run “lxc list” on our laptop.
$ lxc list
+-------------------------+---------+-----------------------+------+------------+-----------+
|          NAME           |  STATE  |         IPV4          | IPV6 |    TYPE    | SNAPSHOTS |
+-------------------------+---------+-----------------------+------+------------+-----------+
| juju-0ed97e-0           | RUNNING | 10.217.72.120 (eth0)  |      | PERSISTENT | 0         |
|                         |         | 10.1.14.0 (flannel.1) |      |            |           |
|                         |         | 10.0.224.1 (lxdbr0)   |      |            |           |
+-------------------------+---------+-----------------------+------+------------+-----------+
| juju-0ed97e-1           | RUNNING | 172.17.0.1 (docker0)  |      | PERSISTENT | 0         |
|                         |         | 10.217.72.136 (eth0)  |      |            |           |
|                         |         | 10.1.12.1 (cni0)      |      |            |           |
|                         |         | 10.1.12.0 (flannel.1) |      |            |           |
+-------------------------+---------+-----------------------+------+------------+-----------+
| juju-a8bbdd-0           | RUNNING | 10.217.72.54 (eth0)   |      | PERSISTENT | 0         |
+-------------------------+---------+-----------------------+------+------------+-----------+
| my-alpine-lxd-container | RUNNING | 10.217.72.102 (eth0)  |      | PERSISTENT | 0         |
+-------------------------+---------+-----------------------+------+------------+-----------+
| webserver               | RUNNING | 10.217.72.74 (eth0)   |      | PERSISTENT | 0         |
+-------------------------+---------+-----------------------+------+------------+—————+
COOL !!! Now we can manage our LXD remotely.
Let’s go back and check the status of kubernetes deployment.

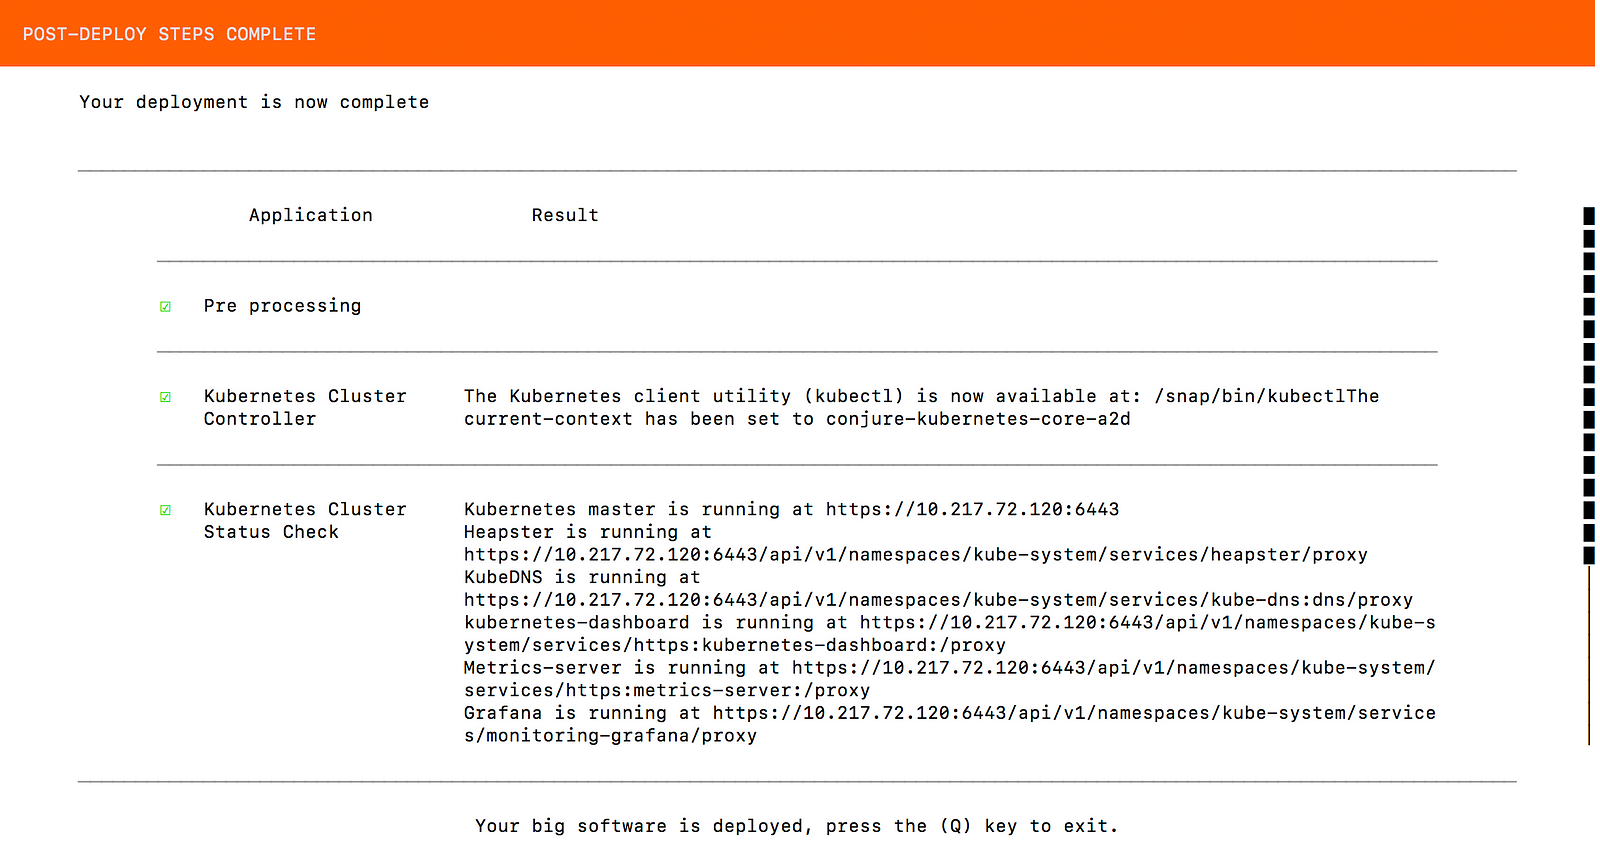
Congratulations !!! Our Kubernetes Deployment on LXD Containers is Completed.
We can verify our k8s master node and worker node as below:
$ lxc info juju-0ed97e-0
Name: juju-0ed97e-0
Remote: https://13.250.45.177:8443
Architecture: x86_64
Created: 2018/05/20 04:20 UTC
Status: Running
Type: persistent
Profiles: default, juju-conjure-kubernetes-core-a2d
Pid: 25540
Ips:
  lo:inet127.0.0.1
  lo:inet6::1
  lxdbr0:inet10.0.224.1
  lxdbr0:inet6fe80::6432:3cff:fe07:f32f
  veth58AEPD:inet6fe80::fcf7:9dff:fe0a:a91d
  eth0:inet10.217.72.120vethHIBQEA
  eth0:inet6fe80::216:3eff:feca:580cvethHIBQEA
  flannel.1:inet10.1.14.0
  flannel.1:inet6fe80::fc96:25ff:fe8e:ca77
Resources:
  Processes: 242
  CPU usage:
    CPU usage (in seconds): 665
  Memory usage:
    Memory (current): 3.44GB
    Memory (peak): 3.51GB
  Network usage:
    eth0:
      Bytes received: 689.96MB
      Bytes sent: 15.48MB
      Packets received: 184636
      Packets sent: 118813
    flannel.1:
      Bytes received: 41.31kB
      Bytes sent: 24.28kB
      Packets received: 269
      Packets sent: 249
    lo:
      Bytes received: 25.61MB
      Bytes sent: 25.61MB
      Packets received: 87787
      Packets sent: 87787
    lxdbr0:
      Bytes received: 1.98MB
      Bytes sent: 141.17MB
      Packets received: 27299
      Packets sent: 31633
    veth58AEPD:
      Bytes received: 2.34MB
      Bytes sent: 141.17MB
      Packets received: 27299
      Packets sent: 31634
$ lxc info juju-0ed97e-1
Name: juju-0ed97e-1
Remote: https://13.250.45.177:8443
Architecture: x86_64
Created: 2018/05/20 04:21 UTC
Status: Running
Type: persistent
Profiles: default, juju-conjure-kubernetes-core-a2d
Pid: 27193
Ips:
  lxdbr0:inet6fe80::d4ed:47ff:fe80:e006
  lxdbr0:inet6fe80::1
  vethd8be2574:inet6fe80::c19:b7ff:fe97:6a9a
  cni0:inet10.1.12.1
  cni0:inet6fe80::9085:81ff:fe0b:dcf4
  flannel.1:inet10.1.12.0
  flannel.1:inet6fe80::c4e8:e3ff:fe76:fb54
  lo:inet127.0.0.1
  lo:inet6::1
  veth46d4a179:inet6fe80::e8ea:d2ff:fe9a:d27
  veth5c0422eb:inet6fe80::fcfe:40ff:fe51:927b
  veth65e39fc3:inet6fe80::784b:5bff:fe06:5e36
  vetha5902530:inet6fe80::b0d7:68ff:fe18:f041
  docker0:inet172.17.0.1
  eth0:inet10.217.72.136vethJ6HM6I
  eth0:inet6fe80::216:3eff:fea4:64e0vethJ6HM6I
  veth23e516ee:inet6fe80::1448:60ff:fe59:7530
Resources:
  Processes: 716
  CPU usage:
    CPU usage (in seconds): 398
  Memory usage:
    Memory (current): 2.60GB
    Memory (peak): 2.64GB
  Network usage:
    flannel.1:
      Bytes received: 25.18kB
      Bytes sent: 42.69kB
      Packets received: 258
      Packets sent: 278
    lo:
      Bytes received: 72.62kB
      Bytes sent: 72.62kB
      Packets received: 814
      Packets sent: 814
    lxdbr0:
      Bytes received: 0B
      Bytes sent: 650B
      Packets received: 0
      Packets sent: 7
    vethd8be2574:
      Bytes received: 126.58kB
      Bytes sent: 95.45kB
      Packets received: 669
      Packets sent: 849
    cni0:
      Bytes received: 1.98MB
      Bytes sent: 5.95MB
      Packets received: 6802
      Packets sent: 7026
    eth0:
      Bytes received: 655.55MB
      Bytes sent: 8.16MB
      Packets received: 181509
      Packets sent: 98928
    veth23e516ee:
      Bytes received: 144.94kB
      Bytes sent: 1.51MB
      Packets received: 1278
      Packets sent: 1332
    veth46d4a179:
      Bytes received: 26.00kB
      Bytes sent: 28.80kB
      Packets received: 282
      Packets sent: 339
    veth5c0422eb:
      Bytes received: 40.95kB
      Bytes sent: 1.30MB
      Packets received: 406
      Packets sent: 435
    veth65e39fc3:
      Bytes received: 1.41MB
      Bytes sent: 1.95MB
      Packets received: 1687
      Packets sent: 1833
    vetha5902530:
      Bytes received: 290.38kB
      Bytes sent: 510.22kB
      Packets received: 2074
      Packets sent: 2309
    docker0:
      Bytes received: 0B
      Bytes sent: 0B
      Packets received: 0
      Packets sent: 0
Thanks for reading.
from https://itnext.io/tutorial-part-2-kubernetes-up-and-running-on-lxc-lxd-6d60e98f22df
----------
https://itnext.io/@hellocloud
No comments:
Post a Comment