WireGuard是一种非常简单而现代,快捷的VPN服务器程序,利用最先进的加密技术。它旨在比IPSec 更快,更简单,更精简,更有用,同时避免大规模的头痛。它打算比OpenVPN更高效。WireGuard设计为通用VPN,可在嵌入式接口和超级计算机上运行,适用于多种不同情况。最初是为Linux内核发布的,现在它是跨平台的,可广泛部署。它目前正在大力发展,但它已经被认为是业内最安全,最易于使用,最简单的VPN解决方案。
TunSafe是第一个使用WireGuard 协议的 Windows VPN客户端。随着WireGuard不断增加的牵引力 – 现在是摆脱传统VPN实施的好时机。
VPN提供商将为您提供以扩展名结尾的WireGuard配置文件
.conf。确保手头有这个,因为它很快就需要导入TunSafe。如果您还没有任何TunSafe / WireGuard兼容VPN提供商的帐户,那么您可以使用我们的免费VPN服务器开始使用。
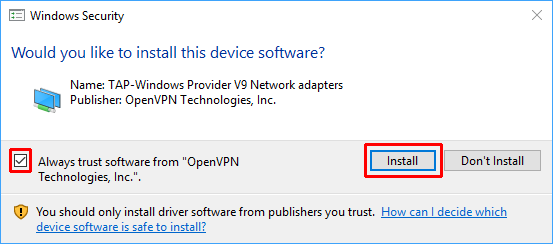
首先确保下载并安装TunSafe。安装时,您将看到一条消息,要求获得安装TAP-Windows网络适配器的权限。确保单击“安装”。这是TunSafe用于从您的计算机捕获TCP / IP数据包的网络组件。
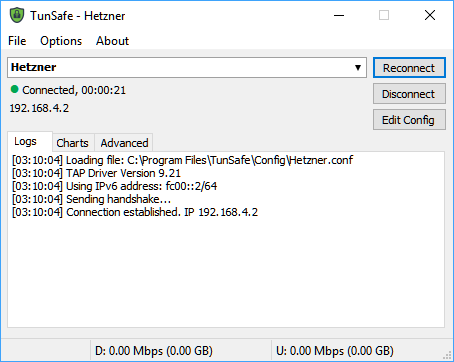
安装完成后,您应该看到TunSafe主窗口。
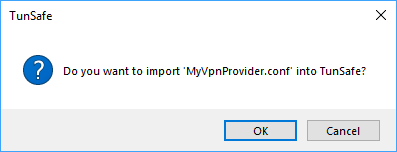
将您从VPN提供商处获得的配置文件拖到TunSafe的窗口中。将弹出一个对话框,要求您确认是否要导入该文件。单击确定。
然后TunSafe将自动连接到VPN服务器,如果一切正常,您应该
Connection established在日志中看到该消息,并且您将收到一条通知泡泡,表示VPN现已连接。[15:49:25]加载文件:C:\ Program Files \ TunSafe \ Config \ Hetzner.conf [15:49:25] TAP驱动程序版本9.21 [15:49:25]使用IPv6地址:fc00 :: 2/64 [15:49:25]阻止所有适配器上的标准DNS [15:49:25]添加路线195.201.90.153/32 => 192.168.1.1 [15:49:25]添加路线0.0.0.0/1 => 192.168.4.1 [15:49:25]添加了路由128.0.0.0/1 => 192.168.4.1 [15:49:25]添加了Route :: / 1 => fc00 :: 1 [15:49:25]添加了Route 8000 :: / 1 => fc00 :: 1 [15:49:25]发送握手...... [15:49:25]建立连接。IP 192.168.4.2
现在,根据您的VPN提供商的确切设置,您的所有互联网流量都将通过VPN隧道进行路由。下次启动TunSafe时,它将自动重新连接到上次使用的服务器。
注意:WireGuard官方已经开发出了适用于安卓、路由器(OpenWRT)、macOS和Linux的客户端,下载地址:https://www.wireguard.com/install/;WireGuard官方ios和windows系统客户端正在开发中,在此期间WireGuard官方不建议使用TunSafe这类第三方客户端,说是会存在风险。
此外TunSafe官方提供免费的WireGuard VPN服务,您使用TunSafe创建公钥后复制到https://tunsafe.com/vpn这里的位置来创建账号,下载配置文件后把里面的私钥换成你TunSafe创建公钥时生成的对应私钥就可以连接使用的,目前有几个美欧的服务器。
TunSafe创建的那个虚拟网卡和OpenVPN一样的,如果已经安装过OpenVPN了,直接下来TunSafe绿色版就可以运行连接了,无需安装了。
------------------
在https://tunsafe.com/download中下载客户端,可使用
一路接受,信任即可。
创建密钥文件
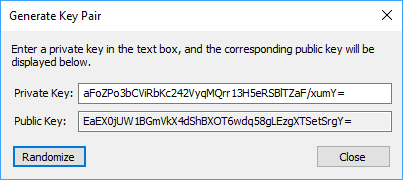
打开tunsafe→Generate Key Pair,点击
编辑客户端设置
创建一个
添加下面的内容
------------------
window下的客户端程序TunSafe的配置
在https://tunsafe.com/download中下载客户端,可使用
RC版本。一路接受,信任即可。
创建密钥文件
打开tunsafe→Generate Key Pair,点击
Randomize把里面的内容记录下来,并且把public key的内容添加到服务器的[Peer]行下面的PublicKey 后面。编辑客户端设置
创建一个
wg0.txt(也可以用其他名字)的文件。添加下面的内容
- [Interface]
- PrivateKey = 客户端私钥
- Address = 10.10.10.2/24
- DNS = 8.8.8.8
- [Peer]
- PublicKey = 服务端公钥
- Endpoint = 服务端IP:54321
- AllowedIPs = 0.0.0.0/0
将wg0.txt重命名为wg0.conf,打开tunsafe→File→Import File,选择wg0.conf,然后选择wg0,然后
connect即可。国内外分流
原理是将国内IP写进系统路由表,路由表以外的IP走VPN代理。
1.开启Tunsafe的Pre/Post命令功能。在”Option”选择”Allow Pre/Post Commands”
2.下载route.zip解压到Tunsafe安装目录。
3. Wireguard客户端配置文件加入PreUp,Postdown命令调用批处理文件。
然后我们在
1.开启Tunsafe的Pre/Post命令功能。在”Option”选择”Allow Pre/Post Commands”
2.下载route.zip解压到Tunsafe安装目录。
3. Wireguard客户端配置文件加入PreUp,Postdown命令调用批处理文件。
然后我们在
[Interface]字段中加入以下两行代码,注意别加到[Peer]中!
- PreUp = start "" "D:\Program Files\TunSafe\route\routes-up.bat"
- PostDown = start "" "D:\Program Files\TunSafe\route\routes-up.bat"
自行修改
D:\Program Files\TunSafe\route为你的文件路径。
4.正常使用Tunsafe点击connect就会调用routes-up.bat将国内IP写进系统路由表,断开disconnect则会调用routes-down.bat删除路由表。
连接成功后可上 http://ip111.cn/ 测试自己的IP。
相关帖子:https://briteming.blogspot.com/2018/11/wireguardtunsafetunsafemac.html连接成功后可上 http://ip111.cn/ 测试自己的IP。
--------------------
Download TunSafe
The installation program is the most convenient way to install TunSafe as it picks the version that matches your computer and automatically installs the virtual network adapter.
The bleeding edge version is the Release Candidate of version 1.4-rc1.
If you would like the older, legacy version, try out version 1.2. It doesn't have all the features of the version above.
To learn about what's new in TunSafe, take a look in the Changelog.
Because this client is still in the early days of development it should be considered experimental software. The official WireGuard protocol is also not yet complete, so you should not rely on TunSafe or WireGuard for mission critical data. It has not undergone proper degrees of security auditing and the protocol is still subject to change. Since TunSafe implements the current WireGuard protocol it shares the same security issues that may be present in the WireGuard protocol. It's your responsability to be up-to-date with the latest versions of TunSafe. Because of this TunSafe is not subject to CVEs.
If you're looking for a Mac OS X version, please see the Development page.
We also have a number of alternative downloads available. Note that TunSafe will not function without a TAP virtual network adapter. The installation program above will assist you with installing that.
- Standalone TunSafe-TAP Installer 9.21.2 (Windows 7 or later, 178 kB)
- TunSafe 1.2 Standalone Zip for 64-bit systems (x64, Windows 7 or later, 165 kB)
- TunSafe 1.2 Standalone Zip for 32-bit systems (x86, Windows 7 or later, 144 kB)
- TunSafe 1.4-rc1 Standalone Zip for 64-bit systems (x64, Windows 7 or later, 204 kB)
- TunSafe 1.4-rc1 Standalone Zip for 32-bit systems (x86, Windows 7 or later, 176 kB)
- Source Code of TunSafe-TAP (GPL) (239 kB)
- Source Code of TunSafe (GitHub)
from https://tunsafe.com/download
-------------
User Guide
Overview
To understand the basics of the WireGuard protocol, please take a moment to read WireGuard's Conceptual Overview and the WireGuard Quick Start Guide. TunSafe is an implementation of this protocol for Windows. Unlike WireGuard, but similar to OpenVPN, TunSafe runs as a user-mode application and does not run inside of the kernel. To facilitate this, TunSafe uses the TAP-Windows network adapter. This is an open source network adapter created by the OpenVPN team in order to get direct access to the low-level TCP/IP packets.
For performance reasons, it's typically preferred to run this type of packet routing fully inside of the kernel. However, TunSafe has been carefully tuned and optimized for speed, so the benefits of running it as a user-mode application arguably outweighs the costs. For example, TunSafe won't compromise the stability of your operating system or cause the computer to crash. TunSafe is also easy to configure and upgrade.
Using TunSafe on Windows
TunSafe is available as a 32-bit or 64-bit application for computers running Windows 7 or later. Please first go ahead and Download TunSafe. The installation program will then automatically download and install the GPL licensed TAP network adapter.
The main window of TunSafe looks like this:
The Edit Config button will let you edit the current configuration file in a text editor. By pressing Options, you see a menu where you can load one of the available configuration files.

You can also Import a configuration file from this menu, or drag-and-drop a configuration file from another program onto TunSafe. This will make a copy of the file in TunSafe's configuration directory, in
C:\Program Files\TunSafe\Config.
If you press Generate Key Pair you get to see a dialog that randomizes a secure keypair. The private key can be used in the configuration file, while the public key will be used on the WireGuard server.
The format of the configuration files uses the same syntax as the
wg-quick(8) tool.
Here's an example configuration file.
# This is a sample config file for TunSafe. It uses the same syntax as
# WireGuard's wg-quick tool

[Interface]
# The private key of this computer. This is a secret key, don't give it out.
# To convert it to a public key you can go to 'Generate Key Pair' in TunSafe.
PrivateKey = gIIBl0OHb3wZjYGqZtgzRml3wec0e5vqXtSvCTfa42w=

# Whether we want to bind a port to allow others to initiate connections to us.
# Please ensure this port is mapped in your router.
# ListenPort = 51820

# Switch DNS server while connected. Either IPv4 or IPv6.
# DNS = 8.8.8.8

# Whether to block all outgoing DNS and force all DNS to go through the VPN. This
# prevents leakage of what websites you visit.
# BlockDNS = true

# The addresses to bind to. Either IPv4 or IPv6. /31 and /32 are not supported.
Address = 192.168.2.2/24

# Can be used to change MTU of the network adapter in Windows. We want this to
# be lower than the default 1500 to ensure the WireGuard headers don't cause
# fragmentation.
# MTU = 1420

[Peer]

# The public key of the peer. Do not use the private key here. Use the 'Generate Key Pair'
# function in TunSafe to convert a private key to a public key.
PublicKey = hIA3ikjlSOAo0qqrI+rXaS3ZH04Yx7Q2YQ4m2Syz+XE=

# It's also possible to use a preshared key for extra security
PresharedKey  =  SNz4BYc61amtDhzxNCxgYgdV9rPU+WiC8woX47Xf/2Y=

# The IP range that we may send packets to for this peer. Specify 0.0.0.0/0 or ::/0 here
# to also insert an entry in the routing table to tunnel all traffic through the VPN.
AllowedIPs = 192.168.2.0/24

# Address of the server. Can be either IPv4 or IPv6.
Endpoint = 192.168.1.4:8040

# Send periodic keepalives to ensure connection stays up behind NAT, in seconds.
PersistentKeepalive = 25

# When the peer is used as default gateway, whether to forward multicast and broadcast
# packets through the tunnel.
# AllowMulticast = false
Example Configuration of WireGuard on Linux
There are many different ways to setup WireGuard on Linux, and many different elaborate guides. The below is just a short introduction to give an understanding how it works on Ubuntu. For other Linux distributions please have a look at the official WireGuard installation instructions. For support with using WireGuard, please visit the official WireGuard web page.
First install the wireguard package.
# add-apt-repository ppa:wireguard/wireguard && apt-get update && apt-get install wireguard
Create a public and private keypair for the server using the
wg(8) tool.# wg genkey | tee server_private | wg pubkey > server_public
Then create a keypair for the client:
# wg genkey | tee client_private | wg pubkey > client_public
The keys are just short strings that can be easily copied and pasted from the terminal.
# cat client_private client_public
sAHRG4iRj8JekFDgNuevjNwMPuNDIVbTfFuZu9dBY1o=
T/DjhrM8hkbqYnOYQvHExF0HI/Csi6DktQth5ijcpDI=
Load the kernel module and create a WireGuard network interface using
ip-link(8).# ip link add dev wg0 type wireguard
Configure an IP address of the server using
ip-address(8).# ip address add dev wg0 192.168.2.1/24
Configure the private key of the server and add the client's public key using the
wg(8) tool. In this example we use UDP port 8040 but you may choose a port of your liking. Ensure this port is properly mapped through your router if you want to access your WireGuard server from the Internet.# wg set wg0 listen-port 8040 private-key server_private # wg set wg0 peer `cat client_public` allowed-ips 192.168.2.0/24
Activate the newly configured network interface using
ip-link(8).# ip link set up dev wg0
All done, verify that WireGuard is properly configured with the
wg(8) tool. It should look similar to this.root@ubuntu:~# wg interface: wg0 public key: 8q1SiKy7hKDTPXltp2iimxLjWpL53lRnQzms9f8LXU0= private key: (hidden) listening port: 8040 peer: T/DjhrM8hkbqYnOYQvHExF0HI/Csi6DktQth5ijcpDI= allowed ips: 192.168.2.0/24
from https://tunsafe.com/user-guide
----------
一键脚本搭建基于WireGuard协议的增强版VPN:TunSafe,支持WireGuard混淆伪装
很多人担心WireGuard作为一个VPN是否会有明显特征,今天就介绍实现了WireGuard混淆、WireGuard伪装的VPN,那就是TunSafe,TunSafe是一个基于WireGuard协议的VPN实现,在最近的版本更新中,TunSafe已经做了很大的升级,那就是可以支持混淆、可以使用TCP传输,甚至伪装为https:1、UDP可添加混淆参数2、可使用TCP协议传输3、TCP可伪装为https一键脚本搭建TunSafe服务端:
1、系统安装为ubuntu >= 16.042、建议使用UDP+混淆模式3、个别地区如果udp限制严重,可选择TCP模式任意一个,但效率比UDP模式低4、速度比较 UDP > TCP > TCP + HTTPS首先连接VPS,使用以下一键脚本安装
- wget https://raw.githubusercontent.com/atrandys/tunsafe/master/tunsafe_install.sh && chmod +x tunsafe_install.sh && ./tunsafe_install.sh
(https://github.com/luckypoem/tunsafe/raw/master/tunsafe_install.sh)在弹出的页面中选择1 安装tunsafe安装过程中需要你选择使用哪种模式,建议1 UDP模式,如果UDP干扰严重,可选择TCP中的一个,https比tcp还要慢一点安装完成后在/etc/tunsafe/目录下可看到client.conf,这个就是客户端配置文件。客户端上,安装TunSafe
windows版:下载安装TunSafe,这是一个windows端的第三方客户端,因为官方windows版本的还没开发完成,先用这个软件代替,TunSafe已经开源了,可以放心使用。注意下载TunSafe 1.5-rc2版本,其他版本不支持混淆。官网下载:TunSafe打开TunSafe,点击file,选择import file,选择第5步下载的client.conf文件,导入到软件中。导入后会自动连接,连接成功后,所有流量都会被代理,也就是全局代理。移动版
移动客户端暂不支持混淆的TunSafe,等待客户端更新。多用户
- ./tunsafe_install.sh
使用以上命令,输入需要增加的用户名,不可输入client,不要和已经存在的用户重复即可.from http://archive.is/J6BVl
WireGuard for Windows 发布首个版本
WireGuard 作者 Jason Donenfeld 宣布发布首个 Windows 测试版本。他称这个版本是 pre-alpha,也就是软件还不完整,很多安全相关的功能还没有完成,性能也没有优化。但它已经有了足够的功能,释出这个版本主要是测试和听取反馈。WireGuard 是一种新兴的 VPN 实现,配置比 OpenVPN 等更简单。它已经支持 Linux,Android、BSD 和 macOS。
No comments:
Post a Comment